Mastering PDF Creation: The Ultimate Guide to Using PDFKit and Node JS
 Oluwatobi
The world has been evolving rapidly and technology isn’t left out. From the days when slates were used, down to the invention of hard-cover books and pens and now in the area of smart electronic devices, the need to pass information from one entity to another remains sacrosanct.
PDFs, also referred to as portable document formats have become ingrained in our day-to-day lives as they are been used to replace the need to print hard cover books, generate invoices and its various other uses.
Right now, we would like to delve deep into the generating well crafted PDFs using special PDF libraries available in our web application. We intend to use dummy data values to serve as our database with Node JS express serving as our backend application server.
Before we dive into this educative tutorial, let's evaluate some prerequisites necessary to fully understand and implement this tutorial.
Basic Knowledge of Node JS
Basic knowledge of JSON
Knowledge of JavaScript Maps and Arrays
Setting Up
Right now, we will hen go on to setup a basic Node JS application. Necessary packages such as Express and NodeMon would be installed to help run the application seamlessly.
This tutorial will have us creating a JSON file which contains some dummy data. This will serve as our database locally. However, MongoDb databases and other databases can also be integrated with the application to produce the same outcome. Initialize the Node JS express backend service and connect it to a port number of your choice.
To run the Node JS application, Navigate to the file path on the command line and run “ node index”. You should see a success message if the app is running fine. Now let us go on to the next section of the tutorial.
Introduction to PDF libraries.
To help in personalizing the use of the Node JS platform, several packages relating to several industries have been developed and launched. These packages help simplify the process of building quality applications and reduce the need for developers to reinvent the wheel to achieve the same results. The majority of these packages or modules are stored and managed by the Node Package manager library. Details regarding each package are usually stored on this platform.
Conversion of file formats to PDFs, in our case JSON formats would require a file generating package. In this section, we intend to delve into various packages that can help us achieve this. Some notable packages include;
Jspdf-autotable and many more.
However, we would be using the PDFKit library for this tutorial as it has wholesome documentation and a strong user community.
Introducing PDFKit
So what is PDFKit all about? PDFKit is a PDF generation tool specifically designed for Node JS applications and browsers via browserify. It is inclusive of a wide variety of features, some of which includes:
Ability to design vector graphics
Font embedding
Image embedding
File encryption
Link annotation and much more.
More details regarding the library can be found on their documentation site.
Project demo
In this demo, we will work on an function which generates a student result in PDF format from a JSON format. This JSON code encompasses the student’s courses and the scores and grades attached to the course throughout the period in school. This JSON data was generated with the help of Chat GPT. Attached below is the JSON code of this information.
{ "_id": "65b04bf770315e1fdc742ca4", "name": "John Doe",

"matricNo": "M123456",

"details": [ {

"_id": "65b04bf770315e1fdc742ca5",

"twoHundredLevel": [ {

"_id": "65b04bf770315e1fdc742ca7",

"courseTitle": "Anatomy",

"courseScore": 90,

"courseGrade": "Distinction" }, {

"_id": "65b04bf770315e1fdc742ca6",

"courseTitle": "Anatomy",

"courseScore": 90,

"courseGrade": "Distinction" } ],

"threeHundredLevel": [ { "_id": "65b04bf770315e1fdc742ca9",

"courseTitle": "Biochemistry",

"courseScore": 85,

"courseGrade": "High Pass" }, {

"_id": "65b04bf770315e1fdc742ca8",

"courseTitle": "Anatomy",

"courseScore": 90,

"courseGrade": "Distinction" } ],

"fourHundredLevel": [ {

"_id": "65b04bf770315e1fdc742cab",

"courseTitle": "Biochemistry",

"courseScore": 85,

"courseGrade": "High Pass" }, {

"_id": "65b04bf770315e1fdc742caa",

"courseTitle": "Anatomy",

"courseScore": 90,

"courseGrade": "Distinction" } ],

"fiveHundredLevel": [ { "_id": "65b04bf770315e1fdc742cad",

"courseTitle": "Biochemistry",

"courseScore": 85,

"courseGrade": "High Pass" }, {

"_id": "65b04bf770315e1fdc742cac",

"courseTitle": "Anatomy",

"courseScore": 90,

"courseGrade": "Distinction" } ],

"sixHundredLevel": [ {

"_id": "65b04bf770315e1fdc742caf",

"courseTitle": "Anatomy",

"courseScore": 90,

"courseGrade": "Distinction" }, {

"_id": "65b04bf770315e1fdc742cae",

"courseTitle": "Biochemistry",

"courseScore": 85,

"courseGrade": "High Pass" } ],

"studentElectives": [] } ], "__v": 0 }
Quite extensive and detailed right? Well, we are on to beautifying this data in a PDF file for onward processing.
To create files on the Node JS backend system, The FS package is required. This package comes installed alongside Node JS on the operating system. This FS allows the Node JS application to modify and manipulate files within the operating system. To utilize this package, it would be imported and initialized in the JS file.
const fs = require('fs');
thereafter, the PDFKit library will then be imported and initialized in the file.
const PDFDocument = require('pdfkit-table');
With that, we would like to write a function that would then be executed to generate the PDF file from the JSON code already available.
module.exports = function(jsonData, outputPath = 'output.pdf') {
    const doc = new PDFDocument({ margin: 10, size: 'A4' });
    const stream = fs.createWriteStream(outputPath);

    doc.pipe(stream);
};
This function parses the JSON data and a specified output path which I named output.pdf. The pdf file outline is also highlighted with the necessary dimensions. The margin is 10 inches while the page size is A4. The FS package is then initiated to create a writeStream function to write the data into the created PDF. The doc.pipe() then parses the already created stream into the pdf file.
const data = jsonData?.details?.map( s => {
const studentInfoTwo = s.twoHundredLevel;
const studentInfoThree = s.threeHundredLevel;
 const studentInfoFour = s.fourHundredLevel;
const studentInfoFive = s. fiveHundredLevel;
const studentInfoSix = s.sixHundredLevel;
The code above utilizes the JavaScript array method to destructor the JSON file to access the information contained therein.
const processedStudentTwo = studentInfoTwo.map(o => {
    return [
        o.courseTitle, o.courseScore, o.courseGrade
    ];
});

const table1 = {
    title: "200 level",
    headers: ["Student courses", "student score", "student grades"],
    rows: processedStudentTwo
};

doc.table(table1, { width: 600 });
doc.moveDown();
The code above creates an object containing the title, headers and row components. This is then passed into the document already created and the width of the table will then be specified. In this case, the width is 600 inches. The doc.moveDown creates a paragraph and separates the table above from the bottom table. This can then be applied to other parts of the JSON file to generate tables also. To end this, the entire text outputted is added to the document via the doc.text(data) code. The doc.end() function signifies the closure of the document
doc.end();
Attached below is the full code for the project.
const fs = require('fs');
const PDFDocument = require('pdfkit-table');

module.exports = function (jsonData, outputPath = 'output.pdf') {
    const doc = new PDFDocument({ margin: 10, size: 'A4' });
    const stream = fs.createWriteStream(outputPath);

    doc.pipe(stream);

    const data = jsonData?.details?.map(s => {
        const studentInfoTwo = s.twoHundredLevel;
        const studentInfoThree = s.threeHundredLevel;
        const studentInfoFour = s.fourHundredLevel;
        const studentInfoFive = s.fiveHundredLevel;
        const studentInfoSix = s.sixHundredLevel;
        const studentElective = s.studentElectives;

        const processedStudentTwo = studentInfoTwo.map(o => [
            o.courseTitle, o.courseScore, o.courseGrade
        ]);

        const table1 = {
            title: "200 level",
            headers: ["Student courses", "student score", "student grades"],
            rows: processedStudentTwo
        };

        doc.table(table1, { width: 600 });
        doc.moveDown();

        const processedStudentThree = studentInfoThree.map(o => [
            o.courseTitle, o.courseScore, o.courseGrade
        ]);

        const table2 = {
            title: "300 level",
            headers: ["Student courses", "student score", "student grades"],
            rows: processedStudentThree
        };

        doc.table(table2, { width: 600 });
        doc.moveDown(1);

        const processedStudentFour = studentInfoFour.map(o => [
            o.courseTitle, o.courseScore, o.courseGrade
        ]);

        const table3 = {
            title: "400 level",
            headers: ["Student courses", "student score", "student grades"],
            rows: processedStudentFour
        };

        doc.table(table3, { width: 600 });
        doc.moveDown();

        const processedStudentFive = studentInfoFive.map(o => [
            o.courseTitle, o.courseScore, o.courseGrade
        ]);

        const table4 = {
            title: "500 level",
            headers: ["Student courses", "student score", "student grades"],
            rows: processedStudentFive
        };

        doc.table(table4, { width: 600 });
        doc.moveDown();

        const processedStudentSix = studentInfoSix.map(o => [
            o.courseTitle, o.courseScore, o.courseGrade
        ]);

        const table5 = {
            title: "600 level",
            headers: ["Student courses", "student score", "student grades"],
            rows: processedStudentSix
        };

        doc.table(table5, { width: 600 });
        doc.moveDown();

        const processedElectives = studentElective.map(o => [
            o.courseTitle, o.courseCode, o.courseScore, o.courseGrade
        ]);

        const table6 = {
            title: "Special Electives",
            headers: ["course Title ", "course Code", "student score", "student grades"],
            rows: processedElectives
        };

        doc.table(table6, { width: 800 });
        doc.moveDown();
    });

    doc.text(data);
    doc.end();
};
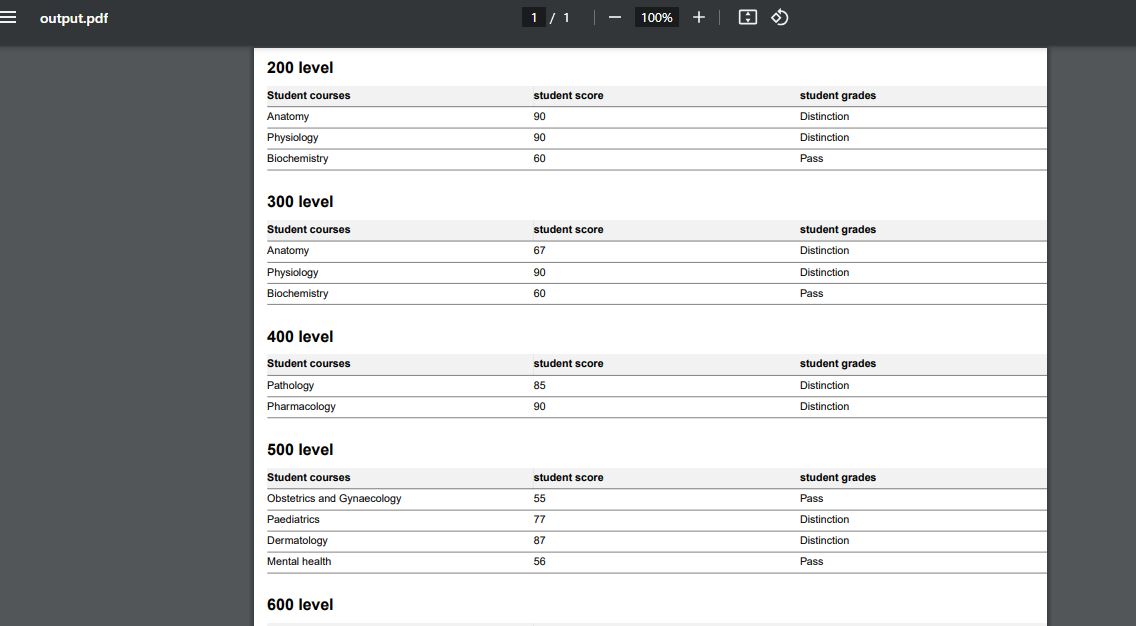
This function can then be linked to a GET request in an API to generate the pdf file with the JSON attached to this article. Running this code should produce a file similar to this.

Additional Features
So far, our project has been done. However, much more customization can be implemented in the PDF design too. Also, the PDF generation feature can be more seamlessly improved to be automatically forwarded to a recipient mail using the Node JOSS SendGrid package. However, do not limit yourself to these suggestions. There are far more innovations achievable with this tool.
Conclusion
With this, we have come to the end of the tutorial. We hope you’ve learnt essentially about PDF generation via the use of PDFKit with Node JS and its intricacies.
Feel free to drop comments and questions and also check out my other articles here. Till next time, keep on coding!
Subscribe to my newsletter
Read articles from Oluwatobi directly inside your inbox. Subscribe to the newsletter, and don't miss out.
Written by

Oluwatobi
Oluwatobi
I am a fullstack web developer with great knowledge of Javascript and Python programming languages. I also possess great skill in React JS , Node JS , Typescript, Firebase libraries and MongoDb database. This skillset has been pivotal in my knowledge of technical terminologies and has also been helpful in selecting topics that educate my target audiences.