Introducing BuildBear Remix Plugin: Enhanced Smart Contract Development On Remix IDE
 BuildBear
We’re excited to introduce the BuildBear Remix Plugin, which provides a private development environment with a personal faucet and integrated explorer to enhance smart contract development on Remix IDE. In this article, we’ll explore its key features, its advantages over traditional environments, and how it addresses the limitations of Remix local and public testnets.
Key Features:
Mainnet Testing Made Easy: Skip the hassle of mock environments. Fork Mainnets and spin up testnets in seconds, testing your contracts alongside real-world protocols.
Rapid Transactions: Experience swift transactions on BuildBear Sandbox, completing in under 3 seconds.
Unlimited Minting: Enjoy endless Native and ERC20 tokens with our personal faucet, eliminating the need for tedious token acquisition.
Private Sandbox: Create secure environments for various EVM-compatible blockchains, shielding your code and transactions from prying eyes.
Built-In Explorer: Debug like a pro with our integrated explorer and transaction tracer. Track every step of your smart contract execution with ease.
Limitations of Remix Local Testnet:
1. Lack of Transaction Explorer:
Remix local testnet lacks a built-in explorer, making it difficult to track transactions and debug unsuccessful ones. This absence of detailed transaction monitoring hinders efficient debugging and troubleshooting.
2. Mainnet State Isolation:
Remix local testnet operates independently from the Mainnet state. If your application relies on Mainnet protocols, setting them up in the local environment for testing can be cumbersome and time-consuming, impacting development efficiency and deployment.
3. Limited Collaboration:
Remix local testnet cannot be shared with team members, forcing developers to work in isolation. This lack of collaborative testing can hinder development progress and team communication.
Limitations of public Testnets:
Contract Confidentiality: Public Testnets lack privacy, potentially exposing sensitive contract information.
Transaction Confirmation: Transaction processing on public Testnets can be slow, leading to delays during development.
Token Accumulation: Gathering enough Testnet tokens for comprehensive testing can be time-consuming.
Mainnet Testing: Setting up existing protocols deployed on the mainnet for testing can be cumbersome and time-intensive.
How to Use BuildBear Remix Plugin
Step 1: Install the BuildBear Plugin
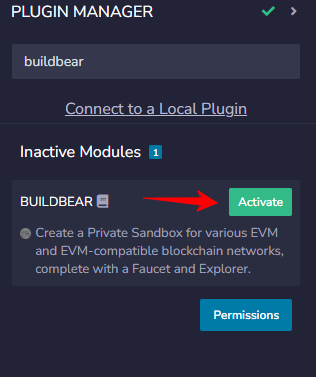
To activate the BuildBear plugin, open the Remix Plugin Manager, search for “BuildBear”, and click “Activate”.
Step 2: Create your BuildBear Sandbox:
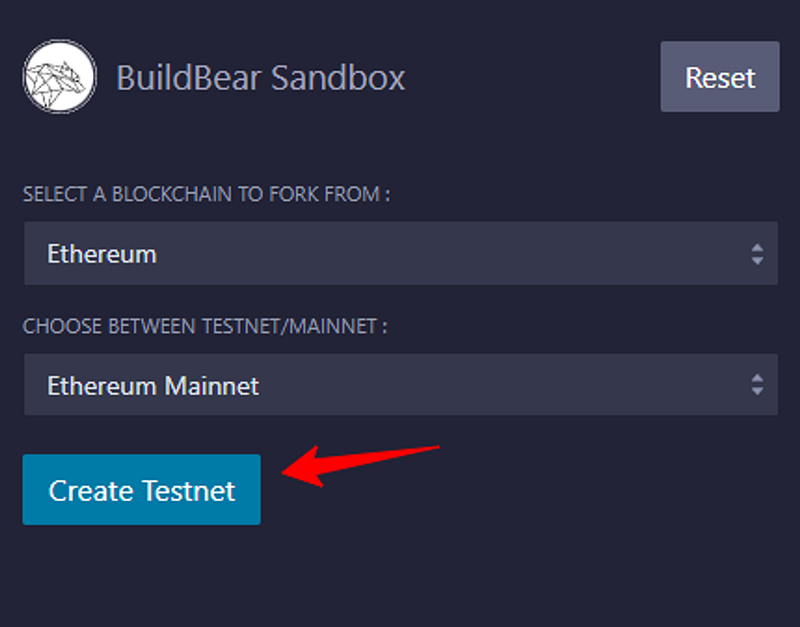
Start by selecting the desired blockchain network for your sandbox and clicking “Create Testnet”.
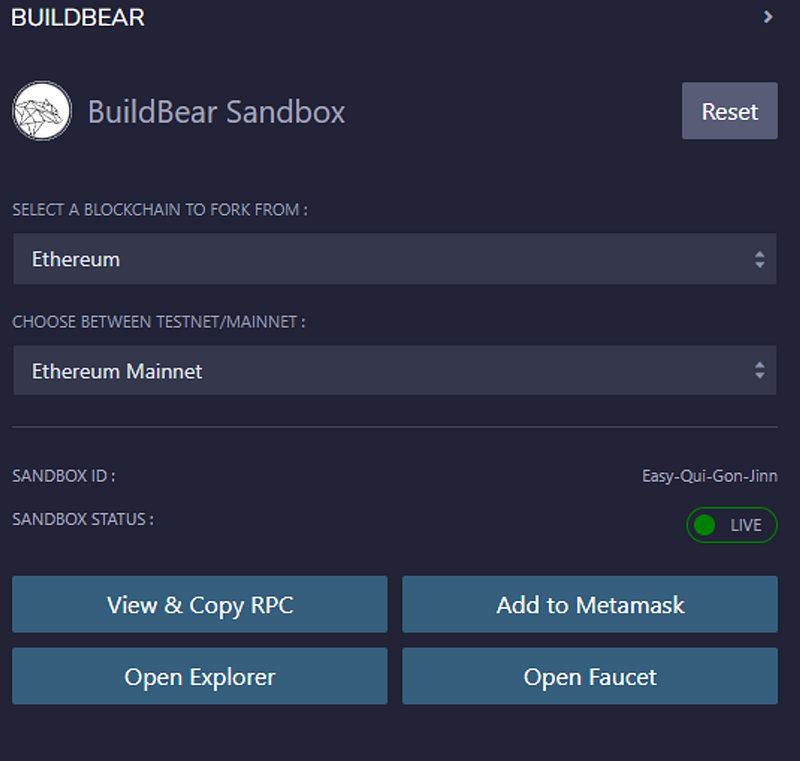
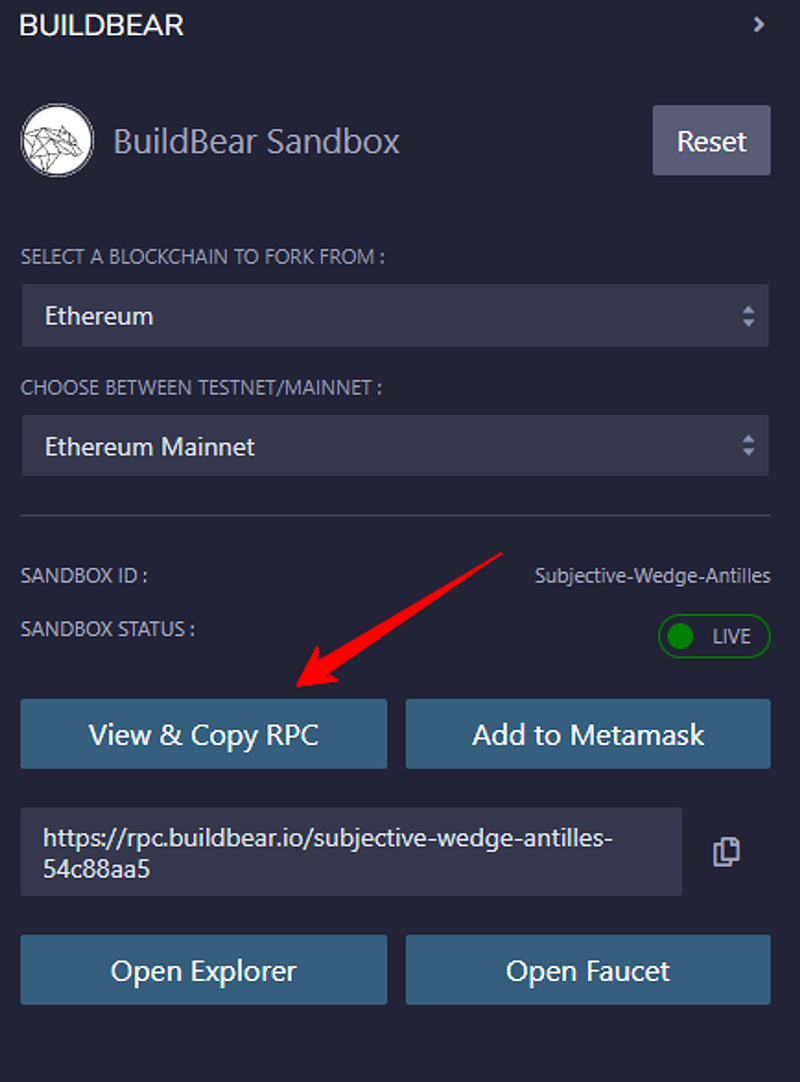
After a brief moment, your private sandbox will come to life, displaying its details in a format similar to the image below:
Step 3: Explore Sandbox Options
With your sandbox ready to go, let’s dive into its available features:
a) View & Copy RPC:
Access your Sandbox RPC, a crucial link for connecting your sandbox to other development tools like Foundry and Hardhat.
Simply copy and paste the RPC into your project’s configuration file to start deploying and interacting with contracts in your sandbox.
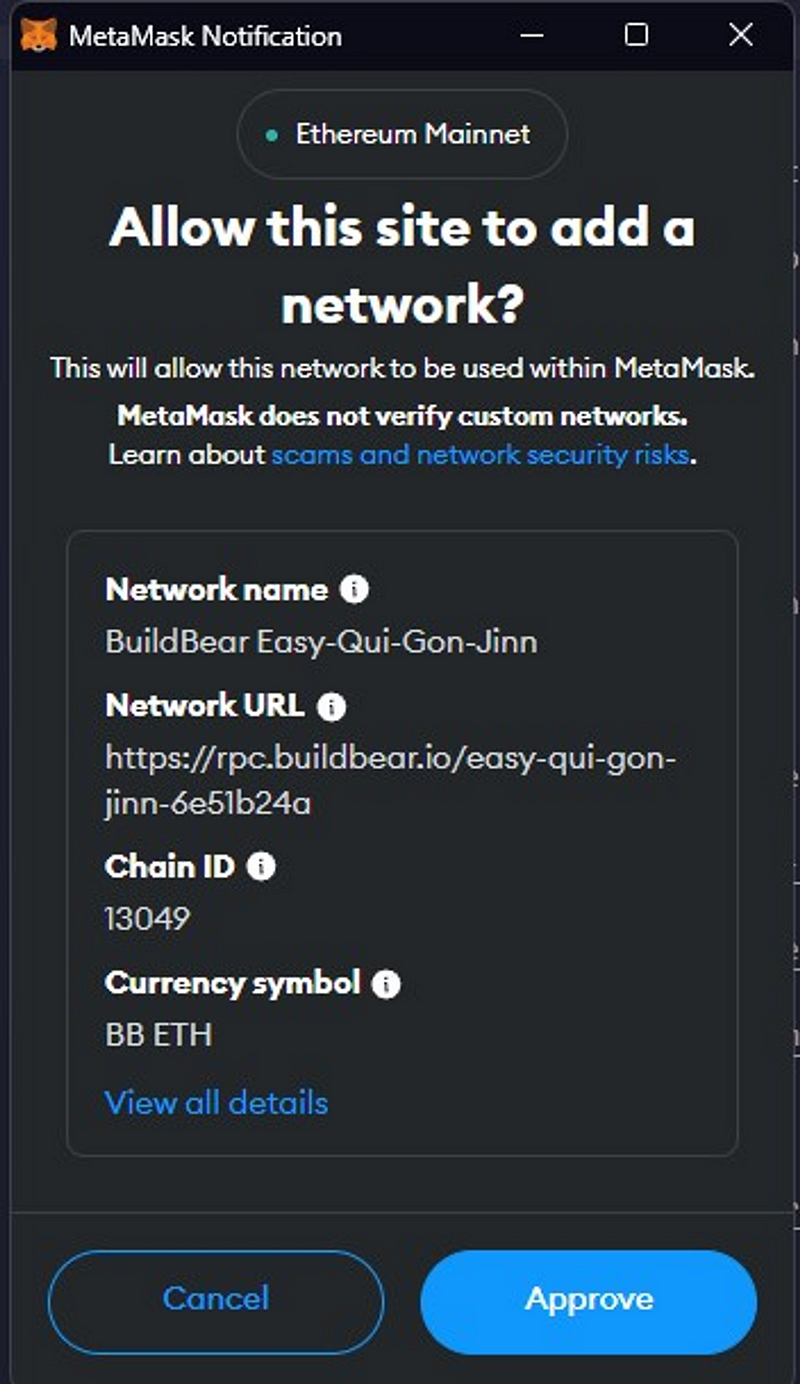
b) Add to MetaMask:
Use this option to add your sandbox network to your MetaMask wallet. This allows you to easily sign transactions from your wallet to your private Sandbox.
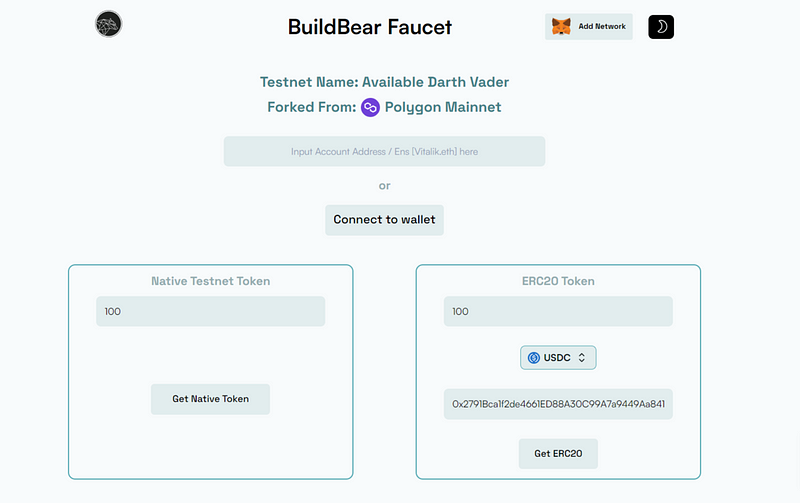
c) Open Faucet:
Visit your sandbox’s private faucet by clicking “Open Faucet.”
Mint Native tokens (essential for network gas fees) and popular ERC20 tokens without any limitations.
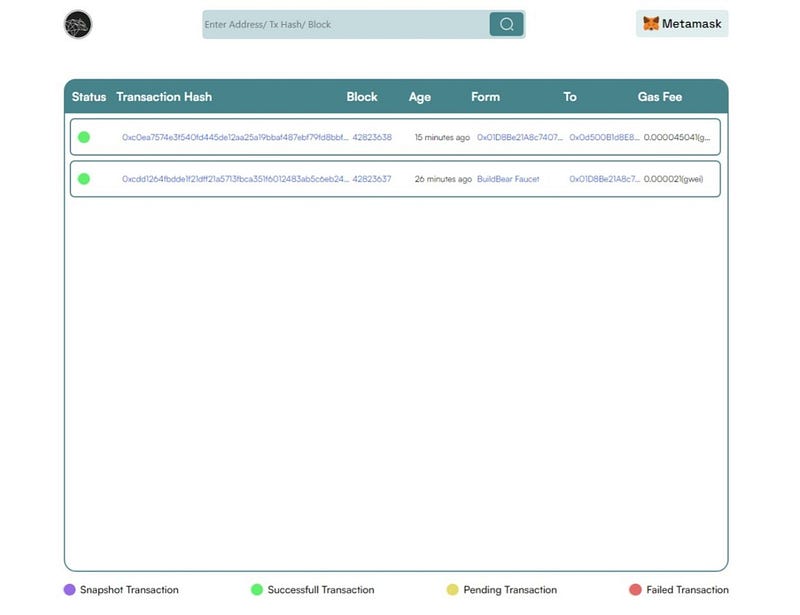
d) Open Explorer:
Gain a comprehensive view of all transactions that have occurred within your sandbox.
Interact with deployed contracts and trace transaction execution for efficient debugging.
Step 4: Deploy Your Contract:
There are two ways to deploy your contract to your BuildBear Sandbox:
Option A: Using MetaMask
- Connect MetaMask:
Navigate to the “DEPLOY & RUN TRANSACTIONS” section within Remix.
Select “Injected Provider” as the environment. This establishes a connection between MetaMask and Remix, enabling contract deployment and signing directly from your wallet.
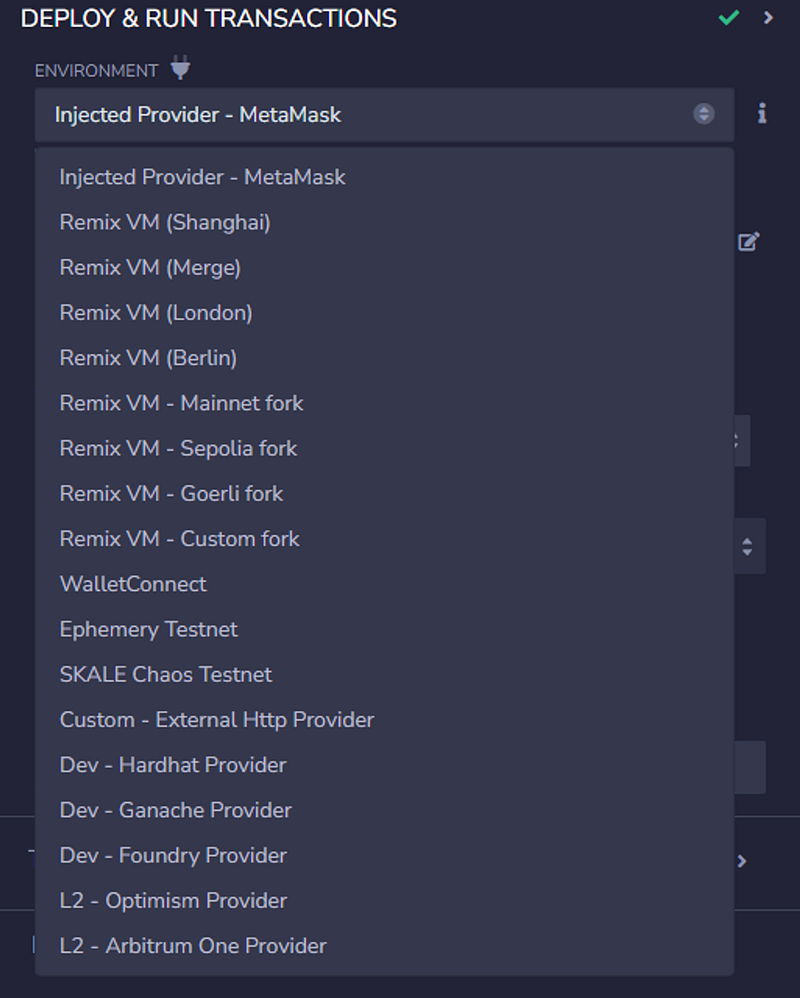
2. Deploy and Sign:
- Choose the contract you wish to deploy.
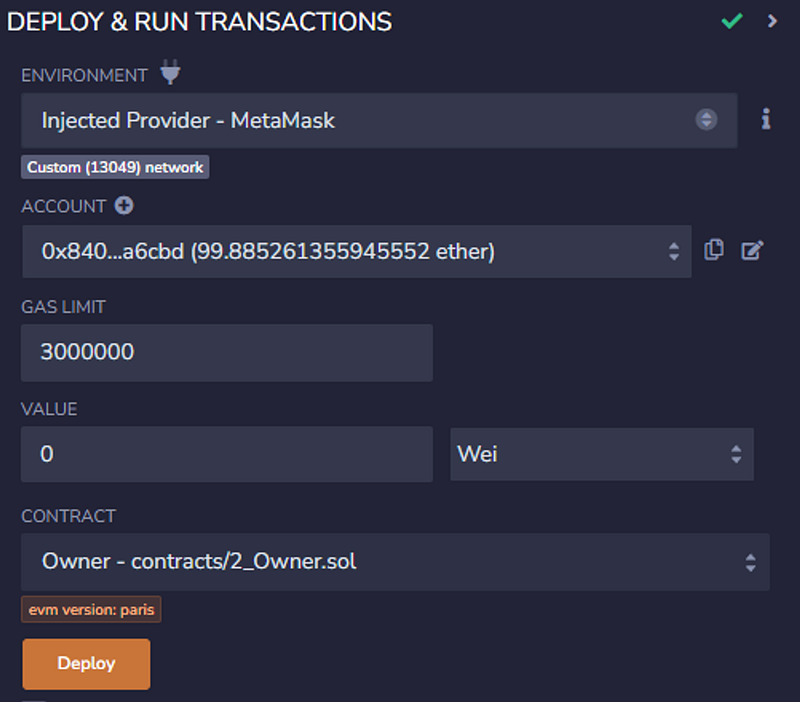
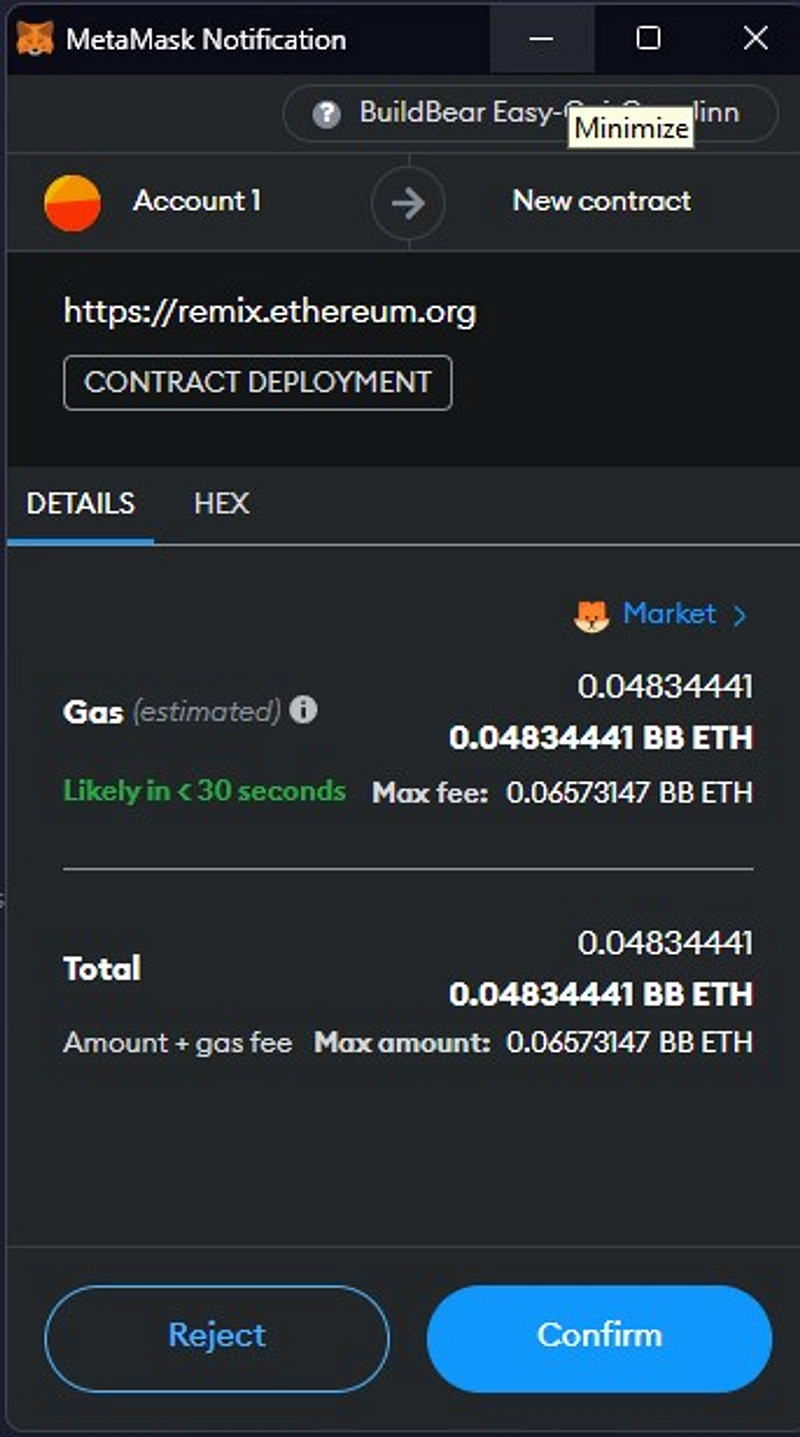
Click “deploy” and confirm the transaction within your MetaMask wallet.
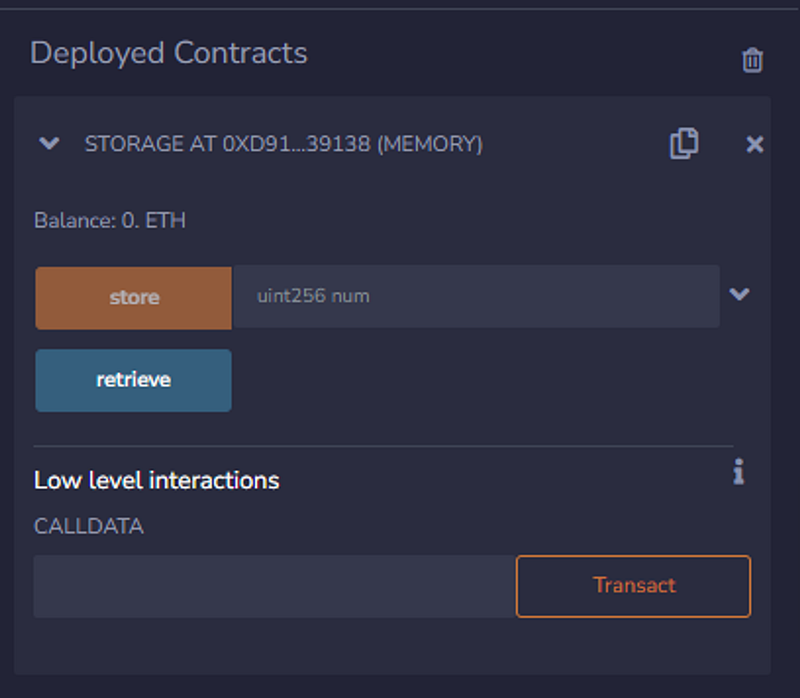
Upon successful deployment, you can seamlessly read and write to the contract directly from Remix.
Option B: Using a Custom External HTTP Provider
- Connect Provider:
- Within the “DEPLOY & RUN TRANSACTIONS” section, select “Custom — External HTTP Provider” as the environment.
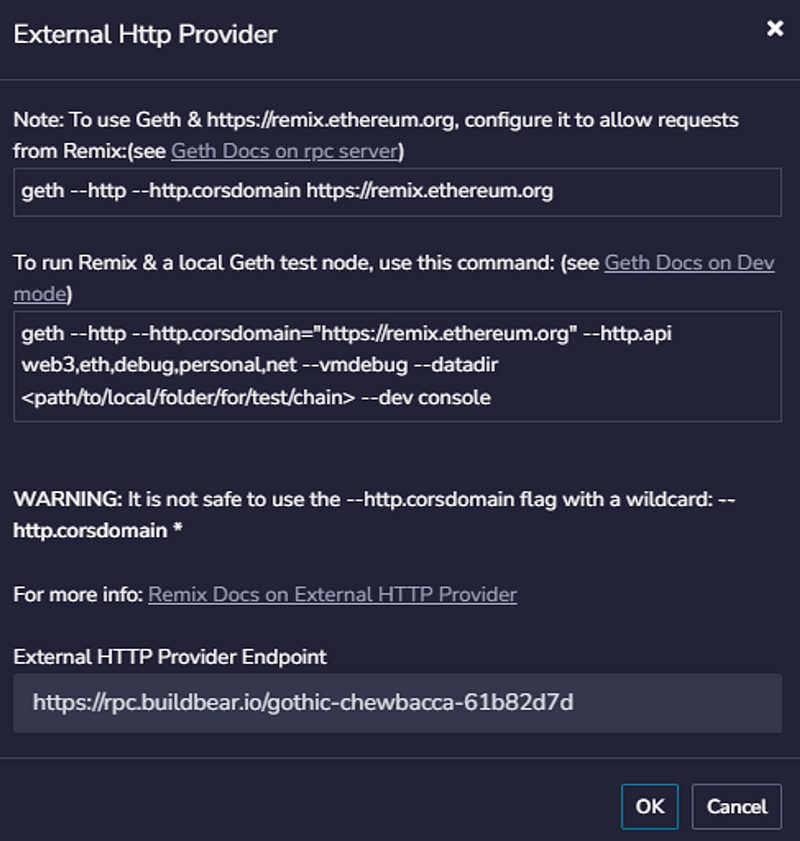
- Paste your Sandbox’s RPC URL to establish the connection.
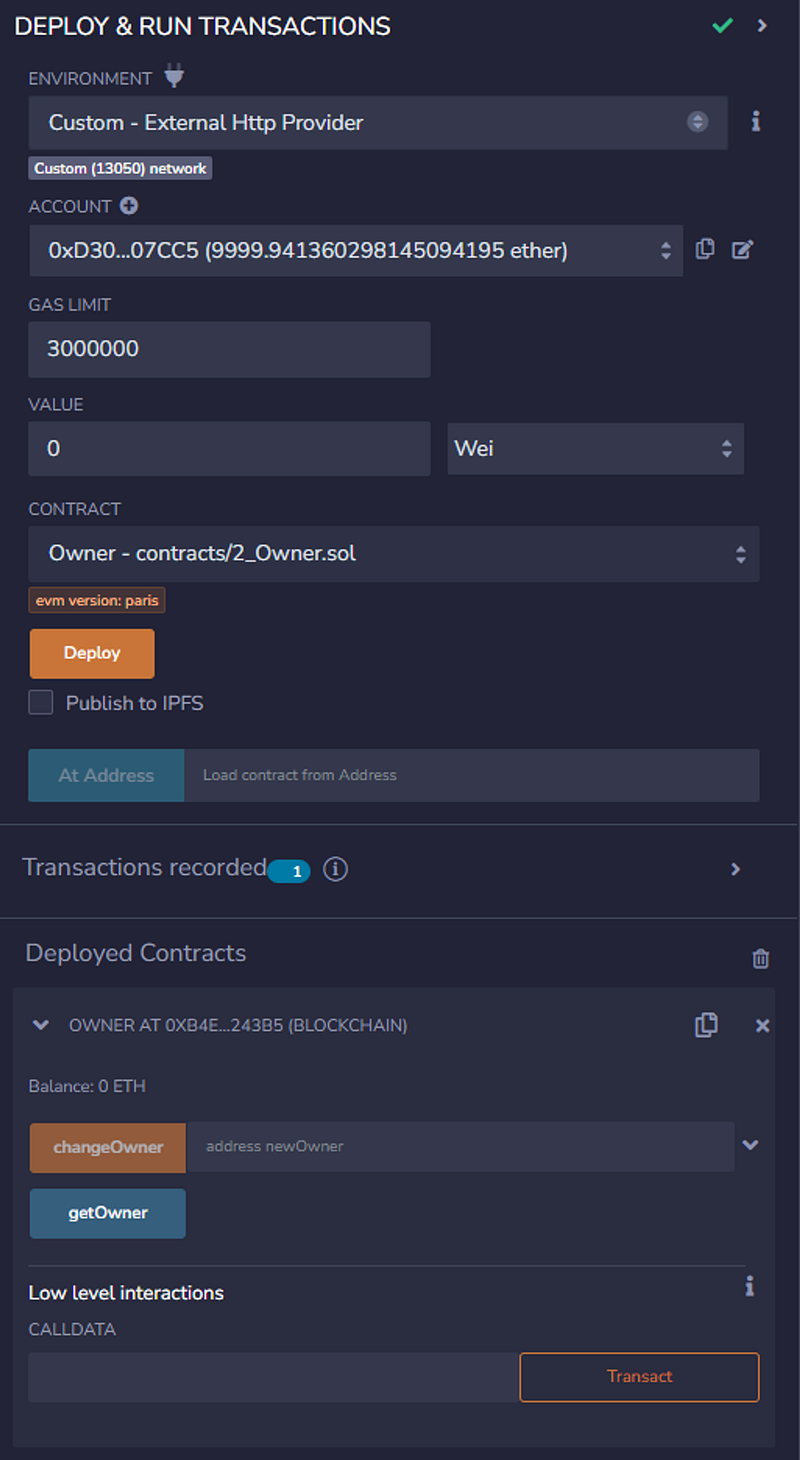
2. Deploy with Sandbox Account:
Select the desired contract and click “deploy.”
The deployment and transaction signing will be automatically handled using the unlocked account within the Sandbox.
Step 5: Submitting the Contract’s ABI
While you can directly interact with your deployed contract through Remix, exploring its functionality within Explorer requires an additional step: submitting the contract’s ABI (Application Binary Interface).
Here’s the process:
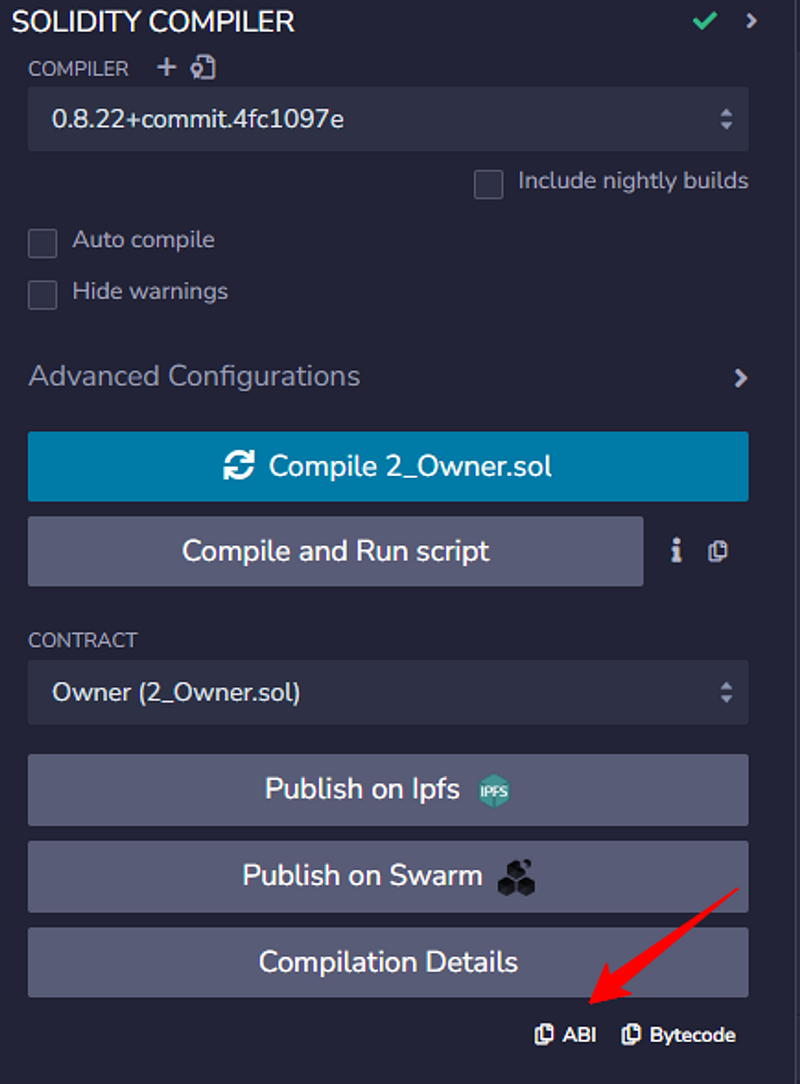
- Obtain the ABI:
Navigate to the Solidity Compiler tab within Remix.
Copy the ABI of the deployed contract.
2. Submit the ABI to the Explorer:
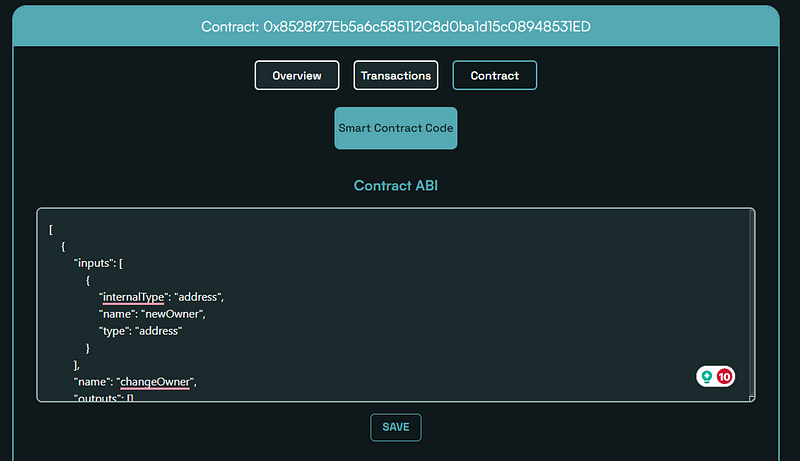
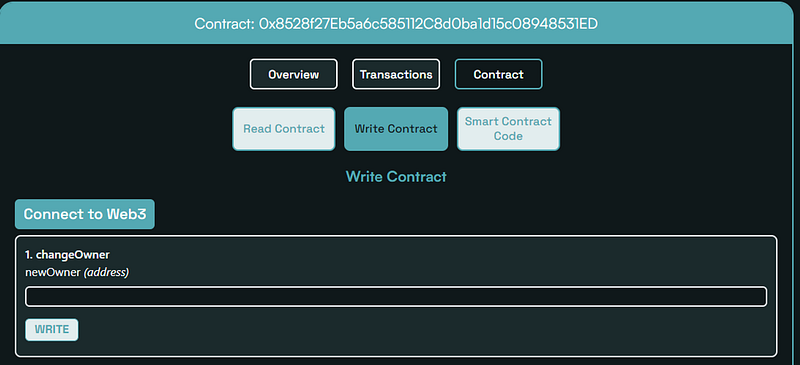
Access the contract page on your sandbox Explorer.
Paste the copied ABI into the designated field.
3. Interact with the Contract:
- Upon successful ABI submission, you’ll gain the ability to utilize the contract’s read-and-write functions, similar to how you would on Etherscan.
Creating a New Sandbox
To start afresh with a new sandbox, simply click the “Reset” button. This action will clear the current sandbox details and provide options for creating a new one.
Conclusion:
The BuildBear Remix Plugin Enhances smart contract development on Remix IDE by providing a private, and efficient development environment. By overcoming the limitations of traditional local and public testnets, BuildBear empowers developers to:
Debug seamlessly: Analyze transactions and identify issues in real time with the built-in explorer and transaction tracer.
Test with Mainnet: Seamlessly integrate Mainnet protocols into your development sandbox, eliminating the need for mock environments and simplifying testing.
Collaborate effectively: Share your private sandbox with team members, fostering better communication and streamlining development workflows.
Maintain confidentiality: Securely develop and test sensitive contracts within a private environment, protecting intellectual property.
If you have any issues, you can reach out to us at https://t.me/Web3_dApp_Developers
About BuildBear:
BuildBear is a platform for testing dApps at scale, for teams. It provides users with their own private Testnet to test their smart contracts and dApps, which can be forked from any EVM chain. It also provides a Faucet, Explorer, and RPC for testing purposes.
BuildBear aims to build an ecosystem of tools for testing dApps at scale for the teams.
Subscribe to my newsletter
Read articles from BuildBear directly inside your inbox. Subscribe to the newsletter, and don't miss out.
Written by

BuildBear
BuildBear
BuildBear is a platform for testing dApps at scale, for teams. It provides users with their own private Testnet to test their smart contracts and dApps, which can be forked from any EVM chain. It also provides a Faucet, Explorer, and RPC for testing purposes.