Build Your Own SMTP Server (:
 Sanskar Gupta
How cool it would be if you can create your own custom domain server. With specific name such as Sanskar@TechySans.dev .
Lets first understand what is a mail server ->
A mail server is a crucial component of email communication, facilitating the reliable exchange of messages between users and ensuring the smooth operation of email services.
Hmm ohkk now comes why there is a need to have a own customize mail (just to look cool Nahhh!!!)
Having a personal email domain offers several advantages over using generic email services like Gmail, Yahoo, or Outlook. Here are some reasons why people might choose to have their own personal email domain:
Professionalism: Having an email address with your own domain (e.g., yourname@yourdomain.com) can convey a more professional image, especially if you're using it for business or networking purposes. It gives the impression that you take your online presence seriously and are invested in your personal brand.
Brand Identity: If you have a personal website or online portfolio, using a custom email domain that matches your domain name reinforces your brand identity. It creates a cohesive online presence and makes it easier for people to remember and associate your email address with your brand.
Control and Ownership: When you have your own domain, you have full control over your email account and its settings. You're not dependent on a third-party service provider, and you have the freedom to customize your email setup according to your preferences. Additionally, you own the domain, so you can keep your email address even if you switch email providers.
Privacy and Security: Some people prefer to have more control over their email data and privacy. With a personal email domain, you have greater control over your email security settings and can implement additional security measures to protect your inbox from threats like phishing attacks and spam.
Flexibility and Customization: Having your own domain gives you flexibility to create multiple email addresses and aliases for different purposes (e.g., info@yourdomain.com, support@yourdomain.com). You can also set up custom email forwarding, autoresponders, and filters to manage your inbox more efficiently.
Now its time to understand basic working of a email service ->
What happens at the backside of service
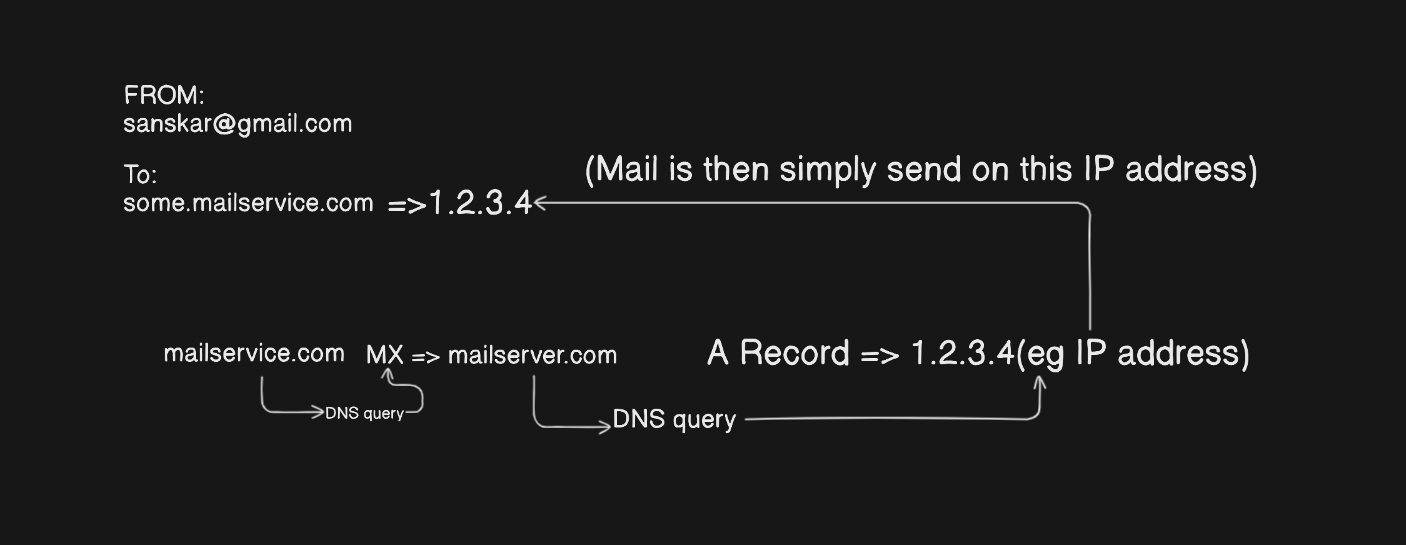
Lets suppose we have to send a mail from sanskar@gmail.com to some.mailservice.com
Step 1 (TO GET THE MX RECORD)
So internally there will be a DNS query done on mailservice.com (because this is the domain name) and will ask for the MX record.
Now what's a MX record actually is
An MX record, or mail exchange record, is a DNS record that routes emails to specified mail servers. MX records essentially point to the IP addresses of a mail server's domain. MX records are especially useful for users who host or lease an email because it differentiates web and email servers. (In simple terms if a email is send on the mailservice.com which server will handle it)
MX will simply return a server where all the incoming email request will be handled lets suppose mx return a server mailserver.com (don't get confused with the domain name)
Step 2 ( TO GET THE A RECORD TO EVENTUALLY GET THE IP ADDRESS)
Again a DNS query will be done on the mailserver.com asking about the A record (An A record uses a domain name to find the IP address of a computer connected to the internet)
After getting the mail record specific mail is send to the desired IP address
Basic Flow Diagram ->

Some cool websites to get MX record of particular domain :
Step 3 (TO GET THE SPF RECORD)
What is the SPF record for?
An SPF record identifies the mail servers and domains that are allowed to send email on behalf of your domain. Receiving servers check your SPF record to verify that incoming messages that appear to be from your organization are sent from servers allowed by you. Domains can have one SPF record.
This basically checks the authenticity of the user sending the mail. it has some required checks .
Step 4 (DMARC Record)
A DMARC (Domain-based Message Authentication, Reporting, and Conformance) record is a DNS record that specifies how email receivers should handle messages claiming to be from your domain. It includes a policy indicating whether to monitor, quarantine, or reject such emails, as well as parameters for aligning sender and recipient domains to prevent spoofing. Additionally, DMARC allows for the collection of reports from email receivers about the disposition of emails sent from your domain, aiding in monitoring and troubleshooting email authentication issues. By implementing DMARC, organizations can enhance email security, prevent unauthorized use of their domain, and improve email deliverability.
it basically has a check if the user fails then what to do in specific, the three main criteria would be
NONE => Accept inbox
Quarantine => Spam
Reject => reieve hi mtt kroo
Next comes how to use and implement this record and use them.
To connect and deploy your services to Skiff using Cloudflare, you can follow these general steps:
Sign up for Skiff: First, sign up for Skiff and create an account if you haven't already. You'll need to set up your Skiff account and obtain any necessary credentials or access keys for deploying your services.
Set up your services: Prepare the services or applications that you want to deploy to Skiff. Ensure that they are configured correctly and ready for deployment.
Sign up for Cloudflare: If you haven't already, sign up for Cloudflare and create an account. Cloudflare provides various services, including DNS management and security solutions, which you can integrate with Skiff.
Add your domain to Cloudflare: Add your domain to Cloudflare's DNS management system. This involves changing your domain's nameservers to Cloudflare's nameservers. Follow the instructions provided by Cloudflare to complete this process.
Configure DNS settings: Once your domain is added to Cloudflare, configure the necessary DNS settings for your services. This may involve creating DNS records such as A records, CNAME records, or MX records to point to the appropriate destinations for your services.
Set up Cloudflare Access: Cloudflare Access provides authentication and authorization solutions for accessing your services. Set up Cloudflare Access to control access to your services deployed on Skiff. You can configure access policies, authentication methods, and user permissions as needed.
Deploy your services to Skiff: Deploy your services to Skiff using the appropriate deployment methods and tools provided by Skiff. This may involve using Skiff's CLI (Command-Line Interface), SDKs (Software Development Kits), or other deployment integrations.
Configure security and access settings: Configure security settings and access controls for your services deployed on Skiff. This may include setting up firewalls, encryption, access controls, and other security measures to protect your services and data.
Test and monitor: After deploying your services, thoroughly test them to ensure that they are functioning correctly and securely. Monitor your services for any issues or anomalies and make any necessary adjustments.
Regular maintenance and updates: Regularly maintain and update your deployed services on Skiff to ensure optimal performance, security, and reliability. Monitor for any security vulnerabilities or updates and apply patches or updates as needed.
Please note that the specific steps and configurations may vary depending on your specific requirements, the services you are deploying, and the integration options provided by Skiff and Cloudflare. Be sure to consult the documentation and support resources provided by both Skiff and Cloudflare for detailed instructions and guidance tailored to your setup. and here's a specific link for required steps to be followed.
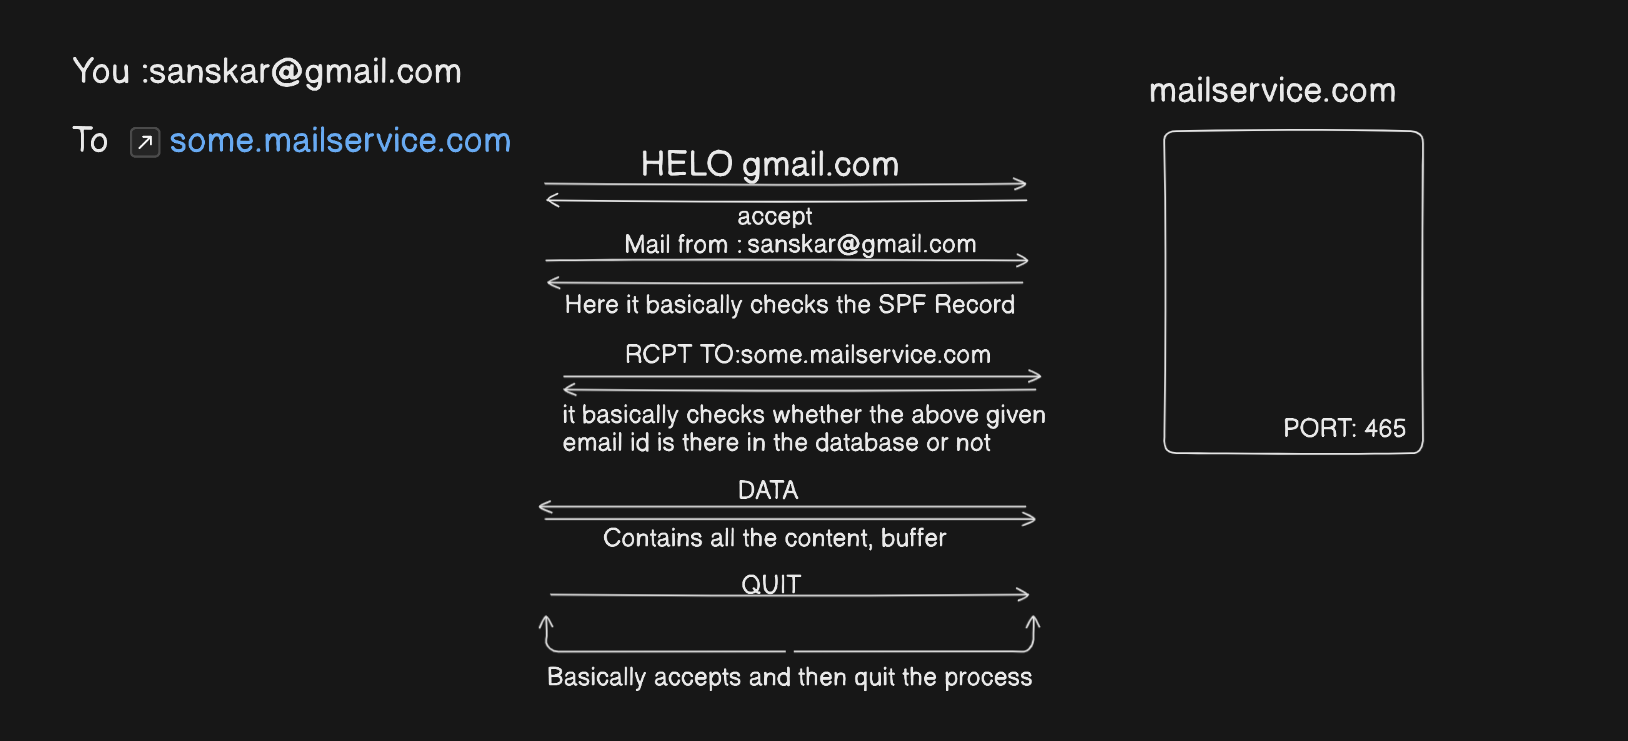
-> Basically a SMTP uses TCP protocol and runs on port
Checks performed by the SMTP server

Essential SMTP commands in the order they may be used
Each SMTP command defines a particular function within the SMTP session, which consists of three steps:
handshake – establishing a TCP connection
email transfer – manipulations with the email
termination – closing a TCP connection
Therefore, we decided to list the SMTP commands according to this flow.
HELO/EHLO
The HELO command initiates the SMTP session conversation. The client greets the server and introduces itself. As a rule, HELO is attributed with an argument that specifies the domain name or IP address of the SMTP client.
Example: HELOclient.net
EHLO is an alternative to HELO for servers that support the SMTP service extensions (ESMTP). If the server does not support ESMTP, it will reply with an error.
Example: EHLOclient.net
In any case, HELO or EHLO is a MUST command for the SMTP client to commence a mail transfer.
MAIL FROM
The MAILFROM command initiates a mail transfer. As an argument, MAIL FROM includes a sender mailbox (reverse-path). For some types of reporting messages like non-delivery notifications, the reverse-path may be void. Optional parameters may also be specified.
Example: MAIL FROM "test@client.net"
RCPT TO
The RCPT TO command specifies the recipient. As an argument, RCPT TO includes a destination mailbox (forward-path). In case of multiple recipients, RCPT TO will be used to specify each recipient separately.
Example: RCPT TO "user@recipient.net"
DATA
With the DATA command, the client asks the server for permission to transfer the mail data. The response code 354 grants permission, and the client launches the delivery of the email contents line by line. This includes the date, from header, subject line, to header, attachments, and body text.
A final line containing a period (“.”) terminates the mail data transfer. The server responses to the final line.
Example:DATA354 (server response code)Date: Wed, 30 July 2019 06:04:34From:test@client.netSubject: How SMTP worksTo:user@recipient.netBody text.
QUIT
The QUIT command send the request to terminate the SMTP session. Once the server responses with 221, the client closes the SMTP connection. This command specifies that the receiver MUST send a “221 OK” reply and then closes the transmission channel.
Example: QUIT
ALL the rest commands can be viewed from the given link below
LETSS Code Now!!
First create a folder and simply open it in the vs code by drag and drop or using CMD and then cd into the newly built folder and then simply code . this will open the folder in vs code
Simply then open the terminal and do
-> npm init
-> then install a package for creating smtp server called smtp-server
PACKAGE TO BE INSTALLED CLICK HERE
Then create a file called index.js
const SMTPServer = require("smtp-server").SMTPServer;

const server = new SMTPServer({
    allowinsecureAuth: true,
    authOptional: true,
    onConnect(session, cb){
        console.log('onConnect', session.id)
        cb() // accept krr liya ho to mail koo
        // cb(new Error('cannot connect')) iska mtlb u are rejecting email
    },
    onMailFrom(address,session,cb){
        console.log('onMailFrom', address.address,session.id)
        cb()
    },
    onRcptTo(address,session,cb){
        console.log('onRcptTo', address.address,session.id)
        cb();
    },
    onData(stream,session,cb){
        stream.on('data',(data) => {
            console.log('onData, ${data.toString()}')
        })
            stream.on('end',cb);
        }
    }
);
server.listen(25,()=>
console.log('Server running on port 25'))// as we are creating a smtp server we are using port 25
This server is basically running on my localhost we need to host it somewhere
Soo we are using AWS to host our server
Hosting part will be done in a new blog
Subscribe for more cool stuffs
Subscribe to my newsletter
Read articles from Sanskar Gupta directly inside your inbox. Subscribe to the newsletter, and don't miss out.
Written by

Sanskar Gupta
Sanskar Gupta
Backend Developer in Node.Js (exploring new tech )