How to create your own autopatch-like "ring" groups in Azure using Azure Automation and PowerShell
 Ondrej Sebela
I like the idea of Autopatch ring groups where you have one "root" group, whose members are distributed across several "ring" groups based on a given percentage proportion.
And because I needed the same thing for my gradual applications update automation I've created my own "ring" groups solution.
OK, so what will be the result of this post?
One main Azure "root" group whose members will be distributed on schedule across several Azure "ring" groups by Azure Automation Runbook that will run my function Set-AzureRingGroup (part of my module AzureGroupStuff).
Interested? OK, let's go! 😉
Create Azure "root" group + "ring" groups
Root group
A "root" group is nothing else than an ordinary group whose members will be distributed across the "ring" groups based on a defined percentage proportion.
Therefore you can use any existing group, or create a new one.
Group should be of security type!
Ring groups
A "ring" group is where members are managed automatically through the created Azure Automation Runbook.
Members are picked from the "root" group and distributed across the "ring" groups based on the percentage proportion defined in the Runbook code. The group members are reorganized when needed.
Groups should be of security type with manually assigned members. Don't add any members now!
So create as many groups as you need. Make a note of each created group and its ID. We will need this when setting up the Azure automation later.
It is a good idea to specify the group purpose in the group name (ring1, ring2,...), to make it easier to identify the group purpose later (TIP: the group description will be automatically set using our automation)
Create & set Azure automation for managing "ring" group members
To keep members in our "ring" groups up to date, we need some automation that will do the rebalancing for us. This is where Azure Automation steps in.
Create an Azure Automation Account
How to create an Azure Automation Account is outside the scope of this article, but you can follow the official documentation.
Create Runbook
Inside your Automation Account create a new runbook. Choose PowerShell type and 5.1 as a runtime version.
Once created, open the Runbook, choose Edit > Edit in portal and insert the code below

#requires -modules AzureGroupStuff, MSGraphStuff, Microsoft.Graph.Authentication, Microsoft.Graph.Groups, Microsoft.Graph.DirectoryObjects, Microsoft.Graph.Users, Microsoft.Graph.Identity.DirectoryManagement

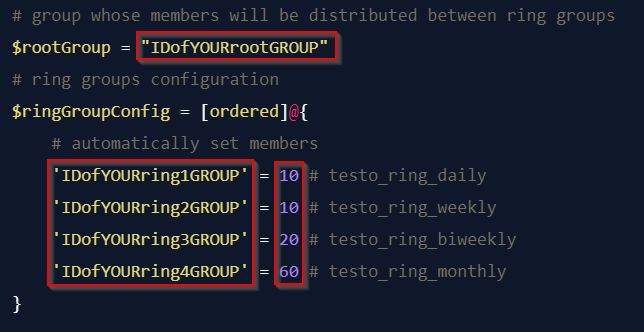
# group whose members will be distributed between ring groups
$rootGroup = 'IDofYOURrootGROUP'
# ring groups configuration
$ringGroupConfig = [ordered]@{
    # automatically set members
    'IDofYOURring1GROUP' = 10 # testo_ring_daily
    'IDofYOURring2GROUP' = 10 # testo_ring_weekly
    'IDofYOURring3GROUP' = 20 # testo_ring_biweekly
    'IDofYOURring4GROUP' = 60 # testo_ring_monthly
}

Connect-MgGraph -Identity -NoWelcome

# Set-AzureRingGroup is part of the AzureGroupStuff module
Set-AzureRingGroup -rootGroup $rootGroup -ringGroupConfig $ringGroupConfig -forceRecalculate -skipUnderscoreInNameCheck -Verbose
Don't forget to modify $rootGroup variable to match the ID of your "root" group.
Also you need to modify $ringGroupConfig hashtable.
Keys in the hash are the IDs of the "ring" groups created earlier and values are integers representing the percentage of how many members of the "root" group should be placed in this "ring" group.
The sum of the values must be obviously 100 in total.

firstRingGroupMembersSetManually parameter of the Set-AzureRingGroup function for more details.Used function Set-AzureRingGroup is part of my module AzureGroupStuff and I really encourage you to check its help to better understand how it works and what option does it offer.
Schedule the Runbook
Schedule the Runbook to run regularly using the button Link to schedule in your Runbook pane

Create a new schedule to run every three hours or so (based on your needs).
Assign required permissions to the Automation Account Managed Identity
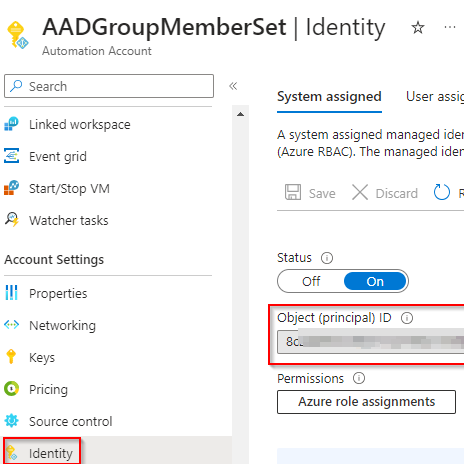
Every Automation Account has automatically created Managed Identity (enterprise application a.k.a. service principal). It allows the runbook to access and perform actions on other Azure resources without storing any credentials in the runbook code or configuration.

For this identity to have appropriate Graph API permissions to manipulate group members, the following application permissions have to be granted.
Device.Read.All- to be able to work with member device objects
User.Read.All- to be able to work with member user objects
Group.ReadWrite.All- to be able to set group members and description
You can do this using my function Grant-AzureServicePrincipalPermission (part of my module AzureApplicationStuff)
Grant-AzureServicePrincipalPermission -servicePrincipalId 'IDofYOURAUTOMATIONmanagedIDENTITY' -permissionType application -permissionList Grant-AzureServicePrincipalPermission -servicePrincipalId '2de94e47-895d-4780-8f8f-b803d5e243b2' -permissionType application -permissionList Directory.Read.All, User.Read.All, Group.ReadWrite.All
Import required modules to the Automation Account
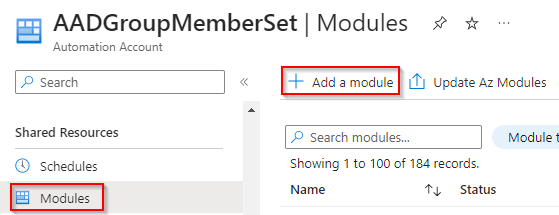
The following PowerShell modules need to be imported so the Runbook can run
AzureGroupStuffMSGraphStuffMicrosoft.Graph.AuthenticationMicrosoft.Graph.GroupsMicrosoft.Graph.DirectoryObjectsMicrosoft.Graph.UsersMicrosoft.Graph.Identity.DirectoryManagement
You can do this manually using Add a module button.

Or using my function New-AzureAutomationModule (part of my AzureResourceStuff module).
'AzureGroupStuff', 'MSGraphStuff', 'Microsoft.Graph.Authentication','Microsoft.Graph.Groups','Microsoft.Graph.DirectoryObjects','Microsoft.Graph.Users','Microsoft.Graph.Identity.DirectoryManagement' | % {
    New-AzureAutomationModule -moduleName $_ -resourceGroupName yourRESOURCEgroupNAME -automationAccountName yourAUTOMATIONaccountNAME
}
For more details check my post Import new (or update existing) PowerShell module (including its dependencies!) into Azure Automation Account using PowerShell
Add members to the "root" group
In case you didn't do so already. Add some test users or devices to your "root" group that should be targeted by this updating solution.
Set "ring" groups members by running the Runbook
Run your Runbook using the Start button.

When the Runbook ends you should see members from the "root" group added to the "ring" groups based on the percent ratio specified in the Runbook code $ringGroupConfig hashtable.
And that's it 👍.
From now on, members of the "root" group will be automatically distributed across your "ring" groups whenever the Automation will run.
Subscribe to my newsletter
Read articles from Ondrej Sebela directly inside your inbox. Subscribe to the newsletter, and don't miss out.
Written by

Ondrej Sebela
Ondrej Sebela
I work as System Administrator for more than 15 years now and I love to make my life easier by automating work & personal stuff via PowerShell (even silly things like food recipes list generation).