Entity Framework Core - Code First Approach Example
 Sudip Bhandari

. ASP.NET Entity Framework Core simplifies data access in ASP.NET applications by providing a powerful and flexible ORM (Object-Relational Mapping) framework with support for modern development practices and cross-platform compatibility.
To get started follow following steps:
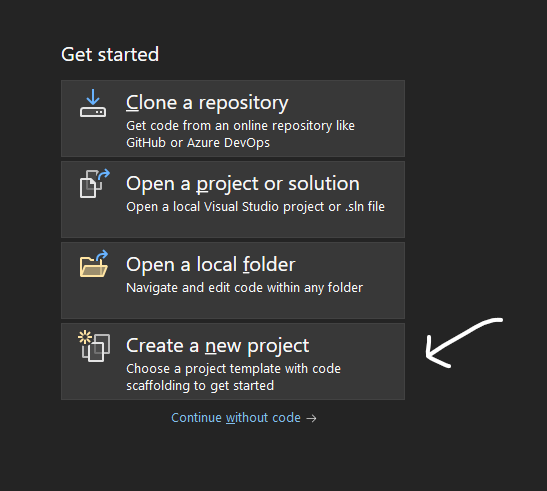
Open Visual Studio and click on create a new project from right helper menu.
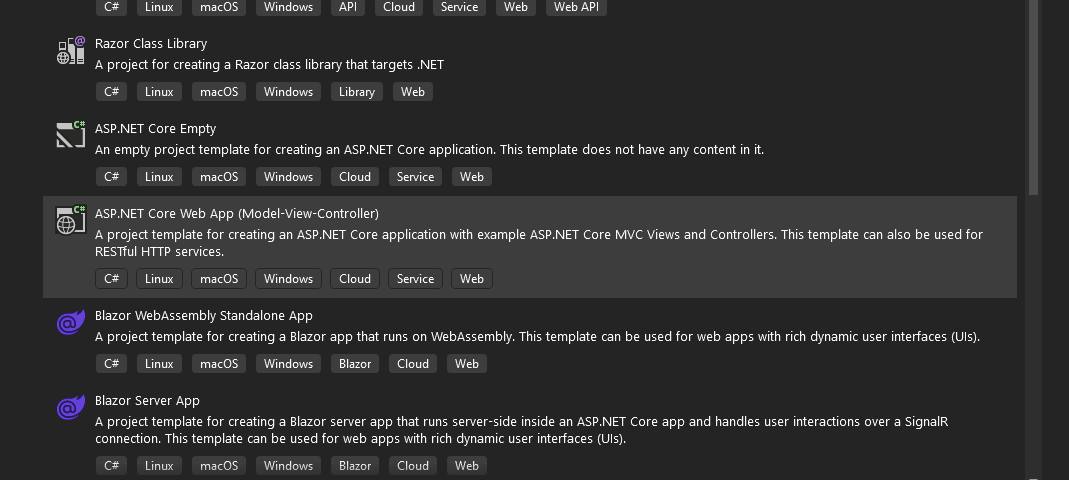
Choose ASP.NET Core Web App (Model-View-Controller)
Provide the appropriate name for the project and click on Next and click on create.
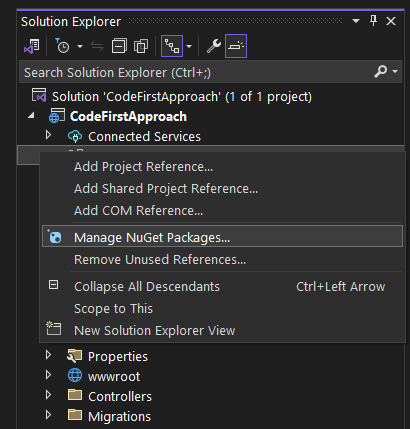
Let's install the necessary packages now. Right-click on the dependencies from solution explorer and select Manage NuGet Packages
Install following packages
Microsoft.EntityFrameworkCore.Design
Microsoft.EntityFrameworkCore.Designcontains all the design-time logic for Entity Framework Core. It's the code that all of the various tools (PMC cmdlets likeAdd-Migration,dotnet ef&ef.exe) call into.Microsoft.EntityFrameworkCore.Tools
Enables these commonly used commands: Add-Migration Bundle-Migration Drop-Database Get-DbContext Get-Migration Optimize-DbContext Remove-Migration Scaffold-DbContext Script-Migration Update-Database
Microsoft.EntityFrameworkCore.SqlServer
Microsoft SQL Server database provider for Entity Framework Core.
Now, define a new model class say
Student.cs.Right click on Models and click on Add -> Class. Provide appropriate name for class and click on Add.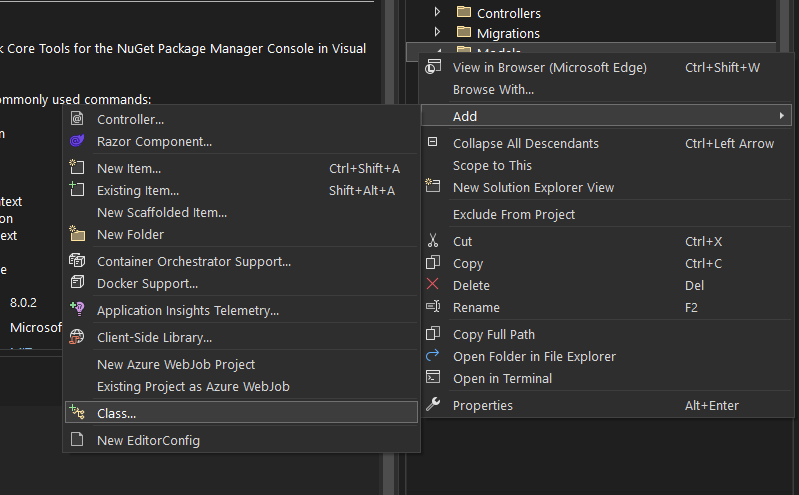
Define Model class
 using System.ComponentModel.DataAnnotations;
 using System.ComponentModel.DataAnnotations.Schema;
 using System.Security.Principal;

 namespace CodeFirstApproach.Models
 {
     public class Student
     {
         [Key]
         public int Id { get; set; }

         [Required]
         [Column("StudentName", TypeName ="varchar(100)")]
         public string Name { get; set; }

         [Required]
         [Column("StudentGender", TypeName = "varchar(100)")]
         public string Gender { get; set; }

         [Required]
         public int Age { get; set; }

     }
 }
Define dbcontext
Dbcontext is used to interact with the underlying database,manage database connection and is used to retrieve and save data in database. Instance of dbcontext represents session with the database which can be used to query and save instance of your entities to database.
On models folder create another file StudentDBContext.cs
 using Microsoft.EntityFrameworkCore; // Importing the necessary namespace

 namespace CodeFirstApproach.Models
 {
     public class StudentDBContext : DbContext // Defining a class named StudentDBContext which inherits from DbContext
     {
         // Constructor for the StudentDBContext class
         // It takes an argument of type DbContextOptions which typically carries information like connection string and other database configurations
         // It calls the base constructor of DbContext passing the options parameter to it
         public StudentDBContext(DbContextOptions options): base(options)
         {
             // Constructor body
             // It can contain initialization logic if needed
         }

         // DbSet property declaration
         // It declares a property named Students of type DbSet<Student>
         // DbSet<Student> represents the collection of all Student entities in the database
         // This property is used to interact with the Student table in the database
         public DbSet<Student> Students { get; set; }
     }
 }
Now, it's time to connect to the database. Go to appsetting.json and add a connection string.
 "ConnectionStrings": {
   "dbcs": "Data Source=(localdb)\\MSSQLLocalDB; Database=CodeFirst; Initial Catalog=CodeFirst;Integrated Security=True;Connect Timeout=30;Encrypt=False;Trust Server Certificate=False;Application Intent=ReadWrite;Multi Subnet Failover=False"
 }, //change initial catalog to set your database name
Define your connection in Program.cs file as
var builder = WebApplication.CreateBuilder(args);

// Add services to the container.
builder.Services.AddControllersWithViews();

var provider = builder.Services.BuildServiceProvider();
var config = provider.GetRequiredService<IConfiguration>();
builder.Services.AddDbContext<StudentDBContext>(item => item.UseSqlServer(config.GetConnectionString("dbcs")));

var app = builder.Build();
To migrate tables to the database. Goto Tools and select NuGet Package Manager and select NuGet Package Manager.
On the package manager console, enter the commands:
add-migrationThis command will create migrationsupdate-databaseReflects migrations on the database
In HomeController.cs, create a constructor for HomeController as
using CodeFirstApproach.Models;
using Microsoft.AspNetCore.Mvc;
using System.Diagnostics;

namespace CodeFirstApproach.Controllers
{
    public class HomeController : Controller
    {
        private readonly StudentDBContext studentDB;
        public HomeController(StudentDBContext studentDB)
           {
               this.studentDB = studentDB;
           }
    }
}
This line defines a constructor for the
HomeControllerclass. Constructors are special methods that are called when an instance of a class is created. This constructor takes one parameter of typeStudentDBContext, which means it expects an instance ofStudentDBContextto be passed when an object ofHomeControlleris instantiated.Now let's create a CRUD app for Student model class.
Index Action
Displays a list of students. Retrieves all students from the database using
studentDB.Students.ToList()and passes them to theIndexview.Now, scaffold the code for Index method. Right click over the method name and click on Add View, Choose Razer View , List method for index, choose model class and dbcontext class and click on next.
 public IActionResult Index()
 {
     var students = studentDB.Students.ToList();
     return View(students);
 }
Create Action
Displays a form for creating a new student. Returns the
Createview which contains a form for entering student details.public IActionResult Create() { return View(); }Post create action
Handles the submission of the form to create a new student. Receives the form data submitted by the user, adds the new student to the database, and redirects to the
Indexaction if the model state is valid.ModelState.IsValid: This property checks whether the model state is valid or not.[HttpPost] public IActionResult Create(Student student) { if (ModelState.IsValid) { studentDB.Students.Add(student); studentDB.SaveChanges(); return RedirectToAction("Index"); } return View(student); }Details action
Displays details of specific student.
studentDB.Students.FirstOrDefault(s =>s.Id== id);retrieves the firstStudententity from the database where theIdmatches the providedid. If no such student is found, it returnsnull. The retrievedStudententity (ornullif not found) is then stored in the variablestudent. This code is commonly used to retrieve a specific student from the database based on their ID.public IActionResult Details(int id) { var student = studentDB.Students.FirstOrDefault(s => s.Id == id); return View(student); }Delete action
Returns delete confirmation page with a record.
 public IActionResult Delete(int id)
 {
     var student = studentDB.Students.FirstOrDefault(s => s.Id == id);
     return View(student);
 }
Post delete action
Overloading delete method with post request.[HttpPost, ActionName("Delete")] public IActionResult DeleteConfirmed(int id) { var student = studentDB.Students.FirstOrDefault(s => s.Id == id); studentDB.Students.Remove(student); studentDB.SaveChanges(); return RedirectToAction("Index"); }Edit action
 public IActionResult Edit(int id)
 {
     var student = studentDB.Students.Find(id);
     return View(student);
 }
Post Edit action
 [HttpPost]
 public IActionResult Edit(int id, Student student)
 {
     if(ModelState.IsValid)
     {
         studentDB.Students.Update(student);
         studentDB.SaveChanges();
         return RedirectToAction("Index");
     }
     return View(student);
 }
Visit : blog.1space.dev
Subscribe to my newsletter
Read articles from Sudip Bhandari directly inside your inbox. Subscribe to the newsletter, and don't miss out.
Written by
