AWS EC2 Hands-On | A Step-by-Step Guide
 Divya Mahajan
Table of contents
- Introduction
- Creating Key-Pair
- Launching EC2 Virtual Server
- Step 1. Launching a New Instance
- Step 2. Choose an Amazon Machine Image (AMI)
- Step 3. Choose an Instance Type and Key Pair (login):
- Step 4. Configure network settings and Security Group
- Step 5. Configure Storage
- Step 6. Add User Data Script
- Step 7. Review and Launch
- Step 8. Accessing and Managing Your Instance
- Security Groups
- How to SSH
- EC2 Instance Connect Using AWS Management Console
- Attaching IAM Role to EC2 Instance
Introduction
Amazon Elastic Compute Cloud (EC2) is a fundamental service in Amazon Web Services (AWS) that lets you rent virtual servers for running your applications. Knowing how to use EC2 is crucial for anyone wanting to harness the benefits of cloud computing for their projects or businesses.
This guide will walk you through the essential steps of working with EC2, such as creating key pairs for secure access, launching virtual servers, and managing security groups.
You'll also discover how to SSH into your instances, connect using AWS EC2 Instance Connect, and attach IAM roles for better security and control. By the end of this guide, you'll have a solid grasp of EC2 and feel confident deploying and managing your own cloud infrastructure.
Creating Key-Pair
Step 1. Signing in to AWS Console
Open your web browser and navigate to the AWS Management Console.
Sign in using your AWS account credentials.
Step 2. Accessing EC2 Dashboard
Once logged in, locate the "Services" dropdown menu at the top left corner of the console.
From the dropdown, select "EC2" under the "Compute" category.

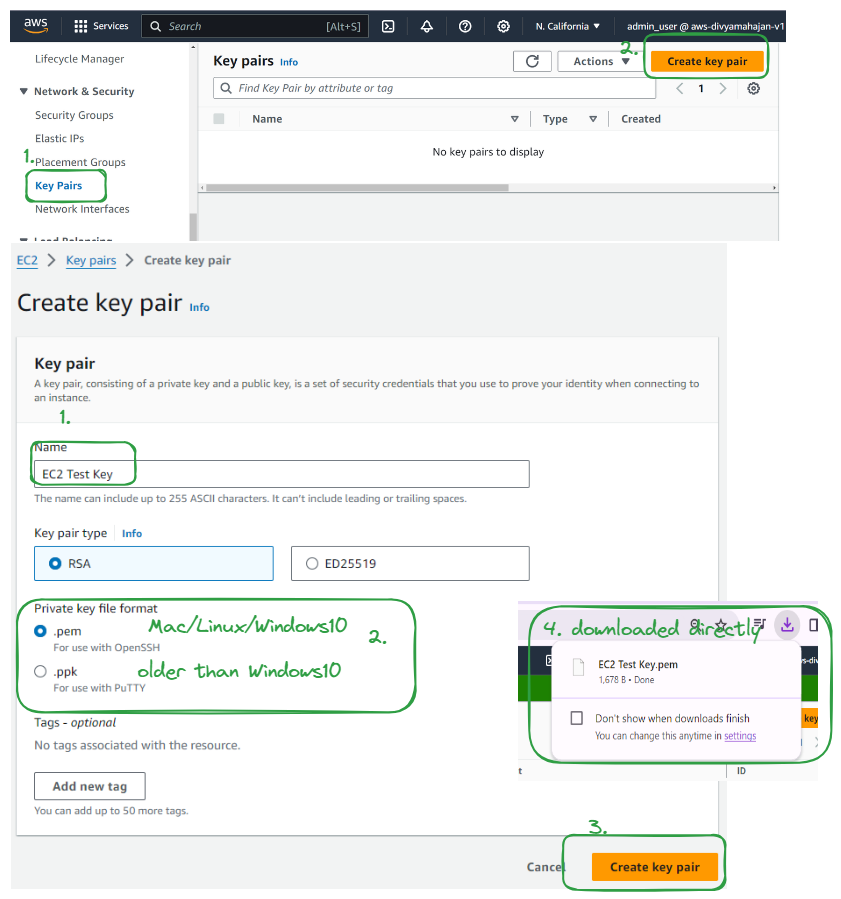
Step 3. Creating a Key Pair
Before launching your instance, you need to create a key pair for secure SSH access.
In the EC2 dashboard, navigate to "Key Pairs" under the "Network & Security" section in the left sidebar.
Click on the "Create Key Pair" button.
Provide a name for your key pair, and select the file format (typically PEM).
Click "Create Key Pair" and save the private key file (.pem) to a secure location. This key will be used to connect to your instance via SSH.
Launching EC2 Virtual Server
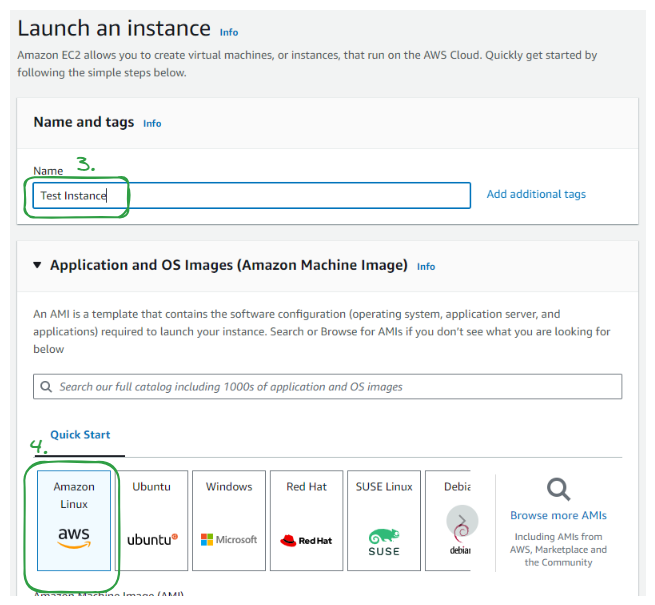
Step 1. Launching a New Instance
In the EC2 dashboard, click on the "Launch Instance" button

Step 2. Choose an Amazon Machine Image (AMI)
Select an appropriate AMI based on your requirements, such as Amazon Linux, Ubuntu, or Windows Server.
Step 3. Choose an Instance Type and Key Pair (login):
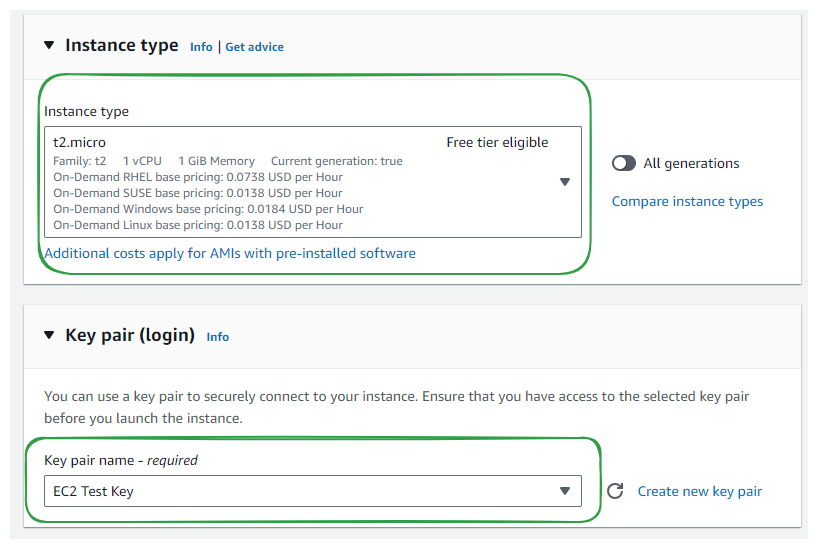
Select the instance type based on your workload requirements (e.g., t2.micro for a basic test). and key pair login from dropdown.
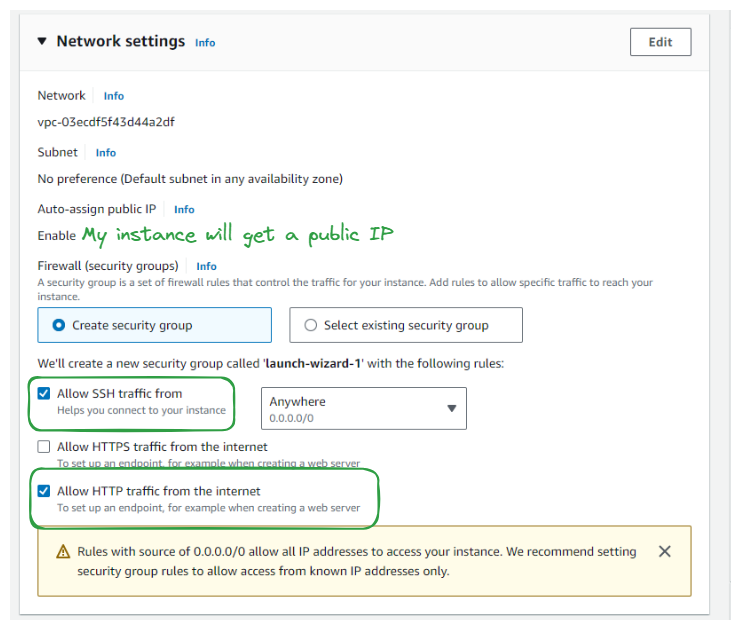
Step 4. Configure network settings and Security Group
Set parameters such about security group and rules for what traffic to allow
Define firewall rules by creating or selecting an existing security group to control traffic to your instance.
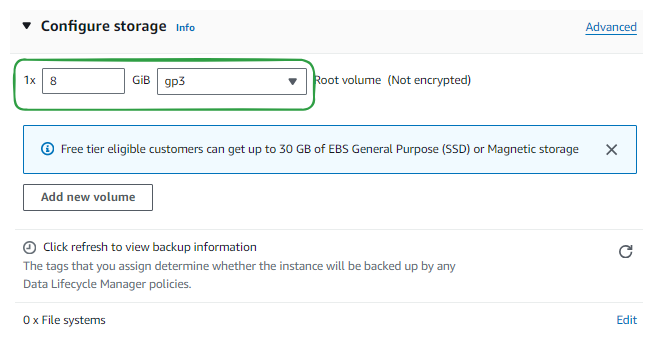
Step 5. Configure Storage
Specify the size and type of storage volume for your instance.
Add Tags: Optionally, add tags to your instance for better organization and management.
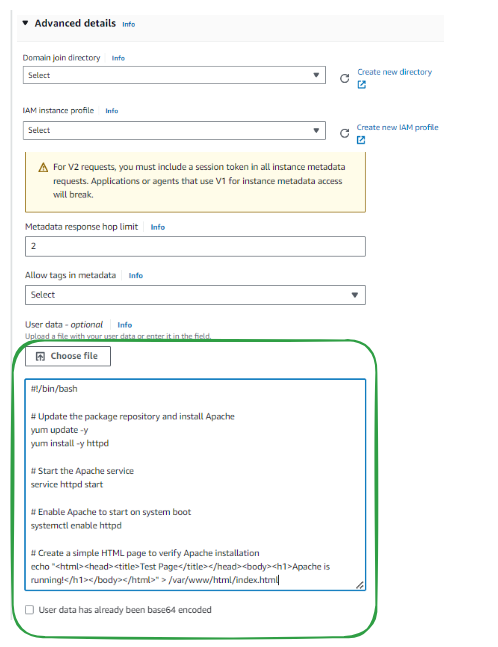
Step 6. Add User Data Script
- Go to Advance Settings and all the way to the bottom paste user Data.
#!/bin/bash

# Update the package repository and install Apache
yum update -y
yum install -y httpd

# Start the Apache service
service httpd start

# Enable Apache to start on system boot
systemctl enable httpd

# Create a simple HTML page to verify Apache installation
echo "<html><head><title>Test Page</title></head><body><h1>Apache is running!</h1></body></html>" > /var/www/html/index.html
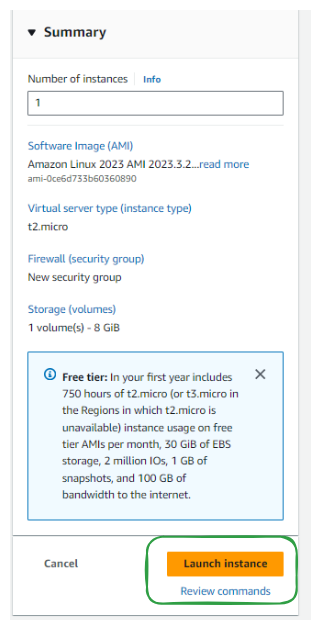
Step 7. Review and Launch
Review Instance Launch: Review the configuration details of your instance.
Click "Launch" to initiate the instance creation process.

Step 8. Accessing and Managing Your Instance
Once your instance is launched, you can monitor its status from the EC2 dashboard.
To access your instance, click on the "Instances" link in the navigation pane, then select your instance from the list.
From here, you can view details about your instance, including its public IP address and status.

To test the running instance go to http://<IP_address> or click of public IP above, just ensure it is http:// and not https://

To start, stop, or terminate your instance:
Start: Select your instance, click on the "Actions" dropdown menu, and choose "Instance State" > "Start".
Stop: Similarly, select your instance, click on the "Actions" dropdown menu, and choose "Instance State" > "Stop".
Terminate: Be cautious as this action will permanently delete your instance and its associated data. Select your instance, click on the "Actions" dropdown menu, and choose "Instance State" > "Terminate". Confirm the termination when prompted.

Note: Once you Stop and restart the server, the public IP changes, though private IP remains the same
Congratulations! You have successfully launched your first virtual server on AWS EC2 and learned how to manage it using the AWS Console. Remember to manage your instances responsibly to avoid unnecessary costs and ensure security
Security Groups
Step 1. Create a New Security Group
In the EC2 dashboard, locate and click on "Security Groups" in the left-hand sidebar under the "Network & Security" section.
Click on the "Create Security Group" button.

Provide a name and description for your security group.
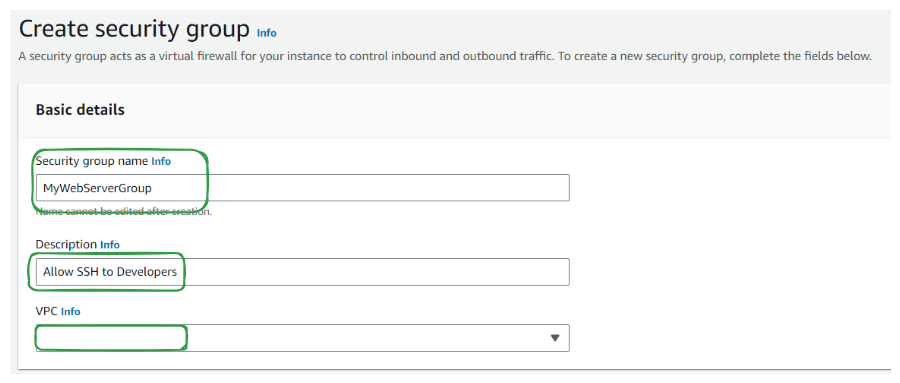
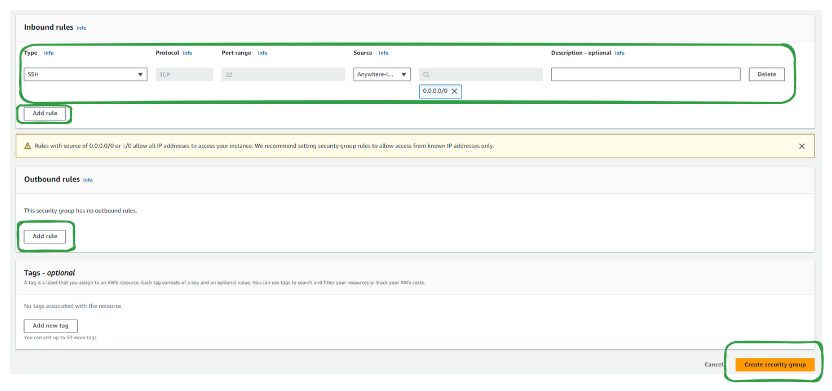
Define inbound and outbound rules based on your requirements. You can specify protocols, ports, and IP ranges for both inbound and outbound traffic.
Click on the "Create" button to create your new security group.
Step 2. Associate Security Group with an Instance
Select the newly created security group from the list.
Click on the "Actions" dropdown menu and choose "Edit inbound rules" or "Edit outbound rules" to modify the rules if needed.
Once satisfied with the rules, navigate to the "Instances" tab in the bottom panel.
Select the instance(s) you want to associate with the security group.
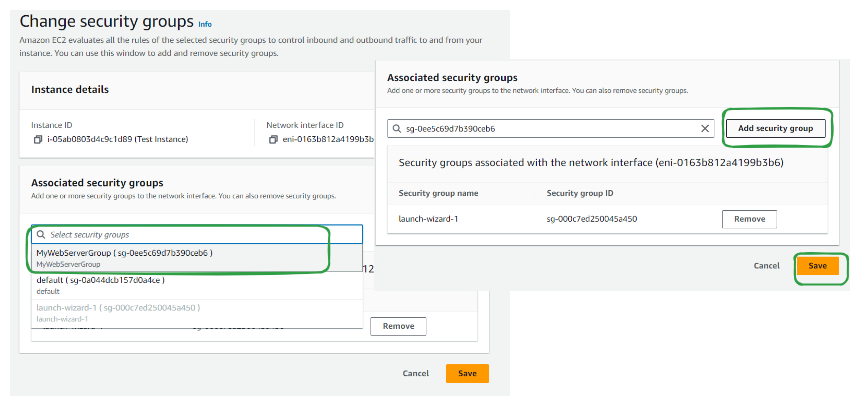
Click on the "Actions" dropdown menu and choose "Security" > "Change Security Groups."

Select and add the newly created security group and click "Save."
Step 3. Test Security Group Configuration:
Access the instance associated with the security group.
Test inbound and outbound connectivity based on the configured rules.
Ensure that traffic is allowed or denied as per your defined rules.
Step 4. Monitor and Manage Security Groups:
Regularly review and update your security group rules as needed.
Utilize AWS CloudTrail and Amazon CloudWatch for monitoring and logging security group activity.
Consider implementing automated processes for managing security groups, such as AWS Lambda functions or AWS Config rules.
Step 5. Delete or Modify Security Groups:
If no longer needed, you can delete security groups by selecting them and clicking on the "Actions" dropdown menu, then choosing "Delete Security Group."
Modify existing security groups by selecting them and clicking on the "Actions" dropdown menu, then choosing "Edit inbound rules" or "Edit outbound rules" to make adjustments.

How to SSH
Step 1. Retrieve Key Pair
If you haven't already, create or select an existing key pair. You may refre to section Creating Key-Pair above
Or follow to download existing key-pair
Select Key Pairs: In the EC2 Dashboard, select "Key Pairs" from the navigation pane under "Network & Security."
Locate Key Pair: You'll see a list of existing key pairs. Locate the key pair associated with your EC2 instance.
Download PEM Key: Select the key pair, and then click the "Download Key Pair" button. This will download the PEM key file (with a
.pemextension) to your local machine.Save the PEM File: Save the downloaded PEM file to a secure location on your computer.
Step 2. Retrieve your Public IP
Locate your EC2 instance: In the EC2 Dashboard, you'll see a list of your instances. Click on the instance for which you want to find the public IP address.
View Public IP: Once you've selected your instance, you should see its details displayed in the lower panel. Look for the "IPv4 Public IP" field. This field will display the public IP address assigned to the EC2 instance.
Copy the Public IP: You can click on the copy icon next to the public IP address to copy it to your clipboard for easy access.

Step 3. Connect via SSH
In security group of your instance, ensure Port 22 is open for SSH

Open your terminal or command prompt.
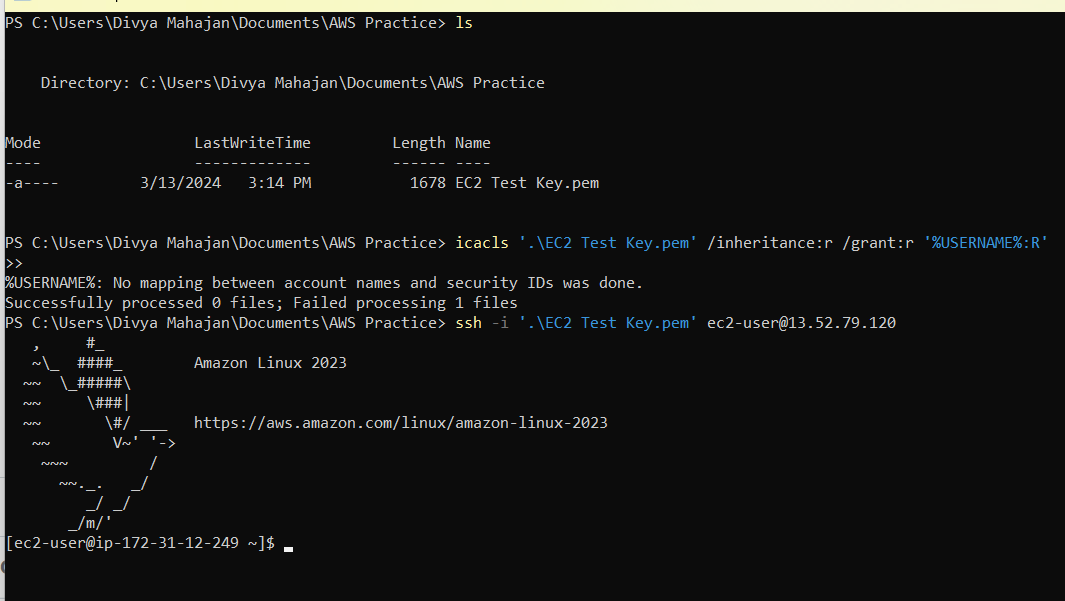
Change the permissions of your private key file to ensure it's secure:
 # Linux
 chmod 400 /path/to/your-key.pem

 # Windows
 icacls /path/to/your-key.pem /inheritance:r /grant:r '%USERNAME%:R'
Connect to your EC2 instance using SSH. Replace
your-key.pemwith the path to your private key file andec2-userwith the appropriate username for your AMI (e.g.,ubuntu,centos,admin, etc.):ssh -i /path/to/your-key.pem ec2-user@your-instance-public-ipIf you're using a custom SSH port (not the default port 22), add the
-pflag followed by the port number.You will be prompted to confirm the connection and authenticate using the private key.
Once authenticated, you will gain access to your EC2 instance via SSH.
Step 4. Disconnect and Exit
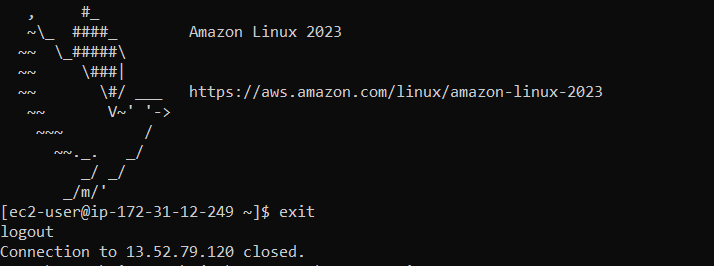
To disconnect from the EC2 instance, simply type:
exitThis will return you to your local terminal/command prompt.
EC2 Instance Connect Using AWS Management Console
Amazon EC2 Instance Connect provides a simple and secure way to connect to your EC2 instances using the AWS Management Console.
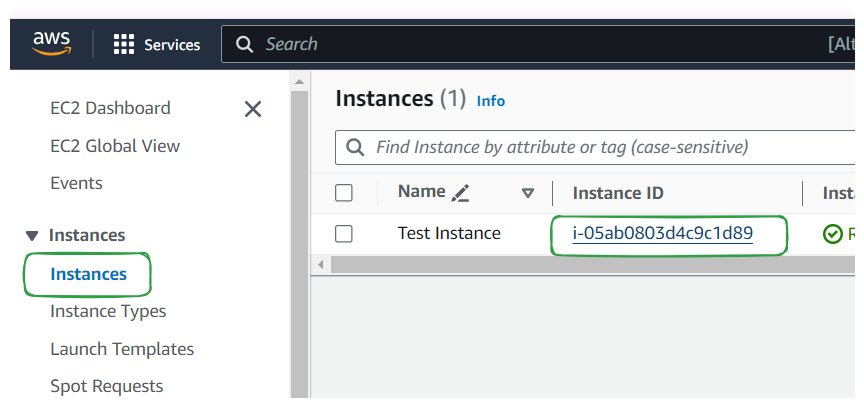
Step 1. Select Your Instance
In the EC2 Dashboard, select the EC2 instance you want to connect to by clicking on its instance ID.
Step 2. Choose "Connect" Option
In the instance details pane, click on the "Connect" button at the top.

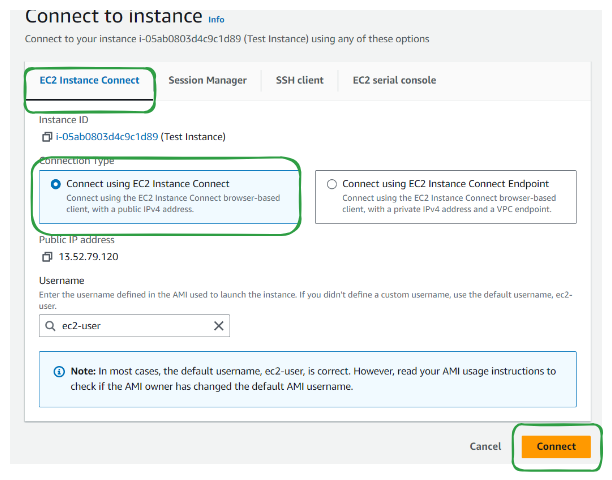
Step 3. Select "Connect using EC2 Instance Connect"
In the connect to instance dialog, select "Connect using EC2 Instance Connect" tab.
Review the connection details and click on the "Connect" button.
Step 4. Access the Instance
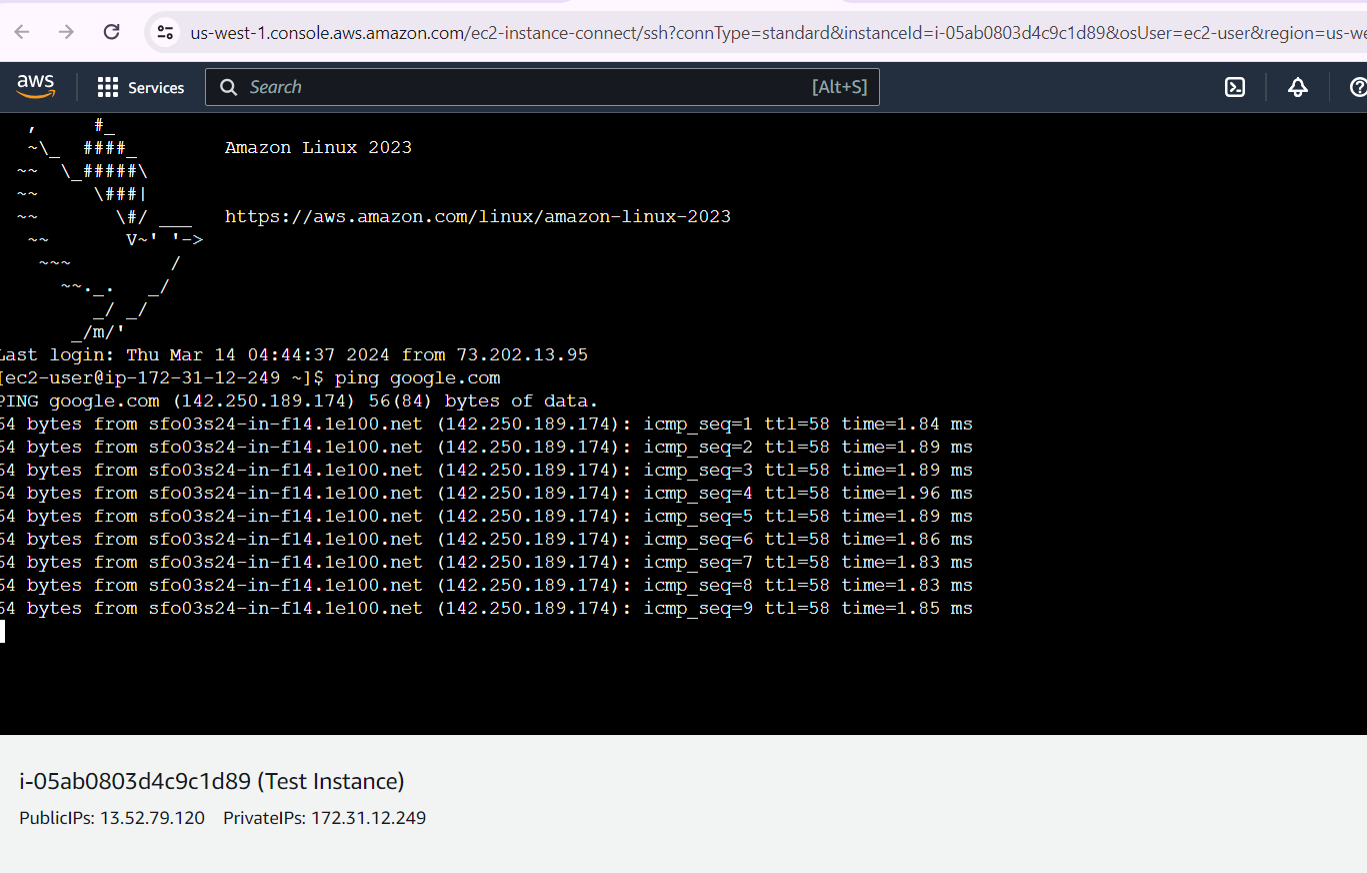
You'll be connected to the EC2 instance using EC2 Instance Connect through your web browser. You can now perform any necessary tasks on the instance using the terminal provided.
Attaching IAM Role to EC2 Instance
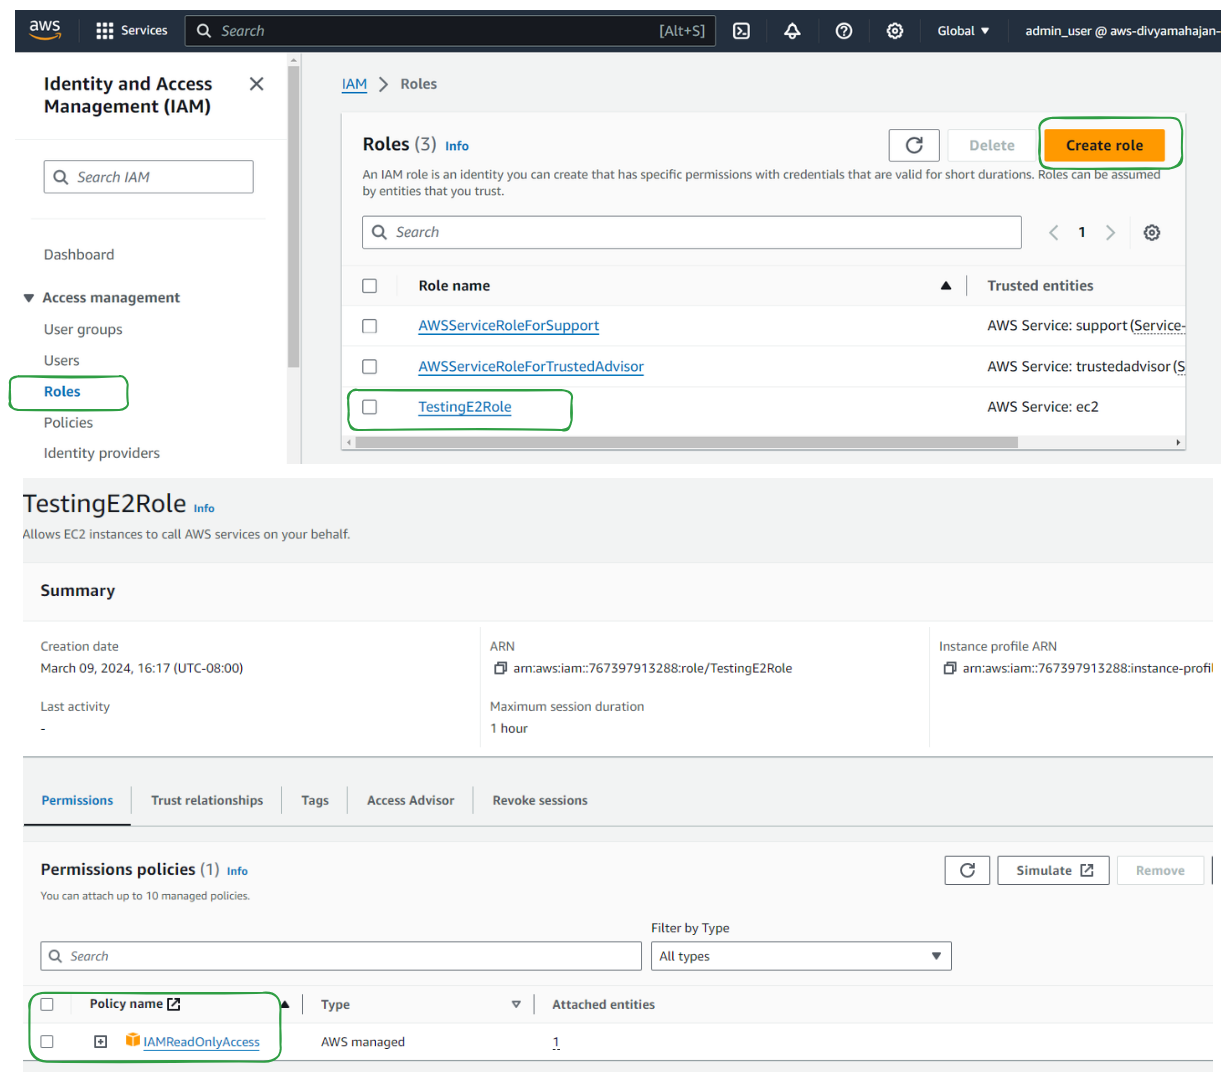
Step 1. Creating or Locating an IAM Role:
If you haven't created IAM roles yet, I recommend checking out the step-by-step guide "AWS IAM: Hands-On | A Step-by-Step Guide" at the link provided: AWS IAM: Hands-On | A Step-by-Step Guide. It offers clear instructions for setting up and using IAM roles effectively.
We creates "TestingE2Role" role with "IAMReadOnly" policy attached and will be using this
Step 2. Navigate to EC2 Instance:
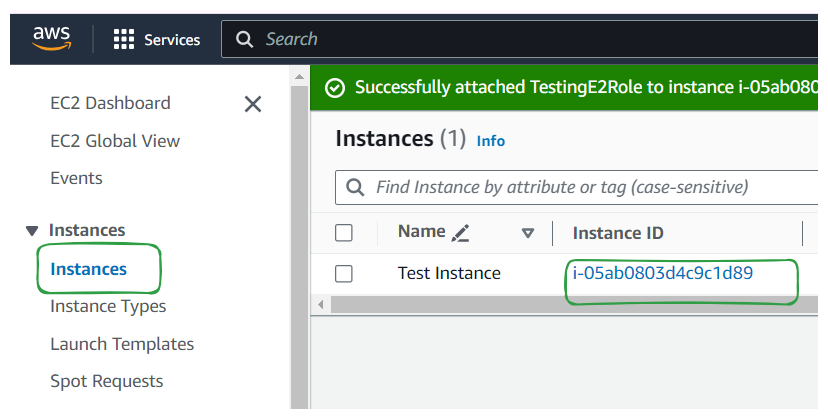
From the services menu, select "EC2" under the "Compute" section.
In the EC2 Dashboard, select the EC2 instance to which you want to attach the IAM role by clicking on its instance ID.
Step 3. Modify Instance IAM Role:
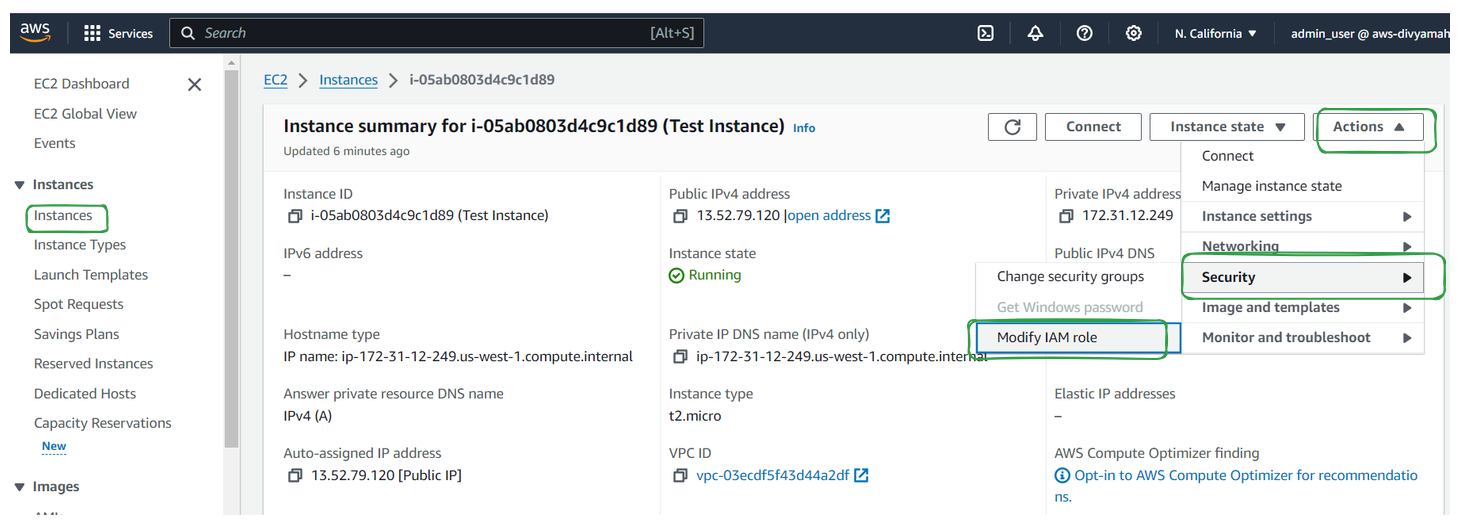
In the instance details pane, click on the "Actions" dropdown menu.
Select "Security" and then click on "Modify IAM role."
Step 4. Attach IAM Role:
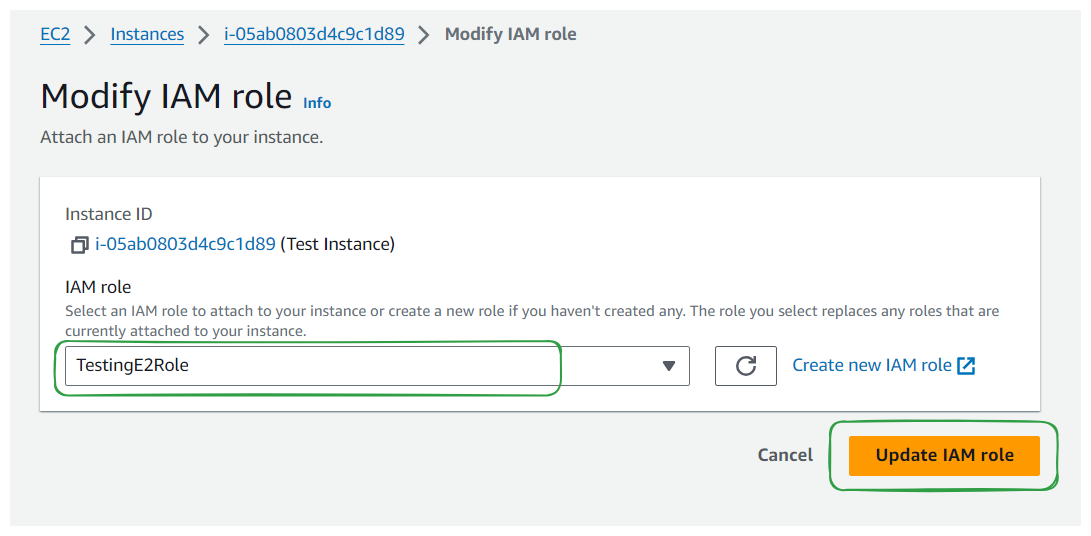
In the "Modify IAM role" dialog, select the IAM role you want to attach to the instance from the dropdown menu.
Click on the "Save" button to attach the IAM role to the EC2 instance.
Step 5. Review and Test
Once the IAM role is attached to the EC2 instance, it will have the permissions associated with that IAM role. Any AWS CLI or SDK commands executed on the EC2 instance will inherit the permissions of the attached IAM role.
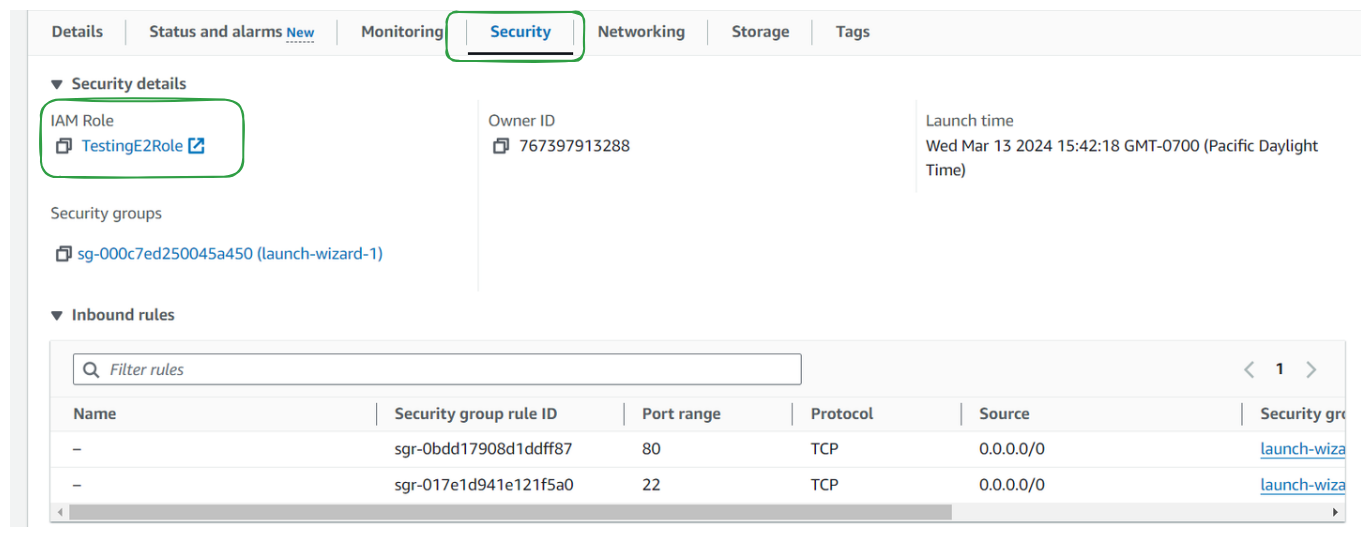
To verify that the IAM role is correctly attached and has the desired permissions, you can run AWS CLI commands or SDK calls from the EC2 instance.
For example in EC2 Instance Connect Using AWS Management Console, you can run the
aws iam list-userscommand to list IAM users and verify that it works as expected.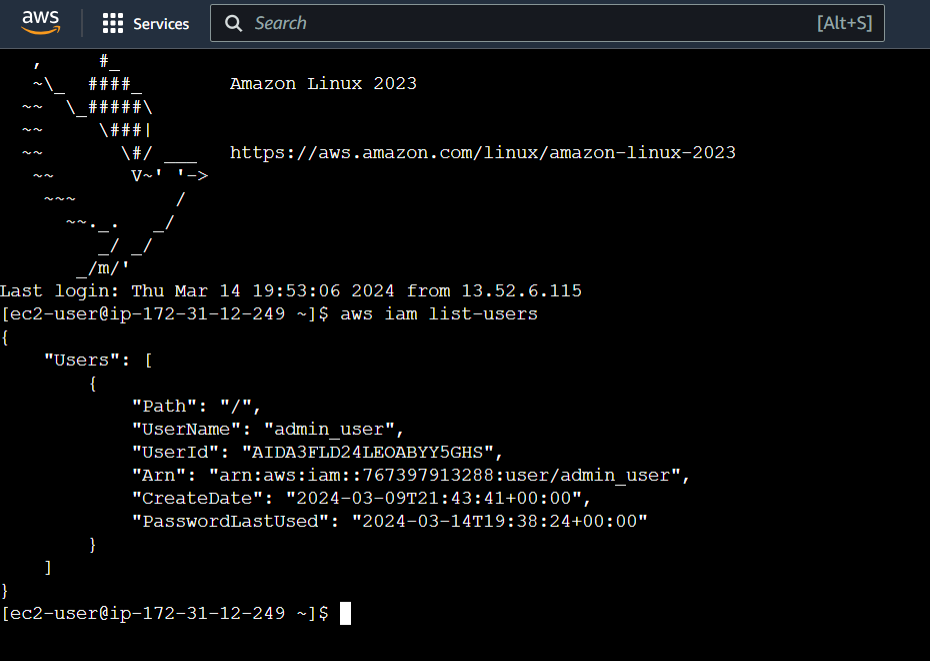
Subscribe to my newsletter
Read articles from Divya Mahajan directly inside your inbox. Subscribe to the newsletter, and don't miss out.
Written by

Divya Mahajan
Divya Mahajan
Experienced Technical developer with 6+ years' global collaboration. Proficient in Python, Go, React, Next.js, Django, various databases, Cloud & DevOps (AWS EC2, Docker, Kubernetes), and Big Data tools. Skilled in data structures and algorithm, API development, and end-to-end software engineering. Excels in back-end development, front-end design, Root Cause Analysis, and product management to deliver superior user experiences. Holds a master’s degree in computer engineering.