Build and Send Emails Using React and TypeScript
 Sachin Chaurasiya
Emails are widely used for communication, whether it's expressing thoughts, sharing product information, sending content to newsletter subscribers, sharing event details, and more.
Crafting and sending emails isn't straightforward. You have to design templates for various emails using an old-fashioned table structure, which can make emails less intuitive. Additionally, you need to set up a server to send emails, and there are other issues like emails ending up in spam folders or being blocked by the recipient's service.
But don't worry, in this article, we'll explore how to create and send emails using React and TypeScript. Exciting, isn't it? Let's dive in!
React can't send emails on its own. So, we'll use Resend, a great tool for sending emails. We'll also use React Email to make our email designs look really good.
We'll make a simple Contact Us form. Then, we'll design an email layout just for that form. Lastly, we'll set it up so that when someone fills out the contact form, an email gets sent.
Setup Project
We will use Next.js for scaffolding our project, so please run the following command in your terminal.
Make sure you have Node installed, version 18.18.2 or higher.
# yarn
npx create-next-app@latest build-send-emails-react-typescript

# navigate to project folder
cd build-send-emails-react-typescript

Resend and React Email
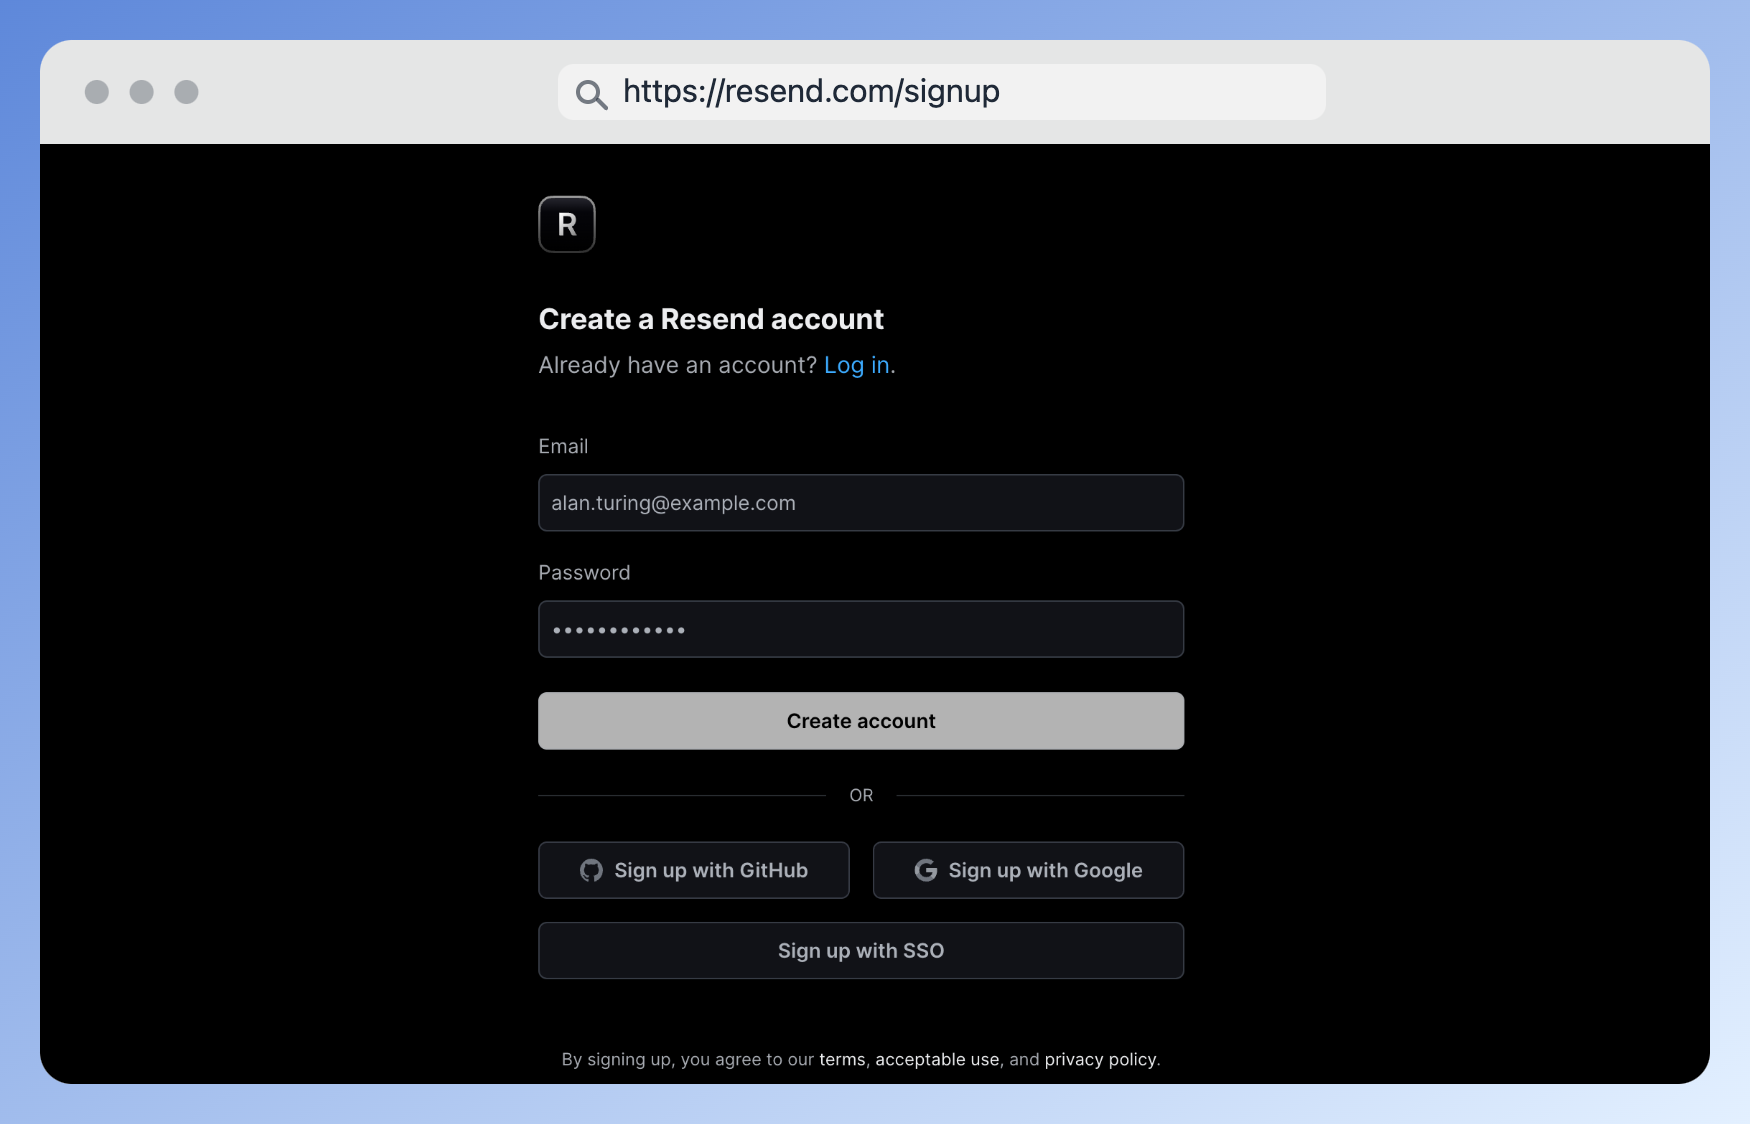
Sign up for a free account on Resend and get your API keys.
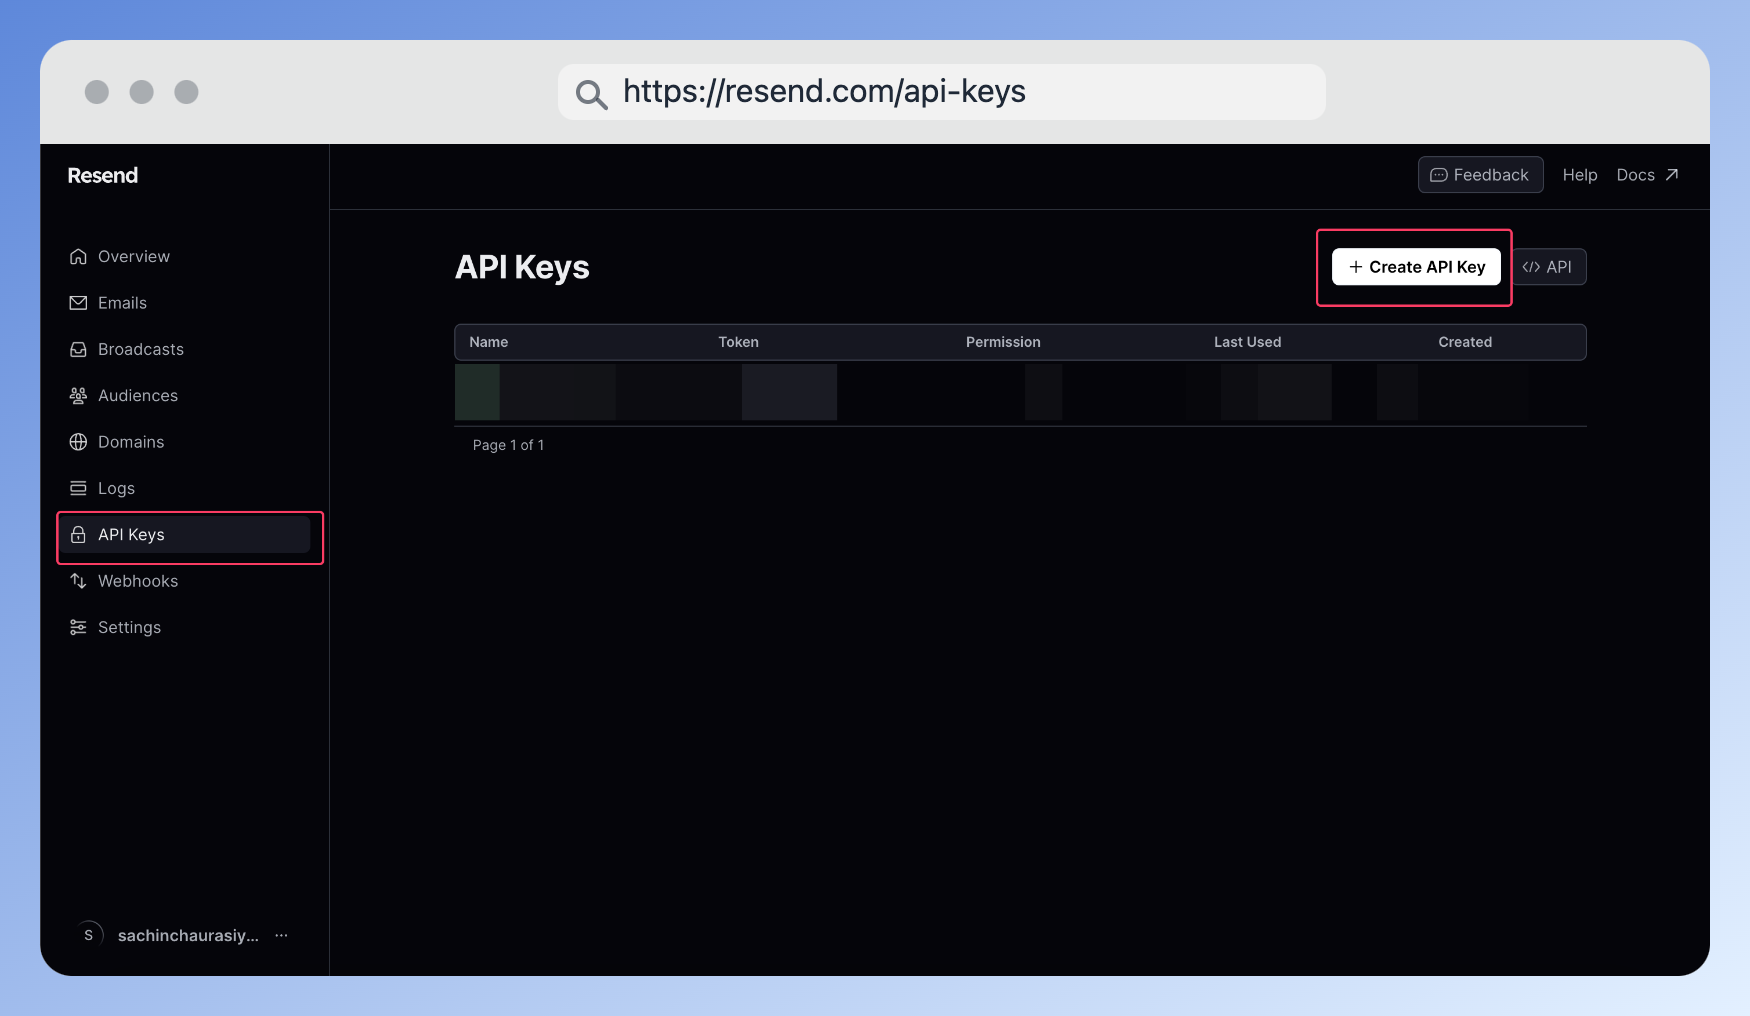
After you sign up, go to the API keys on the left side of the screen. Then, create a new API key and copy it.
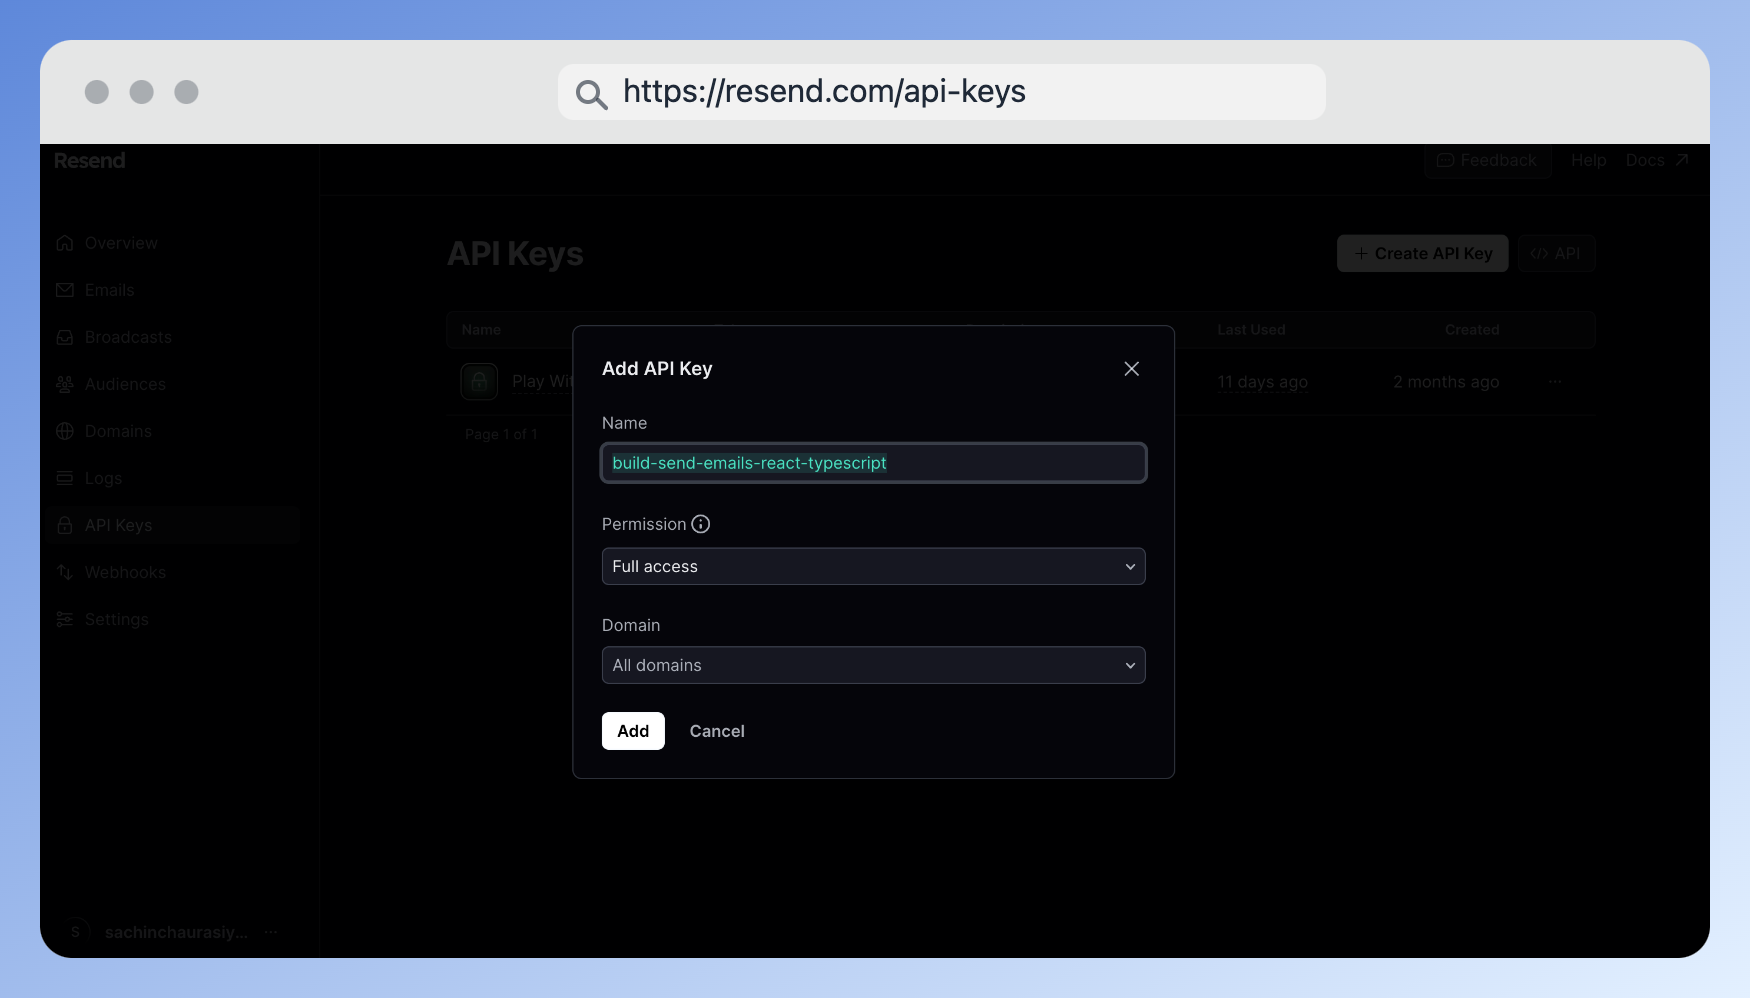
I named it build-send-emails-react-typescript , but you can choose any name you like. It's totally up to you!
Create .env file in the project root folder and add your API key.
RESEND_API_KEY=XXX-XXX-XXX
Install the Resend Node.js SDK.
yarn add resend
Then, install React Email and React Email Components.
yarn add react-email @react-email/components -E
Great, we've set up our project! Next, we'll create a template for an email that we will send to users when they fill out the Contact Us form.
Email Template
Create a file emails/contact-us.tsx in the src folder. Then, copy and paste the code provided below into that file.
import {
  Body,
  Container,
  Head,
  Html,
  Markdown,
  Preview,
  Text,
} from '@react-email/components';
import { CSSProperties } from 'react';

interface ContactUsEmailProps {
  name: string;
  email: string;
  message: string;
}

export const ContactUsEmail = ({
  name,
  email,
  message,
}: ContactUsEmailProps) => (
  <Html>
    <Head />
    <Preview>Thanks for contacting us {name}!</Preview>
    <Body style={main}>
      <Container style={container}>
        <Text style={paragraph}>Hi {name},</Text>
        <Text style={paragraph}>We have received your message</Text>
        <Markdown
          markdownContainerStyles={{
            boxShadow: '0 0 10px rgba(0, 0, 0, 0.05)',
            borderRadius: '8px',
            padding: '20px',
            backgroundColor: '#f3f4f6',
            border: '1px solid #e5e7eb',
          }}
        >
          {message}
        </Markdown>
        <Text style={paragraph}>
          We will get back to you as soon as possible at {email}.
        </Text>
      </Container>
    </Body>
  </Html>
);

const main: CSSProperties = {
  backgroundColor: '#ffffff',
  borderRadius: '8px',
  border: '1px solid #e5e7eb',
  boxShadow: '0 0 10px rgba(0, 0, 0, 0.05)',
  fontFamily:
    '-apple-system,BlinkMacSystemFont,"Segoe UI",Roboto,Oxygen-Sans,Ubuntu,Cantarell,"Helvetica Neue",sans-serif',
};

const container: CSSProperties = {
  margin: '0 auto',
  padding: '20px 0 48px',
};

const paragraph: CSSProperties = {
  fontSize: '16px',
  lineHeight: '26px',
};
In this code, we're using components from a react-email to design our email template.
This text will show up in the recipient's inbox.
<Preview>Thanks for contacting us {name}!</Preview>
We're allowing markdown for the message, so we're using a component called Markdown from react-email.
<Markdown
          markdownContainerStyles={{
            boxShadow: '0 0 10px rgba(0, 0, 0, 0.05)',
            borderRadius: '8px',
            padding: '20px',
            backgroundColor: '#f3f4f6',
            border: '1px solid #e5e7eb',
          }}
        >
          {message}
        </Markdown>
Alright, we have created the email template for our form. In the next section, we will create an API route for sending emails.
API Route For Sending Email
Create a file api/email/route.ts in the src/app folder. Then, copy and paste the code provided below into that file.
import { Resend } from 'resend';
import * as React from 'react';
import { ContactUsEmail } from '../../../emails/contact-us';

const resend = new Resend(process.env.RESEND_API_KEY);

export async function POST(req: Request) {
  const payload = await req.json();

  try {
    const { data, error } = await resend.emails.send({
      from: 'your-email@domain.com',
      to: payload.email,
      subject: `Thank you for contacting us, ${payload.name}`,
      react: ContactUsEmail(payload),
    });

    if (error) {
      return Response.json({ error });
    }

    return Response.json({ data });
  } catch (error) {
    return Response.json({ error });
  }
}
This will create the resend instance which will have all the helper methods to send email.
const resend = new Resend(process.env.RESEND_API_KEY);
Next, we have a POST function to handle the POST request on the api/email route.
export async function POST(req: Request) {
  const payload = await req.json();
  ...
}
This code manages everything needed to send an email. It specifies:
from: Your email address, from which the email will be sent.to: The recipient's email address.subject: The subject of the email.react: The React component we previously created.
const { data, error } = await resend.emails.send({
      from: 'your-email@domain.com',
      to: payload.email,
      subject: `Thank you for contacting us, ${payload.name}`,
      react: ContactUsEmail(payload),
    });
To test the form, you can use the testing domain provided by Resend in the "from" field, which is onboarding@resend.dev. However, it will only allow sending emails to the email address linked with your Resend account.
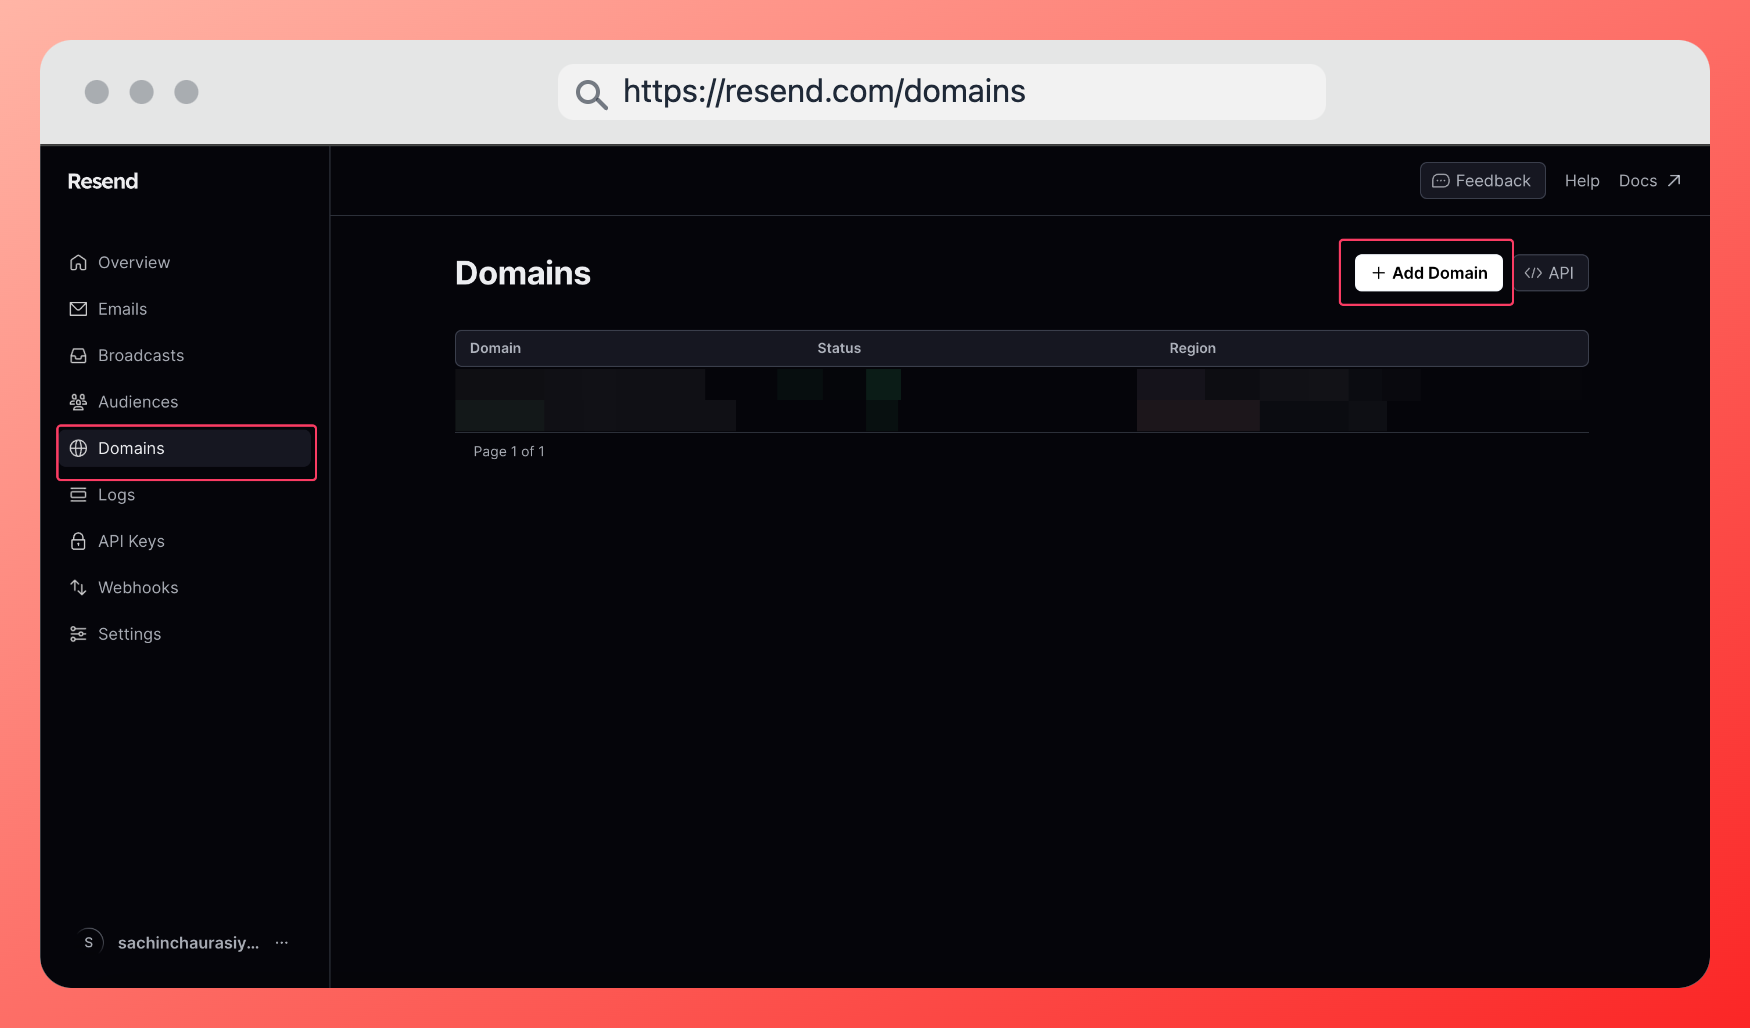
Resend offers the option to set up your domain for sending emails to any email address. You can do this by going to the Domains section in the left-side menu.
Awesome, we've set up the API route for sending emails! Next, we'll create a Contact Us form and style it using Tailwind CSS to make it look nice.
Contact Us Form
We'll make a super simple form with just three fields:
name
email
message.
Create a components/contact-us.tsx file inside the src directory and add the following code.
'use client';

import React, { useState } from 'react';

interface FormState {
  name: string;
  email: string;
  message: string;
}

const ContactUs: React.FC = () => {
  const [formState, setFormState] = useState<FormState>({
    name: '',
    email: '',
    message: '',
  });
  const [errors, setErrors] = useState<FormState>({
    name: '',
    email: '',
    message: '',
  });

  const [isSubmitting, setIsSubmitting] = useState(false);

  const validateEmail = (email: string) => {
    const re = /\S+@\S+\.\S+/;
    return re.test(email);
  };

  const handleChange = (
    e: React.ChangeEvent<HTMLInputElement | HTMLTextAreaElement>
  ) => {
    setFormState({ ...formState, [e.target.name]: e.target.value });
  };

  const handleSubmit = async (e: React.FormEvent) => {
    e.preventDefault();

    try {
      setIsSubmitting(true);
      const errors = { name: '', email: '', message: '' };

      if (formState.name === '') {
        errors.name = 'Name is required';
      }

      if (formState.email === '' || !validateEmail(formState.email)) {
        errors.email = 'Valid email is required';
      }

      if (formState.message === '') {
        errors.message = 'Message is required';
      }

      setErrors(errors);

      if (!errors.name && !errors.email && !errors.message) {
         await fetch('/api/email', {
          method: 'POST',
          headers: {
            'Content-Type': 'application/json',
          },
          body: JSON.stringify(formState),
        });
        setFormState({ name: '', email: '', message: '' });
      }
    } catch (error) {
      // handle error here
    } finally {
      setIsSubmitting(false);
    }
  };

  return (
    <form
      className="flex flex-col gap-4 justify-center"
      onSubmit={handleSubmit}
    >
      <div className="flex flex-col gap-1">
        <input
          className="w-full rounded-md border-2 border-slate-300 px-2 py-1 outline-purple-500"
          type="text"
          name="name"
          value={formState.name}
          onChange={handleChange}
          placeholder="Name"
        />
        {errors.name && <p className="text-sm text-red-400">{errors.name}</p>}
      </div>

      <div className="flex flex-col gap-1">
        <input
          className="w-full rounded-md border-2 border-slate-300 px-2 py-1 outline-purple-500"
          type="email"
          name="email"
          value={formState.email}
          onChange={handleChange}
          placeholder="Email"
        />
        {errors.email && <p className="text-sm text-red-400">{errors.email}</p>}
      </div>

      <div className="flex flex-col gap-1">
        <textarea
          className="w-full rounded-md border-2 border-slate-300 px-2 py-1 outline-purple-500"
          name="message"
          value={formState.message}
          onChange={handleChange}
          placeholder="Message"
          rows={6}
        />
        {errors.message && (
          <p className="text-sm text-red-400">{errors.message}</p>
        )}
      </div>

      <button
        disabled={isSubmitting}
        className="rounded-md bg-purple-500 text-white px-2 py-1 block"
        type="submit"
      >
        {isSubmitting ? 'Submitting...' : 'Submit'}
      </button>
    </form>
  );
};

export default ContactUs;
This code sets up a basic Contact Us form with validation. When the user submits the form, it first checks if the data entered is valid. If everything looks good, it then sends an email to the user by making an API call.
await fetch('/api/email', {
          method: 'POST',
          headers: {
            'Content-Type': 'application/json',
          },
          body: JSON.stringify(formState),
 });
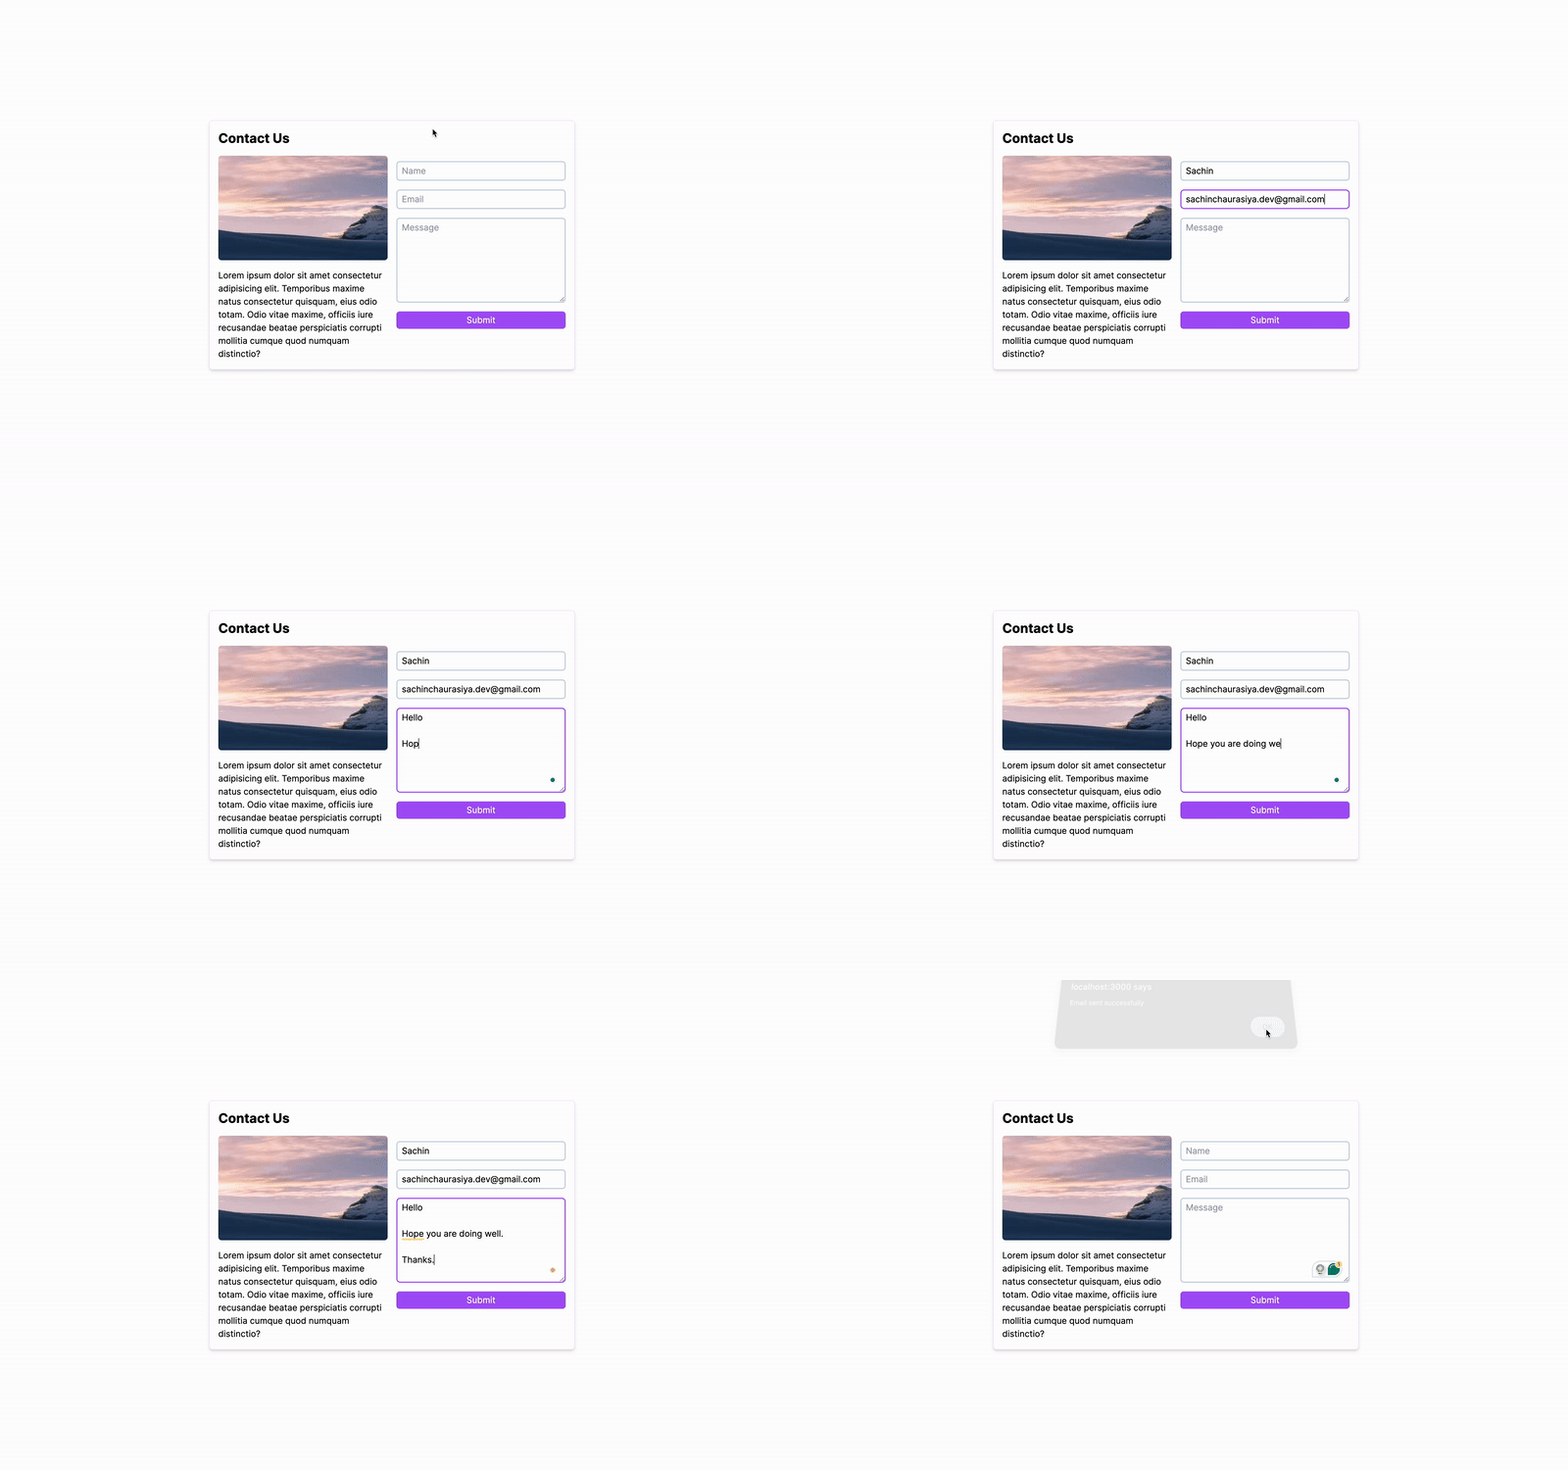
To see the demo, let's submit the form. Start the server and go to http://localhost:3000/ in your web browser.
yarn run dev
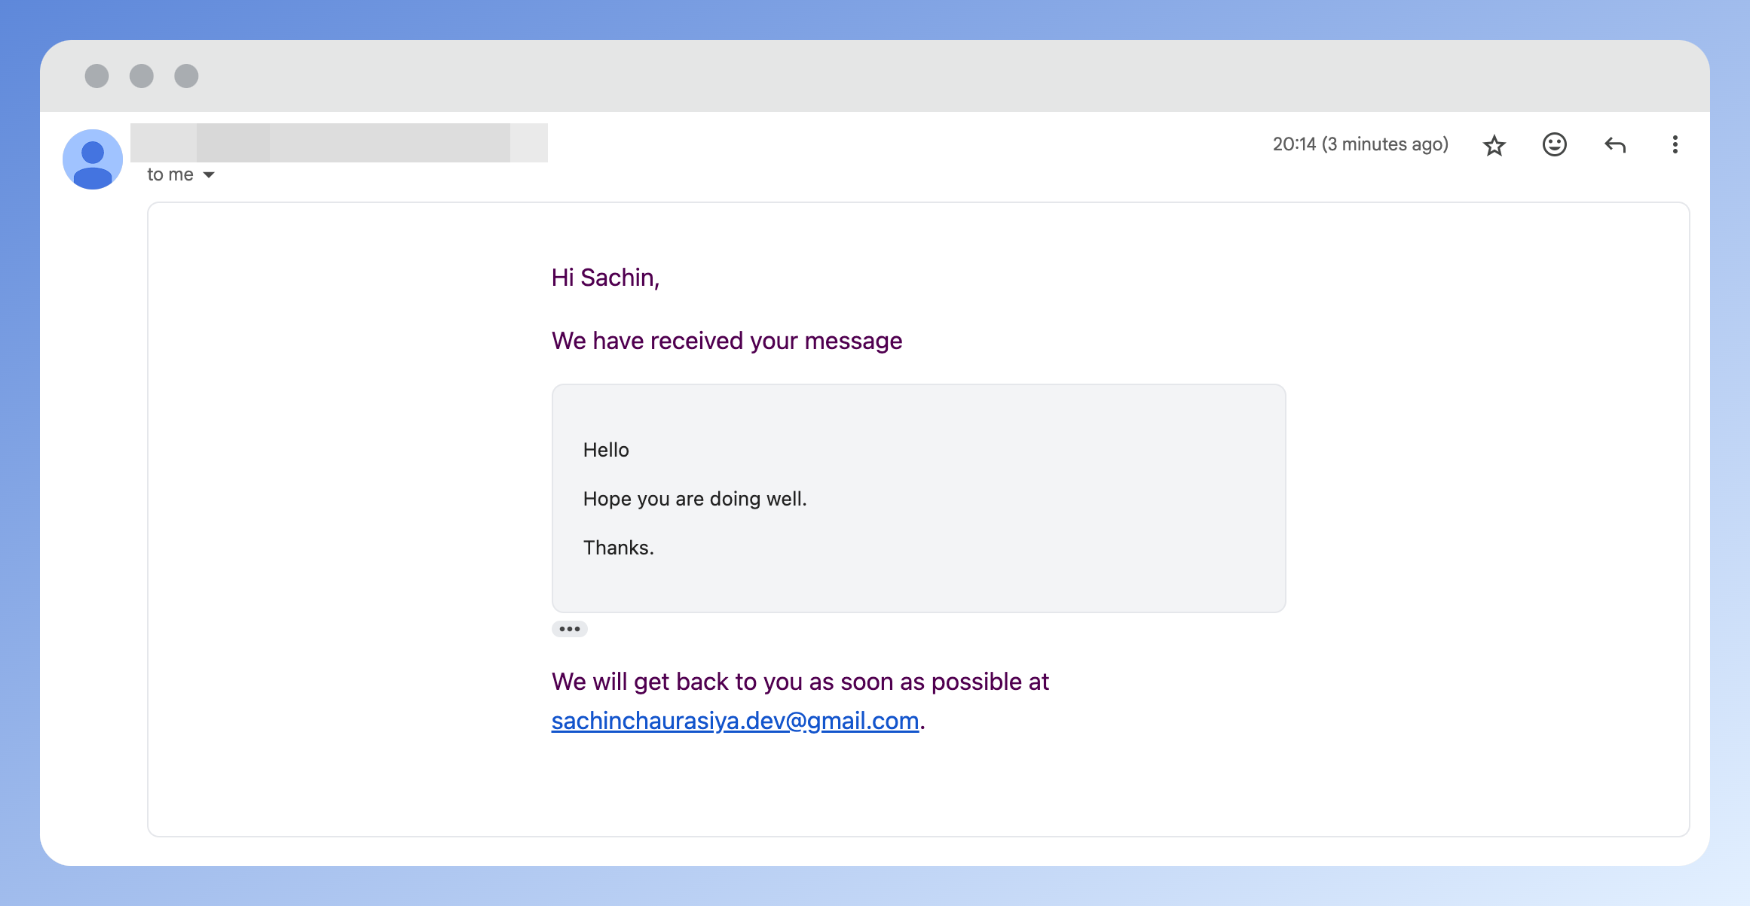
Here's an example of an email that has been sent.
Conclusion
We created a basic Contact Us form and incorporated Resend and React Email to send emails using only React and TypeScript.
You can experiment with creating more user-friendly templates using other components provided by react-email, such as images, headings, buttons, code blocks, and more.
That's all for this topic. Thank you for reading! If you found this article helpful, please consider liking, commenting, and sharing it with others.
Resources
Connect with me
Subscribe to my newsletter
Read articles from Sachin Chaurasiya directly inside your inbox. Subscribe to the newsletter, and don't miss out.
Written by

Sachin Chaurasiya
Sachin Chaurasiya
Hi there 👋, I’m Sachin Chaurasiya, a software engineer with over 4 years of experience in building scalable, performant, and user-centric products. I enjoy solving challenging problems and creating products that make a difference for users. Collaboration is a big part of my work. I’ve worked closely with designers, backend engineers, and other teams to deliver solutions that are efficient and easy to use. I also enjoy mentoring and guiding other engineers to help them grow in their careers. I believe in taking ownership of my work and always strive to go the extra mile to ensure high-quality results. Beyond work, I love sharing knowledge through writing technical blogs and contributing to open-source projects, and I am currently contributing to OpenMetadata and ReactPlay. If you’re looking for someone who’s passionate about building impactful products and working as part of a team, let’s connect and create something amazing together. You can reach me at sachinchaurasiya.dev@gmail.com.