Building your first FAAS with Wasm
 Etienne ANNE
Welcome back to Wasm ecosystem ! Today we're going to build a FAAS (Function as a service) using our reverse proxy Otoroshi and the capabilities of WebAssembly.
Function as a service (FaaS) is a cloud-computing service that allows customers to run code in response to events, without managing the complex infrastructure typically associated with building and launching microservices applications.
Many FAAS platforms were already in existence, and their numbers have only increased, particularly with the rise of WebAssembly (Wasm) within cloud service providers.
Over the past few years and with the advent of WebAssembly, FAAS providers leveraged Wasm to allow users to run any type of code. This shift isn't solely due to the flexibility Wasm offers but also because of its robust security features. By operating within a sandboxed environment, Wasm fundamentally transforms the landscape for providers. They can execute user code with enhanced security measures, ensuring airtight protection against vulnerabilities, while also finely controlling user capabilities.
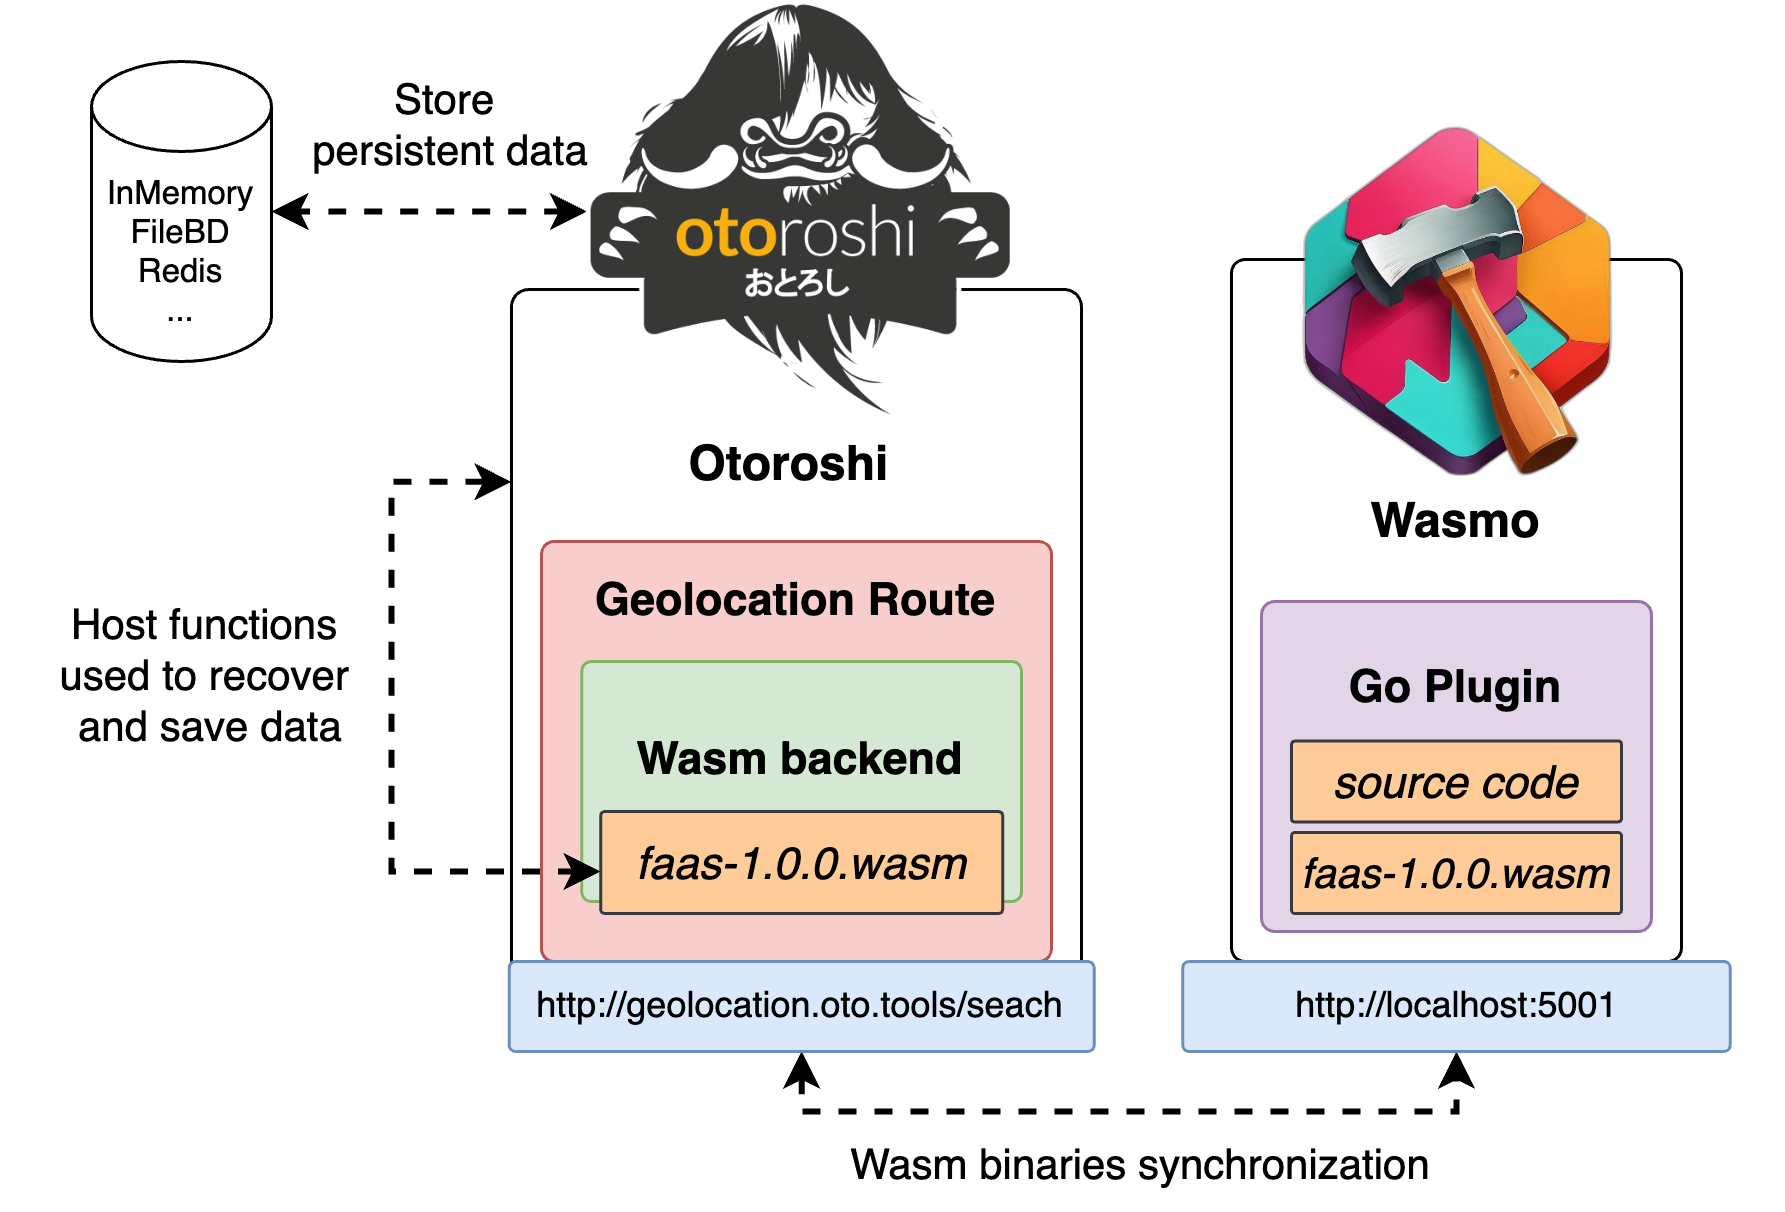
So for this article and our FAAS, let's create a Geolocation service with a straightforward objective: fetching addresses from the French Government Geolocation service using WebAssembly (Wasm) and storing data in Otoroshi for caching.
We will proceed by :
Creating an Otoroshi Route with
/searchdesignated as the frontend URLIncorporating a Wasm backend plugin designed specifically for execution solely upon
/searchrequestsDeveloping our Wasm binary via Wasmo, incorporating a call to the French Government Geolocation service for address retrieval
Employing Host Functions facilitated by Otoroshi to cache information at runtime within the Wasm binaries
The outcome will appear as depicted in the following schema.

Our Geolocation service using Go
Let's start by writing our module using Go
go mod init faas
Creating package and importing all needed packages
package main

import (
    "io"
    "log"
    "net/http"
)
We can now create the global addresses cache
var addressesCache = make(map[string]string)
And start writing the function to fetch and retrieve information from the geolocation service.
func GetAddress(search string) (string, error) {
    log.Println("call geolocation service")

    resp, err := http.Get("https://api-adresse.data.gouv.fr/search/?q=" + search)
    if err != nil {
        return "", err
    }

    body, err := io.ReadAll(resp.Body)
    if err != nil {
        return "", err
    }

    return string(body), nil
}
The implementation is quite simple: we only need to invoke the https://api-adresse.data.gouv.fr/search/?q= endpoint with the address we intend to search for.
Now that the function for accessing this endpoint is ready, our next step involves incorporating a cache lookup mechanism. Initially, we'll check the cache for the requested address data. Should the data not be present in the cache, we'll proceed to invoke the GetAddress function to retrieve it, subsequently storing the obtained result in our cache.
func GetCompleteAddress(search string) (string, error) {
    if cachedAddress, found := addressesCache[search]; found {
        log.Println("using cache")
        return cachedAddress, nil
    } else {
        address, err := GetAddress(search)

        if err != nil {
            return "", err
        }

        addressesCache[search] = address

        return address, nil
    }
}
Let's add the main function that call our GetCompleteAddress and run it by executing go run main.go
func main() {
    log.Println(GetCompleteAddress("200+avenue+Salvador+Allende+79000"))
}
// go run main.go
{
    "label": "200 Avenue Salvador Allende 79000 Niort",
    "score": 0.9678663636363636,
    "housenumber": "200",
    "postcode": "79000",
    "x": 431952.32,
    "y": 6587277.49,
    "city": "Niort"
}
Compile our Go code to Wasm Binary
In previous articles, we've discussed Wasm and Otoroshi. A convenient solution is to utilize the comprehensive tool Wasmo which integrates all necessary processes for building Wasm that's compatible with Otoroshi.
Let's update our code to fit the structure of a Wasm plugin in Go.
The structure utilized isn't the sole method for generating a Wasm from Go code.But in our case, it will be used to fit the Extism and Otoroshi requirements.
Let's start by importing two packages : the first one to include Extism functions, required to execute Wasm binary in Otoroshi, and the second to manipulate JSON objects named jsonparser.
import (
    "github.com/extism/go-pdk"
    "github.com/buger/jsonparser"
)
Then we can remove all lines of our main function. We will directly call the GetCompleteAddress.
func main() {}
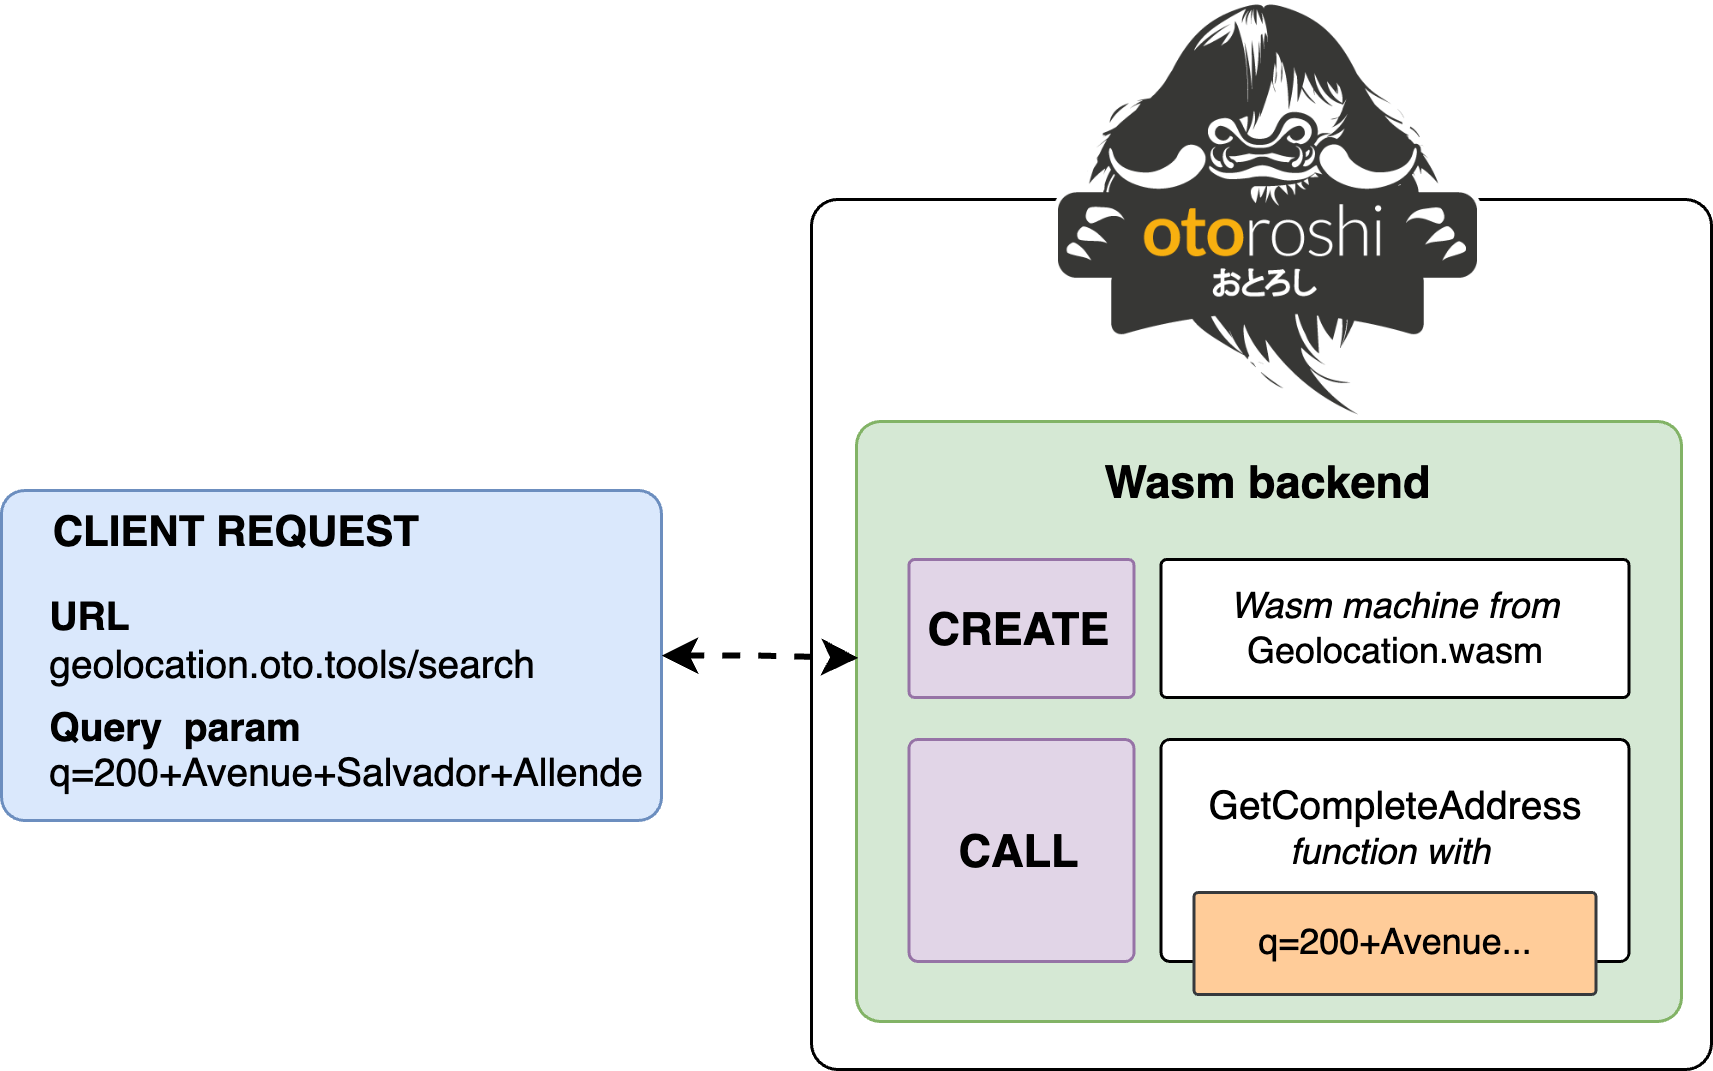
Talking about GetCompleteAddress, let's update its signature to none parameter and an int32 as return type. It is a requirement of Extism for each declared function. It's fine, but now we have to find a way to read the search input. This parameter will come from Otoroshi when the Wasm plugin will be execute. It should correspond to the following diagram.

Wasm Hosts and Guests can only communicate using linear memories. So let's retrieve our search input from the memory using pdk.Input() Extism helper.
func GetCompleteAddress() (string, error) {
    input := pdk.Input()

    var value, dataType, offset, err = jsonparser.Get([]byte(input), "request", "query", "q")

    _ = dataType
    _ = offset

    if err != nil {
        mem := pdk.AllocateString(`{
          status: 400,
          error: {\"error\": \"missing query param q\"}
        }`)
        pdk.OutputMemory(mem)
        return 0
    }
// ...
The incoming input, conveyed as a JSON string dispatched by Otoroshi, encompasses the request information alongside our q query parameter. This JSON string encapsulates the necessary data for processing the address search query.
We need of two more changes before building our WebAssembly binary.
Similarly, as we read the input, we need to write our result into the linear memory to enable Otoroshi to read it.
So let's edit the end of our function by calling pdk.AllocateString and pdk.OutputMemory helpers.
func GetCompleteAddress() (string, error) {
//   ...

    output = `{
      status: 200,
      body_json: ` + output_address + `
    }`

    mem := pdk.AllocateString(output)
    pdk.OutputMemory(mem)
}
We wrapped the result into a JSON object as Otoroshi expected it.
Our GetCompleteAddress function is ready. The last thing is to edit the GetAddress function to use the supported Extism http client.
func GetAddress(search string) (string, error) {
    req := pdk.NewHTTPRequest(pdk.MethodGet, "https://api-adresse.data.gouv.fr/search/?q="+search)
    req.SetHeader("q", search)
    res := req.Send()

    if res.Status() != 200 {
        return "", errors.New("Failed fetching address with given input")
    }

    body := res.Body()

    return string(body), nil
}
This initial version of our plugin is indeed functional. However, it relies on the assumption that Wasm machines in Otoroshi are not erased after each execution. Consequently, the memory of the plugin can only be safely used for a short duration of time.
To address this issue, let's implement a solution that leverages the cache of Otoroshi.
Leveraging Otoroshi Storage for Wasm
Let's talk about the requirements for storing cached data within Otoroshi.
In the Otoroshi Wasm integration, several aspects warrant discussion between the Wasm binary (referred to as Guest) and Otoroshi (commonly termed Host). Within the WebAssembly ecosystem, this interaction between Host and Guest occurs by furnishing a predefined list of Host functions at the inception of the Wasm machine. Subsequently, once the machine is initiated, these Host functions become accessible within the Wasm environment.
The available Otoroshi Host Functions that you can use are concern
access wasi and http resources
access otoroshi internal state, configuration or static configuration
access plugin scoped in-memory key/value storage
access global in-memory key/value storage
access plugin scoped persistent key/value storage
access global persistent key/value storage
For our use case, we only need to access plugin scoped persistent storage. This key/value storage will replace our addressesCache map.
Let's define the two imports in our module
//export proxy_plugin_map_set
func _ProxyPluginMapSet(context uint64, contextSize uint64) uint64
//export proxy_plugin_map_get
func _ProxyPluginMapGet(context uint64, contextSize uint64) uint64
These signatures of functions enable us to read and write the map of key/value pairs. Defining the function at the top of our plugin is required by the WebAssembly. The runtime will utilize it to verify if, at the start, the imports are provided by Otoroshi.
Let's encapsulate these two functions with two additional functions to simplify the calls to these functions. Indeed, our primary goal is to consistently access values by their corresponding keys and modify the map by providing key/value pairs. We aim to avoid directly manipulating pointers and bytes each time, seeking a more straightforward approach.
func AddNewValueToCache(key string, value string) {
    context := []byte(`{
    "key": "` + key + `",
    "value": ` + value + `
  }`)

    _ProxyPluginMapSet(ByteArrPtr(context), uint64(len(context)))
}

func GetValueFromCache(key string) (string, bool) {
    value := pointerToBytes(
        _ProxyPluginMapGet(StringBytePtr(key), uint64(len(key))))

    if len(value) > 0 {
        return string(value), true
    } else {
        return "", false
    }
}
Let's add few helpers methods to convert bytes array to string and to load, from the memory, values using pointers. These helpers are automatically present in plugin created from Wasmo.
func StringBytePtr(msg string) uint64 {
    mem := pdk.AllocateString(msg)
    return mem.Offset()
}

func ByteArrPtr(arr []byte) uint64 {
    mem := pdk.AllocateBytes(arr)
    return mem.Offset()
}

func pointerToBytes(p uint64) []byte {
    responseMemory := pdk.FindMemory(p)

    buf := make([]byte, int(responseMemory.Length()))
    responseMemory.Load(buf)

    return buf
}
Let's apply our last update on our GetCompletAddress function to use the cache.
func GetCompleteAddress() int32 {
    // ...
    var output_address = string("")
    if cachedAddress, found := GetValueFromCache(search); found {
        output_address = cachedAddress
    } else {
        address, err := GetAddress(search)

        if err != nil {
            mem := pdk.AllocateString(`{
              status: 400,
              error: {\"body_str\": \"Failed fetching address with given input\"}
            }`)
            pdk.OutputMemory(mem)
            return 0
        }

        out, err := json.Marshal(address)

        if err != nil {
            mem := pdk.AllocateString(`{
                status: 400,
                error: {\"body_str\": \"Failed to marshal response\"}
            }`)

            pdk.OutputMemory(mem)
            return 0
        }

        AddNewValueToCache(search, string(out))

        output_address = string(out)
    }
// ...
}
We've incorporated our GetValueFromCache and AddNewValueToCache functions to read from and write to the cache, respectively. Additionally, we've adjusted our error-handling approach to accommodate the necessity of writing the result into the linear memory.
So, the final code should be something
Let's outline the variances between the original implementation in Go and the subsequent one aimed at Wasm
| Features | Go script | Wasm Go Plugin |
| Entry point | main | GetCompleteAddress function declared and exported to be accessible from Otoroshi |
| HTTP client | http.Get | pdk.NewHTTPRequest |
| Cache | Global map declared | Host functions coming from Otoroshi : proxy_plugin_map_set/get |
| Helper functions declared to manage pointer usage between guest and host | ||
| Inputs/Outputs | Retrieve input from command line arguments | Retrieve input as a byte array from linear memory and utilize Extism helpers to write bytes into memory. |
Deploy and Test Our Solution
The solution can be easily tested by deploying an Otoroshi instance connected to a Wasmo instance.
Start a new Otoroshi instance
 curl -L -o otoroshi.jar \
'https://github.com/MAIF/otoroshi/releases/download/v16.15.1/otoroshi.jar'
java -Dotoroshi.adminPassword=password -jar otoroshi.jar
Start a new Wasmo instance
docker network create wasmo-network
docker run -d --name s3Server \
    -p 8000:8000 \
    -e SCALITY_ACCESS_KEY_ID=access_key \
    -e SCALITY_SECRET_ACCESS_KEY=secret \
    --net wasmo-network scality/s3server
docker run -d --net wasmo-network \
    --name wasmo \
    -p 5001:5001 \
    -e "AUTH_MODE=NO_AUTH" \
    -e "AWS_ACCESS_KEY_ID=access_key" \
    -e "AWS_SECRET_ACCESS_KEY=secret" \
    -e "S3_FORCE_PATH_STYLE=true" \
    -e "S3_ENDPOINT=http://localhost:8000" \
    -e "S3_BUCKET=wasmo" \
    -e "STORAGE=DOCKER_S3" \
    maif/wasmo
Connect Wasmo and Otoroshi
Log in to the Otoroshi UI here and update the global configuration from the danger zone (accessible from the button at the top right). Scroll down to the Wasmo section and change information based on your port, ip and other credentials. You can find more information on How to configure Wasmo here.
Create the Go plugin using Wasmo UI
Navigate to your Wasmo UI, create a new plugin using Go and the Empty template.

Paste the final code of the previous section and build it using the Hammer button, at the top right.
Final step: Create the route in Otoroshi
Return to the Otoroshi UI, where you'll initiate a new route by assigning it a name. Next, navigate to the Designer tab and follow these steps:
Modify the frontend by accessing geolocation.oto.tools:8080.
Incorporate a new Wasm Backend plugin using the plugin menu located on the left side of the interface.
Choose "Wasmo" as the type of plugin.
Opt for your plugin in the subsequent selector.
Specify "GetCompleteAddress" as the Name of the exported function for invocation.
Activate Wasi support.
Enable the appropriate Host functions in the subsequent section.
Under Advanced settings, include *.data.gouv.fr as Allowed hosts.
Repeatedly save and request it. You'll notice a slight variation, indicating that our cache system is operational.
curl http://geolocation.oto.tools:8080?q=avenue+allende+79000+niort
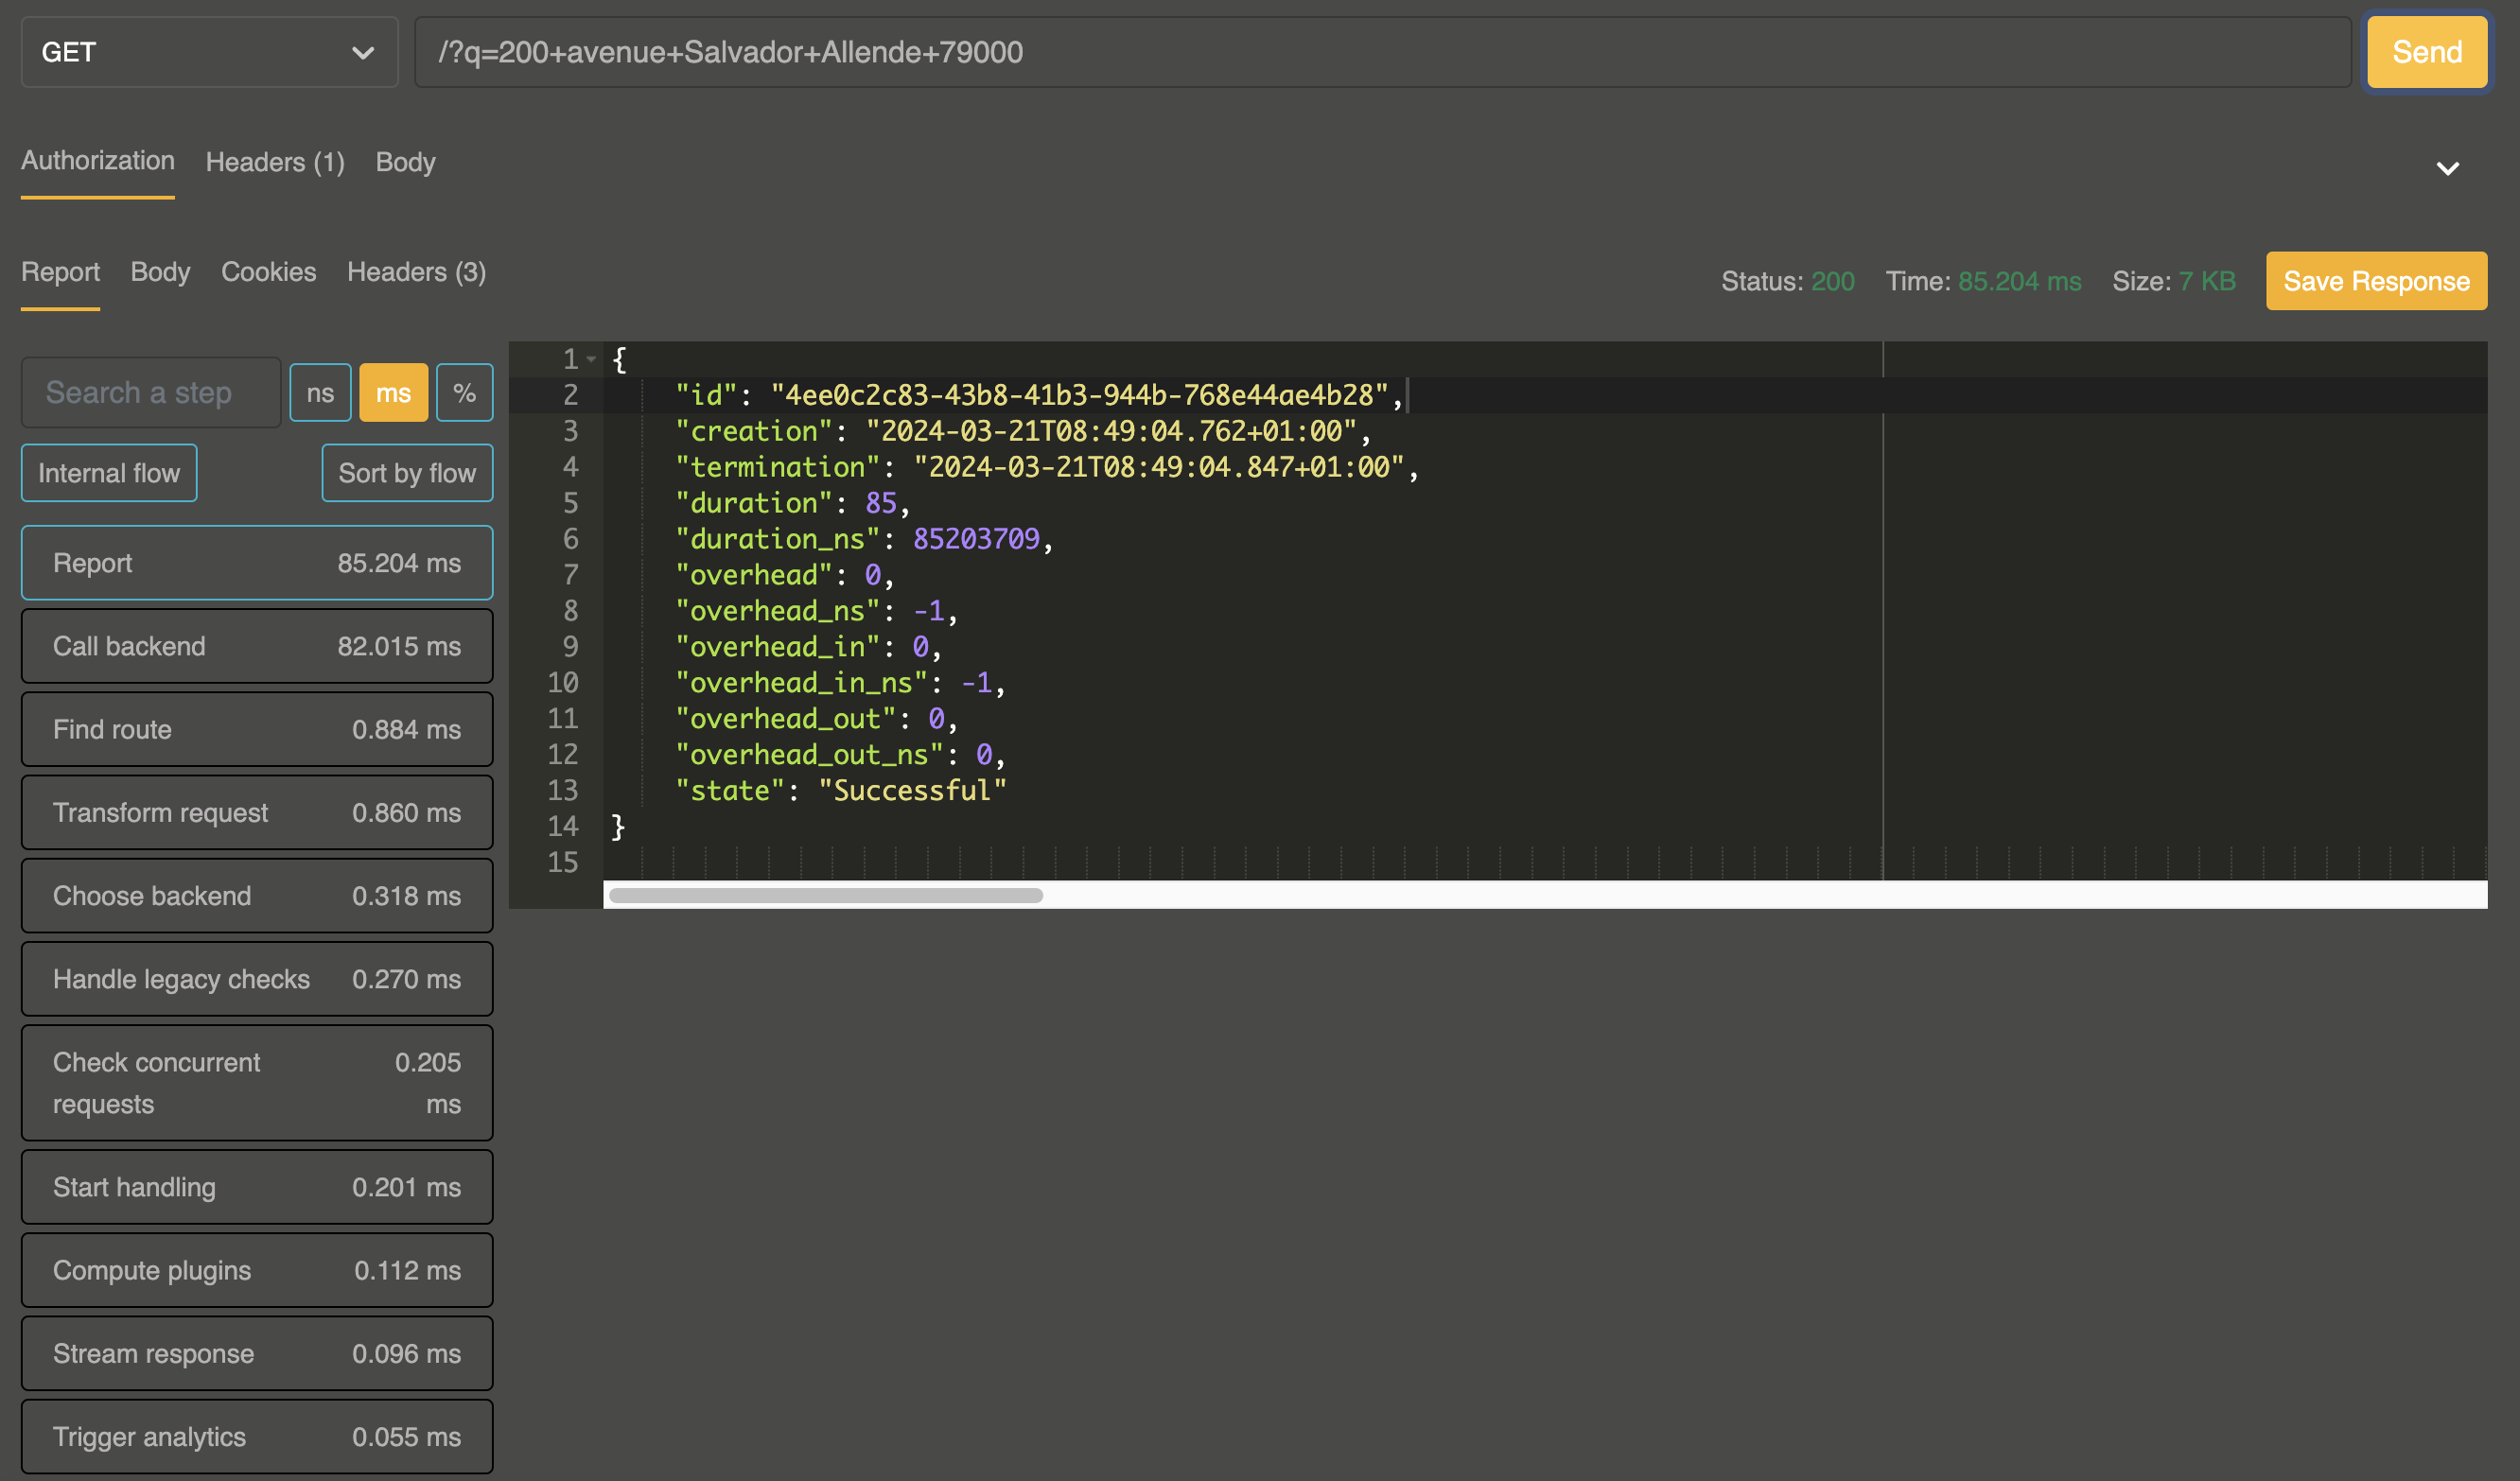
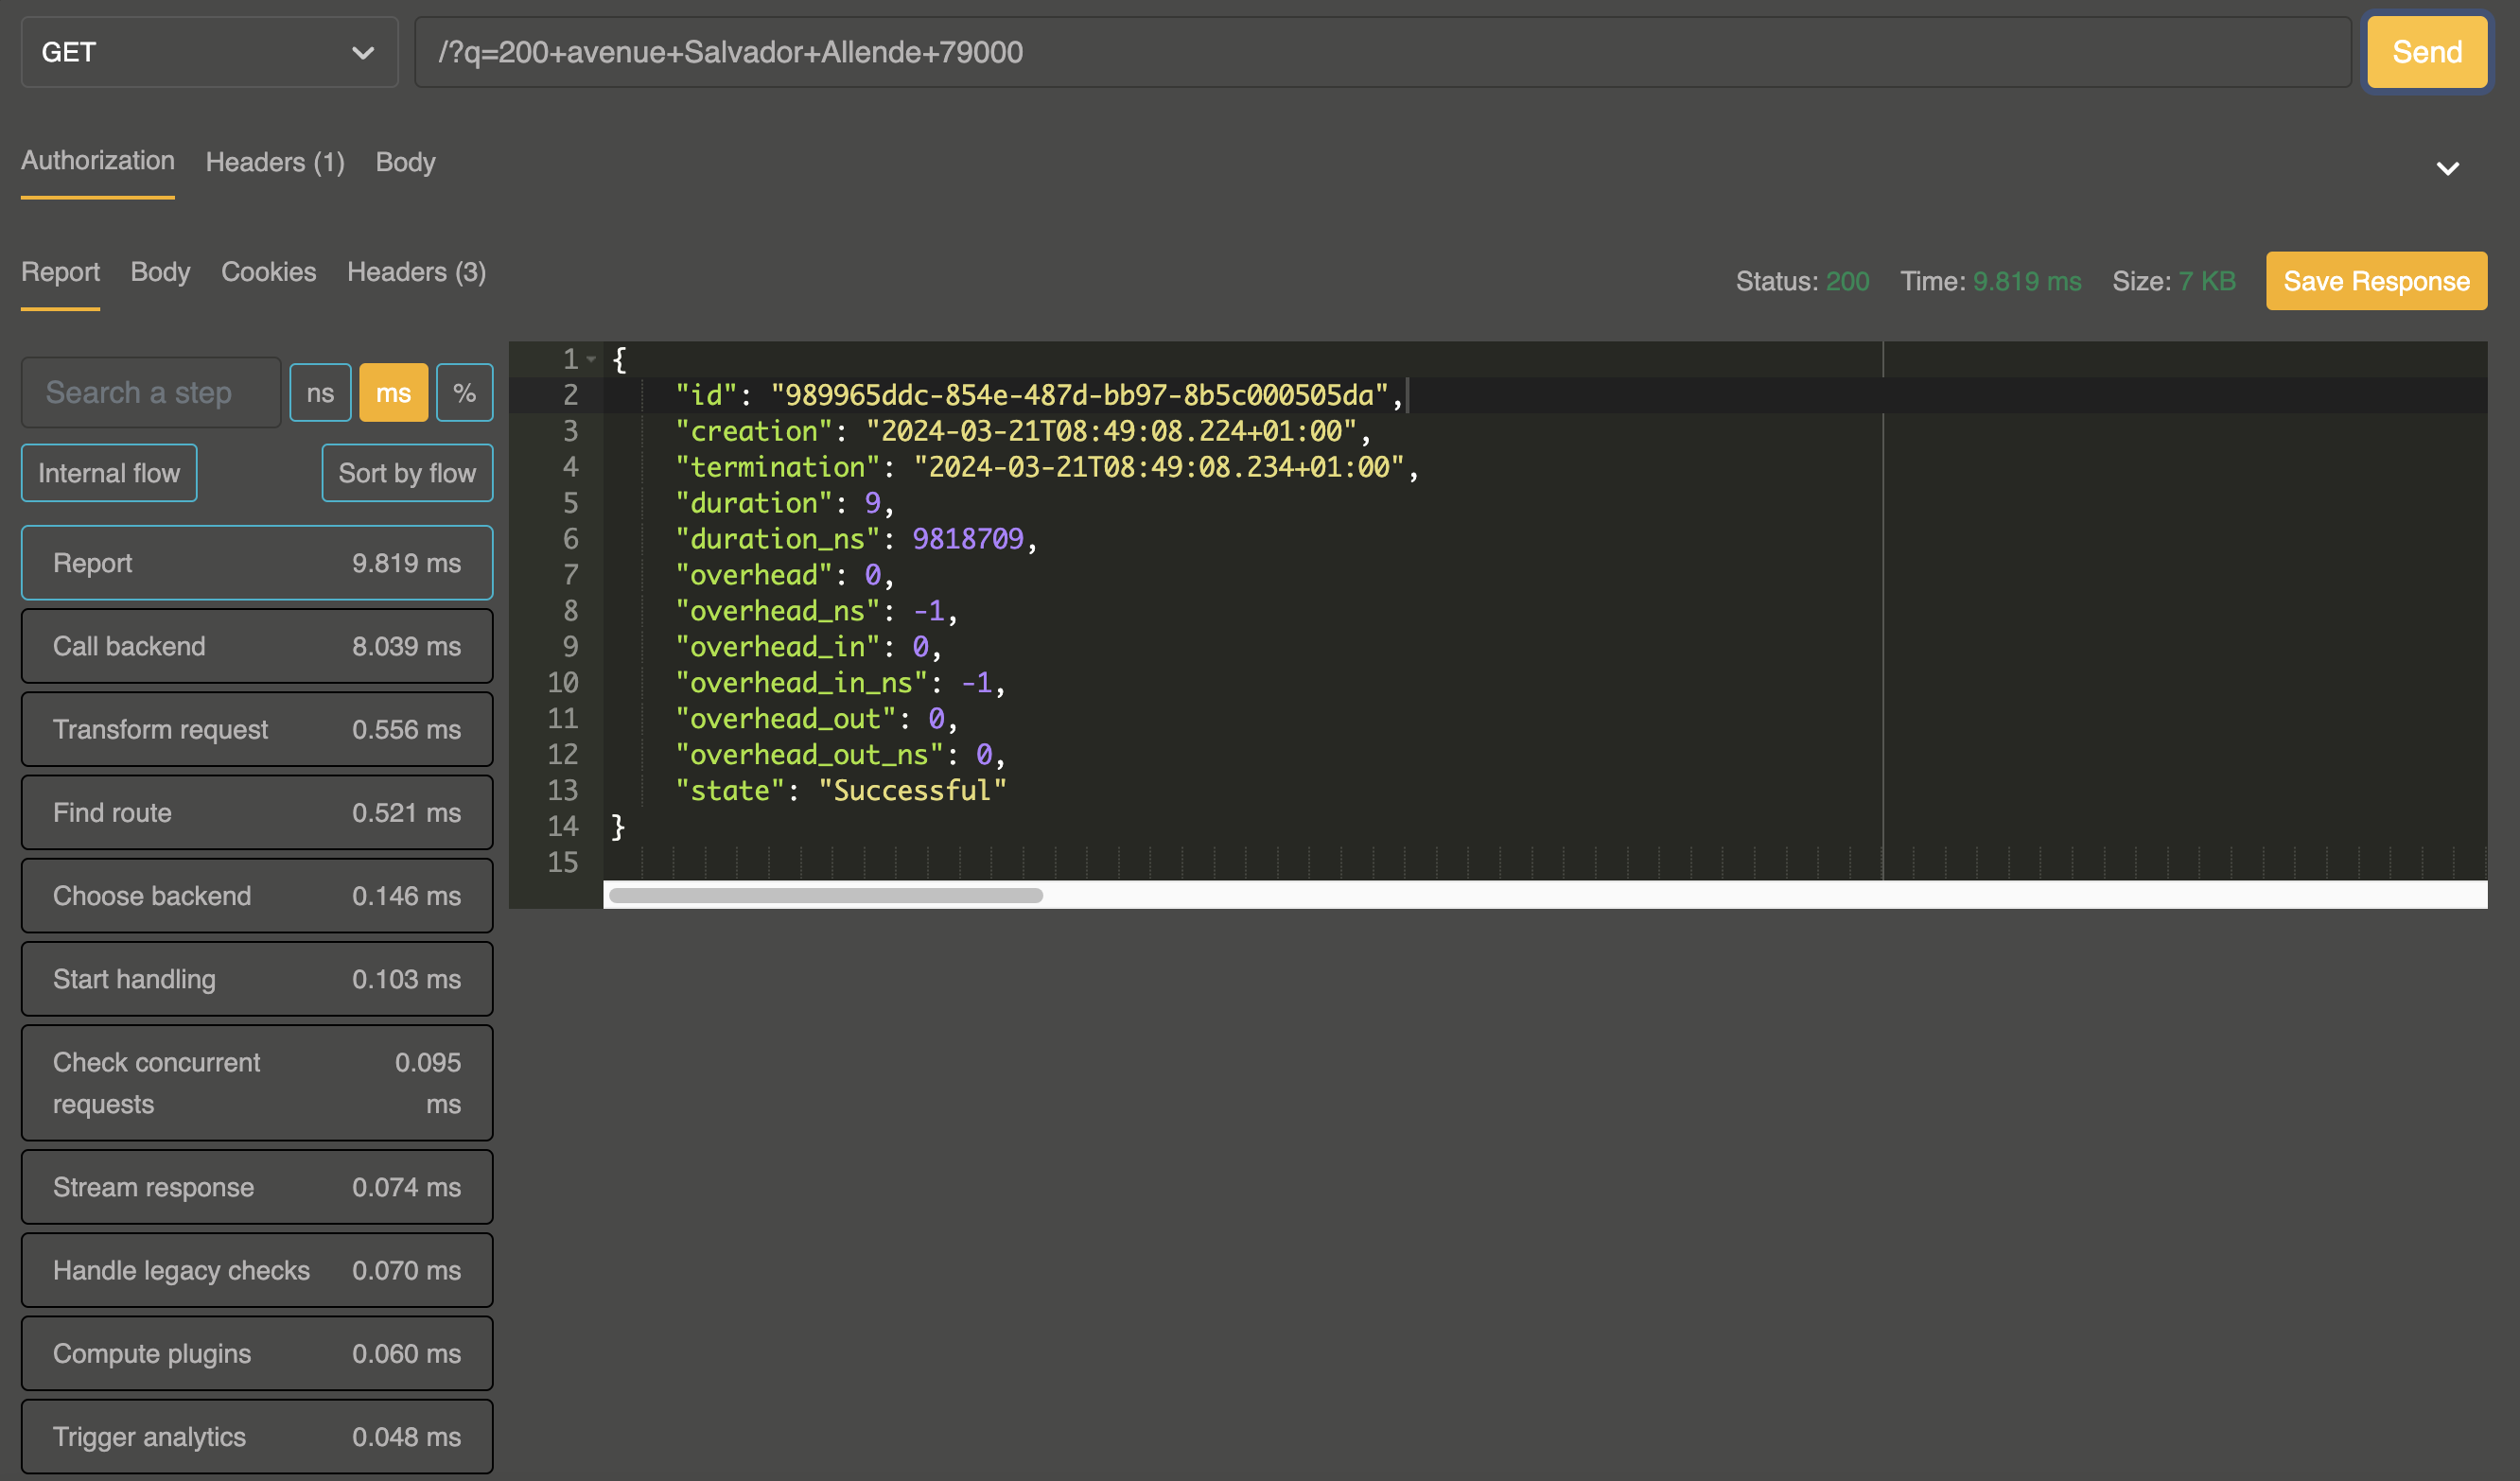
You can also utilize the Tester Tab in the Otoroshi UI to make direct service calls. This feature provides convenient tools for debugging and identifying which plugins and route steps are consuming the most request time.


If we attempt two identical requests consecutively, you'll notice that the cache is indeed functioning properly here: the response time decreases from 85ms to approximately 10ms.
Congratulations ✨, we got our first part of the FAAS using Go, Wasm, Wasmo and Otoroshi.
If you followed this article to the end, add 👏 .
You can join discussions about Wasm, Wasmo or Otoroshi by clicking here.
About the projects used in this article :
Wasmo:https://maif.github.io/wasmo/builder/getting-started
Subscribe to my newsletter
Read articles from Etienne ANNE directly inside your inbox. Subscribe to the newsletter, and don't miss out.
Written by
