Unleashing Jenkins Agents: Scaling Your CI/CD Workflows
 Sandhya Deotare
Introduction
Jenkins, a powerful automation server, offers a distributed architecture to handle complex CI/CD workflows efficiently. This capability is realized through the use of Jenkins agents, also known as nodes. Agents are responsible for executing tasks delegated by the Jenkins master, allowing for parallel execution and workload distribution. In this section, let's delve into the concept of Jenkins agents and how they contribute to enhancing the scalability and distribution of your CI/CD pipelines.
What are Jenkins Agents?
Jenkins agents are independent machines or processes that work in conjunction with the Jenkins master to execute tasks in a distributed manner. The Jenkins master delegates jobs to agents, and each agent runs its assigned tasks independently. This distributed approach is particularly valuable for managing large-scale projects with diverse requirements.
Key Features of Jenkins Agents:
Parallel Execution: Agents enable parallel execution of tasks, significantly reducing the overall build and deployment time.
Workload Distribution: Agents distribute the workload across multiple machines, preventing bottlenecks and optimizing resource utilization.
Platform Diversity: Agents can run on different operating systems and environments, allowing Jenkins to accommodate a variety of project requirements.
Scalability: Adding more agents to your Jenkins setup is a straightforward way to scale your CI/CD pipelines and accommodate growing workloads.
Isolation: Agents operate independently, providing a level of isolation for tasks. Failures on one agent do not affect others.
Types of Jenkins Agents:
Permanent Agents: These agents are configured to be always online, waiting for tasks from the master. Permanent agents are suitable for stable and consistent workloads.
Cloud Agents: Cloud agents are created dynamically based on demand. Jenkins can spawn agents in cloud environments (such as AWS, Azure, or Google Cloud) and terminate them when the workload decreases.
Docker Agents: Jenkins can utilize Docker containers as agents, providing a lightweight and reproducible environment for executing tasks.
Setting Up Jenkins Master and Agent
Step 1: Install Jenkins
If you haven't installed Jenkins yet, follow the official documentation for your operating system: Jenkins Installation
Step 2: Launch AWS EC2 Instances
Launch EC2 instances with the names 'Jenkins-Master' & 'Jenkins-Agent'. Install Jenkins on the master server.
Step 3: Connect to Jenkins Master Instance
Copy the public IP address of your Jenkins master instance.
Open a terminal and navigate to the directory where your Jenkins master private key file is located.
Use the following command to connect to the master instance:
ssh -i your-master-key-file.pem ec2-user@your-master-instance-ip
Step 4: Set Up Jenkins on Master Instance
Once connected to the master instance, install Java and Jenkins by following the commands below:
  sudo apt update
  sudo apt install fontconfig openjdk-17-jre
  sudo wget -O /usr/share/keyrings/jenkins-keyring.asc \
    https://pkg.jenkins.io/debian/jenkins.io-2023.key
  echo deb [signed-by=/usr/share/keyrings/jenkins-keyring.asc] \
    https://pkg.jenkins.io/debian binary/ | sudo tee \
    /etc/apt/sources.list.d/jenkins.list > /dev/null
  sudo apt-get update
  sudo apt-get install jenkins
Follow the on-screen instructions to complete the Jenkins setup.
Step 5: Configure SSH for Master-Agent Communication
On the Jenkins master, generate an SSH key pair:
ssh-keygenCopy the public key (
~/.ssh/id_rsa.pub).On the Jenkins agent, open the
authorized_keysfile and paste the public key.
Step 6: Configure Jenkins Agent on Agent Instance
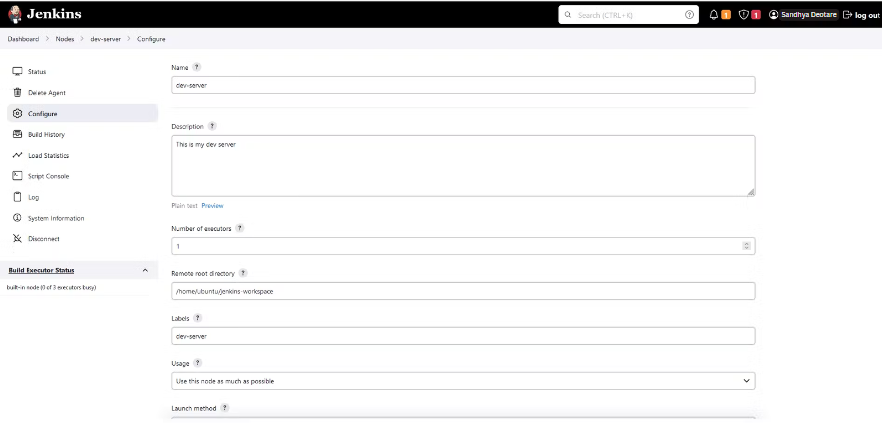
Once Jenkins is running on the master, navigate to "Manage Jenkins" > "Manage Nodes and Clouds."
Click on "New Node" and enter a name for your agent.
Select "Permanent Agent" and click "OK."
Configure the following:
Remote root directory: Leave it as is or specify a custom directory.
Labels: Add any labels you want for this agent.
Launch method: Choose "Launch agent via Java Web Start."

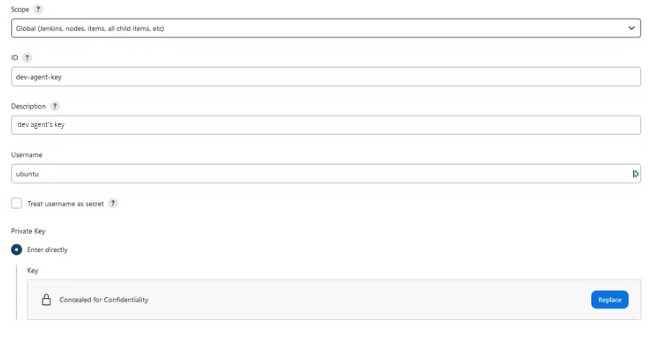
Add credentials.

In 'Key', give the private key you generated in the master server.
Click "Save" and then "Launch Agent" to start the connection.
Check the status of your new agent under "Manage Nodes and Clouds."
Step 7: Use this agent to run your pipeline
Use a simple 'Hello-World' example provided in the pipeline script.
  pipeline {
      agent { label 'dev-server'}
      stages{
          stage('Build') {
              steps{
                  echo 'Hello World'
              }
          }
      }
  }
Save and Run.

Conclusion
Congratulations! You've successfully set up a Jenkins master and agent on separate AWS EC2 instances, creating a distributed CI/CD environment. This architecture allows you to efficiently scale your Jenkins pipelines, enhancing your overall development and deployment processes. Harness the power of Jenkins agents to streamline your workflows and accelerate your software delivery.
Happy Learning! 🚀✨
Subscribe to my newsletter
Read articles from Sandhya Deotare directly inside your inbox. Subscribe to the newsletter, and don't miss out.
Written by
