File Security
 Afridi Shaik
Table of contents
In Red Hat Enterprise Linux (RHEL), file security is managed through a system of permissions and ownership. Each file and directory has associated permissions that determine who can read, write, and execute them. These permissions are defined for three categories of users: the file or directory owner, the group associated with the file or directory, and others (everyone else).
Standard File Permissions
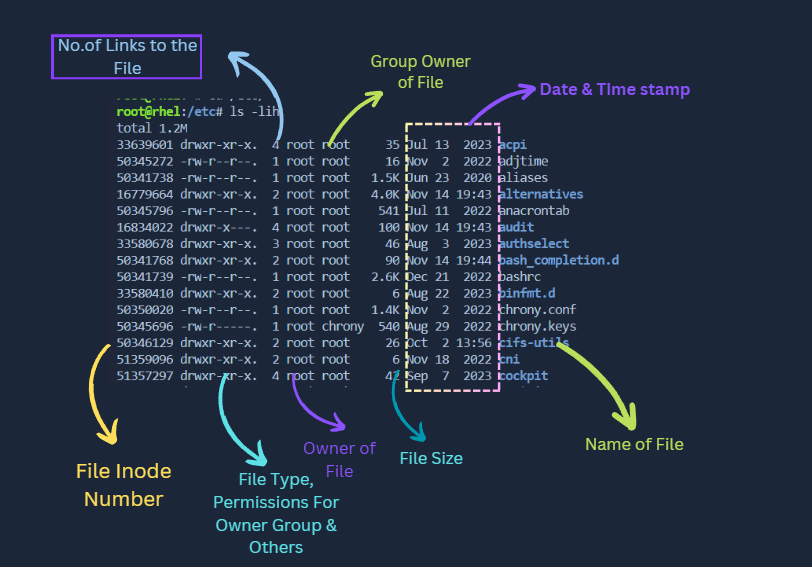
<inode> <Filetype><OwnerFilePerm><GroupFilePerm><OtherFilePerm> <ownerFile> <FileSize> <month><date><Year> <FileName>
inode
📁 An inode is like a file's ID card in a filesystem. It uniquely identifies each piece of metadata (file or directory) and operates independently for each filesystem. Each filesystem has its own pool of inodes, stored in a common table. While an inode number may be reused across different filesystems, it's always combined with a filesystem ID to create a unique label. 🆔
\>> to check inode value of FS[file system]
$ df -i
Advanced:-

FileType
📄 Regular File (
-): Represents standard files containing data or program instructions.📁 Directory (
d): Contains lists of filenames and their corresponding inode numbers.🔗 Symbolic Link (
l): Acts as a pointer or shortcut to another file or directory.🔒 Block Device File (
b): Represents a device that stores data in fixed-size blocks, like hard drives.🔊 Character Device File (
c): Represents devices that transfer data in a character-by-character manner, like keyboards or printers.🕰️ Named Pipe (FIFO) (
p): Provides a mechanism for inter-process communication.🔧 Socket (
s): Facilitates communication between processes on the same or different hosts.
Permissions

file permissions, each permission has a weightage assigned to it. Here's a breakdown:
Read (
r): Weightage of 4.Write (
w): Weightage of 2.Execute (
x): Weightage of 1.Maximum Permission: When all permissions are granted, the maximum permission is
rwx, which has a weightage of 7 (4 for read + 2 for write + 1 for execute).Minimum Permission: When no permission is granted, the minimum permission is
---, which has a weightage of 0.
File Access
Changing Ownership with chown:
In RHEL, the
chowncommand is used to change the ownership of files and directories. You can specify both the user (owner) and group ownership.🔹 Syntax (Symbolic):
chown [options] [user:group] [file/directory]
- Changing ownership to a specific user and group
chown user1:group1 file.txt📝 This command changes the ownership of
file.txttouser1andgroup1. Onlyuser1and members ofgroup1can access the file.
- Changing ownership to a specific user only
chown user2 file.txt📝 This command changes the ownership of
file.txttouser2. Onlyuser2can access the file.
- Changing ownership to a specific group only
chown :group2 file.txt📝 This command changes the group ownership of
file.txttogroup2. Only members ofgroup2can access the file.
- Recursive change of ownership for a directory
chown -R user3:group3 directory/📝 This command recursively changes the ownership of all files and subdirectories within
directory/touser3andgroup3. Onlyuser3and members ofgroup3can access the files and subdirectories.
- Changing ownership of a symbolic link
chown user4:group4 symlink📝 This command changes the ownership of the symbolic link
symlinkitself, not the target file or directory it points to. Onlyuser4and members ofgroup4can manipulate the symbolic link.
Changing Permissions with chmod:
The
chmodcommand is used to change file permissions in RHEL. Permissions can be set using either symbolic representation (u: user, g: group, o: others) or octal numbers.🔹 Syntax (Symbolic):
chmod [u|g|o][+|-|=][r|w|x] [file/directory]
Granting Full Permissions to Owner, Read and Execute to Group, and Read-only to Others:
chmod 754 file.txtOwner has read (👀), write (📝), and execute (▶️) permissions;
Group has read (👀) and execute (▶️) permissions;
Others have read (👀) permission only.
Making a Script Executable by All Users:
chmod +x script.shGrants execute (▶️) permission to the owner, group, and others,
allowing all users to execute the script.
Restricting Access to Owner Only:
chmod 700 file.txtOwner has full access (🔓),
while group and others have no access (🚫).
Giving Group Write Access:
chmod g+w file.txtAdds write (📝) permission to the group,
while keeping other permissions unchanged.
Revoking Write Permission from Others
chmod o-w file.txtRemoves write (📝) permission from others,
while keeping owner and group permissions unchanged.
Setting Permission for a Directory to Allow Listing by Others:
chmod o+rx directoryAllows others to read (👀) files and execute (▶️) directories within the specified directory.
Changing Group Ownership with chgrp:
The
chgrpcommand changes the group ownership of files and directories.🔹 Syntax:
chgrp [group] [file/directory]
Change group ownership of a file to a specific group, allowing members of that group to access the file:
chgrp developers project.txtThis command changes the group ownership of
project.txtto thedevelopersgroup.Members of the
developersgroup can now accessproject.txt.Restrict access to a file to only members of a specific group:
 chgrp managers sensitive_info.txt
 chmod 640 sensitive_info.txt
This sequence of commands changes the group ownership of
sensitive_info.txtto themanagersgroup and sets permissions to640, allowing the owner to read and write, the group to read, and denying access to others.Grant access to a file to multiple groups:
 chgrp -R shared_team project_folder
 chmod g+rw project_folder
-Rrecursively changes the group ownership of all files and directories withinproject_folderto theshared_teamgroup.Then,
g+rwgrants read and write permissions to the group.Members of
shared_teamcan now access all files withinproject_folder.
User File Creation Mask umask
The umask command in linux is used to set default permission for files & directories the user creates
The umask value is a 3-digit octal number that represents the permissions to be removed from the default.
Common umask values include
022(deny write permissions to group and others) and002(deny write permissions to others only).📂 Max File and Max Directory Permissions:
The maximum file permissions are
666(rw-rw-rw-) and the maximum directory permissions are777(rwxrwxrwx).Note:-
Execute permission is typically disabled by default for files for security reasons, as it's often not necessary for regular files.
🛠️ Setting Umask Value:
To set the umask value for a user, use the
umaskcommand followed by the desired octal value.umask 022This command sets the umask value to
022, denying write permissions to group and others.📁 Creating a Directory with Modified Permissions:
To create a directory with modified permissions, use the
mkdircommand followed by the-moption and the desired octal permissions.mkdir -m 755 my_directoryThis command creates a directory named
my_directorywith permissions755(rwxr-xr-x).📂 Copying Files with Preserved Permissions:
To copy files with preserved permissions, use the
cpcommand with the-poption.cp -p source_file destination_fileThis command copies
source_filetodestination_filewhile preserving its permissions.📁 Recursively Copying Directories with Preserved Permissions:
To recursively copy directories with preserved permissions, use the
cpcommand with the-rpoptions.cp -rp source_directory destination_directoryThis command copies
source_directorytodestination_directoryrecursively while preserving permissions.
Advanced File Permissions
In Red Hat Enterprise Linux (RHEL), advanced file permissions provide additional layers of security and functionality beyond the standard read, write, and execute permissions. Two key advanced permissions are the sticky bit and setuid/setgid.
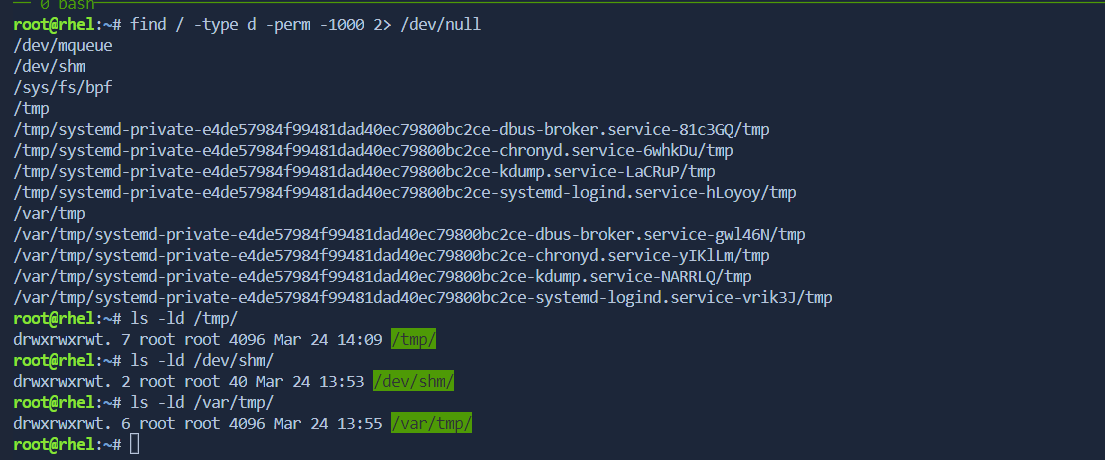
🧩 Sticky Bit [1]
The sticky bit is a special permission that can be applied to directories.
When set on a directory, it restricts the deletion of files within it to only the file owner, the directory owner, or the root user.
Symbolically represented by
torT, indicating whether the execute permission is also set for others or not.🔧 Setting Sticky Bit:
- To set the sticky bit symbolically, use:
chmod +t /directory
- To set the sticky bit using octal notation along with other permissions:
chmod 1777 /directory🚫 Removing Sticky Bit:
- To remove the sticky bit symbolically, use:
chmod -t /directory
- To remove the sticky bit using octal notation, you'll have to redefine permissions without the sticky bit, such as:
chmod 0777 /directory📝 Note:
- By default, the
/tmpdirectory in RHEL has the sticky bit set. This ensures that users can only delete their own files within/tmp, contributing to system security.to check all stickybit files comes exists
$ find / -type d -perm -1000 2> /dev/null
🔒 Setuid and Setgid:
Setgid 🏷️[2]
- Setgid is a special permission that can be applied to directories. When set on a directory, it ensures that files created within that directory inherit the group ownership of the directory, rather than the group ownership of the user creating the file.
🔧 Setting Setgid:
To set the setgid bit symbolically, use:
chmod g+s /directoryTo set the setgid bit using octal notation:
chmod 2777 /directory🚫 Removing Set gid:
To remove the setgid symbolically, use:
chmod g-s /directoryTo remove the setgid bit using octal notation:
chmod 00777 /directory📝 Note:
- To find directories with the setgid bit set:
find / -type d -perm -2000 2> /dev/null
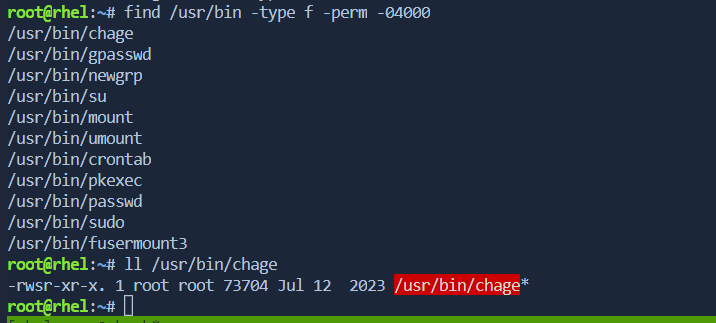
Setuid 🧑🎓 [4]
Setuid is a special permission that can be applied to executable files. When set on an executable file, it allows the file to be executed with the privileges of the file's owner, rather than the privileges of the user executing the file.
🔧 Setting Setuid:
To set the setuid bit symbolically, use:
chmod u+s /executableTo set the setuid bit using octal notation:
chmod 4755 /executable🚫 Removing Set uid:
To remove the setgid symbolically, use:
chmod u-s /directoryTo remove the setgid bit using octal notation:
chmod 00777 /directory📝 Note:
- To find directories with the setgid bit set:
find /usr/bin -type -f -perm -04000
above commands works as it's owner is executing commands by himself.\
Access Control List [ACL]
ACLs extend traditional file permissions (
ugoandrwx) by allowing you to assign specific permissions (read, write, execute) to individual users or groups for a file or directory.Think of it as a detailed access list, granting granular control over who can do what.
While
ls -lmight not show ACLs by default, some systems display a.in the permission string to indicate their presence.Use
getfaclto view the complete ACL for a file or directory.
🖥️ Filesystem Support:
Not all filesystems in RHEL support ACLs. Common supported ones include:
ext3
ext4
XFS (with limitations, explained later) ---> Can't able to disable acl
NFS
🛠️Enabling/Disabling ACLs in/etc/fstab:
The
/etc/fstabfile controls how filesystems are mounted. You can specify options to enable or disable ACL support for specific filesystems./dev/sda1 / ext4 defaults,acl # Enables ACL for the root filesystem /dev/sdb1 /data ext4 defaults # No ACL for the /data partition /dev/sdb2 /opt ext4 defaults,noacl # also disable ACL for the opt filesystem📝 Note:
ACLs cannot be disabled in XFS. They are enabled by default.
Managing ACLs withgetfacl and setfacl:
getfacl:
Retrieves the ACL entries for a file or directory.
getfacl filename# file: filename # owner: user # group: group user::rwx group::r-x other::r--
Get ACL for a directory and its contents recursively:
getfacl -R directory# file: directory # owner: user # group: group user::rwx group::r-x other::r-x # file: directory/file1 # owner: user # group: group user::rw- group::r-- other::r-- # file: directory/file2 # owner: user # group: group user::r-- group::r-- other::---Get only the effective permissions (without mask):
getfacl --no-mask filename# file: filename # owner: user # group: group user::rwx group::r-x other::r--Get ACL for multiple files:
getfacl file1 file2# file: file1 # owner: user # group: group user::rw- group::r-- other::--- # file: file2 # owner: user # group: group user::r-- group::r-- other::---
setfacl:
Modifies the ACL for a file or directory.
It has various options:
-m(modify): Change an existing entry.
-x(remove): Delete an entry.
-b(completely replace): Set a new ACL entirely.
--no-mask: Inherit permissions from the parent directory (cautious use advised).
-m (modify): Change an existing entry.
setfacl -m u:john:rw file.txtThis command adds read and write permissions for user
johnto the filefile.txt.# file: file.txt # owner: user1 # group: group1 user::rw- user:john:rw- group::r-- mask::rw- other::r---x (remove): Delete an entry.
setfacl -x u:john file.txtThis command removes any ACL entry for user
johnfrom the filefile.txt.# file: file.txt # owner: user1 # group: group1 user::rw- group::r-- mask::rw- other::r---b (completely replace): Set a new ACL entirely.
 setfacl -b file.txt
 setfacl -m u:john:rw file.txt
These commands remove all existing ACL entries and then add read and write permissions for user
johnto the filefile.txt.# file: file.txt # owner: user1 # group: group1 user::rw- user:john:rw- group::--- mask::rw- other::-----no-mask: Inherit permissions from the parent directory.
setfacl --no-mask -m u:john:rw file.txtThis command sets read and write permissions for user
johnon the filefile.txt, ignoring the mask entry and inheriting permissions from the parent directory.# file: file.txt # owner: user1 # group: group1 user::rw- user:john:rw- group::r-- mask::rw- other::r--
🔗File Links
File links are references to files that allow them to be accessed from multiple locations in the filesystem.
They provide flexibility and organization, enabling files to be logically grouped or accessed from different directories.
📄inode
Inodes are data structures used by the filesystem to store metadata about files, including their names, creation dates, permissions, contents, and timestamps.
Each file in the filesystem is associated with an inode, which uniquely identifies it.
🔗 Hard Links:
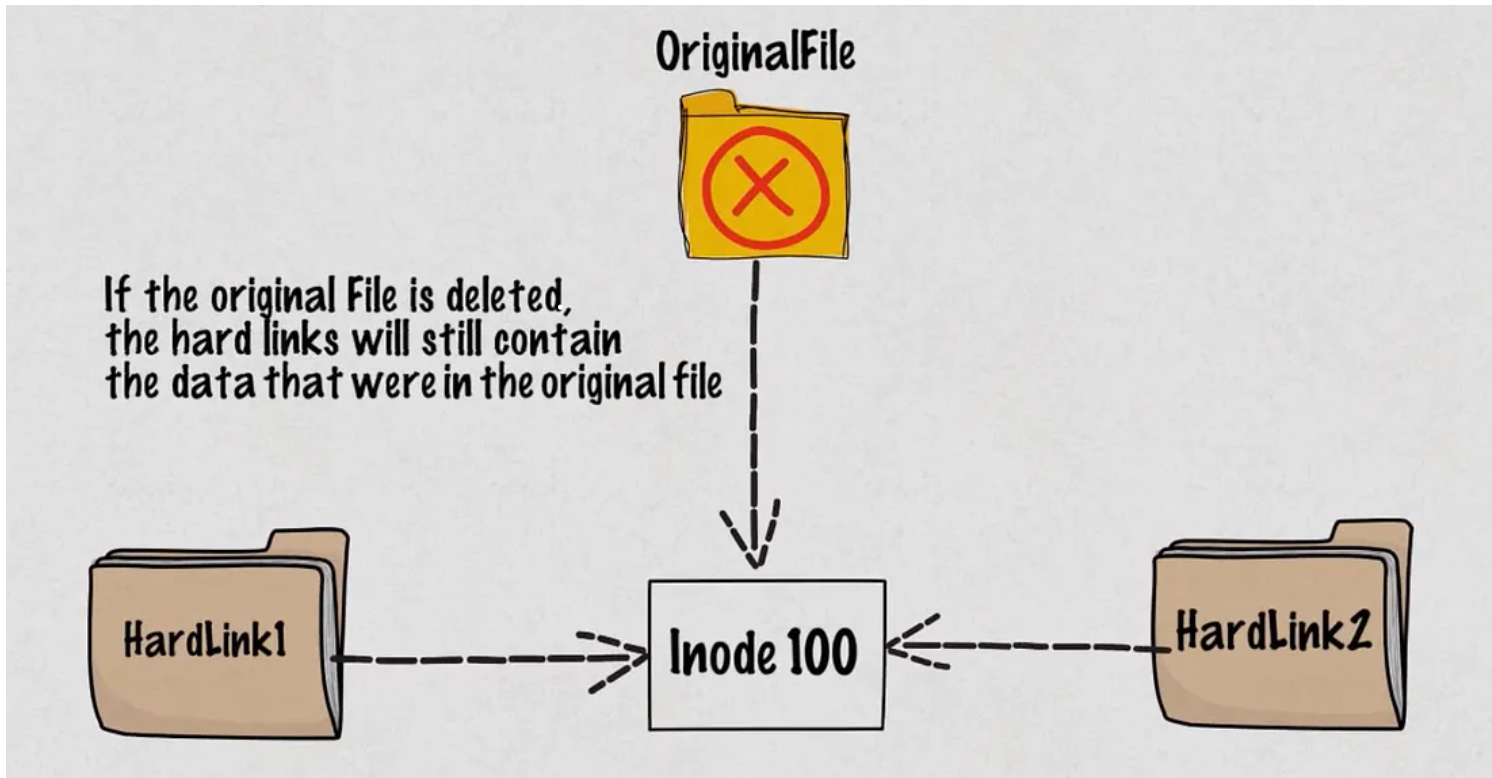
Hard links create additional directory entries (file names) that directly point to the same underlying data on the disk.
Unlike symbolic links (soft links), hard links do not point to a path or location; they reference the inode itself.
- Creating Hard Links:
ln source_file hardlink_nameThis command creates a hard link named
hardlink_namethat points tosource_file.Example:
ln /etc/passwd /tmp/passwd_backup📝 In this example, a hard link named
passwd_backupis created in the/tmpdirectory, pointing to the/etc/passwdfile.
Viewing Inodes:
ls -i filenameThis command displays the inode number of a file.
Example:
 $ ls -i /etc/passwd /tmp/passwd_backup
 123456 /etc/passwd
 123456 /tmp/passwd_backup
📝 The inode numbers of both
/etc/passwdand/tmp/passwd_backupare the same, indicating they are hard links to the same file data.Checking Link Count:
ls -l filenameThis command displays the link count of a file.
Example:
 $ ls -l /etc/passwd /tmp/passwd_backup
 -rw-r--r-- 2 root root 2315 Mar 15 08:00 /etc/passwd
 -rw-r--r-- 2 root root 2315 Mar 15 08:00 /tmp/passwd_backup
📝 Both
/etc/passwdand/tmp/passwd_backuphave a link count of2, indicating they have two hard links.
🔗 Soft Links:
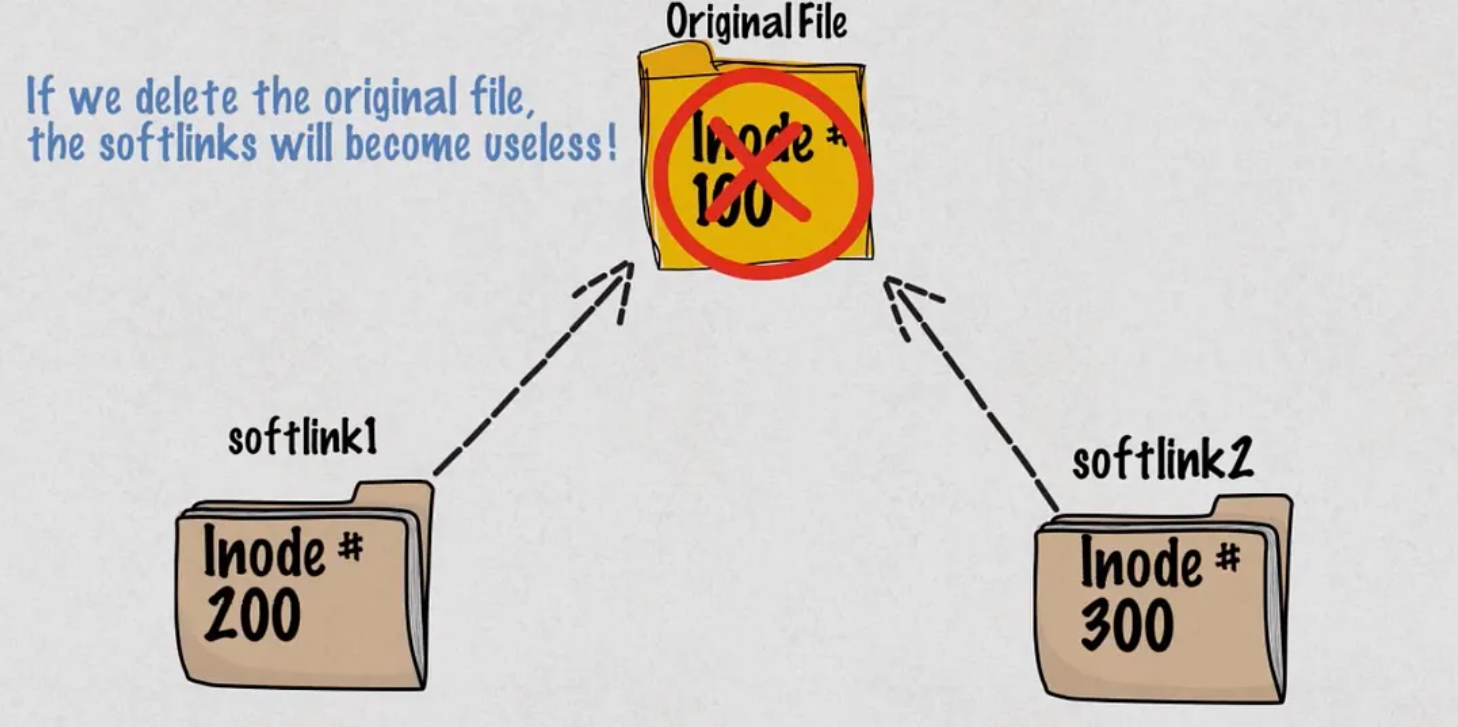
Soft links, also known as symbolic links, are special files that point to other files or directories using their path names. They provide a convenient way to reference files or directories across the filesystem.
Creating a Soft Link:
To create a soft link, use the
lncommand with the-soption followed by the source file or directory and the name of the soft link.ln -s /path/to/source /path/to/softlinkFor example:
ln -s /home/user/documents/file.txt /usr/libraries/file_linkViewing Soft Links:
To view the contents of a directory including soft links, use the
lscommand with the-loption.ls -l /path/to/directorySoft links are indicated by an
lat the beginning of the listing, followed by the path to the target file or directory.For example:
lrwxrwxrwx 1 user group 24 Mar 23 10:00 file_link -> /home/user/documents/file.txt📝 Note:
Soft links can span filesystems and can point to both files and directories.
They provide flexibility but can break if the target file or directory is moved or deleted.
Subscribe to my newsletter
Read articles from Afridi Shaik directly inside your inbox. Subscribe to the newsletter, and don't miss out.
Written by


