Installing Ubuntu 24.04 LTS.
 Brian King
Table of contents
- TL;DR.
- An Introduction.
- The Big Picture.
- Prerequisites.
- Making a Bootable USB Installer.
- Installing Ubuntu 24.04 LTS.
- Connecting my NAS.
- Setting the Audio Output Device.
- Installing Ubuntu Studio.
- Installing Other Package Managers.
- Installing the Browsers.
- Installing the Container and Environment Managers.
- Installing GenApps.
- Installing DevApps.
- Installing Language Model Utilities.
- Installing DaVinci Resolve Studio 18.
- Saving the Final Image.
- The Results.
- In Conclusion.
Update: Friday 5th April 2024.
Update: Thursday 11th April 2024.
TL;DR.
Installing Ubuntu 24.04 LTS is a step-by-step process. It includes making a bootable USB thumb drive on Windows 11, installing and securing Ubuntu, setting up Ubuntu Studio, and imaging my system with CloneZilla. This post also covers installing different package managers, browsers, various software, and LLM utilities. The Ubuntu 24.04 LTS distro offers a stable system and a predictable computing environment.
Fortunately, I also have images of my previous system if anything should go wrong.
Attributions:
An Introduction.
In 2015, I started using CentOS 7 which was my first Linux-based daily driver. When it was released in 2016, I switched to Ubuntu 16.04 LTS. Since then, I have upgraded my LTS distro every 2 years, like clockwork. It is time again to upgrade my systems:
The purpose of this post is to define the installation process for Ubuntu 24.04 LTS, while also including many of the development tools I use, and all of the system utilities I need.
The Big Picture.
I will install the new Ubuntu 24.04 LTS (long term service) distribution on every system in my home. These systems include:
My Workstation PC (which is a dual-boot system),
My Homelab NUC (which sits next to my Workstation),
My Bedroom NUC (for streaming content from my NAS), and
My Lounge Laptop (for streaming content when I'm not in bed).
My NAS has its own proprietary OS.
Prerequisites.
A NEW Linux-based distribution called Ubuntu 24.04 LTS↗.
Deregistering any important apps, e.g. DaVinci Resolve Studio.
Making a Bootable USB Installer.
- In Windows, I plug in a spare 8GB USB thumb drive.
NOTE: I find quality 8GB thumb drives are cheaper than 4GB thumb drives. This makes sense to me. Making a tape-out of an 8GB die costs the same as a 4GB tape-out. Cooking the wafers costs the same, too. Finally, it's cheaper NOT to re-tool for 4GB chips and just make 8GB chips instead. So, my guess is there's no cost-effective reason for making 4GB thumb drives. As a result, I believe scarcity is the main factor that is driving up the prices of 4GB thumb drives.
- I download the Ubuntu 24.04 LTS ISO file:
https://ubuntu.com/download/desktop
I download, and install, an ISO-to-USB utility like Rufus or balenaEtcher.
I use the ISO-to-USB utility to install the Ubuntu 24.04 ISO file onto the 8GB USB thumb drive as a bootable image.
Installing Ubuntu 24.04 LTS.
NOTE: Ubuntu 24.04 LTS is installed on a 1TB M.2 SSD (solid-state drive) within my system. The boot loader is installed on the nvmeOn1p1 (500MB) partition, and the system files are installed on the nvmeOn1p2 (999.5GB) partition.
I plug the bootable Ubuntu 24.04 LTS USB thumb drive into my system.
I (re)start my system.
During POST (power-on self test), I boot into my UEFI BIOS (unified extensible firmware interface basic input output system) by tapping the F2 key.
Within the UEFI BIOS, I set the bootable USB thumb drive as the first boot device.
I (re)start the UEFI BIOS POST sequence.
After booting into the USB thumb drive, I begin installing the Ubuntu 24.04 LTS distribution.
During the Installation Process.
My Workstation is a Windows/Ubuntu dual-boot system. The rest of my home-based PCs run Ubuntu only. Therefore, only my Workstation requires a carefully crafted installation process, i.e. installing Ubuntu without destroying Windows. If things go wrong then I'd have to re-install Windows as well. Upgrading Ubuntu on a dual-boot system is a painful process.
NOTE: I may need to use the 'Grubfix' utility, that I keep on a separate USB thumb drive, if I can't choose Ubuntu or Windows when booting into my Workstation.
OPTIONAL: Fix for the Terminal Input Delay.
- I add a new repo to my system:
sudo add-apt-repository ppa:vanvugt/mutter
- I update my local repo list:
sudo apt update
- I upgrade my system:
sudo apt upgrade
- I reboot my system:
sudo reboot
OPTIONAL: Settings for the Default Audio.
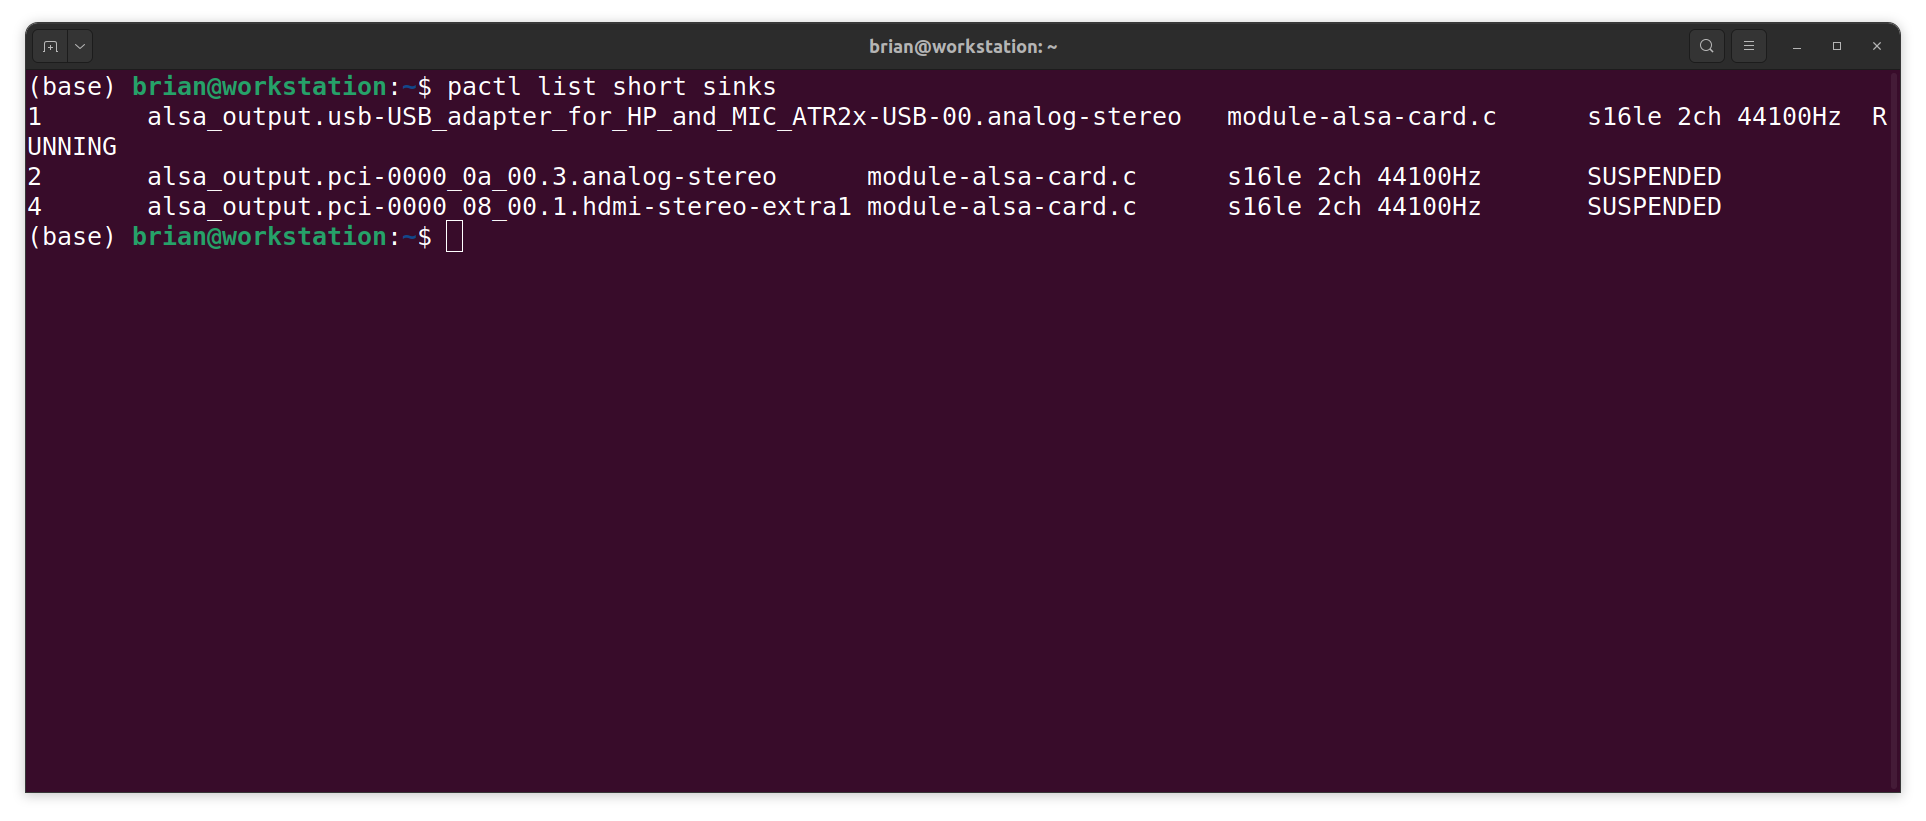
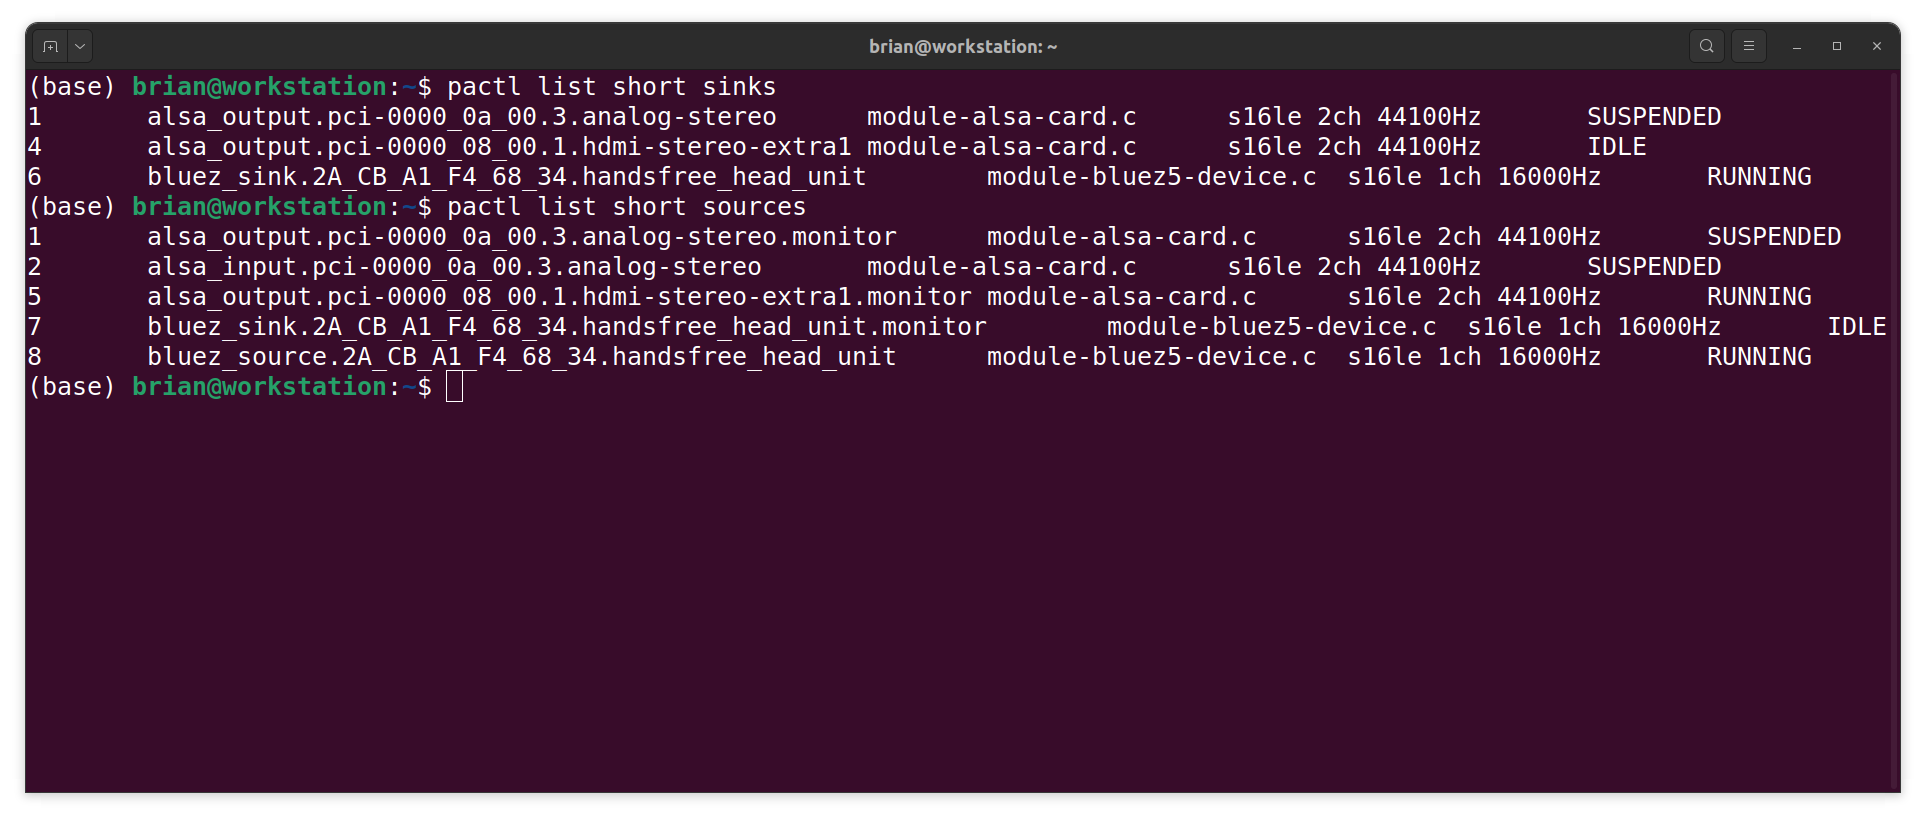
- In a Terminal, I list the audio output devices:
pactl list short sinks
- I list the audio input devices:
pactl list short sources
- I note the numbers of the devices I want to set as the default audio input and output, e.g. 6 and 8:
- I use the Nano text editor to open the Pulse settings file:
sudo nano /etc/pulse/default.pa
- I navigate to the bottom of the file (CTRL + END), add the following, save (CTRL + S) the changes, and exit (CTRL + X) Nano:
set-default-sink 6
set-default-source 8
- I reboot my PC:
sudo reboot
Changing Some Other System Settings.
I open the
Settingsmenu (⚙) from theSystemmenu (top-right of the screen) or theApp Drawer(𐄡).I change to
Darkmode atSettings > Appearance > Style, if required.
I change the
Position of New IconstoTop LeftatSettings > Ubuntu Desktop > Desktop Icons > Position of New Icons, if required.I change the
Position on screenof the Dock toBottomatSettings > Ubuntu Desktop > Dock > Position on screen, if required.I deactivate the
Show Volumes and Devicesoption for the Dock atSettings > Ubuntu Desktop > Dock > Configure dock behaviour > Show Volumes and Devices, if required.
- I change the monitor layout at
Settings > Screen Display, if required.
I reduce the animation in the UI at
Settings > Accessibility > Seeing > Reduce Animation.I change the size of all text in the UI at
Settings > Accessibility > Seeing > Large Text.I change the cursor size in the UI at
Settings > Accessibility > Cursor Size.I turn off the blinking cursor in the terminal at
Settings > Accessibility > Typing > Cursor Blinking.I update my system:
sudo apt clean && \
sudo apt update && \
sudo apt dist-upgrade -y && \
sudo apt --fix-broken install && \
sudo apt autoclean && \
sudo apt autoremove -y
Securing the New Installation.
Throughout the rest of this post, I will be creating way-point images as recovery mechanisms, although nothing EVER goes wrong. I suggest saving (or writing down) the names of these images in a file (or on a piece of paper) and crossing these names off the list as each image is created. All the image names are highlighted in yellow throughout the rest of this post.
Using CloneZilla.
I plug the CloneZilla USB thumb drive into my system.
I (re)start my system.
During POST (power-on self test), I boot into my UEFI BIOS (unified extensible firmware interface basic input output system) by continually tapping the F2 key as the POST runs.
Within the UEFI BIOS, I set the bootable USB thumb drive as the first boot device.
I (re)start the UEFI BIOS POST sequence.
After booting into the USB thumb drive, I use CloneZilla to create an image of each stage of my installation process. Just in case. Although nothing EVER goes wrong. Right?
I use CloneZilla to create an image of the distribution called [date]-img-work-ubuntu.
NOTE: The
[date]-imgis automatically generated by CloneZilla,workrefers to the Workstation, andubuntuis a reference to the contents of the image file. For instance, another system might use a name like[date]-img-bed-porn(which stands forpackaging opinions regarding nachos, of course).
- The last option in my imaging sequence is to power off the system after the image is created.
Connecting my NAS.
NOTE: This section of my post is unique to my systems and can be safely ignored. If you have a NAS (network attached server) then you probably already have a plan for connecting it/them to your system(s).
I power up my Workstation.
In the file manager, I navigate into the
img-workdrive.I open the
img-workdrive in a terminal (Right-click > Open in Terminalfrom the pop-up menu).From the terminal, I change the owner of the
Ubuntuimage:
sudo chown -R $USER:$USER [date]-img-work-ubuntu
NOTE: I need to access my NAS early on in this post because of the high number of CloneZilla images I generate. I will occasionally need to off-load these images from the 2GB external HDD to the NAS so I can continue using CloneZilla.
- I install the CIFS utilities:
sudo apt install -y cifs-utils smbclient
NOTE: CIFS is a dialect of SMB.
- I remove these directories:
sudo rm -r ~/Desktop ~/Documents ~/Downloads \
~/Music ~/Pictures ~/Public ~/Templates ~/Videos
NOTE: It is now VITAL to continue this section of the post until the very end as these directories, which no longer exist, are vital to running this distro.
- I make a hidden file called
.cred_smbin my home directory:
sudo touch /home/yt/.cred_smb
- I open the
.cred_smbfile using the Nano text editor:
sudo nano /home/yt/.cred_smb
- I copy the following, add it (CTRL + SHIFT + V) to the
.cred_smbfile, save (CTRL + S) the changes, and exit (CTRL + X) Nano:
username=yt
password=super-secret-password
domain=WORKGROUP
- I change the access permissions for the
.cred_smbfile:
sudo chmod 600 ~/.cred_smb
- I make a copy the
fstabfile asfstab.bak:
sudo cp /etc/fstab /etc/fstab.bak
- I use the Nano text editor to open the
fstabfile:
sudo nano /etc/fstab
- I copy the following, add it (CTRL + SHIFT + V) to the bottom of the
fstabfile, save (CTRL + S) the changes, and exit (CTRL + X) Nano:
//192.168.0.2/ai             /media/yt/AI cifs vers=3.0,uid=1000,gid=1000,credentials=/home/yt/.cred_smb
//192.168.0.2/desktop        /media/yt/Desktop cifs vers=3.0,uid=1000,gid=1000,credentials=/home/yt/.cred_smb
//192.168.0.2/mydocs         /media/yt/Documents cifs vers=3.0,uid=1000,gid=1000,credentials=/home/yt/.cred_smb
//192.168.0.2/downloads      /media/yt/Downloads cifs vers=3.0,uid=1000,gid=1000,credentials=/home/yt/.cred_smb
//192.168.0.2/drawings       /media/yt/Drawings cifs vers=3.0,uid=1000,gid=1000,credentials=/home/yt/.cred_smb
//192.168.0.2/images         /media/yt/Images cifs vers=3.0,uid=1000,gid=1000,credentials=/home/yt/.cred_smb
//192.168.0.2/multimedia     /media/yt/Media cifs vers=3.0,uid=1000,gid=1000,credentials=/home/yt/.cred_smb
//192.168.0.2/music          /media/yt/Music cifs vers=3.0,uid=1000,gid=1000,credentials=/home/yt/.cred_smb
//192.168.0.2/mydocs         /media/yt/MyDocs cifs vers=3.0,uid=1000,gid=1000,credentials=/home/yt/.cred_smb
//192.168.0.2/mydrive        /media/yt/MyDrive cifs vers=3.0,uid=1000,gid=1000,credentials=/home/yt/.cred_smb
//192.168.0.2/photos         /media/yt/Pictures cifs vers=3.0,uid=1000,gid=1000,credentials=/home/yt/.cred_smb
//192.168.0.2/public         /media/yt/Public cifs vers=3.0,uid=1000,gid=1000,credentials=/home/yt/.cred_smb
//192.168.0.2/screencasts    /media/yt/Screencasts cifs vers=3.0,uid=1000,gid=1000,credentials=/home/yt/.cred_smb
//192.168.0.2/screenshots    /media/yt/Screenshots cifs vers=3.0,uid=1000,gid=1000,credentials=/home/yt/.cred_smb
//192.168.0.2/templates      /media/yt/Templates cifs vers=3.0,uid=1000,gid=1000,credentials=/home/yt/.cred_smb
//192.168.0.2/videos         /media/yt/Videos cifs vers=3.0,uid=1000,gid=1000,credentials=/home/yt/.cred_smb
- I create these directories where the remote shares will mount:
sudo mkdir /media/yt/AI && \
sudo mkdir /media/yt/Desktop && \
sudo mkdir /media/yt/Documents && \
sudo mkdir /media/yt/Downloads && \
sudo mkdir /media/yt/Drawings && \
sudo mkdir /media/yt/Images && \
sudo mkdir /media/yt/Media && \
sudo mkdir /media/yt/Music && \
sudo mkdir /media/yt/MyDocs && \
sudo mkdir /media/yt/MyDrive && \
sudo mkdir /media/yt/Pictures && \
sudo mkdir /media/yt/Public && \
sudo mkdir /media/yt/Screencasts && \
sudo mkdir /media/yt/Screenshots && \
sudo mkdir /media/yt/Templates && \
sudo mkdir /media/yt/Videos
- I create these symlinks (symbolic links) where the remote shares will display:
ln -s "/media/yt/AI" "/home/yt/AI"  && \
ln -s "/media/yt/Desktop" "/home/yt/Desktop" && \
ln -s "/media/yt/MyDocs" "/home/yt/Documents" && \
ln -s "/media/yt/Downloads" "/home/yt/Downloads" && \
ln -s "/media/yt/Drawings" "/home/yt/Drawings" && \
ln -s "/media/yt/Images" "/home/yt/Images" && \
ln -s "/media/yt/Media" "/home/yt/Media" && \
ln -s "/media/yt/Music" "/home/yt/Music" && \
ln -s "/media/yt/MyDocs" "/home/yt/MyDocs" && \
ln -s "/media/yt/MyDrive" "/home/yt/MyDrive" && \
ln -s "/media/yt/Pictures" "/home/yt/Pictures" && \
ln -s "/media/yt/Public" "/home/yt/Public" && \
ln -s "/media/yt/Screencasts" "/home/yt/Screencasts" && \
ln -s "/media/yt/Screenshots" "/home/yt/Screenshots" && \
ln -s "/media/yt/Templates" "/home/yt/Templates" && \
ln -s "/media/yt/Videos" "/home/yt/Videos"
NOTE: Some of these symlinks will replace system directories, e.g. the Downloads directory.
- I reboot my system to check the NAS symlinks.
NOTE: Within a terminal, my prompt tells me I'm in the
/media/yt/whateverdirectory. This makes sense given the symlinks I just created.
- I update my system:
sudo apt clean && \
sudo apt update && \
sudo apt dist-upgrade -y && \
sudo apt --fix-broken install && \
sudo apt autoclean && \
sudo apt autoremove -y
I reboot my system with the CloneZilla USB thumb drive installed.
I use CloneZilla to create an image of the distribution called [date]-img-work-nas.
Setting the Audio Output Device.
NOTE: These settings relate to the devices that drive speakers and headphones.
I power up my Workstation.
I open a Terminal.
I list my Pulse Audio output devices:
pactl list short sinks
NOTE: I can also use the
pactl list short sourcescommand to list audio inputs.
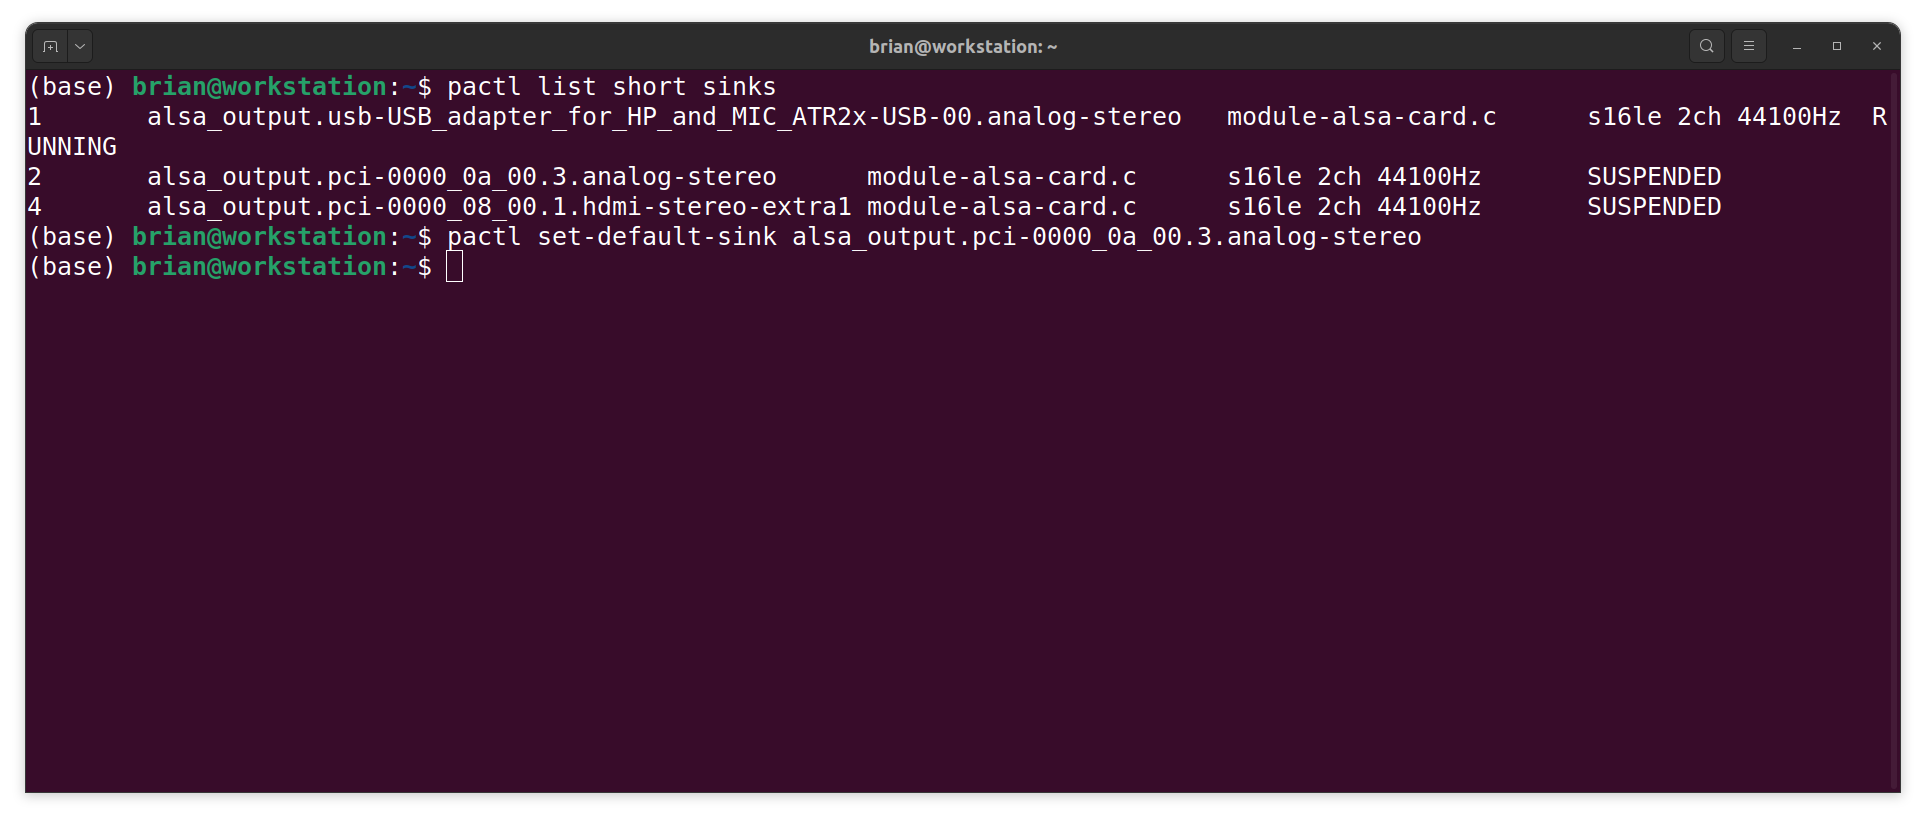
- I set my default output audio device:
pactl set-default-sink alsa_output.pci-0000_0a_00.3.analog-stereo
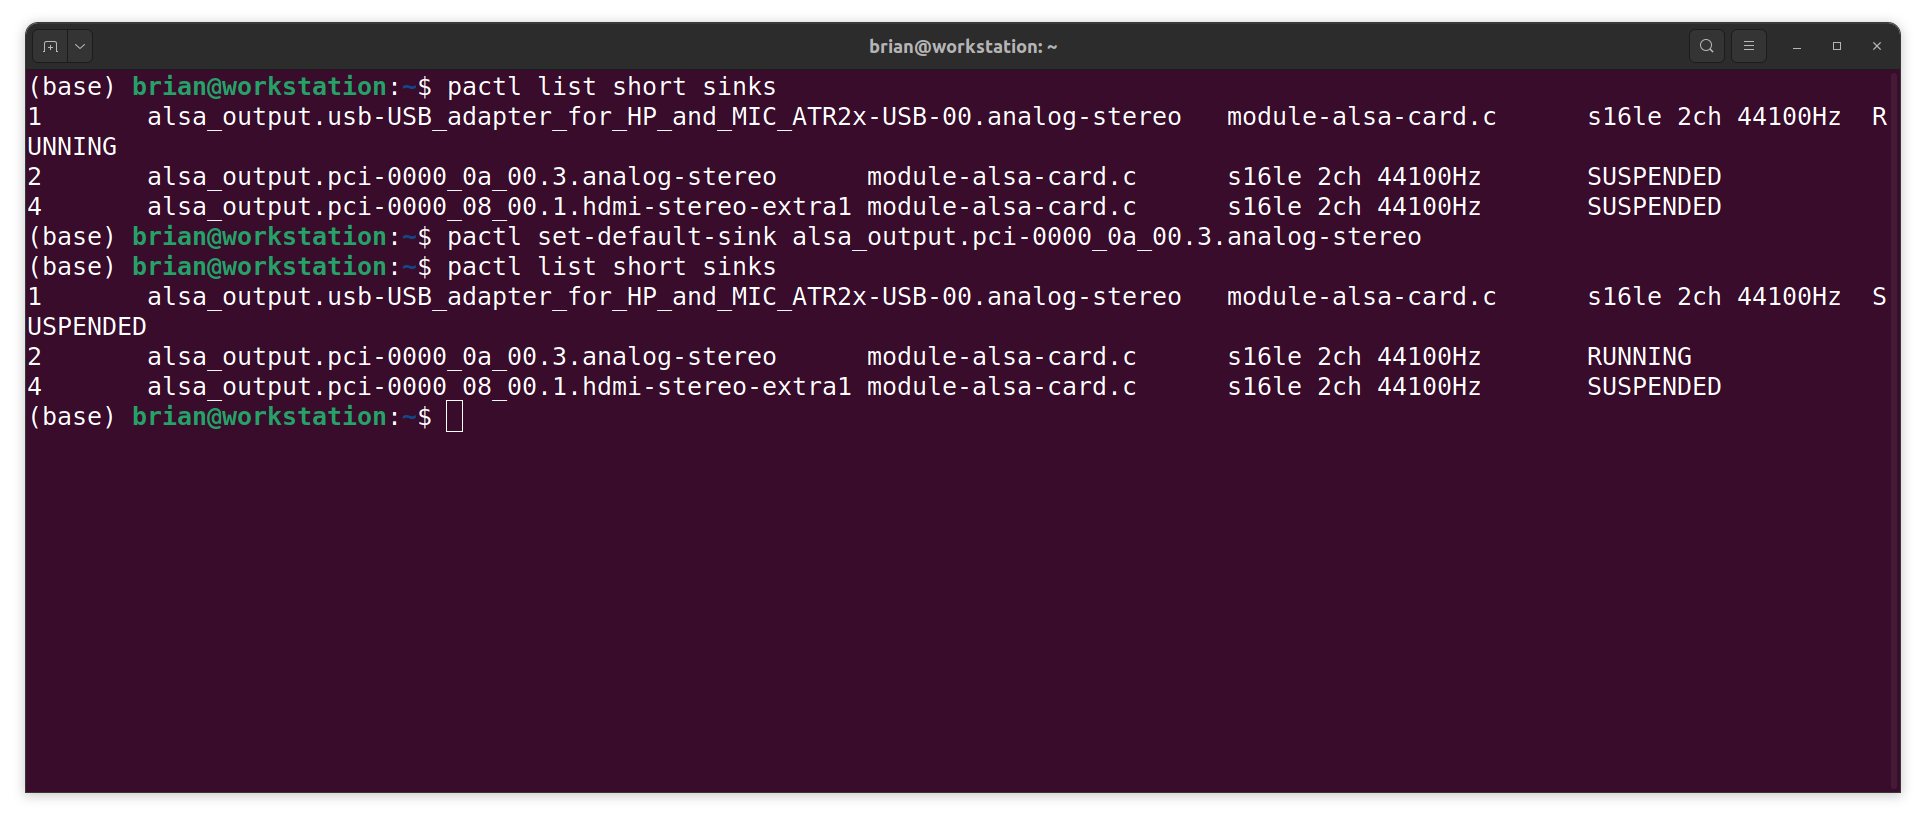
- I list my output audio devices again, to confirm the change:
pactl list short sinks
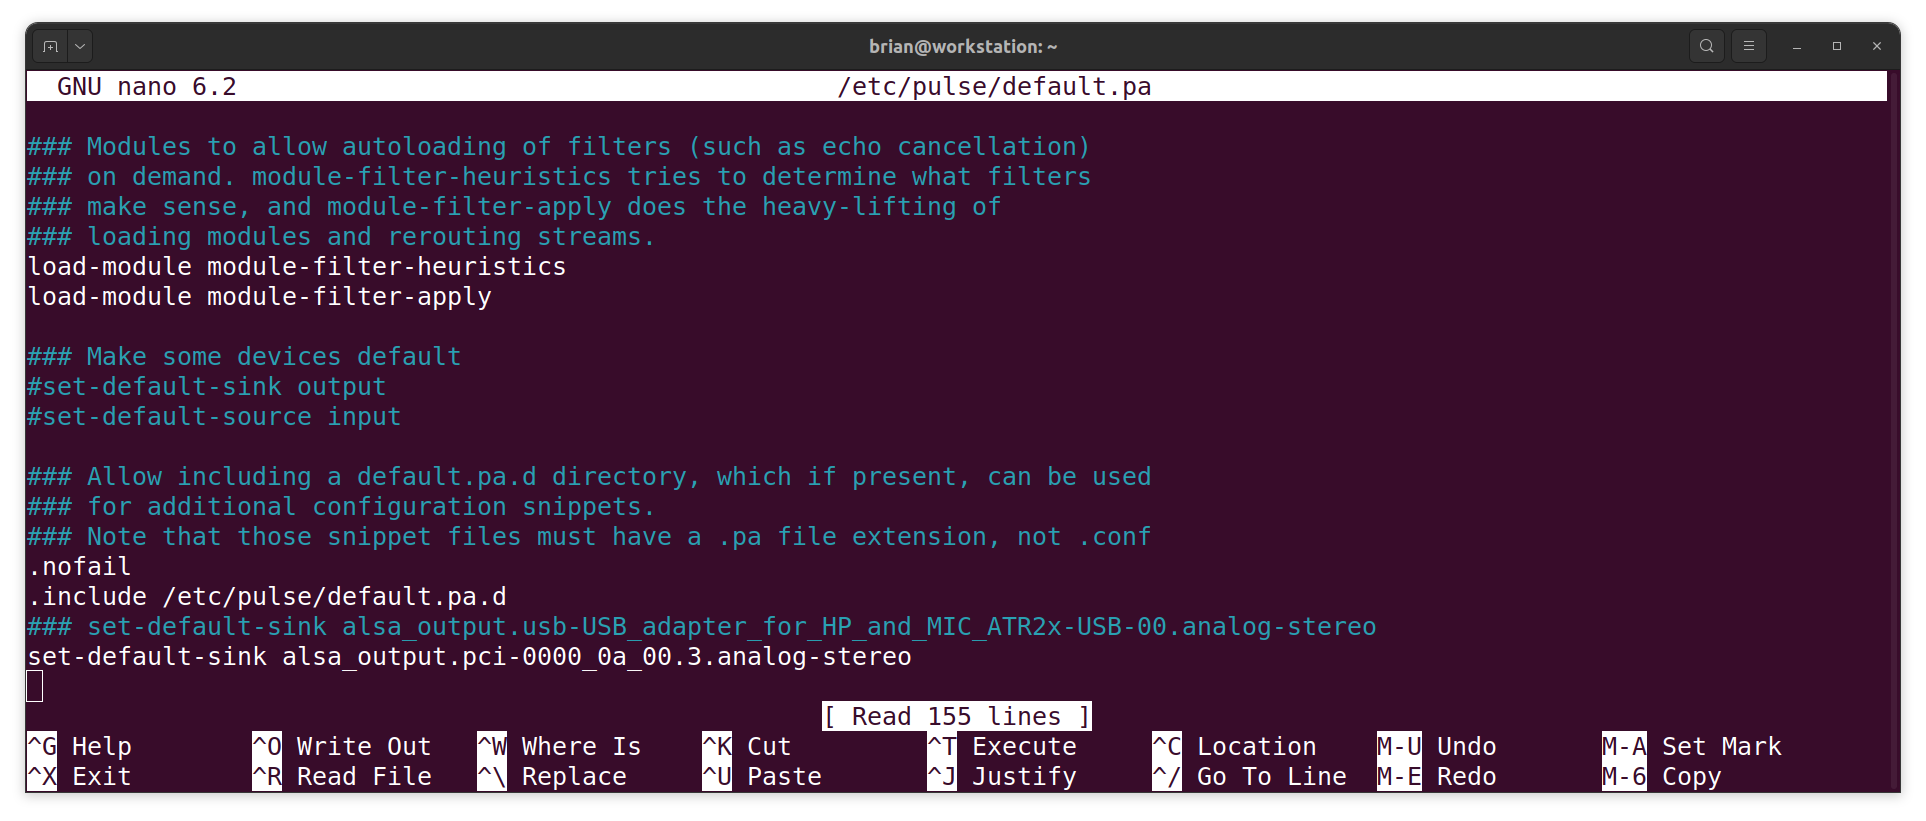
- I open the default Pulse Audio file with the Nano text editor:
sudo nano /etc/pulse/default.pa
- I scroll to the end of the file (CTRL + END), comment out the existing
set-default-sinksetting with a hash (#), replace it with the following, save (CTRL + S) the changes, and exit (CTRL + X) Nano:
set-default-sink alsa_output.pci-0000_0a_00.3.analog-stereo
- I update my system:
sudo apt clean && \
sudo apt update && \
sudo apt dist-upgrade -y && \
sudo apt --fix-broken install && \
sudo apt autoclean && \
sudo apt autoremove -y
I reboot my system with the CloneZilla USB thumb drive installed.
I use CloneZilla to create an image of the distribution called [date]-img-work-audio.
Installing Ubuntu Studio.
I power up my Workstation.
In the file manager, I navigate into the
img-workdrive.I open the
img-workdrive in a terminal (Right-click > Open in Terminalfrom the pop-up menu).I change the owner of the
Nasimage:
sudo chown -R $USER:$USER [date]-img-work-nas
- I download, and install, Ubuntu Studio:
sudo apt install -y ubuntustudio-installer
- I run the installer:
ubuntustudio-installer
NOTE: I can also run the installer from the
App Drawer(𐄡).
- When the installer completes, I reboot my system to check the installation.
NOTE: I had a small issue with the 535 GPU driver. Here's my fix: I switched to the X.Org open source driver, rebooted my system, re-installed the 535 GPU driver with
sudo ubuntu-drivers install nvidia:535, and re-booted my system again.
- I update my system:
sudo apt clean && \
sudo apt update && \
sudo apt dist-upgrade -y && \
sudo apt --fix-broken install && \
sudo apt autoclean && \
sudo apt autoremove -y
I reboot my system with the CloneZilla USB thumb drive installed.
I use CloneZilla to create an image of the distribution called [date]-img-work-studio.
Installing Other Package Managers.
I power up my Workstation.
In the file manager, I navigate into the
img-workdrive.I open the
img-workdrive in a terminal (Right-click > Open in Terminalfrom the pop-up menu).From a terminal, I change the owner of the
Studioimage:
sudo chown -R $USER:$USER [date]-img-work-studio
The Snap Package Manager.
- From the terminal, I use the
APTtoinstallthe Snap daemon:
sudo apt install -y snapd
- I use
SnaptoinstalltheSnappackage managercore:
sudo snap install core
- I create a symbolic (
-s) link (ln) to theSnapddaemon:
sudo ln -s /var/lib/snapd/snap /snap
The Flatpak Package Manager.
- I use the
APTtoinstalltheFlatpakpackage manager:
sudo apt install -y flatpak
The AppImage Package Manager.
I have yet to find any packages that I want to use that is bundled using the AppImage package manager. This is the reason I haven't written a post about the technology.
- I update my system:
sudo apt clean && \
sudo apt update && \
sudo apt dist-upgrade -y && \
sudo apt --fix-broken install && \
sudo apt autoclean && \
sudo apt autoremove -y
I reboot my system with the CloneZilla USB thumb drive installed.
I use CloneZilla to create an image of the distribution called [date]-img-work-pacman.
Installing the Browsers.
I power up my Workstation.
In the file manager, I navigate into the
img-workdrive.I open the
img-workdrive in a terminal (Right-click > Open in Terminalfrom the pop-up menu).From the terminal, I change the owner of the
Pacmanimage:
sudo chown -R $USER:$USER [date]-img-work-pacman
The Firefox Browser.
- From the terminal, I download the Firefox browser, if required:
sudo snap install firefox
I sign-in to my Firefox account.
I setup the Firefox browser.
The Chrome Browser.
- I change to the Downloads directory:
cd ~/Downloads
- I download the Chrome browser:
wget https://dl.google.com/linux/direct/google-chrome-stable_current_amd64.deb
- I install the Chrome browser:
sudo apt install ./google-chrome-stable_current_amd64.deb
- I run the Chrome browser:
google-chrome
- I remove the Chrome browser installer:
sudo apt autoremove google-chrome-stable
The Brave Browser.
- I download the GPG (GNU Privacy Guard) keyring:
sudo curl -fsSLo /usr/share/keyrings/brave-browser-archive-keyring.gpg https://brave-browser-apt-release.s3.brave.com/brave-browser-archive-keyring.gpg
- I download the repo:
echo "deb [signed-by=/usr/share/keyrings/brave-browser-archive-keyring.gpg] https://brave-browser-apt-release.s3.brave.com/ stable main"|sudo tee /etc/apt/sources.list.d/brave-browser-release.list
- I add the repo to my local system:
sudo apt update
- I install the Brave browser:
sudo apt install -y brave-browser
- I run the following command that creates, or replaces, the
brave-browser-release.listfile so that it includes thearch=amd64parameter:
echo "deb [arch=amd64 signed-by=/usr/share/keyrings/brave-browser-archive-keyring.gpg] https://brave-browser-apt-release.s3.brave.com/ stable main"|sudo tee /etc/apt/sources.list.d/brave-browser-release.list
- I update my system:
sudo apt clean && \
sudo apt update && \
sudo apt dist-upgrade -y && \
sudo apt --fix-broken install && \
sudo apt autoclean && \
sudo apt autoremove -y
I reboot my system with the CloneZilla USB thumb drive installed.
I use CloneZilla to create an image of the distribution called [date]-img-work-browsers.
Installing the Container and Environment Managers.
I power up my Workstation.
In the file manager, I navigate into the
img-workdrive.I open the
img-workdrive in a terminal (Right-click > Open in Terminalfrom the pop-up menu).From the terminal, I change the owner of the
Browsersimage:
sudo chown -R $USER:$USER [date]-img-work-browsers
NOTE: These posts describe how to install the container and environment managers.
I update my system:
sudo apt clean && \
sudo apt update && \
sudo apt dist-upgrade -y && \
sudo apt --fix-broken install && \
sudo apt autoclean && \
sudo apt autoremove -y
I reboot my system with the CloneZilla USB thumb drive installed.
I use CloneZilla to create an image of the distribution called [date]-img-work-envman.
Installing GenApps.
I power up my Workstation.
In the file manager, I navigate into the
img-workdrive.I open the
img-workdrive in a terminal (Right-click > Open in Terminalfrom the pop-up menu).From a terminal, I change the owner of the
EnvManimage:
sudo chown -R $USER:$USER [date]-img-work-envman
I install the following apps.
Checking the GPU Driver.
I check the GPU driver from the
Software & Updates > Additional Driverstab, if required.I install the GPU device driver (the
nvidia-driver-535Metapackage) for my GTX3060 graphics card, if required:
sudo ubuntu-drivers install nvidia:535
- Or I can let the system decide which drivers to install (not recommended):
sudo ubuntu-drivers autoinstall
- I can remove the NVIDIA packages, if required:
sudo apt remove *nvidia*
- I can then use APT to re-install the 535 driver:
sudo apt install nvidia-driver-535
Fixing the Dual-Boot Time Issue.
- I adjust the clock to fix the dual-boot time issue:
sudo apt update && sudo apt upgrade -y
timedatectl set-local-rtc 1 --adjust-system-clock
timedatectl
timedatectl set-local-rtc 0 --adjust-system-clock
Installing Pika Backup.
- I install the Flatpak package manager, if required:
sudo apt install flatpak
- I add the Flathub repository:
flatpak remote-add --if-not-exists flathub https://flathub.org/repo/flathub.flatpakrepo
- I install the Pika Backup utility:
flatpak install flathub -y org.gnome.World.PikaBackup
- I can uninstall Pika Backup, if required:
flatpak uninstall --delete-data org.gnome.World.PikaBackup
- I can uninstall any unused Flatpacks, if required:
flatpak uninstall --unused
Installing Spotify.
- I use Snap to install Spotify:
sudo snap install spotify
Installing Audacity.
- I use APT to install Audacity:
sudo apt install audacity
Installing Screenkey.
- I use Snap to install Screenkey:
sudo snap install screenkey --beta
Installing Tweaks.
- I use APT to install the GNOME Tweaks tool:
sudo apt install gnome-tweaks
Installing Elgato Stream Deck for Linux.
- I install streamdeck-ui:
https://timothycrosley.github.io/streamdeck-ui/
Installing HydraPaper.
- I use APT to install HydraPaper:
sudo apt install hydrapaper
Troubleshooting.
NOTE: There is a known bug in HydraPaper running on Ubuntu 21.10 and later. Here is the (Dark Mode) fix.
- I find the
wallpaper_merger.pymodule:
sudo find / -name "*wallpaper_merger.py*"
- I use VS Code to open the
wallpaper_merger.pymodule:
code /usr/lib/python3/dist-packages/hydrapaper/wallpaper_merger.py
I find the
set_wallpaper_gnomefunction.I remove the
ifpart so all that is left iswp_key='picture-uri-dark',(WITH the ending comma.)I save the change.
I run HydraPaper in Dark Mode.
Updating Blender.
- I check the Blender version:
blender --version
- I remove Blender:
sudo apt purge --auto-remove blender
- I use Snap to install Blender:
sudo snap install blender --classic
- I check the Blender version:
blender --version
- I can remove Blender, if required:
sudo snap remove blender
- I update my system:
sudo apt clean && \
sudo apt update && \
sudo apt dist-upgrade -y && \
sudo apt --fix-broken install && \
sudo apt autoclean && \
sudo apt autoremove -y
I reboot my system with the CloneZilla USB thumb drive installed.
I use CloneZilla to create an image of the distribution called [date]-img-work-genapps.
Installing DevApps.
I power up my Workstation.
In the file manager, I navigate into the
img-workdrive.I open the
img-workdrive in a terminal (Right-click > Open in Terminalfrom the pop-up menu).From a terminal, I change the owner of the
GenAppsimage:
sudo chown -R $USER:$USER [date]-img-work-genapps
I install the following apps.
Installing VS Code.
- I use APT to install VS Code:
sudo apt install -y code
- Alternatively, I can instead use Snap to install VS Code:
sudo snap install code --classic
- I run VS Code:
code
I activate Auto Save from
File > Auto Save.I can uninstall the APT-installed VS Code:
sudo apt purge --auto-remove code
- I can uninstall the Snap-installed VS Code:
sudo snap remove code
I also install the following VS Code Extensions:
Python from Microsoft,
Pylance from Microsoft,
AsciiDoc from asciidictor,
Live Server from Ritwick Dey,
Python Debugger from Microsoft,
Markdown All in One from Yu Zhang,
Prettier - Code formatter from Prettier,
Geo Data Viewer from Random Fractals Inc.,
Code Spell Checker from Street Side Software,
Markdown Table Prettifier from Krisztian Daroczi,
JavaScript (ES6) Code Snippets from charalampos karypidis, and
rust-analyzer from The Rust Programming Language rust-lang.org.
I have also used these extensions in the past:
C/C++,
ES Lint,
Colorize,
Beautify,
Rainbow Tags, and
Auto Rename Tag.
NOTE: These extensions are OS-independent.
Installing Rust.
- I install the essential build tools:
sudo apt install build-essential
- I install Rust:
curl --proto '=https' --tlsv1.3 https://sh.rustup.rs -sSf | sh
- I add the Cargo environment to my system:
source "$HOME/.cargo/env"
- I check the Rust version:
rustup --version
- I open the Rust documents:
rustup doc
- I can uninstall Rust, if required:
rustup self uninstall
Installing Python.
- I install Python 3:
sudo apt install -y python3
- I install the Python packages:
sudo apt install -y python3-pip python3-dev python3-venv build-essential libssl-dev libffi-dev zlib1g-dev libncurses5-dev libgdbm-dev libnss3-dev libreadline-dev
Installing the Modular Tools.
- I download the Modular CLI:
curl https://get.modular.com | sh - && \
modular auth mut_511d5ea22b594cd385f8216af63b2d73
- I can update the Modular CLI, if required:
sudo apt install -y modular
- I sign into your Modular account:
modular auth
- I install Mojo:
modular install mojo
- I can update Mojo, if required:
modular update mojo
- I install MAX:
modular install max
- I can update MAX, if required:
modular update max
- I install the MAX Engine Python package:
MAX_PATH=$(modular config max.path) \
&& python3 -m pip install --find-links $MAX_PATH/wheels max-engine
- I use
Bashto set environment variables:
MAX_PATH=$(modular config max.path) \
&& BASHRC=$( [ -f "$HOME/.bash_profile" ] \
&& echo "$HOME/.bash_profile" || echo "$HOME/.bashrc" ) \
&& echo 'export MODULAR_HOME="'$HOME'/.modular"' >> "$BASHRC" \
&& echo 'export PATH="'$MAX_PATH'/bin:$PATH"' >> "$BASHRC" \
&& source "$BASHRC"
- I update my system:
sudo apt clean && \
sudo apt update && \
sudo apt dist-upgrade -y && \
sudo apt --fix-broken install && \
sudo apt autoclean && \
sudo apt autoremove -y
I reboot my system with the CloneZilla USB thumb drive installed.
I use CloneZilla to create an image of the distribution called [date]-img-work-devapps.
Installing Language Model Utilities.
I power up my Workstation.
In the file manager, I navigate into the
img-workdrive.I open the
img-workdrive in a terminal (Right-click > Open in Terminalfrom the pop-up menu).From a terminal, I change the owner of the
DevAppsimage:
sudo chown -R $USER:$USER [date]-img-work-devapps
NOTE: There are missing posts which should be available by the end of April 2024.
MemGPT
LangChain
I update my system:
sudo apt clean && \
sudo apt update && \
sudo apt dist-upgrade -y && \
sudo apt --fix-broken install && \
sudo apt autoclean && \
sudo apt autoremove -y
I reboot my system with the CloneZilla USB thumb drive installed.
I use CloneZilla to create an image of the distribution called [date]-img-work-langutils.
Installing DaVinci Resolve Studio 18.
I power up my Workstation.
In the file manager, I navigate into the
img-workdrive.I open the
img-workdrive in a terminal (Right-click > Open in Terminalfrom the pop-up menu).From the terminal, I change the owner of the
LangUtilsimage:
sudo chown -R $USER:$USER [date]-img-work-langutils
Plan A: Install DaVinci Resolve Studio 18 Directly.
If the direct install fails, I can switch to Plan B.
- I change to the Downloads directory:
cd ~/Downloads
- I install these libraries:
sudo apt install -y libfuse2 libapr1 libaprutil1 libglu1-mesa \
libnuma1 libxcb-composite0 libxcb-cursor0 libxcb-damage0 \
libxcb-icccm4 libxcb-image0 libxcb-keysyms1 libxcb-render-util0 \
libxcb-util1 libxcb-xinerama0 libxcb-xinput0 libxcb-xkb1 \
libxkbcommon-x11-0 ocl-icd-libopencl1 libasound2 libxcb-shape0 libxtst6
I go to the DaVinci Resolve Studio 18 downloads page and download the installer:
I unpack the DaVinci Resolve Studio 18 zip file:
unzip ./DaVinci_Resolve_18.6.5_Linux.zip
NOTE: At the time of writing, 18.6.5 is the latest version.
- I change into the unzipped directory:
cd ./DaVinci_Resolve_18.6.5_Linux
- I list the contents of the directory:
ls
- I change the permission of the DaVinci_Resolve_Studio_18.6.5_Linux.run file to an executable:
sudo chmod +x ./DaVinci_Resolve_Studio_18.6.5_Linux.run
- I install the DaVinci_Resolve_Studio_18.6.5_Linux.run file:
sudo ./DaVinci_Resolve_Studio_18.6.5_Linux.run -i
- This is the displayed output after the installation:
Using a pre-existing Data dir : /var/BlackmagicDesign/DaVinci Resolve
DaVinci Resolve installed to /opt/resolve
Plan B: Install DaVinci Resolve Studio 18 within Distrobox.
I update my system:
sudo apt clean && \
sudo apt update && \
sudo apt dist-upgrade -y && \
sudo apt --fix-broken install && \
sudo apt autoclean && \
sudo apt autoremove -y
I reboot my system with the CloneZilla USB thumb drive installed.
I use CloneZilla to create an image of the distribution called [date]-img-work-davinci.
Saving the Final Image.
I power up my Workstation.
In the file manager, I navigate into the
img-workdrive.I open the
img-workdrive in a terminal (Right-click > Open in Terminalfrom the pop-up menu).From a terminal, I change the owner of the
DaVinciimage:
sudo chown -R $USER:$USER [date]-img-work-davinci
I reboot my system with the CloneZilla USB thumb drive installed.
I use CloneZilla to create an image of the distribution called [date]-img-work-fullsys.
The Results.
Transitioning to Ubuntu 24.04 LTS promises to be a tiresome journey, filled with the promise of new features yet still ending up with the same ol' stable distribution. This guide has walked through the installation process, from preparing a bootable USB on a Widows 11 system to securing the APT package manager, and even connecting to a NAS. I've also covered the installation of various package managers, browsers, and essential software like Ubuntu Studio, ensuring I'm well-equipped for work. I've tackled system updates, app installs, and even the integration of LLM utilities, demonstrating the versatility of Ubuntu 24.04 LTS for app development. By creating system images at each significant step, I've ensured a safety net exists that makes for a time-consuming, yet stress-free process.
As I look forward to the official release, it's clear that Ubuntu 24.04 LTS is set to underwhelm my computing expectations, reaffirming Ubuntu's commitment to providing a bland, though user-friendly operating system. Whether for professional development, creative endeavours, or everyday use, Ubuntu 24.04 LTS is poised to become another mediocre upgrade for enthusiasts and newcomers alike. Safe. Boring. Predictable. Stable. Exactly what a developer needs in her systems.
In Conclusion.
I'm looking forward to the Ubuntu 24.04 LTS launch! It's coming out on April 25, 2024, and I plan to update all of my home devices to this new version. This includes my Workstation PC, my Homelab NUC, the bedroom NUC, and the living room laptop.
I've been practising my installation process with Ubuntu 23.10, also known as "Mantic Minotaur," to ensure I'm ready for the launch. Even though it's only supported until July 2024, it's a great way to prepare for the big update. (I also needed content for this blog.)
Why choose Ubuntu 24.04 LTS? It has stability, security, and many features that will improve my computing experience. My current, yet continually evolving, process involves making a bootable USB on Windows 11, securing the APT package manager, and setting up Ubuntu Studio for my creative work. Plus, I made sure to back up all my systems with CloneZilla images at every step. Because, honestly, nothing ever goes wrong... right?
I've also installed LLM utilities, from LXD/LXC to AutoGen Studio, so I can make sure I'm ready for work. As the release gets closer, I feel excited and inspired. Ubuntu 24.04 LTS will be a stable and predictable upgrade, great for developers like me who prefer reliability over extra features.
What about you? Are you planning to upgrade to Ubuntu 24.04 LTS, or will you be watching from the sidelines? Let's discuss in the comments below!
Until next time: Be safe, be kind, be awesome.
#UbuntuInstallation #Ubuntu2404LTS #Ubuntu2404 #LTSRelease #UbuntuRelease #UbuntuExperience #UbuntuDesktop #UbuntuStudio #Ubuntu #Linux #LinuxDistro #LinuxCommunity #OperatingSystemUpgrade #SystemUpgrade #TechUpgrade #TechJourney #TechGuide #CloneZilla #SystemBackup #TechPreparation #SoftwareInstallation #DeveloperTools #OpenSource #LLMUtilities
Subscribe to my newsletter
Read articles from Brian King directly inside your inbox. Subscribe to the newsletter, and don't miss out.
Written by

Brian King
Brian King
Thank you for reading this post. My name is Brian and I'm a developer from New Zealand. I've been interested in computers since the early 1990s. My first language was QBASIC. (Things have changed since the days of MS-DOS.) I am the managing director of a one-man startup called Digital Core (NZ) Limited. I have accepted the "12 Startups in 12 Months" challenge so that DigitalCore will have income-generating products by April 2024. This blog will follow the "12 Startups" project during its design, development, and deployment, cover the Agile principles and the DevOps philosophy that is used by the "12 Startups" project, and delve into the world of AI, machine learning, deep learning, prompt engineering, and large language models. I hope you enjoyed this post and, if you did, I encourage you to explore some others I've written. And remember: The best technologies bring people together.
