Complete Avail Light Client Lift-off challenge quickly with Supernoderz and mint NFT
 Spheron Network
Are you interested in participating in the Avail Light client challenge and looking to deploy an Avail Light Client node to complete the challenge? But don't know where to start? Look no further! In this step-by-step guide, we'll show you how to easily deploy an Avail Light Client node using Supernoderz. With just a few clicks, you can set up your own Avail Light Client node, giving you access to the features and benefits of the Avail ecosystem.
The Avail light client plays a crucial role in the Avail network by allowing anybody to verify the network's state with minimal resources. The Avail light client challenge will run from 2April 2024 to 9 April 2024. This guide outlines all the instructions for participating and quickly earning the Blobscription NFT in the challenge. Completing the challenge gives you the chance to receive exclusive winner NFTs and much-anticipated community rewards.
This challenge will be the last one as part of Avail's incentivized testnet program as Avail rolls towards the mainnet. You can visit the Avail light client challenge page to sign up for the challenge.
Follow the Supernoderz thread on X to complete the challenge
What you will need
A Subwallet you can use to sign transactions.
Some AVL tokens if you don't have them. You can use the Avail faucet to get some. (This is important)
A computer with an internet connection and Supernoderz.
And that's it.
Step-by-step guide on how to participate and complete the challenges
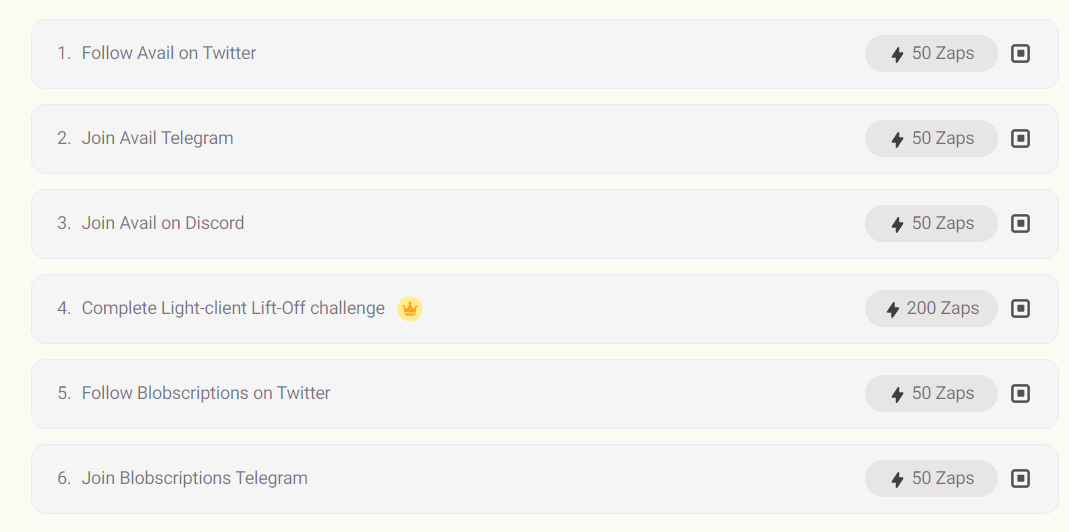
You need to complete all six tasks mentioned in the challenge. Five of the tasks are easy to follow, and you can join Avail's social media handles and groups to complete them. However, one main task carries higher points. This guide will focus on Challenge 4, which requires you to deploy an Avail Light Client Node with the highest point of 200 Zaps.

Deploying an Avail Light Node on Supernoderz is a simple, streamlined process that does not require any DevOps knowledge!
Step 1: Create and Connect Your Sub Wallet for the seed phrase
Note: You can follow the below steps to create a new account to get a seed phrase. Or you can use the existing account seed phrase to deploy the avail node and skip this step.
Install Sub Wallet Chrome Extension:
Go to the Chrome Web Store and search "Sub Wallet—Polkadot Wallet." You can also download it from Here. Or You can download by going on subwallet.app
Click the "Add to Chrome" button and follow the prompts to install the extension.
Create a Sub Wallet Account:
Click on the Sub Wallet extension icon in your Chrome browser.
On the SubWallet page, click on "Create a new account".
Agree to the terms and conditions by clicking the checkbox and then click "Continue".
Create a secure password for your account and remember to save it securely, as SubWallet cannot recover lost passwords. Copy or download the seed phrase provided.
- Confirm that you have securely stored the seed phrase by clicking "I have kept it somewhere safe." (it's needed to deploy the avail node)
Now, you have successfully created a subwallet account and have a seed phrase with you.
Step 2: Deploy Your Avail Light Client Node
1. Go to https://supernoderz.com/ and click on "Sign Up" to continue with Google.
2. Next, You will land on the dashboard; click on the Marketplace tab in the upper left corner.
3. Search for "Avail Light Client" and click on it.
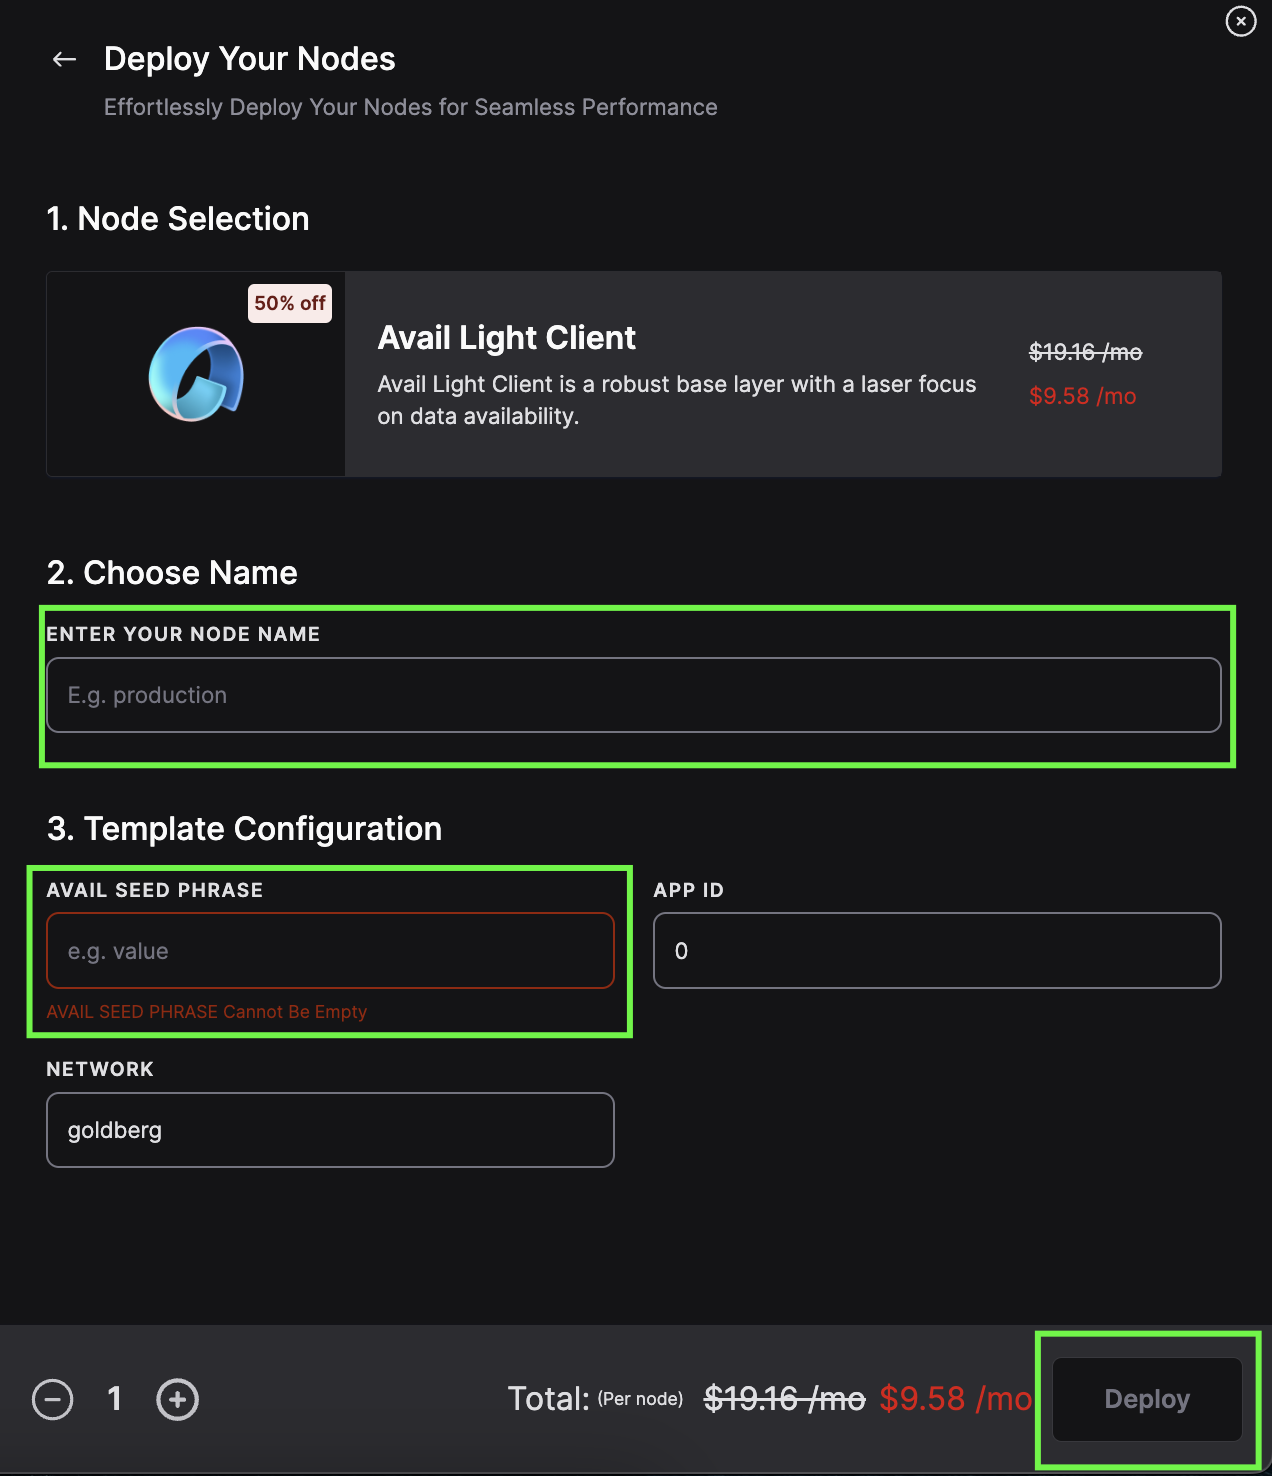
4. Choose your node name (e.g., batman, godzilla, etc).
5. Next, you will see the configuration section. Add a seed phrase of your existing wallet, or create a new account and get it from Step 1.

Click "Deploy" to start the deployment process. It's as simple as that!
Step 3: Copy the Avail Light Client Public Key
1. Wait for your node to be fully set up and provisioned. If the instance logs don't appear after a few minutes, click the "Refresh" button.
2. In the logs, search for the ‘public key’ and copy it. Save it somewhere safe.
Step 4: You can check the Status of Your Node (Optional)
1. Copy the connection URL of your node.
2. Add "/v1/status" to the connection URL (e.g., http://<connection URL of 7000 port>/v1/status).
Step 5: Complete Challenge 4 - Light-client Lift-Off challenge
1. Next, Click "Connect Wallet" from the avail challenge page. Choose the existing account you used for the seed phrase and connect it.
After connecting your wallet successfully, you will get a notification like the one below.
2. Click on Challenge 4
3. Next, you will see a section to Paste your ‘Avail Light Client Public Key’ (from Step 3). Click "Verify," and then Click "Next."
You will get a success notification like this.
Step 6: Claim Your Reward
1. After completing all the 5 remaining tasks which you can do by following Avail social media channels and handles, You will see the "Claim Mint NFT Participant" button will be enabled. Click on it.
2. Your subwallet window will open to approve the signature request. Click on the "Approve" button.
3. Voila! You have successfully completed all the challenges and minted your participation NFT.
Note: Make sure you have sufficient AVL tokens available in your wallet to Mint the NFT. If you don't have any, get them fromhttps://faucet.avail.tools/by pasting your subwallet address.
Conclusion
And that's it! Following these simple steps, you can now participate in the Avail Light Client challenge and deploy your Avail Light Client node using Supernoderz. With just a few clicks, you can set up your node and start enjoying the benefits of the Avail ecosystem. Don't miss out on this exciting opportunity to earn exclusive rewards and be a part of the growing Avail community. Good luck, and happy deploying nodes!
Subscribe to my newsletter
Read articles from Spheron Network directly inside your inbox. Subscribe to the newsletter, and don't miss out.
Written by

Spheron Network
Spheron Network
On-demand DePIN for GPU Compute