Get started with SysVinit init system in Linux
 Maxat Akbanov
Table of contents
- 1. The Init Process
- 2. Initialization and Runlevels
- 3. Service Management
- 4. Transition and Legacy
- Workshop: Get acquainted with SysVinit
- Exercise 1: Understanding the Init Process
- Exercise 2: Exploring /etc/inittab
- Exercise 3: Identifying and Changing Runlevels
- Exercise 4: Managing Services
- Exercise 5: Modifying Runlevel Services
- Exercise 6: Hands-on Challenge
- Hand-on Challenge Solution
- Step 1: Writing the Custom Script
- Step 2: Registering the Script with System Startup
- Step 3: Testing the Script
- References:

SysVinit, or System V init, is the traditional initialization system that Linux distributions used to adopt to bootstrap the user space and manage system processes after the Linux kernel has been booted. Named after the Unix System V style of initialization, it represents one of the earlier approaches to system startup and service management in Unix-like operating systems. Here’s a closer look at how it works and its components:
1. The Init Process
At boot time, the Linux kernel launches the
initprogram, which is the first process (process 1) and the parent of all other processes. SysVinit provides thisinitprogram.
Image source: linuxtldr.com
2. Initialization and Runlevels
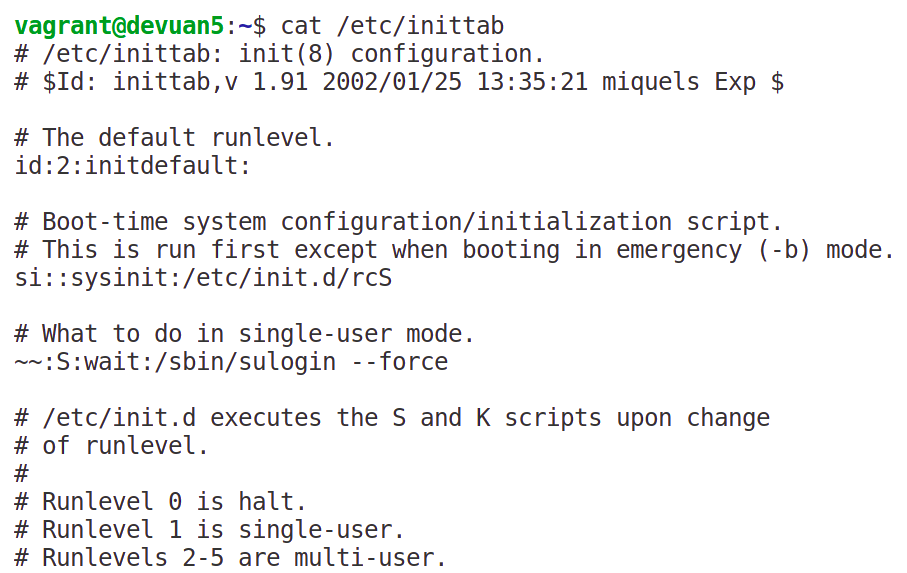
/etc/inittab: This configuration file defines how the system should be initialized. SysVinit reads this file to determine the script to execute during the boot process.
Runlevels: SysVinit introduces the concept of runlevels, which are modes of operation that dictate which services or processes are active. Common runlevels include:
0: Halt
1 or S: Single-user mode, mainly for maintenance
2: Multi-user mode without networking (not used in all distributions)
3: Full multi-user mode with networking but without a graphical interface
5: Multi-user mode with networking and a graphical interface
6: Reboot
3. Service Management
Scripts: Services and daemons are managed through scripts located in
/etc/init.d/(or sometimes/etc/rc.d/), which can be started, stopped, or otherwise managed by passing them appropriate arguments.Runlevel Directories: These scripts are linked to specific runlevel directories (
/etc/rcX.d/, whereXis the runlevel number), which contain symbolic links to scripts in/etc/init.d/. The names of these links begin withSto start a service orKto kill a service, followed by a number indicating the order in which they should be processed.
4. Transition and Legacy
Superseded by Systemd: Many Linux distributions have transitioned to systemd, a newer init system, due to its more robust features, faster boot times, and improved system management capabilities. However, SysVinit is still in use in certain distributions, especially those favoring traditional Unix philosophies or minimalism.
Compatibility Layer: Systemd provides a compatibility layer for SysVinit scripts, allowing systems to continue using old init scripts under the new system.
SysVinit’s simplicity and straightforwardness made it a foundation for many Linux systems over the years. Despite being largely superseded by systemd in recent distributions, understanding SysVinit is crucial for managing older systems or distributions that still rely on this classic initialization system.
Workshop: Get acquainted with SysVinit
Exercise 1: Understanding the Init Process
Verify init as PID 1 and understand its role.
Steps:
Open the terminal.
Execute
ps -p 1.
Solution:
You should see output indicating that PID 1 is
/sbin/initor justinit, affirming it as the first process started by the Linux kernel.
Exercise 2: Exploring /etc/inittab
Familiarize yourself with the /etc/inittab file, which controls the init process.
Steps:
- View
/etc/inittabby executingcat /etc/inittab.
Solution:
You will see various configurations, including system initialization, runlevel settings, and scripts executed at different runlevels. This file is crucial for customizing system boot behavior.

Exercise 3: Identifying and Changing Runlevels
Learn how to identify the current runlevel and change to a different runlevel.
Steps:
Identify the current runlevel by executing
runlevel. For devuan based VM you have to type/sbin/runlevel
Change to multi-user mode without GUI (usually runlevel 3) by executing
sudo telinit 3.
Solution:
The initial
runlevelcommand will show the current runlevel. After changing to runlevel 3, runningrunlevelagain will confirm the change.
Exercise 4: Managing Services
Practice starting, stopping, and restarting services.
Steps:
Go to
/etc/init.d/.Choose a service, for example,
ssh.Start the service with
sudo /etc/init.d/ssh start.Stop the service with
sudo /etc/init.d/ssh stop.Restart the service with
sudo /etc/init.d/ssh restart.

Exercise 5: Modifying Runlevel Services
Learn how to add or remove services from runlevels.
Steps:
Create a simple script in
/etc/init.d/testservice(this can be a simple bash script that echoes a message).### BEGIN INIT INFO # Provides: testservice # Required-Start: $local_fs $network # Required-Stop: $local_fs # Default-Start: 2 3 4 5 # Default-Stop: 0 1 6 # Short-Description: Example service # Description: This is an example service script. ### END INIT INFO echo "Test Service"Make it executable with
chmod +x /etc/init.d/testservice.Add the service to default runlevels with
sudo update-rc.d testservice defaults.Verify by checking the relevant
/etc/rcX.d/directories.
Remove the service with
sudo update-rc.d -f testservice remove.
Exercise 6: Hands-on Challenge
You are tasked with ensuring a custom script runs at startup, performing necessary system health checks.
Steps:
Write a simple bash script in
/etc/init.d/customhealthcheckthat logs system health information.Make the script executable.
Add the script to run at runlevel 3.
Reboot the system and verify the script ran by checking its log output.
Hand-on Challenge Solution
For the hands-on challenge in Exercise 6, where you're tasked with ensuring a custom script runs at startup to perform system health checks, follow these steps to create and configure the script:
Step 1: Writing the Custom Script
Create the Script: Open a text editor (like
nanoorvi) to create your script in the/etc/init.d/directory. Name it something descriptive, such ascustomhealthcheck.sudo nano /etc/init.d/customhealthcheckAdd the Script Contents: Below is a simple template for the script. It includes the necessary LSB tags and a simple command that appends a health check message to a file in
/var/log/.#!/bin/bash ### BEGIN INIT INFO # Provides: customhealthcheck # Required-Start: $local_fs $network # Required-Stop: $local_fs # Default-Start: 2 3 4 5 # Default-Stop: 0 1 6 # Short-Description: Perform system health check # Description: Logs system health check status ### END INIT INFO case "$1" in start) echo "Performing system health check..." # Example health check: log disk usage echo "Disk usage as of $(date):" >> /var/log/healthcheck.log df -h >> /var/log/healthcheck.log ;; stop) # This script doesn't need to do anything on stop ;; *) echo "Usage: /etc/init.d/customhealthcheck {start|stop}" exit 1 ;; esac exit 0Make the Script Executable: Change the permissions of your script to make it executable.
sudo chmod +x /etc/init.d/customhealthcheck
Step 2: Registering the Script with System Startup
Add the Script to Default Runlevels: Use the
update-rc.dcommand to add your script to the system's startup sequences.sudo update-rc.d customhealthcheck defaultsVerify the Links: Verify that symbolic links have been created in the appropriate
/etc/rcX.d/directories for the runlevels you've chosen. For example, for runlevel 3, you would check in/etc/rc3.d/.ls /etc/rc3.d/ | grep customhealthcheck
Step 3: Testing the Script
Reboot Your System: To test that the script runs at startup, reboot your system.
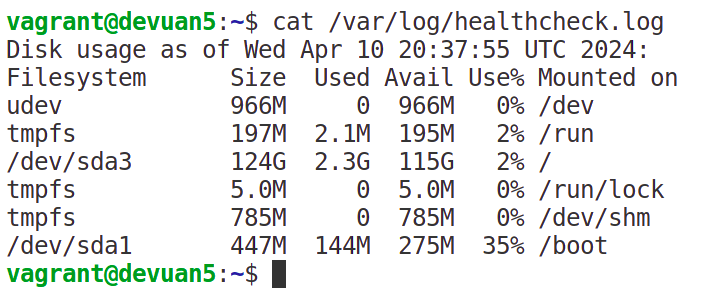
sudo rebootCheck the Log: After the system has restarted, check the
/var/log/healthcheck.logfile to confirm that your script executed and logged the disk usage.cat /var/log/healthcheck.log
This completes the hands-on challenge. You've written a custom startup script to perform a basic system health check, registered it with the system's startup sequence, and verified that it executes upon system boot. This exercise demonstrates how to integrate custom scripts into the SysVinit system, a foundational skill for Linux system administration.
References:
Subscribe to my newsletter
Read articles from Maxat Akbanov directly inside your inbox. Subscribe to the newsletter, and don't miss out.
Written by

Maxat Akbanov
Maxat Akbanov
Hey, I'm a postgraduate in Cyber Security with practical experience in Software Engineering and DevOps Operations. The top player on TryHackMe platform, multilingual speaker (Kazakh, Russian, English, Spanish, and Turkish), curios person, bookworm, geek, sports lover, and just a good guy to speak with!