Docker init
 Sakeena Shaik
🚀 𝑫𝒊𝒔𝒄𝒐𝒗𝒆𝒓 𝑫𝒐𝒄𝒌𝒆𝒓'𝒔 '𝒅𝒐𝒄𝒌𝒆𝒓 𝒊𝒏𝒊𝒕' 𝑪𝒐𝒎𝒎𝒂𝒏𝒅!
𝑺𝒂𝒚 𝒉𝒆𝒍𝒍𝒐 𝒕𝒐 𝒕𝒉𝒆 𝒇𝒖𝒕𝒖𝒓𝒆 𝒐𝒇 𝑫𝒐𝒄𝒌𝒆𝒓𝒇𝒊𝒍𝒆 𝒄𝒓𝒆𝒂𝒕𝒊𝒐𝒏! 💻⚡️ '𝒅𝒐𝒄𝒌𝒆𝒓 𝒊𝒏𝒊𝒕' 𝒊𝒔 𝒉𝒆𝒓𝒆 𝒕𝒐 𝒓𝒆𝒗𝒐𝒍𝒖𝒕𝒊𝒐𝒏𝒊𝒛𝒆 𝒚𝒐𝒖𝒓 𝑫𝒐𝒄𝒌𝒆𝒓 𝒘𝒐𝒓𝒌𝒇𝒍𝒐𝒘.
🚀 𝑵𝒐 𝒎𝒐𝒓𝒆 𝒎𝒂𝒏𝒖𝒂𝒍 𝑫𝒐𝒄𝒌𝒆𝒓𝒇𝒊𝒍𝒆 𝒘𝒓𝒊𝒕𝒊𝒏𝒈! '𝒅𝒐𝒄𝒌𝒆𝒓 𝒊𝒏𝒊𝒕' 𝒕𝒂𝒌𝒆𝒔 𝒄𝒂𝒓𝒆 𝒐𝒇 𝒕𝒉𝒆 𝒉𝒆𝒂𝒗𝒚 𝒍𝒊𝒇𝒕𝒊𝒏𝒈 𝒇𝒐𝒓 𝒚𝒐𝒖, 𝒈𝒆𝒏𝒆𝒓𝒂𝒕𝒊𝒏𝒈 𝑫𝒐𝒄𝒌𝒆𝒓𝒇𝒊𝒍𝒆 𝒕𝒆𝒎𝒑𝒍𝒂𝒕𝒆𝒔 𝒕𝒂𝒊𝒍𝒐𝒓𝒆𝒅 𝒕𝒐 𝒚𝒐𝒖𝒓 𝒑𝒓𝒐𝒋𝒆𝒄𝒕'𝒔 𝒏𝒆𝒆𝒅𝒔.
🐳𝑻𝒓𝒚 '𝒅𝒐𝒄𝒌𝒆𝒓 𝒊𝒏𝒊𝒕' 𝒕𝒐𝒅𝒂𝒚 𝒂𝒏𝒅 𝒅𝒊𝒔𝒄𝒐𝒗𝒆𝒓 𝒕𝒉𝒆 𝒑𝒐𝒘𝒆𝒓 𝒐𝒇 𝒂𝒖𝒕𝒐𝒎𝒂𝒕𝒆𝒅 𝑫𝒐𝒄𝒌𝒆𝒓𝒇𝒊𝒍𝒆 𝒄𝒓𝒆𝒂𝒕𝒊𝒐𝒏! 💪🐳
Introduction:
docker init is a command-line utility that helps in the initialization of Docker resources within a project. It creates Dockerfiles, Compose files, and .dockerignore files based on the project’s requirements. It guides users through a series of questions to customize the Dockerfile according to their requirements, eliminating the need to write the Dockerfile from scratch.
Advantages of using docker init:
Saves time: Quickly generate a basic Dockerfile without manual effort.
Reduces errors: Ensures correct syntax and structure of the Dockerfile.
Customization: Allows users to tailor the Dockerfile based on their specific needs.
Learning aid: Helps beginners understand Dockerfile syntax and best practices.
Best Practices: Aids in following the best practices and avoids introducing security vulnerabilities while writing Dockerfiles
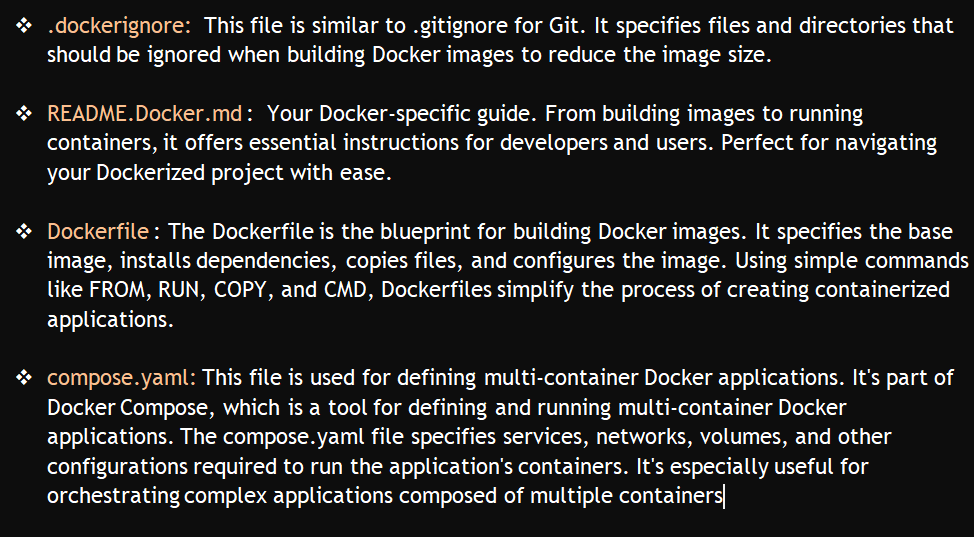
docker init creates the below files for our application:
- .dockerignore
- Dockerfile
- compose.yaml
README.DOCKER.md
Let’s try building a Dockerfile using the docker init utility:
Prerequisite: You should install/upgrade the docker desktop of version v4.26.0 and later versions where docker init runs.
The most recent release of docker init accommodates a range of languages including Go, Python, Node.js, Rust, ASP.NET, PHP, and Java. This updated feature is accessible through Docker Desktop
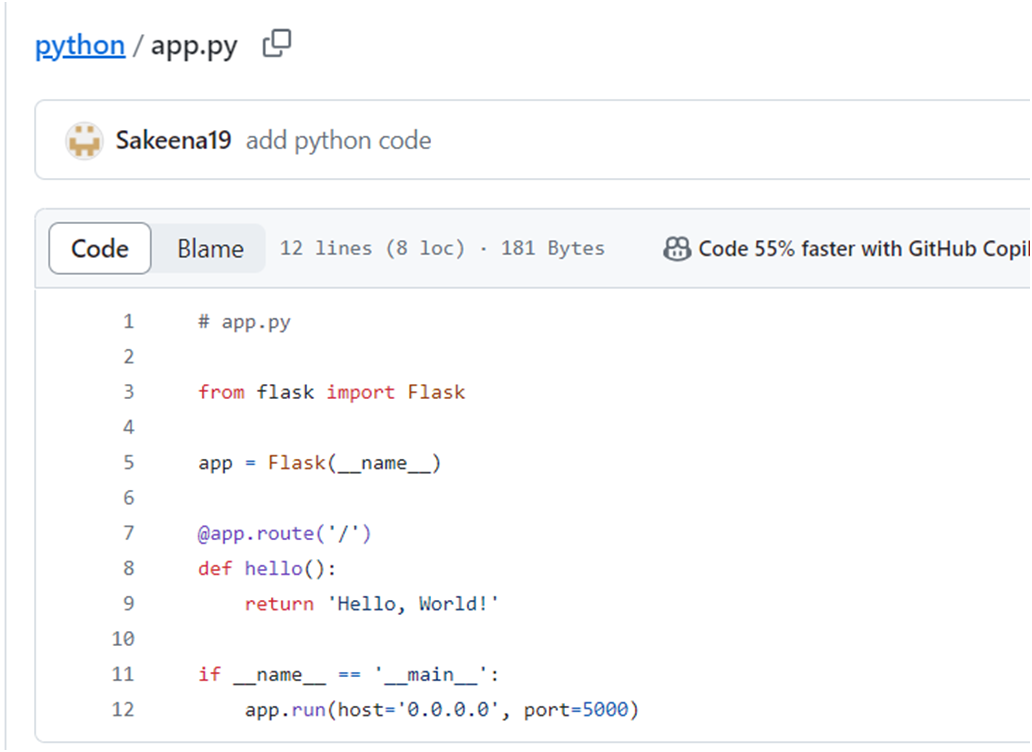
Below is a simple example of a Python application that you can host on GitHub along with instructions to generate a Dockerfile using docker init.
You can create a GitHub repository containing the following files:

Copy the below code into your respective files:

The docker init command scans your project to identify suitable templates and prompts you to confirm the selection. After choosing the template, it gathers project-specific details from you, automatically generating the required Docker resources tailored to your project.
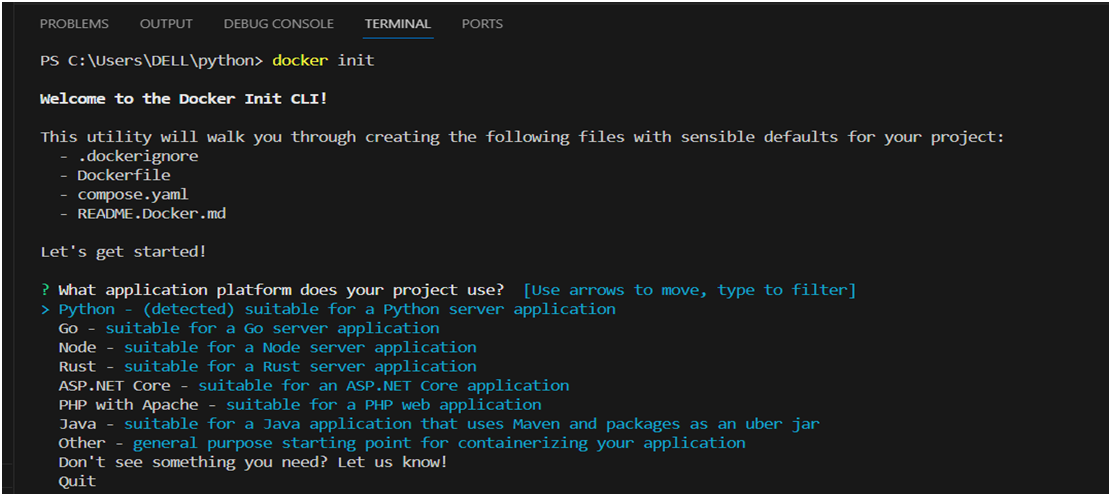
Next, you'll select the application platform. In our example, we're using Python. The tool will propose recommended values for your project, including the Python version, port, and startup commands, etc.
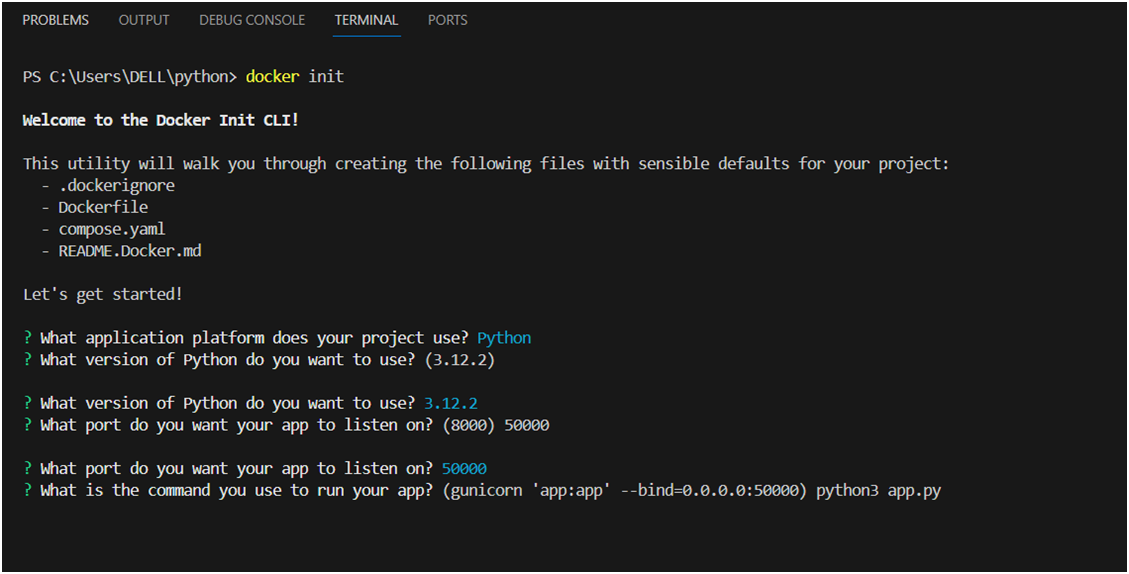
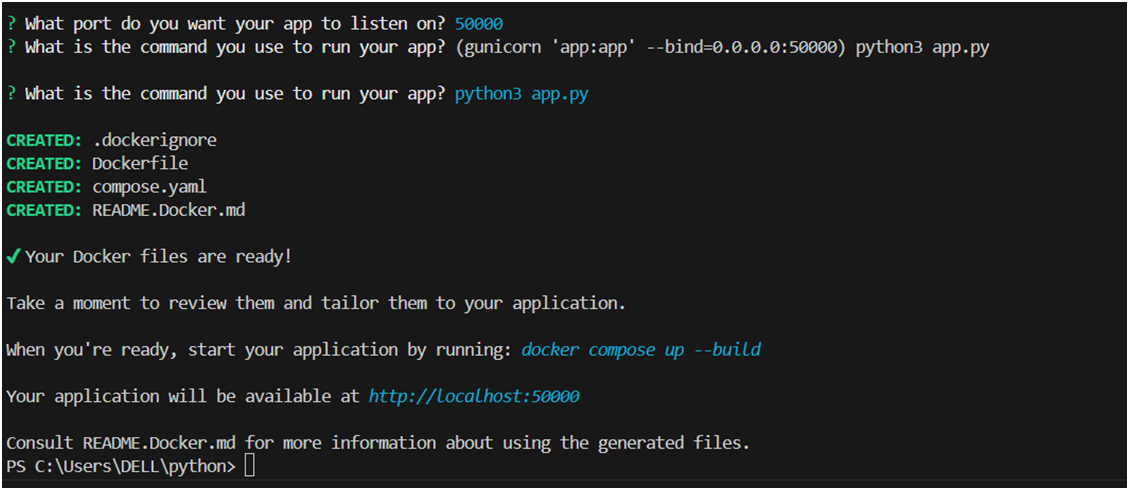
You have the option to either accept the default values or specify your preferences. The tool will then generate your Docker configuration files, including instructions for running the application, based on your selections.
Let’s see the context of compose.yaml created
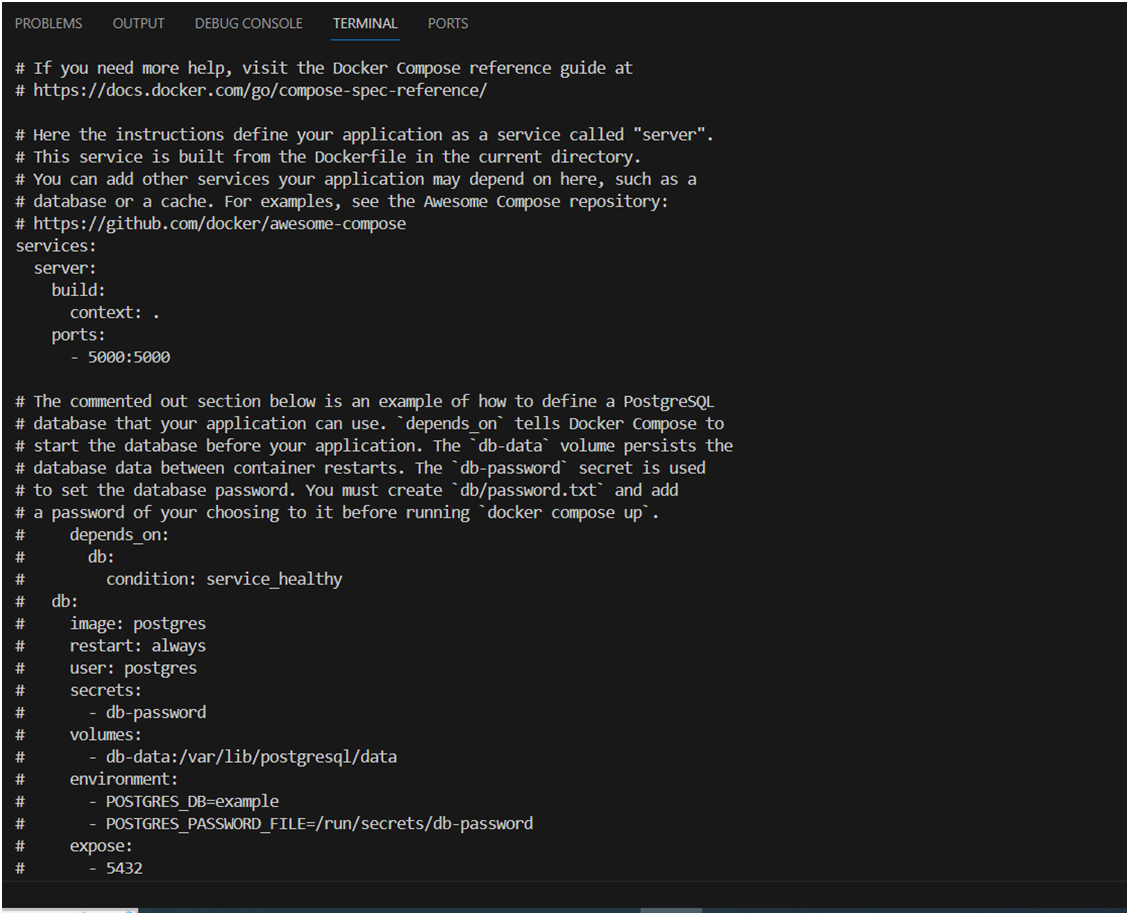
Here there is only one service that is running and uncommented i,e,. docker file is available and it’s mapped to port 5000 and the rest of the information is commented on as there is no database being used for this example.
To integrate a database with your Flask application, you can activate the database service configuration by removing the comment from the respective section in the docker-compose file. Additionally, you'll need to create a local file containing sensitive information, such as credentials, and then execute the application.
Now run the below command to check if docker-compose is running
docker compose up –-build
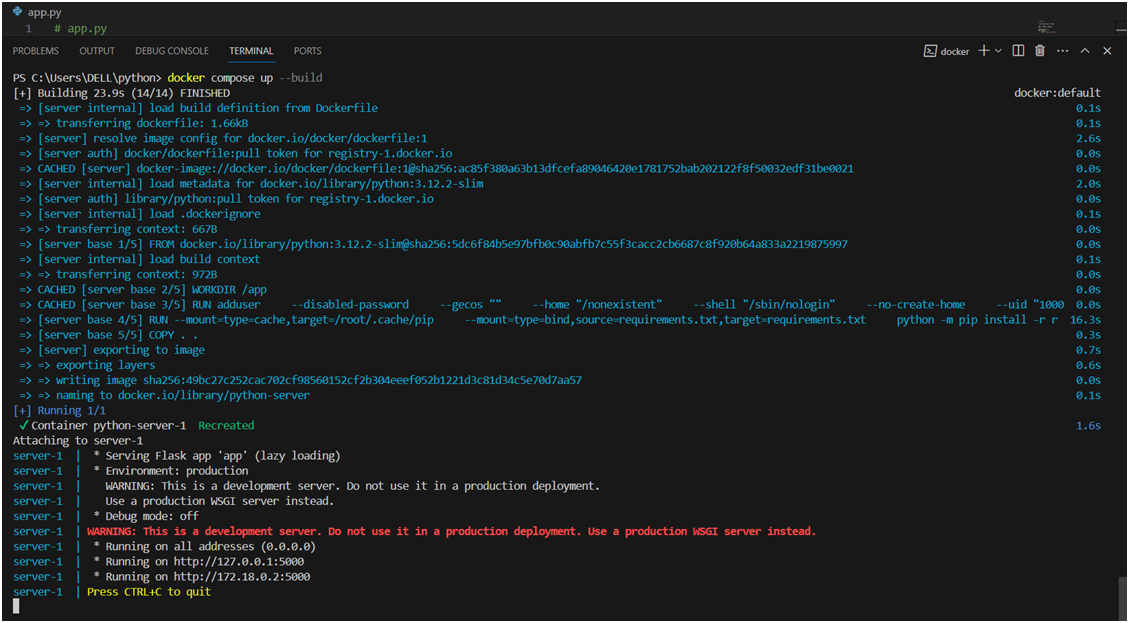
you can access the url given by above command in your browser
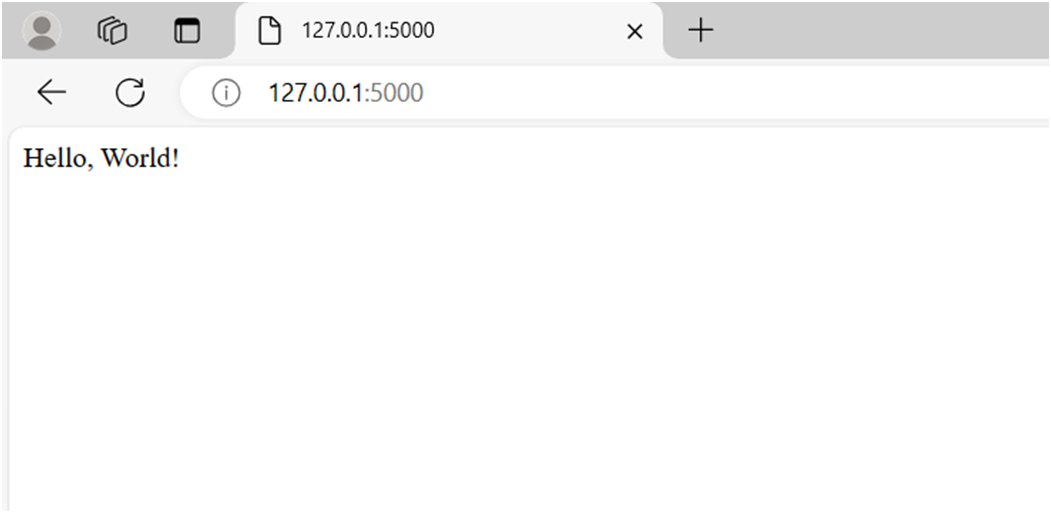
Now let’s check the docker file created by docker init utility
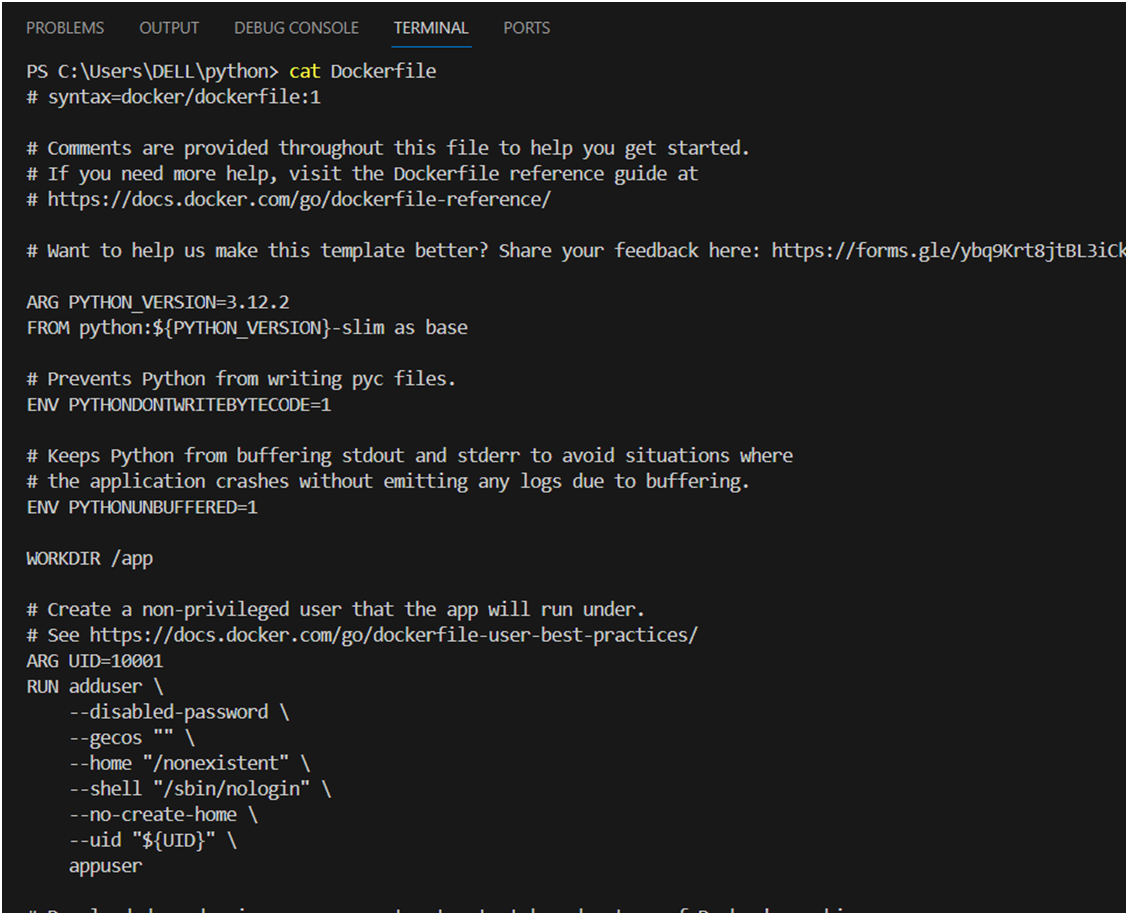
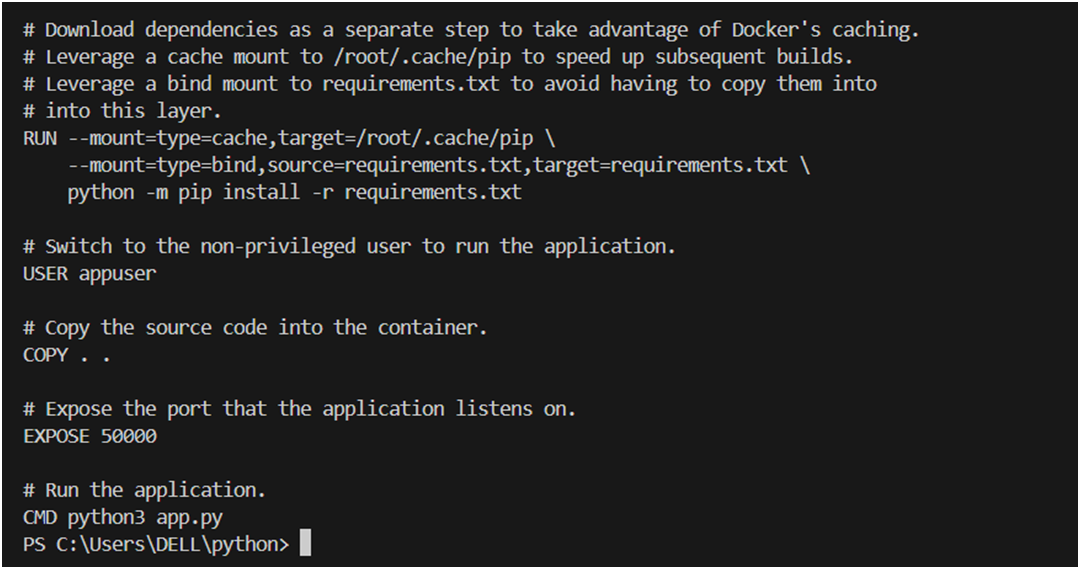
The below best practices has been observed from the docker file which has been created using docker init:
1. Multi-Stage Build: The Dockerfile uses a multi-stage build approach, where it defines multiple stages (base stage) to separate the build environment from the final production environment. This helps keep the final image size smaller by discarding build-time dependencies after the application has been built.
2. Minimize Image Layers: The Dockerfile combines multiple commands using && to minimize the number of layers in the final image. This helps reduce the image size and improves build performance.
3. Environment Variables: The Dockerfile sets environment variables (PYTHONDONTWRITEBYTECODE, PYTHONUNBUFFERED) to configure Python to work more effectively in a Docker container environment.
4. Non-Privileged User: The Dockerfile creates a non-privileged user (appuser) to run the application inside the container. This enhances security by reducing the impact of potential security vulnerabilities in the application.
5. Caching Dependencies: Dependencies are downloaded separately from the application code to take advantage of Docker's layer caching mechanism. This optimizes the Docker build process by avoiding unnecessary reinstallation of dependencies when the application code changes.
6. Cache Mounts: Cache mounts are used to speed up subsequent builds by leveraging a cache mount to /root/.cache/pip.
7. Bind Mounts: Bind mounts are used to avoid copying the requirements.txt file into the Docker image, which can improve build performance and reduce the size of the final image.
8. Expose Port: The Dockerfile exposes port 5000, indicating that the application inside the container listens on that port.
9. CMD Instruction: The Dockerfile specifies the default command to run when the container starts using the CMD instruction. This simplifies running the container by specifying the default behavior.
To conclude, docker init automates Dockerfile creation based on user input, streamlining image creation which saves a lot of time and manual effort.
However, it’s advisable to scrutinize the generated configuration before proceeding, ensuring it meets the project's requirements and adheres to best practices.
🐳Happy Dockerizing!🐳

Subscribe to my newsletter
Read articles from Sakeena Shaik directly inside your inbox. Subscribe to the newsletter, and don't miss out.
Written by

Sakeena Shaik
Sakeena Shaik
🌟 DevOps Specialist | CICD | Automation Enthusiast 🌟 I'm a passionate DevOps engineer who deeply loves automating processes and streamlining workflows. My toolkit includes industry-leading technologies such as Ansible, Docker, Kubernetes, and Argo-CD. I specialize in Continuous Integration and Continuous Deployment (CICD), ensuring smooth and efficient releases. With a strong foundation in Linux and GIT, I bring stability and scalability to every project I work on. I excel at integrating quality assurance tools like SonarQube and deploying using various technology stacks. I can handle basic Helm operations to manage configurations and deployments with confidence. I thrive in collaborative environments, where I can bring teams together to deliver robust solutions. Let's build something great together! ✨