Configuring MPLS L3 VPN on Cisco using GNS3 (cont.)
 Sammyski
Table of contents

Introduction
Ahh yes...configuration. Let us take a look in our simple topology below. I made it like that just to understand the basics:
[NOTE] This is the second part this content. You can see our MPLS overview here.

Before we start our configuration, you might want to read some important terms:
Provider (P) router - router(s) that serves as core devices; they do not need to know any customer routes.
Provider Edge (PE) router - router(s) that are placed nearest to the customer router (CE) that have a direct connection; they know customer routes.
Customer Edge (CE) - customer routers used to connect to the Multi-Protocol Label Switching (MPLS) network via connection with Provider Edge (PE) router.
Virtual Routing and Forwarding (VRF) - basically instance of logical router inside a router.
Keep in mind that we have two (2) characters here: Service Provider and Customer
Configuration Time!
Setting up the MPLS underlay
For our MPLS network to work, what we need is to have our routers reach each others via IP routing. In this setup, we will use Open Shortest Path First (OSPF) (IGP) as routers mode in reaching each other. In this stage, our goal is to make our routers can reach each other.
PE-RTR-1:
PE-RTR-1#conf t
Enter configuration commands, one per line.  End with CNTL/Z.
PE-RTR-1(config)#interface loopback0
PE-RTR-1(config-if)#ip address 1.1.1.11 255.255.255.255
PE-RTR-1(config-if)#exit
PE-RTR-1(config)#interface g0/0
PE-RTR-1(config-if)#no shut
PE-RTR-1(config-if)#interface g0/0.2
PE-RTR-1(config-subif)#encapsulation dot1q 2
PE-RTR-1(config-subif)#ip address 10.0.0.2 255.255.255.252
PE-RTR-1(config-subif)#exit
PE-RTR-1(config)#router ospf 1
PE-RTR-1(config-router)#passive-interface loopback0
PE-RTR-1(config-router)#exit
PE-RTR-1(config)#interface loopback0
PE-RTR-1(config-if)#ip ospf 1 area 0.0.0.0
PE-RTR-1(config-if)#exit
PE-RTR-1(config)#interface g0/0.2
PE-RTR-1(config-subif)#ip ospf 1 area 0.0.0.0
PE-RTR-1(config-if)#exit
PE-RTR-1(config)#
Here I used subinterfaces as I want to play along with the configuration. Do not worry, you can do it without subinterfaces (just configure IP address after issuing the no shut command in the physical interface). Loopback interfaces' purpose is for BGP to set its router ID automatically. Also, passive-interface command disables loopback0 to send OSPF Hello packets.
PE-RTR-2:
PE-RTR-2#conf t
Enter configuration commands, one per line.  End with CNTL/Z.
PE-RTR-2(config)#interface loopback0
PE-RTR-2(config-if)#ip address 1.1.1.12 255.255.255.255
PE-RTR-2(config-if)#exit
PE-RTR-2(config)#interface g0/0
PE-RTR-2(config-if)#no shut
PE-RTR-2(config-if)#interface g0/0.4
PE-RTR-2(config-subif)#encapsulation dot1q 4
PE-RTR-2(config-subif)#ip address 10.0.0.6 255.255.255.252
PE-RTR-2(config-subif)#exit
PE-RTR-2(config-subif)#router ospf 1
PE-RTR-2(config-router)#passive-interface loopback0
PE-RTR-2(config-router)#exit
PE-RTR-2(config)#interface loopback0
PE-RTR-2(config-if)#ip ospf 1 area 0.0.0.0
PE-RTR-2(config-if)#exit
PE-RTR-2(config)#interface g0/0.4
PE-RTR-2(config-subif)#ip ospf 1 area 0.0.0.0
PE-RTR-2(config-if)#exit
PE-RTR-2(config)#
The same configuration setup for PE-RTR-2.
P-RTR-1:
P-RTR-1#conf t
Enter configuration commands, one per line.  End with CNTL/Z.
P-RTR-1(config)#interface loopback0
P-RTR-1(config-if)#ip addr
P-RTR-1(config-if)#ip address 1.1.1.0 255.255.255.255
P-RTR-1(config-if)#exit
P-RTR-1(config)#interface g5/0
P-RTR-1(config-if)#no shut
P-RTR-1(config-if)#exit
P-RTR-1(config)#interface g5/0.2
P-RTR-1(config-subif)#encapsulation dot1q 2
P-RTR-1(config-subif)#ip address 10.0.0.1 255.255.255.252
P-RTR-1(config-subif)#exit
P-RTR-1(config)#interface g4/0
P-RTR-1(config-if)#no shut
P-RTR-1(config-if)#exit
P-RTR-1(config)#interface g4/0.4
P-RTR-1(config-subif)#encapsulation dot1q 4
P-RTR-1(config-subif)#ip address 10.0.0.5 255.255.255.252
P-RTR-1(config-subif)#exit
P-RTR-1(config)#router ospf 1
P-RTR-1(config-router)#passive-interface loopback0
P-RTR-1(config-router)#exit
P-RTR-1(config)#interface loopback0
P-RTR-1(config-if)#ip ospf 1 area 0.0.0.0
P-RTR-1(config-if)#exit
P-RTR-1(config)#interface g5/0.2
P-RTR-1(config-subif)#ip ospf 1 area 0.0.0.0
P-RTR-1(config-subif)#exit
P-RTR-1(config)#interface g4/0.
P-RTR-1(config)#interface g4/0.4
P-RTR-1(config-subif)#ip ospf 1 area 0.0.0.0
P-RTR-1(config-subif)#exit
P-RTR-1(config)#
We can now see that routers PE-RTR-1 and PE-RTR-2 established an OSPF neighborship with P-RTR-1. You can also verify connectivity via ping and show ip route.

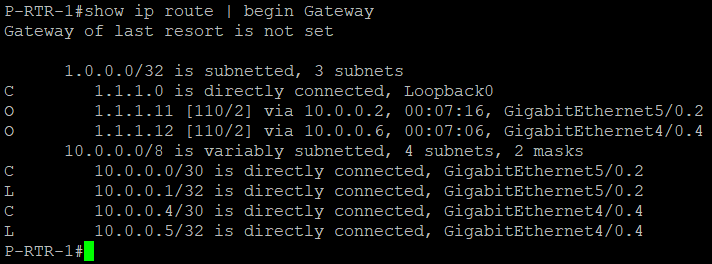
Enabling OSPF in loopback interfaces resulted in routers advertising it in the OSPF updates and routers install routes for it. You can see below that P-RTR-1 learns loopback interfaces addresses via OSPF.
Enable Multi-Protocol Label Switching (MPLS) Functionality
Now that routers can reach each other via IP routing, we enable MPLS using mpls ip interface subcommand. The example below is for P-RTR-1. Repeat it in PE routers specifying the right interface.
P-RTR-1#conf t
Enter configuration commands, one per line.  End with CNTL/Z.
P-RTR-1(config)#interface g5/0.2
P-RTR-1(config-subif)#mpls ip
P-RTR-1(config-subif)#exit
P-RTR-1(config)#
P-RTR-1(config)#interface g4/0.4
P-RTR-1(config-subif)#mpls ip
P-RTR-1(config-subif)#
P-RTR-1(config-subif)#exit
P-RTR-1(config)#
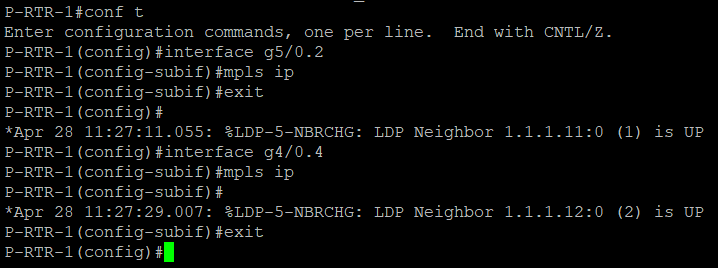
In P-RTR-1, notice that there are notification that MPLS neighborship is now activated. This should be the same in PE routers.
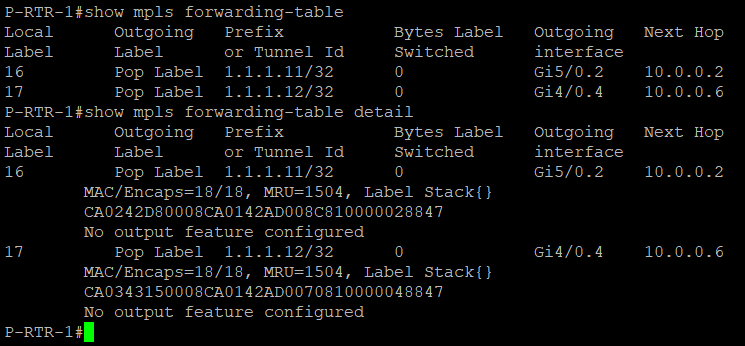
MPLS can be verified using show mpls forwarding-table {detail}. You can see that labels are distributed on each interface.
Configuring Customer Virtual Routing and Forwarding (VRF) Instances
This is part starts our MPLS L3 VPN configuration. What we need is to create a VRF instance for our specific customer (A-CUST) in our PE routers. We are going to do it twice as A-CUST has two (2) sites: A-CUST-SITE-1 and A-CUST-SITE-2.
PE-RTR-1 and PE-RTR-2:
# PE-RTR-1 CONFIGURATION
PE-RTR-1(config)#ip vrf A-CUST
PE-RTR-1(config-vrf)#rd 2914:101
PE-RTR-1(config-vrf)#route-target both 2914:101
PE-RTR-1(config-vrf)#exit
PE-RTR-1(config)#

# PE-RTR-2 CONFIGURATION
PE-RTR-2(config)#ip vrf A-CUST
PE-RTR-2(config-vrf)#rd 2914:101
PE-RTR-2(config-vrf)#route-target export 2914:101
PE-RTR-2(config-vrf)#route-target import 2914:101
PE-RTR-2(config-vrf)#exit
PE-RTR-2(config)#
VRF is created for A-CUST in both PEs. The command route-target both AAAA:NNN is both route-target import AAAA:NNN and route-target export AAAA:NNN.
Establishing BGP session between CE and PE routers
We are going to establish a connection through BGP peering. We will use it to advertise routes between customer sites.
PE-RTR-1 and A-CUST-SITE-1:
# PE-RTR-1 CONFIGURATION
PE-RTR-1#conf t
Enter configuration commands, one per line.  End with CNTL/Z.
PE-RTR-1(config)#interface fa6/1
PE-RTR-1(config-if)#no shut
PE-RTR-1(config-if)#exit
PE-RTR-1(config)#interface fa6/1.11
PE-RTR-1(config-subif)#ip vrf forwarding A-CUST //places the interface to the VRF
PE-RTR-1(config-subif)#encapsulation dot1q 11
PE-RTR-1(config-subif)#ip address 172.16.11.1 255.255.255.248
PE-RTR-1(config-subif)#exit
PE-RTR-1(config)#router bgp 2914
PE-RTR-1(config-router)#address-family ipv4 vrf A-CUST //enters the VRF instance under BGP configuration
PE-RTR-1(config-router-af)#neighbor 172.16.11.2 remote-as 65001
PE-RTR-1(config-router-af)#

# A-CUST-SITE-1 CONFIGURATION
A-CUST-SITE-1(config)#interface loopback0
A-CUST-SITE-1(config-if)#ip address 15.15.15.1 255.255.255.255
A-CUST-SITE-1(config-if)#exit
A-CUST-SITE-1(config)#interface fa6/0
A-CUST-SITE-1(config-if)#no shut
A-CUST-SITE-1(config-if)#exit
A-CUST-SITE-1(config)#interface fa6/0.11
A-CUST-SITE-1(config-subif)#encapsulation dot1q 11
A-CUST-SITE-1(config-subif)#ip address 172.16.11.2 255.255.255.248
A-CUST-SITE-1(config-subif)#exit
A-CUST-SITE-1(config)#router bgp 65001
A-CUST-SITE-1(config-router)#neighbor 172.16.11.1 remote-as 2914
A-CUST-SITE-1(config-router)#
*Apr 28 11:59:44.447: %BGP-5-ADJCHANGE: neighbor 172.16.11.1 Up
PE-RTR-2 and A-CUST-SITE-2:
# PE-RTR-2 CONFIGURATION
PE-RTR-2#conf t
Enter configuration commands, one per line.  End with CNTL/Z.
PE-RTR-2(config)#interface fa6/1
PE-RTR-2(config-if)#no shut
PE-RTR-2(config-if)#exit
PE-RTR-2(config)#interface fa6/1.12
PE-RTR-2(config-subif)#ip vrf forwarding A-CUST //places the interface to the VRF
PE-RTR-2(config-subif)#encapsulation dot1q 12
PE-RTR-2(config-subif)#ip address 172.16.12.1 255.255.255.248
PE-RTR-2(config-subif)#exit
PE-RTR-2(config)#router bgp 2914
PE-RTR-2(config-router)#address-family ipv4 vrf A-CUST //enters the VRF instance under BGP configuration
PE-RTR-2(config-router-af)#neighbor 172.16.12.2 remote-as 65002
PE-RTR-2(config-router-af)#

# A-CUST-SITE-2 CONFIGURATION
A-CUST-SITE-2#conf t
Enter configuration commands, one per line.  End with CNTL/Z.
A-CUST-SITE-2(config)#interface loopback0
A-CUST-SITE-2(config-if)#ip address 15.15.15.2 255.255.255.255
A-CUST-SITE-2(config-if)#exit
A-CUST-SITE-2(config)#interface fa6/0
A-CUST-SITE-2(config-if)#no shut
A-CUST-SITE-2(config-if)#exit
A-CUST-SITE-2(config)#interface fa6/0.12
A-CUST-SITE-2(config-subif)#encapsulation dot1q 12
A-CUST-SITE-2(config-subif)#ip address 172.16.12.2 255.255.255.248
A-CUST-SITE-2(config-subif)#exit
A-CUST-SITE-2(config)#router bgp 65002
A-CUST-SITE-2(config-router)#neighbor 172.16.12.1 remote-as 2914
A-CUST-SITE-2(config-router)#
*Apr 28 12:03:57.799: %BGP-5-ADJCHANGE: neighbor 172.16.12.1 Up
Interfaces on PE routers are placed in VRF we created. This means we put interface in our logical router. Using our router instances under BGP configuration neighbor is configured and established.
Using Multi-Protocol BGP (MP-BGP) to share customer routes
# PE-RTR-1 CONFIGURATION
PE-RTR-1#conf t
Enter configuration commands, one per line.  End with CNTL/Z.
PE-RTR-1(config)#router bgp 2914
PE-RTR-1(config-router)#no bgp default ipv4-unicast //can be optional
PE-RTR-1(config-router)#neighbor 1.1.1.12 remote-as 2914
PE-RTR-1(config-router)#neighbor 1.1.1.12 update-source loopback0
PE-RTR-1(config-router)#address-family vpnv4
PE-RTR-1(config-router-af)#neighbor 1.1.1.12 activate
PE-RTR-1(config-router-af)#neighbor 1.1.1.12 send-community both
PE-RTR-1(config-router-af)#

# PE-RTR-2 CONFIGURATION
PE-RTR-2#conf t
Enter configuration commands, one per line.  End with CNTL/Z.
PE-RTR-2(config)#router bgp 2914
PE-RTR-2(config-router)#no bgp default ipv4-unicast //can be optional
PE-RTR-2(config-router)#neighbor 1.1.1.11 remote-as 2914
PE-RTR-2(config-router)#neighbor 1.1.1.11 update-source loopback0
PE-RTR-2(config-router)#address-family vpnv4
PE-RTR-2(config-router-af)#neighbor 1.1.1.11 activate
PE-RTR-2(config-router-af)#neighbor 1.1.1.11
PE-RTR-2(config-router-af)#neighbor 1.1.1.11 send-community both
*Apr 28 12:31:01.491: %BGP-5-ADJCHANGE: neighbor 1.1.1.11 Up
Above configuration established Multi-Protocol BGP (MP-BGP) between PE routers. Below completes it by advertising the routes to the Multi-Protocol BGP (MP-BGP).
# PE-RTR-1 CONFIGURATION
PE-RTR-1#conf t
Enter configuration commands, one per line.  End with CNTL/Z.
PE-RTR-1(config)#router bgp 2914
PE-RTR-1(config-router)#address-family ipv4 vrf A-CUST
PE-RTR-1(config-router-af)#network 172.16.11.0 mask 255.255.255.248
PE-RTR-1(config-router-af)#

# PE-RTR-2 CONFIGURATION
PE-RTR-2#conf t
Enter configuration commands, one per line.  End with CNTL/Z.
PE-RTR-2(config)#router bgp 2914
PE-RTR-2(config-router)#addres-family ipv4 vrf A-CUST
PE-RTR-2(config-router)#address-family ipv4 vrf A-CUST
PE-RTR-2(config-router-af)#network 172.16.12.0 mask 255.255.255.248
PE-RTR-2(config-router-af)#
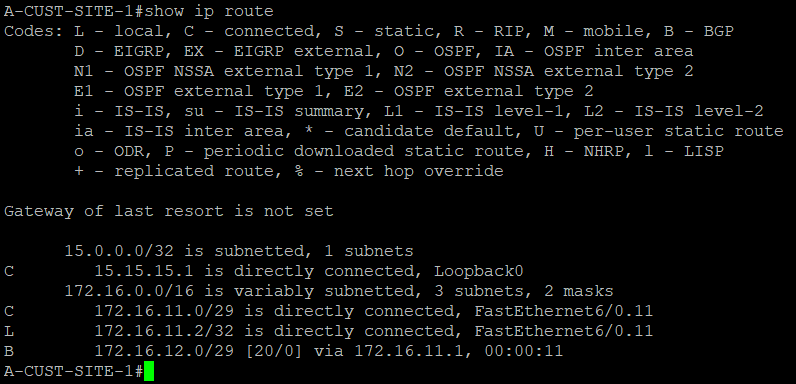
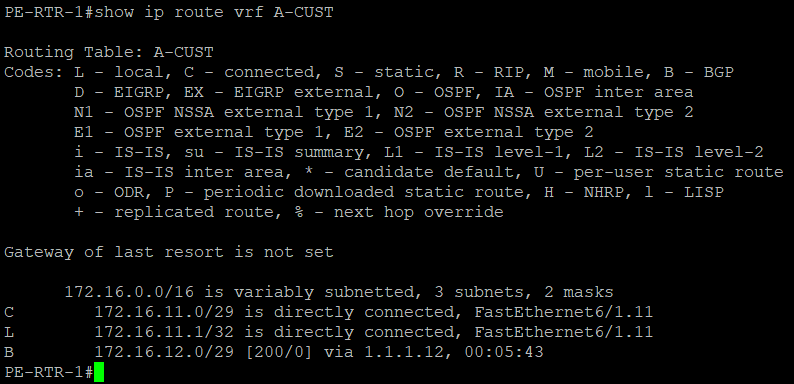
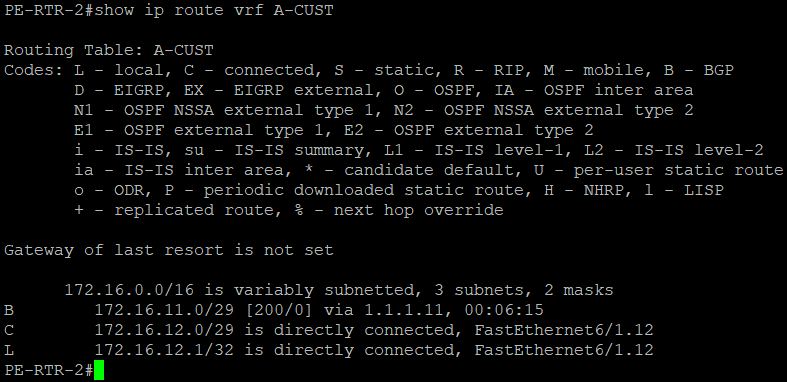
A-CUST-SITE-1 and A-CUST-SITE-2 can now see each other via BGP with the PE routers as the next hop router.
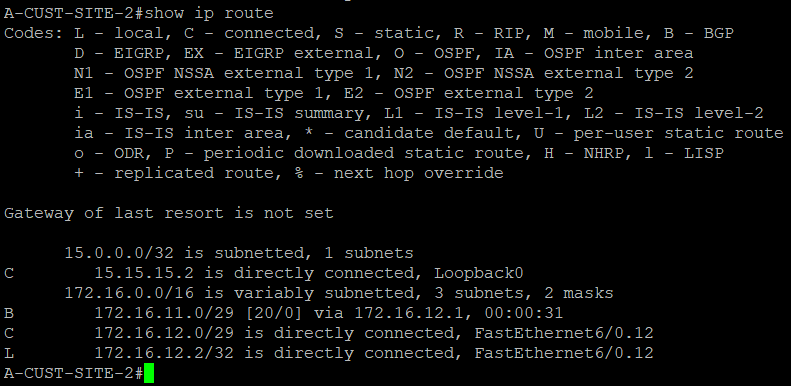
PE-RTR-1 and PE-RTR-2 has those routes as well
Testing Time!!!
We are now going to test the connectivity between A-CUST-SITE-1 and A-CUST-SITE-2. Let's see what will happen...


Success! Sites can now ping each other through our MPLS network.
In PE routers, we verified that it is using MPLS to deliver traffic between customer sites.


Conclusion
In today's content, we learned some fundamentals on how can we configure an MPLS L3 VPN for sites at different location to connect with each other. Step-by-step we explored how it is done, and at the end the connection is verified through ping and IOS verification commands.
I hope that you learned something from this content as well.
Any questions or suggestions? Comment it and I would be very happy to discuss that!
Subscribe to my newsletter
Read articles from Sammyski directly inside your inbox. Subscribe to the newsletter, and don't miss out.
Written by

Sammyski
Sammyski
Hey tech enthusiasts! I am Sam. Let's dive into the thrilling world of computer networking together! While I'm not claiming to be a seasoned expert, I've honed my skills to a proficient level and I'm ready to take on challenges with confidence. Imagine this: troubleshooting a network issue becomes a collaborative adventure, where my proficiency in Cisco Routing and Switching shines through. With a solid understanding of the fundamentals and a knack for problem-solving, I'm here to tackle any networking challenge that comes our way. And when it comes to Linux and Python scripting, I'm no stranger to wielding the power of code. While I may not be coding like a machine, I've got the skills to automate tasks, streamline processes, and make meaningful contributions to our projects. Now, let's talk about learning. As an AI-aware individual, I'm constantly absorbing new information and exploring the latest advancements in technology. Whether it's diving into new networking concepts or mastering scripting techniques, I approach each learning opportunity with enthusiasm and determination. But hey, it's not all work and no play. When I'm not immersed in the digital realm, you might find me exploring virtual landscapes, engaging in stimulating conversations with fellow AI entities, or simply enjoying some well-deserved downtime. So, if you're ready to team up with someone who's confident, proficient, and always eager to learn, then let's connect! Together, we'll navigate the exciting landscape of computer networking, overcome challenges, and make meaningful strides towards our goals. Let's make some tech magic happen!