"🐧 Introduction to Linux: History, Commands, and Basics 🐧"
 Sakeena Shaik
Introduction:
Linux is an open-source operating system that plays a crucial role in the tech world, powering everything from personal computers to servers and even smartphones. In this blog, we take a journey through the history of Linux, exploring its evolution and why it has become a favorite among developers and tech enthusiasts. We will also cover some of the most important Linux commands to help you get started. This comprehensive guide is perfect for newcomers and those looking to sharpen their Linux skills.
Linux and Chill! 🐧
- 👉A project started in 1964, Bell Laboratory in New Jersey.
Purpose: To develop a multi-user operating system where multiple people can work at a time.
👉Almost spent 5 years and withdrew in 1969 in failure.
👉In the same project, Dennis Ritchie and Ken Thompson started working on that
👉Dennis and Ken developed UNICS named OS as a free source platform,
UNICS - Uniplexed information and computing services.
👉In 1975, unix v6 was released
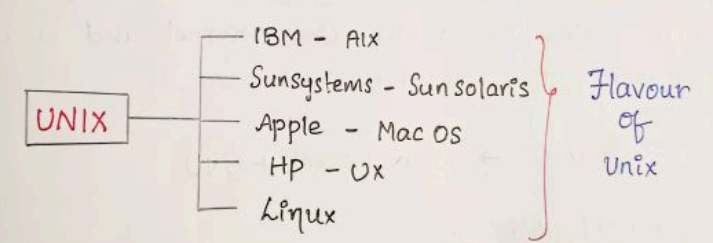
👉Now many companies have taken the reference of UNICS which is a free source and developed their commercial versions,
some of them as below:
History of Linux:
Linus Torvald is a person who developed Linux from zero in 1991. Linus has taken the reference of MINUX invented by Andrew Tanenbaum and developed Linux.
It is a free source.
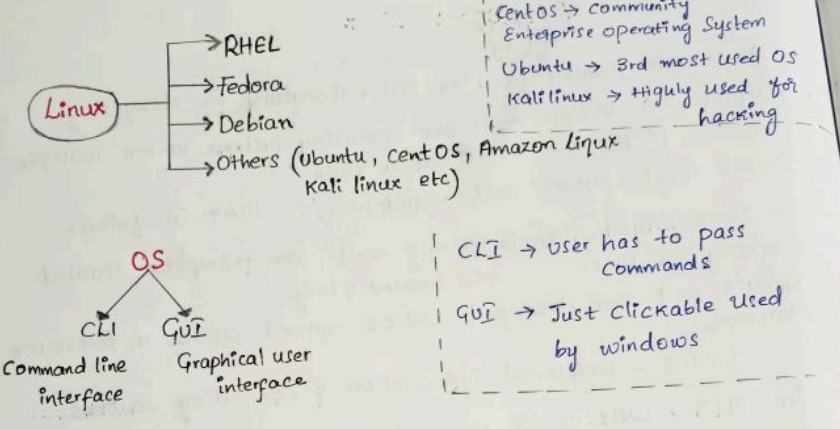
Now Linux has different flavors.
POINTS TO REMEMBER:
🔹Linux is a kernel, not an OS.
🔹Linux is not a Unix derivative, it was written from scratch.
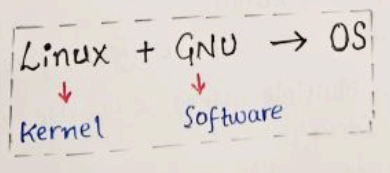
🔹A Linux distribution is the Linux kernel and a collection of software that together create an OS.
Linux OS ➡️ Linux kernel ✚ GNU
Linux features/Advantages:
💠Open Source: anyone can use and modify their own code.
💠Secure: The virus will not corrupt the entire system, it will only present in a particular folder, its anti-virus free.
💠Simplified updates for all installed software: Commands are easy for updation.
💠Lightweight: consumes less space (RAM space)
💠Multi-user-Multi task: Multiple users can use a single Linux server.
💠Multiple distributions: Linux OS has multiple versions in the available Linux flavors as per user requirement, some of the distributions are Redhat, Fedora, Debian, Kali-Linux, centos, etc.
Basics of Linux:
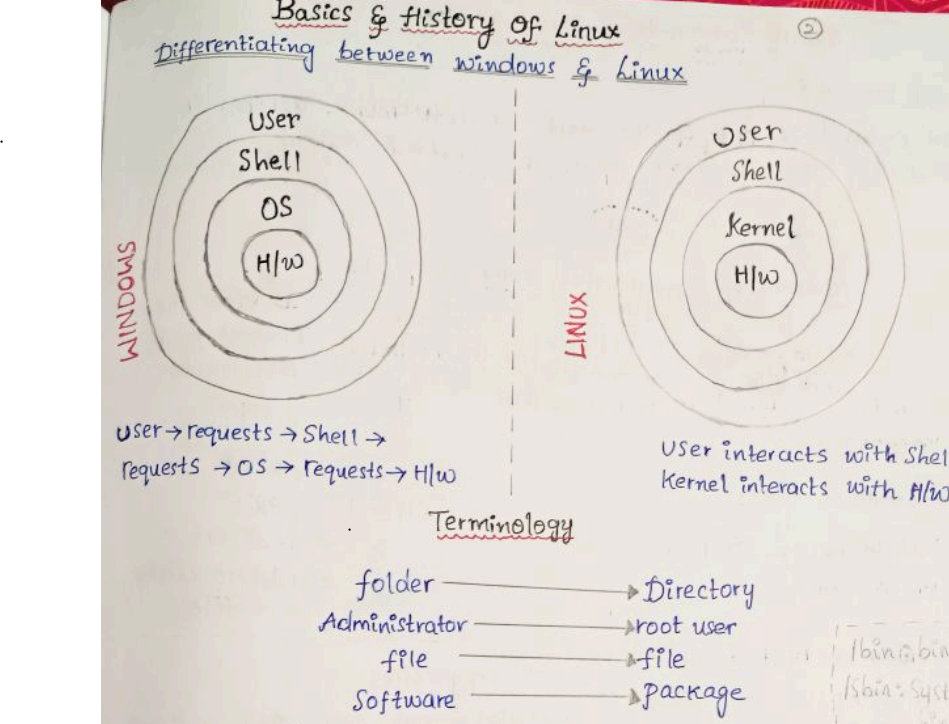
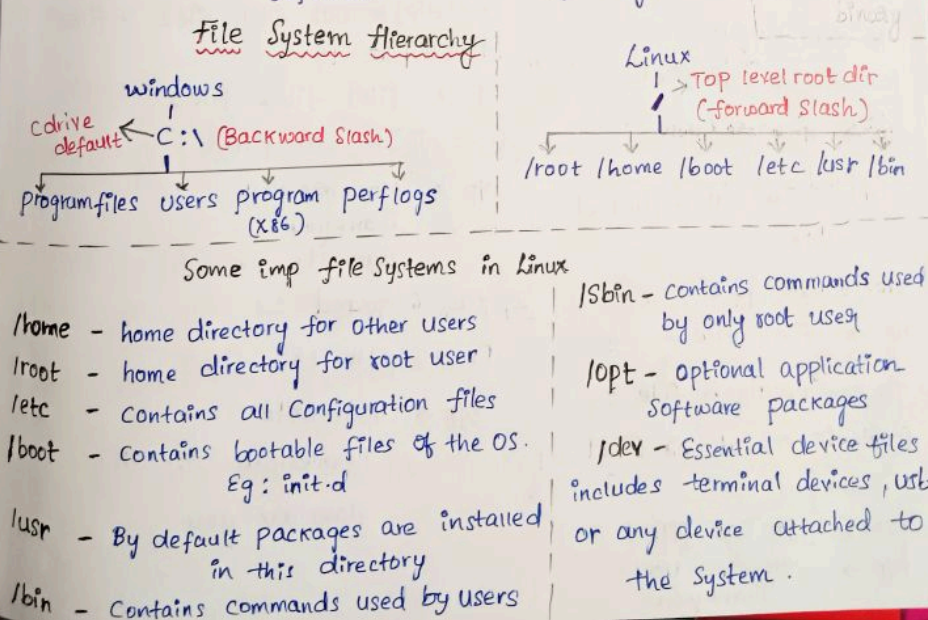
Linux commands and their use cases:
cat command:
cat command is one of the most universal tools, yet all it does is copy standard input to standard output.
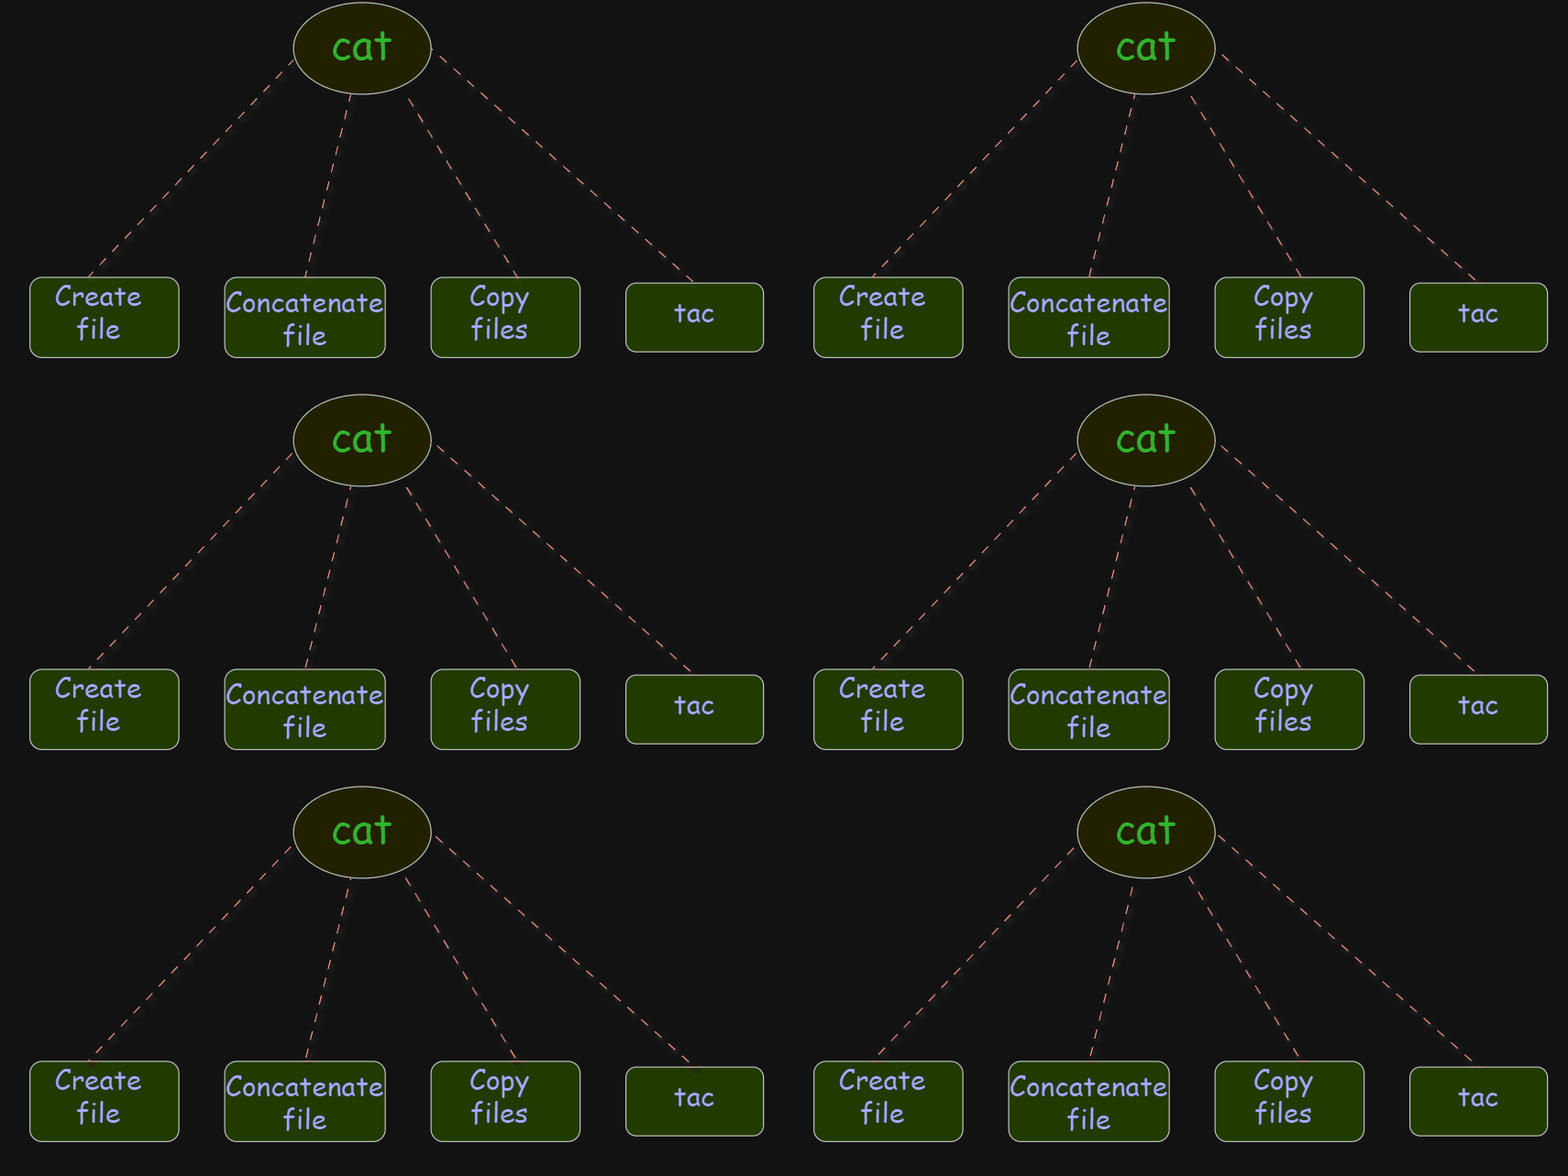
create file: Used to create a single file.
concatenate file: To add more than one file into a single file.
copy files: To copy the content of x into y.
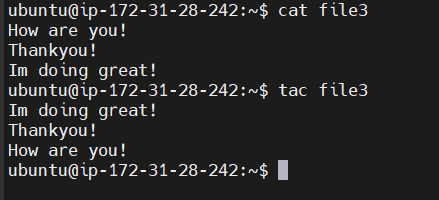
tac: To view the content from bottom to top.
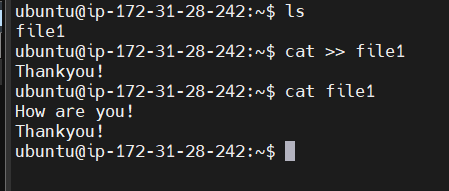
To create a file:

- To add content to an existing file:
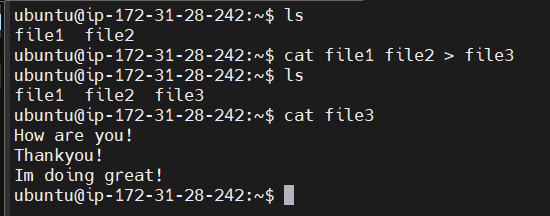
To copy 2 files into a single file:
Using tac command:
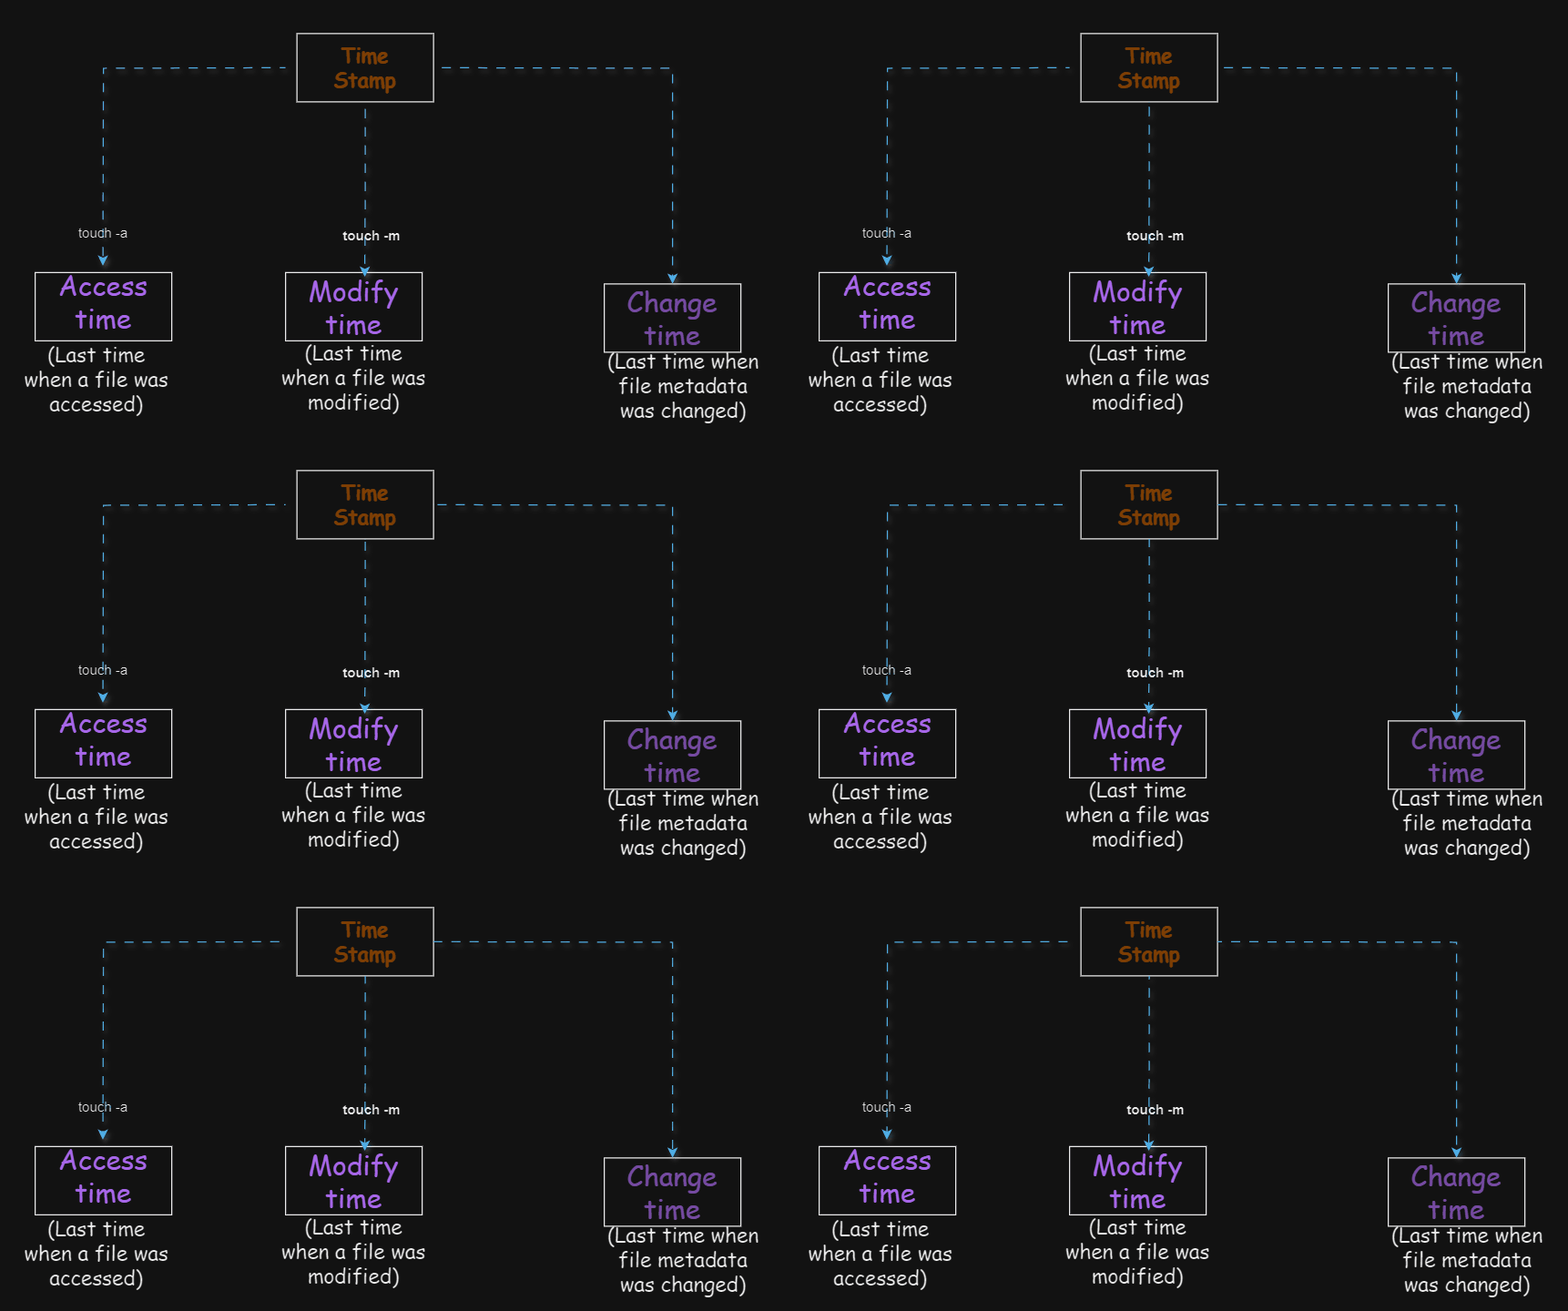
Touch command:
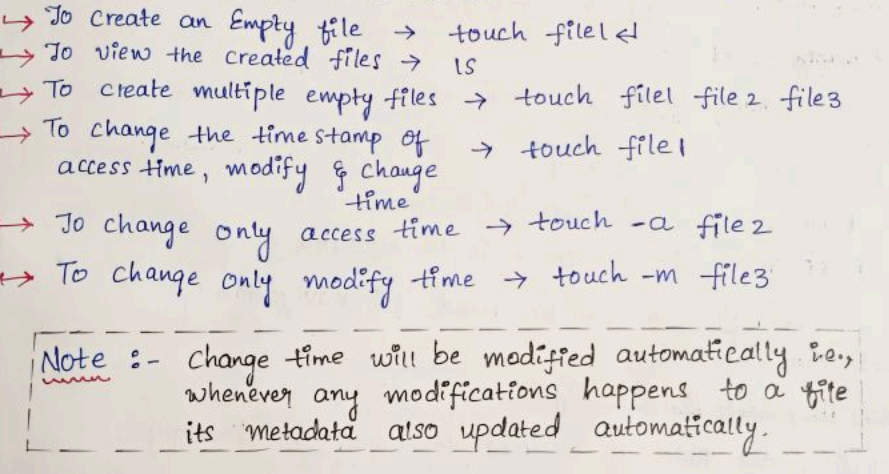
🔸create an empty file.
🔸create multiple empty files.
🔸change all timestamps of a file.
🔸update only the access time of the file, and modify the time of the file.
nano command:
Used for file editing or creating a file with data.
eg: nano file1
Ctrl +X -> for exit
Y -> for saving
Ctrl +O -> override
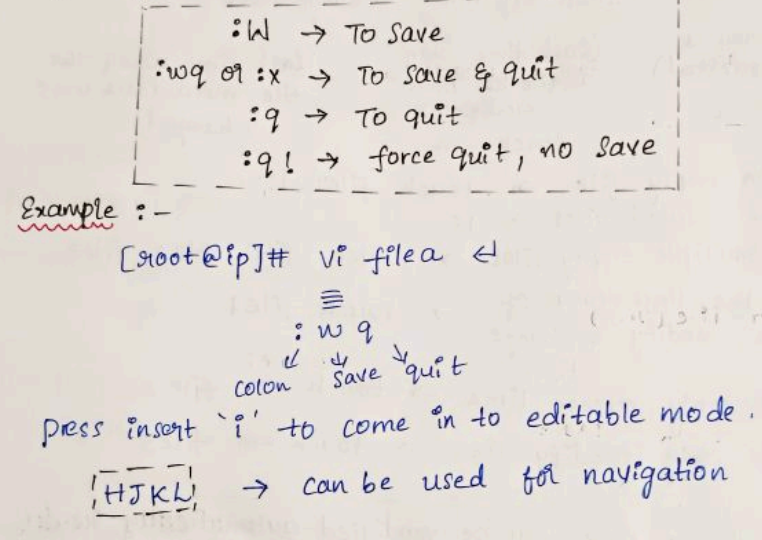
vi editor:
A programmer text editor
It can be used to edit all kinds of plain texts, it is specifically useful for editing programs mainly used for Unix programs.
vi is a standard where nano will be available depending on the linux you use.
How to create a directory:
mkdir( make directory) is used to create a directory.
mkdir file - To create a single file
mkdir file1 file2 - to create multiple directories

Change directory (cd):
Use cd to change the directory from one to another.
cd dir1 -> moves to the particular directory.
cd dir1/dir2/dir3 -> moves to the particular dir as per the given path.

To remove a directory(rm):
rmdir -> This command is used to remove the specified directory(empty)
rmdir -p -> removes both the parent and child directories along with verbose
rmdir -pv -> removes all the parent and subdirectories along with verbose
rm -rf -> removes even non-empty files and directories forcefully
rm -rp -> removes non-empty directories including parent and its sub-directories
rm -r -> remove empty directories.
To copy a file(cp):
cp file1 file2 -> copies file1 content to file2
**
To rename a file(mv):**
mv file1 file2 -> renames file1 to file2
To cut and copy:
mv file1 file2 -> removes file1 and pastes in file2 folder
To create a hidden file:
mkdir .dir1 -> creates a hidden file when we use .(dot)
A few more commands:
💠ls -la : To view the hidden files
💠hostname: displays the info on which machine we are working, eg: ubuntu
💠cat /etc/os-release: Displays the os version of the machine
💠yum install httpd -y: installs Apache files by default
💠yum remove httpd -y: removes apache related files
💠yum update httpd: updates the default files which is installed
-y or -N => If we add this in the command, it will not wait for user confirmation during execution.
💠service httpd start: To start the httpd service
💠service httpd status: To check the status of the service
💠chkconfig httpd on: By default, the service will be started when you log in
💠chkconfig httpd off: to display the service on option
💠yum list installed: lists all installed packages
💠whoami: displays whether we are root users or normal users
💠which chef: shows whether the chef is installed or not
💠echo "Hello": Displays the output as Hello.
💠echo "welcome" > file1: creates a file and saves the message as welcome
💠echo "Hi" >> file1 : To append new message to a file
💠sort: Arrange the data in alphabetical order
💠tree: shows files/directories in a tree-structured form
💠useradd sakeena: to add user, can be viewed under /etc/passwd
💠groupadd devops: to add group, can be viewed under /etc/group
💠gpasswd -a sakeena devops: adding a single user into a group
💠gpasswd -M sakeena, pooja, Samiksha devops: adding multiple users into a group
Hardlink:
Hardlink is just a backup of any file, whenever the file is updated in the future it will update the backup file as well, and vice versa.
eg: ln file1 backupfile
Softlink:
Softlink is used to create a shortcut even if we delete the softlink file, the original file will not be affected, once the original file is deleted the softlink file will become useless.
eg: ln -s file1 softfile1
Tar: tar is an archiver used to combine multiple files into one.
eg: tar -cvf dirx.tar dirx
(c =create, v=verbose, f = forcefully)
gzip: gzip is a compression tool used to reduce the size of a file.
eg: gzip dirx.tar -> to zip the file.
gunzip dirx.tar.gz -> to unzip the file.
tar -xvf dirx.tar -> to extract the file.
wget: wget is the non-interactive network downloader, usually used to download any file.
eg: wget <url>
Access Mode/ permissions:
In Unix and Unix-like systems, file and directory permissions are managed through an access control system known as "access modes" or "file permissions." These permissions determine who can read, write, or execute a file or directory. Let's break down the concepts and give examples to understand them better.
Permission Types
Permissions are typically represented by three characters, each representing one of the following types of access:
r: Read - Allows a user to read the contents of a file or directory (view files in a directory).w: Write - Allows a user to modify or delete a file, or add/remove files from a directory.
x: Execute - Allows a user to execute a file (run a script/program), or access a directory (enter and list files)
Permission Groups
Permissions are defined for three groups of users:
Owner: The user who owns the file or directory.
Group: A set of users grouped together, typically for project or team purposes.
Others: Any other users not in the owner or group categories.
Representing Permissions
Permissions are commonly represented in two ways: symbolic notation and octal notation.
Symbolic Notation
In symbolic notation, permissions are represented as a string of nine characters. Here's the format:
The first character indicates the type of file (
-for regular files,dfor directories,lfor symbolic links, etc.).The next three characters represent the permissions for the owner.
The following three characters represent the permissions for the group.
The last three characters represent the permissions for others.
Example: -rwxr-xr--
-indicates a regular file.rwxindicates read, write, and execute permissions for the owner.r-xindicates read and execute permissions for the group.r--indicates read-only permissions for others.
Octal Notation
In octal notation, permissions are represented as a three-digit number:
Each digit represents the sum of the permissions for the owner, group, and others.
r=4,w=2,x=1.To set a combination of permissions, you add the corresponding values.
Example: 755
The first digit (
7) means the owner has read (4), write (2), and execute (1) permissions.The second digit (
5) means the group has read (4) and execute (1) permissions.The third digit (
5) means others have read (4) and execute (1) permissions.
Changing Permissions
Permissions are typically modified using the chmod command.
Using Symbolic notation:
chmod u+x file.txt # Adds execute permission for the owner
chmod g-w file.txt # Removes write permission for the group
chmod o+r file.txt # Adds read permission for others
Using Octal Notation:
chmod 644 file.txt # Sets read and write for the owner, read-only for group and others
chmod 755 file.txt # Sets read, write, and execute for the owner, read and execute for group and others
Head command:
Displays a specified number of files from the top of the file.
eg: head file.txt - By default displays top 10 lines
head -n 5 file.txt ( displays top 5 lines)
Tail command:
◼️Displays a specified number of lines from the bottom of the file.
eg: tail -n 20 file1.txt -> Displays last 20 lines
tail file.txt -> by default displays last 10 lines
◼️To print middle files/lines by using a combination of head & tail:
head -30 file1.txt | tail -11
It will return 30 lines first and then on top of the results it displays the last 11 lines.
more command:
◼️Displays the content page by page.
◼️more file1.txt -> first displays 1st page, if want to go to the second page, click on the space bar and so on.
◼️Press the enter key to view line-by-line
to exist, press q
less command:
◼️less file1.txt -> displays page by page, the only difference is, in less command, we can go to previous pages and next pages, in more we cannot see previous pages.
press the upper arrow key to previous page using less.
Subscribe to my newsletter
Read articles from Sakeena Shaik directly inside your inbox. Subscribe to the newsletter, and don't miss out.
Written by

Sakeena Shaik
Sakeena Shaik
🌟 DevOps Specialist | CICD | Automation Enthusiast 🌟 I'm a passionate DevOps engineer who deeply loves automating processes and streamlining workflows. My toolkit includes industry-leading technologies such as Ansible, Docker, Kubernetes, and Argo-CD. I specialize in Continuous Integration and Continuous Deployment (CICD), ensuring smooth and efficient releases. With a strong foundation in Linux and GIT, I bring stability and scalability to every project I work on. I excel at integrating quality assurance tools like SonarQube and deploying using various technology stacks. I can handle basic Helm operations to manage configurations and deployments with confidence. I thrive in collaborative environments, where I can bring teams together to deliver robust solutions. Let's build something great together! ✨