🔥 My React Handbook - Part I
 Tuan Tran Van
Table of contents
- React Advanced Concepts
- How React’s Render, Effects, and Refs work under the hood
- Comprehensive Guide on React Re-renders
- Building React Components: Turning UI Designs into React Components
- React Testing
- React Components Mental Models
- React Logging: How to Implement It Right and Debug Faster
- When to Use and Avoid useEffect in React
- Building Flexible React Components: Common Core, Many Faces
- Beyond the 404: Why React Apps Break on Netlify and What That Teaches Us About The Web
- How to Fix Memory Leaks in React
- This One Vite Plugin Made My React Dev Server 5x Faster
- Loading third-party scripts in React
- 10 Ways to better organize and design your React application
- Use the Atomic Design Pattern to structure your React application
- Event-Driven React with the Observer Pattern: A Clean Alternative to Prop Drilling
- Build Scalable Frontends With React’s Most Underrated Pattern: Behavior Layers
- The useState Debugging Techniques
- 8 Advanced React + TypeScript Patterns Every Developer Should Master

In this comprehensive guide, we delve into the art of writing "clean code" in React.js. Having embarked on my React journey five years ago and continuing to utilize it in my role as a Software Engineer, I've encountered various challenges along the way. Reflecting on past experiences, I strive to approach them in a more refined manner moving forward.
React stands out as one of the most prominent technologies in the realm of JavaScript, often hailed as the preferred choice by many developers. Unlike some frameworks, React grants developers the freedom to structure projects as they see fit. While this fosters creativity, it can also lead to disorder if not managed properly, particularly when collaborating within a team setting. Hence, establishing a clear and comprehensible structure becomes imperative.
Within this article, I aim to uncover 47 invaluable tips for crafting exemplary code in React, fostering improved development practices, and enhancing project efficiency.
React Advanced Concepts
How React’s Render, Effects, and Refs work under the hood
Let’s start with this snippet to get the thoughts rolling:
function ExploringReactRefs() {
  // Why does this ref start as null?
  // When does it get its actual value?
  const divRef = useRef<HTMLDivElement>(null);

  // This feels like it should work... but does it?
  // When exactly does this effect run?
  useEffect(() => {
    console.log("Effect:", divRef.current?.getBoundingClientRect());
  }, []);

  // What's different about this effect?
  // Why might we need this instead of useEffect?
  useLayoutEffect(() => {
    console.log("Layout Effect:", divRef.current?.getBoundingClientRect());
  }, []);

  // What's special about this callback ref approach?
  // When does this function actually get called?
  // See the second div below where handleRef is used.
  const handleRef = (node: HTMLDivElement | null) => {
    if (node) {
      console.log("Callback ref:", node.getBoundingClientRect());
    }
  };

  return (
    <div className="flex gap-4">
      {/* When can we actually access this element via divRef? */}
      <div ref={divRef}>Using useRef</div>

      {/* How is this different from useRef? */}
      <div ref={handleRef}>Using callback ref</div>
    </div>
  );
}
State updates and renders
Whenever your component’s state is updated, React will re-render it. Re-rendering a component renders all of its children(yes, you can optimize this, but it’s not the point here).
And just to be clear, effects only run if their dependencies change. If an array is empty, it will only run once when the component is mounted (created).
Let’s just go over the snippet to be brutally clear about this:
function Component() {
  // 1. No dependency array - runs on EVERY render
  useEffect(() => {
    // Effect runs
    return () => {
      /* Cleanup runs before next effect */
    };
  }); // Missing dependency array

  // 2. Empty array - runs only on mount/unmount
  useEffect(() => {
    // Effect runs once
    return () => {
      /* Cleanup runs on unmount */
    };
  }, []);

  // 3. With dependencies - runs when deps change
  useEffect(() => {
    // Effect runs if count changed
    return () => {
      /* Cleanup runs before next effect if count changed */
    };
  }, [count]);

  // Same rules apply for useLayoutEffect
}
Mount means the component gets created.
Unmount means the component gets destroyed, or in simpler words, removed from the DOM. I used to believe in my younger days that this meant navigating away from the page. But this can also be the case if you are conditionally rendering a component.
When a component is rendered, it goes through two main phases:
Render phase
Commit phase
We are gonna break those down into simpler terms.
For now, understand that every single time a render happens, two phases are executed: Render and commit.
Virtual DOM
Before we dive into the Render phase, let’s talk about the Virtual DOM.
A lot of people who lack understanding instantly rush towards “Virtual DOM is to make React faster“. It’s a bit funny because it’s not really the case. You have UI libraries today, such as Solid.js, that don’t have a Virtual DOM and are faster than React. That statement is very confusing and incorrect.
In actuality, React uses Fiber architecture instead of a simple Virtual DOM. This lets React split into chunks and prioritize it. This is still good for us to understand the basis.
Virtual DOM is just Javascript objects. It’s the representation of the actual DOM.
So here, we noticed the first “cost“ already. We are storing a representation of the DOM in memory. Not that this isn’t a big deal. Millions, if not billions of websites, are using React.
By having a Virtual DOM, React isn’t tied to the browser’s DOM.
This means React can render to different platforms.
That’s why React Native exists and works. Mobile apps do not use the browser’s DOM.
Just pseudo code for our enlightenment:
// React can render to different targets
function render(virtualElement) {
  switch (environment) {
    case "web":
      return renderToDOM(virtualElement);
    case "mobile":
      return renderToNative(virtualElement);
    case "server":
      return renderToString(virtualElement);
  }
}
Batching updates
As we discussed before, React re-renders the entire component (including its children) whenever a state update happens.
This means that when state updates happen, it could result in a lot of DOM changes in the end.
With Virtual DOM, React can batch these updates. It can figure out all the changes that it needs to do and apply them in a single pass when the commit phase is executed.
// Without Virtual DOM
state.change1(); // DOM update
state.change2(); // DOM update
state.change3(); // DOM update

// With Virtual DOM
state.change1(); // Update virtual tree
state.change2(); // Update virtual tree
state.change3(); // Update virtual tree
// One single DOM update at the end!
Render phase
Let’s finally talk about the render phase.
This is the first phase of the render cycle.
One thing that annoys me sometimes when learning is all the terminology people try to use.
We can also call this the first step of going from state change to DOM change.
Let’s look at some pseudo code:
// RENDER PHASE
function renderPhase(newState) {
  // 1. React creates/updates Virtual DOM by calling components
  function handleStateUpdate() {
    // Create new Virtual DOM tree
    const newVirtualDOM = {
      type: "div",
      props: { className: "app" },
      children: [
        {
          type: "span",
          props: { children: newState },
        },
      ],
    };

    // 2. Reconciliation (Diffing)
    // React compares new Virtual DOM with previous one
    // Figures out what needs to change in real DOM
    const changes = diff(previousVirtualDOM, newVirtualDOM);
    // Results in a list of required DOM operations
    // [{type: 'UPDATE', path: 'span/textContent', value: newState}]
  }
}
With the new state, React creates a new Virtual DOM tree.
React uses this new Virtual DOM tree to figure out what changes need to be made to the actual DOM.
It does so by comparing the new Virtual DOM tree with the previous one.
Now React knows exactly the changes that need to be made and we don’t need to update the full DOM every time a state update happens.
Commit phase
Now we know what changes we need to make.
The commit phase is often summarized as “React updates the DOM“. But it’s a bit deeper than that.
If you are not familiar with the event loop. I recommend reading up on it before continuing. Chapters 12, 13, and 14 are relevant if you wanna learn more about the event loop. MDN or YouTube are also good resources.
Let’s look at some pseudo code:
// 1. React's Commit Phase (Synchronous JavaScript)
// This runs on the main thread
function commitToDOM() {
 // React calls DOM APIs
 // Each call gets added to the call stack
 mutateDOM() {
   document.createElement()
   element.setAttribute()
   element.appendChild()
   // ...
 }

 // remember useLayoutEffect?
 // Now we'll run all the layout effects
 // this is synchronous
 // the code in here gets added to the call stack too
 runLayoutEffects()

 // Queue useEffect for later
 queueMicrotask(() => {
   runEffects()
 })
}

// commitToDOM() is done - time for browser to work

// 2. Browser's Work
// - Calculate Layout
// - Paint
// - Composite

// 3. Microtask Queue
// Now useEffect runs
How browsers work is out of the scope of this post. But that is super interesting. It’s on my list of things to learn in 2025. I have done some research on it when I dug into hidden classes and stuff. Let’s go over those points quickly, then get back to the topic:
Calculating layout: The browser calculates exact positions and sizes.
Paint: The browser converts layout results into visual pixels.
Composite: The browser combines layers into a final screen image.
When we run the layout effects, we are running the synchronous Javascript code. The function call and the ones it contains get added to the call stack. Now, if you have been following along closely, you understand that every time the layout’s dependencies change, they will run again. This MEANS more synchronous code to go through before the browser can do its thing (which is why React recommends being careful with useLayoutEffect).
We then run the normal effects. These are queued up with queuedMicrotask() in our example. However, in actuality, React uses its own scheduling system. But I think it helps to review it as a microtask queue to sort of understand the basics.
When the browser does its things, it’s gonna first clear the entire call stack before it’s running anything from the microtask queue. Then, it runs the microtask queue.
Refs
Let’s focus on the refs from the original snippet.
const divRef = useRef<HTMLDivElement>(null);
This ref is created during the render phase. It starts as null because the DOM element doesn’t exist during the first render. It gets its actual value after React commits the changes to the DOM. But you can’t know exactly when this happens just by using useRef alone.
That’s why you always need to check if the ref is null before you use it.
if (divRef.current) {
  console.log(divRef.current.getBoundingClientRect());
}
What happens when you use a callback ref?
const handleRef = (node: HTMLDivElement | null) => {
  if (node) {
    console.log("Callback ref:", node.getBoundingClientRect());
  }
};
Called immediately when the element is attached to the DOM. You can be 100% sure that the callback ref will run at the right time. It’s null when the element is removed in case you need to clean up. It runs before useLayoutEffect. It’s best for immediate DOM measurements or setup.
function Tooltip({ text, targetRef }) {
  const tooltipRef = useRef(null);

  // Wrong: Might cause flicker
  // Why?
  // Because this happens after the DOM is painted
  // You will tooltip in its original position
  // Then it flickers when this runs
  useEffect(() => {
    const targetRect = targetRef.current.getBoundingClientRect();
    tooltipRef.current.style.top = `${targetRect.bottom}px`;
  }, []);

  // Better: No flicker
  // Why?
  // Because this happens before the DOM is painted
  // You will see the tooltip in its final position
  useLayoutEffect(() => {
    const targetRect = targetRef.current.getBoundingClientRect();
    tooltipRef.current.style.top = `${targetRect.bottom}px`;
  }, []);

  // Best: Most direct
  // Why?
  // Because this happens immediately after the DOM is attached (layout effect happens AFTER the DOM is attached)
  const handleRef = (node) => {
    if (node) {
      const targetRect = targetRef.current.getBoundingClientRect();
      node.style.top = `${targetRect.bottom}px`;
    }
  };

  return <div ref={handleRef}>{text}</div>;
}
When do cleanup functions run?
After a render, right BEFORE React runs the effect (useEffect or useLayoutEffect, only if dependencies change), it runs the cleanup functions with the previous values. Then, it runs the new effect with the new values. Or, of course, if the component unmounts.
Comprehensive Guide on React Re-renders
Original post: React re-render guide: everything, all at once.
When talking about React performance, there are two major stages that we need to care about:
initial render: happens when a component first appears on the screen
re-render: second and consecutive render of a component that is already on the screen
Re-render happens when React needs to update the app with some new data. Usually, this happens as a result of a user interacting with the app or some external data coming through via an asynchronous request or some subscription model.
Non-interactive apps that don’t have any asynchronous data updates will never re-render, and therefore don’t need to care about re-render performance optimization.
Watch “intro to re-renders” on Youtube.
Necessary re-renders: re-render of a component that is the source of the changes, or a component that directly uses the new information. For example, if a user types in an input field, the component that manages its state needs to update itself on every keystroke.
Unnecessary re-renders: re-render of a component that is propagated through the app via different re-render mechanisms due to either mistakes or inefficient app architecture. For example, if a user types in an input field and the entire page re-renders on every keystroke, the page has been re-rendered unnecessarily.
Unnecessary re-renders by themselves are not a problem. React is very fast and able to deal with them without users noticing anything.
However, if re-renders happen too often and/or on very heavy components, this could lead to user experience appearing “laggy”, visible delays on every interaction, or even the app becoming completely unresponsive.
When does a React component re-render itself?
There are four reasons why a component would re-render itself: state changes, parent (or children) re-renders, context changes, and hooks changes. There is also a bug myth: that re-renders happen when the component’s props change. By itself, it’s not true.
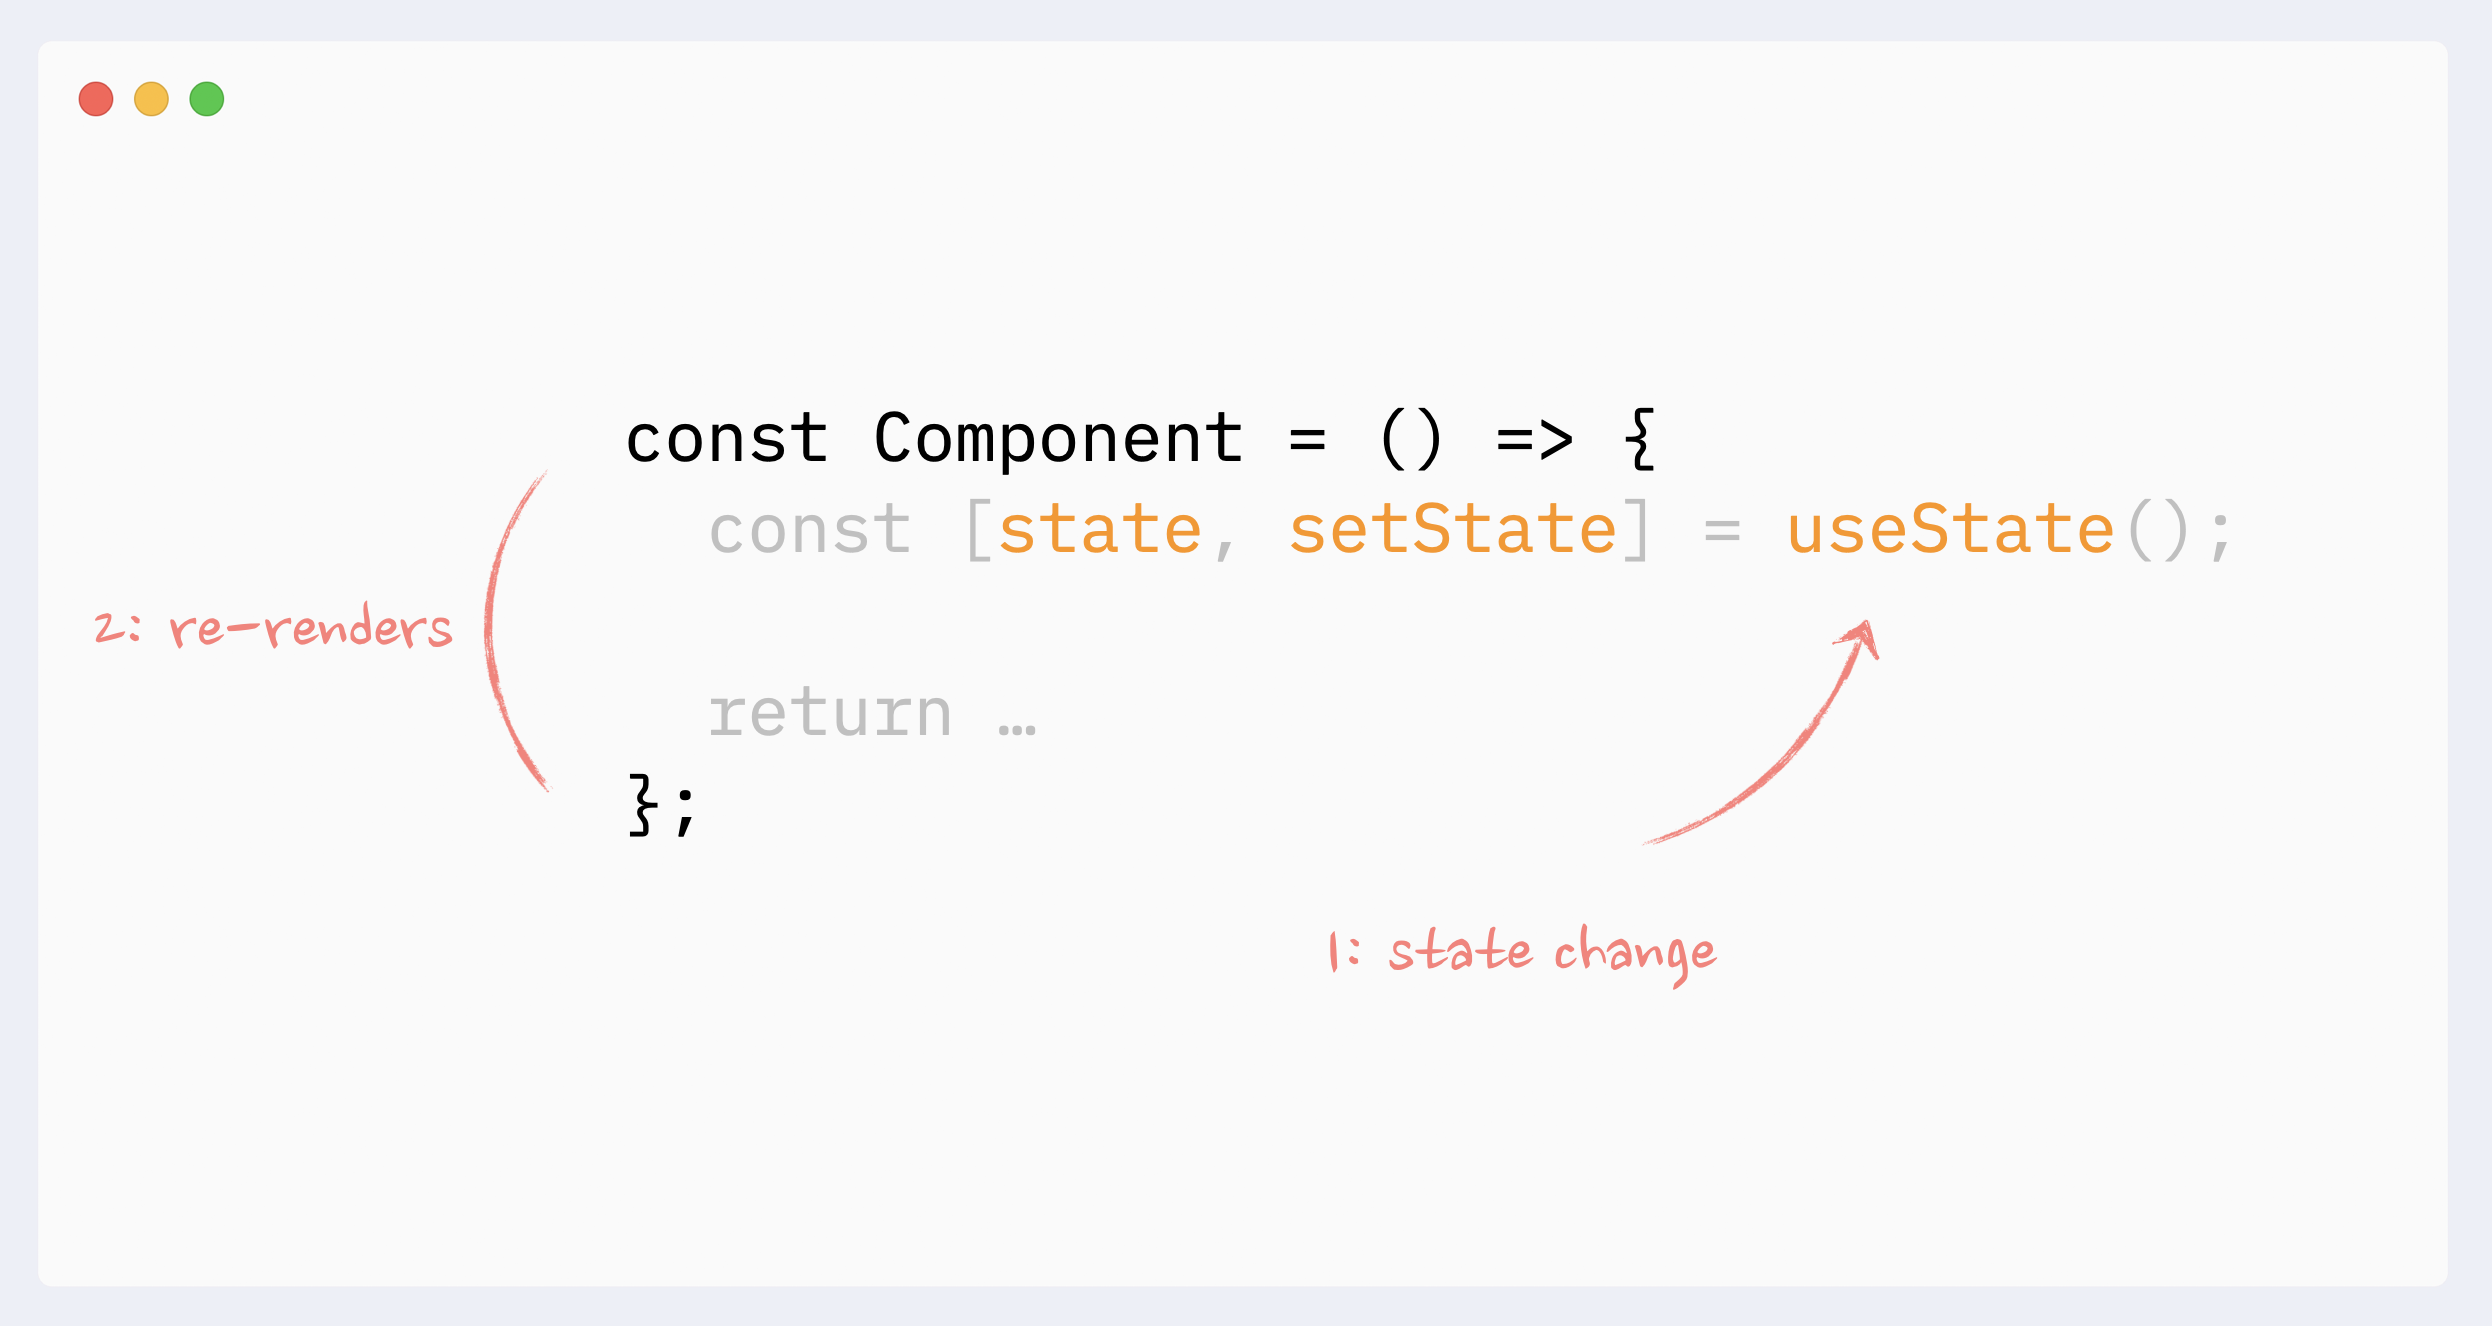
- Re-renders reason: state changes
When a component’s state changes, it will re-render itself. Usually, it happens either in a callback or in useEffect hook.
State changes are the “root” source of all re-renders.
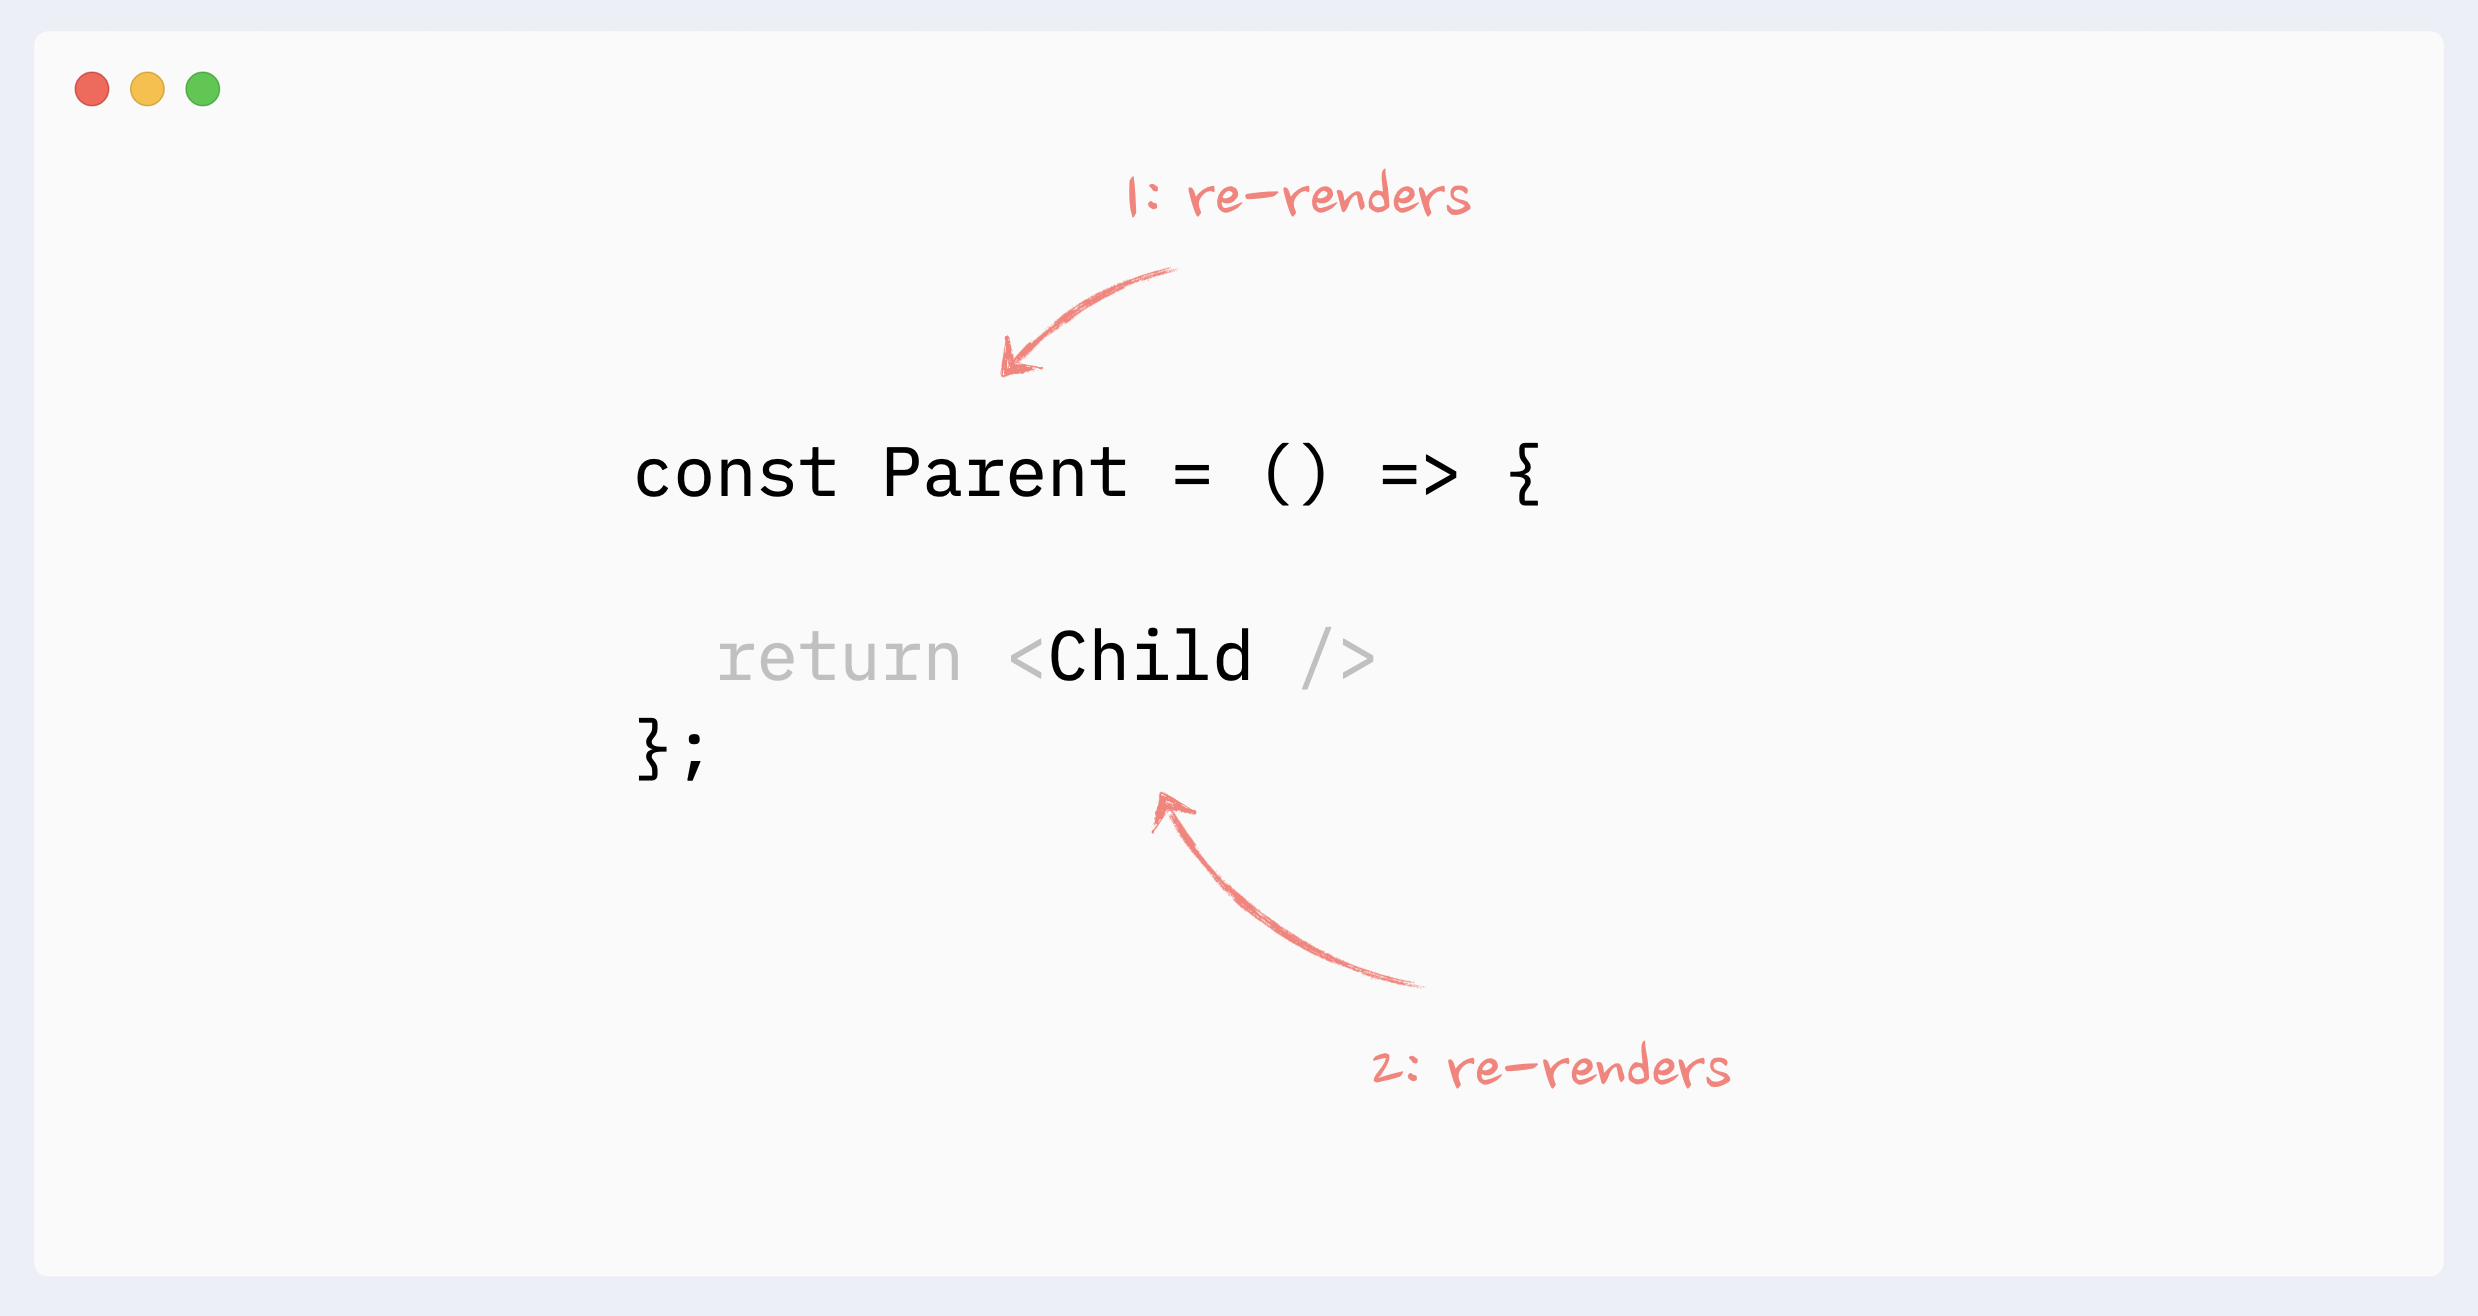
- Re-renders reason: parent re-renders
A component will re-render itself if its parent re-renders. Or, if we look at this from the opposite direction, when a component re-renders, it also re-renders all its children.
It always goes “down” the tree: the re-render of a child doesn’t trigger the re-render of a parent. (There are a few caveats and edge cases here, see the full guide for more details: The mystery of React Element, children, parents, and re-renders)
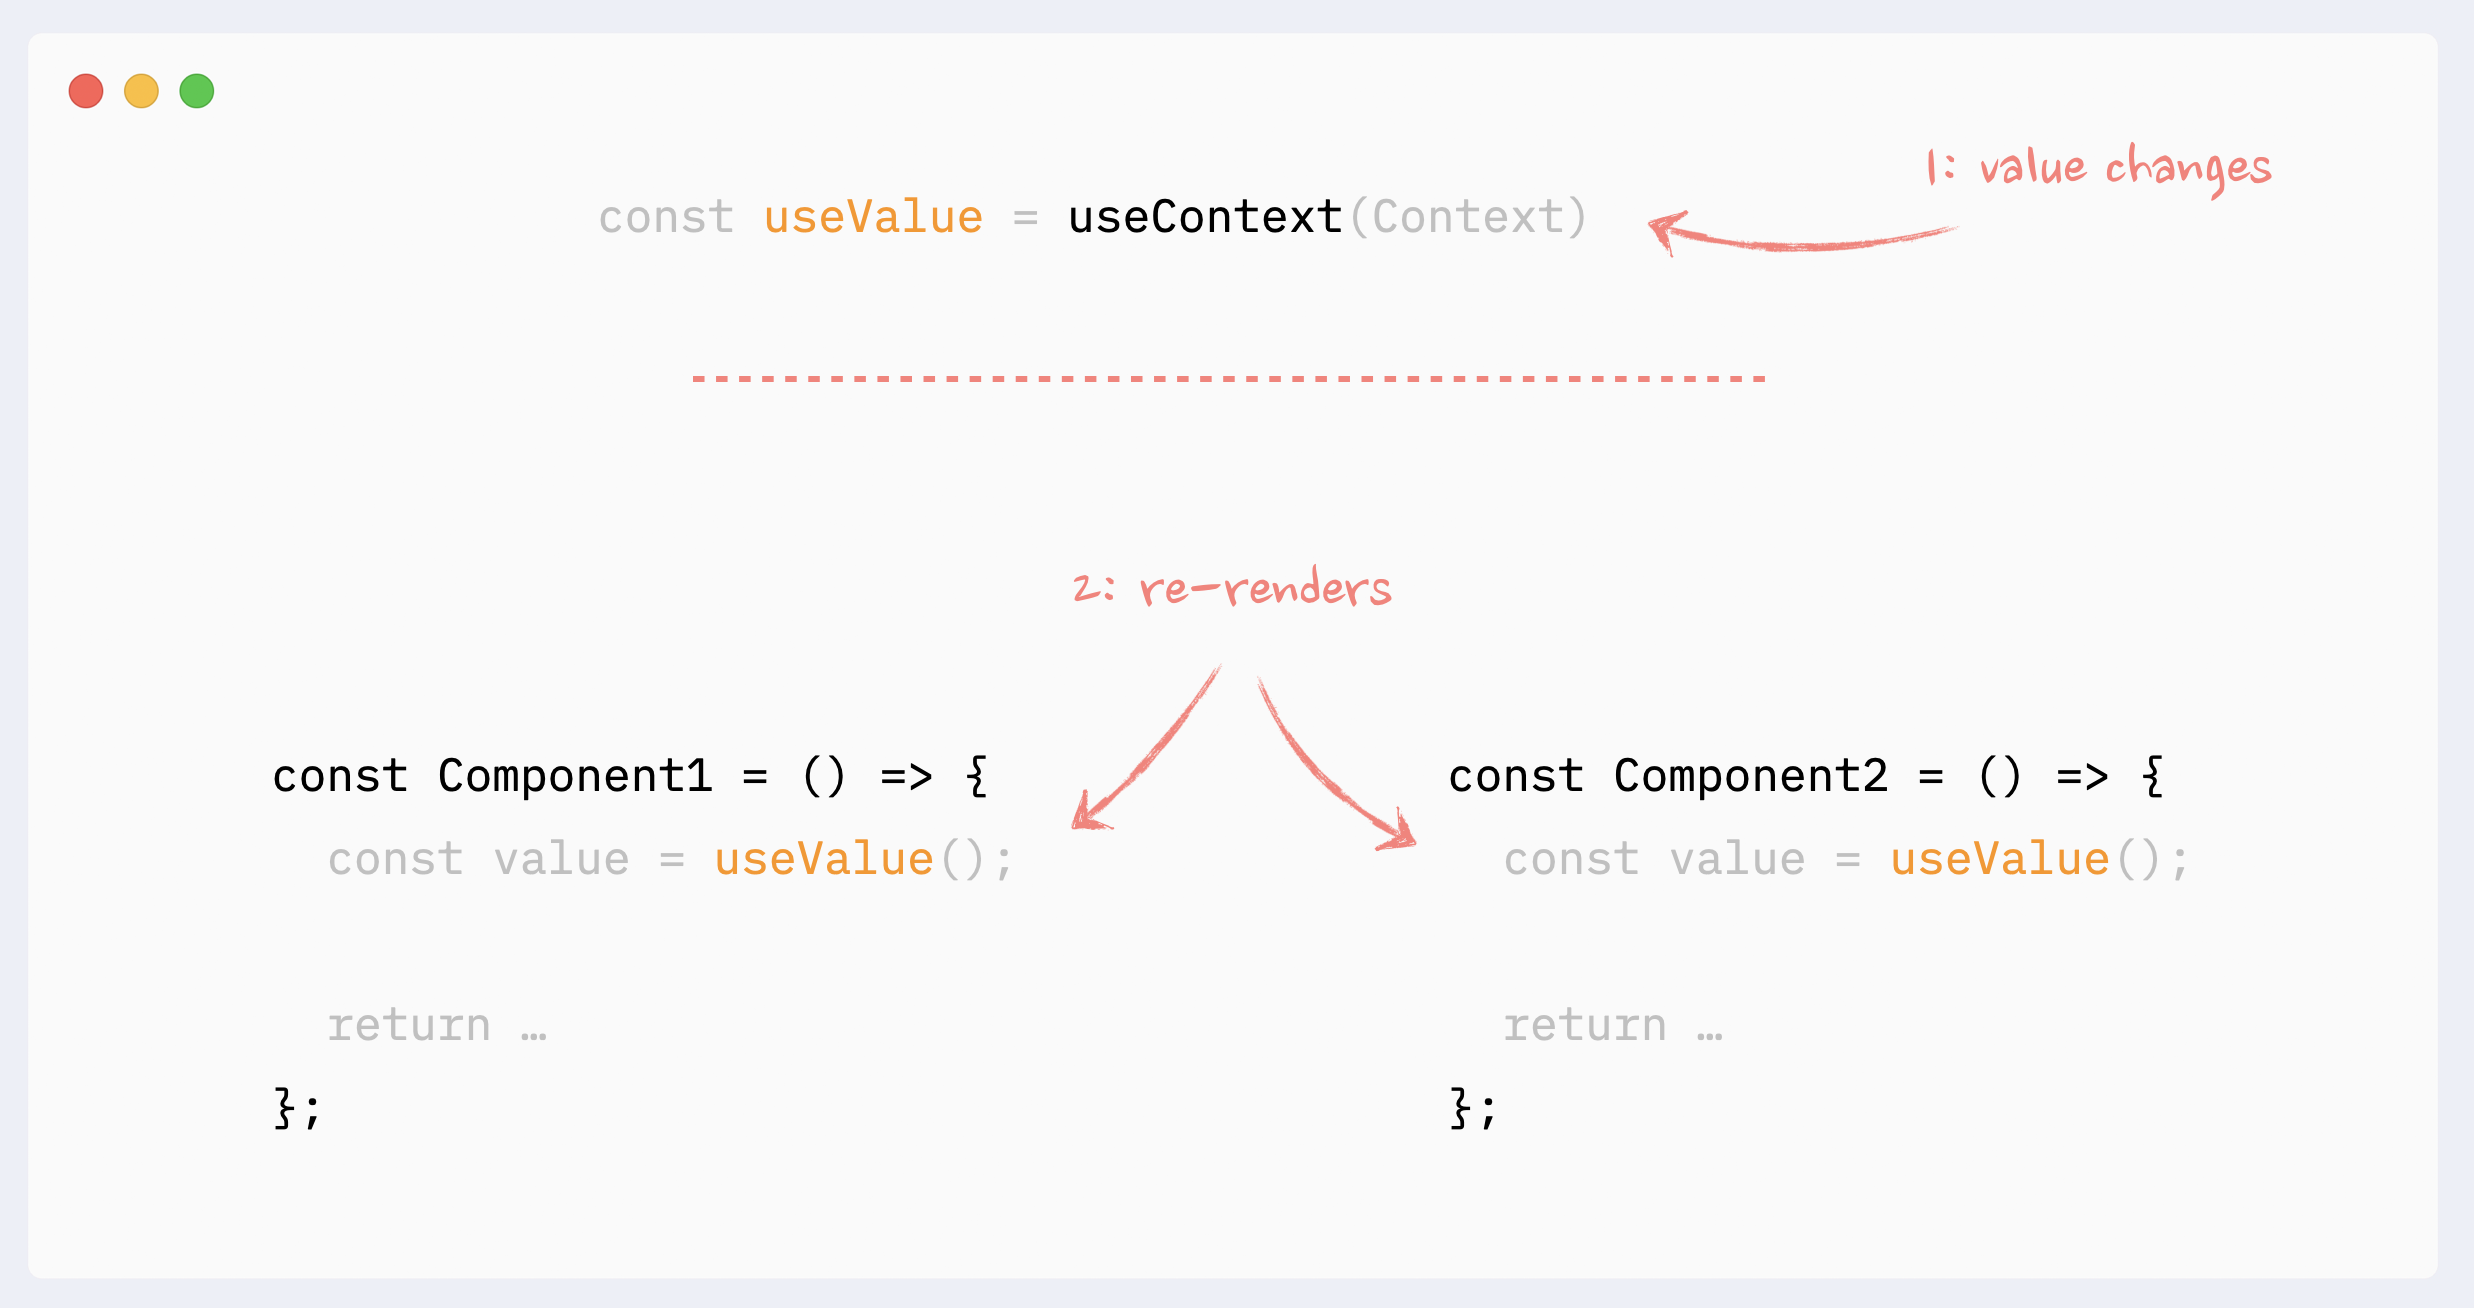
- Re-renders reason: context changes
When a value of the Context Provider changes, all components that use this context will re-render, even if they don’t use the changed portion of the data directly. Those re-renders can not be prevented with memoization directly, but there are a few workarounds that can simulate it
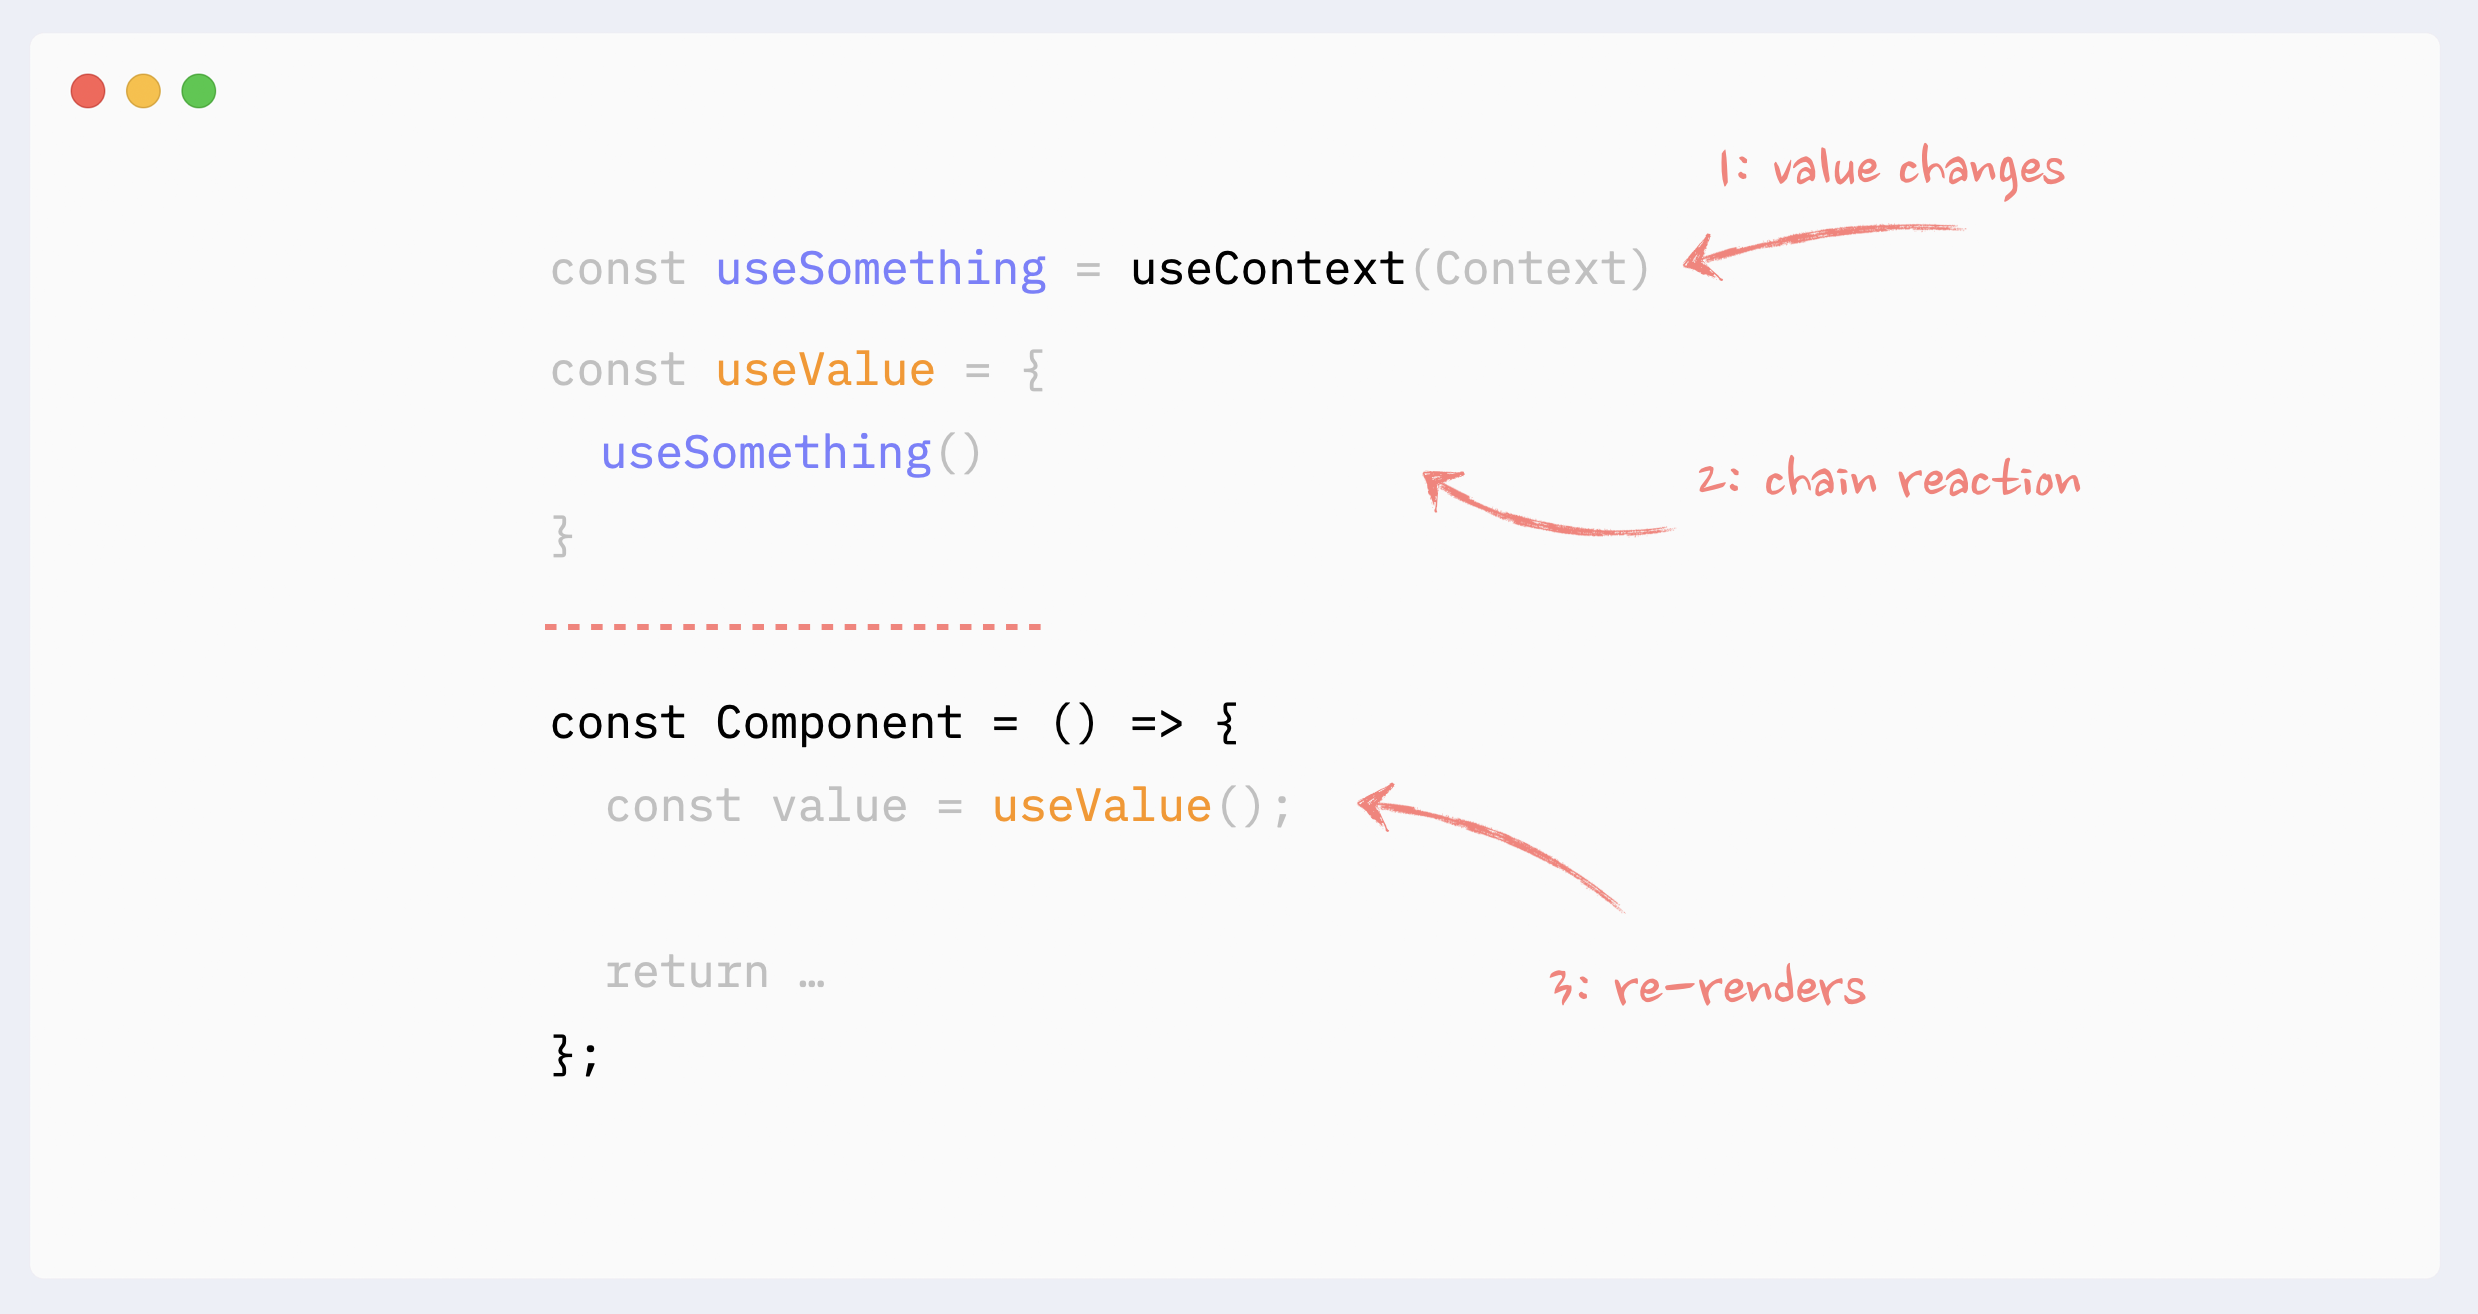
- Re-renders reason: hooks changes
Everything that is happening inside a hook “belongs” to the component that uses it. The same rules regarding Context and State changes apply here:
State change inside the hook will trigger an unpreventable re-render of the “host” component
If the hook uses Context and Context’s value changes, it will trigger an unpreventable re-render of the “host” component
Hooks can be chained. Every single hook inside the chain still “belongs” to the “host” component, and the same rules apply to any of them.
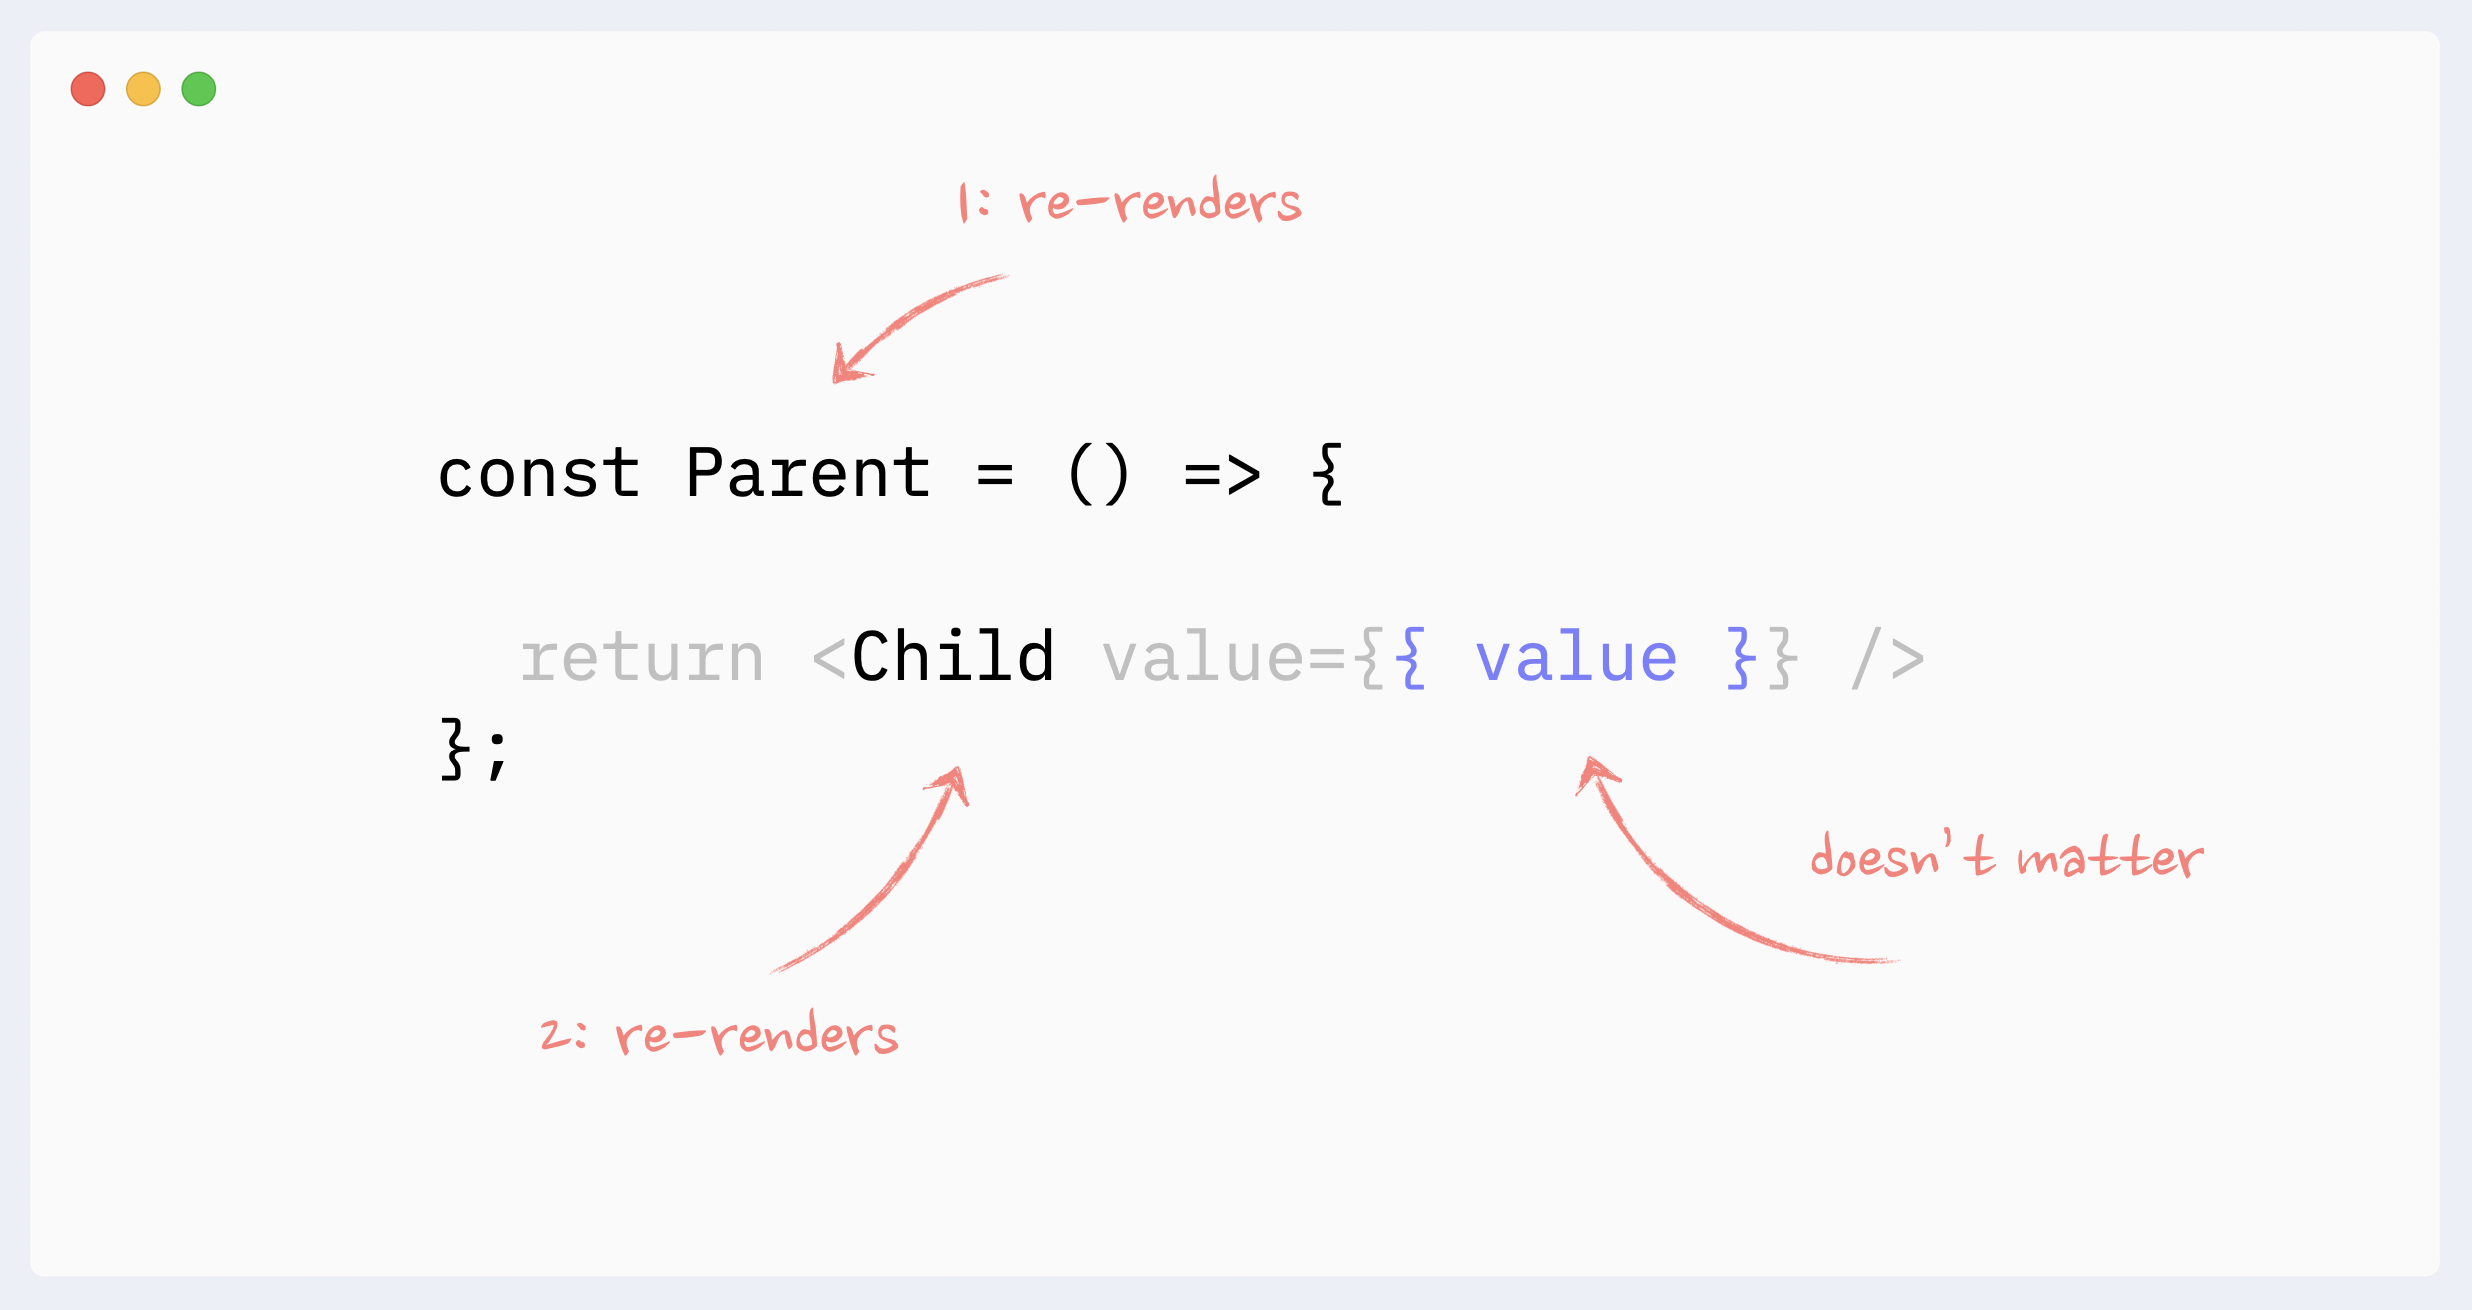
- Re-renders reason: props changes (the big myth)
It doesn’t matter whether the component’s props change or not when talking about re-renders of non-memoized components.
In order for props to change, they need to be updated by the parent component. This means the parent would have to re-render, which will trigger re-render of the child component regardless of its props.
Only when memoization techniques are used (React.memo, useMemo), then props change becomes important.
Preventing re-renders with composition
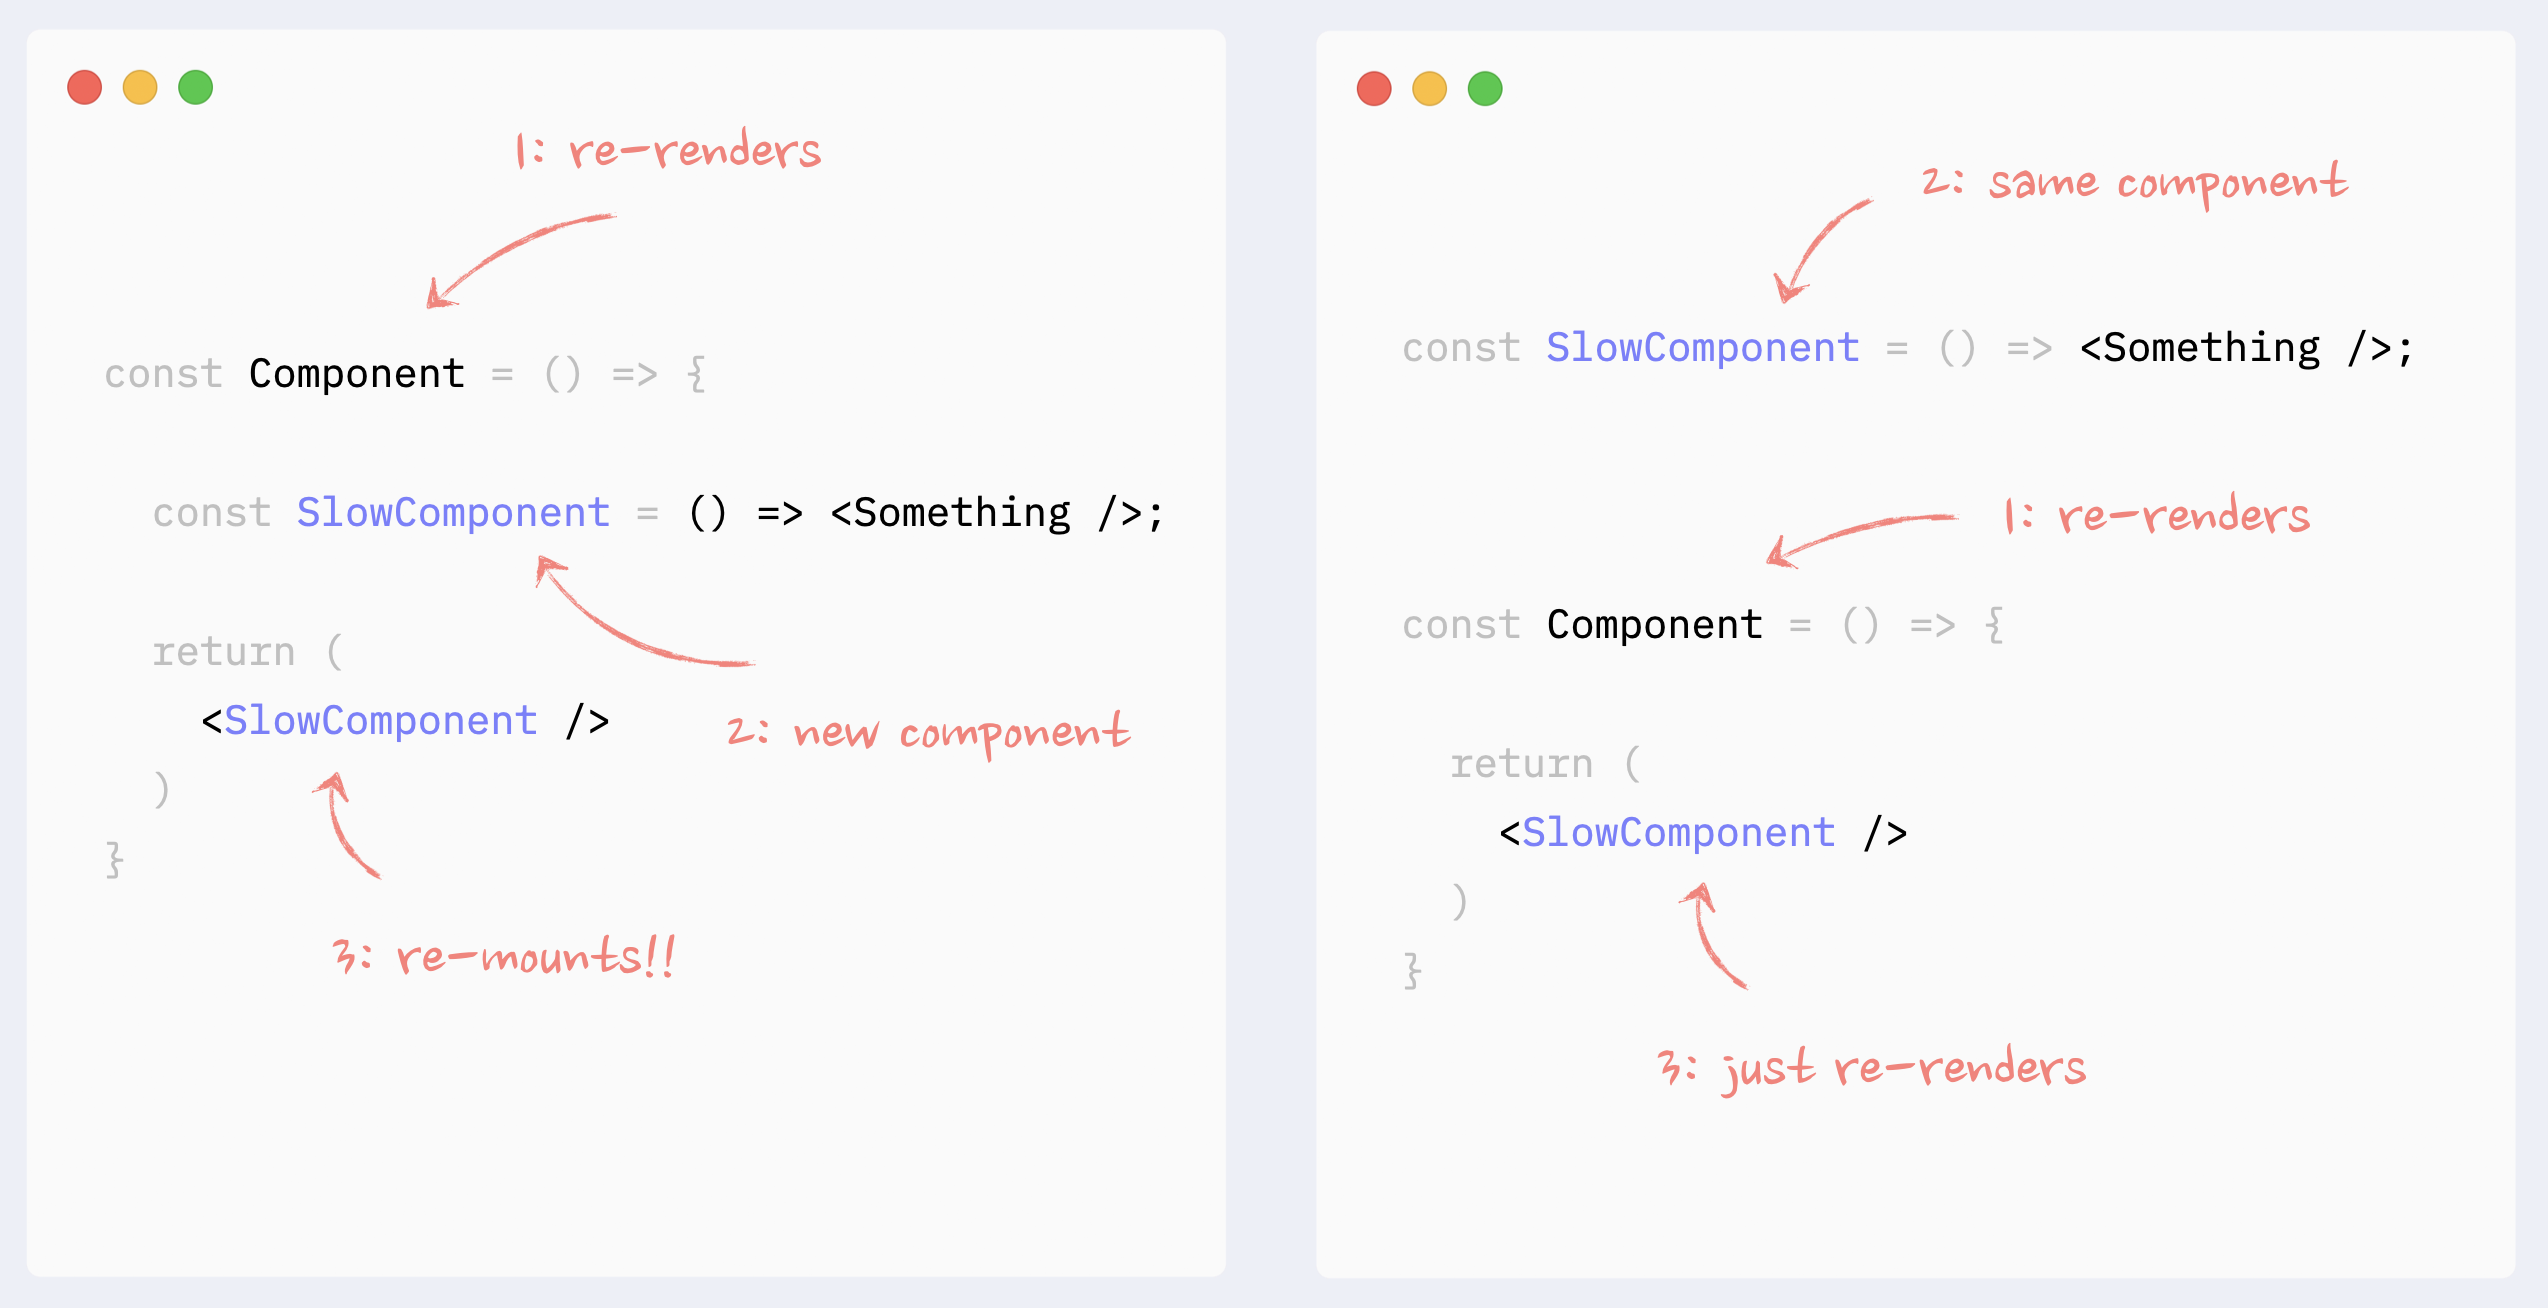
- ⛔️ Antipattern: Creating components in a render function
Creating components inside a render function of other components is an anti-pattern that can be the biggest performance killer. On every re-render, React will re-mount this component (destroy it and re-create it from scratch), which is going to be much slower than a normal render. On top of that, this will lead to such bugs as (possible flashes of content during re-renders, state being reset in the component with every re-render, useEffect with no dependencies triggered on every re-render, if a component was focused, focus will be lost.)
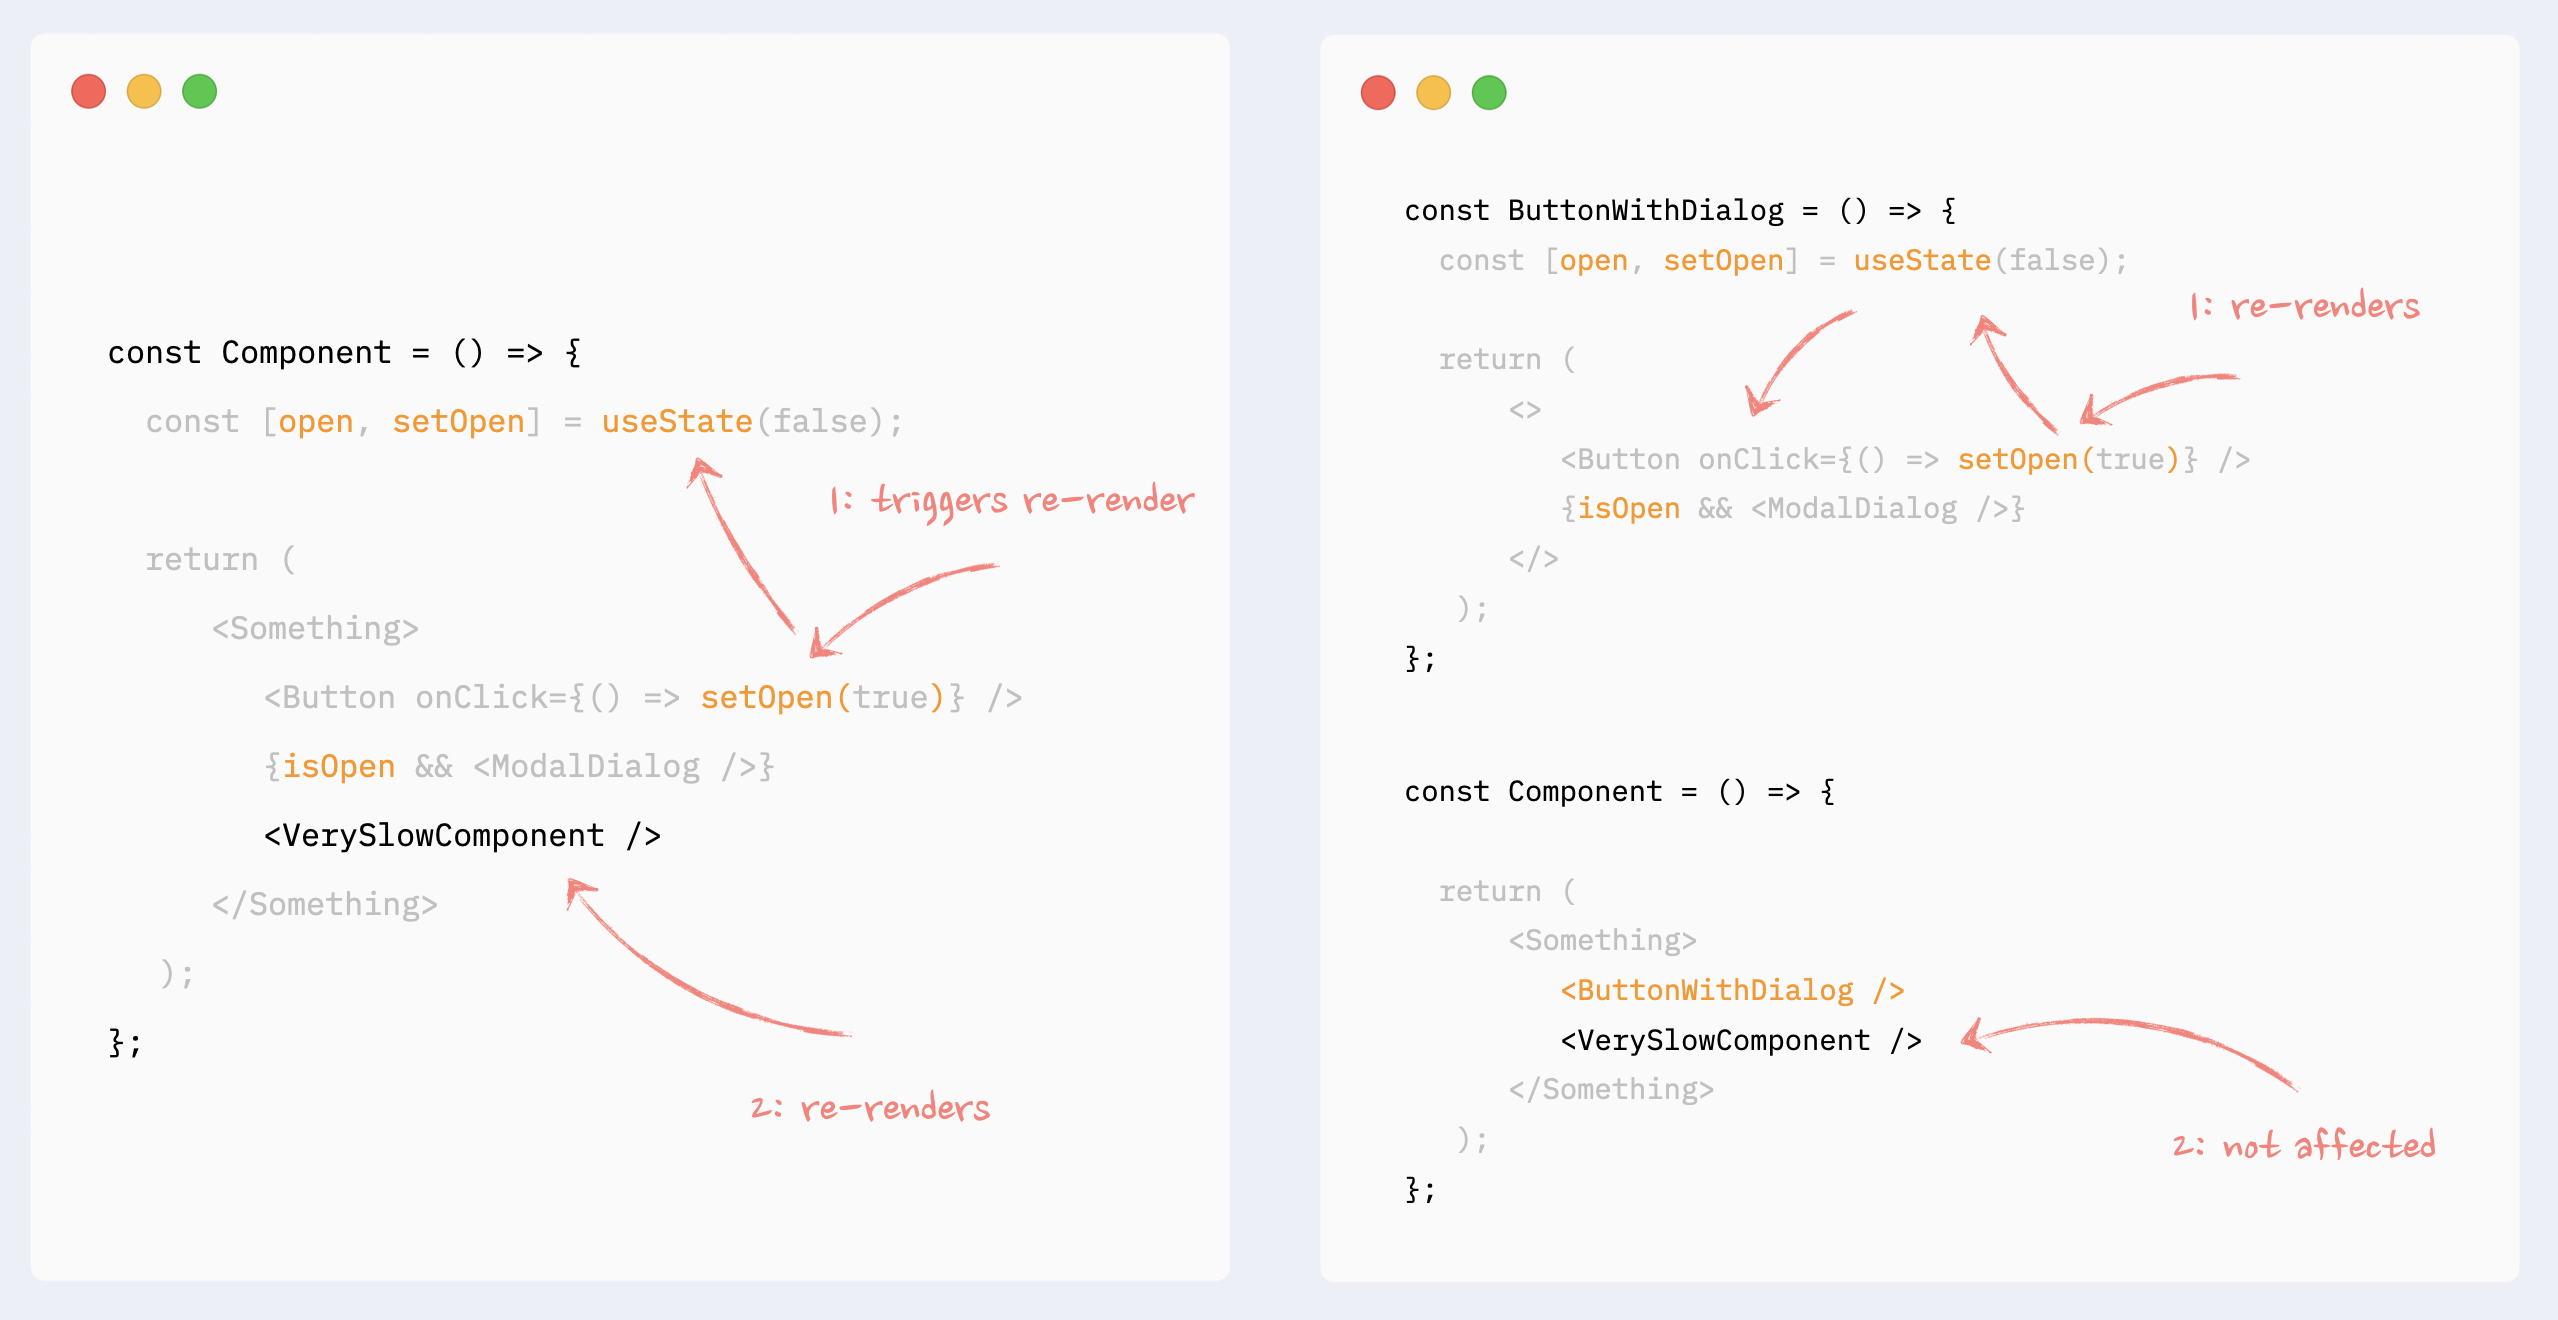
- ✅ Preventing re-renders with composition: moving state down
This pattern can be beneficial when a heavy component manages state, and this state is only used on a small, isolated portion of the render tree. A typical example would be opening/closing a dialog with a button click in a complicated component that renders a significant portion of a page.
In this case, the state that controls modal dialog appearance, dialog itself, and the button that triggers the update can be encapsulated in a smaller component. As a result, the bigger component won’t re-render on those state changes.
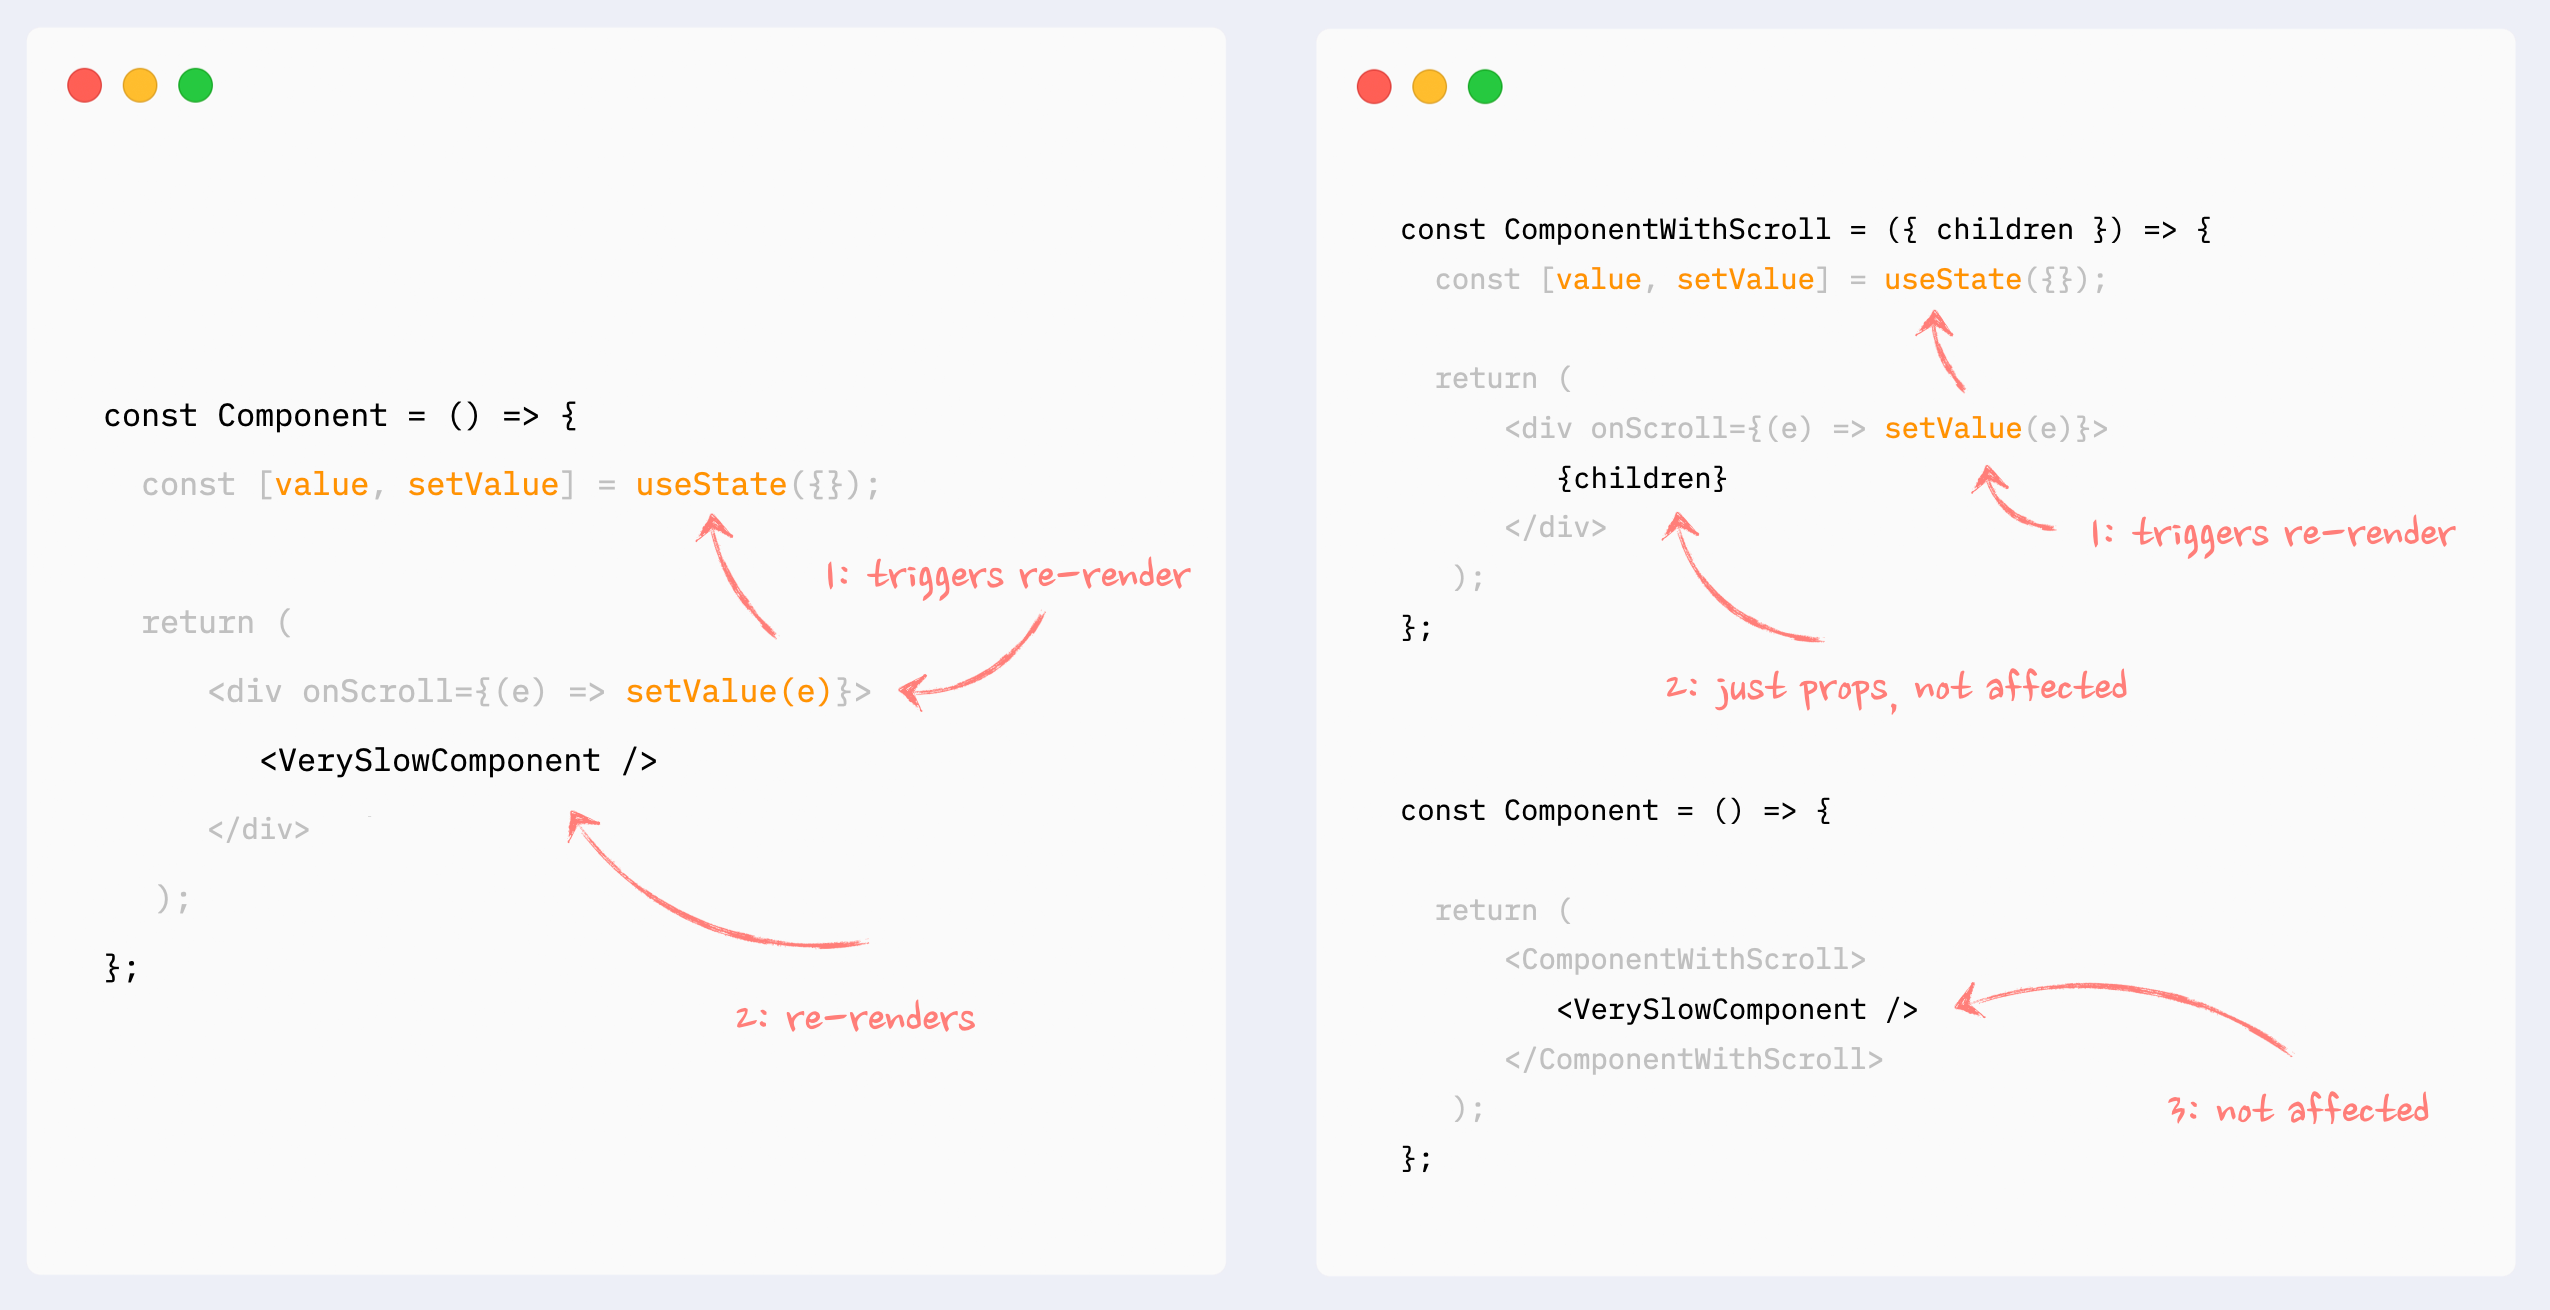
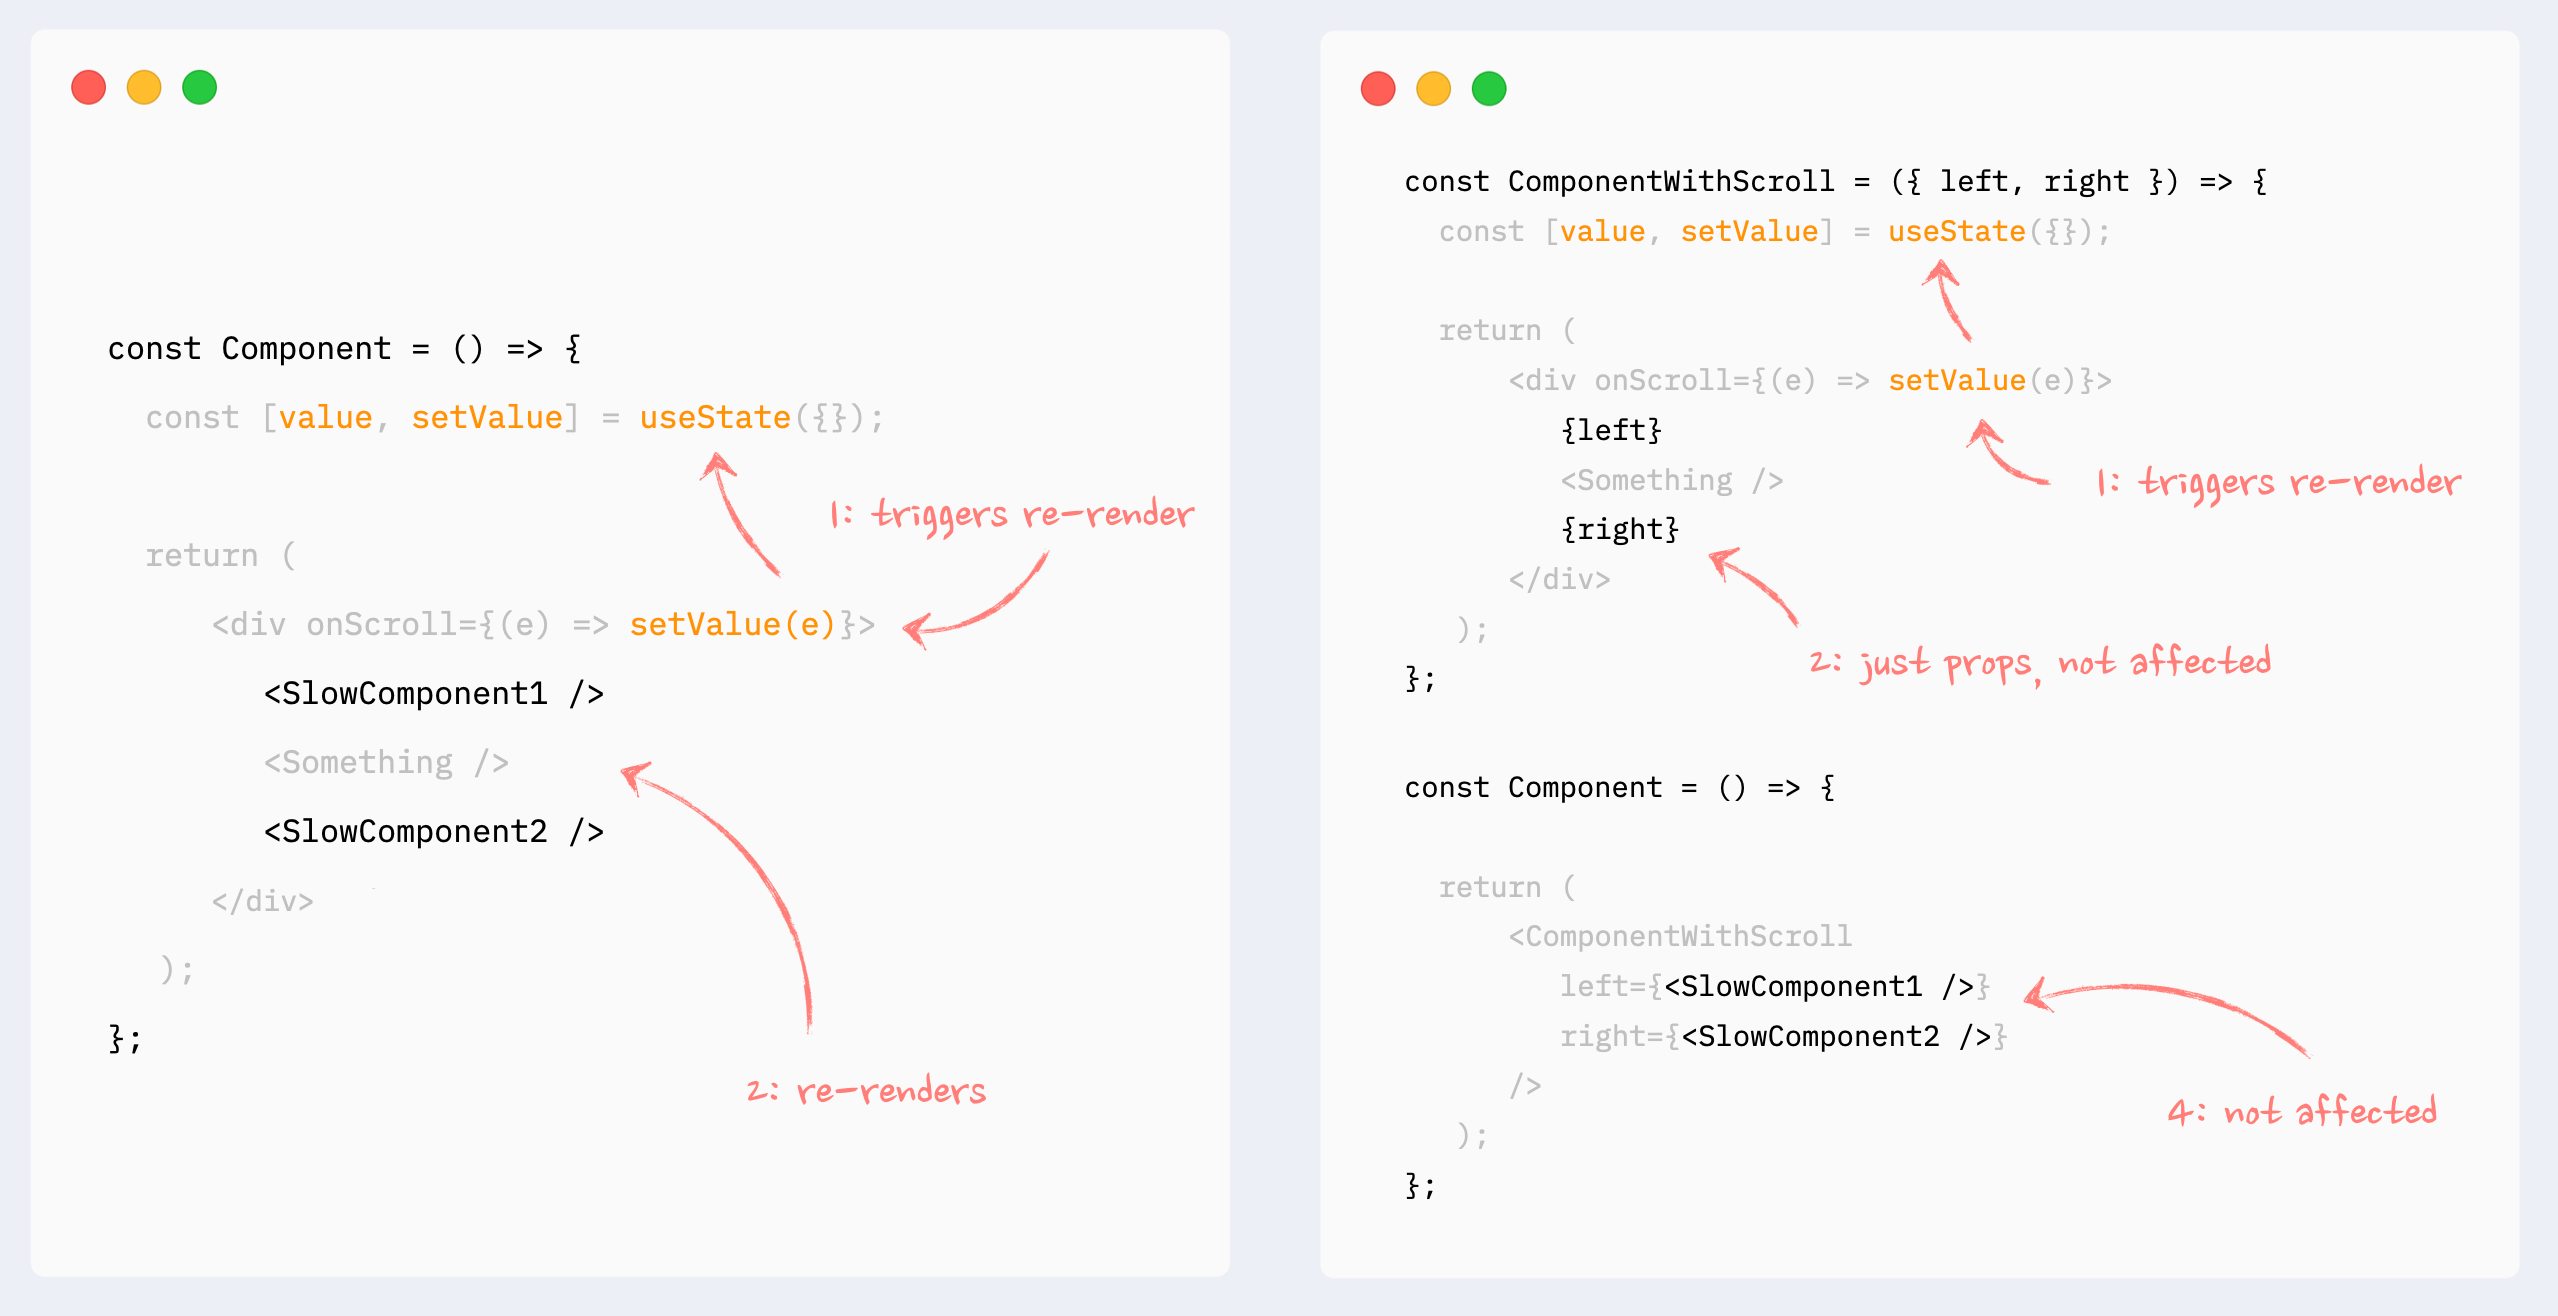
- ✅ Preventing re-renders with composition: children as props
This can also be called “wrap state around children”. This pattern is similar to “moving state down”: it encapsulates state changes in a smaller component. The difference here is that the state is used on an element that wraps a slow portion of the render tree, so it can’t be extracted that easily. A typical example would be onScroll or onMouseMove callbacks attached to the root element of a component.
In this situation, state management and components that use that state can be extracted into a smaller component, and the slow component can be passed to it as children. From the smaller component perspective children are just props, so they will not be affected by the state change and therefore won’t re-render.
- ✅ Preventing re-renders with composition: components as props
Pretty much the same as the previous pattern, with the same behavior: it encapsulates the state inside a smaller component, and heavy components are passed to it as props. Props are not affected by the state change, so heavy components won’t re-render.
It can be useful when a few heavy components are independent from the state, but can’t be extracted as children as a group.
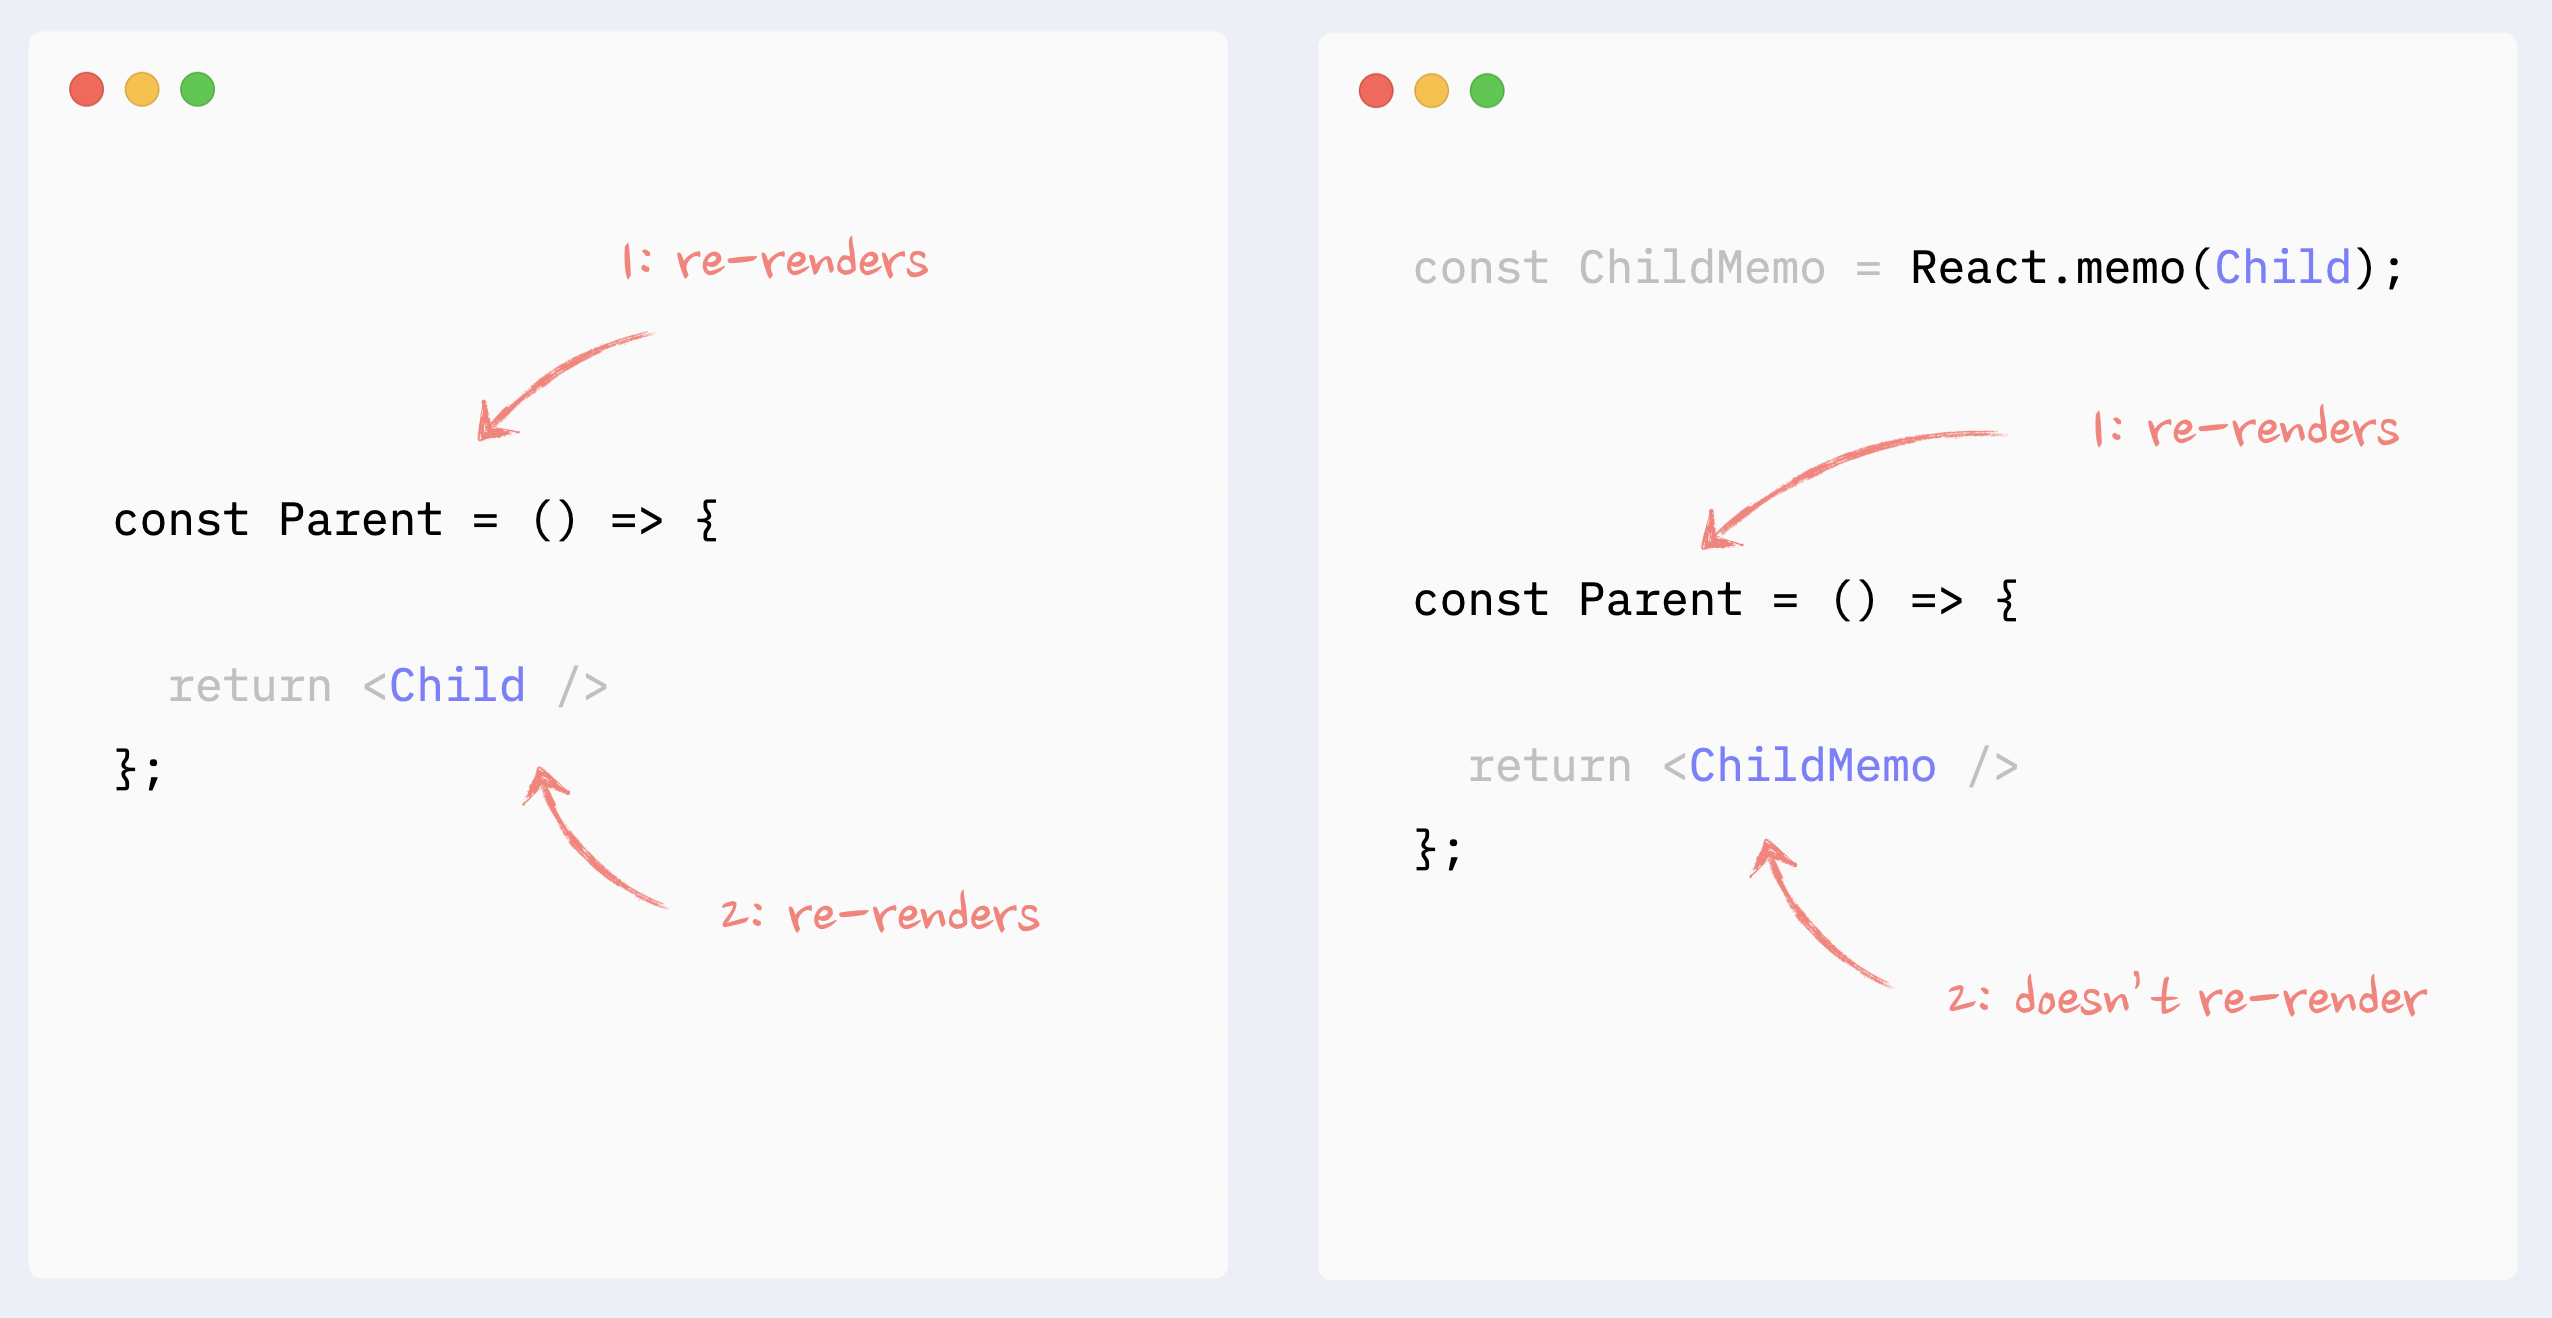
Preventing re-renders with React.memo
Wrapping a component in React.memo will stop the downstream chain of re-renders that is triggered somewhere up the render tree, unless this component’s props have changed.
This can be useful when rendering a heavy component that is not dependent on the source of re-renders (i.e., state, changed data).
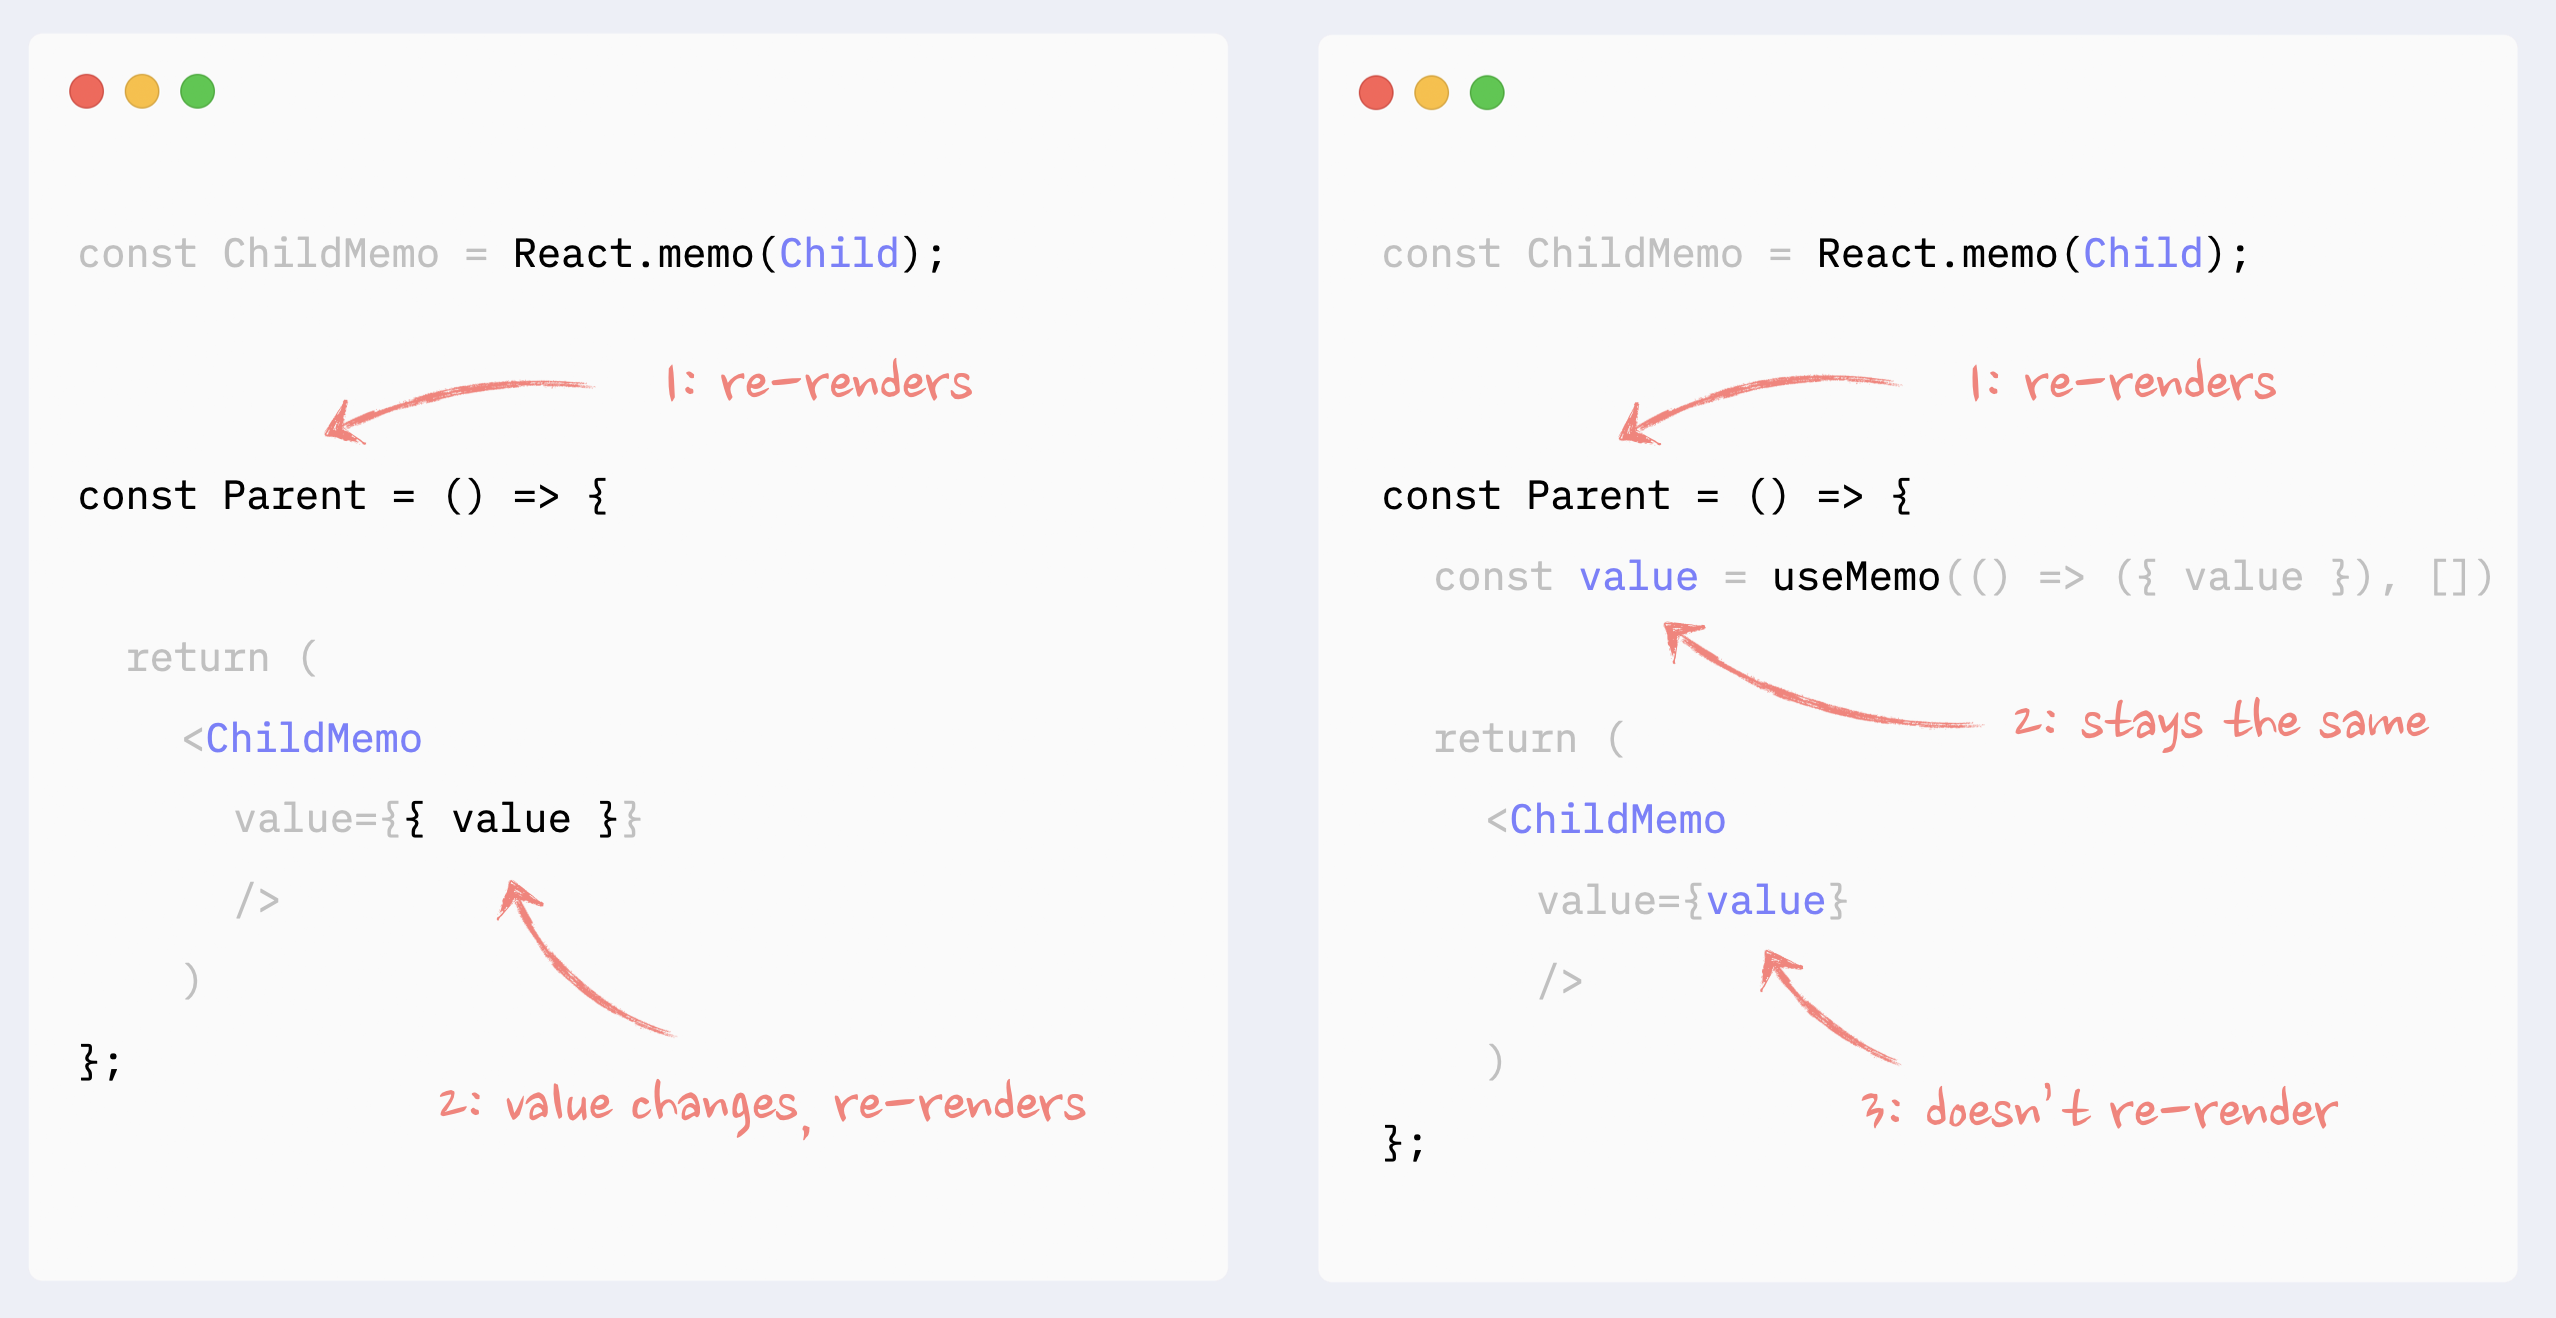
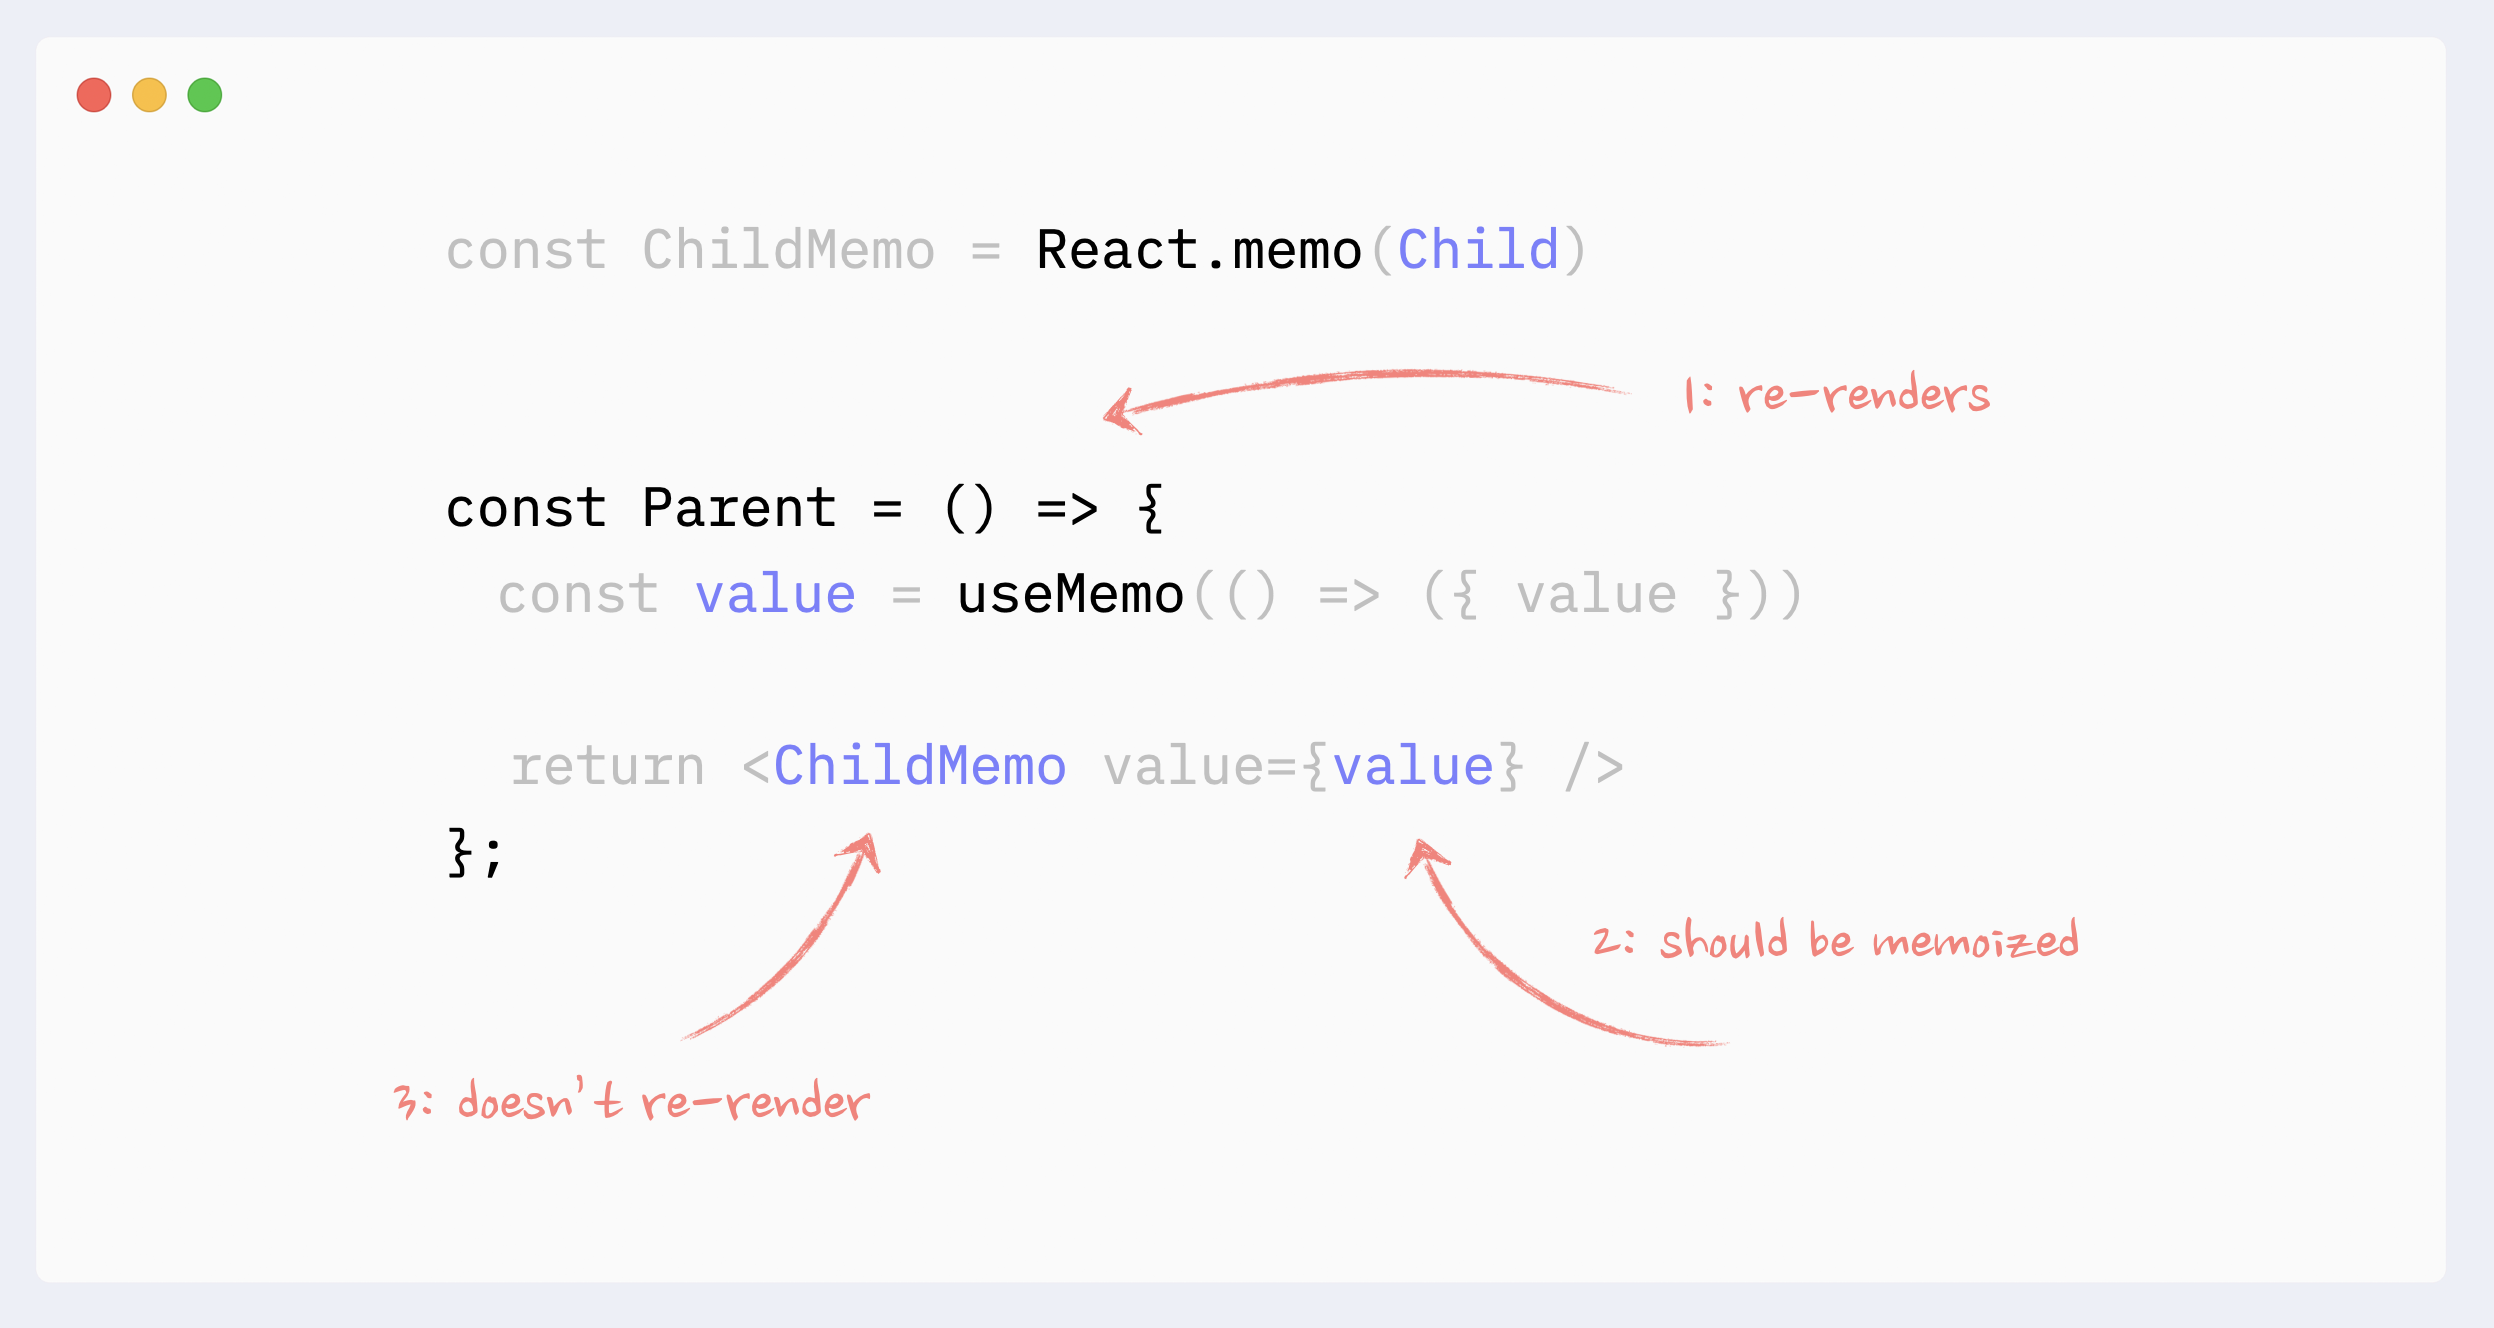
- ✅ React.memo: components with props
All props that are not primitive values have to be memoized for React.memo to work
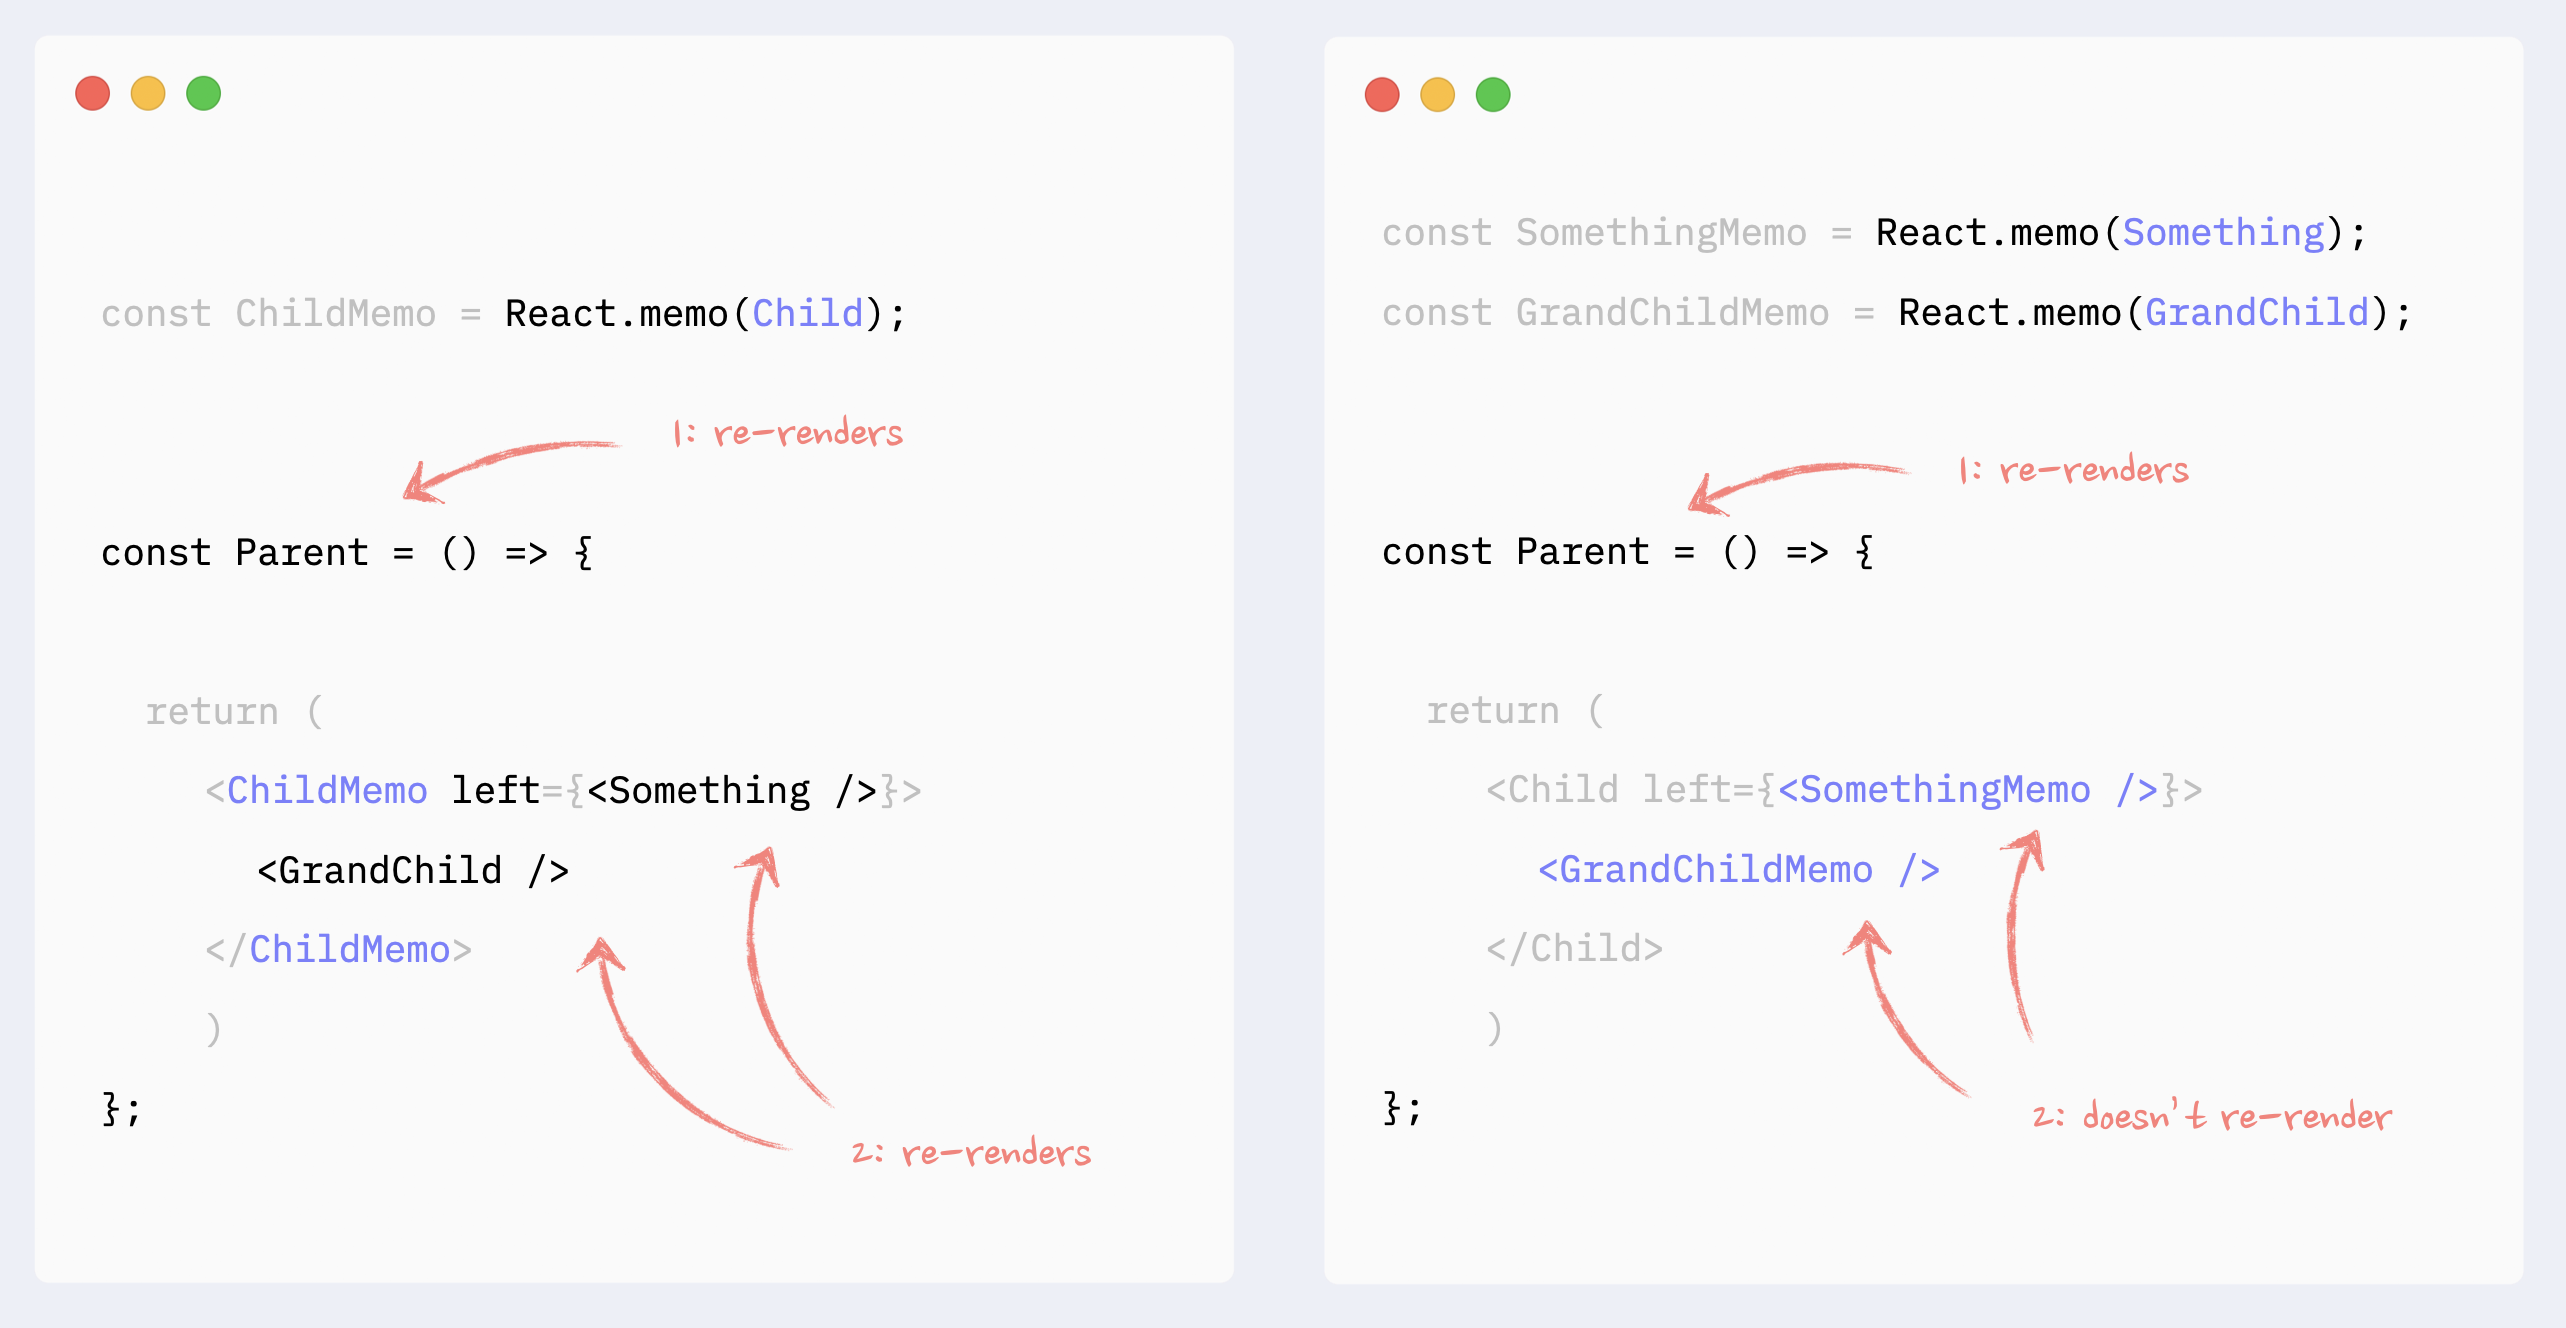
- ✅ React.memo: components as props or children
React.memo has to be applied to the elements passed as children/props. Memoizing the parent component will not work: children and props will be objects, so they will change with every re-render.
Improving re-render performance with useMemo/useCallback
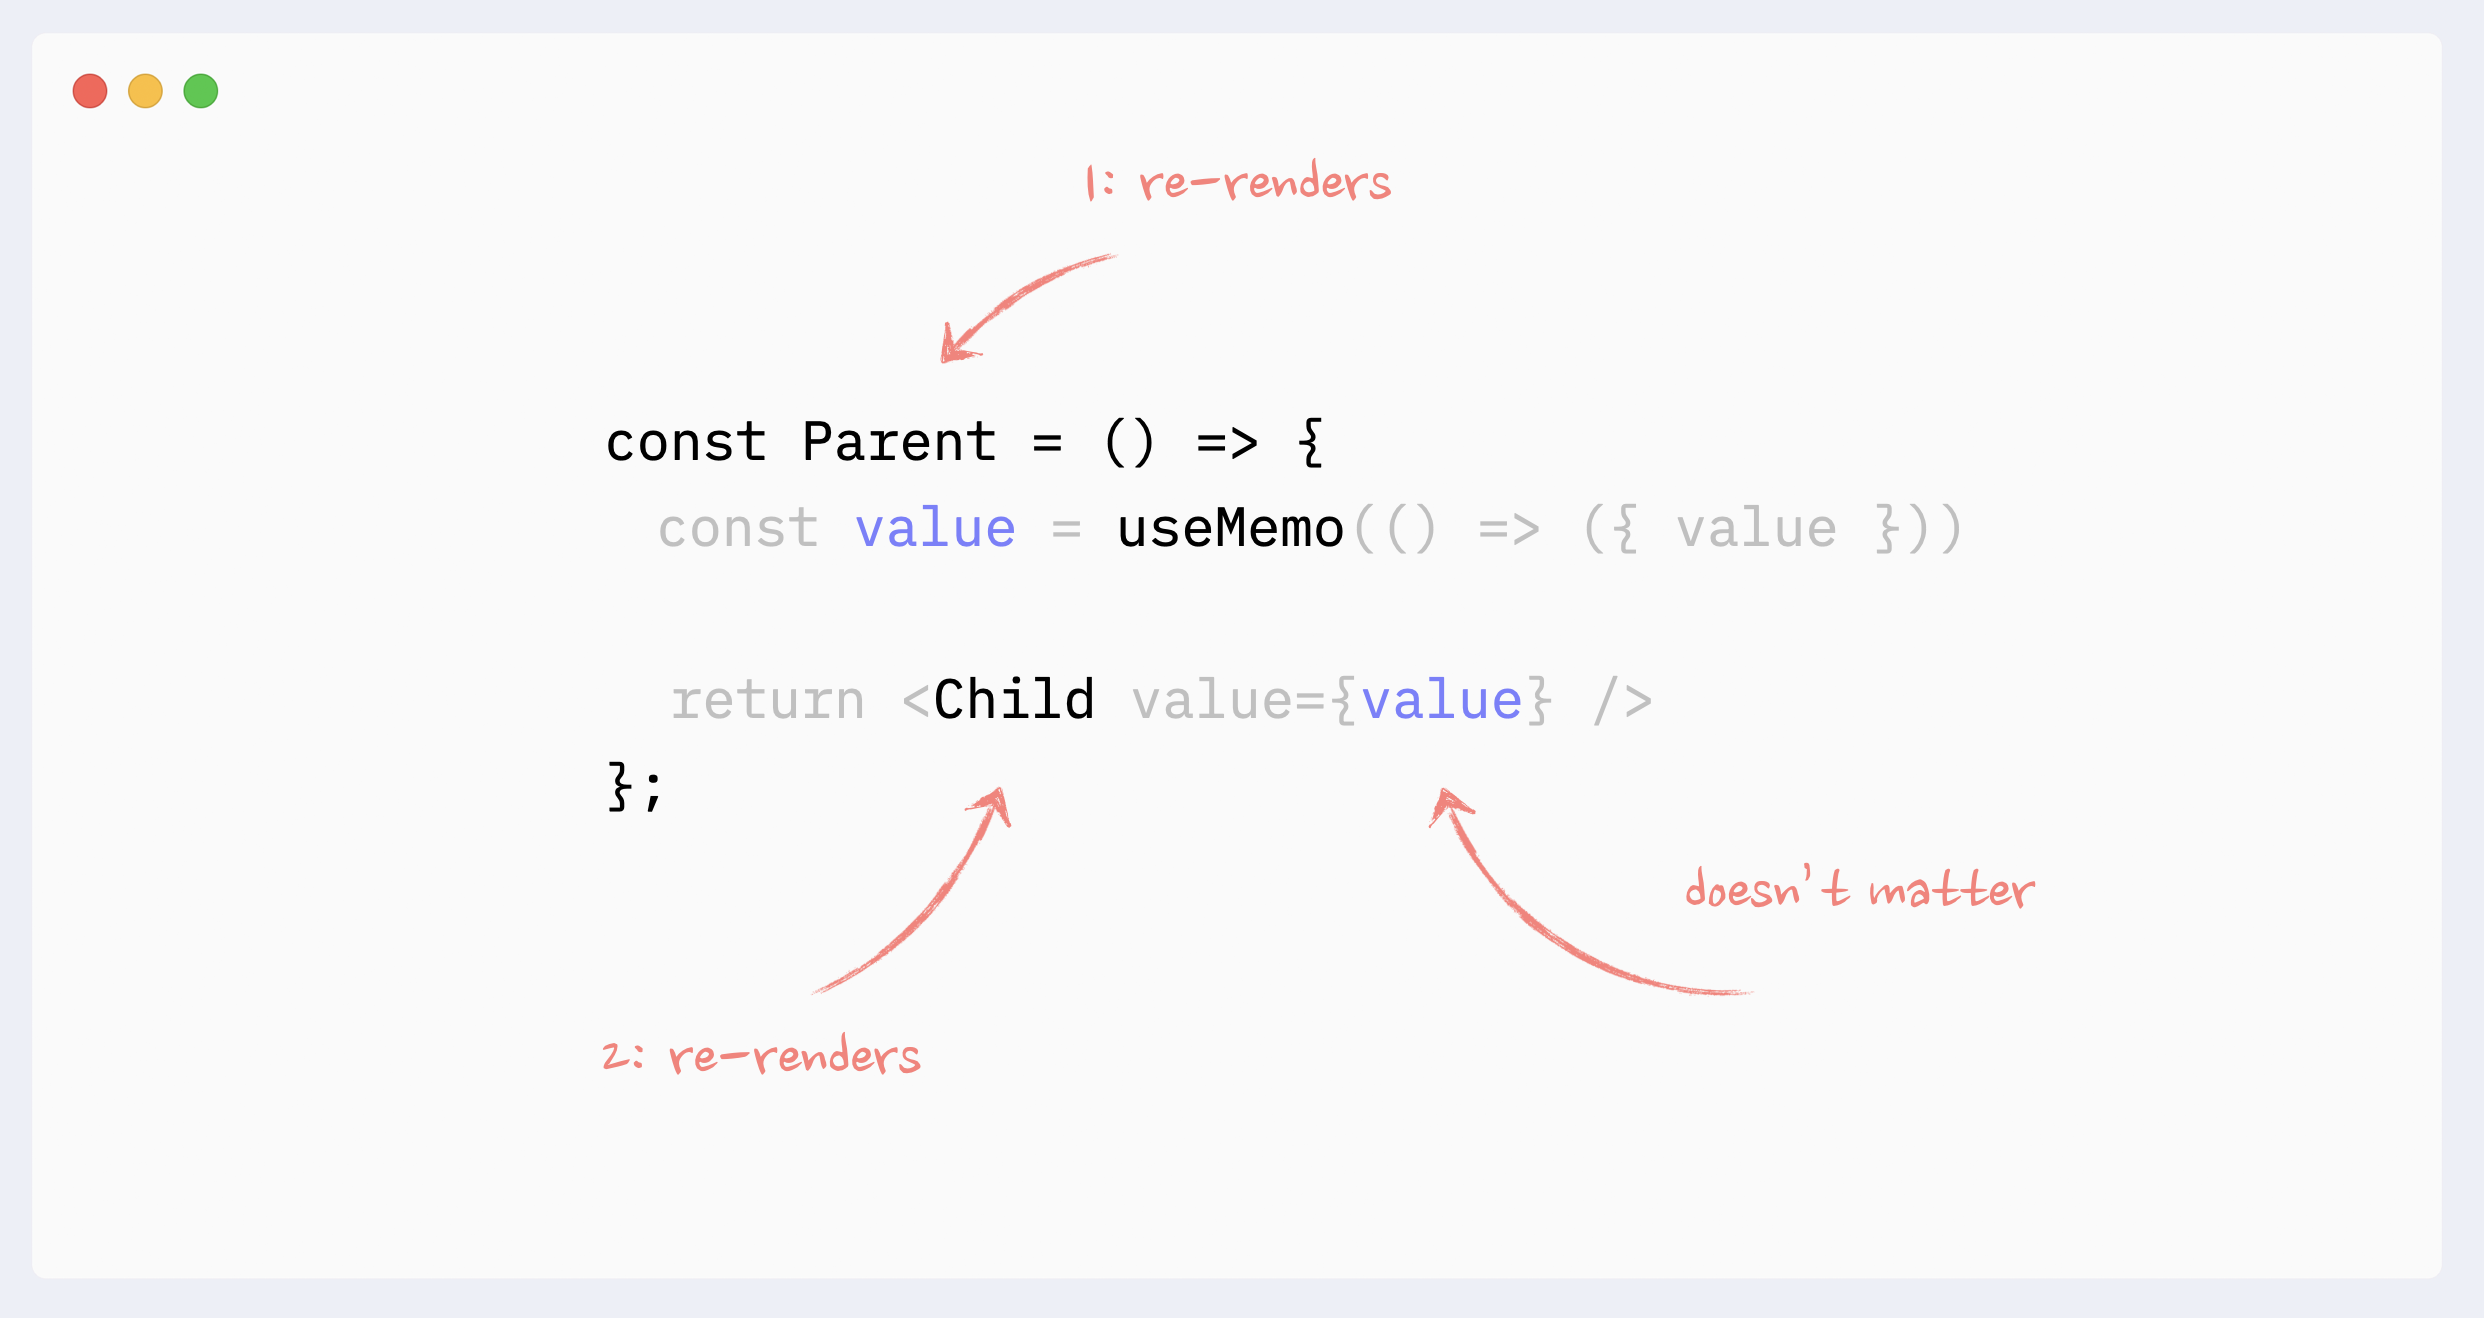
- 🚫 Antipattern: unnecessary useMemo/useCallback on props
Memorizing props by themselves will not prevent re-renders of a child component. If a parent component re-renders, it will trigger re-renders of a child component regardless of its props.
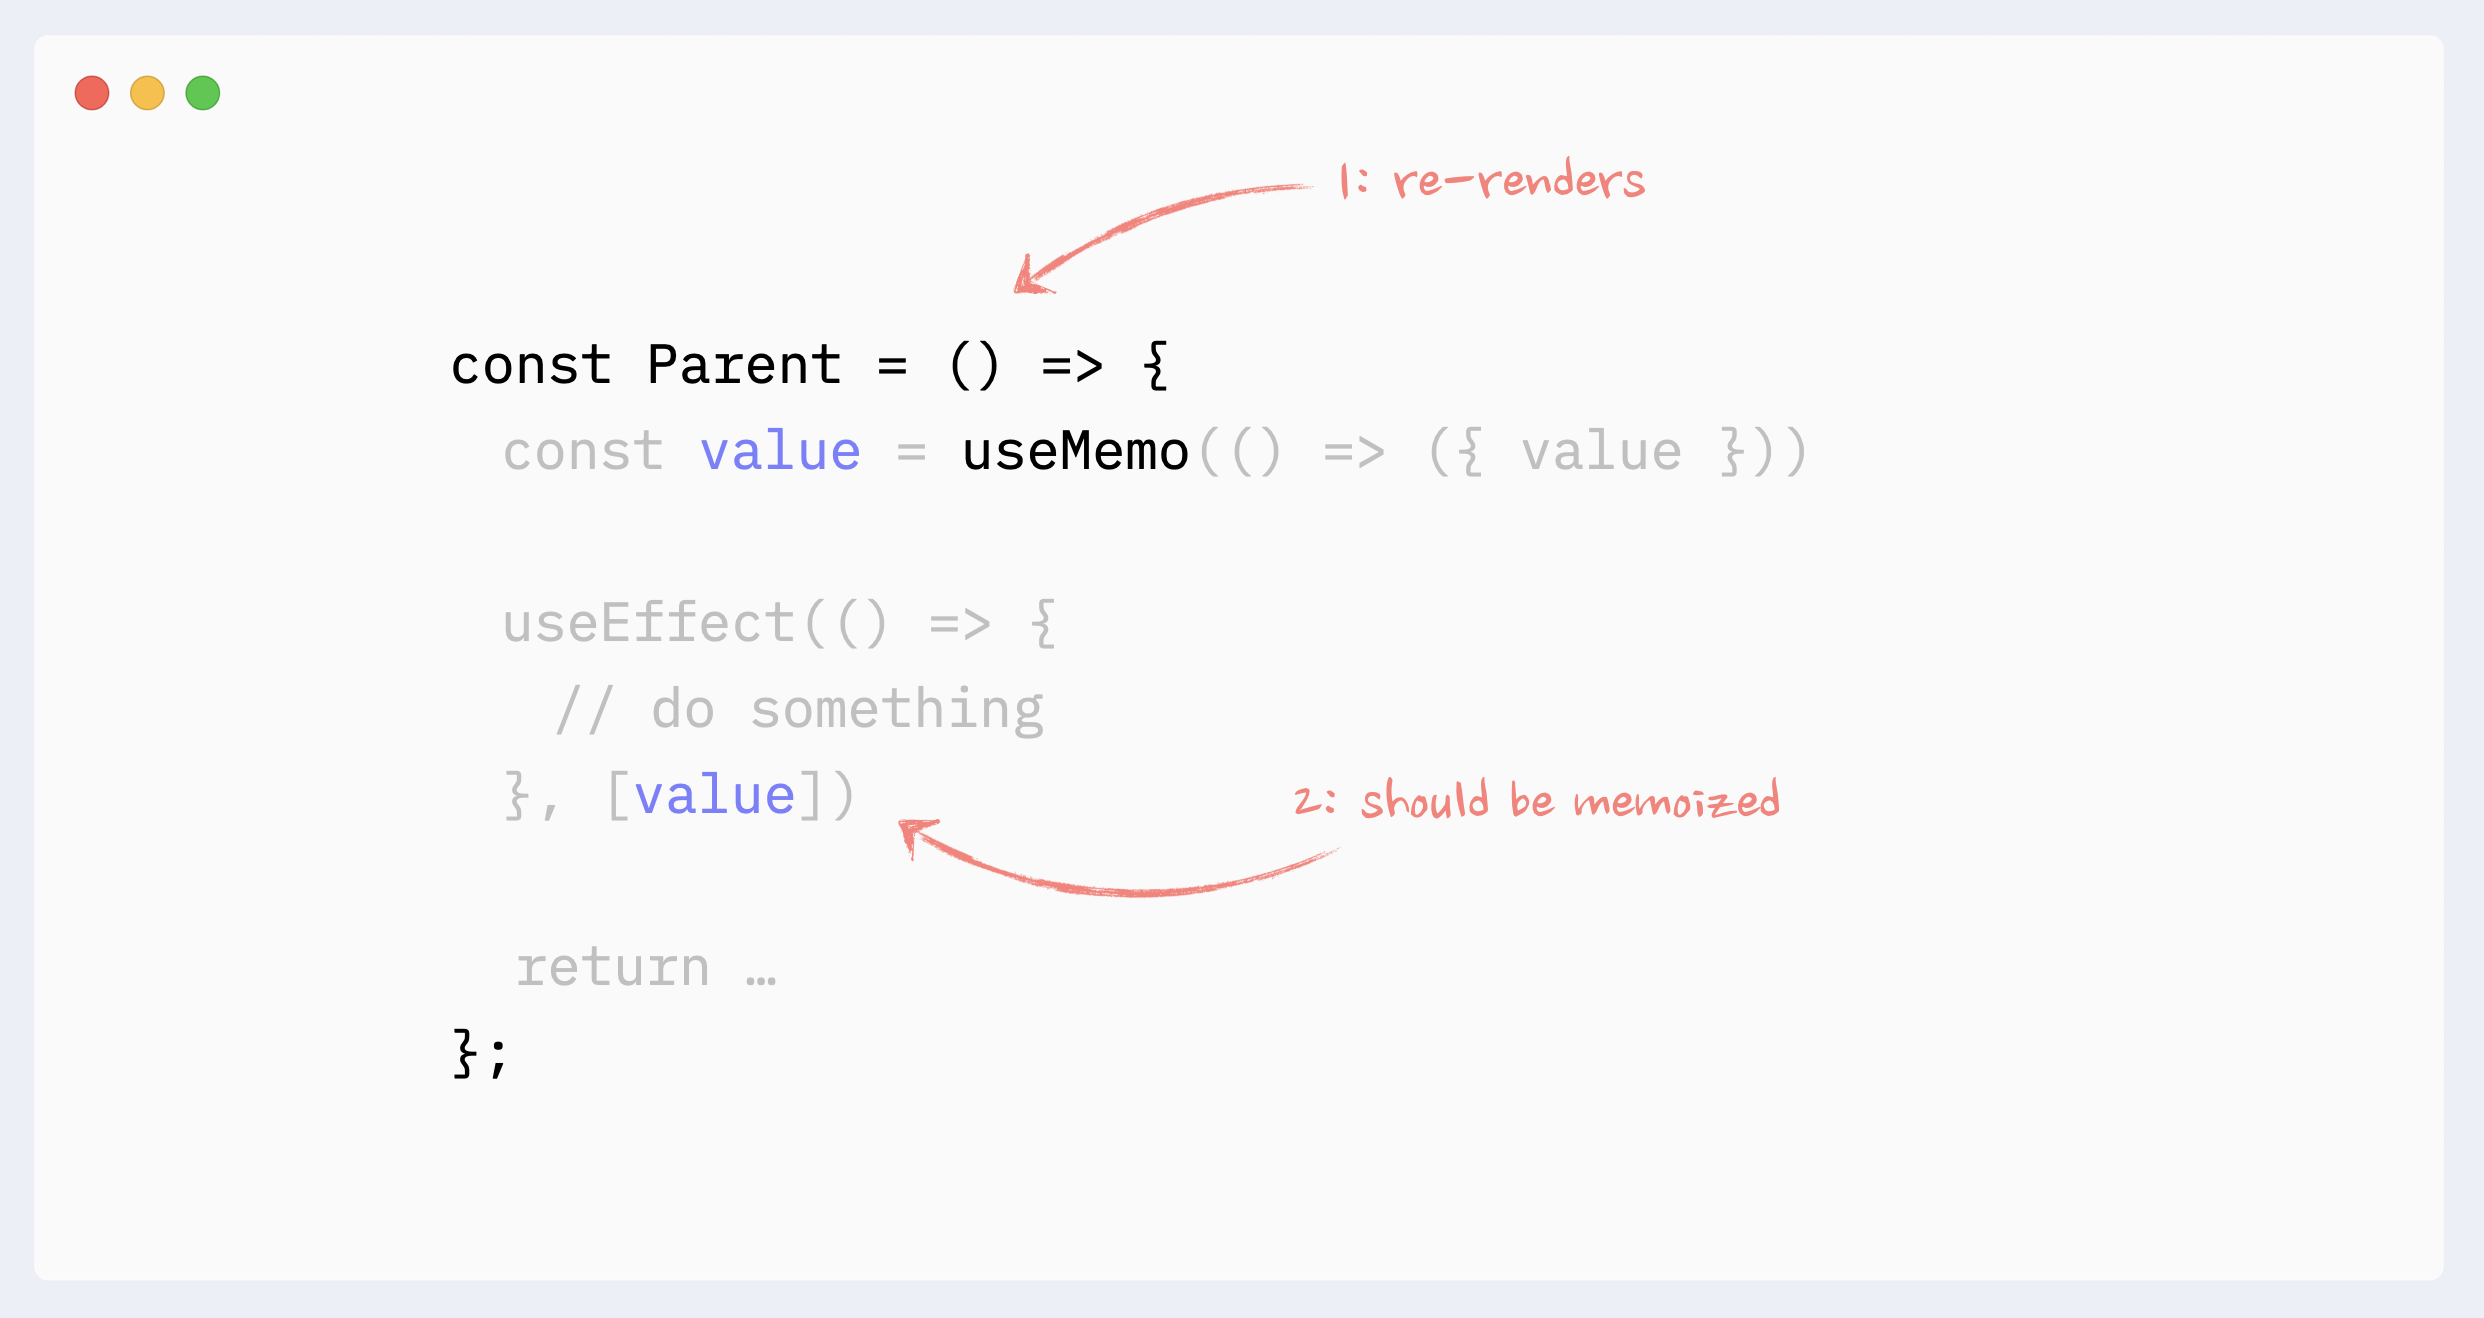
- ✅ Necessary useMemo/useCallback
If a child component is wrapped in React.memo, all props that are not primitive values have to be memorized
If a component uses a non-primitive value as a dependency in hooks like useEffect, useMemo, useCallback, it should be memorized.
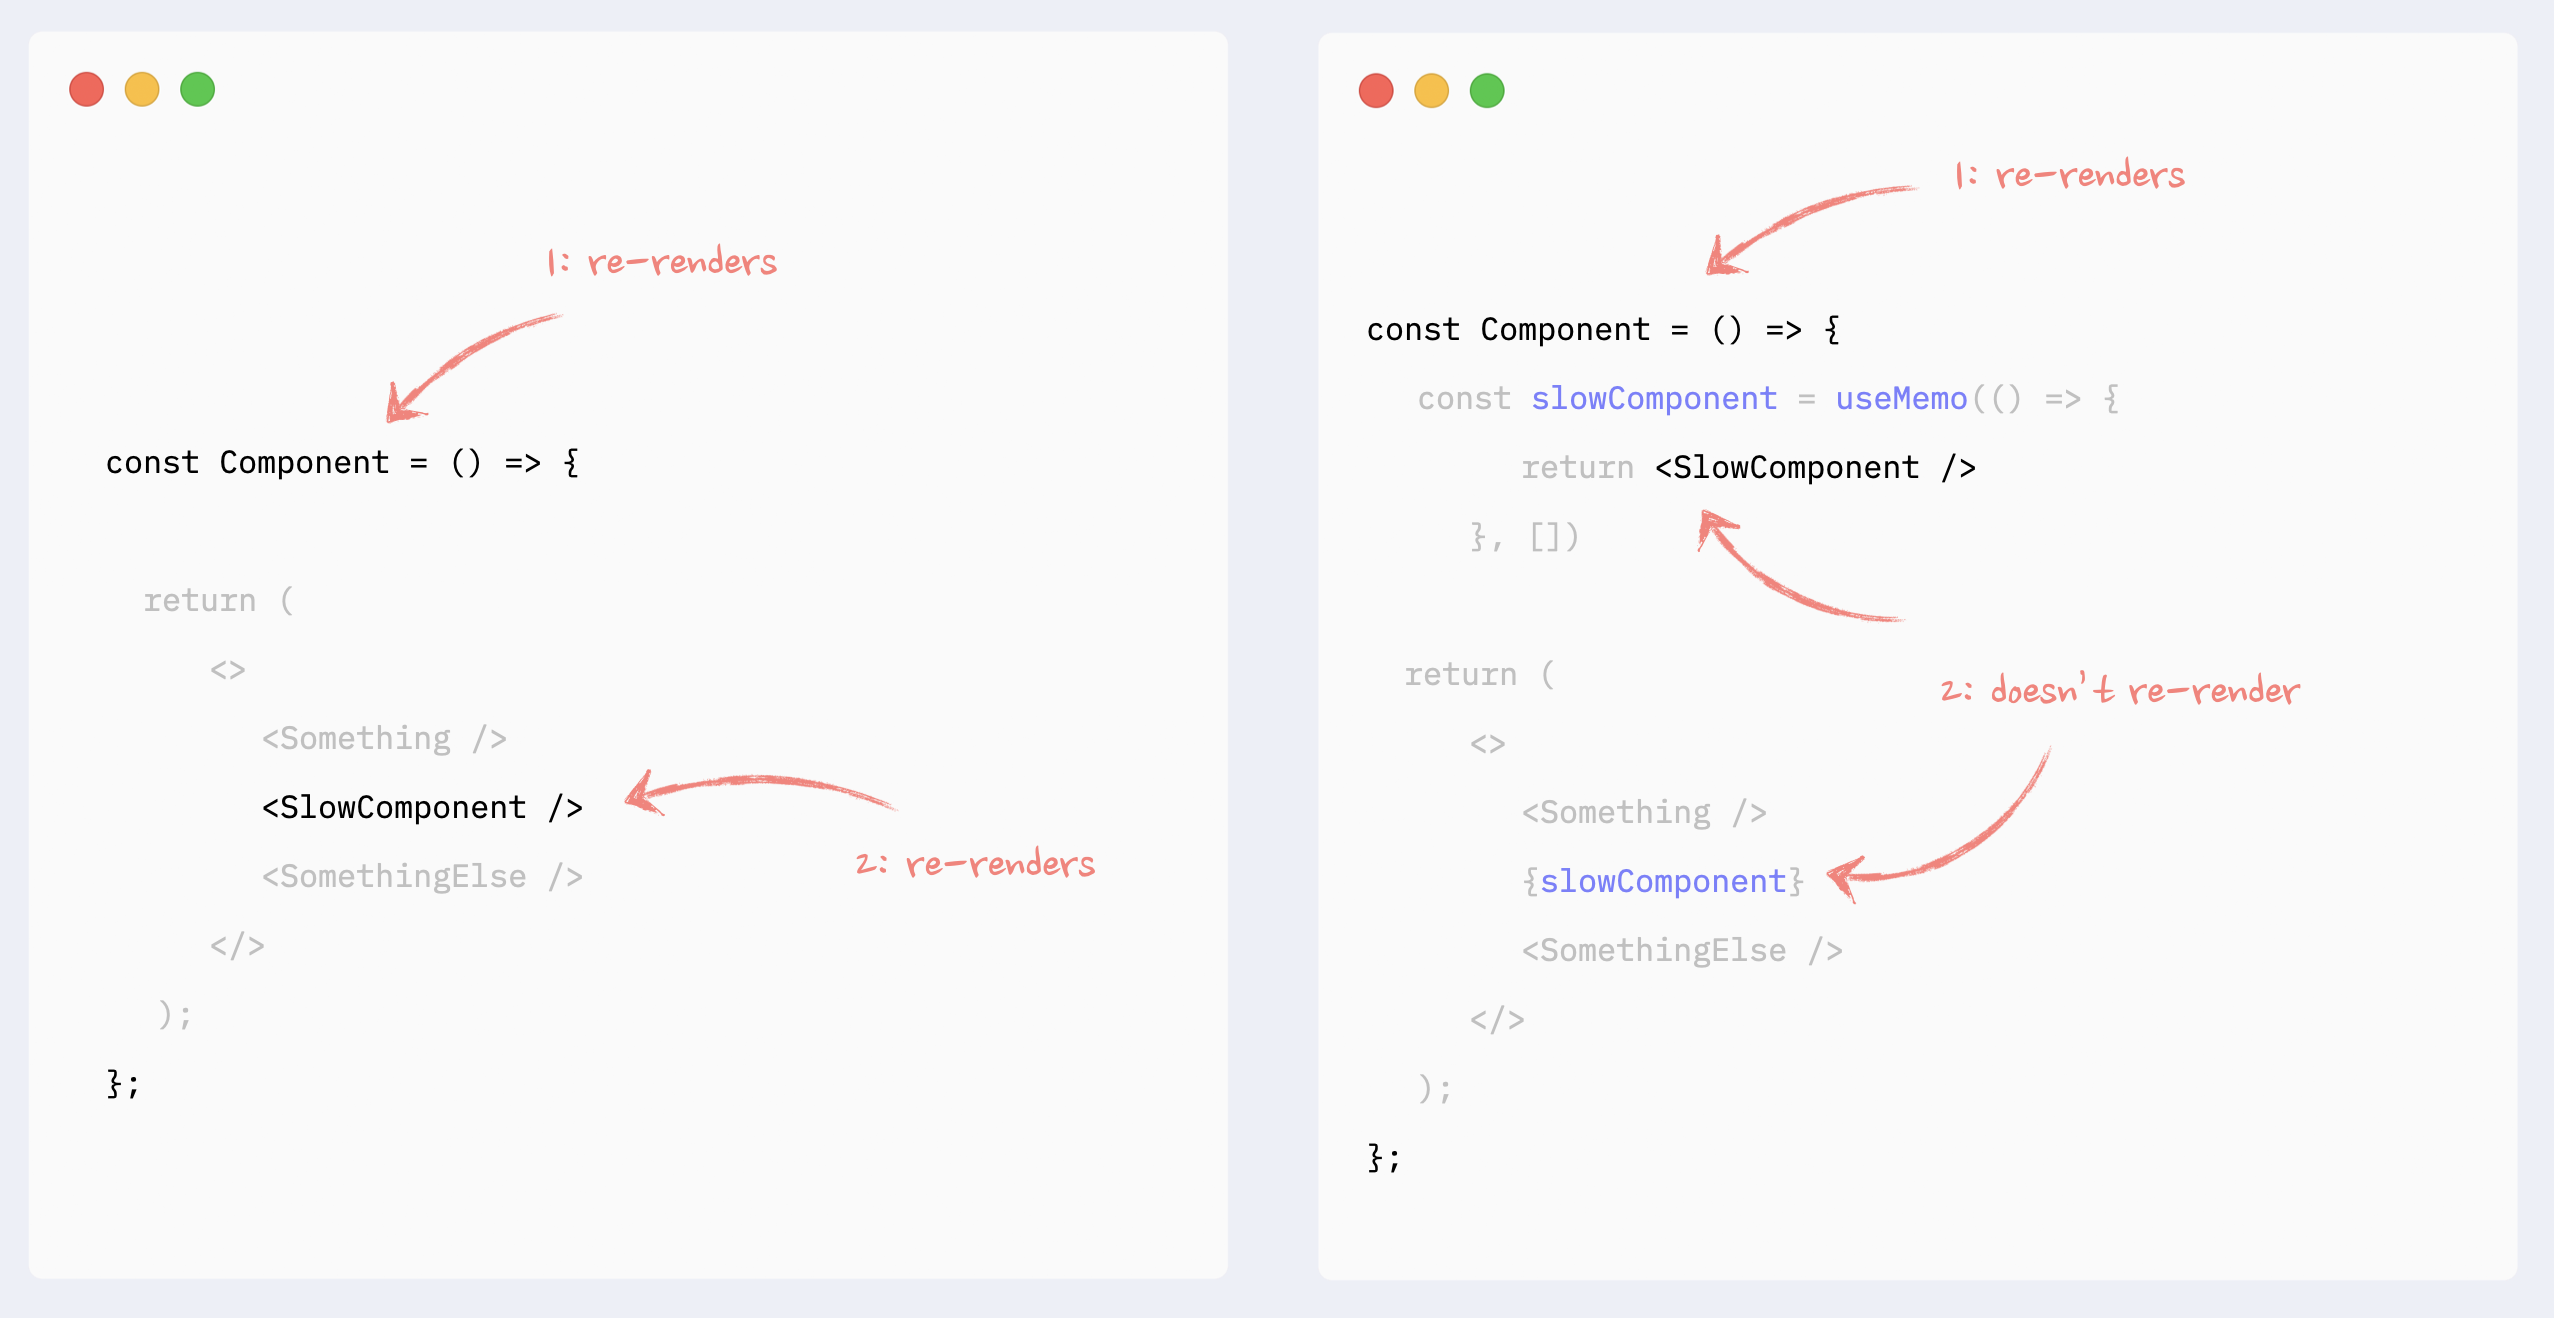
- ✅ useMemo for expensive calculations
One of the use cases for useMemo is to avoid expensive calculations on every re-render.
useMemo has its cost (consumes a bit of memory and makes initial render slightly slower), so it should not be used for every calculation. In React, mounting and updating components will be the most expensive calculation in most cases (unless you’re actually calculating prime numbers, which you shouldn’t do on the frontend anyway).
As a result, the typical use case for useMemo would be to memoize React elements. Usually, parts of an existing render tree or results of a generated render tree, like a map function that returns new elements.
The cost of “pure” JavaScript operations like sorting or filtering an array is usually negligible compared to component updates.
Improving the re-render performance of lists
In addition to the regular render rules and patterns, the key attribute can affect the performance of lists in React.
Important: just providing key attribute will not improve the lists' performance. To prevent re-renders of list elements, you need to wrap them in React.memo and follow all of its best practices.
Value in key should be a string that is consistent between re-renders for every element in the list. Typically, item’s id or array’s index is used for that.
It is okay to use array’s index as key, if the list is static, i.e., elements are not added/removed/inserted/re-ordered.
Using an array’s index on dynamic lists can lead to:
bugs if items have state or any uncontrolled elements (like form inputs)
degraded performance if items are wrapped in React.memo
Additional Resources:
Read about keys in detail: React key attribute: best practices for performant lists.
Read about reconciliation: React reconciliation: how it works and why we should care.
Watch about reconciliation: Mastering React reconciliation.

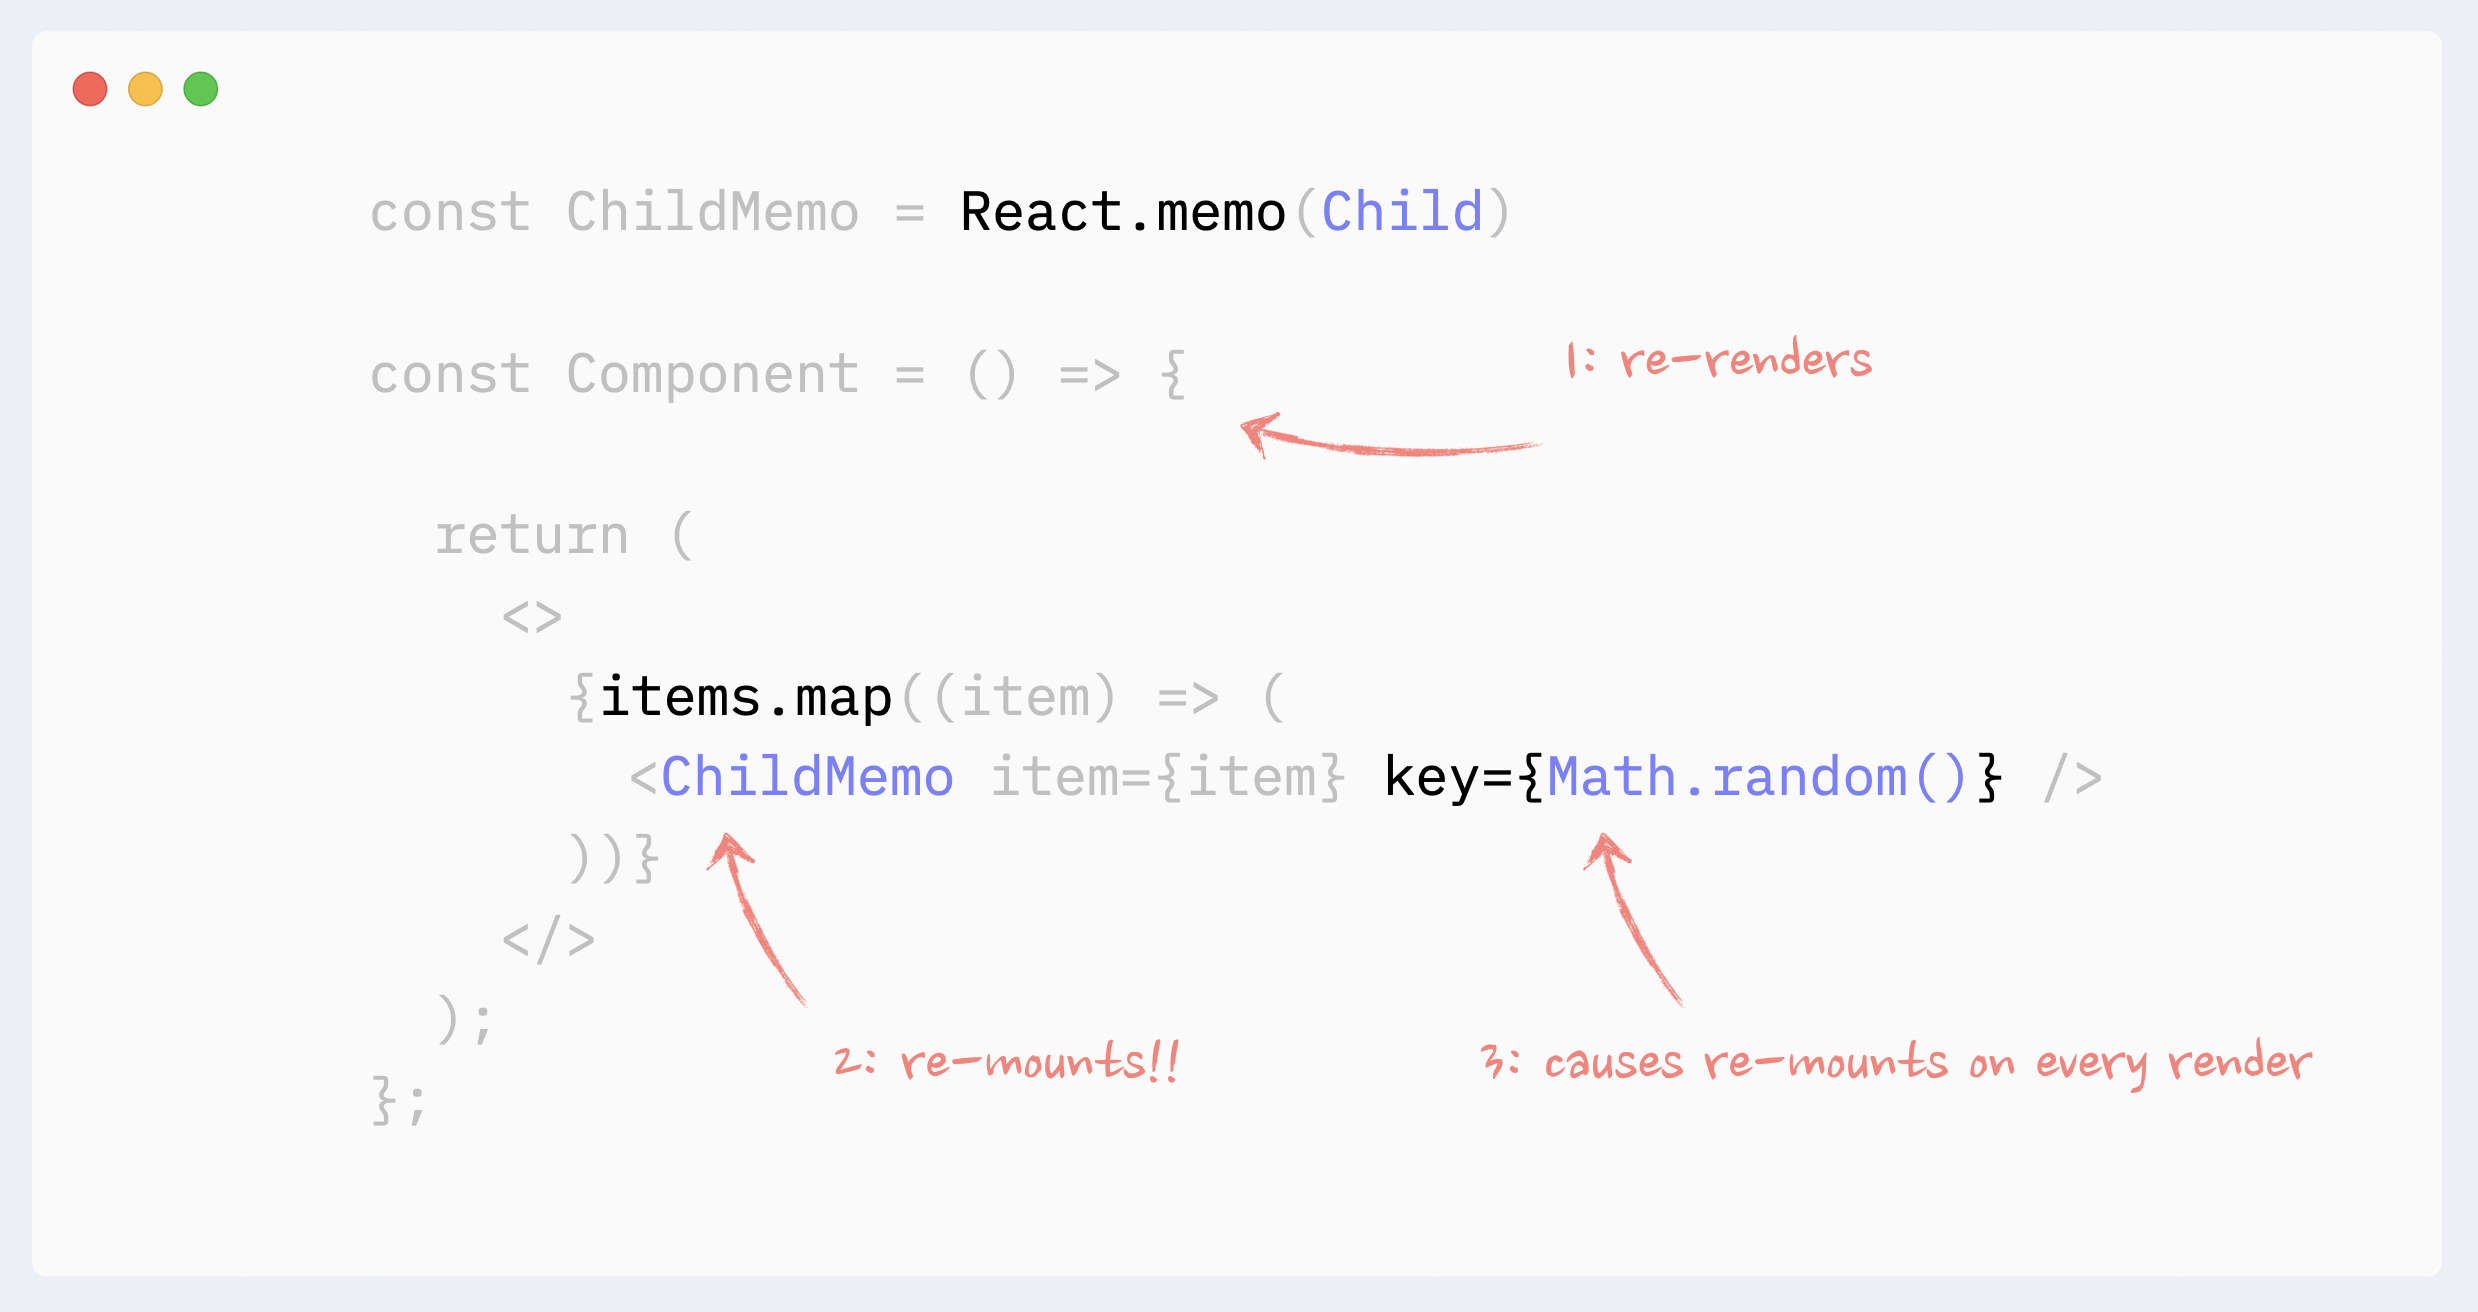
- ⛔️ Antipattern: random value as key in lists
Randomly regenerated values should never be used as values in key attributes in a list. They will lead to React re-mounting items on every re-render, which will lead to (very poor performance of the list, bugs if items have states, or any uncontrolled element such as form inputs)
Preventing re-renders caused by Context
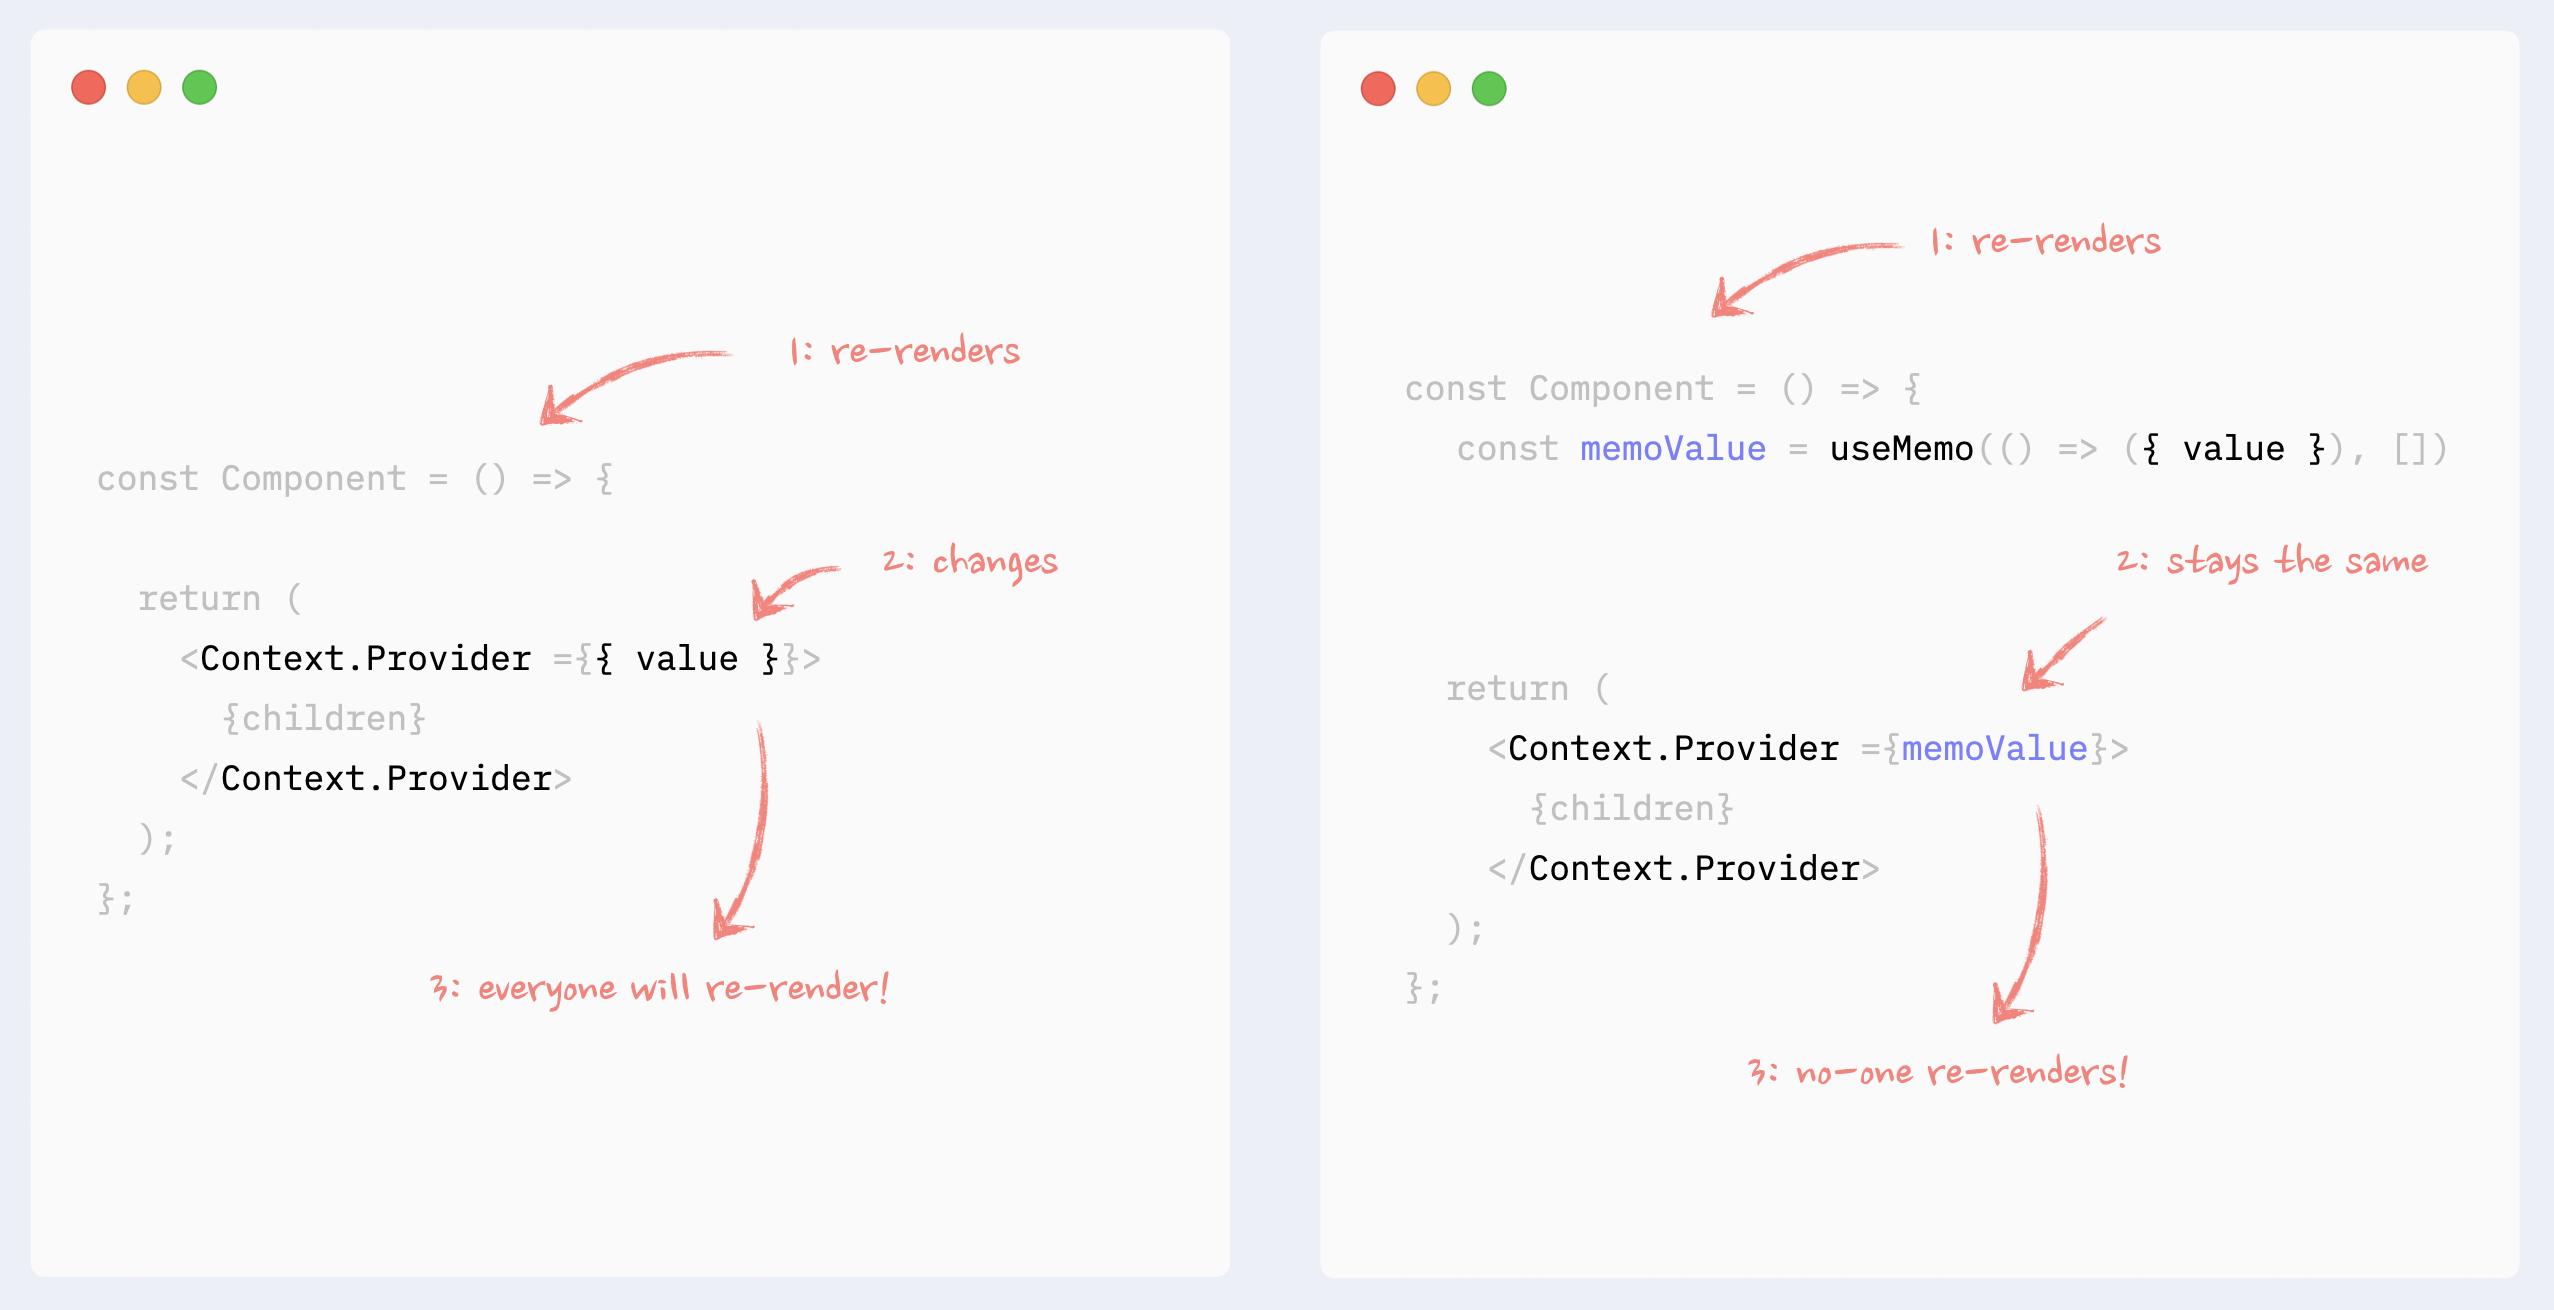
- ✅ Preventing Context re-renders: memorizing Context value
If Context Provider is not placed at the very root of the app, and there is the possibility that it can re-render itself because of changes in its ancestors, its values should be memorized.
See the example in codesandbox.
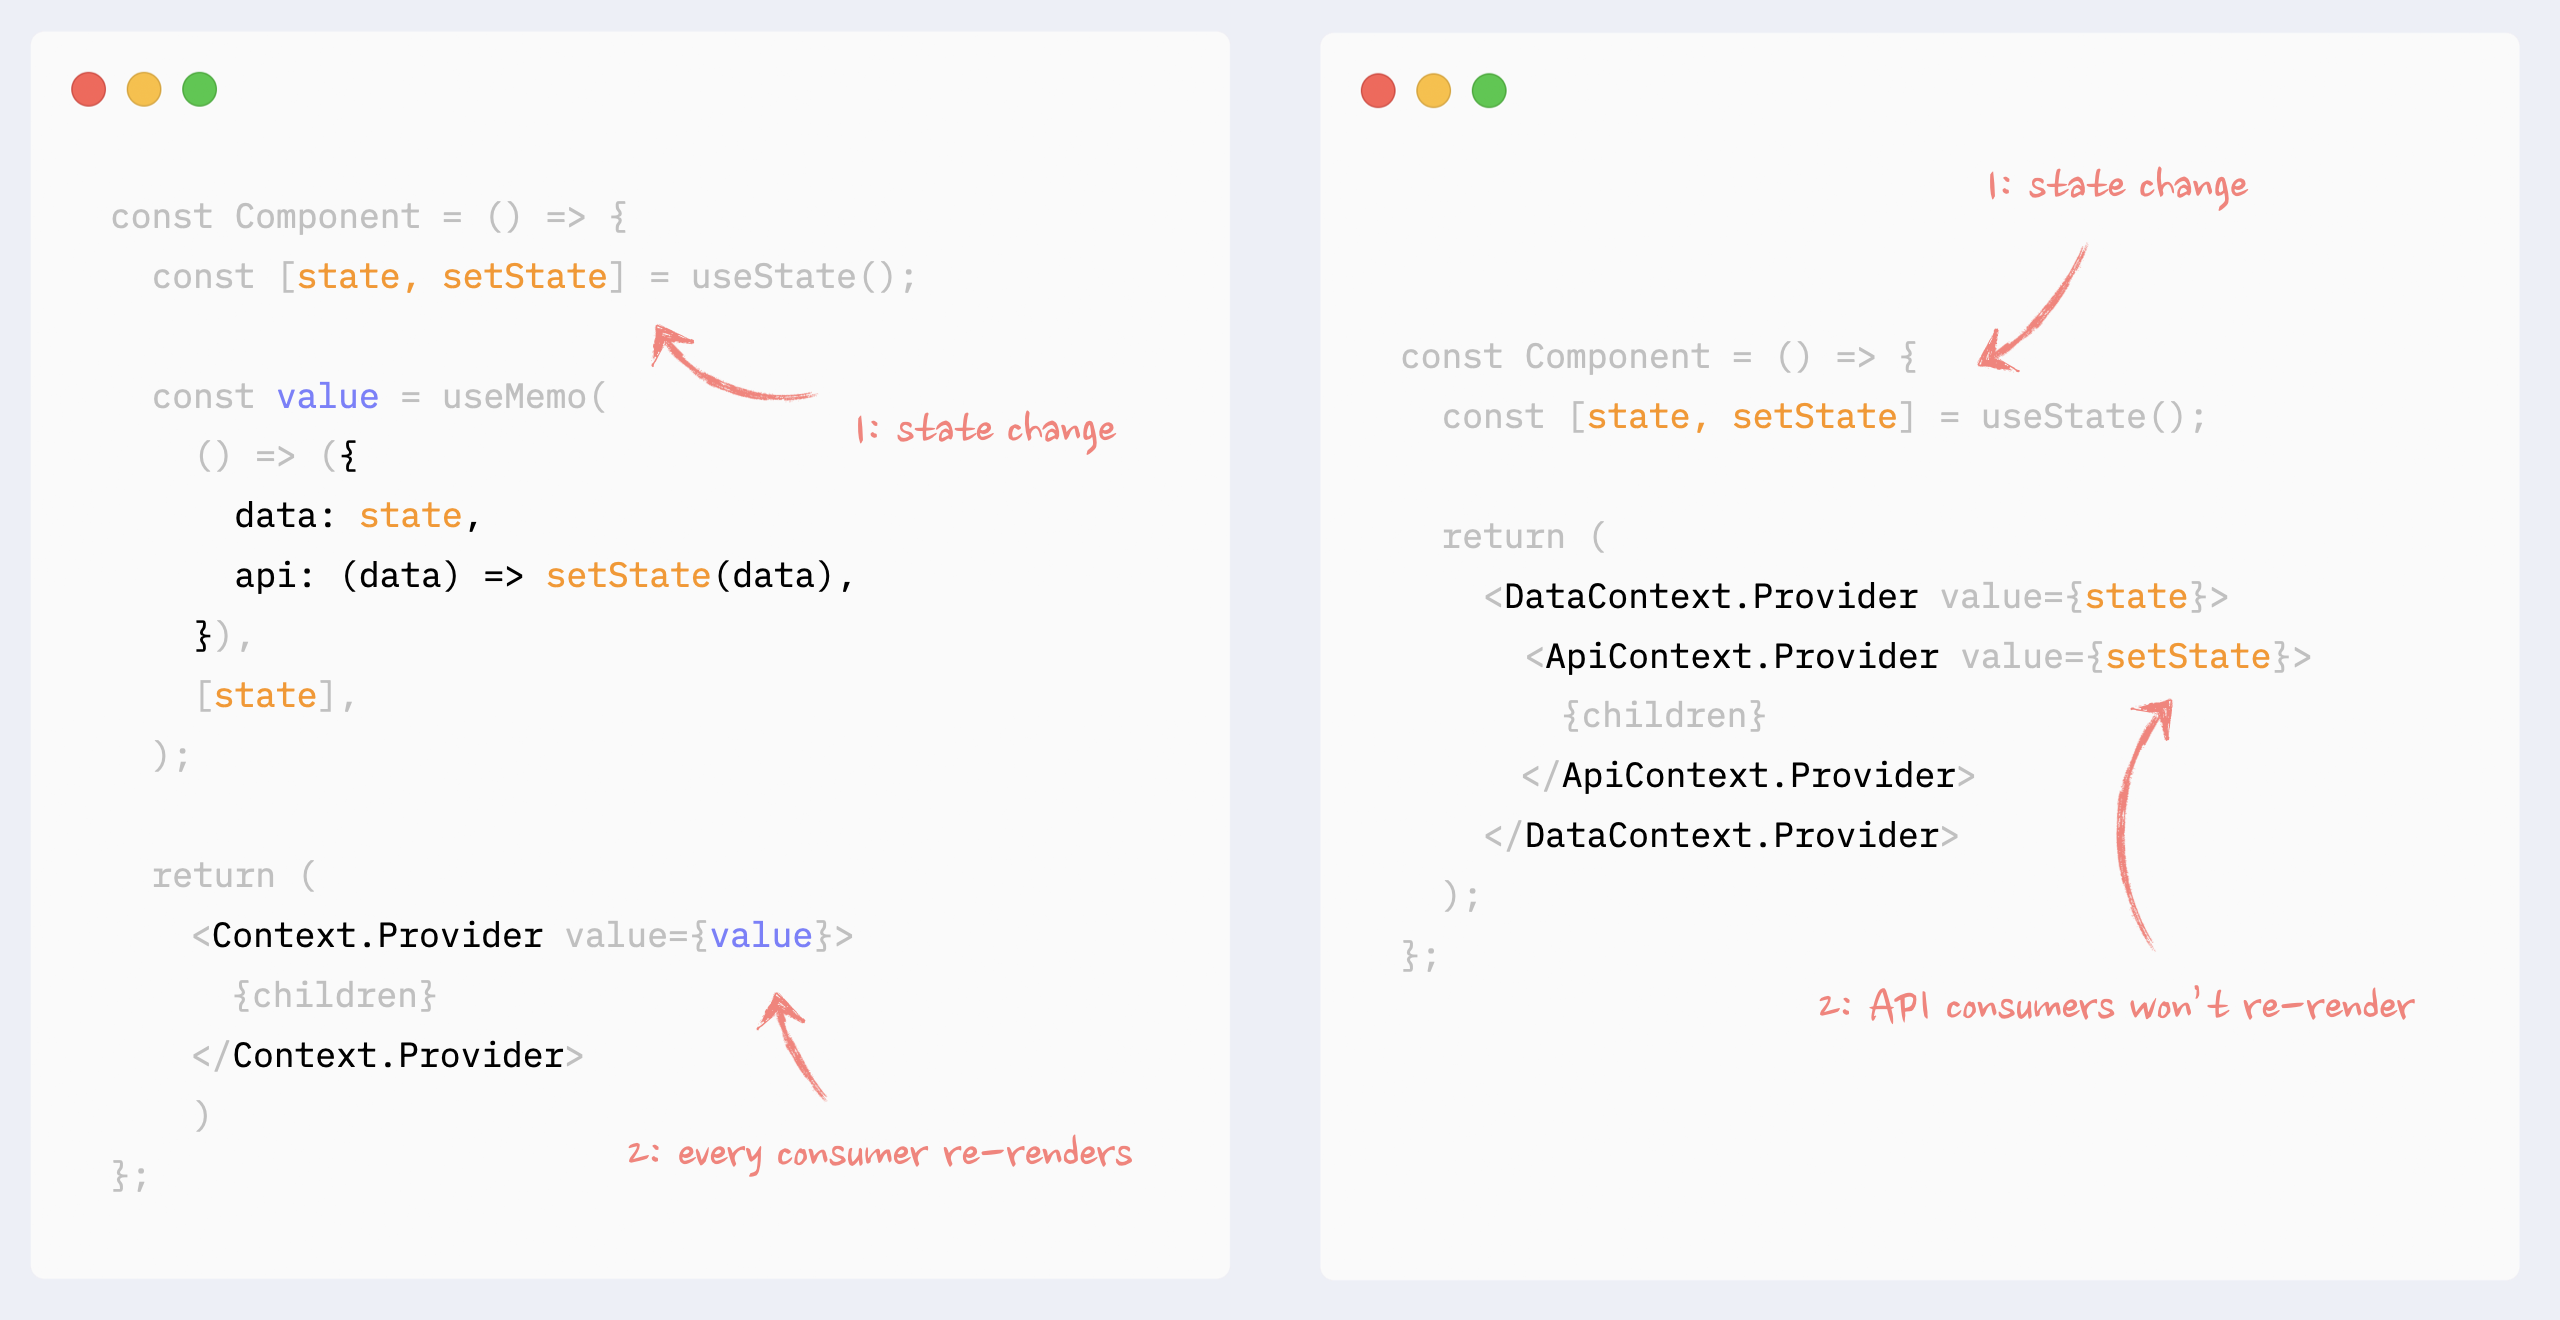
- ✅ Preventing Context re-renders: splitting data and API
If in Context, there is a combination of data and API (getters and setters), they can be split into different Providers under the same component. That way, components that use the API only won’t re-render when the data changes.
Read more about this pattern here: How to write performant React apps with Context.
See the example in codesandbox.
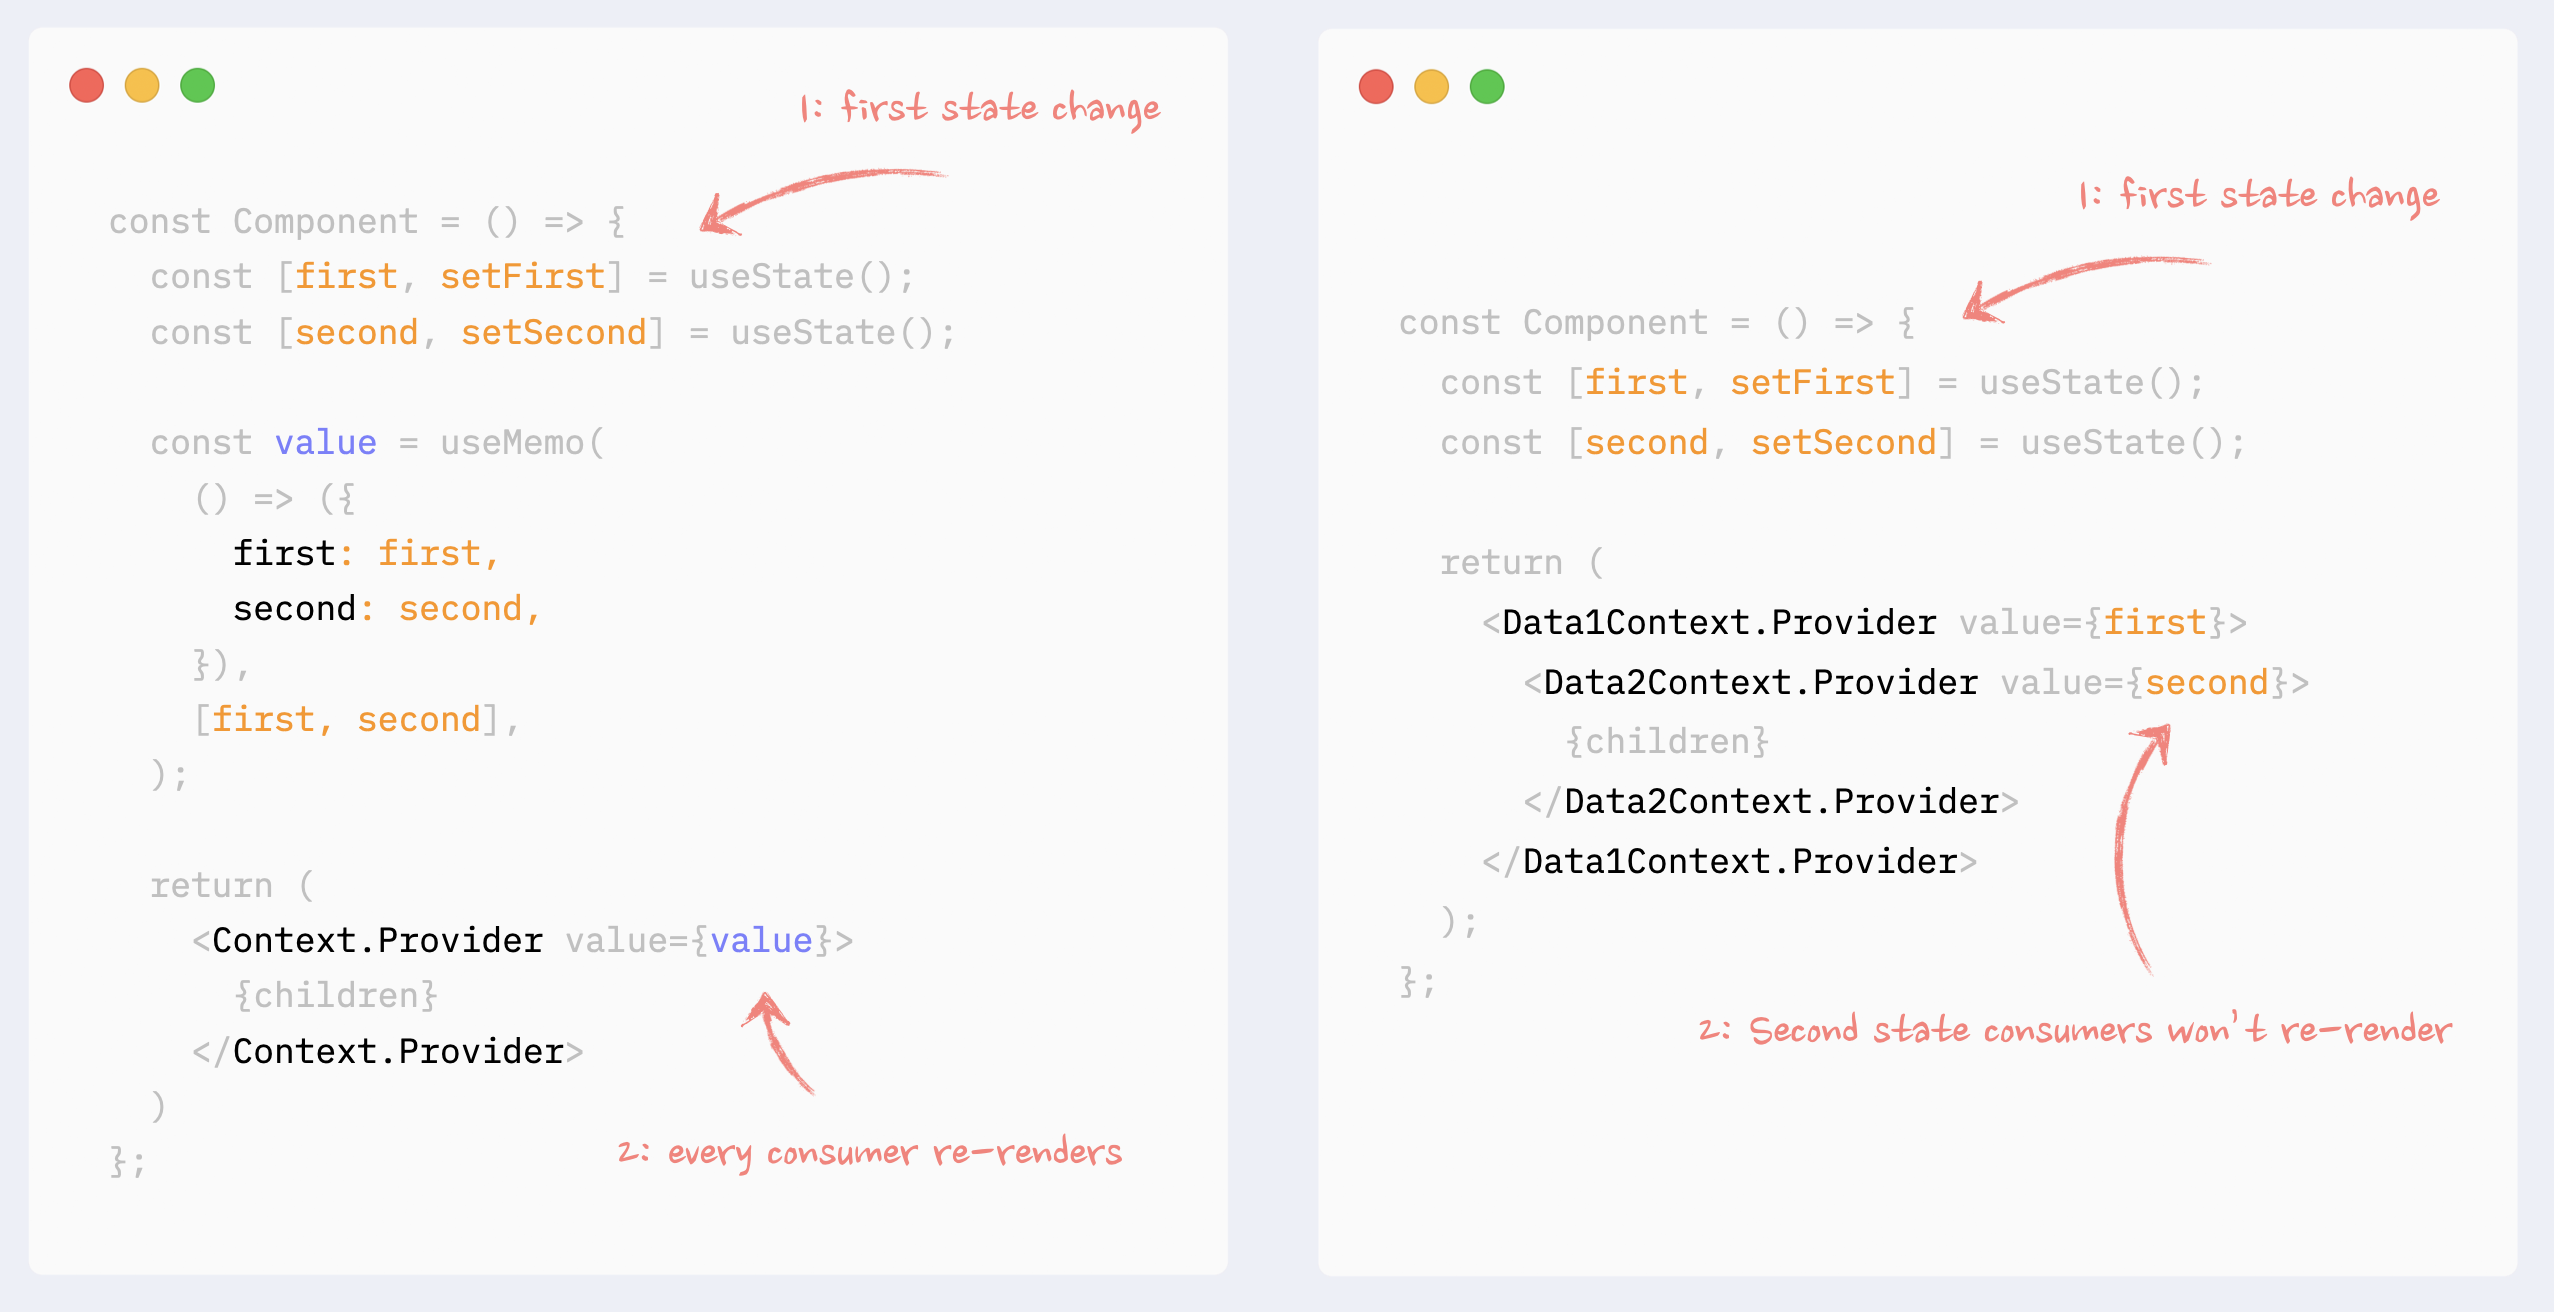
- ✅ Preventing Context re-renders: splitting data into chunks
If Context manages a few dependent data chunks, they can be split into smaller providers under the same provider. That way, only consumers of the changed chunk will re-render.
See the example in codesandbox
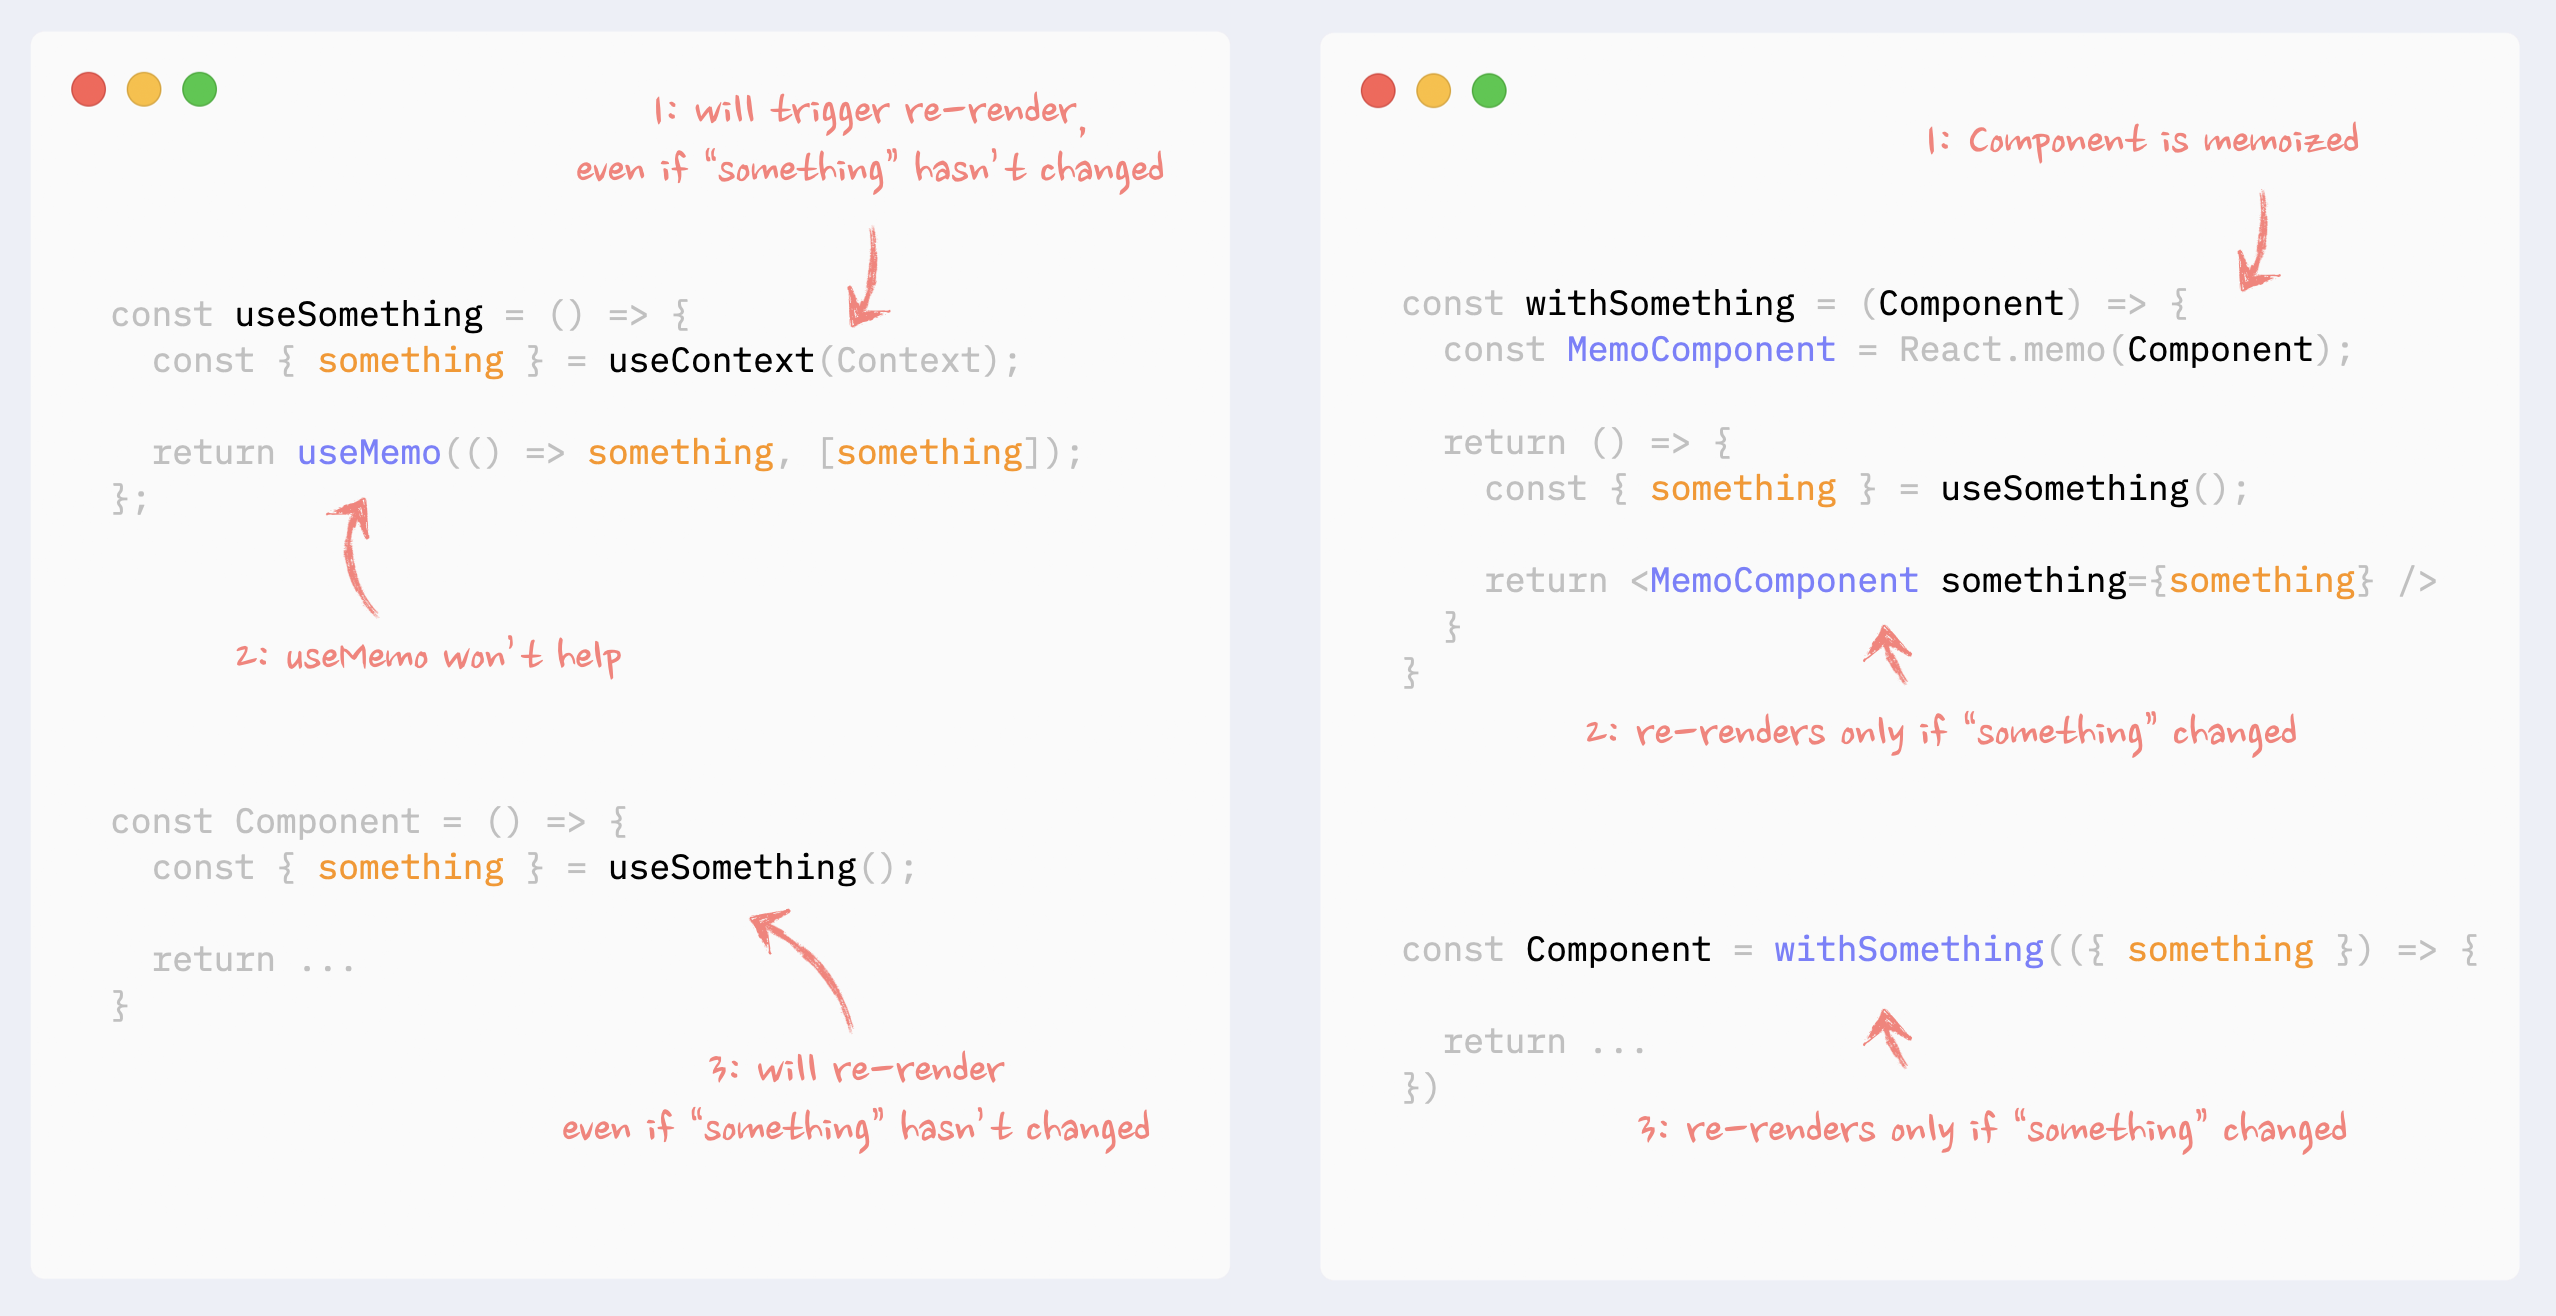
- ✅ Preventing Context re-renders: Context Selectors
There is no way to prevent a component that uses a portion of the Context value from re-rendering, even if the used piece of data hasn’t changed, even with useMemo hook.
Context selectors, however, could be faked with the use of higher-order components and React.memo.
Read more about this pattern here: Higher-Order Components in React Hooks era.
See the example in codesandbox
Building React Components: Turning UI Designs into React Components
When you’ve probably seen User Interface Designs, especially if you’re not working alone.
When creating a new page or screen in large companies or organizations, we first receive mockups or wireframes outlining the desired look and feel.
As Senior React Engineers, it’s crucial to translate these mockups into feasible React components and pages so the UI designers and stakeholders are happy.
If you do it right, you increase your impact, and you are seen as the reliable engineer who can get the job done.
The importance of translating UI Designs into React components
You can save your and your team’s time by reusing React components in multiple places.
You will get a more flexible codebase because of the granularity of the components.
Consistent look and feel across different pages
Good reusable components mean a manageable and understandable codebase.
Create a positive impact on the team and on the company
Divide and Conquer
In my experience, I have found the Divide and Conquer technique to work pretty well for breaking down a complex design into reusable React components.
This idea is to divide a large problem, page, or design into smaller parts that are easier to handle.
When it comes to React components, this means creating multiple smaller, self-contained components, each doing one thing well, so you can combine them to create bigger components and pages.
Let’s get more practical and see what this means in the real world and projects.
Translating Component Design into React Components
Let’s begin with the easier job - turning a design of a UI element into a React component.
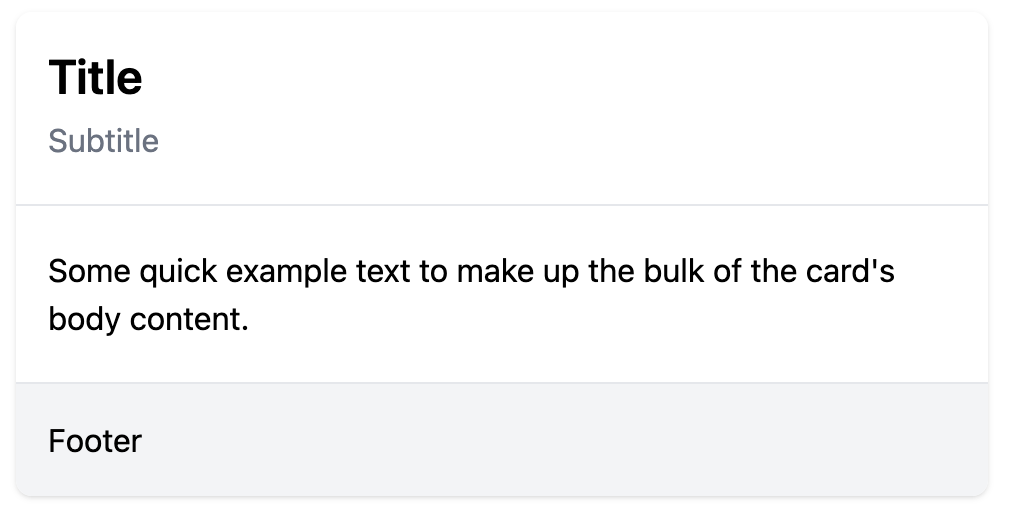
That is an example of a real project I have worked on in the past.
The screenshot illustrates a <Card /> component.
Let’s break it down.
<Card />, <CardHeader />, <CardBody />, and <CardFooter />
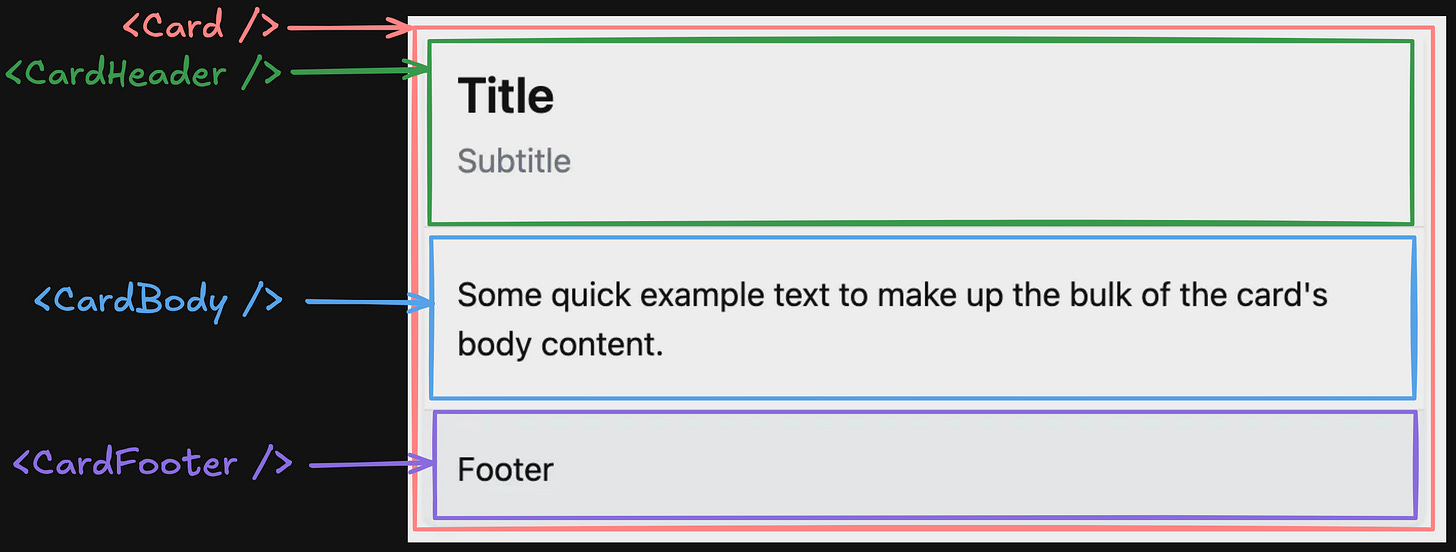
By following the divide and conquer algorithm, we can break down the design into at least 3 main parts - Header, Body, and Footer.
The <Card /> component will contain the other three components and the main styles.
How do I know?
We can’t break it any further, except the Header. So, let’s continue with it.
Breaking <CardHeader/> Into <CardTitle /> and <CardSubtitle />
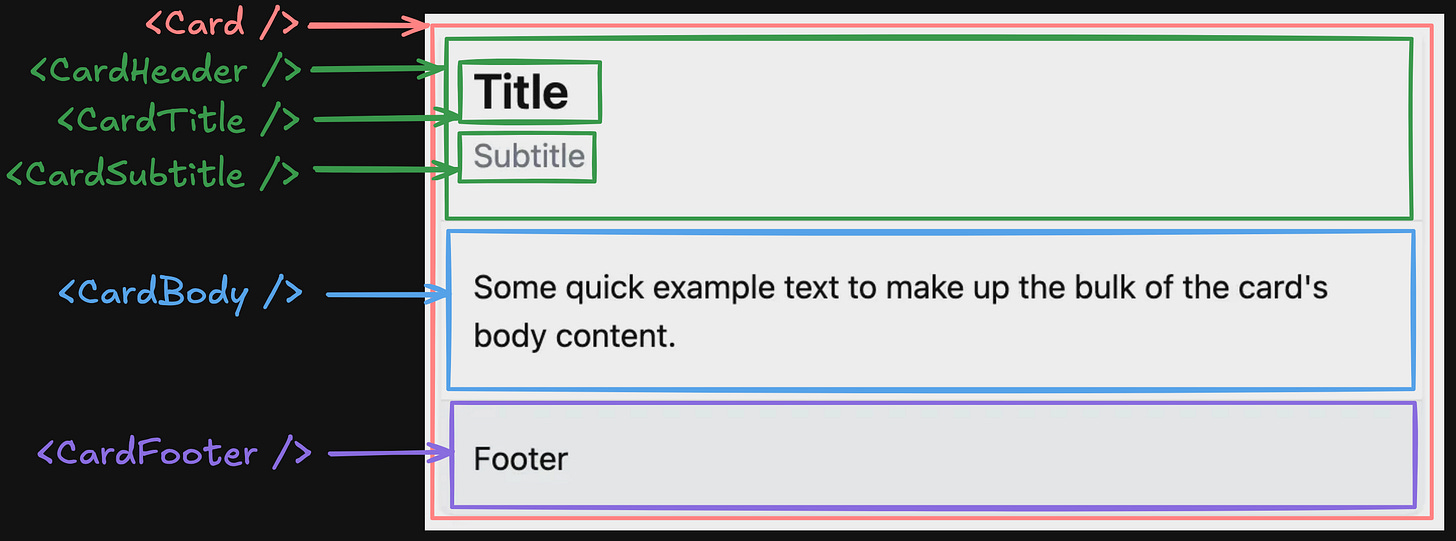
Depending on the design requirements, we might want to clarify whether the Title and Subtitle will always appear together inside the Header, or we might have only the Title.
However, sometimes designers might not be aware of the future use cases and how the design will evolve, so it all depends on our judgment and expertise.
Remember: Embrace Software Entropy
In our case, I decided to split the Title and Header into two components because the additional work of doing it is not a lot, but the benefits are higher.
I get a more flexible Card Header with/without Subtitle for the cost of a few extra lines.
Do we need all components?
The short answer is no, we don’t
However, if we put everything inside one big <Card /> component, we lose flexibility and reusability.
Our component won’t be flexible enough to fulfill other use cases like:
Card without Header
Card without Footer
Card without Subtitle
Card with only Body
etc.
It’s important not to over-engineer the components while making them flexible enough to adapt to the changing requirements.
The balance is thin, so think twice before moving one.
Now, let’s move to a more complex design - the one of a page.
Translating Page Design Into React Components
The approach is the same.
We will break down the page into multiple parts by following the Divide and Conquer principle until we can’t break it further.
The only difference is that we might end up with more reusable components.

Credits: macstadium.com
Start From The Outside to The Inside
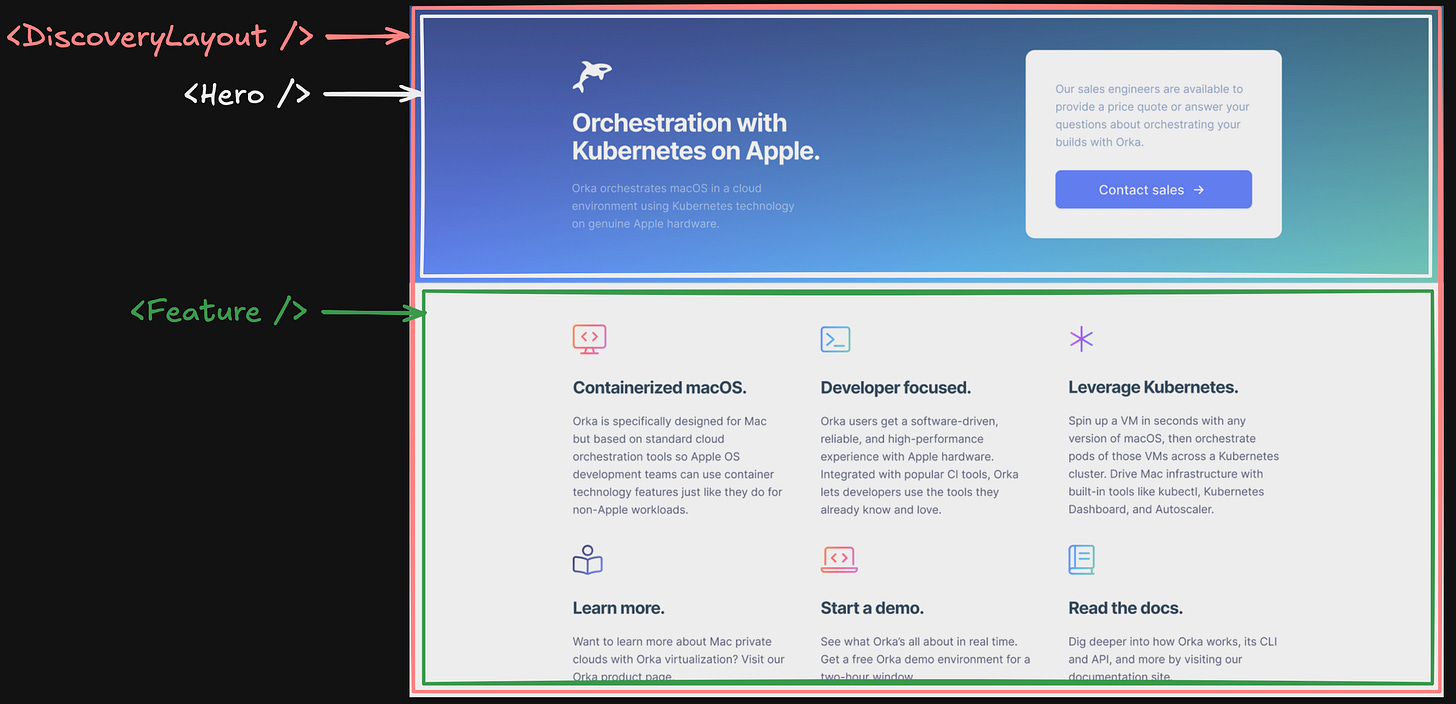
By following the divide and conquer technique, we broke down the page into 3 main parts:
<DiscoveryLayout />, representing the whole page
<Hero />, representing the hero and CTA section
<Feature />, representing the features section
Breaking Down the Hero Section
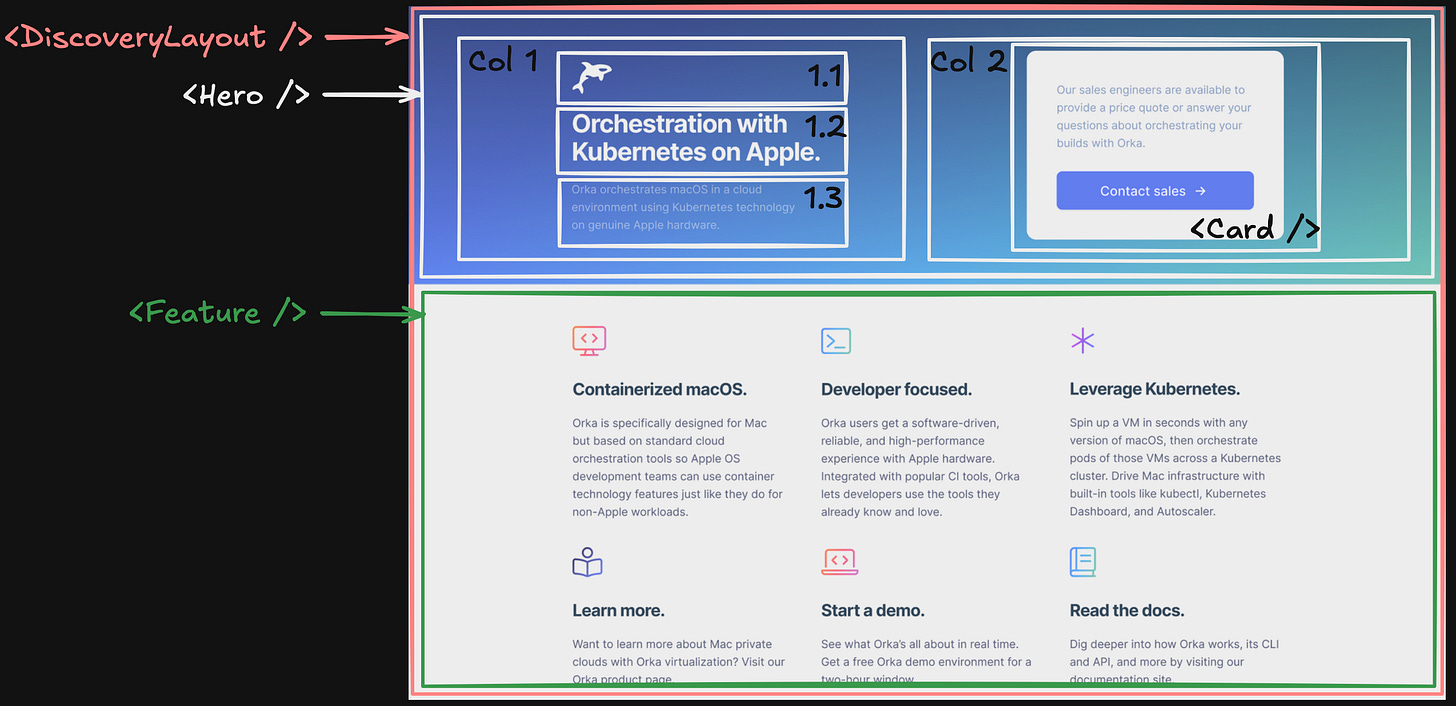
We break the <Hero /> into two columns, so we’re flexible with the responsiveness of the page.
On the left side, column 1, we can split it further into 3 sections.
It’s not necessary to create separate reusable components if they won’t be reused across other pages.
We can only split it semantically, so it’s easier to follow, navigate, and understand the bigger component (<Hero />).
On the right side, column 2, we can reuse the <Card /> component with only the Body.
That’s the beauty of creating multiple reusable components.
We’re flexible enough to tackle different use cases and requirements.
Breaking Down the Feature Section
For this section, we can follow a similar approach.
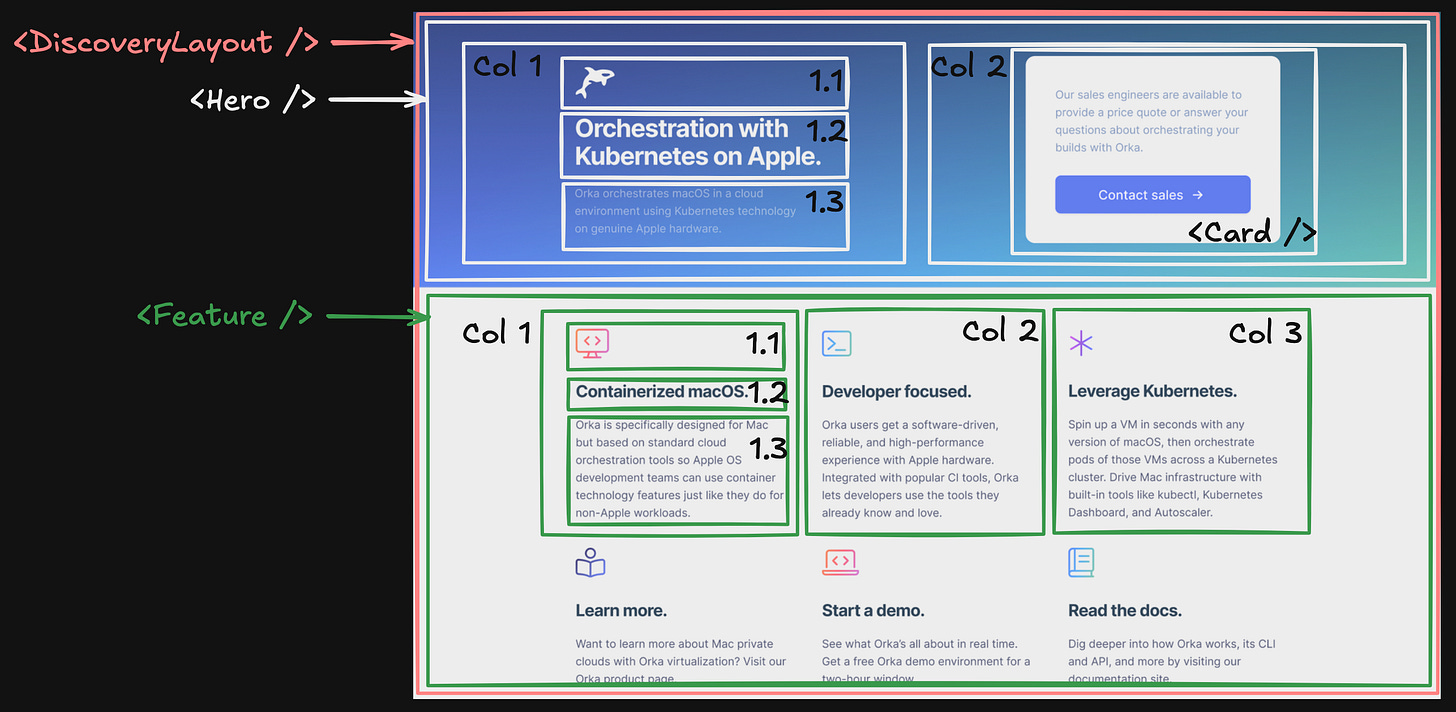
I believe you grasped the idea and the approach
Recap
Being able to translate a UI design into reusable and flexible React components can save your and your’s team time.
Use the Divide and Conquer technique to break down a complex design into smaller pieces.
Start from the outside of the design to the inside of it.
Ask questions to clarify and understand the requirements.
Keep components flexible so you can adapt to the constantly changing requirements and use cases.
React Testing
The evolution of testing strategies
For years, the dominant testing strategy in software development was Martin Fowler’s Test Pyramid. This model suggested having many unit tests at the bottom, fewer integration tests in the middle, and even fewer end-to-end tests at the top.

The pyramid made sense when it was created. Back then, running tests through a UI was painfully slow, expensive to set up, and notoriously brittle. A small change in the UI could break dozens of tests, requiring hours of maintenance.
But times have changed. Modern testing tools have evolved dramatically, making some of Paramid’s assumptions outdated. This led Kent C. Dodds to propose an updated model — the Testing Trophy.
Inspired by Guillermo Rauch’s tweet:
“Write tests. Not too many. Mostly integration.*”*
The trophy flips the script by placing integration tests as the largest, most important section. It also adds a new foundation: static tests. This shift reflects how testing tools and web development have evolved in recent years.
The Testing Trophy consists of four distinct layers:

The types of tests are:
End-to-End (Full app)
Integration (Component interactions)
Unit (Logic in isolation)
Static (Typing, linting, etc.)
Refer to this article for more details.
React Components Mental Models
In React, we write components. Then, we combine these components into a bigger component. Then we continue, and in the end, we have a page - a combination of many smaller components.
Understanding the different types of components in React helps to create well-designed applications and write quality code.
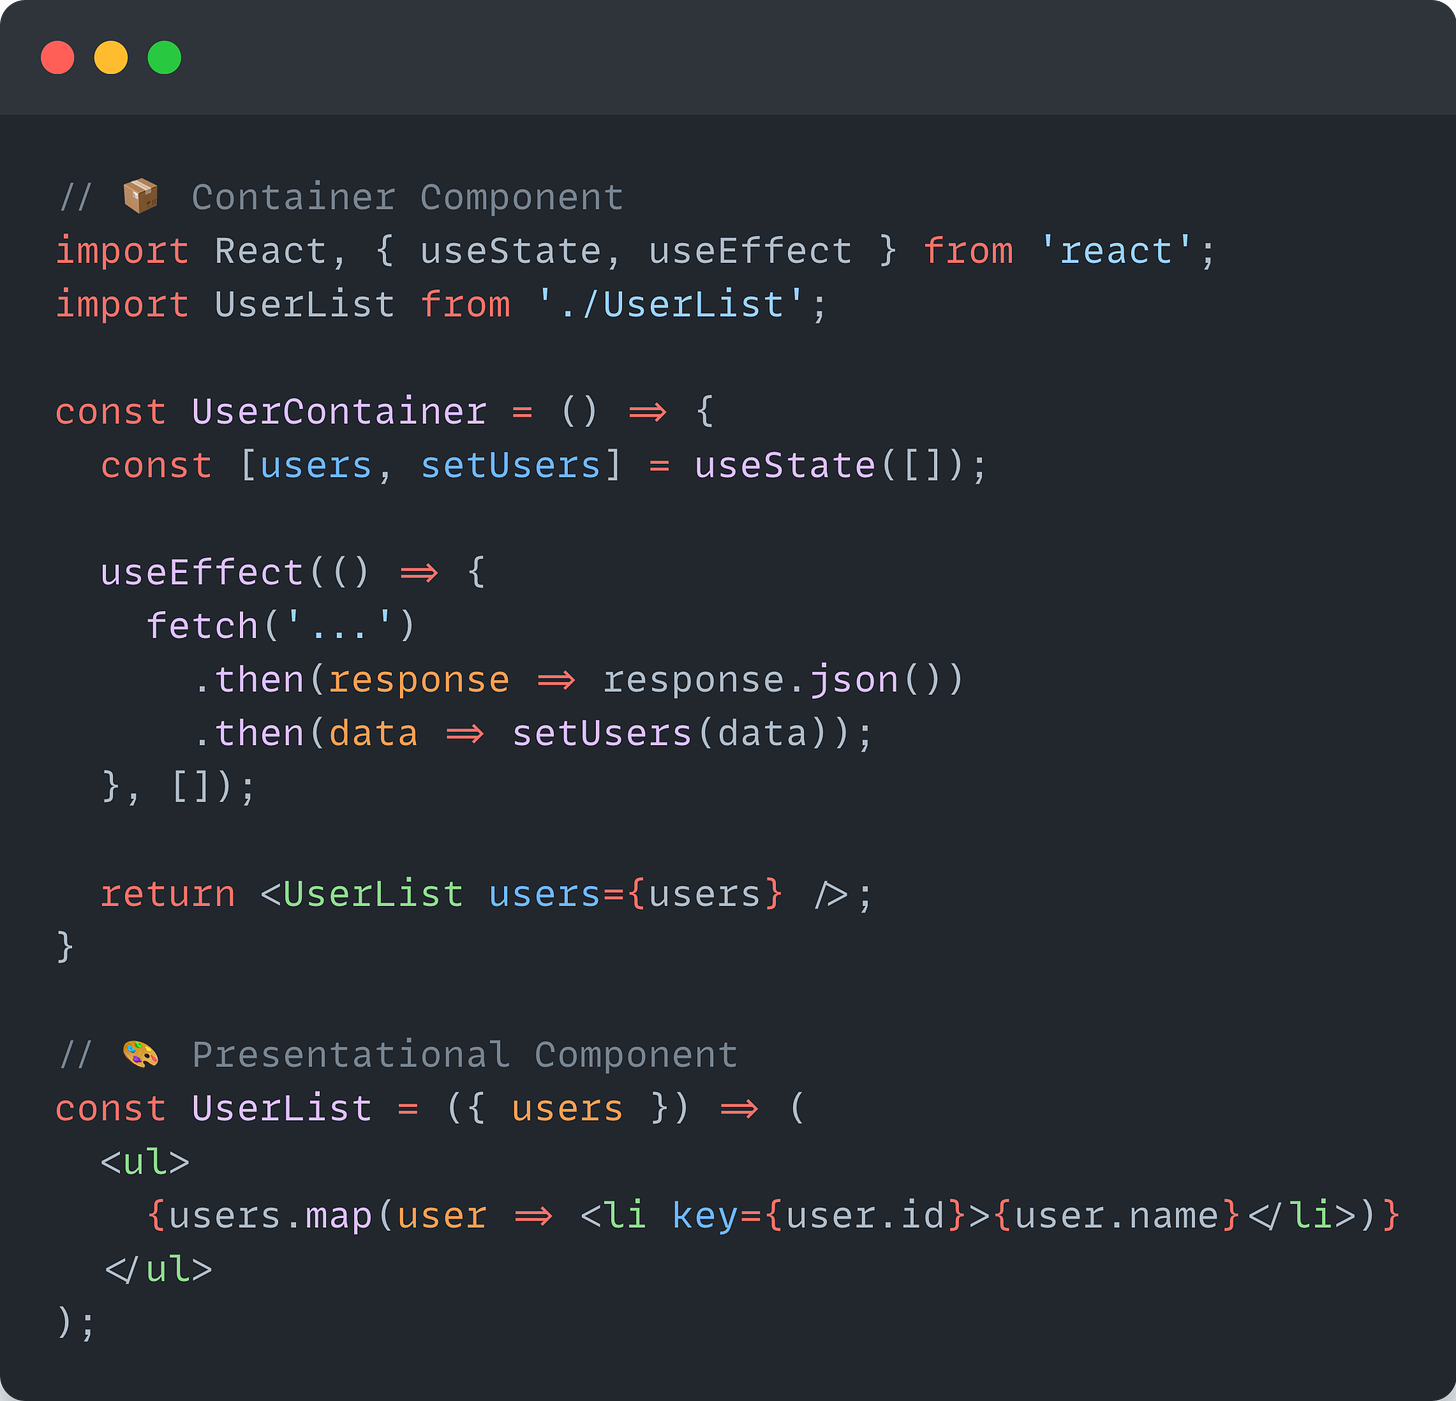
Container and Presentational Components
The Container and Presentational mental model, or pattern, suggests separating the view from the application and business logic. This way of structuring our components helps to better organize our React applications. Another way of looking at these components is smart (container) and dumb (presentational).
Container components are responsible for things like state and data fetching. They care about what data is shown to the user.
Presentational components focus on how things look. They care about how data is shown to the user.
The main idea is that some components hold our business and application logic, while others receive data through their props and visualize it.
This mental model is similar to the MVC (Model-View-Controller) structure used in back-end applications. Because this pattern is generic enough and can work almost everywhere, you can’t go wrong with using it.
However, in modern UI applications, this pattern and mental model don’t work well. We have a few components that hold the logic. They end up with too many responsibilities, which makes them very hard to manage, extend, and test. With the application’s growth and maturity, the maintainability of these places becomes a nightmare.
Hooks and the transition to a new mental model
With the introduction of hooks, the Container and Presentational mental model might become slightly unnecessary. The pattern can be replaced with hooks.
Hooks make it easy for developers to add statefulness without needing a container component to provide a state.
We can refactor and simplify the example from above to:
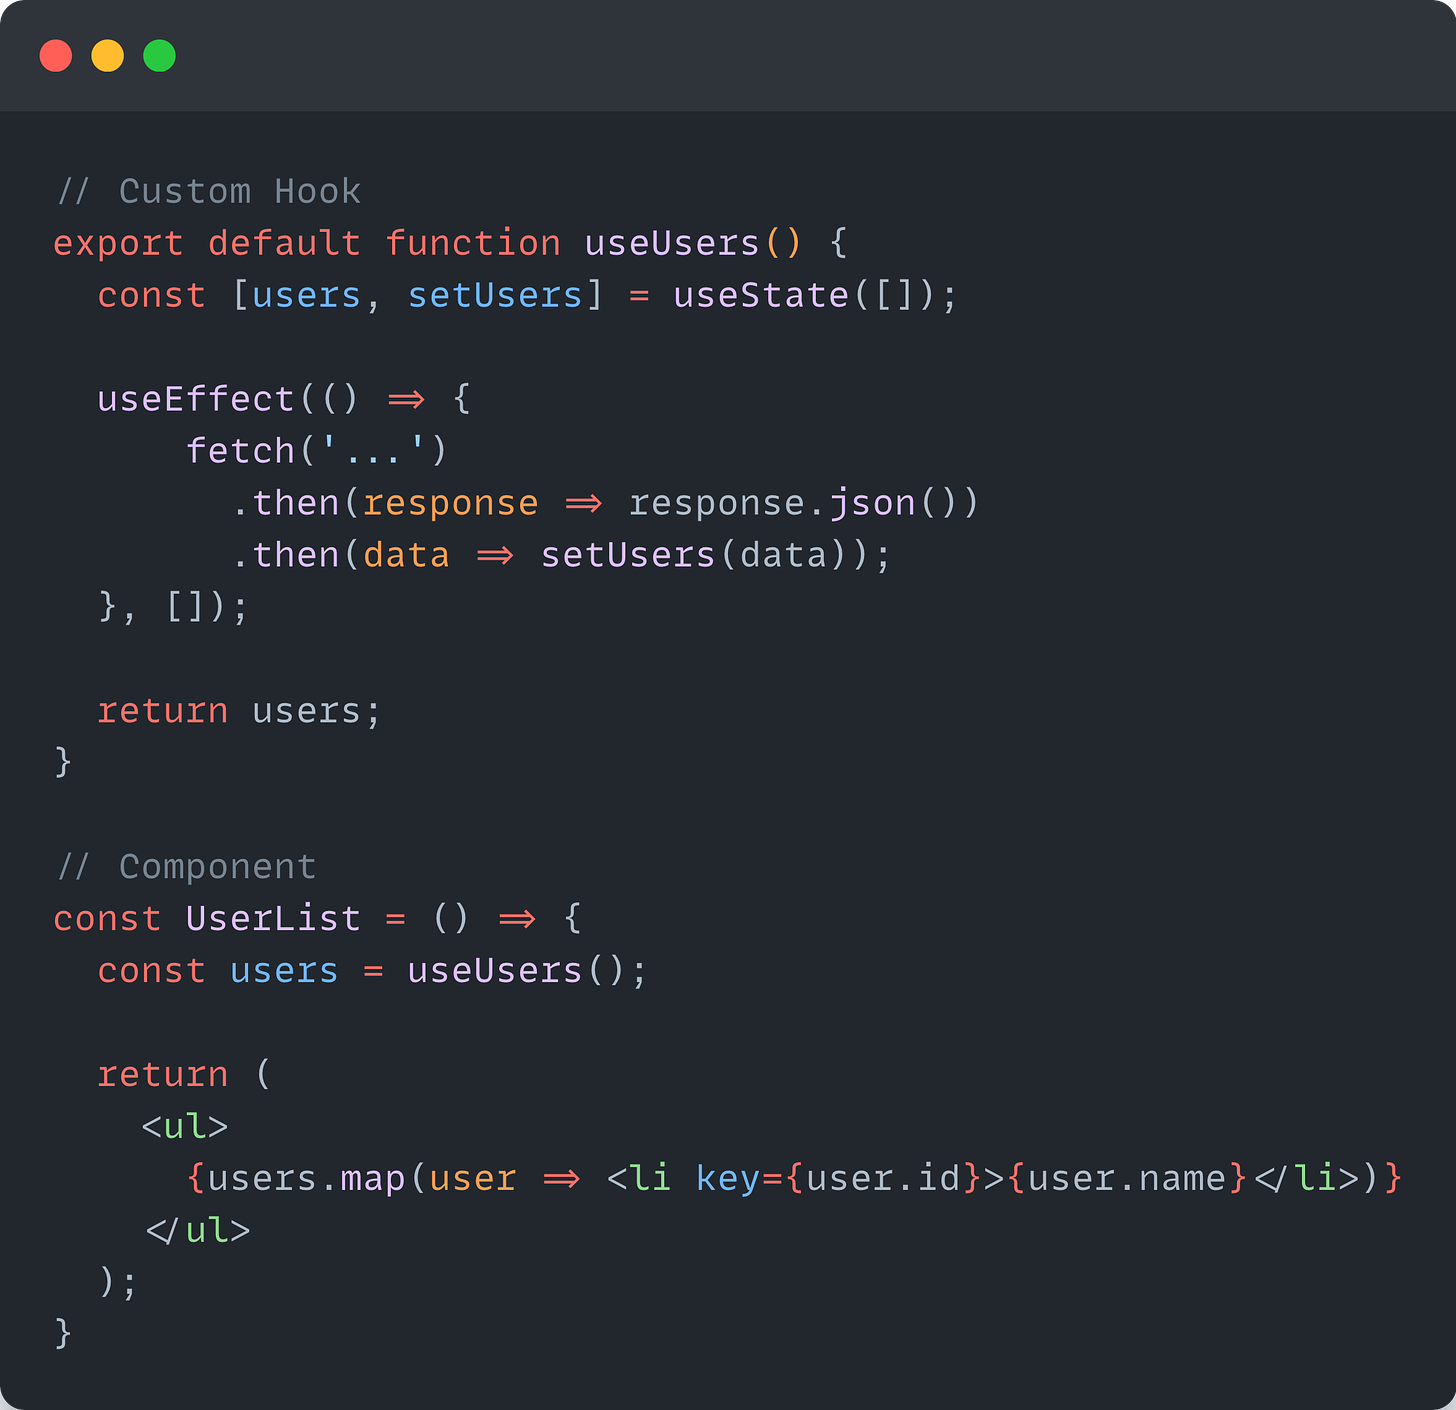
By using a custom hook, we no longer need to wrap the UserList component with the Container component to fetch the data and send it to the Presentation component (UserList).
We also don't violate the separation of concerns principle since the business and application logic is extracted into a custom hook (useUsers), without modifying the data inside the UserList component.
Stateful and Stateless Components
The above-mentioned mental model (Container and Presentational components) suggests that you should have a few components that manage a lot of complexity, while many others are responsible for visualization.
As we discussed earlier, the Container and Presentational components’ mental models fall short with the maturity of the application because it’s maintainability becomes very hard.
Instead, the Stateful and Stateless components’ mental model suggests spreading the complexity throughout the whole application.
The state and business logic should live as close as possible to its usage.
You should think of the different responsibilities our components have, instead of having containers. Think of the most suitable and appropriate place where a responsibility (business logic/state) should be.
Example <Form> component
For example, a <Form /> component should be responsible for handling the data of the form. An <Input /> field should receive data from the outside and call the appropriate callbacks when a change occurs. A <Button /> should be responsible for indicating it was pressed and let the form do the necessary.
Even with the <Form /> example, we may end up with many questions regarding its design, like “Who does the validation of the form? Should we add it to the <Input /> field? How do we show errors? How do we refresh the state in case of an error? If we have an error, how will we prevent the submission of the form?
If we let the <Input /> field manage the validation, then the <Input /> component will be aware of the business logic of our application.
In this example, the better approach is to let the <Input /> component be stateless and leave the rest to the <Form />. The error message will be passed from the <Form /> to the <Input />, so the business logic will be inside the <Form />, and the visualization of the error will be the responsibility of the <Input /> component.
Example <ToggleButton/> component
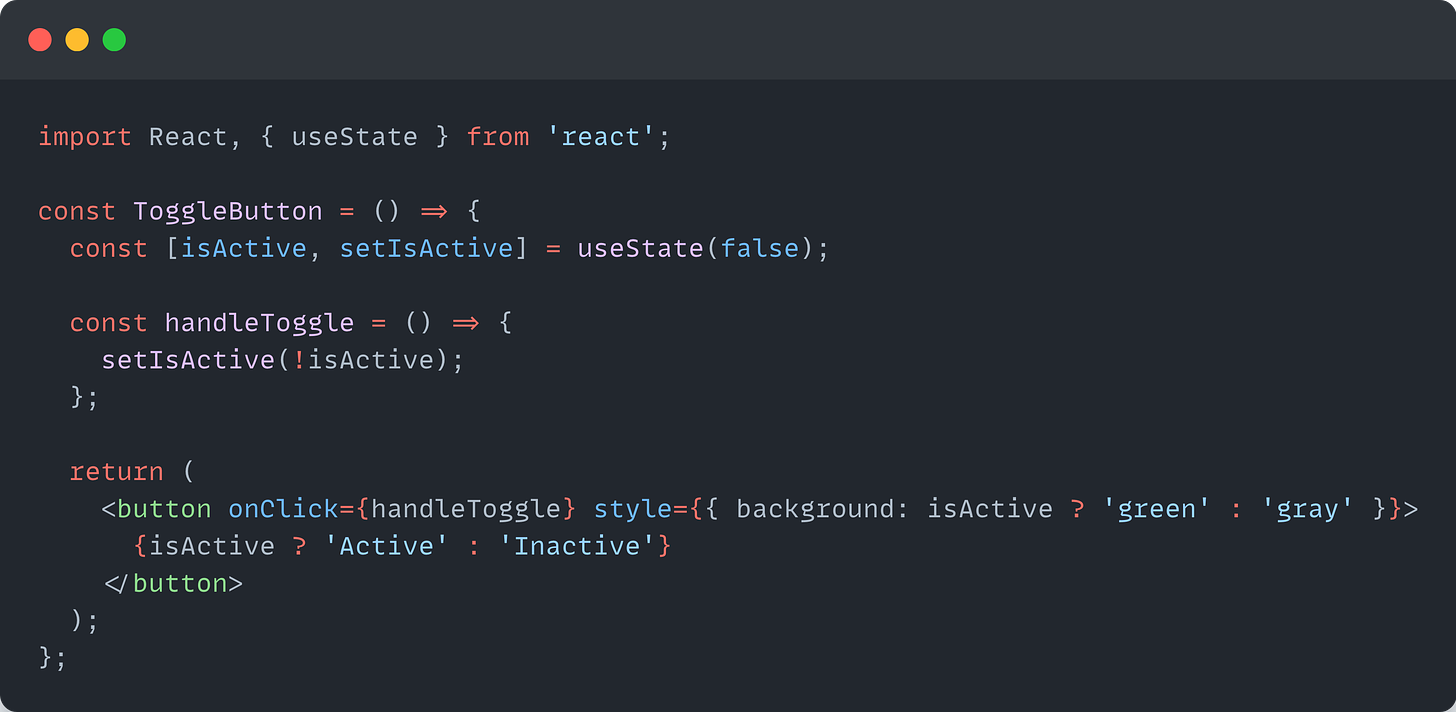
Even for a simple example like the <ToggleButton />, we have a state. If we try to fit this component into the Container and Presentational components’ mental model, it won’t be very suitable.
However, this suits well into the Stateful and Stateless components’ mental model. The responsibility of whether the button is active or inactive lies within it.
React Logging: How to Implement It Right and Debug Faster
React Logging is a practice of recording relevant information about your application’s behavior during runtime.
Unlike traditional server-side logging, React logging happens in the browser and focuses on front-end concerns: component life-cycle events, state changes, user interactions, performance metrics, and network requests. Effective logging creates breadcrumbs that help you understand the application flow and quickly pinpoint problems.
Debugging React applications can be challenging, especially as they grow in complexity. Implementing a solid logging strategy helps identify issues faster and provides valuable insights into your application’s behavior during development and in production.
Basic Console Logging Methods in React
When you are first jumping into React Logging, the simplest place to start is with what’s already available: the console API.
// Don't just console.log everything
console.log("User clicked the button");

// Use different methods for different purposes
console.info("Component mounted successfully");
console.warn("Prop is deprecated and will be removed in next version");
console.error("API call failed:", error);
The console offers more than just console.log(). Each method serves a specific purpose and makes your logs easier to filter when things get messy.
But let’s be real — this approach only takes you so far. Once your app grows beyond a simple to-do list, you will need something more robust.
Build a Configurable Custom Logging Utility for React Applications
Building a custom logger gives you consistency and control. Here’s a simple implementation to get you started.
// src/utils/logger.js
const LOG_LEVELS = {
  DEBUG: 0,
  INFO: 1,
  WARN: 2,
  ERROR: 3,
};

// Set this based on your environment
const CURRENT_LOG_LEVEL = process.env.NODE_ENV === 'production'
  ? LOG_LEVELS.ERROR
  : LOG_LEVELS.DEBUG;

class Logger {
  static debug(message, ...args) {
    if (CURRENT_LOG_LEVEL <= LOG_LEVELS.DEBUG) {
      console.debug(`[DEBUG] ${message}`, ...args);
    }
  }

  static info(message, ...args) {
    if (CURRENT_LOG_LEVEL <= LOG_LEVELS.INFO) {
      console.info(`[INFO] ${message}`, ...args);
    }
  }

  static warn(message, ...args) {
    if (CURRENT_LOG_LEVEL <= LOG_LEVELS.WARN) {
      console.warn(`[WARN] ${message}`, ...args);
    }
  }

  static error(message, ...args) {
    if (CURRENT_LOG_LEVEL <= LOG_LEVELS.ERROR) {
      console.error(`[ERROR] ${message}`, ...args);
    }
  }
}

export default Logger;
Using it in your components becomes straightforward.
import Logger from '../utils/logger';

function UserProfile({ userId }) {
  useEffect(() => {
    Logger.debug('UserProfile mounted', { userId });

    fetchUserData(userId)
      .then(data => {
        Logger.info('User data retrieved successfully');
        setUserData(data);
      })
      .catch(error => {
        Logger.error('Failed to fetch user data', { userId, error });
      });

    return () => {
      Logger.debug('UserProfile unmounted', { userId });
    };
  }, [userId]);

  // Component code...
}
The beauty of this approach? You can easily:
Filter logs by severity
Add context to every log message
Control what gets logged in different environments
Format logs consistently
If you’re looking to bring together logs from various parts of your React application for easier debugging, here’s a practical guide on log consolidation and how it can simplify your workflow.
Monitor React Component Lifecycle Events and Render Frequency
One of React’s quirks is understanding when and why components re-render. Let’s add some logging to track this:
function useLogRenders(componentName) {
  const renderCount = useRef(0);

  useEffect(() => {
    renderCount.current += 1;
    Logger.debug(`${componentName} rendered`, {
      count: renderCount.current,
      props: this.props,
      state: this.state
    });
  });
}

// Usage in a component
function ExpensiveComponent(props) {
  useLogRenders('ExpensiveComponent');

  // Component code...
}
This simple hook can help you identify components that render too often - a common source of performance issues.
Integrate Error Boundaries with Structured Logging for Robust Error Handling
Error boundaries are React’s way of catching JavaScript errors in components. Pairing them with good logging creates a safety net for your app.
class ErrorBoundary extends React.Component {
  constructor(props) {
    super(props);
    this.state = { hasError: false };
  }

  static getDerivedStateFromError(error) {
    return { hasError: true };
  }

  componentDidCatch(error, info) {
    Logger.error('React error boundary caught error', {
      error,
      componentStack: info.componentStack,
    });

    // You could also send this to your error tracking service
    // errorTrackingService.captureException(error, { extra: info });
  }

  render() {
    if (this.state.hasError) {
      return <h1>Something went wrong.</h1>;
    }

    return this.props.children;
  }
}
Wrap key sections of your app with these boundaries to prevent one component crash from bringing down the entire app.
Debug logs can be incredibly useful during development and troubleshooting. This debug logging guide shares when to use them and what to watch out for.
Enhance Log Messages with Contextual Data for Effective Troubleshooting
Raw log messages rarely tell the full story. Adding context makes debugging much easier.
// Bad logging
Logger.error('Payment failed');

// Good logging
Logger.error('Payment processing failed', {
  userId: '123',
  amount: 99.99,
  currency: 'USD',
  errorCode: 'INSUFFICIENT_FUNDS',
  timestamp: new Date().toISOString(),
});
The second example gives you everything you need to understand and fix the issue without having to guess what happened.
Leverage Specialized Logging Libraries for Advanced React Application Monitoring
While custom loggers work for smaller projects, dedicated logging libraries offer more features with less work:
Winston + React Integration
// src/utils/logger.js
import winston from 'winston';

const logger = winston.createLogger({
  level: process.env.NODE_ENV === 'production' ? 'error' : 'debug',
  format: winston.format.combine(
    winston.format.timestamp(),
    winston.format.json()
  ),
  transports: [
    new winston.transports.Console(),
    // Add more transports as needed (files, HTTP, etc.)
  ],
});

// Create browser-friendly methods
export default {
  debug: (...args) => logger.debug(...args),
  info: (...args) => logger.info(...args),
  warn: (...args) => logger.warn(...args),
  error: (...args) => logger.error(...args),
};
Debug
The debug package offers a lightweight alternative with namespace support:
import debug from 'debug';

// Create namespaced loggers
const logRender = debug('app:render');
const logAPI = debug('app:api');
const logRouter = debug('app:router');

function App() {
  useEffect(() => {
    logRender('App component rendered');
    // ...
  }, []);

  // ...
}
Enable specific namespaces in the browser by setting localStorage.debug:
// Enable all app logs
localStorage.debug = 'app:*';

// Only enable API logs
localStorage.debug = 'app:api';
Performance Profiling and Metrics Collection for React Component Optimization
Understanding performance bottlenecks is essential for React applications. Let’s set up comprehensive performance monitoring:
import { Profiler } from 'react';
import Logger from '../utils/logger';

function ProfiledApp() {
  const handleProfilerData = (
    id, // the "id" prop of the Profiler tree
    phase, // "mount" or "update"
    actualDuration, // time spent rendering
    baseDuration, // estimated time for a full render
    startTime, // when React began rendering
    commitTime // when React committed the updates
  ) => {
    Logger.debug('Component performance', {
      id,
      phase,
      actualDuration,
      baseDuration,
      startTime,
      commitTime,
    });
  };

  return (
    <Profiler id="App" onRender={handleProfilerData}>
      <App />
    </Profiler>
  );
}
This gives you valuable timing information for each component render. To make this data more actionable, consider logging performance metrics to your observability platform:
// Hook for tracking slow renders
function usePerformanceTracking(componentName, threshold = 16) {
  // We use useRef to avoid re-renders caused by the hook itself
  const renderTime = useRef(0);
  const startTime = useRef(0);

  useEffect(() => {
    // Measure render completion time
    const endTime = performance.now();
    renderTime.current = endTime - startTime.current;

    // Log slow renders that exceed our threshold (1 frame at 60fps ≈ 16.6ms)
    if (renderTime.current > threshold) {
      Logger.warn('Slow component render detected', {
        component: componentName,
        renderTime: renderTime.current.toFixed(2),
        threshold
      });
    }

    // Setup measurements for the next render
    return () => {
      startTime.current = performance.now();
    };
  });

  // Initialize on first render
  useLayoutEffect(() => {
    startTime.current = performance.now();
  }, []);

  return renderTime.current;
}

// Usage example
function ExpensiveComponent(props) {
  const renderTime = usePerformanceTracking('ExpensiveComponent');

  // Your component code...

  // Optionally display render time in development
  return (
    <div>
      {/* Component content */}
      {process.env.NODE_ENV !== 'production' && (
        <small className="render-time">
          Rendered in {renderTime.toFixed(2)}ms
        </small>
      )}
    </div>
  );
}
This approach helps you identify slow components during development and real-world usage:
For a more comprehensive view, track key performance metrics like:
import Logger from '../utils/logger';

// Call this after your app has loaded
function logPagePerformanceMetrics() {
  // Wait for browser to calculate performance metrics
  setTimeout(() => {
    // Get performance timeline
    const perfData = window.performance.timing;

    // Calculate key metrics
    const metrics = {
      // Network & server metrics
      dnsLookup: perfData.domainLookupEnd - perfData.domainLookupStart,
      tcpConnection: perfData.connectEnd - perfData.connectStart,
      serverResponse: perfData.responseEnd - perfData.requestStart,

      // Page rendering metrics
      domLoading: perfData.domComplete - perfData.domLoading,
      domInteractive: perfData.domInteractive - perfData.navigationStart,
      domContentLoaded: perfData.domContentLoadedEventEnd - perfData.navigationStart,
      pageFullyLoaded: perfData.loadEventEnd - perfData.navigationStart,

      // First paint (approximate if Paint Timing API not available)
      firstPaint: window.performance.getEntriesByType('paint')[0]?.startTime ||
                 (perfData.domContentLoadedEventStart - perfData.navigationStart)
    };

    Logger.info('Page performance metrics', metrics);

  }, 0);
}
By collecting this data systematically, you can track performance trends over time and catch regressions before they impact users significantly.
Here's a comparison of some popular React logging and monitoring tools:
| Tool | Best For | React-Specific Features | Setup Complexity |
| Last9 | Complete observability, high-cardinality data | Connects frontend & backend telemetry | Low |
| React DevTools | Local development | Component inspection, profiling | None (browser extension) |
| Winston | Flexible logging pipelines | None (generic JS logger) | Medium |
| debug | Lightweight namespaced logging | None (generic JS logger) | Low |
| Sentry | Error tracking and performance | React error boundary integration | Medium |
Capture and Log React Router Navigation Events for User Journey Analysis
Single-page apps can be hard to debug because traditional page views don’t exist. Log route changes to understand user journeys.
import { useNavigate, useLocation } from 'react-router-dom';
import { useEffect } from 'react';
import Logger from '../utils/logger';

function RouteLogger() {
  const location = useLocation();

  useEffect(() => {
    Logger.info('Route changed', {
      pathname: location.pathname,
      search: location.search,
      timestamp: new Date().toISOString(),
    });
  }, [location]);

  return null;
}

// Add this component to your Router
function App() {
  return (
    <Router>
      <RouteLogger />
      {/* Rest of your app */}
    </Router>
  );
}
This creates breadcrumbs that help you understand what users were doing before they encountered problems.
Implement User Interaction Tracking for Behavior Analysis
Understanding how users interact with your application can provide valuable insights for debugging and UX improvements. Here’s how to set up user interaction logging:
import { useCallback } from 'react';
import Logger from '../utils/logger';

export function useUserInteractionTracking() {
  const trackClick = useCallback((elementId, elementName, additionalData = {}) => {
    Logger.info('User clicked element', {
      elementId,
      elementName,
      timestamp: new Date().toISOString(),
      ...additionalData
    });
  }, []);

  const trackFormSubmit = useCallback((formId, formData, success = true) => {
    // Make sure to sanitize sensitive data before logging
    const safeFormData = sanitizeFormData(formData);

    Logger.info('Form submission', {
      formId,
      success,
      fieldsCompleted: Object.keys(safeFormData).length,
      timestamp: new Date().toISOString()
    });
  }, []);

  const trackNavigation = useCallback((source, destination) => {
    Logger.info('User navigation', {
      source,
      destination,
      timestamp: new Date().toISOString()
    });
  }, []);

  return {
    trackClick,
    trackFormSubmit,
    trackNavigation
  };
}

// Usage in a component
function LoginForm() {
  const { trackClick, trackFormSubmit } = useUserInteractionTracking();

  const handleSubmit = (event) => {
    event.preventDefault();
    const formData = new FormData(event.target);

    // Track the submission
    trackFormSubmit('login-form', Object.fromEntries(formData));

    // Process login...
  };

  return (
    <form id="login-form" onSubmit={handleSubmit}>
      {/* Form fields */}
      <button
        type="submit"
        onClick={() => trackClick('login-button', 'Login Button')}
      >
        Login
      </button>
    </form>
  );
}

// Helper to remove sensitive data
function sanitizeFormData(data) {
  const sensitiveFields = ['password', 'token', 'credit_card', 'ssn'];
  const safeData = {...data};

  sensitiveFields.forEach(field => {
    if (safeData[field]) {
      safeData[field] = '[REDACTED]';
    }
  });

  return safeData;
}
This approach gives you structured data about how users interact with your application, which becomes invaluable when:
Debug reports of strange behavior
Understanding user flow through your application
Identifying UI components that might confuse users
Correlating user actions with errors that occur later
When to Use and Avoid useEffect in React
It’s 2 AM. You have been debugging the mysterious React re-rendering issues for hours. The component keeps firing an API call in an infinite loop, and you have narrowed it down to a troublesome useEffect hook. Sounds similar?
If you have been developing in React for any length of time, you have likely experienced the love-hate relationship with useEffect. It’s simultaneously one of React’s most powerful hooks and its most misunderstood.
After reviewing thousands of lines of React code across dozens of enterprise applications, I have discovered that what separates average React developers from the top-tier React architect isn’t just experience — it’s how they approach side effects. Let me show you what the best developers do differently.
If your effect solely updates state based on props or state, you might not need an effect at all
Quote from the React docs
The Role of useEffect in React Applications
Since React offers a component-based structure, each component only manages its own state and props. However, there are times when a component needs to interact with the outside world or respond to specific conditions. That’s where useEffect comes into play.
💫 The Main Purpose of useEffect: Managing Side Effects
React components are typically designed to be pure functions, meaning they’re expected to produce the same output for the same input. However, some operations are impure and cause side effects. For example:
Making API calls (fetching or updating data)
Manipulating the DOM (adding/removing event listeners)
Using localStorage or other browser APIs
Working with timers (e.g., setTimeout, setInterval)
Handling WebSockets or real-time data streams
These kinds of operations should only run once or under specific conditions. useEffect is used to manage these side effects effectively..
How useEffect Works and the Re-render Process
In React, useEffect is a hook that runs after the component has finished rendering. That means React first renders the component (updates the DOM), and only then does useEffect execute. However, incorrect use of the dependency array can lead to unnecessary renders or even infinite loops. That's why it’s important to understand when useEffect is triggered and how to optimize it.
useEffect can run during a component’s lifecycle stages: on initial render (mounting), when the component updates (updating), and when it’s removed from the DOM (unmounting).
Here’s the basic syntax:
useEffect(() => {
  // Side effects (API calls, event listeners, subscriptions, etc.)

  return () => {
    // Cleanup function (executed before unmounting or before the next effect runs)
  };
}, [dependencies]); // useEffect runs when dependencies change
💫 How useEffect Works:
After the first render (mounting) → useEffect runs.
If any value in the dependency array changes (updating) → useEffect runs again.
Before the component is removed (unmounted) → the cleanup function runs.
We can visualize this process as follows:
Render → DOM Updates → useEffect Runs
If State/Prop Updates → useEffect Runs Again
If Component Unmounts → Cleanup Function Runs
Common Misuses of useEffect
Before diving on when to use useEffect, let’s examine common situations where it’s necessarily applied.
- Derived State
// ❌ Unnecessary useEffect
function ProductList({ products }) {
  const [filteredProducts, setFilteredProducts] = useState([]);

  useEffect(() => {
    setFilteredProducts(
      products.filter(product => product.inStock)
    );
  }, [products]);

  return (
    <ul>
      {filteredProducts.map(product => (
        <li key={product.id}>{product.name}</li>
      ))}
    </ul>
  );
}
Better approach: Compute values directly during rendering or use useMemo for expensive calculations:
// ✅ Better approach
function ProductList({ products }) {
  // Direct calculation during render
  const filteredProducts = products.filter(product => product.inStock);

  return (
    <ul>
      {filteredProducts.map(product => (
        <li key={product.id}>{product.name}</li>
      ))}
    </ul>
  );
}

// For expensive calculations
function ProductSearch({ products, searchTerm }) {
  const filteredProducts = useMemo(() => {
    return products
      .filter(product => product.inStock)
      .filter(product => product.name.toLowerCase().includes(searchTerm.toLowerCase()))
      .sort((a, b) => a.price - b.price);
  }, [products, searchTerm]);

  return (
    <ul>
      {filteredProducts.map(product => (
        <li key={product.id}>{product.name} - ${product.price}</li>
      ))}
    </ul>
  );
}
For truly expensive calculations, useMemo provides the best of both worlds: direct calculation with memorization to prevent unnecessary recalculation.
- React State Updates Based on Props
// ❌
function ProfilePage({ userId }) {
  const [user, setUser] = useState(null);

  useEffect(() => {
    setUser({ id: userId, name: `User ${userId}` });
  }, [userId]);

  return <div>User: {user?.name}</div>;
}
Better approach: Derive data directly from props:
// ✅ Better approach
function ProfilePage({ userId }) {
  // Directly use props for rendering
  const userName = `User ${userId}`;

  return <div>User: {userName}</div>;
}
- Responding to Events
// ❌ Unnecessarily complex
function SearchComponent() {
  const [query, setQuery] = useState('');
  const [results, setResults] = useState([]);

  useEffect(() => {
    if (query) {
      searchApi(query).then(setResults);
    }
  }, [query]); // This runs on every keystroke!

  return (
    <>
      <input
        value={query}
        onChange={e => setQuery(e.target.value)}
      />
      <ul>
        {results.map(result => (
          <li key={result.id}>{result.name}</li>
        ))}
      </ul>
    </>
  );
}
Better approach: Handle events directly with proper debouncing:
// ✅ Better approach with debouncing
function SearchComponent() {
  const [query, setQuery] = useState('');
  const [results, setResults] = useState([]);

  // Use a ref to store the timeout ID
  const timeoutRef = useRef(null);

  const handleSearch = (value) => {
    setQuery(value);

    // Clear previous timeout
    if (timeoutRef.current) {
      clearTimeout(timeoutRef.current);
    }

    // Set a new timeout to debounce the search
    timeoutRef.current = setTimeout(() => {
      if (value) {
        searchApi(value).then(setResults);
      }
    }, 300);
  };

  // Clean up timeout on unmount
  useEffect(() => {
    return () => {
      if (timeoutRef.current) {
        clearTimeout(timeoutRef.current);
      }
    };
  }, []);

  return (
    <>
      <input
        value={query}
        onChange={e => handleSearch(e.target.value)}
      />
      <ul>
        {results.map(result => (
          <li key={result.id}>{result.name}</li>
        ))}
      </ul>
    </>
  );
}
- Data Transformations
// ❌ Unnecessary state and effect
function UserTable({ users }) {
  const [formattedUsers, setFormattedUsers] = useState([]);

  useEffect(() => {
    setFormattedUsers(
      users.map(user => ({
        ...user,
        fullName: `${user.firstName} ${user.lastName}`,
        joinDate: new Date(user.joinedAt).toLocaleDateString()
      }))
    );
  }, [users]);

  return (
    <table>
      <thead>
        <tr>
          <th>Name</th>
          <th>Joined</th>
        </tr>
      </thead>
      <tbody>
        {formattedUsers.map(user => (
          <tr key={user.id}>
            <td>{user.fullName}</td>
            <td>{user.joinDate}</td>
          </tr>
        ))}
      </tbody>
    </table>
  );
}
Better approach: Transform data directly during rendering:
// ✅ Better approach
function UserTable({ users }) {
  return (
    <table>
      <thead>
        <tr>
          <th>Name</th>
          <th>Joined</th>
        </tr>
      </thead>
      <tbody>
        {users.map(user => (
          <tr key={user.id}>
            <td>{`${user.firstName} ${user.lastName}`}</td>
            <td>{new Date(user.joinedAt).toLocaleDateString()}</td>
          </tr>
        ))}
      </tbody>
    </table>
  );
}
- Sharing logic between event handlers
// 🚨 **Avoid**: Placing specific event logic in useEffect unnecessarily.

function ProductPage({ product, addToCart }) {
  useEffect(() => {
    if (product.isInCart) {
      showNotification(`Added ${product.name} to the shopping cart!`);
    }
  }, [product]);

  // 🚫 Unnecessary useEffect for handling button clicks.

  function handleBuyClick() {
    addToCart(product);
  }

  function handleCheckoutClick() {
    addToCart(product);
    navigateTo('/checkout');
  }
  // ...
}
In the revised version:
Identified the bug caused by the unnecessary
useEffect.Emphasized the importance of considering when code needs to run.
Introduced a better approach, using specific event logic within the event handlers.
Now, let’s present the revised content:
// ✅ **Good**: Execute specific event logic only when the event is triggered.
function ProductPage({ product, addToCart }) {

  function buyProduct() {
    addToCart(product);
    showNotification(`Added ${product.name} to the shopping cart!`);
  }

  function handleBuyClick() {
    buyProduct();
  }

  function handleCheckoutClick() {
    buyProduct();
    navigateTo('/checkout');
  }
  // ...
}
In this improved version:
The event logic is moved directly into the event handlers (
handleBuyClickandhandleCheckoutClick).The unnecessary
useEffectis removed, preventing the bug of repeated notifications on page reload.The code is organized for better readability and maintainability.
- Pass data to the parent
function Parent() {
  const [data, setData] = useState(null);
  // ...
  return <Child onFetched={setData} />;
}

function Child({ onFetched }) {
  const data = useSomeAPI();
  // 🔴 Avoid: Passing data to the parent in an Effect
  useEffect(() => {
    if (data) {
      onFetched(data);
    }
  }, [onFetched, data]);
  // ...
}
🔄 In React, data typically flows in one direction — from the parent component to the child component. This ensures easier error tracing along the component chain.
However, when a child component updates its parent’s state, it can make the data flow less straightforward. To simplify, it’s recommended to have the parent fetch the data and pass it to the child, especially when both components need the same data. 🚀
function Parent() {
  const data = useSomeAPI();
  // ...
  // ✅ Good: Passing data down to the child
  return <Child data={data} />;
}

function Child({ data }) {
  // ...
}
Traditional useEffect Use Cases and Modern Alternatives
- External Systems Integrations
Traditional approach with useEffect:
function BrowserLocationTracker() {
  const [location, setLocation] = useState(null);
  const [error, setError] = useState(null);

  useEffect(() => {
    if (!navigator.geolocation) {
      setError("Geolocation is not supported");
      return;
    }

    const watchId = navigator.geolocation.watchPosition(
      position => setLocation({
        latitude: position.coords.latitude,
        longitude: position.coords.longitude
      }),
      error => setError(error.message)
    );

    return () => navigator.geolocation.clearWatch(watchId);
  }, []);

  if (error) return <div>Error: {error}</div>;
  if (!location) return <div>Loading...</div>;

  return (
    <div>
      <p>Latitude: {location.latitude}</p>
      <p>Longitude: {location.longitude}</p>
    </div>
  );
}
Possible alternative: Custom hooks that encapsulate effects:
// A custom hook that abstracts geolocation logic
function useGeolocation() {
  const [location, setLocation] = useState(null);
  const [error, setError] = useState(null);

  useEffect(() => {
    if (!navigator.geolocation) {
      setError("Geolocation not supported");
      return;
    }

    const watchId = navigator.geolocation.watchPosition(
      position => setLocation({
        latitude: position.coords.latitude,
        longitude: position.coords.longitude
      }),
      error => setError(error.message)
    );

    return () => navigator.geolocation.clearWatch(watchId);
  }, []);

  return { location, error };
}

// Component becomes much simpler
function LocationDisplay() {
  const { location, error } = useGeolocation();

  if (error) return <div>Error: {error}</div>;
  if (!location) return <div>Loading...</div>;

  return <div>Lat: {location.latitude}, Long: {location.longitude}</div>;
}
- Data Fetching in Client Components
Traditional approach with useEffect:
function UserProfile({ userId }) {
  const [user, setUser] = useState(null);
  const [loading, setLoading] = useState(true);
  const [error, setError] = useState(null);

  useEffect(() => {
    let isMounted = true;

    const fetchUser = async () => {
      try {
        setLoading(true);
        const response = await fetch(`https://api.example.com/users/${userId}`);

        if (!response.ok) {
          throw new Error('Failed to fetch user data');
        }

        const userData = await response.json();

        // Only update state if component is still mounted
        if (isMounted) {
          setUser(userData);
          setLoading(false);
        }
      } catch (err) {
        if (isMounted) {
          setError(err.message);
          setLoading(false);
        }
      }
    };

    fetchUser();

    // Cleanup function to prevent state updates if component unmounts
    return () => {
      isMounted = false;
    };
  }, [userId]);

  if (loading) return <div>Loading...</div>;
  if (error) return <div>Error: {error}</div>;
  if (!user) return null;

  return (
    <div>
      <h1>{user.name}</h1>
      <p>Email: {user.email}</p>
    </div>
  );
}
Alternative: React Query/SWR:
import { useQuery } from '@tanstack/react-query';

function UserProfile({ userId }) {
  const {
    data: user,
    isLoading,
    error
  } = useQuery({
    queryKey: ['user', userId],
    queryFn: () => fetch(`/api/users/${userId}`)
      .then(r => {
        if (!r.ok) throw new Error('Failed to fetch user');
        return r.json();
      })
  });

  if (isLoading) return <div>Loading...</div>;
  if (error) return <div>Error: {error.message}</div>;

  return (
    <div>
      <h1>{user.name}</h1>
      <p>Email: {user.email}</p>
    </div>
  );
}
Alternative: React Server Components:
// In Next.js or similar frameworks with React Server Components
async function UserProfile({ userId }) {
  const response = await fetch(`https://api.example.com/users/${userId}`);

  if (!response.ok) {
    // Handle errors appropriately in Server Components
    return <div>Error loading user</div>;
  }

  const user = await response.json();

  return (
    <div>
      <h1>{user.name}</h1>
      <p>Email: {user.email}</p>
    </div>
  );
}
Strategies to minimize useEffect
✅ Move effects to the boundary of your application
- Keep most components pure and push side effects to the edges
✅ Abstract effects into custom hooks
- Hide implementation details and create reusable effect patterns
✅ Use specialized libraries for common patterns
Data fetching: React Query, SWR
Form handling: React Hook Form, Formik
Animation: Framer Motion, React Spring
✅ Use modern React patterns
Server Components for data fetching
Context for shared state
Reducers for complex state logic
Best Practices When Using useEffect
When you do need to use useEffect, follow these guidelines:
✅ Be specific with dependencies
Include all values from the component scope used by the effect
Use the ESLint exhaustive-deps rule
✅ Separate concerns
Each effect should do one thing
Break complex effects into multiple simpler ones
✅ Always clean up
Return cleanup functions to prevent memory leaks
Handle race conditions in async operations
✅ Avoid object/function dependencies when possible
They can cause unnecessary re-renders
Use useCallback/useMemo or move them outside the component
\=> The golden rule is: Try to solve your problem without useEffect first, and only reach out to it when dealing with true side effects that interact with systems outside of React’s control.
Building Flexible React Components: Common Core, Many Faces
Suppose you have ever found yourself copying or directly cloning an existing component just to give it a different look or behavior. In that case, even though the core logic stays the same, there is a good chance you are missing an opportunity to build it more efficiently. In such cases, using a decomposition pattern can help you create flexible and reusable components that are easier to maintain and scale.
The problem
Let’s say you are working at a fitness studio company, and you get a requirement from the UX team to design a simple item card to display exercises.
1.1 Initial requirements: Name, Image & Meta

Requirement 1: Name, Image & Meta
Very straightforward! A simple solution could look like this:
type TProps = {
  name: string;
  imageUrl: string;
  primaryMuscles: string[];
};
const ExerciseCard = ({ name, imageUrl, primaryMuscles }: TProps) => {
  return (
    <Container>
      <FlexRow>
        <ExerciseImg uri={imageUrl} />
        <FlexColumn>
          <TextTitle>{name}</TextTitle>
          <Gap.Vertical size={5} />
          <FlexColumn>
            {primaryMuscles.map((uniqueName, index) => (
              <TextSmall key={uniqueName}>{uniqueName}</TextSmall>
            ))}
          </FlexColumn>
        </FlexColumn>
      </FlexRow>
    </Container>
  );
};
Voilà! The card is ready, and UX is happy!
And now you’re asked to design a different variant of the card for another screen. New twist:
1.2 Requirements/card-will-have : Name, Image, Meta & Checkbox

Also, it can be

✅ Card now needs: Name, Image, Meta, and a Checkbox*✅ A checkbox can appear either on the **left or right*
Why? Who knows — maybe UX is thinking of left-handed mobile users 😄. So you tweak your component:
type TProps = {
  name: string;
  imageUrl?: string;
  primaryMuscles: string[];
  checkboxPosition: 'left' | 'right' // <------------- checkbox added
};
const ExerciseCard = ({ name, imageUrl, primaryMuscles, checkboxPosition }: TProps) => {
  return (
    <Container>
      <FlexRow>
        {checkboxPosition === 'left' &&
           <CheckBox/>.
        }
        <ExerciseImg uri={imageUrl}/>
        <FlexColumn>
          <TextTitle>{name}</TextTitle>
          <Gap.Vertical size={5} />
          <FlexColumn>
            {primaryMuscles.map((uniqueName, index) => (
              <TextSmall key={uniqueName}>{uniqueName}</TextSmall>
            ))}
          </FlexColumn>
        </FlexColumn>
        {checkboxPosition === 'right' &&
           <CheckBox/>
        }
      </FlexRow>
    </Container>
  );
};
You’re done again… or so you thought.
BUT!!!….. Now you know that there are other new card-variants coming! Where the card can ALSO look like the following:


With our current approach of designing the component, this wouldn’t be too complicated either, and we might end up having something like —
type TProps = {
    name: string;
    imageUrl?: string;
    primaryMuscles: string[];
    checkboxPosition?: 'left' | 'right';
    isShowMetaAfterTitle?: true;
    isShowMetaAtBottom?: true;
    difficulty?: {gain: number, level: number};
}
const ExerciseCard = ({
    name,
    imageUrl,
    primaryMuscles,
    checkboxPosition,
    isShowMetaAfterTitle,
    isShowMetaAtBottom,
    difficulty
 }: TProps) => {
    return (
      <Container>
        <FlexRow>
          {checkboxPosition === 'left' && <CheckBox/>}

          <ExerciseImg uri={imageUrl}/>          <FlexColumn>
            <TextTitle>{name}</TextTitle>
            <Gap.Vertical size={5} />
            {isShowMetaAfterTitle && (
                <FlexColumn>
                    {primaryMuscles.map((uniqueName) => (
                        <TextSmall key={uniqueName}>{uniqueName}</TextSmall>
                    ))}
                </FlexColumn>
            )}
            {!!difficulty &&
                <ExerciseDifficulty value={difficulty}>
            }
          </FlexColumn>          {checkboxPosition === 'right' && <CheckBox/>}
        </FlexRow>

        {isShowMetaAtBottom && (
            <FlexRow>
                <Gap.Vertical size={5} />
                {primaryMuscles.map((uniqueName) => (
                    <TextSmall key={uniqueName}>{uniqueName}</TextSmall>
                ))}
            </FlexRow>
        )}
      </Container>
    );
  };
Wow! By now, you are already seeing a pattern! A potential ugly mess of conditional rendering is brewing.
Now, what if more design variants come in? Which always does!
The checkbox might move again. The meta section might move differently. Image might become optional.
Very soon, your component is about to turn into a monster, which is:
🅧 bloated and ever-growing,
🅧 hard to read,
🅧 hard to test,
🅧 unscalable
🅧 The order elements are strictly defined
🅧 bug-prone.
Solution — We need a better design
There are two clean and scalable paths we could take:
- Option 1: File-Based Variants
Break different card types into different files:
/variants/
├── PlanScreenCard.tsx
├── SearchScreenCard.tsx
├── ImageLessCard.tsx
Pros:
Clear separation of concerns
Smaller components
Easier to test and debug
Cons:
Duplicate Logic
Violate the DRY principle
Common changes have to be applied in multiple files
- Option 2: Use Composition (aka Decomposition)
Instead of splitting into entirely different files, we can:
Decompose the card into reusable building blocks
Compose what you need on the fly - like Lego bricks
Keep a shared foundation (e.g.,
BaseCard)
Let’s see how that works.
Decomposition
We will solve our variant mess with three simple steps (Identifying and organizing the “Partials“, Creating the BaseCard, and finally the variants)
- Step 1: Identifying and Organizing the “Partials“
These are your Lego bricks.
ExerciseImg.tsxCheckbox.tsxContent.tsx
└─Content.Difficulty.tsx
└─Content.Muscles.tsxFooter.tsx
Now, let’s build each of our partial components
First the/partials/Checkbox.tsx
type TProps = {
  onCheck: () => void;
  isChecked: boolean;
  isAnimated: boolean;
};
export const Checkbox = (props: TProps) => {
  const handleCheck = useCallback(() => {
    props.onCheck?.();
  }, [props.onCheck]);  if (isAnimated) {
    <CheckBoxAnimated
      isChecked={props.isChecked}
      onChange={handleCheck}
    />;
  }  return (
    <CheckBox
      isChecked={isChecked}
      onChange={handleCheck}
    />
  );
};
Then the /partials/ExerciseImg.tsx
type TProps = {
  uri: string;
  size: number;
};
export const ExerciseImg = ({ uri, size}: TProps) => {
  const [loading, setLoading] = useState(true);  const { handleImageLoaded, imageUri } = useMemo(
    () => ({
      handleImageLoaded: () => setLoading(false),
      imageUri: { uri },
    }),
    [uri]
  );  return (
    <ImageContainer width={size} height={size}>
      {loading && (
        <Skeleton width={size} height={size} />
      )}
      <StyledImage
        source={imageUri}
        width={size}
        height={size}
        onLoad={handleImageLoaded}
        resizeMode="cover"
      />
    </ImageContainer>
  );
};
Next, the /partials/Footer.tsx
type TProps = {
  primaryMuscles: string[];
};
export const Footer = ({ primaryMuscles}: TProps) => {
  return (
    <CardFooter>
      {primaryMuscles.map((cat, index) => (
        <PrimaryMuscleText key={index}>
          {`${index > 0 ? ", " : "🎯 "}${cat}`}
        </PrimaryMuscleText>
      ))}
    </CardFooter>
  );
};
Notice that the Content.tsx is composed of its own partials i.e. Difficulty.tsxand Muscles.tsx , so lets place them together inside a /partials/Content/* directory.
So before we create the,/partials/Content/Content.tsx lets create its two partials.
The /partials/Content/Difficulty.tsx
type TProps = {
  difficultyLevel: number;
  effectiveLevel: number;
};
export const Difficulty = ({ effectiveLevel, difficultyLevel }: TProps) => {
  return (
    <Container>
      <Level value={difficultyLevel} type="Difficulty" />
      <Level value={effectiveLevel} type="Hypertrophy Stimulus" />
    </Container>
  );
};
And the /partials/Content/Muscles.tsx
type TProps = {
  primaryMuscles: string[];
};
export const Muscles = ({ primaryMuscles }: TProps) => {
  return (
    <Container>
      {primaryMuscles.map((uniqueName) => (
        <TextSmall key={uniqueName}>{uniqueName}</TextSmall>
      ))}
    </Container>
  );
};
And now the exciting part, the /partials/Content/Content.tsx ❤️🔥
type TProps = {
  name: string;
} & PropsWithChildren;
type TPartials = {
  Difficulty: typeof Difficulty;
  Muscles: typeof Muscles;
};export const Content: React.FC<TProps> & TPartials = ({ children, name }) => {
  return (
    <Container>
      <TextTitle>{name}</TextTitle>
      {children}
    </Container>
  );
};
Content.Difficulty = Difficulty;
Content.Muscles = Muscles;
So this Content.tsxis our first compound component 🕺. In short, what’s happening above is —
We are defining a compound React component where
- The Content is the main container.
- The Content.Difficulty and Content.Muscles are named subcomponents.
- They all play together in a consistent layout, with shared styles and logic.
It will start to make even more sense and be clearer when all these building blocks come together to form the final variant in Step 3. But before that, we need to create our BaseCard.tsx in the next step
- Step 2: Creating the
BaseCard
import { Checkbox } from "./partials/Checkbox";
import { Content } from "./partials/Content/Content";
import { ExerciseImg } from "./partials/ExerciseImg";
import { Footer } from "./partials/Footer";
type TPartials = {
  Image: typeof ExerciseImg;
  Checkbox: typeof Checkbox;
  Footer: typeof Footer;
  Content: typeof Content;
};
type TProps = PropsWithChildren;
const BaseCard: React.FC<TProps> & TPartials = ({ children }) => {
  return (
    <Container>
      <FlexRow>{children}</FlexRow>
    </Container>
  );
};
BaseCard.Image = ExerciseImg;
BaseCard.Checkbox = Checkbox;
BaseCard.Footer = Footer;
BaseCard.Content = Content;
Just like the “Content.txt, “ we are creating a magic box where all the partials of the original ExerciseCard will reside.
What are we gaining?
👉 Encapsulation: The BaseCard component knows its parts and how they should behave inside.
👉 Flexibility: You can mix and match the parts inside the component while keeping structure.
👉 Discoverability: Developers know which parts are available via BaseCard. dot notation.
Since I have already briefly touched on what’s happening inside above (while defining the Content.tsx), let us jump right to the FINAL and most exciting part!
- Step 3: Finally, the variants
At this point, we have all the building blocks ready:
├── BaseCard.tsx
├── partials/
│   ├── Checkbox.tsx
│   ├── Content
│   │   ├── Content.tsx
│   │   ├── Difficulty.tsx
│   │   └── Muscles.tsx
│   ├── ExerciseImg.tsx
│   └── Footer.tsx
└── variants/
    ├── PlanScreenCard.tsx <---- Lets create 🚀
Finally, let’s create our first variant. I will name it PlanScreenCard.tsx because, this variant of the ExerciseCard will be used in the PlanScreen of my app.
import React from "react";
import { BaseCard } from "../BaseCard";
type TProps = {
  name: string;
  primaryMuscles: string[];
  imageUrl: string;
};const PlanScreenCard = ({ name, primaryMuscles, imageUrl }: TProps) => {
  return (
    <BaseCard>
      <BaseCard.Image
        uri={imageUrl}
        size={PLAN_SCREEN_CARD_CONST.imageSize}
      />
      <BaseCard.Content name={name}>
        <BaseCard.Content.Muscles primaryMuscles={primaryMuscles} />
      </BaseCard.Content>
    </BaseCard>
  );
};
const PLAN_SCREEN_CARD_CONST = {
  height: 95,
  imageSize: 90
};
export { PlanScreenCard, PLAN_SCREEN_CARD_CONST };
Awesome — we have now embraced composable component architecture here! 💪. We are usingBaseCard as a Lego set with useful bricks (Image, Content, Content.Muscles), and PlanScreenCard as a specific Lego model, we built with it.
Instead of building it from scratch, we are assembling it by composing smaller parts from a reusable base — the BaseCard.
We can optionally house all the variants in one object, like the following, in a file ExerciseCard.tsx
import {
  PLAN_SCREEN_CARD_CONST,
  PlanScreenCard,
} from "./variants/PlanScreenCard";
export const ExerciseCard = {
  PlanScreen: {
    FC: PlanScreenCard,
    Const: PLAN_SCREEN_CARD_CONST,
  },
};
We can now use this variant (let’s say in my PlanScreen) like —
<ExerciseCard.PlanScreen.FC
  name={"Barbell bench press"}
  imageUrl={'./path/to/image.jpg'}
  primaryMuscles={['muscle-1', 'muscle-2']}
/>
Advantages
Flexibility
Clean Separation of Concerns
Reusability
Developer Sanity
Composition > Conditions
Disadvantage
You now have the power to create a Botchling 👾 instead of an Optimus Prime 🤖
In other words, with great flexibility comes great responsibility
Don’t misuse layout freedom
Understand UX logic when placing elements
For example, we definitely don’t want a checkbox sitting between the image and the name. That just doesn’t make sense, at least not to me.
Beyond the 404: Why React Apps Break on Netlify and What That Teaches Us About The Web
I had just begun development on my GSoC project, excited and ready to share my work with the world. I pushed to GitHub and deployed to Netlify… and then. A cold red 404 stared back at me. “Page not found “. But everything worked perfectly at localhost…then what happened?
If you have ever run into this issue, a React app that works locally but breaks after deployment, this article is for you. But we are not just going to fix the bug.
We are going to understand it.
This isn’t just a technical bug. It’s a misalignment of responsibilities between the browser, the server, and the JavaScript framework.
The Historical Backdrop
Before React came along, the web was pretty straightforward. When you visit a URL like /about, your browser should ask for the server the exact file, usually something like about.html. The server would find it, send it back, and your browser would display the page.
Every route has its own file, and everything lives on the server. And then React and the ideal of Single Page Applications (SPAs) flipped that model. Instead of separate pages, React gave us just one HTML file, and everything else became dynamic, handled right in the browser.
When React was introduced (by Jordan Walke at Facebook), it wasn’t just another UI library. I brought a new diagram.
“What if we stopped thinking in pages, and started thinking in components“
That shift, from documents to dynamic interfaces, meant the web was no longer just HTML files strung together. The browser became more like a blank canvas, and what felt like moving between pages was now just clever tricks.
The Mental Model of React
React is what we call a Single Page Application (SPA) framework, and that means something pretty interesting: the whole app runs off just one file, index.html. All your routes like /, /about, or /project/5 aren’t actual files on the server.
They are more like states in your app. When you click a link, React steps in and handles it using the browser’s History API. It doesn’t ask the server for a new page; it just updates the content on the screen by rendering a new component.
To you, it feels like the page changed. But technically, your browser never left index.html.
The Netlify Philosophy
Around the same time that React was reshaping how apps ran in the browser, Mathias Biilmann, one of Netlify’s co-founders, was paying close attention to this shift too. A world where developers could build fast, static apps, push their code into Git, and scale effortlessly, without dealing with complicated server setups.
That vision became Netlify. And the philosophy behind it became known as JAMstack: JavaScript, APIs, and Markup.
Netlify was designed for this kind of web, where everything is front-end first, and files are served instantly from a global CDN. But when React came along with its virtual routing model, there was a bit of a mismatch.
See, Netlify works like a traditional file server. When someone visits your site and types in a URL like /about, the browser sends a request to Netlify’s servers for a file or folder named /about. But React doesn’t generate that; it only builds a single index.html file.
The Philosophical Clash: Client vs. Server
At the core of this whole 404 issue is a kind of mismatch between how React thinks the web should work and how Netlify actually handles things.
React speaks the language of the client. Netlify? It still thinks in terms of the server.
Before React and other single-page application frameworks came along, clicking a link like /about meant the browser would ask the server for a real file, say, about.html. The server would return it, and the browser would render it. Simple.
But React flipped that idea on its head. Now, when you visit a React app, your browser just loads a single file: index.html. From there, React wakes up, takes over, and starts managing the whole experience. It decides what to show based on the URL, not by loading a new HTML file, but by rendering a new component in the same DOM.
But here’s the rub: Netlify, by default, still expects that old model. If it gets a request for /about, it looks for a file or folder called /about in your deployed files. If it doesn’t find one, which it won’t, because React didn’t make one, it throws a 404 error.
The Fix: A Redirect With Meaning
How is your netlify.toml fix works?
To solve this, you need to tell Netlify:
“If someone visits any route, just serve index.html, and let React handle the routing.”
That’s exactly what this config does:
Toml
Create a file: netlify.toml in the root folder and add the redirections
# netlify.toml
[[redirects]]
from = “/*”
to = “/index.html”
status = 200
What does it mean:
from = “/*” → Match all routes (e.g. /, /about, /contact, /blog/post/5)
to = “/index.html” → Serve the index.html file instead
status = 200 → Pretend this is a successful page load (not a redirect)
So now:
You visit /about
Netlify sees it’s not a real file
Instead of a 404, it serves index.html
React boots up and sees /about
React Router renders the correct component!
What is netlify.toml?
netlify.toml is Netlify’s configuration file. It tells Netlify:
How to build your app
What to do with specific paths (redirects)
How to treat headers, caching, serverless functions, etc.
When Jordan Walke created React, he asked a bold question: “What if the browser handled everything, not the server?” That changed everything. Around the same time, Mathias Biilmann, one of the people behind Netlify, was dreaming of a web where developers could just push code and go live, no server headaches, no complex setups.
How to Fix Memory Leaks in React
A memory leak is a commonly faced issue when developing React applications. It causes many problems, including:
affecting the project’s performance by reducing the amount of available memory.
slowing down the application
crashing the system
So, you need to eliminate memory leak issues.
You may encounter the following warning message in React applications when working with asynchronous calls:
Can't perform a React state update on an unmounted component. This is a no-op, but it indicates a memory leak in your application. To fix, cancel all subscriptions and asynchronous tasks in a useEffect cleanup function.
React can’t detect memory leaks directly, but it introduces a warning to guide you to help figure them out on your own.
Primary Causes Of Memory Leaks
React components that perform state updates and run asynchronous calls can cause memory leak issues if the state is updated when the component is unmounted. Here is a normal scenario that causes this memory leak issue.
The user performs an action that triggers an API handler to fetch data from the API
After that, a user clicks on a link, which navigates to another page before completing step #1.
Now, the first action completes and passes the data retrieved from the API and the call function, which updates the state.
Since the component was unmounted and the function is being called on the component that is no longer mounted, it causes the memory leak issue, and on the console, you will see the warning message.
Example for unsafe code:
const [value, setValue] = useState('checking value...');
useEffect(() => {
    fetchValue().then(() => {
      setValue("done!"); // ⚠️ what if the component is no longer mounted ?
      // we got console warning of memory leak
    });
}, []);
Fixes for Memory Leaks
There are a few ways to eliminate the memory leak issue. Some of them are as follows:
- Using Boolean Flag
const [value, setValue] = useState('checking value...');
useEffect(() => {
let isMounted = true;
fetchValue().then(() => {
      if(isMounted ){
      setValue("done!"); // no more error
      }
    });
   return () => {
    isMounted = false;
    };
}, []);
In the above code, I've created a boolean variable isMounted, whose initial value is true. When isMounted is true, the state is updated and the function is returned. Else if the action is unmounted before completion, then the function is returned with isMounted as false. This ensures that when a new effect is to be executed, the previous effect will be taken care of.
- Using AbortController
import { useEffect, useState } from "react";

const userApiUrl = "<https://jsonplaceholder.typicode.com/users>";

export function useFetchUser(userId) {
  const [userData, setUserData] = useState({});
  const [loading, setLoading] = useState(false);

  useEffect(() => {
    const controller = new AbortController();
    const signal = controller.signal;

    setLoading(true);
    fetch(`${userApiUrl}/${userId}`, { signal })
      .then((response) => response.json())
      .then((data) => {
        setUserData(data);
      })
      .catch((error) => {
        if (error.name === 'AbortError') {
          console.log('Fetch aborted');
        } else {
          console.error('Fetch error:', error);
        }
      })
      .finally(() => {
        setLoading(false);
      });

    return () => {
      controller.abort(); // Abort fetch on cleanup
    };
  }, [userId]);

  return { userData, loading };
In the above code, I've used AbortController to the unsubscribe effect. When the async action is completed, I abort the controller and unsubscribe the effect.
- Using use-state-if-mounted
const [value, setValue] = useStateIfMounted('checking value...');
    useEffect(() => {
        fetchValue().then(() => {
          setValue("done!"); // no more error
        });
    }, []);
In the above code, I've used a hook that works just like React's useState, but it also checks that the component is mounted before updating the state!
This One Vite Plugin Made My React Dev Server 5x Faster
If you are building a large React app with dozens (or hundreds) of components, you have probably stared at your terminal waiting for the dev server to restart after every tiny change. That’s where I was — until one plugin changed everything.
The Problem: Slow Refreshes, Big Component Trees
Our app isn’t small. We’re talking:
~300 components
Nested dynamic imports
Babel, styled-components, and a few legacy polyfills are still hanging around
With every file change, especially in deeper parts of the tree, Vite’s HMR (Hot Module Replacement) slowed down, sometimes taking 3-4 seconds just to reflect changes on the browser.
That doesn’t sound like a lot … until you make 100 changes a day.
The Curprit: Babel Bottlenecks
At first, we blamed our state management library. Then maybe the CSS-in-JS setup. But after digging in, we turned out that Babel was the bottleneck.
Even though Vite is fast by design, it is still the default for using Bebels for JSX transforms when your setup involves certain plugins. But Babel is, let’s just say… not known for speed.
The Fix: vite-plugin-swc to the Rescue
That’s when I came across vite-plugin-swc. It swaps Babel for SWC, a Rust-based compiler that is orders of magnitude faster.
Here’s how I added it to our project.
Before: Babel (default)
npm run dev
# React dev server starts in ~6.2s
# File change hot reload: ~3.5s average
After: SWC
npm install -D vite-plugin-swc
Then update your vite.config.ts:
import { defineConfig } from 'vite'
import react from '@vitejs/plugin-react'
import swc from 'vite-plugin-swc'
export default defineConfig({
  plugins: [
    react(),   // still needed
    swc()      // replaces babel underneath
  ]
})
Benchmark Results
| Metric                 | Before (Babel) | After (SWC) |
| ---------------------- | -------------- | ----------- |
| Cold start time        | 6.2s           | 1.8s        |
| HMR reload (deep file) | 3.5s           | 0.6s        |
| Dev memory usage       |  ~1.2 GB       |  ~600 MB    |
A nearly 5x improvement in hot reload speed, and 3x faster cold starts.
Bonus: vite-plugin-inspect
If you want to debug your Vite plugins, I also recommend vite-plugin-inspect. It lets you peek into what transformations your plugins are doing — and see if anything is slowing things down.
Just install it:
npm i -D vite-plugin-inspect
Then in vite.config.ts:
import Inspect from 'vite-plugin-inspect'
export default defineConfig({
  plugins: [Inspect()],
})
Then go to http://localhost:5173/__inspect/ during dev to see the internals.
Under the Hood: Why SWC is Faster?
Here’s a high-level breakdown of what’s happening:
Before:
JSX → Babel transform (slow) → JS → Vite HMR
After:
JSX → SWC transform (compiled with Rust) → JS → Vite HMR
SWC does the same transformations but uses native Rust binaries instead of JavaScript to parse and compile the code.
Simplified architecture: Vite + Babel vs. Vite + SWC
If you’ve ever used esbuild, it is a similar philosophy — native tooling = faster tooling.
Loading third-party scripts in React
A few weeks ago, I had to deal with a nasty bug in a React SPA Application.
After thorough debugging and investigation, I found that it is related to how we load and use third-party scripts.
As you can imagine, there is no single best approach.
It really depends on what we are trying to achieve and what trade-offs we are ready to make.
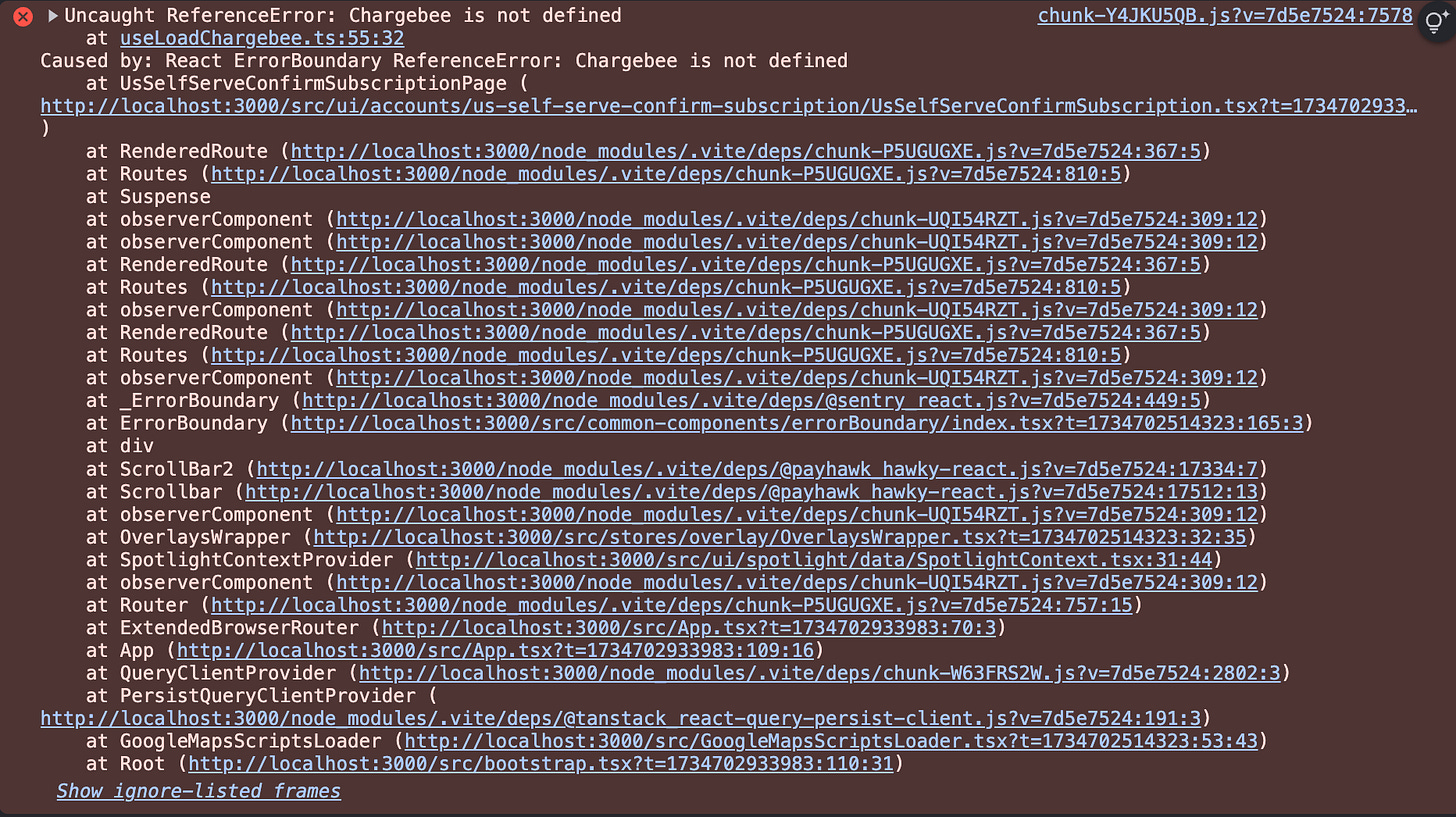
This was the error I was getting from time to time. It was a sporadic failure.
For context, Chargebee is a 3rd party tool for dealing with payment methods, cards, and subscriptions, etc.
Regarding the application, there’s a billing details page where customers are prompted to enter their billing card.
We were loading a chargebee.js script so we could embed their iframes.
After the script is loaded, a Chargebee object is attached to the window object and can be used for displaying iframes or triggering other functionality.
Regarding the error, it appeared that sometimes the Chargebee object is not added to the window object.
That made me think about the way we load the chargebee.js script is not optimal, and there are unhandled corner cases.
Loading third-party scripts through useLayoutEffect and delaying
After some debugging, I’ve found a piece of code that was responsible for loading all 3rd party scripts, including chargebee.js.
This code was executed when the whole React application is bootstrapped.
useLayoutEffect(() => {
  const timer = setTimeout(() => {
    INITIAL_SCRIPTS_TO_PREFETCH.forEach(({ url, fileUrl }) => {
      prefetch(url, fileUrl, 'script');
    });
  }, 1200);

  return () => {
    clearTimeout(timer);
  };
}, []);
This code inside useEffectLayout runs synchronously after React updates the DOM.
It set a timer to delay the loading of third-party scripts.
This improves the overall application performance because the application is not blocked to wait for these scripts to load and can continue rendering the entire tree.
That is a smart way to load 3rd party scripts and will work 99.9% of the cases, especially if the script is not critical.
However, there is one caveat. What will happen when the first page we want to open is using one of these scripts?
Well, we probably get an error because the delay of 1.2 seconds might be too big.
So this was causing the Uncaught Reference Error: XXX is not defined error from above.
If we want to ensure that the script is loaded, we must look for another way to achieve that.
Loading 3rd Party Scripts through conditional rendering and loading
To mitigate the error from above, we must ensure that the script is loaded before referring the window.Chargebee object.
Otherwise, we will get the same error: Uncaught Reference Error: Chargebee is not defined.
Also, we don't want to downgrade the current performance.
Loading the script before the app is bootstrapped is not an option since this script is necessary for 1% of the page.
It is the easiest option, but not the best one.
For example, it’s not okay to add the script loading inside the index.html file because we can’t delay its loading, and it will hurt the performance.
Since the script is used only on a small number of pages, we can create a custom hook responsible for its loading.
We can expose the loading state, which can be used by the clients of the hook.
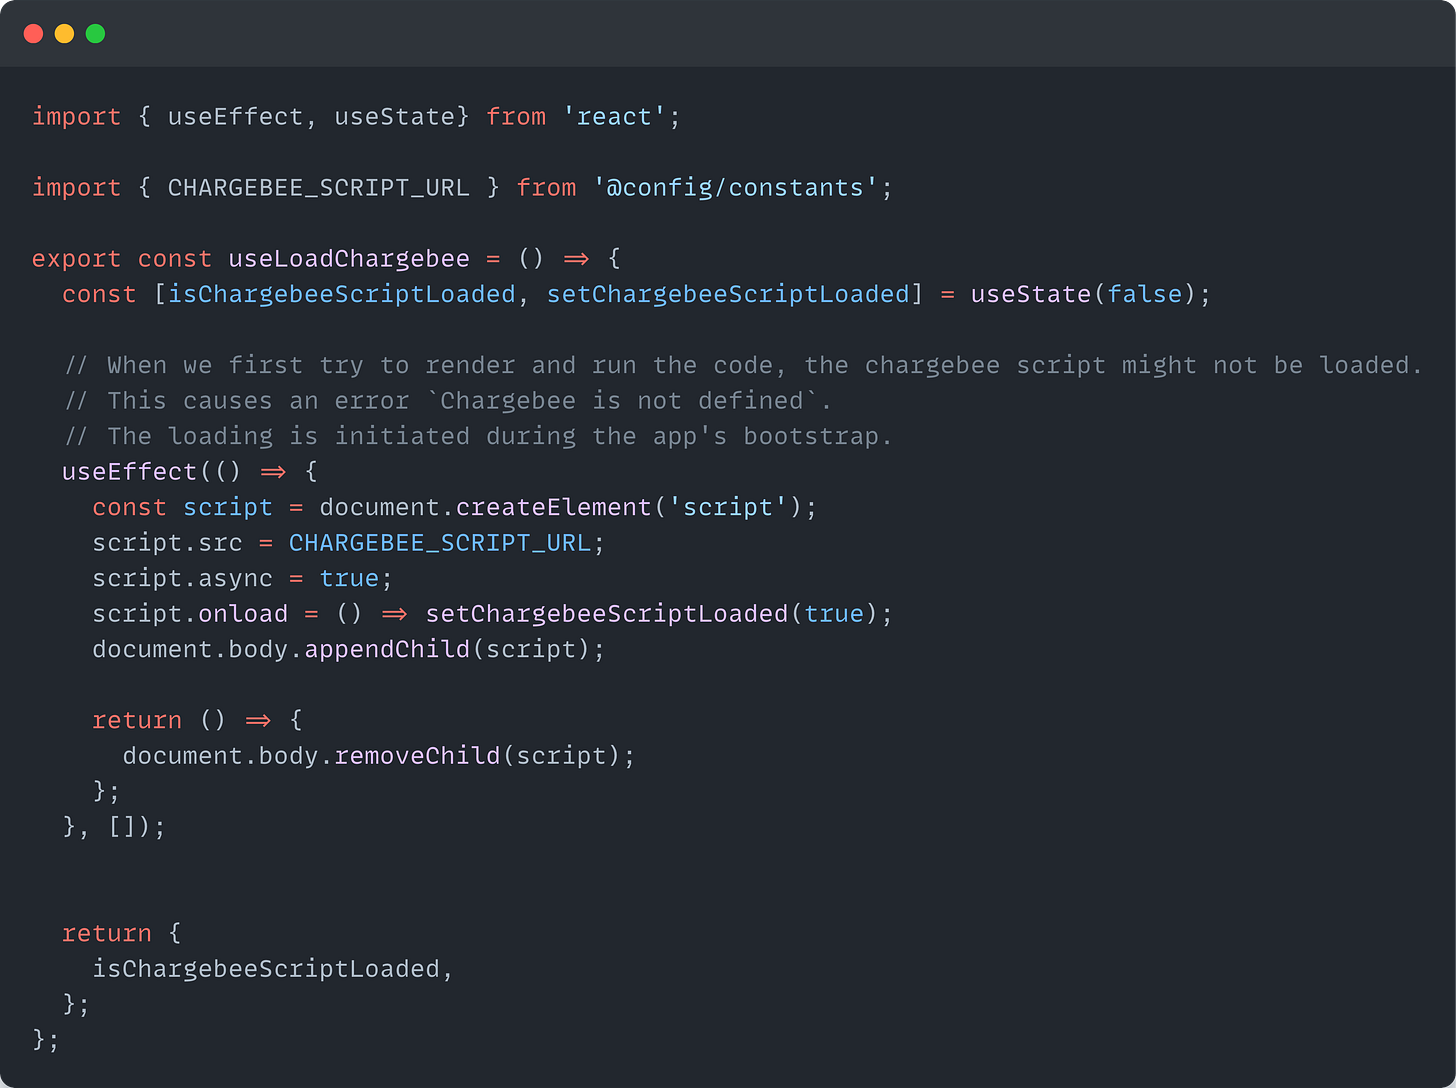
This is another great way to load a 3rd party script and provide feedback on whether the script is loaded or not.
This way, we provide the flexibility to the clients of our custom hooks to do whatever they want - render a spinner, return a fallback message, etc.
We are using a <script>’s onLoad functionality to know that the script is loaded successfully.
The approach is suitable for corner cases where the loading script is critical and might break the UI.
In our case, if the user is prompted directly to the BillingDetails page, they will get an error because the script is not loaded.
For other scenarios, this overhead and complexity are not needed and are not recommended.
Recap
Loading third-party scripts the right way is essential to ensure good UX and application performance.
Use useLayoutEffect + Delay for loading 3rd-party scripts when they are not critical to the application's business logic.
Use conditional rendering + loading inside a custom hook for loading 3rd-party scripts when you want to make sure the script is loaded and provide feedback.
10 Ways to better organize and design your React application
When building a React application, the way you organize and design your code has a tremendous impact. It can either help you and your team find things easier, make updates quicker, and better handle the app as it grows, or make everything much worse.
It’s the same principle as with buildings. If you have laid the foundations and organized the building well, it can last longer, and its residents will be happy. Otherwise, the building might fall.
Sharky foundation leads to shake results.
- Group components by Domain Responsibility
The organization of files and folders in a React application is crucial for maintaining clarity and manageability. The easier it is to navigate throughout the project, the less time developers spend navigating and wondering where and how to change stuff.
It’s important to structure files not just by technical roles but by their domain responsibilities.
⛔ Avoid grouping components by technical responsibilities.
/src
│   ...
│
└───components
│    │   Header.js
│    │   Footer.js
│    │   ...
└───containers
│    │   InvoicesContainer.js
│    │   PaymentProfilesContainer.js
│    │   ...
└───presenters
│     │   InvoicesPresenter.js
│     │   PaymentProfilesPresenter.js
│     │   ...
│   ...
At first glance, this feels clean — everything in its “bucket“. But as the app grows, so does the complexity. Updating something like the cart feature means bouncing between components/, store/, services/, and utils/. This separation slows you down and creates mental overhead.
✅ Prefer grouping components by domain responsibilities by pages(routes) or modules(domains).
/src
│   ...
│
└───pages --> Actual Pages representing different parts of the app
│    └───billing
│    │    └───invoices
│    │    │   │   index.js
│    │    │   │   ...
│    │    └───payment-profiles
│    │    │   │   index.js
│    │    │   │   ...
│    │    │   ...
│    │    │   index.ts
│    └───login
│        │   index.js
│        │   ...
│   ...
Now, everything related to the cart lives in one folder. You don’t need to mentally piece together the UI, API, and logic — it’s all scoped and colocated.
As you team scales, different squads might handle different domains: authentication, payments, dashboard, etc. With a file-type structure, teams often overlap and touch shared folders, which leads to conflicts and tight coupling. Each team owns everything inside their domain — components, API calls, state management, and styles. This clear boundary makes parallel development much easier. Teams can refactor their own features without worrying about breaking others.
Also, where features are self-contained, refactoring becomes safer. You can confidently update the logic inside features/cart/ knowing it won’t affect unrelated features like auth or dashboard.
You can even write integration tests specific to a feature folder or migrate an entire module to a different project if needed.
- Put components into folders
For complex components, it’s better to organize them into separate folders where you can list their subcomponents.
⛔ Avoid having a single file for each component.
/src
│
└───components
│   │   Accordion.ts
|   |   Alert.ts
│   │   ...
│
└───...
✅ Prefer having a single folder for each component.
/src
│
└───components
│   │   ...
│   └───accordion
│   │    │   index.ts
│   │    │   ...
│   └───alert
│       │   index.ts
│       │   types.ts
│       │   Alert.tsx
│       │   AlertTitle.tsx
│       │   Alert.stories.tsx
│       │   Alert.test.tsx
│       │   ...
│
└───...
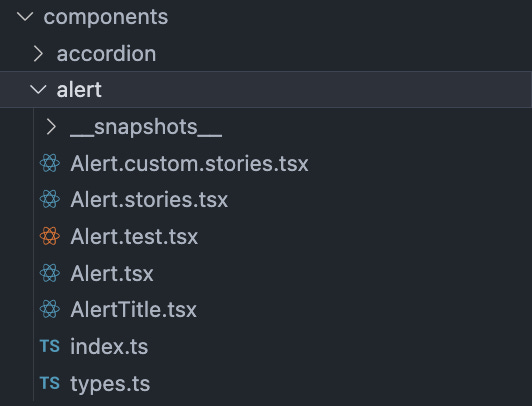
- Favor Absolute Paths
Using the right type of paths in your project can simplify navigation and maintenance, especially as your project grows. Refactoring will be much easier.
⛔ Avoid using relative paths, which can become hard to manage and error-prone in large projects.
import { formatDate } from '../../../utils';
✅ Prefer using absolute paths, which improve readability and make refactoring easier.
import { formatDate } from '@common/utils';
- Use a common module
Common modules play a vital role in avoiding redundancy and promoting reusability across your application.
You can store utility methods, constants, calculations, etc., in this common module.
This centralization helps with better management and reuse.
⛔ Avoid spreading common utilities and components across various locations in your project.
✅ Prefer having a dedicated common module for all generic components and utilities used across different pages or modules.
/src
│   ...
│
└───common
│    └───components
│    │    └───dialogs
│    │    │   │   index.js
│    │    └───forms
│    │    │   │   index.js
│    │    │   ...
│    └───hooks
│    │    │   useDialog.js
│    │    │   useForm.js
│    │    │   ...
│    └───utils
│    │    │   ...
└───pages
│    └───billing
│    │    └───invoices
│    │    │   │   index.js
│    │    │   │   ...
│   ...
- Abstracts external libraries and modules
The integration of external libraries or modules requires careful consideration to ensure future flexibility and easier maintenance.
Using 3rd party libraries or components directly in your project can lead to issues if the external APIs change, or you want to replace the components or library with something else. Then, you have to go through all the places it is being used instead of updating them only in a single place.
Wrapping the 3rd party or module in a custom component allows you to maintain a consistent API within your application and makes it easier to replace the module in the future if needed.
⛔ Avoid direct use of 3rd party components or libraries in your project.
// XYZ_Component.ts (file 1)
import { Button } from 'react-bootstrap';

// ABC_Component.ts (file 2)
import { Button } from 'react-bootstrap';
✅ Prefer wrapping external modules or components in a custom component.
// XYZ_Component.ts (file 1)
import { Button } from '@components/ui';

// ABC_Component.ts (file 2)
import { Button } from '@components/ui';
- Manage dependencies between modules/pages
Managing dependencies widely by centralizing commonly used resources in a shared common module can significantly enhance the code’s manageability and reusability.
If something is used more than once across two or more pages and modules, consider moving it to the common module.
Storing shared components or utilities in a common module eliminates the need to duplicate code across different parts of the application, making the codebase leaner and easier to maintain.
It also makes clear dependencies per module and page.
- Keep things as close as where they are used (LoB)
The easier and faster for a developer to find a piece of code, the better.
The principle of Locality of Behaviour (LoB) suggests organizing the codebase so that components, functions, and resources are located near where they are used within an application. This strategy promotes a modular architecture, where each part of the system is self-contained.
This improves readability and maintainability. When developers work on a feature, they have all the related code in proximity which makes it easier to understand and modify. It also reduces the cognitive load of tracing through distant files and modules.
/src
│   ...
│
└───common
│    └───components
│    │    │   ...
│    └───hooks
│    │    │   ...
│    └───utils
│    │    │   ...
└───pages
│    └───billing
│    │    └───invoices
│    │    │   │   index.js
│    │    │   │   ...
│    │    └───payment-profiles
│    │    │   │   index.js
│    │    │   │   ...
│    │    └───hooks
│    │    │   │   index.js
│    │    │   │   useInvoices.js
│    │    │   │   usePaymentProfiles.js
│    │    │   │   ...
│    │    └───utils
│    │    │   │   index.js
│    │    │   │   formatAmount.js
│    │    │   │   ...
│   ...
- Be careful with utility functions
Utility functions typically handle reusable snippets of code that aren’t tied to the business rules and the application logic. They would rather provide general assistance across the system.
Utility functions should remain pure and purpose-specific, focusing on general tasks like formatting dates, converting data types, etc. Mixing them with business logic, like how data is processed or business-specific decisions, can make these utilities overly complex and less reusable.
Also, business logic and rules change more often than utility functions, so by separating them, you will improve the overall maintainability of the code.
⛔ Avoid adding business logic to utils.
✅ Prefer extracting business logic into separate functions.
- Be careful with business logic
Integrating business logic directly into UI components can lead to problems like harder-to-test code and poor separation of concerns. This can also lead to bulky components that are difficult to manage and update.
In React, custom hooks are a great tool for abstracting business logic from components. By using hooks, you can encapsulate business logic and keep your UI clean and focused on rendering.
This separation not only makes your component more modular and easier to manage but also enhances reusability and maintainability.
⛔ Avoid mixing business logic with UI.
✅ Prefer separating business logic from UI. Use custom hooks.
- Pin Dependencies
When managing a JavaScript project, your package.json plays a crucial role. It defines your project’s dependencies - the external packages your project relies on to function. Pinning these dependencies refers to specifying exact versions of these packages rather than allowing version ranges.
Pinning dependencies ensures that everyone working on the project, as well as the production environment, uses the exact same version of each package, eliminating discrepancies that might occur due to minor updates and patches.
⛔ Avoid using version ranges in your package.json.
{
  "dependencies": {
    "express": "^4.17.1",
    "react": ">=16.8.0"
  }
}
✅ Prefer using exact versions in your package.json.
{
  "dependencies": {
    "express": "4.17.1",
    "react": "16.8.0"
  }
}
https://blog.stackademic.com/react-folder-file-structure-patterns-and-tips-part-1-b8e55bda446f
Use the Atomic Design Pattern to structure your React application
As we build scalable applications in React, we often encounter challenges in managing the growing complexity of component structures. The Atomic Design Pattern has emerged as a powerful methodology for organizing and structuring applications. This pattern, inspired by chemistry, breaks downs the interface into multiple fundamental building blocks, promoting a more modular and scalable approach to application design. It serves as a powerful methodology to enhance the readability, maintainability, and flexibility of our application code.
The Atomic Design Pattern was introduced by Brad Frost and Dave Olsen and is based on the idea that a design system should be broken down into its smallest parts, which are used to build up increasingly complex and reuseable components. The goal is not to create a strict hierarchy but rather to provide a mental model to better understand and create user interfaces.
The Atomic Design methodology breaks down design into 5 distinct levels:
Atoms: These are the basic building blocks of your application, like an input field, a button, or a form label. In react, these would represented as individual components. They serve as foundational elements that are not exactly useful on their own but are fundamental for building more complex components.
Molecules: Molecules are groups of atoms that are combined together to form a functional unit. For example, a form might be a molecule that includes atoms like labels, an input field, and a submit button.
Organisms: Organisms are relatively complex UI components composed of groups of molecules and/or atoms. These are langer sections of an interface like a header, footer, or navigation bar and therefore can have their own states and functionality.
Templates: Templates are page-level objects that place components into a layout and articulate the design’s underlying content structure. They usually consist of groups of organisms, representing a complete layout.
Pages: Pages are specific instances of templates that show what a UI looks like with real representative content in place. These pages serve as ecosystems that display different template renders.
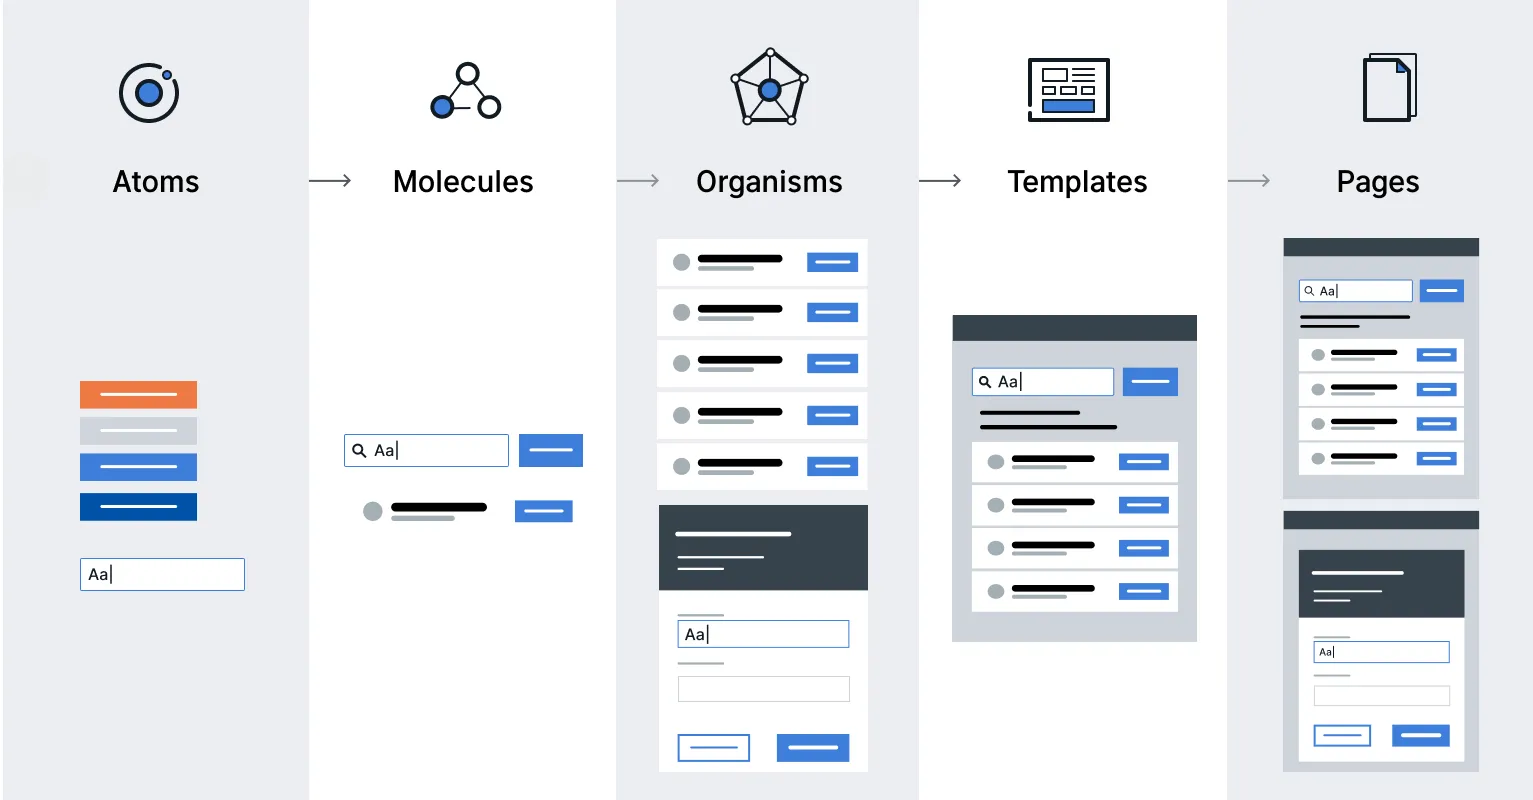
To implement Atomic Design in a React application, we can consider the following key points:
Component Categorization: Organize the components into atoms, molecules, organisms, templates, and pages. This categorization should be reflected in our project’s file structure.
State Management: we also need to decide how the state should be managed across different levels of components. Atoms and molecules might not hold state, while organisms and templates might need to.
Documentation: It’s important to have thorough documentation of its components and usage. This can be facilitated by tools like Storybook, as this will allow us to create a living style guide.
Let’s see a very simple example of how a React application built on the atomic design principle would look structurally like.
import React from 'react';

const noop = () => {};

// Atoms
const Button = ({ onClick, children, type }) => <button type={type} onClick={onClick}>{children}</button>;
const Label = ({ htmlFor, children }) => <label htmlFor={htmlFor}>{children}</label>;
const Input = ({ id, type, onChange, value = "" }) => <input id={id} type={type} onChange={onChange} value={value} />;
const Search = ({ onChange }) => <input type="search" onChange={onChange} />;
const NavMenu = ({ items }) => <ul>{items.map((item) => <li>{item}</li>)}</ul>;

// Molecules
const Form = ({ onSubmit }) => (
  <form onSubmit={onSubmit}>
    <Label htmlFor="email">Email:</Label>
    <Input id="email" type="email" onChange={noop} />
    <Button type="submit" onClick={noop}>Submit</Button>
  </form>
);

// Organisms
const Header = () => (
  <header>
    <Search onChange={noop} />
    <NavMenu items={[]} />
  </header>
);

const Content = ({ children }) => (
  <main>
    {children}
    <Form onSubmit={noop} />
  </main>
);

// Templates
const MainTemplate = ({ children }) => (
  <>
    <Header />
    <Content>{children}</Content>
  </>
);

// Pages
const HomePage = () => (
  <MainTemplate>
    <h2>My Form</h2>
    <p>This is a basic example demonstrating Atomic Design in React.</p>
  </MainTemplate>
);
Why Atomic Design?
The Atomic Design Pattern aligns perfectly with React’s component-based architecture. It allows us to:
Promote reusability: By breaking down the interface into the smallest parts, it becomes easier to reuse components and leverage modular composition across different parts of an application or even across different projects.
Ensure Consistency: Atomic Design helps maintain UI consistency, which is crucial for user experience and brand identity.
Facilitates Maintenance: When components are well-organized, it becomes much simpler to update or maintain them over time.
Improve Collaboration: A shared design language based on Atomic Design Principles can enhance communications, usage, and contributions since it is easier to understand the codebase.
Promotes Code Quality: As we create a sub-ecosystem for each component feature, each component or service has its isolated environment, including styles, actions, and tests. This isolation makes testing more effective and ensures consistent code quality.
While Atomic Design offers many benefits, we would want to ensure that we implement this principle to our advantage and not over-engineer. It can be easy to over-abstract components, which can lead to unnecessary complexity. Therefore, we should also keep an eye on performance implications when breaking down components into smaller pieces to reap the full benefits of this technique.
Event-Driven React with the Observer Pattern: A Clean Alternative to Prop Drilling
In React, prop drilling occurs when you need to pass data or callbacks through multiple layers or components to reach a deeply nested child. This will make your code harder to maintain and more error-prone. While solutions like React and Context API exist to centralize state management, they come with their own trade-offs:
Redux requires a significant amount of boilerplate code and can feel overkill for smaller applications.
Context API is simpler but can lead to unnecessary re-renders if not used carefully.
You may know that there are a lot of alternatives for Redux, e.g., Zustand. But all of them are just external libs, and we try to avoid props drilling without any help.
The Observer Pattern is a design pattern in which the object (the subject) maintains a list of its dependents (observers) and notifies them of state changes. This pattern is perfect for creating an event bus, a central communication channel where components can publish and subscribe to events.
By using an event bus, components can communicate directly without needing to pass props or rely on a global state management library. This approach promotes loose coupling and makes your code more modular and maintainable.

Here’s what we have:
Subject (Event Bus): There, we have methods like on(), off(), and emit().
Observers (Components): boxes represent a React component (Button, MessageDisplay). A button will emit an event
Event Flow (Arrows): from the Button component to the Event Bus (e.g., emit('buttonClicked')) and from the Event Bus to the MessageDisplay component (e.g., on('buttonClicked')).
Implementing an Even Bus In React
First, we will define a simple event bus class:
class EventBus {
  constructor() {
    this.listeners = {};
  }

  on(event, callback) {
    if (!this.listeners[event]) {
      this.listeners[event] = [];
    }
    this.listeners[event].push(callback);
  }

  off(event, callback) {
    if (this.listeners[event]) {
      this.listeners[event] = this.listeners[event].filter(
        (listener) => listener !== callback
      );
    }
  }

  emit(event, data) {
    if (this.listeners[event]) {
      this.listeners[event].forEach((listener) => listener(data));
    }
  }
}

const eventBus = new EventBus();
export default eventBus;
This EventBus class allows components to subscribe to events (on), unsubscribe from events (off), and emit events (emit).
A component can publish an event using the emit method:
import React from 'react';
import eventBus from './eventBus';

const Button = () => {
  const handleClick = () => {
    eventBus.emit('buttonClicked', { message: 'Button was clicked!' });
  };

  return <button onClick={handleClick}>Click Me</button>;
};

export default Button;
Another component can subscribe to the event using the on method:
import React, { useEffect, useState } from 'react';
import eventBus from './eventBus';

const MessageDisplay = () => {
  const [message, setMessage] = useState('');

  useEffect(() => {
    const handleButtonClick = (data) => {
      setMessage(data.message);
    };

    eventBus.on('buttonClicked', handleButtonClick);

    return () => {
      eventBus.off('buttonClicked', handleButtonClick);
    };
  }, []);

  return <div>{message}</div>;
};

export default MessageDisplay;
In this example, when the button is clicked, the MessageDisplay component updates its state to show the message emitted by the Button component.

Build Scalable Frontends With React’s Most Underrated Pattern: Behavior Layers
Most of us started in React thinking in components. A component renders a view, handles some local state, maybe fetches data, shows a loader, and responds to user interactions. For a while, this work just fine:
But as our app grows, so do our components:
They become a mixture of:
UI code
API logic
State management
Conditional rendering
Business rules
Suddenly, we are debugging a 400-line “Dashboard“ component that knows too much. Adding a new feature means tiptoeing around fragile useEffectand deeply nested if conditions. Moving anything feels risky.
In the codebase that I am working on, I see such issues.
That’s the point where many developers start wondering: “Is there a better way to organize my code?“.
Yes, there is. And it begins by rethinking how we structure concerns, not just into components and hooks, but into clear behavior layers.

The Problem with Component-Centric Thinking
React encourages composition. And that is a strength. But it also led many developers to rely entirely on components for the separation of concerns. We build monolithic components that:
Render UI
Fetch and transform data
Handle user input
Manage application state
Validate business logic
Why? Because it’s convenient. One file. One mental unit.
But this strategy breaks down fast:
Reusability suffers — you can’t use that fetching logic elsewhere.
Tests become harder — how do you unit test UI with API calls baked in?
Code becomes tangled — you touch one thing, and ten others react unexpectedly.
The issue isn’t React — it’s how we use it.
And that’s where Behavior Layers help us think bigger.
What are Behavior Layers?
Behavior Layers are a mental model — an architectural way to separate:
What something looks like (UI)
How it behaves (logic, state, interaction)
How it integrates with the world (data, services, side effects)
Think of it like this:

Each layer is a pure function in its own way:
UI: From data → HTML
Behavior: From intent → state transitions
Service: From inputs → side-effectful results
Let’s walk through each layer.
1. UI Layer: The Purest Expression of Your Design
Your UI layer should be predictable and reusable.
It knows nothing about where data comes from. It doesn’t fetch. It doesn’t mutate. It just receives props and renders markup.
function UserList({ users, onSearch }) {
  return (
    <>
      <input placeholder="Search..." onChange={(e) => onSearch(e.target.value)} />
      <ul>
        {users.map(user => (
          <li key={user.id}>{user.name}</li>
        ))}
      </ul>
    </>
  );
}
No useEffect. No useState. Just pure props in, UI out.
Because it doesn’t hold state or side-effects, it’s:
Easy to test
Easy to reason about
Easy to reuse across screens
UI components become visual building blocks, not logic holders.
2. Behavior Layer: The Brains Behind the UI
Now, how does the UI get data? Who tracks the search input? Where do we debounce, or transform, or conditionally load?
That’s the Behavior Layer.
This layer lives in a custom hook. It’s responsible for:
Local UI state
Effects (but UI-related ones)
Coordination between UI pieces
User interaction logic
function useUserListBehavior() {
  const [searchTerm, setSearchTerm] = useState('');
  const { data: users = [] } = useQuery(['users', searchTerm], () =>
    userService.fetchUsers(searchTerm)
  );

  return {
    users,
    onSearch: setSearchTerm
  };
}
Notice:
This hook manages state
It can handle debouncing if needed
It does not care about rendering
By isolating behavior, we unlock logic reuse.
We can plug the same behavior into different UIs — maybe a sidebar user picker, or an admin dashboard, or a modal — without duplicating a line of logic.
3. Service Layer: Business Logic, Pure and Focused
This layer lives in a plain JavaScript module. No hooks, no JSX, just functions.
// userService.js
export async function fetchUsers(search) {
  const res = await api.get('/users', { params: { q: search } });
  return res.data;
}
This layer handles:
API calls
Caching (optional)
Business logic
Persistence (localStorage, DB)
We can test this with plain Jest.
We can reuse it across React Native, server-side rendering, even non-React apps.
It’s the most portable layer of all.
A Complete Picture: Plugging It Together
function UsersPage() {
  const { users, onSearch } = useUserListBehavior();

  return <UserList users={users} onSearch={onSearch} />;
}
Here’s what we gain:
Clean separation: UI doesn’t care about state or fetches
Testability: Each part can be unit-tested independently
Reusability: same logic across various UIs
Debuggability: Smaller surfaces mean clearer stack traces
This is how scalable frontends feel: decoupled, thoughtful, and change-friendly.
Advanced Example: Modal with Shared Behavior
Imagine a ProductSelectModal used across five pages.
Old way:
Each modal fetches its own product list
Each handles pagination, search, and filters separately
Any logic change means updating five places
Behavior Layers way:
UI:
ProductSelectModalViewBehavior:
useProductSelectionBehavior()Service:
productService.fetchProducts(...)
Now you just plug the same behavior into multiple modals!
No logic duplication. Only the presentation varies.
Anti-Patterns Fixed by Behavior Layers
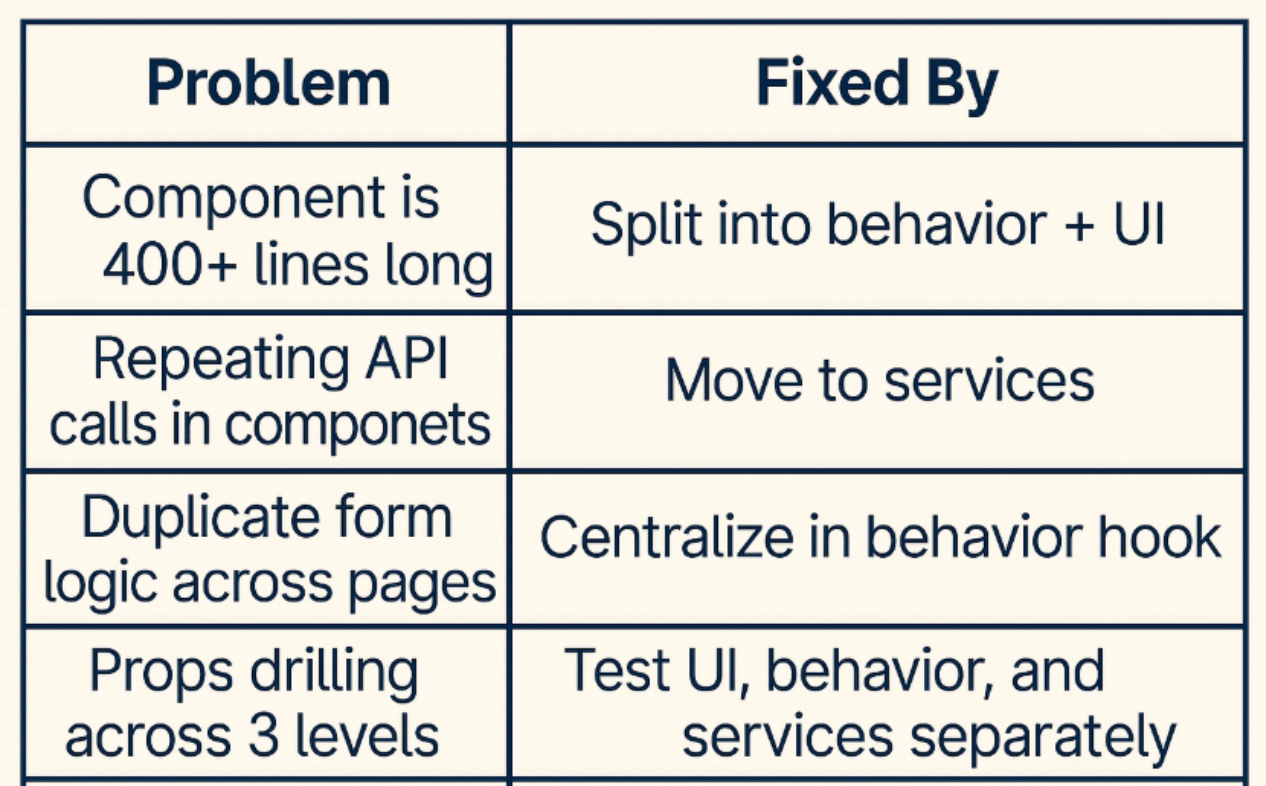
Behavior Layers give us:
A clean separation of visual and logical concerns
A way to reuse without over-abstracting
An approach that scales with the app
As our products grow, the decisions we make today shape our ability to adapt tomorrow.
The useState Debugging Techniques
useState looks simple, but debugging it can be surprisingly complex.
The basic approach, adding console.log everywhere — often fails to reveal the real issues. State updates are asynchronous, React batches updates, closures can strap stale values, and race conditions hide in async operations.
Most debugging tutorials stop at React DevTools and console.log. But there is a whole layer of advanced debugging techniques that can save you hours of troubleshooting.
In this section, I am sharing the practice debugging strategies that go beyond the basics. There are surgical techniques that reveal exactly what is happening with your state updates, when they happen, and they might be failing.
The core challenge: useState involves asynchronous updates, closure behavior, and React’s batching system that can create subtle bugs.
// This looks simple...
const [count, setCount] = useState(0);

// But this behavior might surprise you
const handleClick = () => {
  setCount(count + 1);
  setCount(count + 1);
  // Why is count only increased by 1?
};
Common debugging challenges:
Closure traps capture stale values
Batched updates don’t execute immediately
Asynchronous rendering creates timing issues
Object mutations break reference equality
Race conditions in async operations
Check out those techniques in this article!
8 Advanced React + TypeScript Patterns Every Developer Should Master
Most React development has evolved far beyond simple component creation. With TypeScript’s powerful type system, we can build more robust, maintainable applications. But are you leveraging the full potential of this combination?
These 8 advanced patterns will elevate your React + TypeScript skills from intermediate to expert level. Each pattern solves real-world problems you will encounter in production applications.
https://medium.com/@genildocs/advanced-typescript-patterns-for-react-forms-3115b34a0784
Why These Patterns Matter
While basic React + TypeScript gets you started, these advanced patterns provide:
Type Safety: Catch errors at compile time, not runtime
Developer Experience: Better Intellisense and refactoring support
Code Maintainability: Self-documenting code that is easier to understand
Performance: Optimizations that scale with your application
Let’s dive into these patterns that separate senior developers from the rest.
Generic Component Props with Constraints
Instead of creating multiple components, use generic constraints to build reusable, flexible components.
interface SelectOption<T> {
  value: T;
  label: string;
  disabled?: boolean;
}

interface SelectProps<T extends string | number> {
  options: SelectOption<T>[];
  value: T;
  onChange: (value: T) => void;
  placeholder?: string;
}

function Select<T extends string | number>({
  options,
  value,
  onChange,
  placeholder
}: SelectProps<T>) {
  return (
    <select
      value={value}
      onChange={(e) => onChange(e.target.value as T)}
    >
      {placeholder && <option value="">{placeholder}</option>}
      {options.map((option) => (
        <option
          key={option.value}
          value={option.value}
          disabled={option.disabled}
        >
          {option.label}
        </option>
      ))}
    </select>
  );
}

// Usage with full type safety
const statusOptions: SelectOption<'active' | 'inactive' | 'pending'>[] = [
  { value: 'active', label: 'Active' },
  { value: 'inactive', label: 'Inactive' },
  { value: 'pending', label: 'Pending' }
];

<Select
  options={statusOptions}
  value={status}
  onChange={setStatus} // Fully typed!
/>
👉Real-world use case: Building a design system where components need to work with different data types while maintaining type safety.
Discriminated Unions for Complex State
Handle complex state scenarios with discriminated unions that make impossible states impossible.
type AsyncState<T, E = Error> =
  | { status: 'idle' }
  | { status: 'loading' }
  | { status: 'success'; data: T }
  | { status: 'error'; error: E };

interface UseAsyncResult<T, E = Error> {
  state: AsyncState<T, E>;
  execute: () => Promise<void>;
  reset: () => void;
}

function useAsync<T, E = Error>(
  asyncFunction: () => Promise<T>
): UseAsyncResult<T, E> {
  const [state, setState] = useState<AsyncState<T, E>>({ status: 'idle' });

  const execute = useCallback(async () => {
    setState({ status: 'loading' });
    try {
      const data = await asyncFunction();
      setState({ status: 'success', data });
    } catch (error) {
      setState({ status: 'error', error: error as E });
    }
  }, [asyncFunction]);

  const reset = useCallback(() => {
    setState({ status: 'idle' });
  }, []);

  return { state, execute, reset };
}

// Usage
function UserProfile({ userId }: { userId: string }) {
  const { state, execute } = useAsync(() => fetchUser(userId));

  // TypeScript knows exactly what properties are available
  return (
    <div>
      {state.status === 'loading' && <div>Loading...</div>}
      {state.status === 'error' && <div>Error: {state.error.message}</div>}
      {state.status === 'success' && <div>Hello, {state.data.name}!</div>}
      <button onClick={execute}>Load User</button>
    </div>
  );
}
👉 Real-world use case: Managing API calls, form submissions, or any async operations where you need to handle multiple states cleanly.
Higher-Order Component with Proper Typescript
Create HOCs that preserve component props and add functionality without losing type information:
type WithLoadingProps = {
  isLoading: boolean;
};

function withLoading<T extends WithLoadingProps>(
  WrappedComponent: React.ComponentType<T>
) {
  return function WithLoadingComponent(props: T) {
    if (props.isLoading) {
      return (
        <div className="loading-spinner">
          <div>Loading...</div>
        </div>
      );
    }

    return <WrappedComponent {...props} />;
  };
}

// Usage
interface UserListProps extends WithLoadingProps {
  users: User[];
  onUserClick: (user: User) => void;
}

const UserList: React.FC<UserListProps> = ({ users, onUserClick }) => (
  <div>
    {users.map(user => (
      <div key={user.id} onClick={() => onUserClick(user)}>
        {user.name}
      </div>
    ))}
  </div>
);

const UserListWithLoading = withLoading(UserList);

// All props are properly typed, including the added isLoading
<UserListWithLoading
  users={users}
  onUserClick={handleUserClick}
  isLoading={isLoading}
/>
👉 Real-world use case: Adding cross-cutting concerns like logging, authentication, or loading states to multiple components.
Conditional Props with TypeScript
Create components with mutually exclusive props using conditional types.
type BaseButtonProps = {
  children: React.ReactNode;
  className?: string;
  disabled?: boolean;
};

type ButtonProps = BaseButtonProps & (
  | { variant: 'link'; href: string; onClick?: never }
  | { variant: 'button'; href?: never; onClick: () => void }
);

function Button(props: ButtonProps) {
  if (props.variant === 'link') {
    return (
      <a
        href={props.href}
        className={`btn-link ${props.className || ''}`}
      >
        {props.children}
      </a>
    );
  }

  return (
    <button
      onClick={props.onClick}
      disabled={props.disabled}
      className={`btn ${props.className || ''}`}
    >
      {props.children}
    </button>
  );
}

// TypeScript enforces the correct props based on variant
<Button variant="link" href="/home">Go Home</Button>
<Button variant="button" onClick={handleClick}>Click Me</Button>

// This would cause a TypeScript error:
// <Button variant="link" onClick={handleClick}>Invalid</Button>
👉 Real-world use case: Building flexible UI components that can render as different elements based on props, like buttons that can be links or form elements.
Advanced Ref Forwarding with Generic Components
Properly forward refs in generic components while maintaining type safety.
interface InputProps<T> {
  value: T;
  onChange: (value: T) => void;
  placeholder?: string;
  validator?: (value: T) => string | null;
}

function Input<T extends string | number = string>(
  { value, onChange, placeholder, validator }: InputProps<T>,
  ref: React.ForwardedRef<HTMLInputElement>
) {
  const [error, setError] = useState<string | null>(null);

  const handleChange = (e: React.ChangeEvent<HTMLInputElement>) => {
    const newValue = e.target.value as T;

    if (validator) {
      const validationError = validator(newValue);
      setError(validationError);
    }

    onChange(newValue);
  };

  return (
    <div>
      <input
        ref={ref}
        value={value}
        onChange={handleChange}
        placeholder={placeholder}
      />
      {error && <span className="error">{error}</span>}
    </div>
  );
}

const ForwardedInput = React.forwardRef(Input) as <T extends string | number = string>(
  props: InputProps<T> & { ref?: React.ForwardedRef<HTMLInputElement> }
) => ReturnType<typeof Input>;

// Usage with full type safety and ref forwarding
const emailRef = useRef<HTMLInputElement>(null);

<ForwardedInput
  ref={emailRef}
  value={email}
  onChange={setEmail}
  validator={(value) => value.includes('@') ? null : 'Invalid email'}
/>
👉 Real-world use case: Building form libraries or input components that need to expose imperative APIs while maintaining generic type safety.
Context with Reducer Pattern
Combine Context API with useReducer for complex state management with full type safety.
interface User {
  id: string;
  name: string;
  email: string;
}

type UserState = {
  users: User[];
  selectedUser: User | null;
  isLoading: boolean;
  error: string | null;
};

type UserAction =
  | { type: 'FETCH_USERS_START' }
  | { type: 'FETCH_USERS_SUCCESS'; payload: User[] }
  | { type: 'FETCH_USERS_ERROR'; payload: string }
  | { type: 'SELECT_USER'; payload: User }
  | { type: 'CLEAR_SELECTION' };

const initialState: UserState = {
  users: [],
  selectedUser: null,
  isLoading: false,
  error: null,
};

function userReducer(state: UserState, action: UserAction): UserState {
  switch (action.type) {
    case 'FETCH_USERS_START':
      return { ...state, isLoading: true, error: null };

    case 'FETCH_USERS_SUCCESS':
      return {
        ...state,
        users: action.payload,
        isLoading: false
      };

    case 'FETCH_USERS_ERROR':
      return {
        ...state,
        error: action.payload,
        isLoading: false
      };

    case 'SELECT_USER':
      return { ...state, selectedUser: action.payload };

    case 'CLEAR_SELECTION':
      return { ...state, selectedUser: null };

    default:
      return state;
  }
}

interface UserContextType {
  state: UserState;
  dispatch: React.Dispatch<UserAction>;
}

const UserContext = React.createContext<UserContextType | null>(null);

export function UserProvider({ children }: { children: React.ReactNode }) {
  const [state, dispatch] = useReducer(userReducer, initialState);

  return (
    <UserContext.Provider value={{ state, dispatch }}>
      {children}
    </UserContext.Provider>
  );
}

export function useUserContext() {
  const context = useContext(UserContext);
  if (!context) {
    throw new Error('useUserContext must be used within UserProvider');
  }
  return context;
}
👉 Real-world use case: Managing complex application state that involves multiple related pieces of data and actions, like user management, shopping carts, or dashboard states.
Type-Safe Event Handlers
Create event handlers that are fully type-safe and prevent common runtime errors.
interface FormData {
  email: string;
  password: string;
  rememberMe: boolean;
}

type FormFieldName = keyof FormData;

interface UseFormReturn<T> {
  values: T;
  errors: Partial<Record<keyof T, string>>;
  handleChange: <K extends keyof T>(
    field: K
  ) => (event: React.ChangeEvent<HTMLInputElement>) => void;
  handleSubmit: (
    onSubmit: (values: T) => void | Promise<void>
  ) => (event: React.FormEvent) => void;
  setFieldError: (field: keyof T, error: string) => void;
}

function useForm<T extends Record<string, any>>(
  initialValues: T,
  validators?: Partial<Record<keyof T, (value: T[keyof T]) => string | null>>
): UseFormReturn<T> {
  const [values, setValues] = useState<T>(initialValues);
  const [errors, setErrors] = useState<Partial<Record<keyof T, string>>>({});

  const handleChange = useCallback(<K extends keyof T>(field: K) =>
    (event: React.ChangeEvent<HTMLInputElement>) => {
      const value = event.target.type === 'checkbox'
        ? event.target.checked
        : event.target.value;

      setValues(prev => ({ ...prev, [field]: value }));

      // Clear error when user starts typing
      if (errors[field]) {
        setErrors(prev => ({ ...prev, [field]: undefined }));
      }

      // Run validation if provided
      if (validators?.[field]) {
        const error = validators[field]!(value as T[K]);
        if (error) {
          setErrors(prev => ({ ...prev, [field]: error }));
        }
      }
    }, [errors, validators]);

  const handleSubmit = useCallback(
    (onSubmit: (values: T) => void | Promise<void>) =>
      (event: React.FormEvent) => {
        event.preventDefault();

        // Validate all fields
        const newErrors: Partial<Record<keyof T, string>> = {};
        let hasErrors = false;

        if (validators) {
          for (const [field, validator] of Object.entries(validators)) {
            const error = validator(values[field as keyof T]);
            if (error) {
              newErrors[field as keyof T] = error;
              hasErrors = true;
            }
          }
        }

        setErrors(newErrors);

        if (!hasErrors) {
          onSubmit(values);
        }
      }, [values, validators]);

  const setFieldError = useCallback((field: keyof T, error: string) => {
    setErrors(prev => ({ ...prev, [field]: error }));
  }, []);

  return { values, errors, handleChange, handleSubmit, setFieldError };
}

// Usage
function LoginForm() {
  const { values, errors, handleChange, handleSubmit } = useForm<FormData>(
    { email: '', password: '', rememberMe: false },
    {
      email: (value) => value.includes('@') ? null : 'Invalid email',
      password: (value) => value.length >= 8 ? null : 'Password too short'
    }
  );

  return (
    <form onSubmit={handleSubmit(handleLogin)}>
      <input
        type="email"
        value={values.email}
        onChange={handleChange('email')}
        placeholder="Email"
      />
      {errors.email && <span>{errors.email}</span>}

      <input
        type="password"
        value={values.password}
        onChange={handleChange('password')}
        placeholder="Password"
      />
      {errors.password && <span>{errors.password}</span>}

      <label>
        <input
          type="checkbox"
          checked={values.rememberMe}
          onChange={handleChange('rememberMe')}
        />
        Remember me
      </label>

      <button type="submit">Login</button>
    </form>
  );
}
👉 Real-world use case: Building robust forms with validation, error handling, and type safety across complex form structures.
Render Props with TypeScript Generics
Create flexible, reusable components using the render props pattern with full type safety.
interface DataFetcherProps<T, E = Error> {
  url: string;
  children: (state: {
    data: T | null;
    loading: boolean;
    error: E | null;
    refetch: () => void;
  }) => React.ReactNode;
  transform?: (data: any) => T;
}

function DataFetcher<T, E = Error>({
  url,
  children,
  transform
}: DataFetcherProps<T, E>) {
  const [data, setData] = useState<T | null>(null);
  const [loading, setLoading] = useState(true);
  const [error, setError] = useState<E | null>(null);

  const fetchData = useCallback(async () => {
    setLoading(true);
    setError(null);

    try {
      const response = await fetch(url);
      if (!response.ok) {
        throw new Error(`HTTP error! status: ${response.status}`);
      }

      const rawData = await response.json();
      const transformedData = transform ? transform(rawData) : rawData;
      setData(transformedData);
    } catch (err) {
      setError(err as E);
    } finally {
      setLoading(false);
    }
  }, [url, transform]);

  useEffect(() => {
    fetchData();
  }, [fetchData]);

  return <>{children({ data, loading, error, refetch: fetchData })}</>;
}

// Usage with different data types
interface User {
  id: number;
  name: string;
  email: string;
}

function UserList() {
  return (
    <DataFetcher<User[]>
      url="/api/users"
      transform={(data) => data.users}
    >
      {({ data, loading, error, refetch }) => {
        if (loading) return <div>Loading users...</div>;
        if (error) return <div>Error: {error.message}</div>;
        if (!data) return <div>No users found</div>;

        return (
          <div>
            <button onClick={refetch}>Refresh</button>
            {data.map(user => (
              <div key={user.id}>
                <h3>{user.name}</h3>
                <p>{user.email}</p>
              </div>
            ))}
          </div>
        );
      }}
    </DataFetcher>
  );
}
👉 Real-world use case: Creating reusable data fetching components, virtualization, or any scenario where you need to share logic but allow flexible rendering.
Key Takeaways
These patterns represent the evolution of React + TypeScript development:
Generic Components — Build once, use everywhere with type safety
Discriminated Unions — Make impossible states impossible
Proper HOCs — Add functionality without losing type information
Conditional Props — Enforce correct prop combinations
Advanced Refs — Maintain imperative APIs with type safety
Context + Reducer — Scale state management systematically
Type-Safe Events — Prevent runtime errors with compile-time checks
Render Props — Share logic flexibly while maintaining types
Subscribe to my newsletter
Read articles from Tuan Tran Van directly inside your inbox. Subscribe to the newsletter, and don't miss out.
Written by
Tuan Tran Van
Tuan Tran Van
I am a developer creating open-source projects and writing about web development, side projects, and productivity.