Eclipse intro for IntelliJ IDEA users
 Gabor Nagy
As my team was in the process of migrating a legacy application, we encountered the need to develop a portion of the old frontend originally written in the Eclipse RCP platform. I had prior experience with Eclipse IDE but it became evident that adapting to the new environment would pose challenges in terms of locating and executing simple code tasks for the rest of the team. Recognizing this, I took the initiative to provide a brief introduction to Eclipse IDE for my colleagues. I always like to talk about the big picture as well, so I started with some important background information.
The foundation behind the IDE
First of all, the Eclipse Foundation plays a crucial role in supporting, and advancing the development of the Eclipse IDE, ensuring its continued relevance and success as a leading open-source integrated development environment. So let's first take a look at it, what it is exactly and why they named the IDE like this?
Why Eclipse?
The Eclipse Foundation got its name from the Eclipse project, which was initiated by IBM in November 2001. The name "Eclipse" was chosen to symbolize the idea of bringing light into the world of software development by providing an open, extensible platform for building integrated development environments (IDEs) and tools.
The Eclipse project initially focused on creating an open-source IDE for Java development, but it soon evolved into a broader ecosystem of projects and technologies spanning various domains.
When the Eclipse Foundation was established in 2004 as an independent nonprofit organization to oversee the Eclipse projects, it inherited the name "Eclipse" as a tribute to the project's origins.
Behind the scenes: Eclipse Foundation. What is it exactly?

The Eclipse Foundation is a nonprofit organization that hosts open-source software projects. It was founded in 2004 as an independent body to provide governance, development, and collaboration frameworks for various open-source projects. The most well-known project hosted by the Eclipse Foundation is the Eclipse IDE (Integrated Development Environment), which is widely used for Java development but also supports other programming languages through plugins.
The Eclipse Foundation fosters an open and transparent community-driven development model, where contributors from different organizations and backgrounds collaborate to develop high-quality software. Besides the Eclipse IDE, the foundation hosts a wide range of other projects spanning various domains, including
Artificial Intelligence
ADORe
Provides a modular software library and toolkit for decision making, planning, control and simulation of automated vehicles.
Supporting companies: German Aerospace Center (Deutsches Zentrum für Luft- und Raumfahrt)
IoT (Internet of Things)
Paho
Provides reliable open-source implementations of open and standard messaging protocols aimed at new, existing, and emerging applications for Machine-to-Machine (M2M) and Internet of Things (IoT).
Supporting companies: Microsoft
Cloud computing
Eclipse Temurin
Provides code and processes that support the building of runtime binaries and associated technologies that are high performance, enterprise-caliber, cross-platform, open-source licensed.
Supporting companies: IBM, Microsoft, Rad Hat
Jakarta Messaging
- Java Message Oriented Middleware API for sending messages between two or more clients. It is a programming model to handle the producer-consumer messaging problem.
Jakarta Annotations
Defines a collection of annotations representing common semantic concepts that enable a declarative style of programming that applies across a variety of Java technologies.
Supporting companies: Oracle
Jakarta EE
Produces the Jakarta EE Platform specification, which is an umbrella specification that aggregates all other Jakarta EE specifications.
Supporting companies: Microsoft, Oracle, VMWare
etc.
Automotive
openPASS
Framework for the simulation of interaction between traffic participants to evaluate and parametrize active safety systems. The simulation is based on a specific situation configuration and can contain several simulation runs, which differ due to random parameters.
Supporting companies: BMW, VW
OSGi
Glassfish: complete application server that implements the Jakarta EE specification.
Supporting companies: Oracle, Payara (project for opensource Glassfish)
and more.
You can read more about this organization here.
Download: Few words about Eclipse packages
Surely you can find the download link for Eclipse IDE, maybe if it is your first time, you wonder what to actually download. You can download multiple packages (i.e. installers / executables etc.) of the Eclipse IDE.
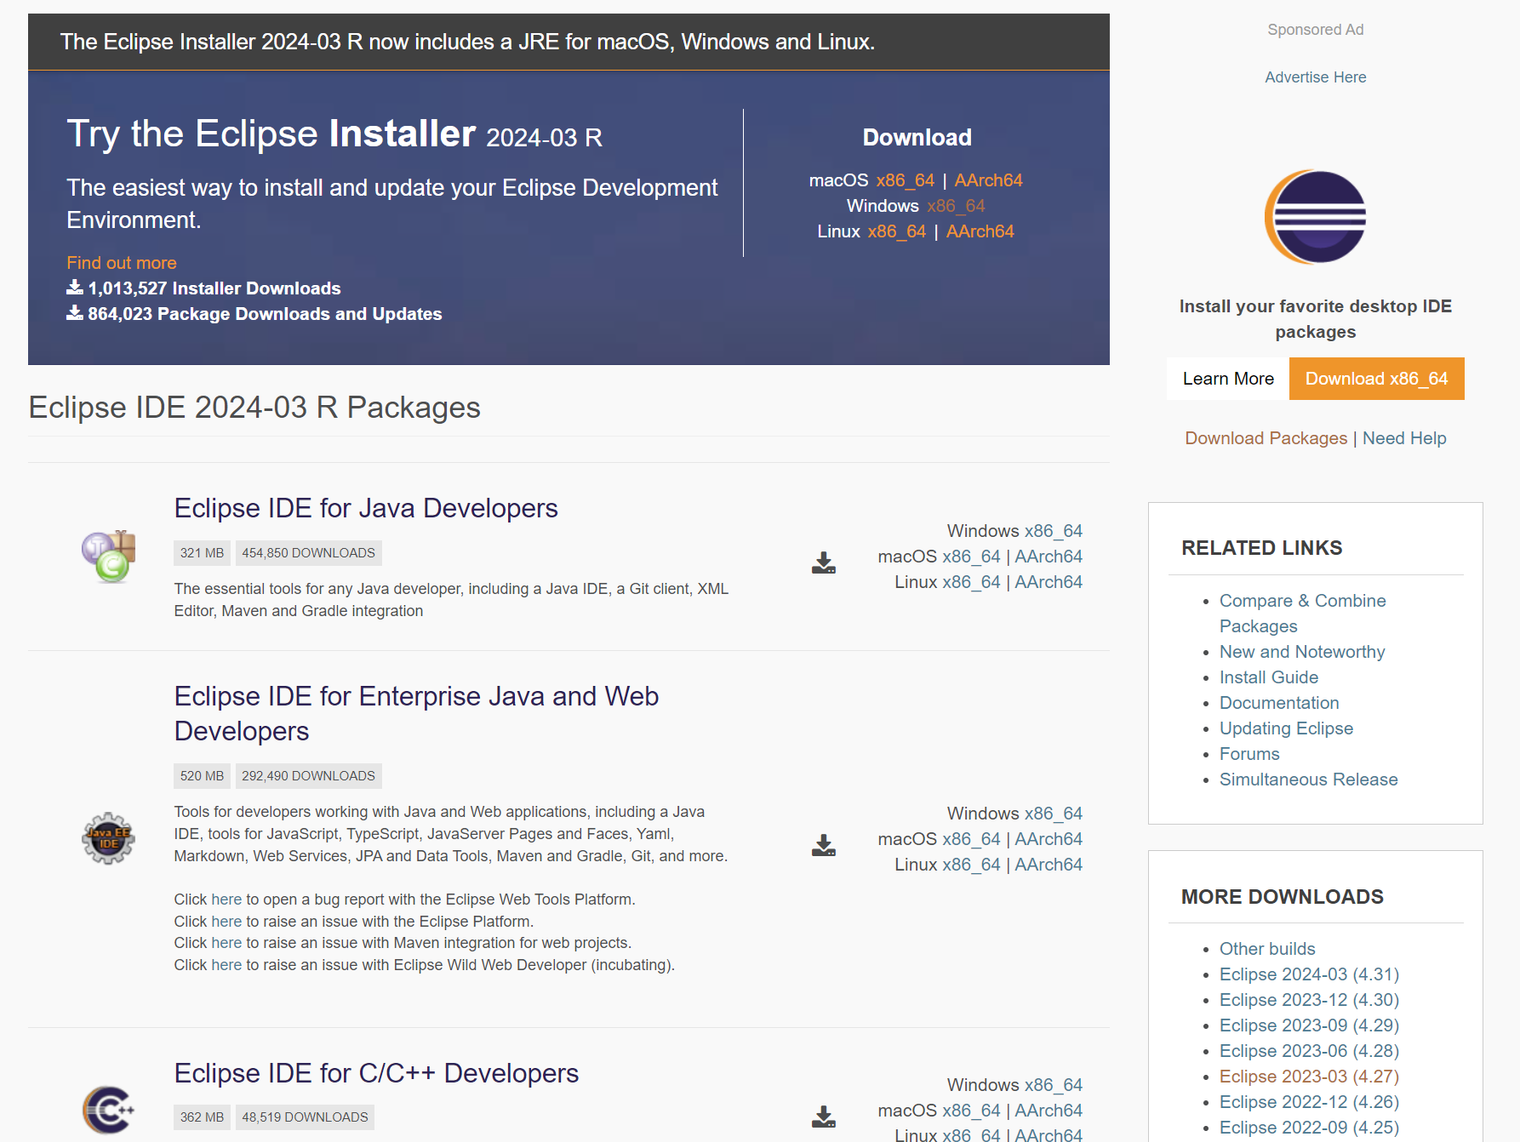
What are these packages?
Eclipse packages refer to pre-configured distributions of the Eclipse IDE that come bundled with specific sets of plugins and tools tailored for different types of development tasks or target audiences. These packages are designed to cater to the diverse needs of developers by providing a focused and ready-to-use environment for specific programming languages, frameworks, or application types.
Packages exists for
Java development
JAVA EE and Web development
C/C++ development
PHP development
RCP (Rich Client Platform) and RAP (Rich Ajax Platform) development
Eclipse RAP enables developers to build modern web applications with rich user interfaces using Java and Eclipse technologies, offering a flexible and efficient development model for both desktop and web environments.
Eclipse RCP provides a comprehensive framework for building desktop applications with advanced features, modular architecture, and cross-platform compatibility, making it a popular choice for developers seeking to create robust and customizable desktop software.
and so on.
For Java development you need either the package named 'Eclipse IDE for Java Developers' or 'Eclipse IDE for Enterprise Java and Web Developers'.
Eclipse IDE for Java Developers includes:
Java IDE
Git client
XML editor
Maven & Gradle integration
Eclipse IDE for Enterprise Java and Web Developers includes:
- everything mentioned above
and
JavaScript support
TypeScript support
JSP (Java Server Pages) & JSF (Java Server Faces) support
YAML support
Web services support
JPA & Data tools
EJB support
etc.
Installing Eclipse
It is fairly easy nowadays to install Eclipse IDE, just start the downloaded installer and follow on-screen instructions. I will rather deep dive into how to actually use it and what interesting features it has, specifically for users who are accustomed to IntelliJ IDEA.
Eclipse workbench structure
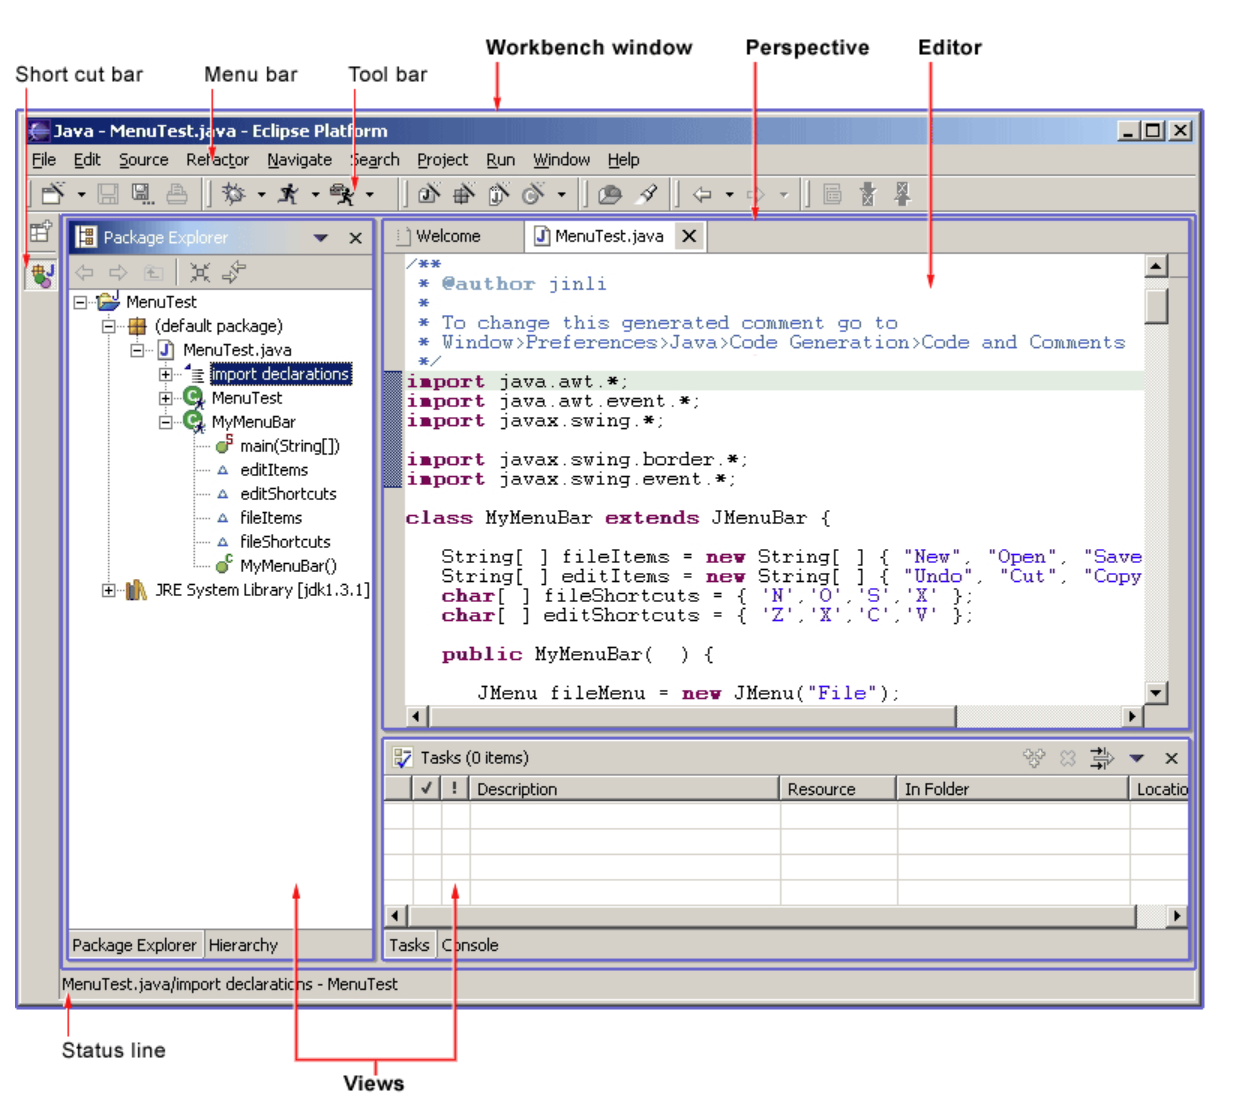
I found this image in the old Eclipse documentation, some parts has changed but it still helps to decompose the Eclipse IDE window into smaller components so we can properly name them and conceptually it is easier to grasp the difference between views and perspectives, which we'll talk about in a moment.
Opening your project in Eclipse
Themes in Eclipse
Approximately half of the developers use dark theme. Eclipse IDE is coming with the Light theme set by default (as IntelliJ), of course you can also use a dark theme as well, just like in IntelliJ. Go to Window → Preferences → Appearance and choose the theme that suits you (Light / Dark / Classic).
Perspectives vs views
Coming from IntelliJ, some new concepts to get used to are views and perspectives. In Eclipse IDE, both are essential components that contribute to the overall user experience and workflow management, but they serve different purposes:
Views:
Views are individual panels or windows within the IDE that display specific information or provide particular functionality.
Examples of views include the Package Explorer, Outline view, Problems view, Console view, and Task List view.
Views can be docked, stacked, or floated within the IDE window, allowing users to customize their layout according to their preferences and workflow requirements.
Users can open, close, resize, and arrange views to create a workspace layout that suits their needs.
Perspectives:
Perspectives, on the other hand, represent different configurations of views tailored for specific tasks or activities.
A perspective is a collection of views, editors, toolbars, and other UI elements arranged in a predefined layout optimized for a particular development scenario.
Each perspective typically focuses on a specific aspect of software development, such as coding, debugging, testing, or version control.
For example, the Java perspective in Eclipse is optimized for Java development and includes views like Package Explorer, Outline view, and editors for Java source files, while the Debug perspective provides tools for debugging applications.
Users can switch between perspectives to quickly transition between different phases of the development process or to perform different tasks without manually rearranging views each time.
In summary, views are individual components that display specific information or provide functionality within the IDE, while perspectives represent preconfigured layouts of views and other UI elements optimized for specific development tasks or activities. Views can be customized and arranged within perspectives to create a personalized workspace layout tailored to the user's needs.
Important perspectives (Window → Perspective → Open Perspective):
Debug
Git
Java
Plug-in Development
Some important views (Window → Show view → Other…):
Console
Problems
Breakpoints
Package Explorer
Coverage
Terminal
etc.
Managing perspectives
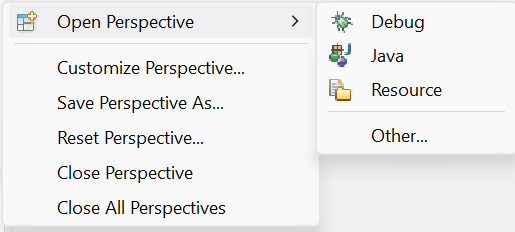
Perspectives can be customized to suit your needs. This can be done at Window → Perspective → Customize Perspective… menu point. You can also save a customized perspective as a new one, under a different name at Window → Perspective → Save Perspective As… menu point.
You can also reset a perspective if you don’t like the adjustments at Window → Perspective → Reset Perspective… menu point.
Basics: Important shortcuts to find your way around your code
You can find all key bindings in your Eclipse IDE under Help → Show active Keybindings… menu. Or you can just press CTRL+SHIFT+L to show it 🙂
A trick to open the Preferences dialog in Eclipse is to press CTRL+SHIFT+L twice which brings up the Preferences dialog to tailor your key bindings but you can set other stuff as well of course.
| Key binding (shortcut) | What it does | Note | In IntelliJ |
| CTRL+SHIFT+T | Open type | Open a class in your project | CTRL+N |
| CTRL+SHIFT+R | Open resource | Open any file in your project | CTRL+SHIFT+N |
| CTRL+3 | Open Quick Access Search | Navigate to various elements within the IDE, such as files, classes, methods, and commands, without having to navigate through menus or views manually. | SHIFT+SHIFT |
| CTRL+H | Search (Java Search) | Search in Workspace | CTRL+SHIFT+F |
| F3 | Open declaration | CTRL+B | |
| F4 | Open type hierarchy | CTRL+H | |
| CTRL+SHIFT+G | Find all references in Workspace | Search for all references e.g., of a class | ALT+F7 |
| CTRL+O | Show outline view | View structure of a class for example | CTRL+F12 |
| CTRL+L | Go to line | Only accepts line number | CTRL+G |
| ALT+↑/↓ | Move line up / down | CTRL+SHIFT+↑/↓ | |
| CTRL+Space | Content assist | CTRL+Space | |
| CTRL+7 | Toggle comment | Add or remove // to the beginning of line | CTRL+/ |
| ALT+SHIFT+S | Open advanced editing options | E.g. generate constructor, sort members etc. | Similar: Alt+Insert |
| CTRL+ALT+SHIFT+T | Open terminal | ALT+F12 | |
| Refactoring | |||
| ALT+SHIFT+T | Open refactoring menu | CTRL+ALT+SHIFT+T | |
| ALT+SHIFT+R | Rename | Shift+F6 | |
| ALT+SHIFT+↑ | Introduce constant | CTRL+ALT+C | |
| ALT+SHIFT+L | Introduce local variable | CTRL+ALT+V | |
| ALT+SHIFT+C | Change signature | CTRL+F6 | |
| ALT+SHIFT+M | Extract method | CTRL+ALT+M |
Eclipse toolbar icons

Important icons in the toolbar (highlighted ones from left to right in order):
New project
Save (CTRL+S)
Save all (CTRL+SHIFT+S)
Open terminal (CTRL+SHIFT+ALT+T)
Skip all breakpoints (CTRL+ALT+B)
- If you are debugging and need to disable breakpoints quickly
Debug
Run
Coverage
Run last tool
New package
New class
Open type
Search
Previous edit location
Next edit location
Back
Forward
Run / debug & their configurations
Before you debug your program, you need breakpoints. You can add them with the mouse by clicking on the left edge of the editor window twice (on the blue border) or by pressing the key combination CTRL+SHIFT+B.
You can run your program with the icon with a run configuration. If there is none yet, you can add one by clicking on the down arrow next to it and choosing ‘Run Configurations…’ option. Then you can choose from the options in the below picture.
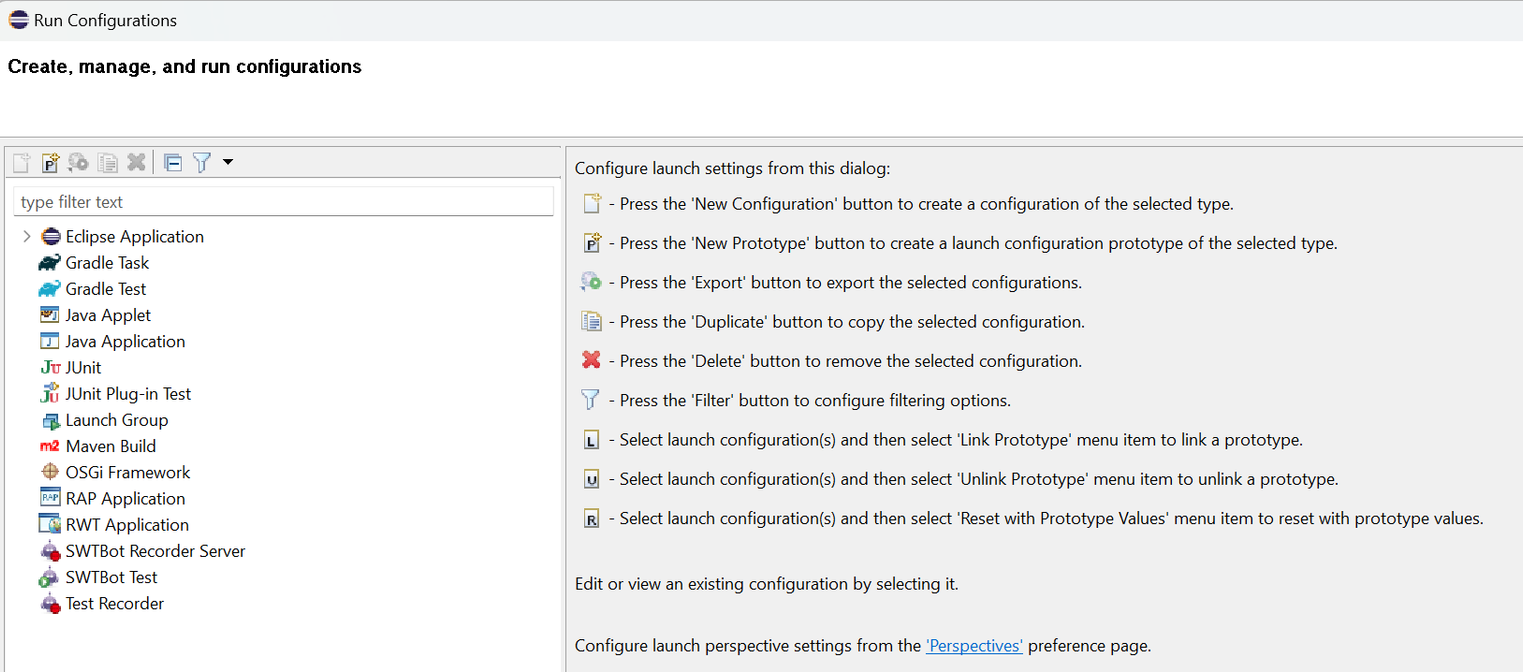
Similarly, you can run your program in debug mode with the icon with a debug configuration. If there is none yet, you can add one by clicking on the down arrow next to it and choosing ‘Debug Configurations…’ option. Then you can choose from the same options as in the Run configurations menu.
Hot code replacement
Hot code replace (HCR) is a debugging technique whereby the Eclipse Java debugger transmits new class files over the debugging channel to another JVM. In the case of Eclipse development, this also applies to the VM that runs the runtime workbench. The idea is that you can start a debugging session on a given runtime workbench and change a Java file in your development workbench, and the debugger will replace the code in the receiving VM while it is running. No restart is required, hence the reference to "hot".
To use HCR, you have to use the Debug Perspective.
Git usage
Configuration
Select Window → Preferences → Version Control (Team) ->Git → Configuration. Configure your full name (user.name) and email (user.email) in the user settings (add new entries). As the Eclipse IDE uses the same settings as the Git command line, this might already be done.
You can configure other settings here as well, these will be saved in your .gitconfig file.
Create new repository
If you need to create a new Git repository, use Ctrl+3 and type Create a new Git repository in the dialog. This opens a dialog which allows you to specify the directory for the new Git repository. Do not forget to add a .gitignore file as well. Eclipse Git does not allow you to create a file directly in the top-level folder of your repository. You have to do this step outside of the Eclipse IDE, either via the command line or via your system project explorer. To put your new project under version control with Git, right-click on your project, select Team → Share Project. If another version control system is installed you have to select that you want to use Git as the version control system.
Project already in Git
Open the Git perspective from Window → Perspective → Open Perspective → Other → Git. This view shows you the Git repositories you can work with in Eclipse and allows you to add existing repositories to Eclipse, create or clone repositories. It also allows you to perform Git operations.
As an example, please have a look below.
Add History view
You can add the view by pressing Ctrl+3, typing History and choosing option History (Version Control (Team)). This way you will see all old commits an related information as well.
Open older state
Select a commit you want to get in the history view. Clicking on the commit, you can see all changes in a small window next to / below it. You can view any file in that commit by clicking on the file and right clicking and choosing ‘Open This Version’. You can also get that file back into your project by choosing ‘Check Out This Version’. This option also exists for the whole commit though, you can reset your files to any commit with this.
Git actions
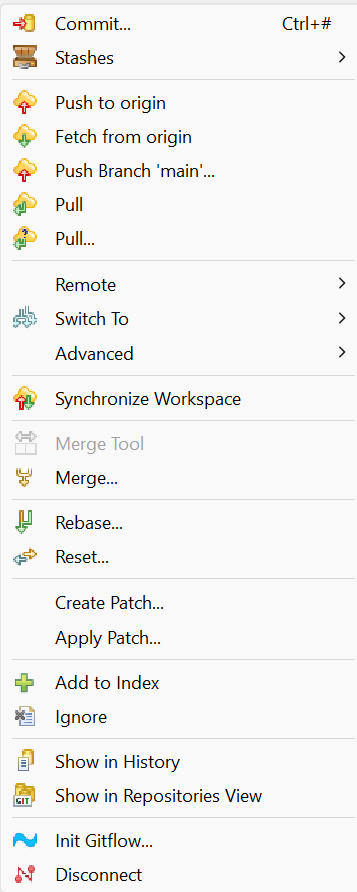
Actions are also available from the right click context menu under Team menu point, please see below.
Launch files
The Eclipse launching framework is a set of APIs and components within the Eclipse platform that provides the infrastructure for launching and running applications, processes, and external tools from within the Eclipse IDE. It enables developers to define, configure, and execute launch configurations for various types of applications, such as Java applications, JUnit tests, remote applications, and more.
Key components of the Eclipse launching framework include:
Launch Configurations: Launch configurations define the parameters and settings required to run or debug an application within the IDE. They specify details such as the executable to run, command-line arguments, VM arguments, class path entries, environment variables, and debugger options.
Launch Configuration Types: Launch configuration types define the different types of launch configurations supported by the framework, such as "Java Application," "JUnit Test," "Remote Java Application," etc. Each type corresponds to a specific kind of application or debugging scenario and provides a set of default settings and behaviors.
Overall, the Eclipse launching framework provides a flexible and extensible infrastructure for launching and running applications within the IDE, making it easier for developers to develop, test, and debug their software projects in a unified environment.
Creating launch files
Actually, launch configurations can be created with the 'Run Configurations…' dialog, clicking on the down arrow:

In the displayed dialog, you can choose between different launch configuration types. Those launch configurations can also be exported to a \.launch* file. You can reach the export wizard via export command in the file menu or by typing Export and choosing Launch Configuration in the Quick Access.
What is a target platform?
Eclipse employs target definitions to specify the Java libraries available for development within the Eclipse environment. The active target definition is known as the 'target platform.'
The target platform establishes the libraries used for compiling and executing your code. These libraries complement the plug-in projects within your workspace.
When no specific target definition is set, the Eclipse IDE acts as the target platform. However, it's recommended to utilize a target definition file to reduce dependency on the IDE. Typically, developers share a target definition file to ensure consistent library usage across development environments.
The Target Platform is a critical part of developing using PDE (plug-in Development Environment). It defines what your workspace will be built and launched against. Again, the target platform in Eclipse PDE plays a crucial role in defining the development environment for building Eclipse plug-ins and applications. It provides the necessary dependencies, libraries, and runtime components required for development and testing, ensuring consistency and compatibility across different development environments and team members.
Creating target definitions
A target definition file can be created via the File → New → Other… → Plug-in Development → Target Definition menu. You can add new libraries via the Add button but you can also add
software sites (update sites)
directories
installations
features
maven repos
other target definitions
Some useful tricks
Linking the currently edited file to the file in the project explorer can be done by clicking on the ‘Link with editor' icon.

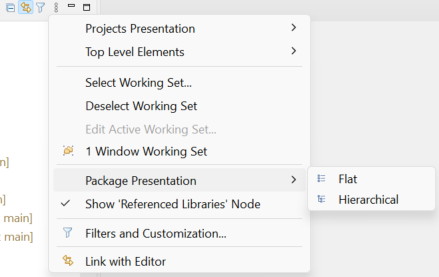
Package representation can be set in the view menu (vertical …). I prefer to use hierarchical.
Plugins can be installed from Help → Eclipse Marketplace…
- The Eclipse Marketplace is an online platform where users can discover, install, and manage a wide range of plugins, extensions, and tools for the Eclipse IDE. It serves as a central hub for accessing both free and commercial offerings that enhance the functionality and capabilities of Eclipse for various development tasks and domains.
Updates can be automatically installed from Help → Check for Updates
Auto completion for Java always: By default only after character . does auto completion kick in. If you want auto completion all the time, open Window → Preferences → Editor → Content Assist and change setting ‘Auto activation triggers for Java' to 'abcdefghijklmnopqrstuvwxyzABCDEFGHIJKLMNOPQRSTUVWXYZ._'
Increasing the size of the icons is possible via editing the eclipse.ini and adding these lines (150 will be a multiplicator of 1.5)
  -Dswt.enable.autoScale=true
  -Dswt.autoScale=150
  -Dswt.autoScale.method=nearest
Interesting facts - Java IDEs
From 2023, here is a statistics of the IDE usage.
IntelliJ IDEA - 42%
Eclipse - 27%
VSCode - 22%
NetBeans - 5%
Other - 4%
Subscribe to my newsletter
Read articles from Gabor Nagy directly inside your inbox. Subscribe to the newsletter, and don't miss out.
Written by

Gabor Nagy
Gabor Nagy
I am a senior software engineer and team lead. What keeps me rolling is finding the best solution for complex problems while being passionate about quality in general. I like to read and talk about new technologies and to mentor in my area of expertise.