Building a Real-Time Chat Application with Socket.io
 ByteScrum Technologies
Introduction
Real-time chat applications have become increasingly popular for instant communication and user collaboration. In this guide, we will explore building a real-time chat application using Socket.io, a JavaScript library that enables real-time, bidirectional and event-based communication between clients and servers.
1. Setting Up Your Project
npm init -y
npm install express
npm install socket.io
- Create Your Server: Set up a basic Node.js server using Express and Socket.io:
// server.js
const express = require('express');
const http = require('http');
const socketIo = require('socket.io');

const app = express();
const server = http.createServer(app);
const io = socketIo(server);

server.listen(3000, () => {
    console.log('Server running on port 3000');
});
2. Creating the Chat Interface
- Set Up Your Frontend: Create an HTML file (index.html) for your chat interface:
<!-- index.html -->
<!DOCTYPE html>
<html>
<head>
    <title>Chat Application</title>
</head>
<body>
    <div id="messages"></div>
    <input id="messageInput" type="text" placeholder="Enter your message">
    <button id="sendButton">Send</button>
</body>
</html>
- Client-Side Socket.io Setup: Include Socket.io on the client side and connect to the server:
<!-- index.html -->
<script src="/socket.io/socket.io.js"></script>
<script>
    const socket = io();

    socket.on('connect', () => {
        console.log('Connected to server');
    });
</script>
3. Handling Chat Events
- Sending Messages: Handle sending messages from the client to the server:
const messageInput = document.getElementById('messageInput');
const sendButton = document.getElementById('sendButton');

sendButton.addEventListener('click', () => {
    const message = messageInput.value;
    socket.emit('chatMessage', message);
    messageInput.value = '';
});
- Receiving Messages: Handle receiving messages from the server and displaying them on the client:
socket.on('chatMessage', (message) => {
    const messagesDiv = document.getElementById('messages');
    const messageElement = document.createElement('div');
    messageElement.textContent = message;
    messagesDiv.appendChild(messageElement);
});
4. Implementing the Chat Logic on the Server Side
- Broadcasting Messages: Handle incoming messages from clients and broadcast them to all connected clients:
io.on('connection', (socket) => {
    console.log('A user connected');

    socket.on('chatMessage', (message) => {
        io.emit('chatMessage', message);
    });

    socket.on('disconnect', () => {
        console.log('A user disconnected');
    });
});
Complete code:
You can check the complete code below:
// server.js
const express = require('express');
const http = require('http');
const socketIo = require('socket.io');

const app = express();
const server = http.createServer(app);
const io = socketIo(server);

app.get('/', (req, res) => {
    res.sendFile(__dirname + '/index.html');
});

io.on('connection', (socket) => {
    console.log('A user connected');

    socket.on('chatMessage', (message) => {
        io.emit('chatMessage', message);
    });

    socket.on('disconnect', () => {
        console.log('A user disconnected');
    });
});

server.listen(3000, () => {
    console.log('Server running on port 3000');
});
<!-- index.html -->
<!DOCTYPE html>
<html>
<head>
    <title>Chat Application</title>
</head>
<body>
    <div id="messages"></div>
    <input id="messageInput" type="text" placeholder="Enter your message">
    <button id="sendButton">Send</button>

    <script src="/socket.io/socket.io.js"></script>
    <script>
        const socket = io();

        socket.on('connect', () => {
            console.log('Connected to server');
        });

        const messageInput = document.getElementById('messageInput');
        const sendButton = document.getElementById('sendButton');
        const messagesDiv = document.getElementById('messages');

        sendButton.addEventListener('click', () => {
            const message = messageInput.value;
            socket.emit('chatMessage', message);
            messageInput.value = '';
        });

        socket.on('chatMessage', (message) => {
            const messageElement = document.createElement('div');
            messageElement.textContent = message;
            messagesDiv.appendChild(messageElement);
        });
    </script>
</body>
</html>
To run the server, save both files (server.js and index.html) in the same directory and then run the following command in your terminal:
node server.js
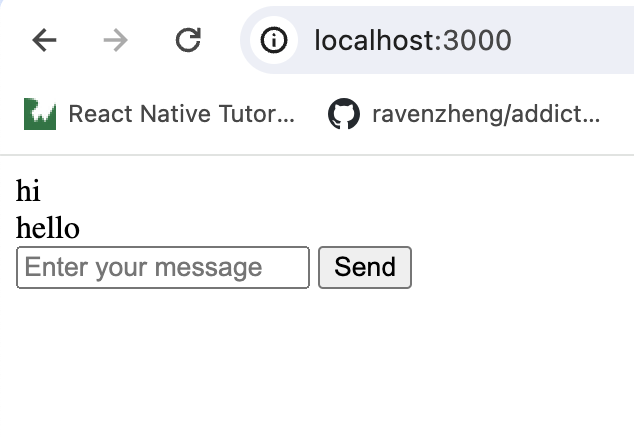
Your chat application should now be running and accessible at http://localhost:3000 in your web browser.

Conclusion
References
Share Your Thoughts
Have you built a real-time chat application with Socket.io? Share your experiences and tips in the comments below!
Subscribe to my newsletter
Read articles from ByteScrum Technologies directly inside your inbox. Subscribe to the newsletter, and don't miss out.
Written by

ByteScrum Technologies
ByteScrum Technologies
Our company comprises seasoned professionals, each an expert in their field. Customer satisfaction is our top priority, exceeding clients' needs. We ensure competitive pricing and quality in web and mobile development without compromise.