How to Integrate ReactJS with Django Framework
 SHAIK IRFAN
Introduction
In today's web development landscape, building dynamic and interactive user interfaces is essential for creating engaging web applications. ReactJS has emerged as a powerful front-end library for building user interfaces, while Django remains a popular choice for building robust back-end services. Integrating ReactJS with Django allows developers to leverage the strengths of both technologies, resulting in efficient and scalable web applications. In this article, we'll explore the steps to integrate ReactJS with the Django framework.
Why Integrate ReactJS with Django?
Before we delve into the integration process, let's briefly explore why integrating ReactJS with Django can be advantageous:
Rich User Interfaces: ReactJS excels at creating interactive and responsive user interfaces, making it ideal for building modern web applications.
Efficient Backend Services: Django provides a solid foundation for building backend services, including features such as routing, authentication, and database management.
Separation of Concerns: By separating the frontend and backend layers, developers can focus on specific aspects of the application, leading to cleaner code and easier maintenance.
Integration Steps
Step 1: Create a New Django Project and a New React Application
You'll first need to set up your development environment to integrate React with Django. This involves installing Django and creating a new Django project. You can install Django using pip, Python's package manager, with the following command:
pip install django
Once Django is installed, you can create a new Django project by running:
django-admin startproject myproject
For the React part, you'll typically use create-react-app, a command-line tool that sets up the structure of a new React application. Install it globally using npm and then create your React app:
npm install -g create-react-app
create-react-app frontend
Step2: Creating a Django RESTful API
You'll need to create a RESTful API to enable communication between your React frontend and Django backend. Django REST framework (DRF) is a powerful and flexible toolkit for building Web APIs in Django.
Install Required Packages
First, you'll need to install the Django REST framework and Django Cors Headers:
pip install djangorestframework django-cors-headers
After installing DRF and Django Cors Headers add the following lines of code in settings.py file:
INSTALLED_APPS = [
    # ...
    'myapp',
    'rest_framework',
    'corsheaders'
]
These lines of code will add the rest_framework, corsheaders, and myapp apps to the INSTALLED_APPS list, add the CorsMiddleware to the MIDDLEWARE list, and allow all origins to make cross-origin requests.
MIDDLEWARE = [
    # ...
    # 👇 Add this line here
    'corsheaders.middleware.CorsMiddleware',
    # Add above line just before this line 👇
    'django.middleware.common.CommonMiddleware',
]
# 👇 Add this line here
CORS_ORIGIN_ALLOW_ALL = True
CORS_ALLOWED_ORIGINS = [
    "http://localhost:3000", # Add your React app's origin here
    "http://127.0.0.1:3000",
]
Step 3: Build the API Endpoints in Django
Defining the Todo Model
Let’s create a model to define how the Todo items should be stored in the database.
Open the todo/models.py file in your code editor and add the following lines of code:
from django.db import models

# Create your models here.

class Todo(models.Model):
    title = models.CharField(max_length=120)
    description = models.TextField()
    completed = models.BooleanField(default=False)

    def _str_(self):
        return self.title
Because you have created a Todo model, you will need to create a migration file migrate model to the database:
python manage.py makemigrations
And apply the changes to the database:
python manage.py migrate
You can test to see that CRUD operations work on the Todo model you created by using the admin interface that Django provides by default.
Open the todo/admin.py file with your code editor and register your model by adding the following lines of code:
from django.contrib import admin
from .models import Todo

# Register your models here.

admin.site.register(Todo, TodoAdmin)
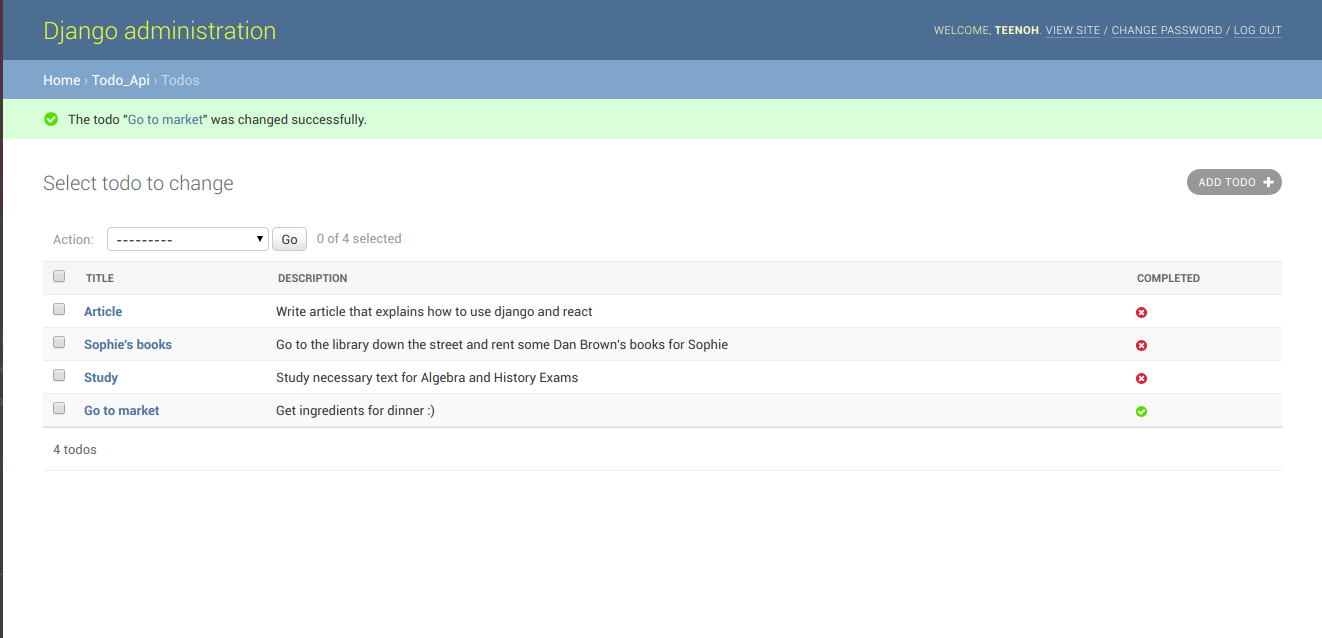
Navigate to http://localhost:8000/admin in your web browser. And log in with the username and password (superuser credentials):
You can create, edit, and, delete Todo items using this interface:

setting up the endpoints
Creatingserializer
You will need serializers to convert model instances to JSON so that the frontend can work with the received data.
Create a serializers.py file with your code editor in your myapp folder. Open the serializers.py file and update it with the following lines of code:
from rest_framework import serializers
from .models import Todo

class TodoSerializer(serializers.ModelSerializer):
    class Meta:
        model = Todo
        fields = ('id', 'title', 'description', 'completed')
Creating the View
You will need to create a TodoView class in the todo/views.py file.
Open the todo/views.py file with your code editor and add the following lines of code:
from rest_framework.decorators import api_view
from rest_framework.response import Response
from .serializers import TodoSerializer
from .models import Todo

# Create your views here.
@api_view(['GET'])
def TodoView(request):
  Todos=Todo.objects.all()
  serializer=TodoSerializer(Todos,many=True)
  return Response(serializer.data)
Open the backend/urls.py file with your code editor and replace the contents with the following lines of code:
from django.contrib import admin
from django.urls import path,include

urlpatterns = [
    path('admin/', admin.site.urls),
    path("",include("api.urls"))
]
This code specifies the URL path for the API. This was the final step that completes the building of the API.
Let’s restart the server
python manage.py runserver
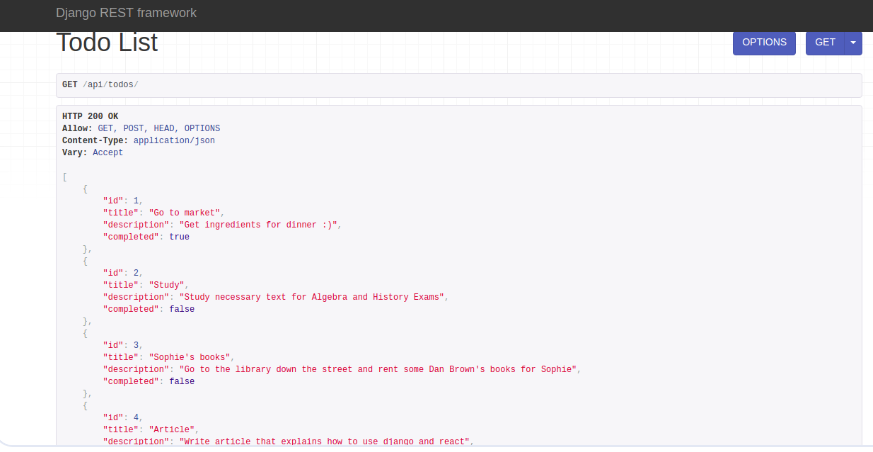
Navigate to http://localhost:8000/api/todos in your web browser:

Step 4: Create a React Component to Make HTTP Requests
Install Axios :
Axios is a popular choice for making HTTP requests from React applications. Install it using npm
npm install axios
Next, We need to create a React component that makes HTTP requests to the API endpoints. We will use Axios to make the HTTP requests. Once we receive the JSON data, we can display it on the web page using React components.
Create a new file called HelloWorld.js inside the src directory of the myapp directory, and add the following lines of code:
import React, { useState, useEffect } from 'react';
import axios from 'axios';

function HelloWorld() {
  const [message, setMessage] = useState('');

  useEffect(() => {
    axios.get('http://localhost:8000/api/todos/')
      .then(response => {
        setMessage(response.data.message);
      })
      .catch(error => {
        console.log(error);
      });
  }, []);

  return (
    <div>
      <h1>Hello, World!</h1>
      <p>{message}</p>
    </div>
  );
}

export default HelloWorld;
This code defines a new React component called HelloWorld that makes an HTTP GET request to the hello-world API endpoint we defined earlier. The response data is stored in the message state, which is displayed on the web page.
Step 5: Render the React Component
Finally, we need to render the HelloWorld component inside the App.js file in the src directory of the myapp directory. Replace the contents of App.js with the following lines of code:
import React from 'react';
import HelloWorld from './HelloWorld';

function App() {
  return (
    <div>
      <HelloWorld />
    </div>
  );
}

export default App;
Step 6: Run the Project
To run the project, open two terminal windows.
In the first window, navigate to the myproject directory and run the following command:
python manage.py runserver
This will start the Django development server.
In the second window, navigate to the myapp directory and run the following command:
npm start
This will start the React development server.
Open your web browser and navigate to http://localhost:3000/. You should see the message "Hello, world!" displayed on the web page.
Conclusion
Connecting ReactJS and Django Framework can be a powerful combination for building web applications. By following the steps outlined in this article, you can connect these two tools and build a robust web application. Remember to install the required packages and handle CORS errors to ensure smooth communication between the React app and the Django API.
That's a wrap. Thanks for reading.
Hope this article was helpful to you.
If you enjoyed reading this, then please like and share this article with others.
Have fun coding!
Subscribe to my newsletter
Read articles from SHAIK IRFAN directly inside your inbox. Subscribe to the newsletter, and don't miss out.
Written by

SHAIK IRFAN
SHAIK IRFAN
"Full Stack Web Developer | Bridging Front-End Elegance with Back-End Power | Crafting Dynamic and User-Centric Digital Solutions"