Real Time DevOps Project | Deploy to Kubernetes Using Jenkins | End to End DevOps Project | CI/CD
 ProDevOpsGuy Tech Community
Table of contents
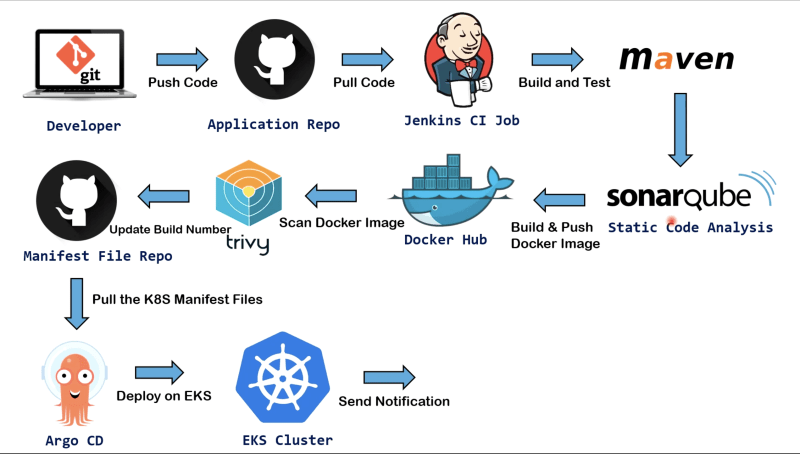
Lets begin now :)
Launch an ec2 server - Jenkins-Master
AMI - Ubuntu(Free tier)
Instance Type - t2.micro
Select or create Key Pair
Configuration Storage - 15 GiB
Launch Instance Now

Open 'Terminal', access your Server and run below commands-
//Change directory to the location where key pair file is located
$ cd Downloads
$ ssh -i [keypair-name].pem ubuntu@[public IP]
$ sudo apt update
$ sudo apt upgrade -y
//Change server hostname to avoid confusion
$ sudo hostnamectl set-hostname Jenkins-Master
$ bash
$ sudo apt install openjdk-17-jre -y
$ java -version
$ curl -fsSL https://pkg.jenkins.io/debian/jenkins.io-2023.key | sudo tee
/usr/share/keyrings/jenkins-keyring.asc > /dev/null echo deb [signed-by=/usr/share/keyrings/jenkins-keyring.asc]
https://pkg.jenkins.io/debian binary/ | sudo tee
/etc/apt/sources.list.d/jenkins.list > /dev/null
$ sudo apt-get update
$ sudo apt-get install jenkins
$ sudo systemctl enable jenkins
$ sudo systemctl start jenkins
$ systemctl status jenkins
$ sudo vi /etc/ssh/sshd_config
A editor file will open. Press i button on keyboard to enable edit mode and uncomment two lines(Remove '#') as below-

Save & close this file (Press 'esc' button from keyboard and then ':wq' hit enter)
// Now reload the server
$ sudo service sshd reload
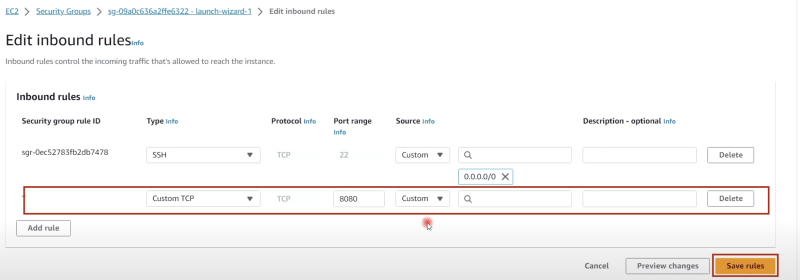
Go to AWS Console:
Edit Inbound rules of Jenkins-Master from Security Group to allow jenkins port 8080 -
Launch an ec2 server - Jenkins-Agent
AMI - Ubuntu(Free tier)
Instance Type - t2.micro
Select or create Key Pair
Configuration Storage - 15 GiB
Launch Instance Now

Open 'New Terminal', access your Server and run below commands-
//Change directory to the location where key pair file is located
$ cd Downloads
$ ssh -i [keypair-name].pem ubuntu@[public IP]
$ sudo apt update
$ sudo apt upgrade -y
//Change server hostname to avoid confusion
$ sudo hostnamectl set-hostname Jenkins-Master
$ bash
$ sudo apt install openjdk-17-jre -y
$ java -version
//Now install Docker
$ sudo apt-get install docker.io -y
$ sudo usermod -aG docker $USER

// Reboot server now
$ sudo init 6

//After reboot need to reconnect
$ ssh -i [keypair-name].pem ubuntu@[public IP]

$ sudo vi /etc/ssh/sshd_config
A editor file will open. Press i button on keyboard to enable edit mode and uncomment two lines(Remove '#') as below-
Save & close this file (Press 'esc' button from keyboard and then ':wq' hit enter)
// Now reload the server
$ sudo service sshd reload
Go to Jenkins-Master server:
$ ssh-keygen // Hit enter till it generates key
$ cd .sh/
$ ls

// You will see files as - authorized_key id_rsa id_rsa.pub

$ sudo cat id_rsa.pub  // copy complete key
Go to Jenkins-Agent Server:
$ cd .ssh/
$ ls
// You will see files as - authorized_key
$ sudo vi authorized_key
// An editor will open. Paste public key copied from Jenkins-Master server. Save and exit
Copy public IP of Jenkins-Master server and paste in the browser with port 8080

$ sudo cat /var/lib/jenkins/secrets/initialAdminPassword
// copy password and paste in Administration Password -> Continue -> Install suggested plugins
Create first admin user -

Save & Continue -> Save and finish -> Start using jenkins

Jenkins Dashboard-
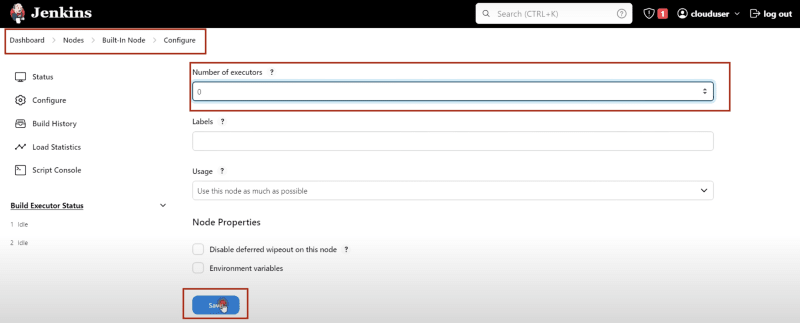
Manage Jenkins -> Nodes -> Build-in-Node -> Configure
Number of Executor - 0
Save
Create new Node -
Node name - Jenkins-Agent
Type - Permanent Agent
Click on 'Create'
Description - Jenkins-Agent
Number of Executor - 2
Remote root Directory - /home/ubuntu
Labels - Jenkins-Agent
Launch Method - Launch agents via SSH
Host - [Jenkins-Agent server private IP]
Credentials -> Add -> Jenkins
Kind -> SSH Username with private key
Id - Jenkins-Agent
Description - Jenkins-Agent
Username - ubuntu
Private Key -> Enter Directly -> Under key Add
Note: Copy private key of Master server (file name - id_rsa) and paste here under add key.
Now click on 'Add'
Credentials - choose ubuntu(Jenkins-Agent)
Host Key verification Strategy - Non verifying Verification Strategy
Click on 'Save'

Integrate Maven to Jenkins & add GitHub credentials to Jenkins:
Go to Jenkins Dashboard-
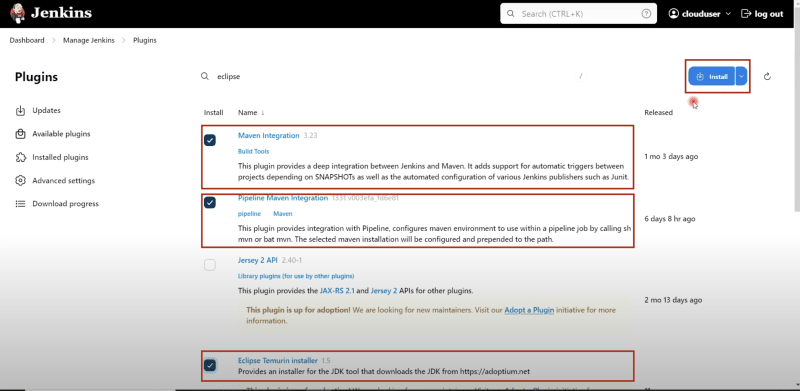
- Manage Jenkins -> Plugins -> Available Plugins
Note: Install selected plugins as shown below
Manage Jenkins -> Tools -> find Maven Installation
Click on Add maven
Name - Maven3
Apply & Save
Manage Jenkins -> Tools -> find JDK Installation
Click on Add JDK
Name - Java17
Tick on 'Install automatically'
Click on Add Installer -> Install from adoptium.net
Version -> Under OpenJDK 17 HotSpot -> Choose jdk-17.0.5+8
Apply & Save
Manage Jenkins -> Under Security choose 'Credentials'
Stores scoped to Jenkins - Click on global drop down and Add Credentials
Kind - Username with password
Username - [GitHub username]
Password - [Provide personal access token created in GitHub]
Id - github
Description - github
Click on 'Create'
Create pipeline script(Jenkinsfile) for build and test Artifacts and Create CI Job on Jenkins
Here is GitHub repository, you can fork it to your account
Go to Jenkins Dashboard -
New Item
Enter an Item name - register-app-ci -> Select 'Pipeline' -> Click 'Ok'
Configuration -> General
Tick on 'Discard old build'
Max # of builds to keep - 2
Under 'Pipeline' -> Definition -> Choose 'pipeline script from SCM'
SCM - git
Repositories -> Repository URL - [Paste your forked repository URL]
Credentials -> Choose [your GitHub Credentials]
Branch Specifier - */main
Apply and Save
Install and Configure SonarQube-
Go to AWS Console -
Launch new ec2 with name as 'SonarQube'
AMI - Ubuntu(Free tier)
Instance Type - t3.medium
Select or create Key Pair
Configuration Storage - 15 GiB
Launch Instance Now

Open 'New Terminal', access your Server and run below commands-
//Change directory to the location where key pair file is located
$ cd Downloads
$ ssh -i [keypair-name].pem ubuntu@[public IP of SonarQube Server]
$ sudo apt update
$ sudo apt upgrade -y
$ sudo sh -c 'echo "deb http://apt.postgresql.org/pub/repos/apt $(lsb_release -cs)-pgdg main" > /etc/apt/sources.list.d/pgdg.list'
$ wget -qO- https://www.postgresql.org/media/keys/ACCC4CF8.asc | sudo tee /etc/apt/trusted.gpg.d/pgdg.asc &>/dev/null
$ sudo apt update
$ sudo apt-get -y install postgresql postgresql-contrib
$ sudo systemctl enable postgresql

//Create Database for Sonarqube
$ sudo passwd postgres // set the password
$ su - postgres // Provide the password that we set just now
$ createuser sonar
$ psql
# ALTER USER sonar WITH ENCRYPTED password 'sonar';
# CREATE DATABASE sonarqube OWNER sonar;
# grant all privileges on DATABASE sonarqube to sonar;
# \q
$ exit

// Add Adoptium repository
$ sudo bash
# wget -O - https://packages.adoptium.net/artifactory/api/gpg/key/public | tee /etc/apt/keyrings/adoptium.asc
# echo "deb [signed-by=/etc/apt/keyrings/adoptium.asc] https://packages.adoptium.net/artifactory/deb $(awk -F= '/^VERSION_CODENAME/{print$2}' /etc/os-release) main" | tee /etc/apt/sources.list.d/adoptium.list

//Install Java 17
# apt update
# apt install temurin-17-jdk
# update-alternatives --config java
# /usr/bin/java --version
# exit

// Linux Kernel Tuning
$ sudo vi /etc/security/limits.conf
An editor file will open. Add below two line at the end of the files-
sonarqube - nofile 65536
sonarqube - nproc 4097
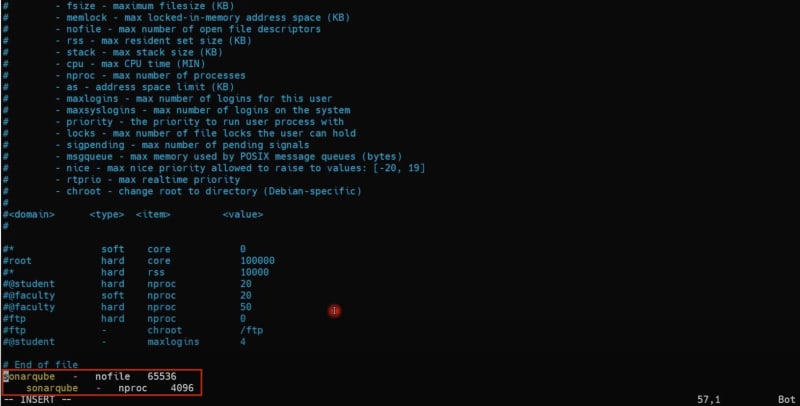
Save and come out of the file using ESC button and :wq + hit enter
$ sudo vi /etc/sysctl.conf
An editor file will open. Paste the below line at the end
vm.max_map_count = 262144

// reboot server now
$ sudo init 6
Note: Edit inbound rules of 'SonarQube' server to allow its port 9000

Access again to SonarQube server using terminal and run the below commands -
//Change directory to the location where key pair file is located
$ cd Downloads
$ ssh -i [keypair-name].pem ubuntu@[public IP of SonarQube server]
// Sonarqube installation
$ sudo wget https://binaries.sonarsource.com/Distribution/sonarqube/sonarqube-9.9.0.65466.zip
$ sudo apt install unzip
$ sudo unzip sonarqube-9.9.0.65466.zip -d /opt
$ sudo mv /opt/sonarqube-9.9.0.65466 /opt/sonarqube
// Create user and set permissions
$ sudo groupadd sonar
$ sudo useradd -c "user to run SonarQube" -d /opt/sonarqube -g sonar sonar
$ sudo chown sonar:sonar /opt/sonarqube -R
// Update Sonarqube properties with DB credentials
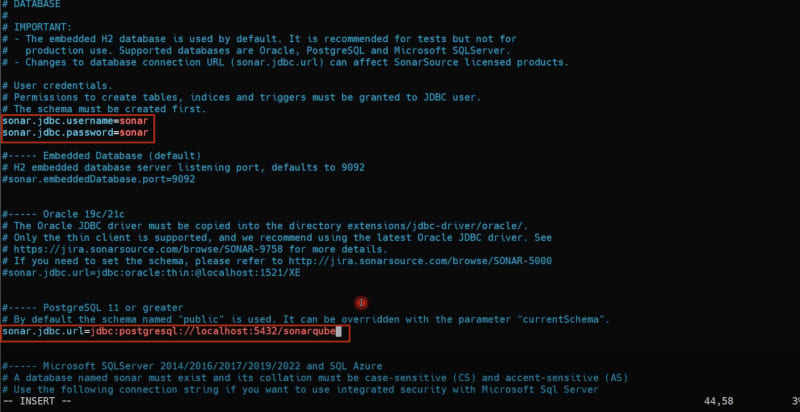
$ sudo vim /opt/sonarqube/conf/sonar.properties
An editor will open. Find, uncomment and replace below values, you might need to add the sonar.jdbc.url
sonar.jdbc.username=sonar
sonar.jdbc.password=sonar
sonar.jdbc.url=jdbc:postgresql://localhost:5432/sonarqube
// Create service for Sonarqube
$ sudo vim /etc/systemd/system/sonar.service   //Paste the below into the file [Unit] Description=SonarQube service After=syslog.target network.target

 [Service]
 Type=forking

 ExecStart=/opt/sonarqube/bin/linux-x86-64/sonar.sh start
 ExecStop=/opt/sonarqube/bin/linux-x86-64/sonar.sh stop

 User=sonar
 Group=sonar
 Restart=always

 LimitNOFILE=65536
 LimitNPROC=4096

 [Install]
 WantedBy=multi-user.target

// Start Sonarqube and Enable service
$ sudo systemctl start sonar
$ sudo systemctl enable sonar
$ sudo systemctl status sonar

// Watch log files and monitor for startup
$ sudo tail -f /opt/sonarqube/logs/sonar.log
Copy public IP of SonarQube server and paste in the browser with port 9000

Note: By default SonarQube's username is 'admin' and password is also 'admin'
Update new password and go to console

Integrate SonarQube with Jenkins
From SonarQube Console-
Click on profile -> My Account -> Security
Name - jenkins-sonarqube-token
Type - Global Analysis Token
Expire in - Never
Click on generate Note: Copy token & save it
Go to Jenkins Dashboard-
Manage jenkins -> Credentials -> Add new Credentials
Kind - Secret Text
Secret - [Paste jenkins-sonarqube-token here]
Id - jenkins-sonarqube-token
Description - jenkins-sonarqube-token
Now click on 'create'
Go to plugins and Download plugins for SonarQube and install it
Restart Jenkins
Manage Jenkins -> System -> Search for 'SonarQube Servers' -> Add SonarQube
Name - sonarqube-server
Server URL - http://[private IP of Sonar server]:9000
Server authentication Server - Select 'jenkins-sonarqube-token'
Apply & Save
Manage jenkins -> Tools
Search 'SonarQube Scanner installations' -> Add SonarQube Scanner
Name - sonarqube-scanner
Apply & Save
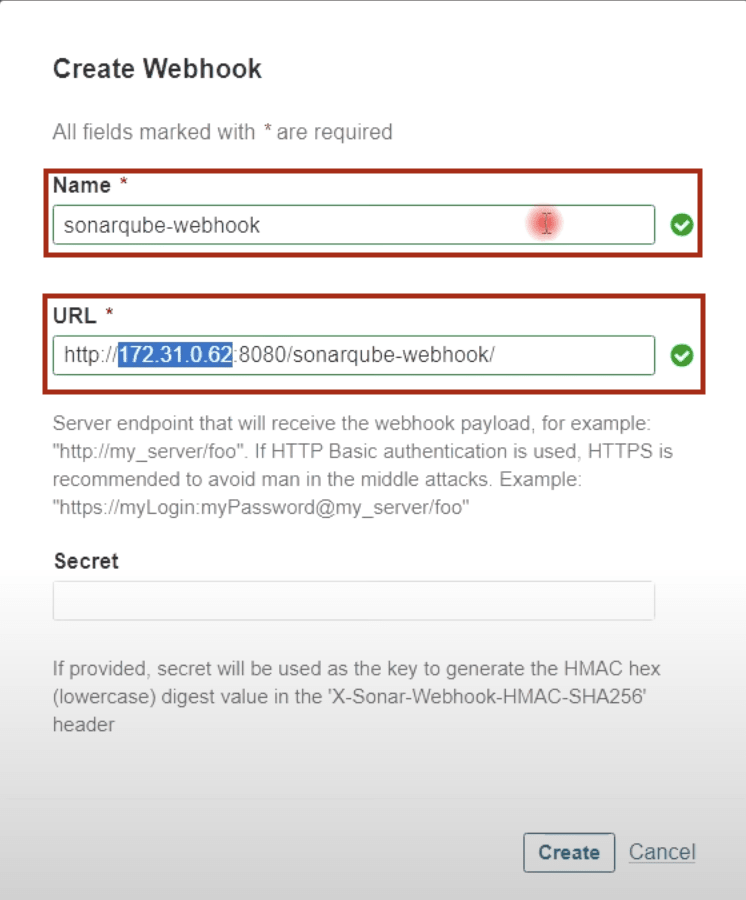
Go to SonarQube Dashboard-
Create Webhook
Name - sonarqube-webhook
URL - http://[Private IP of Jenkins-Master]:8080/sonarqube-webhook/
Build and Push Docker Image using Pipeline Script
Go to Jenkins Dashboard-
Download all Plugins for Docker and install it
Restart Jenkins
Now, add credentials for Docker in Jenkins
Note: Before adding credentials in Jenkins create a New access token from Docker hub and use the same while adding credentials in Jenkins.
Id - dockerhub
Description - dockerhub
Setup Bootstrap server for eksctl and setup Kubernetes using eksctl
Go to AWS Console
Name - EKS-Bootstrap-Server
AMI - Ubuntu(Free tier)
Instance Type - t2.micro
Select or create Key Pair
Configuration Storage - 15 GiB
Launch Instance Now

//Install AWS Cli on the above EC2
$ curl "https://awscli.amazonaws.com/awscli-exe-linux-x86_64.zip" -o "awscliv2.zip"
$ apt install unzip
$ unzip awscliv2.zip
$ sudo ./aws/install
$ /usr/local/bin/aws --version

//Installing kubectl
$ curl -O https://s3.us-west-2.amazonaws.com/amazon-eks/1.27.1/2023-04-19/bin/linux/amd64/kubectl
$ ll
$ chmod +x ./kubectl //Gave executable permisions
$ mv kubectl /bin  //Because all our executable files are in /bin
$ kubectl version --output=yaml
$ curl --silent --location "https://github.com/weaveworks/eksctl/releases/latest/download/eksctl_$(uname -s)_amd64.tar.gz" | tar xz -C /tmp
$ cd /tmp
$ ll
$ sudo mv /tmp/eksctl /bin
$ eksctl version
Go to AWS Console and create one IAM role
Select AWS Service
Service or Use Case - EC2
Add Permission - AdministrationAccess
Name - eksctl_role
Click on Create role
Back to Instances
Select 'EKS-Bootstrap-Server'
Click on 'Action' drop down
Go to 'Security'
Click on 'Modify IAM role'
Click on 'Choose IAM role'
Select 'eksctl_role'
Click 'Update IAM role'
Go to EKS-Bootstrap-Server terminal
// Setup Kubernetes using eksctl
$ eksctl create cluster --name [name of cluster]
--region ap-south-1
--node-type t2.small
--nodes 3 \       //Minimum 3 nodes required for this project
$ kubectl get nodes
ArgoCD Installation on EKS Cluster and Add EKS Cluster to ArgoCD
On EKS-Bootstrap-Server terminal
$ kubectl create namespace argocd

//Next lets apply the yaml configuration files for ArgoCd
$ kubectl apply -n argocd -f https://raw.githubusercontent.com/argoproj/argo-cd/stable/manifests/install.yaml

//Now we can view the pods created in the ArgoCD namespace.
$ kubectl get pods -n argocd

//To interact with the API Server we need to deploy the CLI:
$ curl --silent --location -o /usr/local/bin/argocd https://github.com/argoproj/argo-cd/releases/download/v2.4.7/argocd-linux-amd64
$ chmod +x /usr/local/bin/argocd

//Expose argocd-server
$ kubectl patch svc argocd-server -n argocd -p '{"spec": {"type": "LoadBalancer"}}'

//Wait about 2 minutes for the LoadBalancer creation
$ kubectl get svc -n argocd

//Get pasword and decode it.
$ kubectl get secret argocd-initial-admin-secret -n argocd -o yaml
$ echo WXVpLUg2LWxoWjRkSHFmSA== | base64 --decode
Copy DNS name for the LoadBalancer, created for the argocd-cluster and paste it in the browser

Login to ArgoCD using admin as username and decoded password
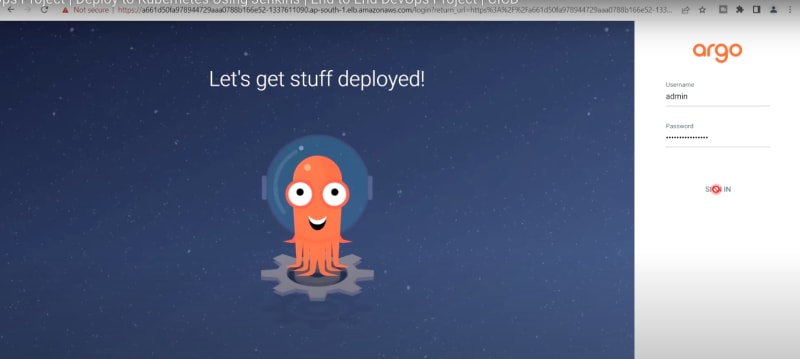
Note: Update password once you are logged in
Login to ArgoCD in Terminal
$ argocd login [url of argocd_cluster] --username admin // Use updated password

Go to ArgoCD Dashboard -> Setting -> Clusters
Note: We can see default cluster here. We can see same cluster using CLI
$ argocd cluster list

//To get details of eks_cluster
$ kubectl config get contexts

//To add eks_cluster to argocd
$ argocd cluster add [name of eks-cluster] --name shamim-eks-cluster
$ argocd cluster list
Note: Go to ArgoCD and you can see created cluster there.

Configure ArgoCD to deploy Pods on eks and Automate ArgoCD Deployment job using GitOps GitHub Repository
Note: We need another repository and can be forked from https://github.com/MSFaizi/gitops-register-app.git
Go to ArgoCD Dashboard and configure this repository.
Dashboard -> Settings -> Repositories -> Connect Repo
Via HTTPS
Type - git
Project - Default
Repository URL - [gitops-register-app github URL]
Username - [GitHub username]
Password - [GitHub account password]
Click on 'Connect' Note: It will show 'Successful' as connection status
Dashboard -> New App ->
Application Name - register-app
Project Name - default
Sync Policy - Automatic
Tick on 'Prune Resources' and 'Self Heal'
Repository URL - Select added one
Revision - Head
Path - ./
Cluster URL - Select added one from drop down
Namespace - default
Now click on create

Go to EKS-Bootstrap-Server terminal
//To see pods
$ kubectl get pods

// To get external DNS name for app
$ kubectl get svc // Copy DNS name and paste in the browser with port 8080
We can see default homepage of Apache server

Put /webapp after port 8080 in the browser

Go to Jenkins Dashboard in the browser
Dashboard -> New Item
Item Name - GitOps-register-app-cd
Select 'Pipeline' and click OK
Tick 'Discard old builds'
Max # builds to keep - 2
Tick on 'This project is parameterized'
Add Parameter - String Parameter
Name - IMAGE_TAG
Tick on 'Trigger builds remotely (e.g. from scripts)'
Authentication token name - GitOps-token
Under Pipeline -> Definition - pipeline script from SCM
SCM - git
Repository URL - [GitOps-register-app GitHub URL]
Credentials - Select GitHub credential [If don't show in drop down then add it from Jenkins Credentials settings]
Branch Specifier - */main
Apply & Save
Click on User profile -> Configure
Under API token click on 'Add new token'
Give name as 'JENKINS_API_TOKEN' and click on Generate Note: Copy token and save it
Apply & Save
Dashboard -> Manage Jenkins -> Credentials
Click on global and and add Credentials
Kind - Secret text
Secret - [paste JENKINS_API_TOKEN code here]
Description - JENKINS_API_TOKEN
Click on create
Congratulation! Its done now
Verify CI/CD pipeline by doing test commit on GitHub Repo
Go to Jenkins Dashboard again
Click on register-app-ci

Configure
Under build triggers
Tick Poll SCM
Schedule - *
Apply & Save
Note*: Now you can test this pipeline as many times as you want by changing to the code and pushing them to GitHub*
Subscribe to my newsletter
Read articles from ProDevOpsGuy Tech Community directly inside your inbox. Subscribe to the newsletter, and don't miss out.
Written by
ProDevOpsGuy Tech Community
ProDevOpsGuy Tech Community
𝑪𝒍𝒐𝒖𝒅 𝒂𝒏𝒅 𝑫𝒆𝒗𝑶𝒑𝒔 𝑻𝒆𝒄𝒉 𝑪𝒐𝒎𝒎𝒖𝒏𝒊𝒕𝒚 || 𝑷𝒓𝒐𝑫𝒆𝒗𝑶𝒑𝒔𝑮𝒖𝒚 🤖 https://t.me/prodevopsguy 👋 Hi there! We are ProDevOpsGuy, a passionate DevOps enthusiast Tech Community with a strong belief in the power of automation and collaboration to drive innovation. 🚀 I thrive in bridging the gap between development and operations, creating seamless and efficient software delivery pipelines. My journey in the world of DevOps has allowed me to blend my technical skills with a knack for problem-solving, enabling me to contribute effectively to agile and dynamic environments. 💡 With a keen interest in continuous integration, continuous delivery (CI/CD), containerization, and orchestration, I've had the privilege to explore cutting-edge technologies like Docker, Kubernetes, Jenkins, and Ansible. I find joy in designing scalable and resilient infrastructures that enable teams to deploy applications faster and with greater confidence. 🌐 Beyond the tech realm, I'm an advocate for DevOps culture, emphasizing collaboration, communication, and a relentless pursuit of improvement. I'm always eager to connect with fellow professionals, exchange insights, and explore opportunities to collaborate on exciting projects. 📚 When I'm not tinkering with the latest DevOps tools, you can find me indulging in books on technology trends, hiking to rejuvenate, and occasionally experimenting with new coding challenges. 🌟 Let's connect! Whether you're looking to discuss DevOps methodologies, explore partnership opportunities, or simply share experiences, feel free to reach out. I'm excited to be part of the DevOps journey, driving excellence together.