What happens when you type a URL in your browser ?
 deepak chawla
Table of contents
Step 1) DNS Lookup:
Suppose you enter https://www.example.com, now your browser needs to make a request for the webpage on the server of https://www.example.com but where is that server on the internet, there are so many computers connected to internet, which one is the server of website i want to request. Think, how do you solve this problem in real life, how do you go to your friends house ? how do you go to your college or office ?
You go to any of these places with the help of it's address. So, as we humans creates address of each house, building, lane, city and more , likewise we have addresses of each computer connected on the internet, that address is called as the Public IP of that computer. So till now you have understood that each server which actually is just any other computer has it's unique address called it's Public IP address, now the question is how our browser will be able to know that address ? Because what my browser has is just the url(https://www.example.com) what i have written.
Let's see how it works !! Basically like we have our phone book where we store phone number of corresponding person, similarly there are some specific servers called Domain Name Servers which maintains a record of domain names and their corresponding Public IPs.
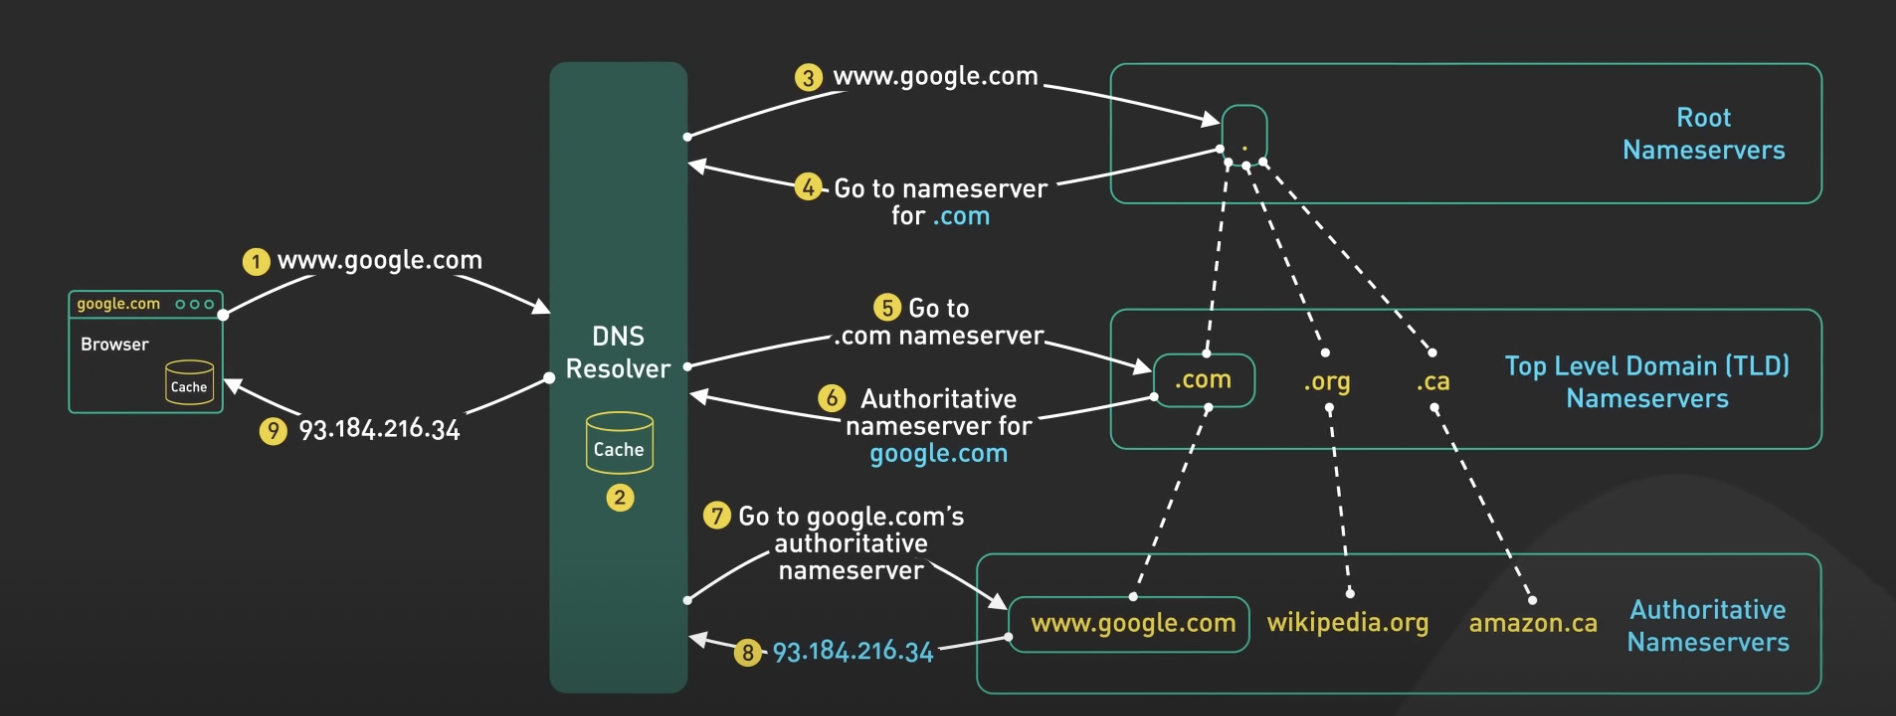
So once you type a URL, the very first step that browser does is, it check if it can found the ip of that specific domain in it's cache, if not it will check in OS Cache, if not there also, it will be check in router cache, if not there, it will check in HUB Cache, if not there, ISP cache will be checked, it will keep on checking recursively till it founds the IP. If it's not present in ISP cache also, request goes to DNS Resolver. If the DNS resolver does not have the answer in it's cache it. It finds the right Authoritative Nameserver and ask it. Authoritative Name servers are the ones who knows the answer. When we update domain's DNS records, we are updating its authoritative nameserver.
I know last paragraph can be little overwhelming or confusing. Let's understand step by step. So before going into depth of Authoritative Nameserver, let's understand how DNS resolver find the correct Authoritative Nameserver.

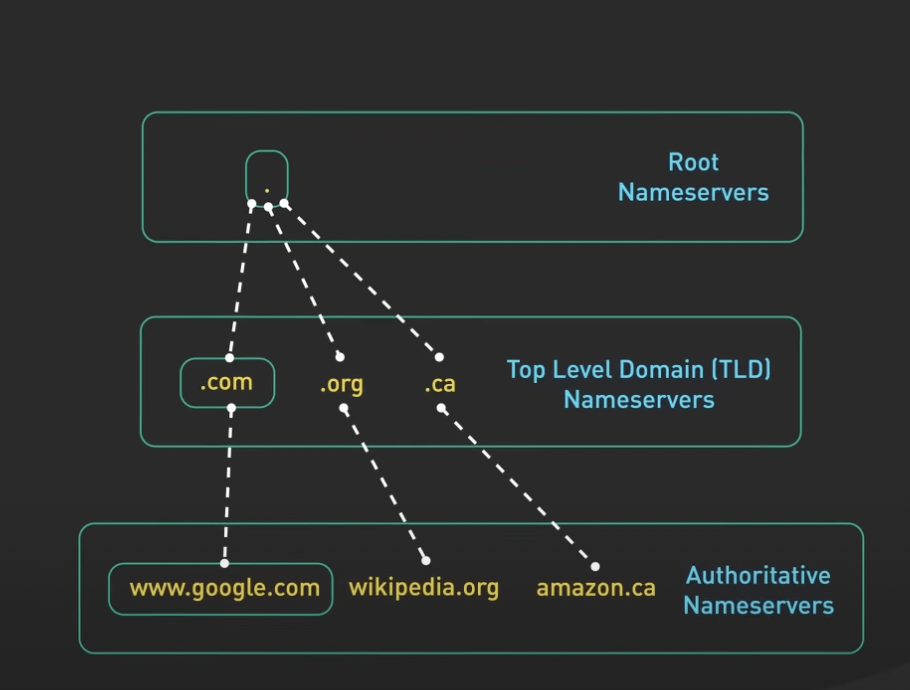
So there are basically 3 main levels of Authoritative Domain Name Servers.
Root Nameservers :

Root Nameservers stores the ip address of TLD Nameservers. There are total 13 Root nameservers. It returns the IP address of correct TLD server to DNS resolver.
TLD Nameservers:

Once DNS resolver got the ip of TLD nameserver, it requests the TLD Nameserver for the ip of Authoritative nameserver. There are many kinds of TLD names like .com, .co, .in, .gov, .edu and many more.
- Authoritative nameservers: Once DNS resolver got the ip of Authoritative nameserver, it requests the the for the ip of the requested domain.
Look at the below image to see how a typical DNS Query is resolved.

Finally after so many efforts, our browser has the Pubic IP address of the domain. Now it moves to the next step, which is making a connection to that server.
Step 2) TCP Handshake:
Once our browser has figured out the address of the server, it's time to talk to it. To talk to it, first browser needs to make a connection to the server. Therefore our browser makes a connection using a protocol called TCP (Transmission Control Protocol). It happens using a process called TCP - Three Way Handshake.

First, client sends to SYN(hey server, i want to connect to you) message to the server.
Second, servers sends back ACK (hi client, i have received your message) and SYN (and, i am available to connect)
Third, client sends back ACK (hi server, i have received your acknowledgement)
Once this 3 way handshake is done, our connection is established with the server and we are ready to transfer data.
Step 3) SSL Handshake:
This step is not required in case of HTTP connection while it's must in case of HTTPS. This handshake is done to make the connection secure so that no one can interpret when data is being transferred between client and server. To read about this, you can go here.
Step 4) Critical Rendering Path:
Note: This step is also asked as a separate question in interviews and it's super important when it comes to Frontend System Design rounds
Once the secure connection is established, you will start getting data from the server and first thing you will get is HTML file and eventually CSS and Javascript files. Now from the time you got your HTML, CSS and Javascript till UI is painted on your browser, the complete process is called Critical Rendering Path.It is the sequence of steps by which browser converts your HTML, CSS and Javascript into pixels on screen. It's very important to understand this because you can optimise your frontend application only after understanding how it is rendered.
HTML DOM : This is the very first step in CRP, it involves converting your HTML into DOM tree. DOM construction is a incremental step. This incremental construction allows web browsers to start rendering and displaying content to users before the entire document has been loaded. As the browser parses additional HTML content, it continues to update and expand the DOM tree accordingly. This approach helps improve perceived page load times and provides a smoother user experience, especially for large or complex web pages
CSSOM: Once your DOM is created, it's time to convert into CSS into CSS Object Model. DOM contains all the information about contents of the webpage while CSSOM contains information on how to style the DOM.
Note: While DOM construction is incremental CSSOM construction is rendering blocking because rules can be overwritten eg. first you give yellow color to a class but later in the css file, you make it red. If CSSOM would also be incremental, you will see yellow color for a blink and soon it will be blue, which is not at all a good experience.Render Tree: Once your DOM and CSSOM both are ready. It's time to merge them both and make render tree. Render tree only contains content that is actually going to be rendered on the screen. eg. if you have specified
display:noneon any HTML element, it will be present in HTML DOM Tree but will be removed from render tree only with it's descendants.Layout : This step basically determines how the layout is going to be looked. Where and how the elements are going to be positioned on webpage, determining width and height of each element, where they are in relation of each other and more.
Width of device impacts the layout. The viewport meta tag defines the width of layout.
If we don't set the meta tag, browser uses the default viewport width which is
960pxfor full screen.<meta name="viewport" content="width-device-width"/>specifies width will be width of device instead of viewport width.Layout happens every time a device is rotated or browser is resized
Paint: Once your layout is decided, it's time to paint the pixels on the screen. On first load, entire screen is painted. After that, only impacted areas will be repainted as browsers are optimized to repaint the minimum area required.
This is how you should answer, if someone asks you what happens when a enter a URL !!! If you like my content, please consider following me on Linkedin
Subscribe to my newsletter
Read articles from deepak chawla directly inside your inbox. Subscribe to the newsletter, and don't miss out.
Written by
