How to Install aaPanel on Ubuntu
 Deactivated User
aaPanelis an open-source lightweight Linux control panel that provides a web interface and tools that simplify the creation of a web hosting environment. The control panel offers a straightforward web dashboard to set up websites, databases, DNS entries, mail accounts, and applications on the server.
In this article, we’ll install aaPanel on a Server, then create a simple website using the web interface.
Prerequisites
Deploy a new Ubuntu 20.04 cloud server.
SSH to the server and Create a standard user with sudo privileges.
Update the server.
Step 1 - Install aaPanel
Download the aaPanel installation script.
wget http://www.aapanel.com/script/install-ubuntu_6.0_en.sh
Run the downloaded script.
sudo bash install-ubuntu_6.0_en.sh
You will be prompted to set the installation directory. By default, /var/www/ will be used if you enter Y.
+----------------------------------------------------------------------
| aaPanel 6.0 FOR CentOS/Ubuntu/Debian
+----------------------------------------------------------------------
| Copyright © 2015-2099 BT-SOFT(http://www.aapanel.com) All rights reserved.
+----------------------------------------------------------------------
| The WebPanel URL will be http://SERVER_IP:8888 when installed.
+----------------------------------------------------------------------

Do you want to install aaPanel to the /www directory now?(y/n):
After the installation completes, a random administrator username and password will be displayed in your console and the required aaPanel ports will be automatically configured on the firewall.
Firewall reloaded
==================================================================
Congratulations! Installed successfully!
==================================================================
aaPanel Internet Address: http://example.com:8888/042cb80b
aaPanel Internal Address: http://example.com:8888/042vb80b
username: ***************
password: ***************
Warning:
If you cannot access the panel,
release the following port (8888|888|80|443|20|21) in the security group
==================================================================
Time consumed: 3 Minute!
Confirm current firewall rules if port 8888, and other aaPanel ports are allowed:
sudo ufw status
aaPanel is now ready for configuration.
Step 2 - Configure aaPanel
Copy the random secure URL from your SSH console. Paste it in your web browser and log in to the control panel using random credentials generated by the installation script.
http://your_server_ip:8888/your-random-string
Step 3 - Install a LAMP Stack
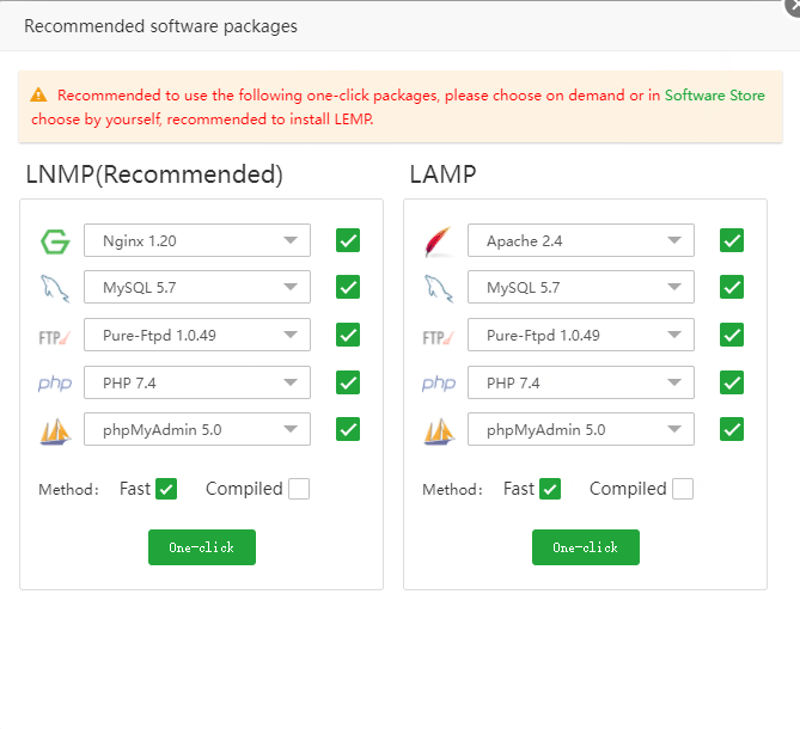
You will be required to install a web stack on your server. Both the LEMP and LAMP Stack will be displayed in a pop-up window. Select your best choice. In this article, we’ll install the LAMP stack.

The web stack installation process will start. Depending on your server specifications, the installation will take about 5 minutes to complete.
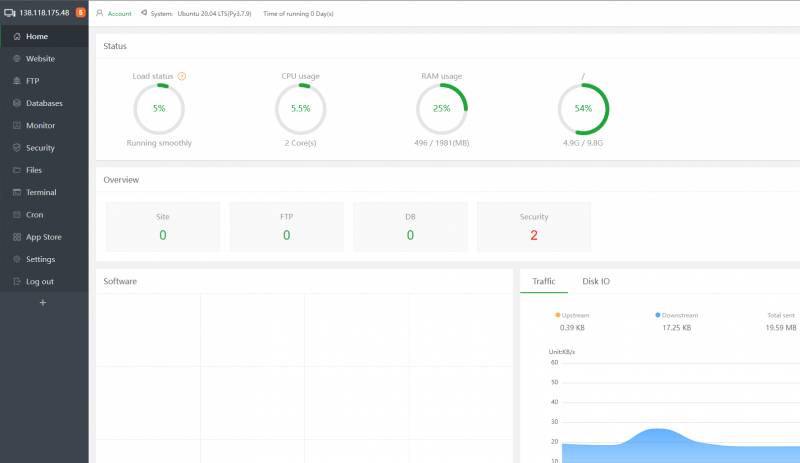
Next, the main aaPanel dashboard displays your current server resources usage, traffic, statistics, and control panel tools to configure the server.

Step 4 - Add a Domain Name
Let’s add a new domain name and create a simple website to host on the server.
Navigate to Website on the right pane, then choose between a PHP or Node JS Project and click Add Site. Enter your domain name, a description for the website, then select your database server and PHP version to use.
To secure the website with HTTPS, click Apply for SSL, then click Submit to create your new website.
Your website will be parked with a default system page. You can change it by uploading your website files to the domain’s web files directory /var/www/wwwroot/example.com/.
Step 5 - Secure the Server
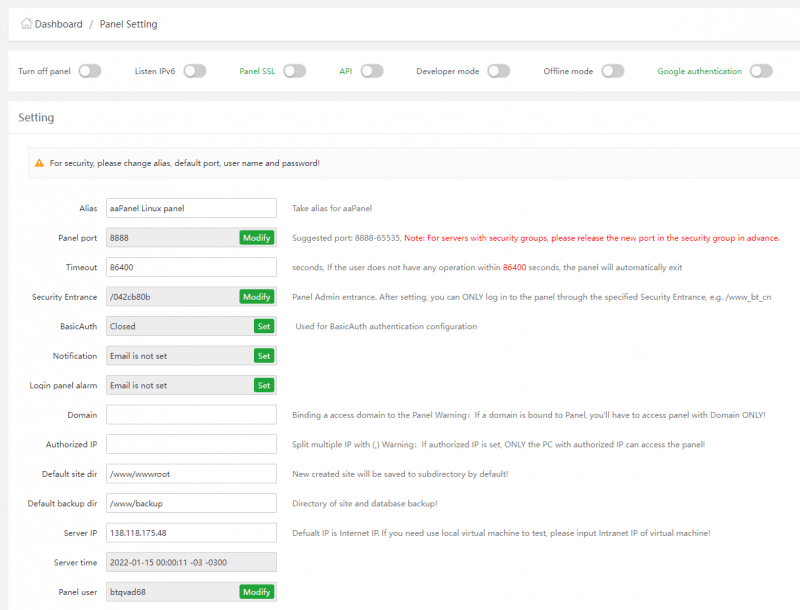
To secure the control panel, navigate to Settings and change the default port from 8888 to something random, then change Alias (Panel name) to your desired custom text.
Set a short timeout period of at least 360 seconds (6 minutes) to log out active users if the control panel is dormant with no user action.

Modify Security Entrance to a custom string you can use to securely access the control panel. You can not access the web panel without the security key because Security Entrance is turned on by default.
Additionally, change the administrator Panel user account and Panel Password from the random defaults provided by the installation script to your custom values. To further tighten your server security, you can optionally specify a list of authorized IP addresses that can access the web panel under Authorized IP.
Step 6 - Configure the System Service
If the server reboots, the web panel will fails to load on port 8888. Start aaPanel using bt as the service identifier.
sudo systemctl start bt
To confirm if the panel is running with or without errors, query the bt service status.
sudo systemctl status bt
Conclusion
In this article, you learned how to installed aaPanel on an Ubuntu 20.04 server. You can create multiple websites, FTP accounts, Email accounts, set Cron jobs, and use other tools that make web hosting possible on a virtual private server.
Subscribe to my newsletter
Read articles from Deactivated User directly inside your inbox. Subscribe to the newsletter, and don't miss out.
Written by
