Full Stack Web Application using Next JS
 Sujal Soni

Here's the 6th blog in this ongoing series, continuing our journey of building a Full Stack Web Application using Next JS.
Till now, I have uncovered the secrets of implementing backend with Next JS and performing User Authentication & performing CURD operation on Data using MongoDB.
In the previous blogs , I have provided the steps to setup Next JS project from scratch. Do check them out if you want to learn next.js from scratch!!
What's Coming up ⏩:
Setting up Firebase Storage for Image Upload.
Modifying the User Data Model and User Data Routes for Image upload.
Storing the image URL from Firebase to mongoDB along with the text data.
Before starting up, let me introduce myself 👦🏼
I'm Sujal Soni, a 3rd Year B.Tech. student in CSE who is a dedicated Full Stack Web Developer proficient in technologies like Node.js, Express.js, React.js, MongoDB, Firebase, Next JS. With a passion for problem-solving and attention to detail, I've successfully completed various projects. Eager to contribute to innovative projects and collaborate with talented teams to drive impactful solutions.
You can connect with me on Linkedin as well as on Twitter 👨🏼💻
If you are following this series from the start, then I'm sure that you have already implemented and understood important bits of next.js project setup.
New To this Blog Series? Start from Blog 1 taking the best out of this series.
Now as we are already done (Check previous blogs) with the Setup of our User Data Model and User Data Routes inside next.js, lets modify them in order to add Image feature in our next js project.
Code Reference:
Refer to my GitHub Repository to access the updated code and take reference:
https://github.com/Sujal-2820/Full-Stack-Web-Application
Step 1:
Updating Model file:
Add a new
imageUrlfield to store image URLs.Define
imageUrlas an array of strings with a default value ofnull.
// src/models/userData.js

import mongoose from "mongoose";

const userDataSchema = new mongoose.Schema({
    title: {
        ...
    },
    category: {
        ...
    },
    imageUrl: {
        type: [String],
        default: null
    },
    description: {
        ...
    },
    date: {
        ...
    },
    userID: {
        ...
    }
})

const UserData = mongoose.models.UserData || mongoose.model('UserData', userDataSchema);

export default UserData;
Updating User Data Route file:
Update POST route to handle
imageUrlinside userData/route.js file.// api/userData/route.js import UserData from "../../../models/userData"; ... export async function POST(request) { try { await Connection(request); ... const { title, category, imageUrl, description } = body; // Convert imageUrl to a single string const singleImageUrl = imageUrl; const newUserData = new UserData({ title, category, imageUrl: singleImageUrl, description, userID, }); await newUserData.save(); ... } catch (error) { ... } }
Step 2:
We had already setup Firebase SDK and Firebase Storage inside our project. ViewBlog 1for reference.
Now visit the Firebase Storage inside the Firebase and click on Rules tab.
Modify the firebase storage security rules as follows ⬇️:
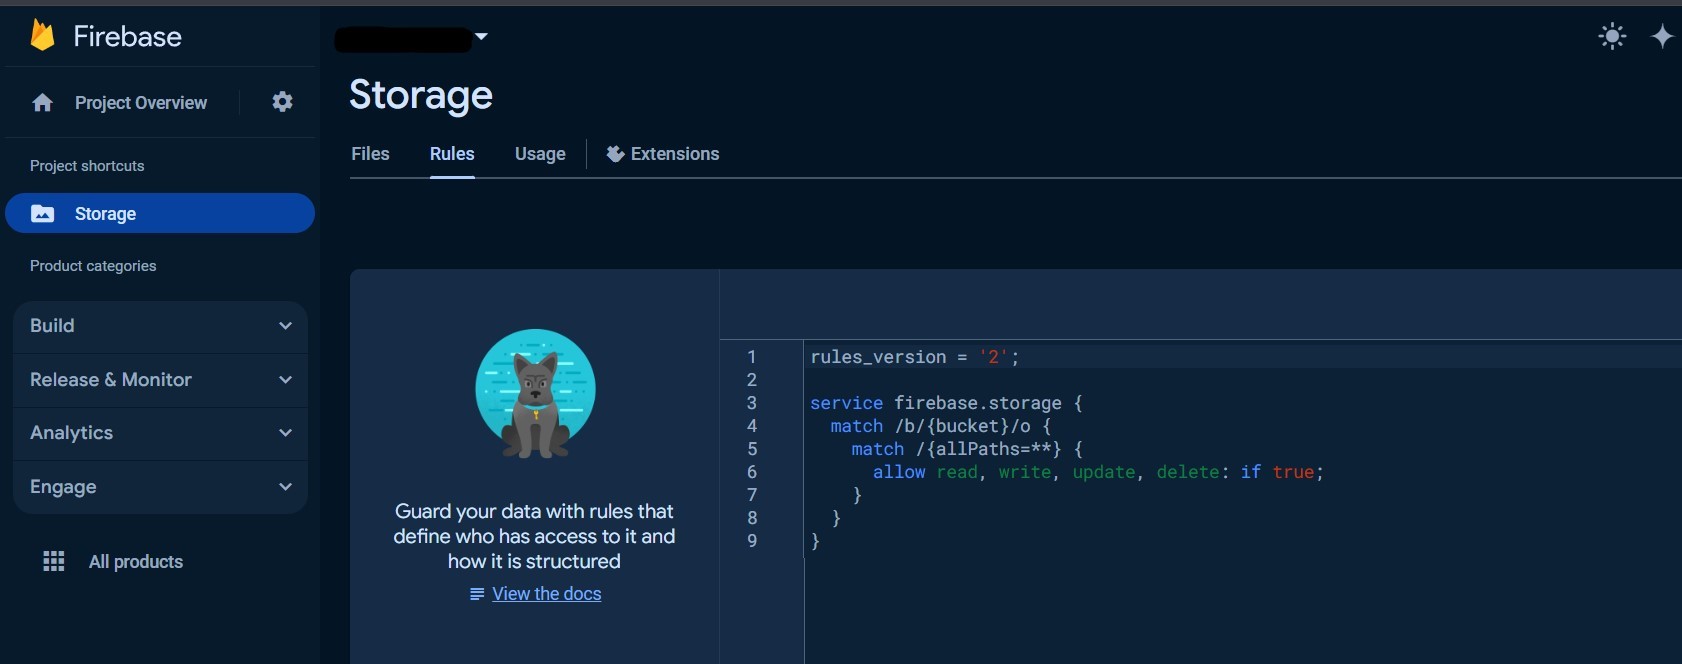
NOTE: I could have added authentication restrictions in the rules to make the storage of images more secure but for the sake of simplicity in understanding as of now, we will be working with the above rules only.
Step 3:
Modifying the existing Frontend:
Updating dashboard/addData/page.js file:
Integrate Firebase Storage functionalities like
getDownloadURL,ref,uploadBytesinto the file to interact with Firebase Storage.Implemented a function to update the selected image state when a user chooses a file for upload.
Utilize
uuidv4from theuuidpackage to generate a unique filename by appending a UUID to the original filename's extension.Add logic to handle form submission, including checks for selected image presence and size before proceeding with submission.
Enhance error handling for scenarios such as image upload failure or server-side errors, providing users with appropriate error messages for feedback.
      //src/app/dashboard/addData/page.js

      "use client";

      import React, { useState } from "react";
      other imports...
      import { imageDb } from "../../../../firebase";
      import { getDownloadURL, ref, uploadBytes } from "firebase/storage";
      import { v4 as uuidv4 } from "uuid";

      const AddDataPage = () => {
        const router = useRouter();
        ...
        const [selectedImage, setSelectedImage] = useState(null);
        ...

        const handleImageChange = (event) => {
          setSelectedImage(event.target.files[0]);
        };

        function generateUniqueFilename(originalFilename) {
          const extension = originalFilename.split(".").pop(); // Get the file extension
          return `${uuidv4()}.${extension}`;
        }

        const handleSubmit = async (e) => {
          e.preventDefault();

          if (!selectedImage) {
            setErrorMessage("Please select an image to upload");
            return;
          }

          // Check image size
          if (selectedImage.size > 5 * 1024 * 1024) {
            // Size exceeds 5MB
            setErrorMessage("Image size should be less than 5MB");
            return;
          }

          try {
            let uniqueFilename = generateUniqueFilename(selectedImage.name);

            // Upload image to Firebase Storage
            const imageRef = ref(
              imageDb,
              `dataImages/${uniqueFilename}/${selectedImage.name}`
            );
            await uploadBytes(imageRef, selectedImage);
            const imageUrl = uniqueFilename;
            console.log("image URL in Firebase", imageUrl);

            const response = await axios.post("/api/userData", {
              title,
              category,
              imageUrl,
              description,
            });
            console.log(response.data);
            router.push("/dashboard");
            setTitle("");
            setCategory("");
            setDescription("");
            setSelectedImage(null);
          } catch (error) {
            if (error.response) {
              // Check for errors during image download
              console.error(
                "Error downloading image URL:",
                error.response.data.message
              );
              setErrorMessage(error.response.data.message);
            } else {
              console.error("Error adding data:", error);
              setErrorMessage("An error occurred. Please try again later.");
            }
          }
        };

        return (
          <>
            <DashboardNavbarComponent />

            <div className="addData-parent-div">
              <h1 className="addData-heading">Add Data</h1>
              {errorMessage && (
                <p className="addData-error-message">{errorMessage}</p>
              )}
              <form className="addData-submit-form" onSubmit={handleSubmit}>
                <div className="addData-input-div">
                  ...
                </div>

                <div className="addData-input-div">
                  ...
                </div>

                <div className="addData-input-div">
                  <label className="addData-label" htmlFor="image">
                    Image:
                  </label>
                  <input
                    className="addData-input"
                    type="file"
                    id="image"
                    onChange={handleImageChange}
                  />
                </div>

                <div className="addData-input-div">
                  ...
                </div>

                <button className="addData-submit-button" type="submit">
                  Submit
                </button>
              </form>
            </div>
          </>
        );
      };

      export default AddDataPage;
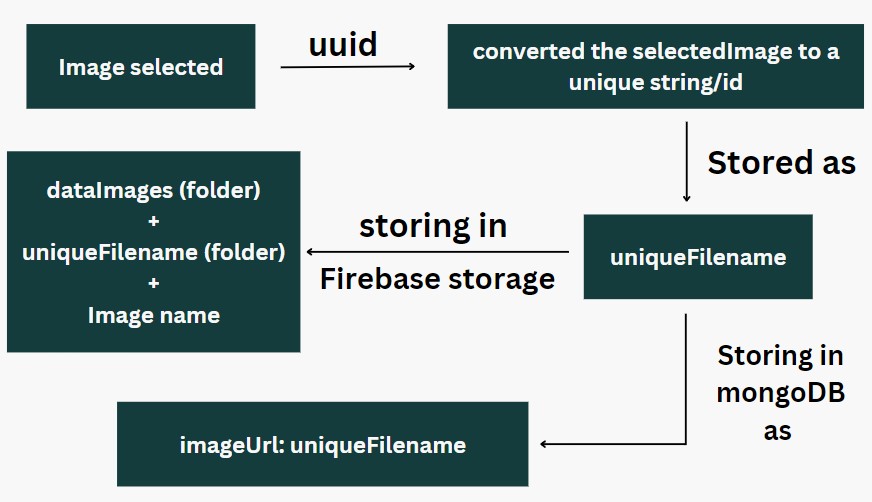
Can't understand what's happening here 🤷🏼♂️
Well this diagram is here to explain the scenario:
What is uuid here 🤔
💡UUID stands for Universally Unique Identifier.
💡It generates unique identifiers that are highly unlikely to be duplicated.
💡In the provided code, uuidv4() is used to generate a version 4 UUID, typically represented as a string of 32 hexadecimal digits.
Updating dashboard/page.js file:
Utilize Firebase Storage functionalities such as
listAll,ref,deleteObject, andgetDownloadURLto interact with images stored in Firebase Storage.Integrate functionality to delete user data along with its associated image from Firebase Storage upon user confirmation.
Enhance user experience by truncating long titles and descriptions in card components and formatting dates for better readability.
```javascript // src/app/dashboard/page.js
"use client";
import React, { useEffect, useState } from "react"; ... import axios from "axios"; import { imageDb } from "../../../firebase"; import { getDownloadURL, listAll, ref, deleteObject } from "firebase/storage";
function DashboardPage() { const router = useRouter(); const [userData, setUserData] = useState([]); ...
useEffect(() => { fetchData(); }, []);
const fetchData = async () => { try { const response = await axios.get("/api/userData"); const { userData } = response.data; console.log(userData);
const formattedData = await Promise.all(
userData.map(async (data) => {
const imgs = await listAll(
ref(imageDb, dataImages/${data.imageUrl})
);
console.log("Image reference: ", imgs);
const urls = await Promise.all(
imgs.items.map((val) => getDownloadURL(val))
);
console.log(urls);
const imageUrl = urls.length > 0 ? urls[0] : ""; return { ...data, imageUrl }; }) );
setUserData(formattedData); } catch (error) { console.error("Error fetching user data:", error); } };
const handleDelete = async (id, imageUrl) => { try { const confirmation = prompt( "Are you sure to want to delete the Data? Type Yes" ); if (confirmation !== "Yes") { return; // If the user doesn't confirm, do nothing }
// Delete image from Firebase Storage
const imageRef = ref(imageDb, imageUrl);
await deleteObject(imageRef);
await axios.delete(/api/userData/${id});
fetchData(); } catch (error) { console.error("Error deleting data:", error.response.data.message); // Handle error } };
...
return (
<>
{/ Cards /}
/dashboard/editData/${data._id})
}
>
Update
handleDelete(data._id, data.imageUrl)}
>
Delete
))}
</>
);
}
export default DashboardPage; ```
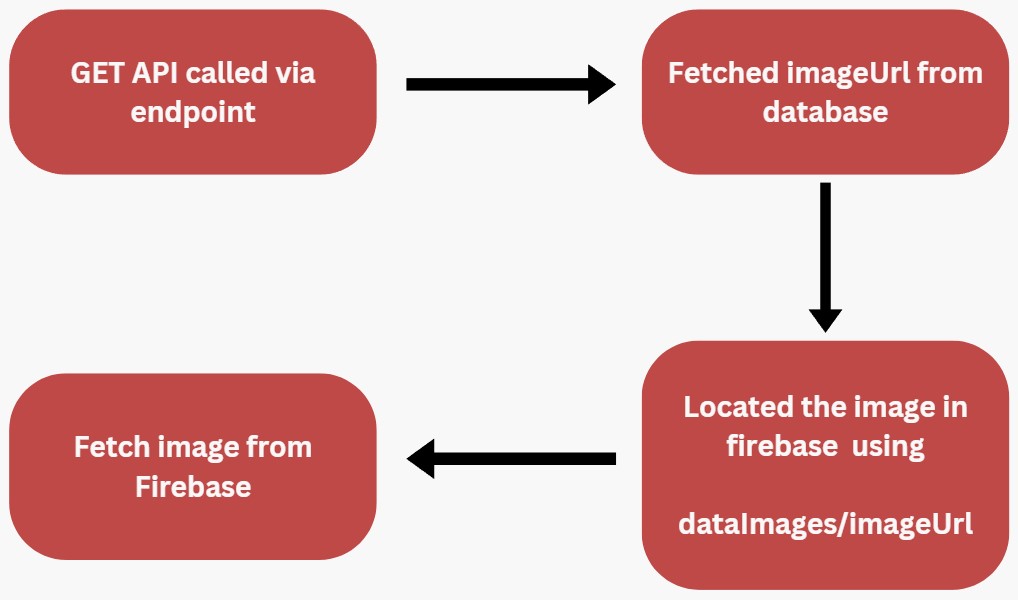
Diagram explanation of above implementation 👆🏼
👨🏼💻 Access the Full Code inside my GitHub repository: https://github.com/Sujal-2820/Full-Stack-Web-Application
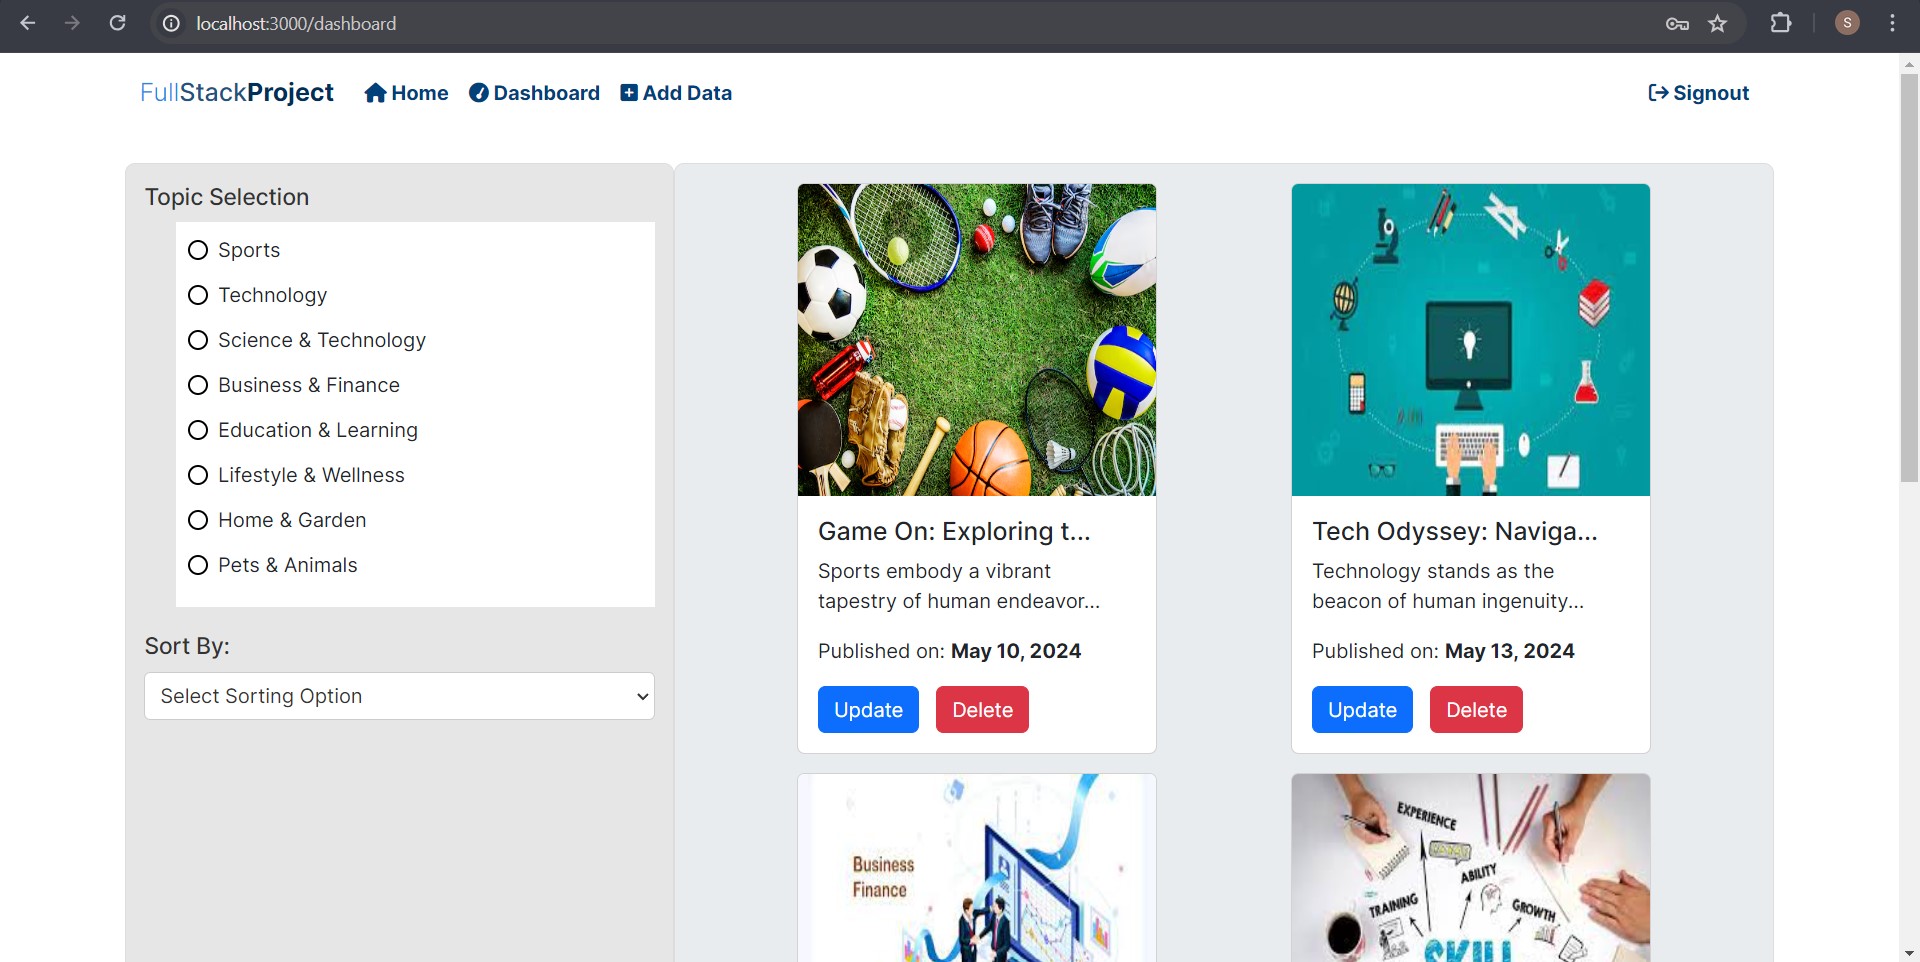
Our project has finally started taking a good Shape. Here is the snippet showcasing the same:
Well Done 🙌, you have successfully implemented CRUD operations inside the Next JS project using routes and model.
In the further parts of this series "Building Full-Stack Web Application using Next.js" I would be covering the following:
Sorting and displaying Data based on selected options. 🔥
Deploying the project globally to make it shareable 🌐
In case of any doubt, you can reach out to me via LinkedIn 👨💻
You can also connect with me on various other platforms like Twitter, GitHub
If you liked this Blog, make sure to give it a 💟 and do Follow me on this platform to get notified for my next blogs in this series.
Happy Coding!! 👨💻
Subscribe to my newsletter
Read articles from Sujal Soni directly inside your inbox. Subscribe to the newsletter, and don't miss out.
Written by

Sujal Soni
Sujal Soni
A passionate Web Developer who seeks to learn new Technologies every day