Sticky Situations: Pinning Toast Messages Dynamically in Angular!
 Joao Bento Candido Bezerra
Hey there, Angular aficionados! Ever had that "blink-and-you-miss-it" moment with toast messages in your web app? You know, when they pop up to share some juicy info, but vanish quicker than a plate of cookies at a bake sale? 🍪 We've all been there!
Toast messages are like those little sidekicks in our web adventures, popping up to deliver important updates or celebrate our victories. But let's face it, sometimes they disappear faster than a ninja in the night, leaving us squinting at our screens like, "Wait, what just happened?" 😅
I've been there, too! In my own Angular apps, whether using Angular Material or PrimeNG, I've scoured the internet for a solution to keep those messages hanging around a bit longer. But alas, it seemed like I was searching for the holy grail of toast persistence!
That's where dynamically pinning them comes in! Imagine if you could give those toast messages a little sticky note, keeping them around until you're good and ready to bid them farewell. Now that's what I call a game-changer in the world of Angular UI design!
What Are Toast Messages, Anyway?
Alright, let's break it down! 🎤 Toast messages are like those little pop-ups that slide into your web app to deliver bite-sized info. They're the digital equivalent of a friendly tap on the shoulder, letting you know what's up without being too in-your-face.
So, what's their jam? 🍓 Well, they're perfect for all sorts of situations! Think of them as your app's personal cheerleader, hyping up users with success messages after they hit that "submit" button or giving them a heads-up about any hiccups along the way. From confirming actions to delivering quick updates, toast messages are like the Swiss Army knives of user interaction!
Setup
Node.js 21
Angular 17 with standalone components
Display Toast Messages with PrimeNG
Step 1: Create an Angular Project
First things first, let's fire up a fresh Angular project using Angular CLI. Open your terminal and run the following command:ng new my-toast-project This command will create a new Angular project named my-toast-project.
Step 2: Install PrimeNG
Now, let's simply follow the installation guide on the official PrimeNG website. Navigate to your project directory and run:
cd my-toast-project
npm install primeng
After that add the necessary styles to your angular.json above styles.scss .
"styles": [
    "node_modules/primeng/resources/themes/lara-light-blue/theme.css",
    "node_modules/primeng/resources/primeng.min.css",
    "src/styles.css"
],
Step 3: Add providers for Animation and MessageService
Inside of your app.config.ts add the provider for the general animations and the used MessageService .
export const appConfig: ApplicationConfig = {
  providers: [
    ...
    provideAnimations(),
    MessageService
  ]
};
Step 4: Displaying a Toast
Now, let's display a toast message in our Angular component. Open app.component.html and update it as follows using the basic example in the primeNG Docs:
<div class="card flex justify-content-center">
  <p-toast />
  <p-button pRipple (click)="show()" label="Show" />
</div>
Lastly edit your app.component.ts as follows:
import {Component, inject} from '@angular/core';
import {ToastModule} from "primeng/toast";
import {ButtonModule} from "primeng/button";
import {MessageService} from "primeng/api";
import {RippleModule} from "primeng/ripple";

@Component({
  selector: 'app-root',
  standalone: true,
  imports: [ToastModule, ButtonModule, RippleModule],
  templateUrl: './app.component.html',
  styleUrl: './app.component.css'
})
export class AppComponent {
  private messageService: MessageService=  inject(MessageService);

  show() {
    this.messageService.add(
      { severity:'success', summary:'Success', detail:'Message Content' }
    );
  }
}
Here, we've imported MessageService from PrimeNG and injected it into our component. We've also created a method showToast() that adds a success toast message using the add() method of MessageService.
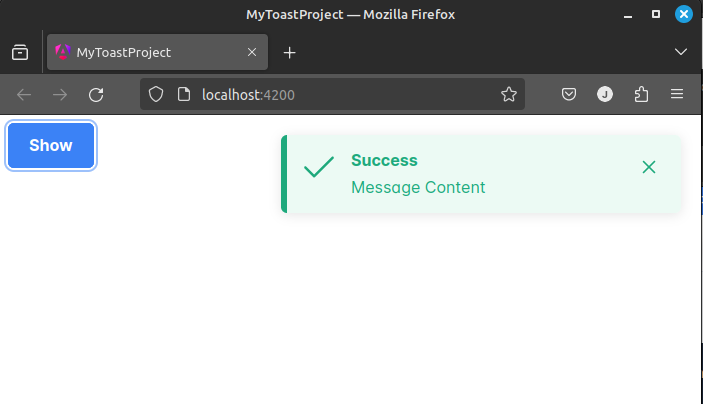
Great! With this setup we can now simply run our application with ng serve and see our toast popping up:

The Challenge: Toast Messages That Vanish in a Flash!
So, you've got your Angular app up and running, and those toast messages are doing their thing—popping up to share updates, confirmations, and all that jazz. But here's the snag: they're vanishing quicker than you can say "Angular rocks!"
But here's the kicker: we can't just make every toast sticky by default, or we'd end up in a sticky situation ourselves! Imagine having to manually clear every toast that's cluttering up the screen. Ain't nobody got time for that! 🙅♂️
This vanishing act can spell frustration and a downright poor user experience. Users might miss important updates, overlook critical information, or worse, feel like they're playing a game of "Where's Waldo?" with their toast messages. And trust me, nobody wants to play that game!
Solution: Stick Around with Dynamically Pinned Toasts!
Enter the hero of our story: dynamically pinning toast messages! 📌💬 Picture this: instead of your toasts pulling a vanishing act, they come with their own little "stay" button. Yep, you heard that right! With dynamically pinning, users can keep those toast messages front and center until they're ready to bid them adieu.
No more blink-and-you-miss-it moments here! Dynamically pinning gives users the power to call the shots, keeping those important updates, victories, and tidbits of info right where they need 'em.
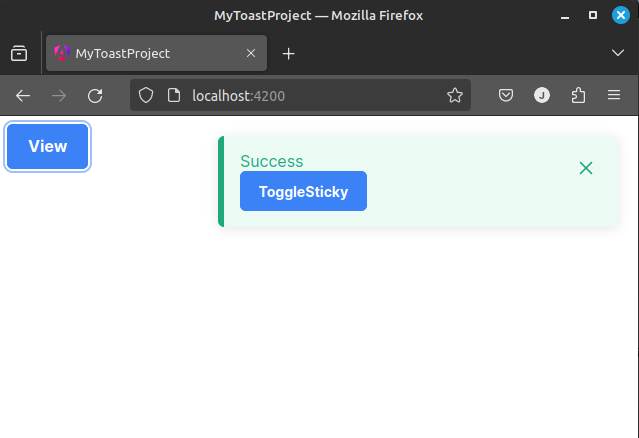
To keep things simple, I'll jazz up my toast messages with a little 'toggleSticky' button right inside my toast using the PrimeNG templates. With a click of this magic button, the corresponding toast will go from being a fleeting visitor to a permanent resident on your screen until you give it the tap again. Easy peasy, right? Let's see how that works.
First up, let's give our toast messages a fresh new look:
<div class="card flex justify-content-center">

  <!-- we need to use a key now -->
  <p-toast position="top-right" key="test-toggle-toast">
    <ng-template let-message pTemplate="message">
      <div class="flex flex-column align-items-start" style="flex: 1">
        <div class="font-medium text-lg my-3 text-900">
          {{ message.summary }}
        </div>
        <p-button size="small" label="ToggleSticky" (click)="onToggleSticky()" />
      </div>
    </ng-template>
  </p-toast>
  <p-button pRipple (click)="show()" label="View" />
</div>
In this revamped HTML section, all we really need to focus on is jazzing up our toast with a catchy key (maybe a random string) to help us identify the messages it throws. As for the rest, it's all simple PrimeNG templating stuff.
export class AppComponent {
  // @ts-ignore
  @ViewChild(Toast) toast: Toast;

  private readonly messageService: MessageService=  inject(MessageService);

  show() {
    this.messageService.add(
      { severity: 'success', summary: 'Success', detail: 'Message Content', key:'test-toggle-toast' }
    );
  }

  onToggleSticky() {
    this.toast.messages?
      .filter(m => m.key === "test-toggle-toast")
      .forEach(m => m.sticky = !m.sticky)
  }
}
Now for the interesting part! You see, while the MessageService is a straightforward service that holds an observable, it's not really in the loop about which toast messages are currently on display. That's where our Toast instance comes into play. It's the one that's subscribed to the MessageService and holds the crucial array of our toast messages currently in view. In this smart move, we'll rely on our dependable Toast instance to track down the message with our special key.
I'm throwing in a little @ts-ignore here to keep TypeScript's strictness at bay. After all, we don't want to bother initializing a @ViewChild just to keep TypeScript happy, do we?
Voila! We're all set and sticky now. Here's the scoop: hitting that 'Show' Button will toss a fresh message onto the toast, but it'll vanish after a few seconds. However, when you give that 'ToggleSticky' button inside the toast a little lovely tap, that toast will stick around like an old friend at a cozy gathering – until you decide it's time to bid it farewell by hitting 'ToggleSticky' again. Pretty neat, huh? Give it a try and see for yourself!

Look it up on Github or try the demo on Stackblitz.
Subscribe to my newsletter
Read articles from Joao Bento Candido Bezerra directly inside your inbox. Subscribe to the newsletter, and don't miss out.
Written by
