Your own container registry
 Binyamin Yawitz
In this article we'll learn how to create our own container registry, that will be functions as a private container registry and a Docker Hub mirror altogether.
Why?
When using a containerized-first architecture, two issue may arise.
The need of having private repositories AKA private images.
The need of having fast image fetching for multiple servers inside a local network, even for public available images.
To solve the first problem we need to have a private registry, and to solve the second we need to have a registry to mirror the public registry currently in use.
What?
The good old Docker Hub registry is part the CNCF, and is publicly available under the name Distribution.
As of now Distribution supports one of two type of deployments, either as a mirror (proxy) or as a private registry, as noted in the official website
Pushing to a registry configured as a pull-through cache is unsupported
But, we can find a way around it.
Using NJS
Nginx is one of the most popular revers-proxy out there offering resilient, reliable and fast proxy to various type of services. One of the less-known features of Nginx is NJS or Ngnix JavaScript.
NJS is integrated inside Nginx and can be enabled with one line. After enabling NJS, Nginx abilities are extended to the full power of programming-driven logic, you can see a lot of NJS examples here.
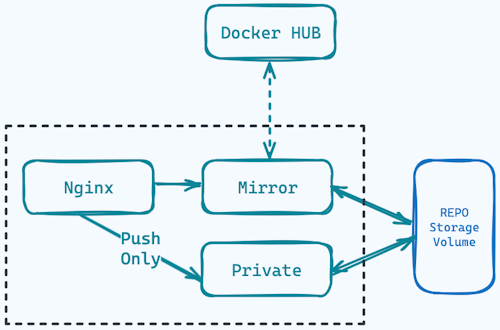
We're going to utilize NJS for enabling two Distributions deployment act as one, offering both mirroring option and private registry option.
Inside the JS code we're going to check whether the request method is GET for mirroring and existing images, or any other method for pushing images into our private registry.

As we can see in the diagram the deployment is composed of a Nginx service standing as the entry-point to our infrastructure, separating the requests to two different Distribution deployments based on the request method.
Both of the Distribution services are mounting the same storage as their repo volume storage.
How?
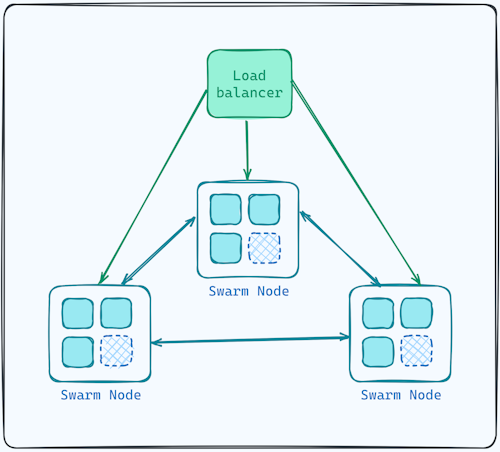
We'll deploy our registry using Docker Swarm using three Docker Swarm managers - with no workers as it's not required - behind load balancer, like such:

Each one of the Docker Swarm node manager need to have access to the same Storage volume. For that, we can utilize either nfs or any S3 compatible service.

Our nginx.conf is pretty short
upstream mirror {
  server registry-mirror:5000;
}

upstream private {
  server registry-private:5000;
}


js_import mirror from conf.d/mirror.js;
js_set $mirror mirror.set;

server {
    if ($http_user_agent ~ "^(docker\/1\.(3|4|5(?!\.[0-9]-dev))|Go ).*$" )  {
              return 404;
          }
  client_max_body_size 2G;
  listen 8080;

  location / {
    proxy_pass        http://$mirror;
    proxy_set_header  Host              $http_host;
    proxy_set_header  X-Real-IP         $remote_addr;
    proxy_set_header  X-Forwarded-For   $proxy_add_x_forwarded_for;
    proxy_set_header  X-Forwarded-Proto $scheme;
    proxy_read_timeout                  900;
  }
}
We're setting two upstreams. One for the mirror, and one for the private one. the decision to which one we'll route the traffic is done using NJS as we can see in these two lines
js_import mirror from conf.d/mirror.js;
js_set $mirror mirror.set;
The first line loads the file conf.d/mirror.js into an object named mirror, then it sets the value into a variable named $mirror using the mirror.set function. When the value is setup is being used as the proxy_pass value.
proxy_pass http://$mirror;
Last thing left to investigate is the code mirror.js itself.
export default {set}

const mirror      = 'mirror'
const privateRepo = 'private'

function set(r) {
    let c = mirror;

    if (r.method !== 'GET')
        c = privateRepo;

    return c;
}
Here we're exporting the function set, that checks to see if the request method is not GET and if so it will set the upstream to the private upstream.
To deploy our custom-registry we need to do the following steps:
Create a Docker Swarm leader
Join another 2 nodes as leaders as well
[in case of
nfs, attach thenfsstorage to the leaders]deploy the stack using the
docker-compose.ymlfile into the Swarm.
Prior to all servers setup make sure you're placing all serves in the same local network using VPC.
Create a Docker Swarm leader
Setup a Ubuntu server, and install Docker by running the following command as a root user.
curl -fsSL https://get.docker.com | sh
Then, init the swarm by running
docker swarm init
That's it you've a working docker swarm.
Run the following command to get the command for joining another managers to the Swarm.
docker swarm token join-token manager
# docker swarm join --token Very-Long-Token 10.0.16.230:2377
Join another 2 nodes
Setup another 2 Ubuntu servers and install Docker in them, then run join command from above
docker swarm join --token Very-Long-Token 10.0.16.230:2377
Now, run this command from anyone of the managers to see all attached nodes (machines).
docker node ls
Attach storage or set S3 credentials
Now it's time to attach the storage, we can use one of two options (other options are of course available, but we'll focus on those two) nfs="network file system" or S3 compatible storage. We'll R2 which is S3 compatible storage provided by Cloudflare with free egress (bandwidth) usages
Clone the lab repo and cd into the lab folder, then choose either nfs or r2.
git clone https://github.com/byawitz/labs.git
cd labs/02-your-own-cr/docker
# For nfs
cd nfs
# For r2
cd r2
R2
To set an R2 edit the docker-compose.yml file and adjust the the S3 endpoint, replace ACCOUNT_ID with your Cloudflare account ID.
REGISTRY_STORAGE_S3_REGIONENDPOINT: https://ACCOUNT_ID.r2.cloudflarestorage.com/
Then, create admin read/write/delete token within your Cloduflare r2 settings and paste the values into files/r2-access-key.txt and files/r2-secret-key.txt accordingly. you can move to the last step "Deploy the stack".
NFS
To set an NFS storage, setup another Ubuntu server and install the nfs service by running
apt update
yes | apt install nfs-kernel-server
Then, create a folder and grant it will all permissions.
mkdir -p /mnt/nfs/registry
chmod 777 /mnt/nfs/registry/
Find your local network subnet and run the following command, replacing the 192.168.1.0/24 with your current subnet.
echo "/mnt/nfs/registry 192.168.2.0/24(rw,sync,no_subtree_check)" >> /etc/exports
This command will append a line to the file /etc/exports states everyone within that subnet will have a read-write access to that folder.
Now run these two commands to apply the exports and restart the nfs-kernal server.
exportfs -a
service nfs-kernel-server restart
Optional: in case you're using firewall you can run this command to let any machine with the local subnet accessing the nfs server.
ufw allow from 192.168.2.0/24 to any port nfs
Now for the last step, find out the nfs server internal IP by running ip a, then, run the following commands on each of the Swarm servers, replace 192.168.2.10 with your nfs local IP.
apt update
yes | apt install nfs-common
mkdir -p /nfs/registry
echo "192.168.2.10:/mnt/nfs/registry    /nfs/registry/    nfs    defaults    0 0 " >> /etc/fstab
mount -a
This will
Install the
nfs-commonthat will utilize the nfs client,Create a local folder
/nfs/registry/Add mounting point for the nfs remote directory into our newly created one.
will mount the folder, from now on it will happen automatically during system boot.
Deploy the stack
After setting the storage we can run the stack by running
docker stack deploy -c docker-compose.yml cri
That's it
You're custom registry is now ready and can be used as a mirror a private registry, or both. Go build something awesome!
Subscribe to my newsletter
Read articles from Binyamin Yawitz directly inside your inbox. Subscribe to the newsletter, and don't miss out.
Written by
