Creating a Conda environment
 Shuraim Shafiulla B
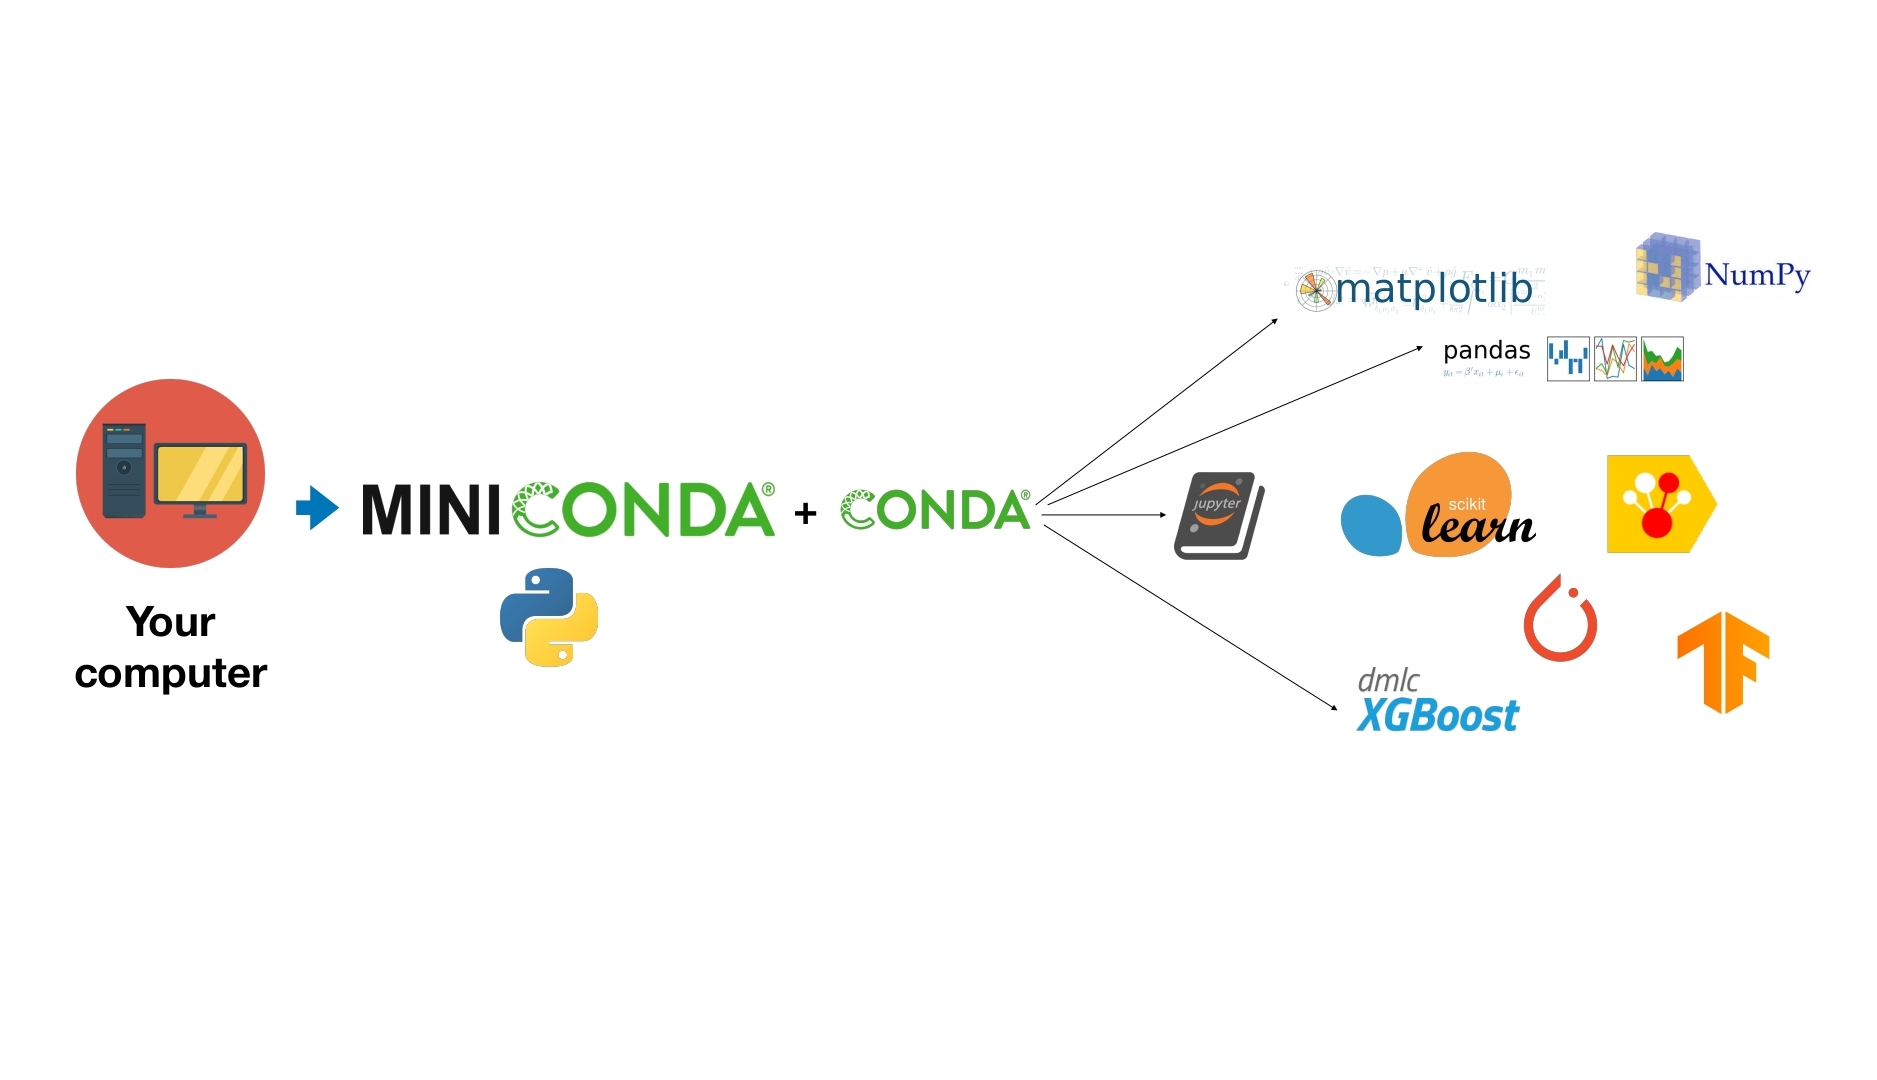
In the previous blog, I explained the Introduction to Machine Learning and this includes all I learned in the first couple of sections of the ZTM ML course.
In this blog, I'll explain how to create an environment where we can build out projects using the DS framework.
Anaconda , Miniconda and Conda

Anaconda and Miniconda are software distributions and include code written by other people which we can take advantage to use it in our ML projects.
Anaconda takes approximately 3 GB of RAM and is heavy as it contains all the tools and packages.

Miniconda takes approximately 200 MB of RAM and is lighter than Anaconda.
Anaconda is thought of as a hardware store as it includes many many tools to choose from based on the requirement and Miniconda as the workbench of data scientists.
Conda is a personal assistant and therefore we'll install and use Conda to create an environment which is much lighter than Anaconda and Miniconda.
What is Conda?
Conda helps us to set up our workbench, order tools when needed or even make and share a copy of tools you're working with to others.

Anaconda and Miniconda are known as Software distributions and Conda as Package manager.
Conda comes with installation of Anaconda or Miniconda and Conda helps install packages and these packages are written by other people.
Understanding Conda takes time and as you create your environments, you'll get used to it.
Conda environments
Conda gives you the ability to create environments and a collection of tools or packages is called an environment.

Our computer is installed with Miniconda which contains Python and Conda which is used to create environments to include tools we need for our project.
We use Conda to create environments and then use it again to install different packages and update tools as we need.
Conda also allows sharing and updating the environment with others working on the same project.
Setting up our Conda environment on windows

These are the steps we need to follow to set up our Conda environment to build ML projects.
When we open Miniconda terminal, the base is the default environment that gets downloaded with Conda.
Download MiniConda from its official site for your respective OS.
Install it on your computer by clicking on next.
Test the installation. On windows, type the following command
conda --version
After installation of Miniconda
Create a project folder in desired location on your computer.
Use Conda to create a custom environment.
conda env create --prefix ./env python=3.11 numpy pandas matplotlib scikit-learn jupyter
./ means it uses the same path to create an environment where this command is run.
Tidbit:- Also include the python version you want in your environment to avoid any discrepancies between different libraries installed in your environment. (Python 3.12 doesn't support Jupyter)
The above command means - " Create a folder called env which is short for environment and in that, install NumPy, Pandas, Matplotlib, Scikit-learn and Jupyter with specified python version and all these will be downloaded from the internet." Now, the env folder contains the DS and ML tools we require.
- Activate the environment
conda activate .\env
- Load jupyter notebook and check the tools.
Example

Let's see all the steps we need to perform after we install Conda and a heart disease project.
- Create a project folder and change into the folder (specify the exact path of the folder). This folder also contains the data.
cd ./folder-name
- Create a custom environment within this project folder using the command below
conda env create --prefix ./env python=3.11 numpy pandas matplotlib scikit-learn jupyter
- Open Miniconda terminal and activate the environment as 👇
conda activate ./env
- Open jupyter notebook and import the tools
jupyter notebook
- After you're done working, deactivate the environment
conda deactivate
Exporting an environment
- Activate the project environment to be exported as .yml (yaml) file and also specify the exact path where it should be exported.
conda env export > environment.yml
Now the environment.yml contains all the tools and packages current environment has.
- Now move the new project folder (specify the exact path of the folder)
cd ./heart-disease-project
- Now create environment in that folder using the exported environment.
conda env create --prefix ./env -f ./environment.yml
After -f , specify the exact path of the environment.yml file.
To list the available conda environments,
conda env list
Conclusion
This is how we create and export a Conda environment and as you use Conda, you'll get used to it.
As an extension to this blog, please do refer the blog on this topic by Sir Daniel Bourke.
https://www.mrdbourke.com/get-your-computer-ready-for-machine-learning-using-anaconda-miniconda-and-conda/
Images reference
Images are taken from the ZTM ML course slides.
Subscribe to my newsletter
Read articles from Shuraim Shafiulla B directly inside your inbox. Subscribe to the newsletter, and don't miss out.
Written by
Shuraim Shafiulla B
Shuraim Shafiulla B
I'm an aspiring machine learning engineer interested in machine learning and building ML projects.