Enhance Your React Projects with Context API Mastery
 Himanshu verma
Mastering Context API: An Entertaining Approach to Streamline Your React Applications
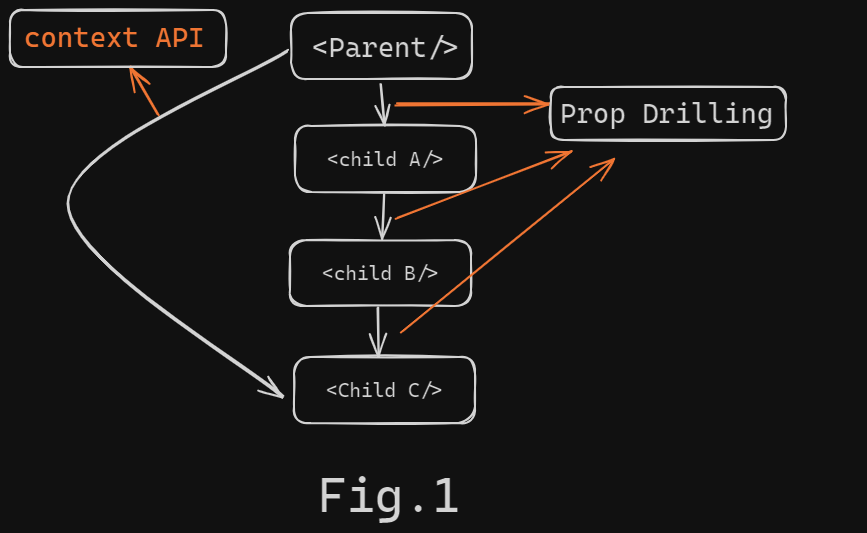
Have you ever found yourself exasperated by the incessant task of prop drilling through your React components? If you're nodding in agreement, you're in for a delightful surprise. The Context API is here to restore your peace of mind. In this blog entry, we'll explore the Context API in an engaging and straightforward manner, enabling you to seamlessly integrate it into your projects. Let’s embark on this journey!
What is the Context API?

Imagine possessing a magical wand that allows you to disseminate data across your entire application without the cumbersome process of passing props at each level. That's the Context API for you! It's a React feature that facilitates effortless state sharing, making your code more elegant and your life more manageable.
Why Should the Context API Matter to You?
If you've ever played the game of telephone, you understand how messages can become garbled as they are relayed. Prop drilling in React evokes a similar sensation. The Context API remedies this by allowing data access anywhere in your application, bypassing intermediary components. Here’s why it will captivate you:
Simplifies global settings: Manage themes, user preferences, and more with ease.
Eases user authentication: Keep track of logged-in status throughout your app.
Streamlines state management: Offers a simpler alternative to state management libraries.
How to Set Up the Context API
Setting up the Context API is akin to unboxing a new gadget – it's both easy and enjoyable. Here’s a step-by-step guide:
Step 1: Create a Context
Begin by creating a context using createContext().
import React from 'react';
const MyContext = createContext();
This line of code initializes a new context. You can think of it as creating a "container" for your data.
Step 2: Provide Context
Encapsulate your components with the Provider component and pass the value you wish to share.
import React, { useState } from 'react';
import MyContext from './MyContext';

const App = () => {
  const [value, setValue] = useState('Hello, Context!');

  return (
    <MyContext.Provider value={value}>
      <MyComponent />
    </MyContext.Provider>
  );
};
Here, the App component wraps its child components with MyContext.Provider and provides a value (value) that can be accessed by any child component.
Step 3: Consume Context
Utilize the useContext hook to retrieve the context in any component.
import React, { useContext } from 'react';
import MyContext from './MyContext';

const MyComponent = () => {
  const value = useContext(MyContext);
  return <div>{value}</div>;
};
In MyComponent, we use the useContext hook to access the value provided by MyContext.Provider and render it.
A Practical Example: Theme Switcher
Let's bring this to life with a simple theme switcher example.
Step 1: Create the Theme Context
const ThemeContext = createContext();
This creates a new context named ThemeContext.
Step 2: Provide the Theme
import React, { useState } from 'react';
import ThemeContext from './ThemeContext';

const App = () => {
  const [theme, setTheme] = useState('light');

  return (
    <ThemeContext.Provider value={{ theme, setTheme }}>
      <ThemeSwitcher />
    </ThemeContext.Provider>
  );
};
In this example, App component provides the theme and setTheme function to its children using ThemeContext.Provider.
Step 3: Consume the Theme
import React, { useContext } from 'react';
import ThemeContext from './ThemeContext';

const ThemeSwitcher = () => {
  const { theme, setTheme } = useContext(ThemeContext);

  return (
    <button onClick={() => setTheme(theme === 'light' ? 'dark' : 'light')}>
      Switch to {theme === 'light' ? 'dark' : 'light'} theme
    </button>
  );
};
ThemeSwitcher component uses useContext to access theme and setTheme, and toggles between light and dark themes on button click.
Real-World Use Cases
User Authentication: Keep track of logged-in status and user information across various components.
 const AuthContext = createContext();

 const AuthProvider = ({ children }) => {
   const [isAuthenticated, setIsAuthenticated] = useState(false);

   return (
     <AuthContext.Provider value={{ isAuthenticated, setIsAuthenticated }}>
       {children}
     </AuthContext.Provider>
   );
 };
Language Preferences: Manage and switch languages in a multilingual application.
 const LanguageContext = createContext();

 const LanguageProvider = ({ children }) => {
   const [language, setLanguage] = useState('en');

   return (
     <LanguageContext.Provider value={{ language, setLanguage }}>
       {children}
     </LanguageContext.Provider>
   );
 };
Shopping Cart: Share shopping cart state across various components in an e-commerce application.
 javascriptCopy codeconst CartContext = React.createContext();

 const CartProvider = ({ children }) => {
   const [cart, setCart] = useState([]);

   return (
     <CartContext.Provider value={{ cart, setCart }}>
       {children}
     </CartContext.Provider>
   );
 };
Advantages of Utilizing the Context API
The Context API is akin to having a superhero in your codebase:
Simplifies state management: Say goodbye to endless prop drilling.
Enhances readability: Your code becomes more comprehensible and maintainable.
Provides flexibility: Easily share data across disparate parts of your application.
Potential Drawbacks of the Context API
Even superheroes have their vulnerabilities, and the Context API is no exception:
Performance concerns: Overuse can lead to performance degradation due to re-renders.
Complexity in large applications: For highly complex state management, libraries like Redux might be more suitable.
Conclusion
The Context API is a formidable tool in React that simplifies state management and enhances code maintainability. It’s perfect for sharing data across your application without the headaches of prop drilling. While it has certain limitations, its benefits often surpass the drawbacks for many applications.
FAQs
Q1: Can I use multiple Contexts in one application?
Absolutely, you can create and utilize multiple contexts to manage different state segments. It’s like having multiple tools for diverse tasks.
Q2: Is the Context API superior to Redux?
It depends on your application's complexity. For simpler state management, the Context API is excellent. For more complex requirements, Redux might be more appropriate.
Q3: Does using the Context API impact performance?
If overused, it can lead to performance issues due to re-renders. Use it judiciously to keep your application running smoothly.
Q4: How do I debug Context API issues?
React DevTools supports context, making it easier to debug and understand what’s happening in your application.
Q5: Can I use the Context API with class components?
Yes, you can use the Context.Consumer component to consume context in class components, adding versatility.
Now that you’re equipped with the knowledge of the Context API, go forth and enhance your React applications. Happy coding!
Subscribe to my newsletter
Read articles from Himanshu verma directly inside your inbox. Subscribe to the newsletter, and don't miss out.
Written by
