Get Started with Firebase Realtime Database and watchOS
 Rohit Rajendran
Firebase Realtime Database is a NoSQL database that lets you store and sync data between your users in realtime. I loved how easy and simple it made it to integrate to my apps and websites without the need of APIs or servers but was disappointed when I was trying to build out a watchOS app and realized it wasn’t supported.
But there’s good news! As of version 7.9.0 of the Firebase iOS SDK, watchOS is now supported for Realtime Database. It’s been working great for me and it’s been amazing to have the realtime sync capabilities easily enabled in my Apple Watch app. In this guide, I’ll go through an example of getting your Firebase Realtime Database connection started with your Watch app. If you already have an Xcode and Firebase project to try this out with, you can skip straight to the good stuff at the “Working with Firebase” section.
Create a watchOS Project
Let’s start off by creating a new watchOS project that we will get talking to the Firebase Realtime Database.
- Open up Xcode and create a new project. For this example, we’ll use the Watch App template with a Swift UI interface and Swift UI App lifecycle. We’ll also uncheck Include Notification Scene and Include Tests to keep things simple.
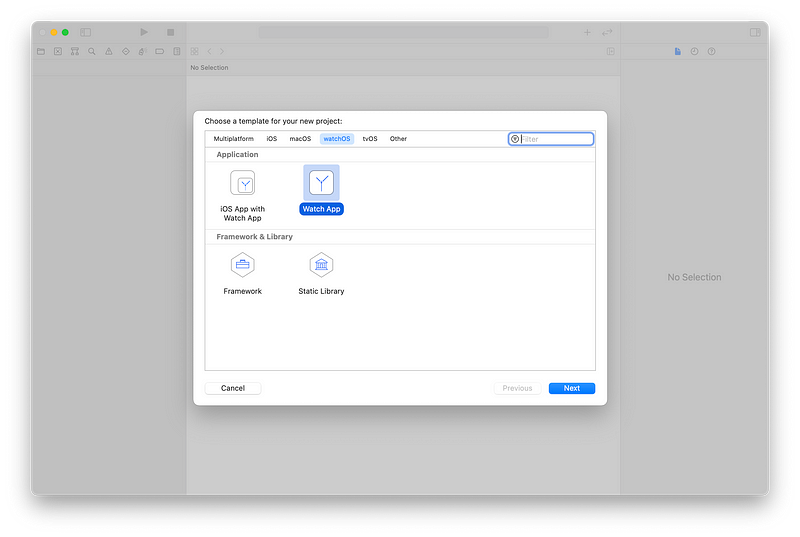
Select “Watch App” as the template.
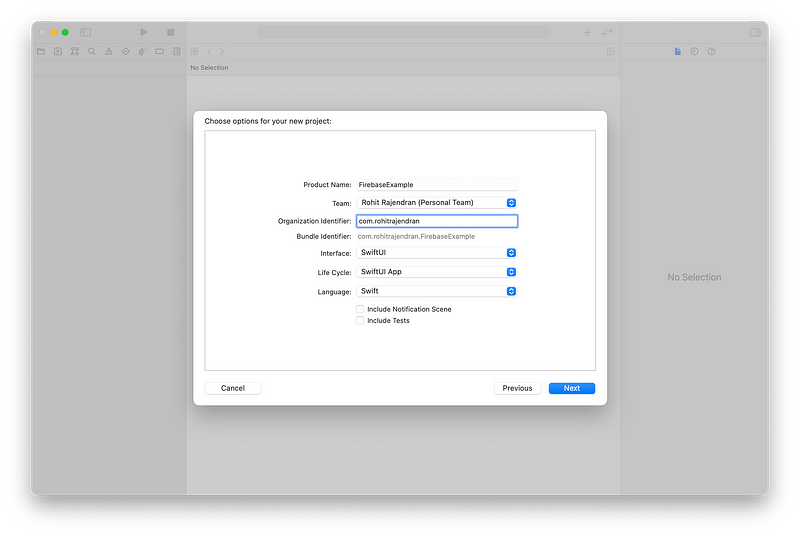
Enter an organization identifier and set the following set: Interface as “SwiftUI”, Life Cycle as “SwiftUI App”, Language as “Swift”, Uncheck “Include Notification Scene”, Uncheck “Include Tests.”
2. Navigate to the Project File > WatchKit App Target > Signing and Capabilities. Note the bundle identifier for the Watchkit app, you’re going to need this in the next step where you’re setting up the Firebase Project
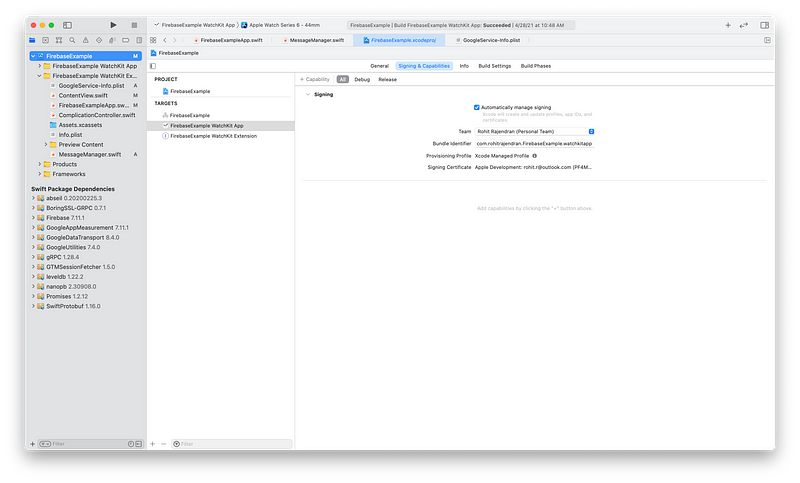
Setup Firebase Project
Now that we have a watchOS app and a bundle identifier, let’s head over to Firebase and add the app to our Firebase project. If you don’t already have a Firebase project, you can just visit https://firebase.google.com/, log in and follow the steps to create a project.
Navigate to the Realtime Database section and create a database. For this exercise, we’ll start it in test mode to make things easier.
Next, from your project dashboard, click on the button to add an iOS app to your project. In the first step, you’ll want to enter the bundle identifier you used when you created the watchOS project. You can enter an app nickname if you’d like. We don’t have an App Store ID yet so we’ll leave that blank. Click on Register App when you’re done.
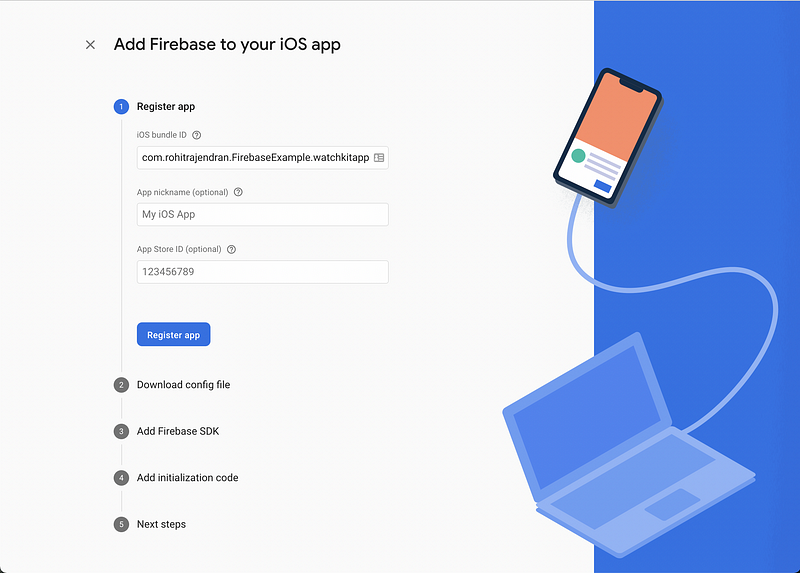
2. Just like Firebase helpfully explains, we’ll want to download the GoogleService-Info.plist, move it to the root of the Xcode project, and add it to all targets.
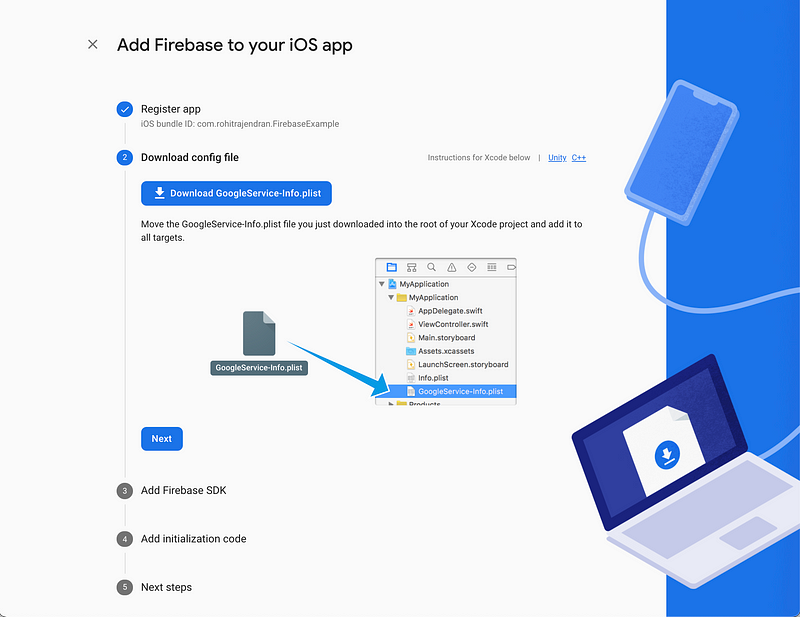
Working with Firebase
Initializing Firebase
1. Next, we’re going to add the Firebase SDK. Now there’s a couple ways you can do this: CocoaPods, Swift Package Manager, Install from Github, and Carthage. You can choose whichever you would prefer. There are instruction details for each of these methods in the Firebase iOS SDK repo. Make sure you include the Firebase/Database package. I’ve been using the Swift Package Manager so I’ll walk through the steps with that as part of this guide.
2. To add Firebase as a Swift Package, navigate to File > Swift Packages > Add Package Dependency. Paste the URL of the Firebase Github ([https://github.com/firebase/firebase-ios-sdk.git](https://github.com/firebase/firebase-ios-sdk.git)) and select Up to Next Major version. WatchOS support for Firebase Realtime Database was only added as of Version 7.9.0 so make sure you’re using a version higher than that. You’ll then want to choose the Firebase products that you want installed. For this example, we’ll want to check FirebaseDatabase and add it to the WatchKit Extension target.
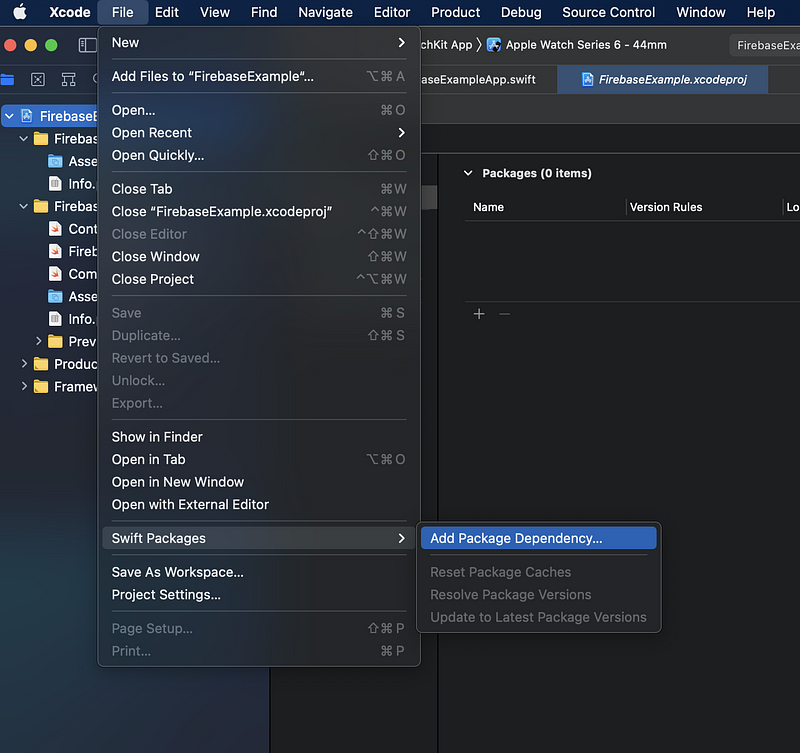
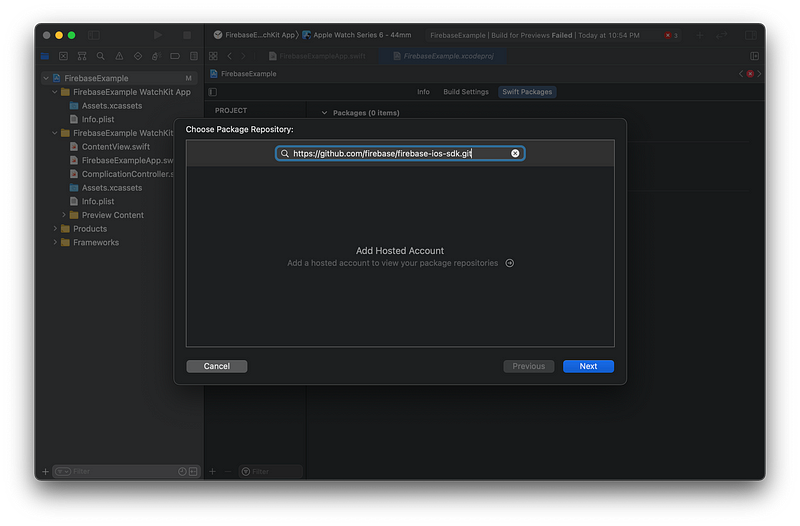
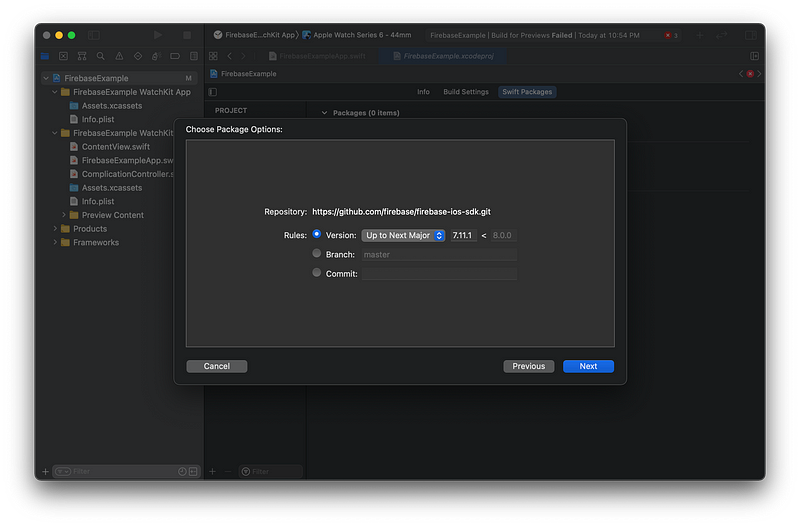
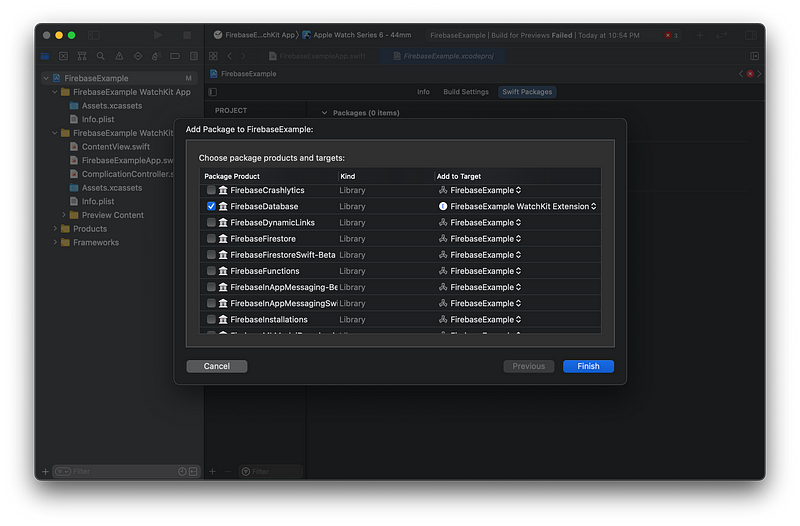
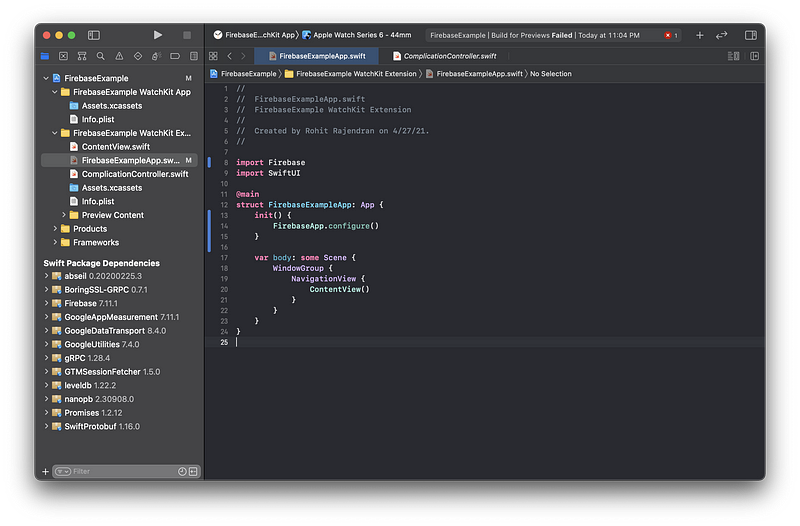
3. In the WatchKit Extension folder of your project, you’ll want to open up the [APP_NAME].swift file. This is where you’re going to initialize Firebase. In this file, we’re going to import Firebase and add call FirebaseApp.configure() in the initializer of the struct. When you call Firebase.configure(), it’ll automatically pull the credentials from the GoogleService-info.plist file you added and get everything set up. You’re now ready to start talking to Firebase Realtime Database (or any other Firebase product)!
Working with Firebase Realtime Database
You’re now ready to start cooking with fire(base). Sorry I had to 🥸. Working with Firebase Realtime Database in a watchOS app is exactly like working with it in iOS app. Let’s take a look by updating a screen to show a message live from the the database.
- We’ll start with creating a new Swift file in the
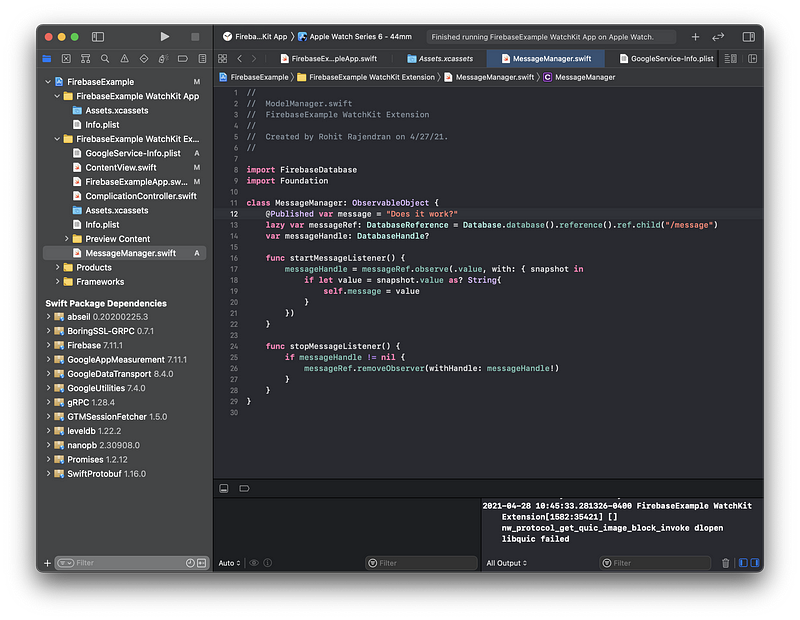
WatchKit ExtensioncalledMessageManagerthat will consist of a class that will get our message from Firebase Realtime Database.
Let’s break down what’s happening here. We published the message var so that changes to that variable can be watched. messageRef stores a reference to where our message is located in the database. messageHandle is used to store the handle of the observer we’re creating on the reference so that it can be removed later.
We’ve also created a start and stop message listener since we’ll want to make sure we appropriately start and stop watching the reference when we enter and leave the view.
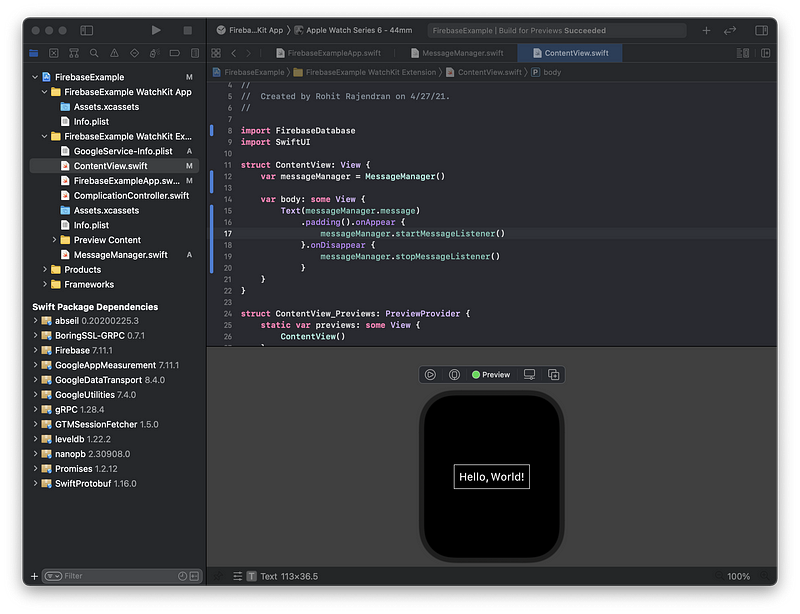
2. In ContentView.swift, initialize the message manager and display that message variable instead. We’ll also hook up to the onAppear and onDisappear methods to make sure we’re appropriately starting and disposing of the watcher.
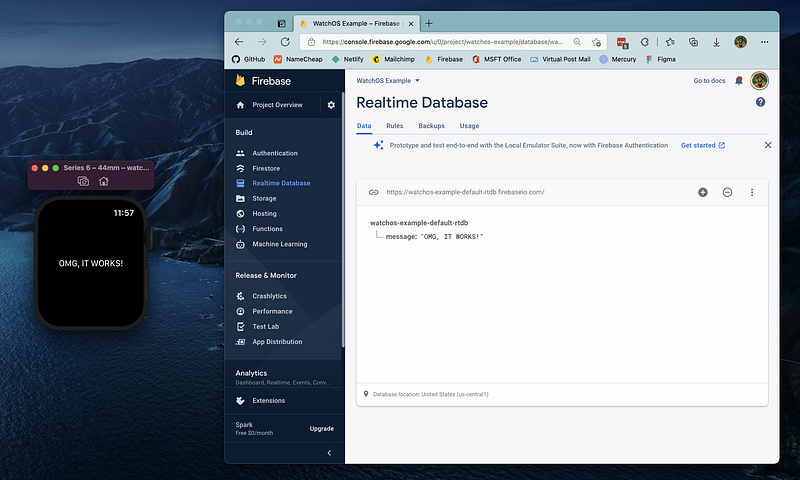
3. Now let’s run this in the simulator and test this out by editing the Realtime Database in the console. Navigate to the Firebase console for the Realtime Database and add a key value pair of message and OMG, IT WORKS. You should instantly see changes getting reflected in your Watch app!
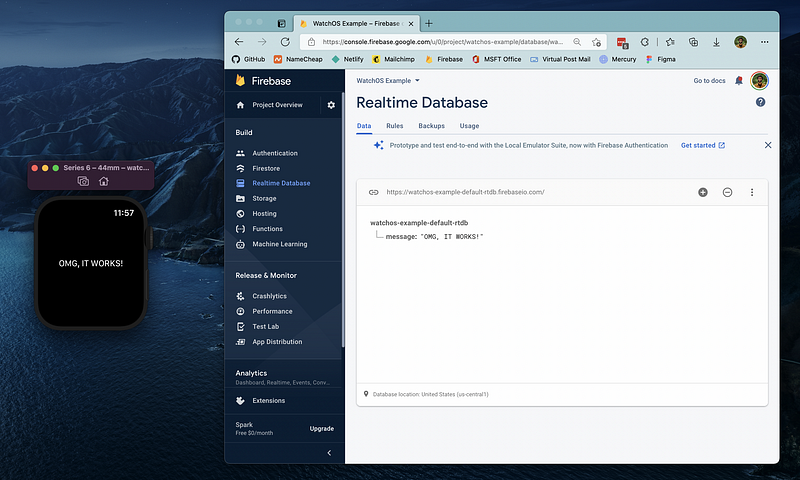
There you have it! A watchOS app working seamlessly with Firebase Realtime Database.
Have something you want me to dive into more detail into? Run into any problems getting it set up? Just post a comment and I would be happy to help out!
Subscribe to my newsletter
Read articles from Rohit Rajendran directly inside your inbox. Subscribe to the newsletter, and don't miss out.
Written by
