How to Use Reqable to Analyze Android Emulator App Traffic
 Reqable
Title: How to Use Reqable to Analyze Android Emulator App Traffic
This tutorial will guide you on how to use Reqable for traffic analysis on an Android emulator.
1. Android System Certificate Policy
First, let's briefly introduce the Android system certificate policy to better understand the problem.
In any system, there is a CA certificate manager that contains most of the commonly used CA root certificates. Only the certificates signed by these root certificates can be trusted (trust is needed for HTTPS and other protocols based on SSL handshakes to successfully connect), and Android is no exception. We can search for "Credentials" in the settings to view all certificates in the system.
In Android, certificates are divided into two types: system certificates and user certificates. System certificates are those installed by the manufacturer (or OTA) of the system, while user certificates are those installed by users themselves.
The difference between system certificates and user certificates is as follows:
Currently, Android has iterated to version 14.0, and there is a very important watershed for the certificate mechanism: Android 7.0. Before this version (excluding), the authority of system certificates and user certificates is equivalent, i.e., the system will trust user certificates unconditionally. This is obviously a potential security risk, so from Android 7.0 onwards, the system defaults to not trusting user certificates anymore. Generally, system certificates cannot be modified by users (added or deleted), while user certificates have no restrictions.
For our analysis of Android system traffic, starting from Android 7.0, there are restrictions. Reqable/Charles/Fiddler and other debugging tools cannot install their certificates to the user certificate directory and only to the system directory.
Strictly speaking, the above paragraph is not entirely correct. In order to maintain compatibility with some apps, if the
targetSDKVersion < 24, Android 7.0+ systems will still trust user certificates. Of course, most current apps havetargetSDKVersiongreater than 24.
This restriction is also quite troublesome for Android developers, so Android provides an additional configuration item called "Network Security Config" that allows apps to specify which user certificates they trust. For details, please refer to here.
2. Using Reqable for Traffic Analysis
Now that we've covered the background knowledge, let's use the Android emulator as an example to show how to use Reqable for traffic analysis.
2.1 Emulator Installation
Here, using Android Studio's emulator as an example. If you have other emulators, you can skip step 2.1. But make sure your emulator has root permissions.
First, install Android Studio. The installation process is not shown here, there are many tutorials online.
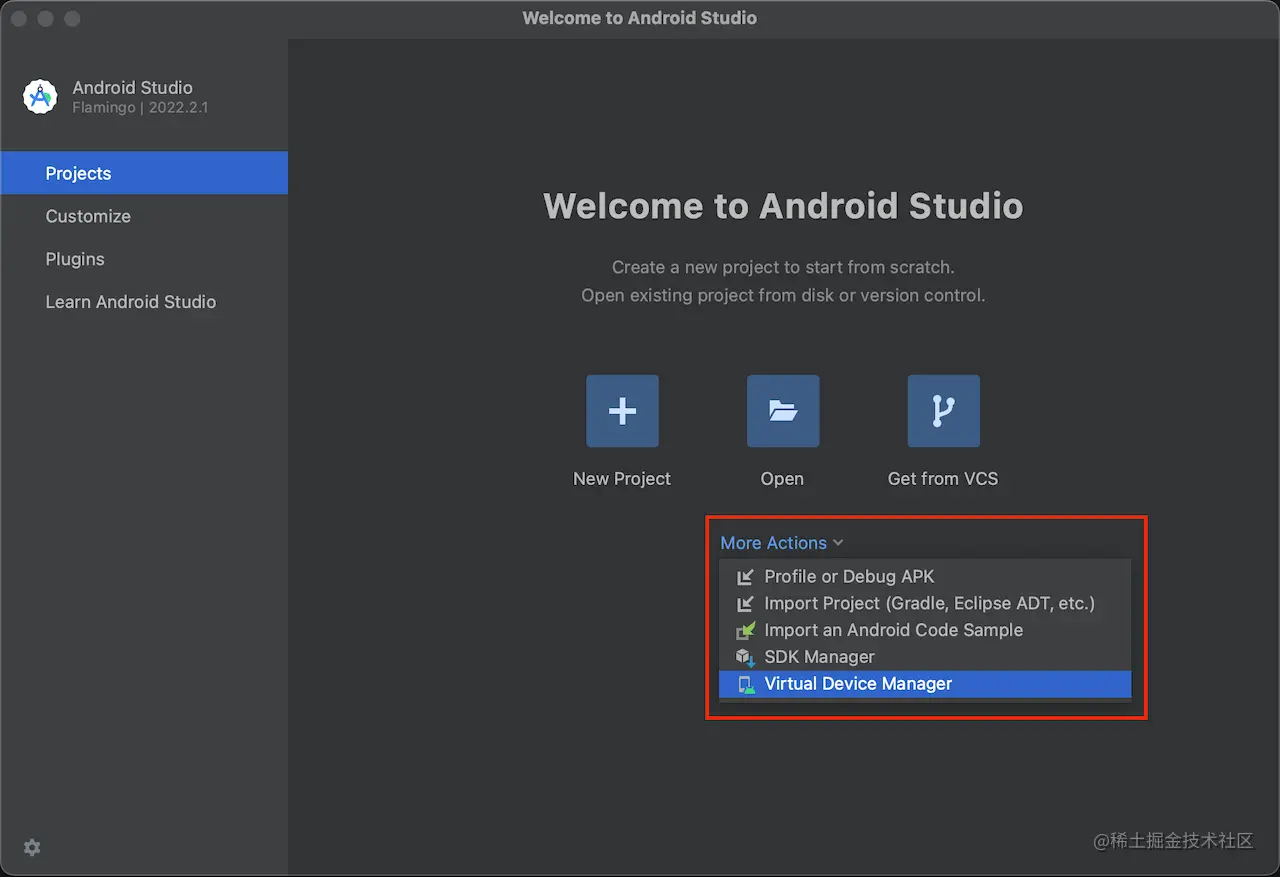
After installation, start without creating a new project. Click "More Actions" -> "Virtual Device Manager", and you will see the emulator manager interface.
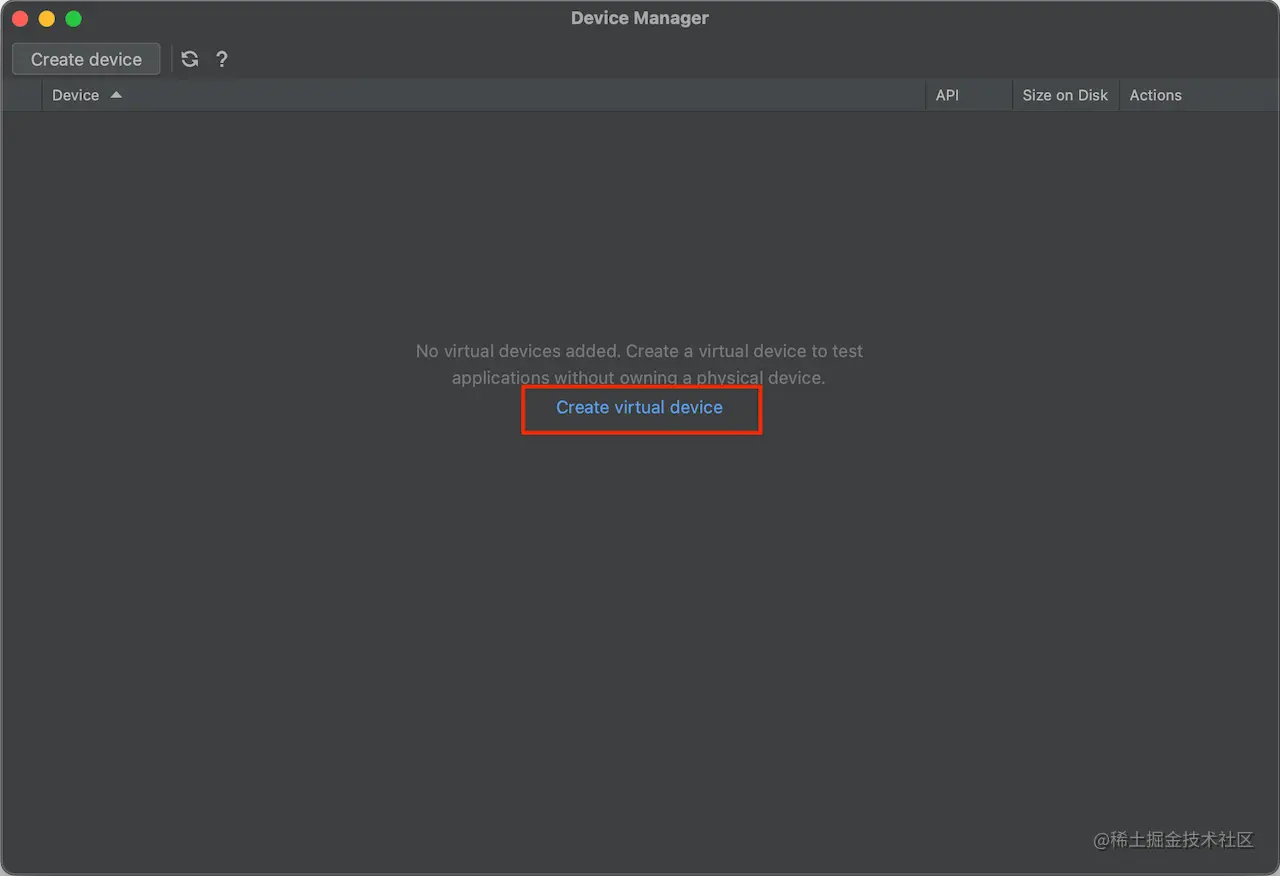
Click "Create virtual device", and you will see the emulator list interface:
Android provides a large number of emulator options, including phones, tablets, TVs, wearable devices, etc. Here we choose to create a phone emulator "Pixel 6".
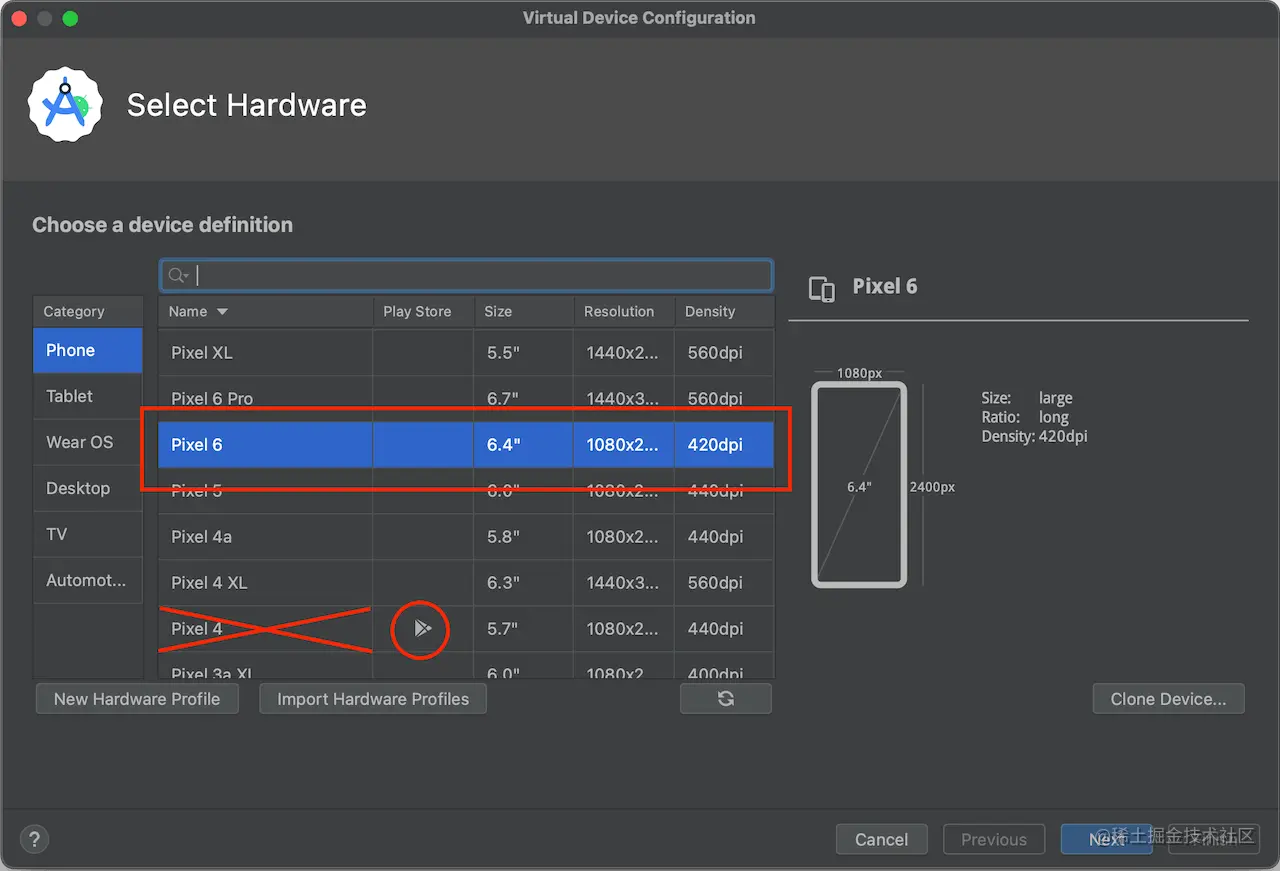
Note that emulators with
Play Store cannot be rooted. Different systems have different emulator architectures. For example, my MacBook M1 uses arm64 emulators, which are the best performance. On Windows x64 platforms, it generally uses x64 emulators.
Next, select the system version, and click the Download button next to the Release Name to download the system image. We take Android 13.0 as an example. After downloading the system image, click Next for the next step.
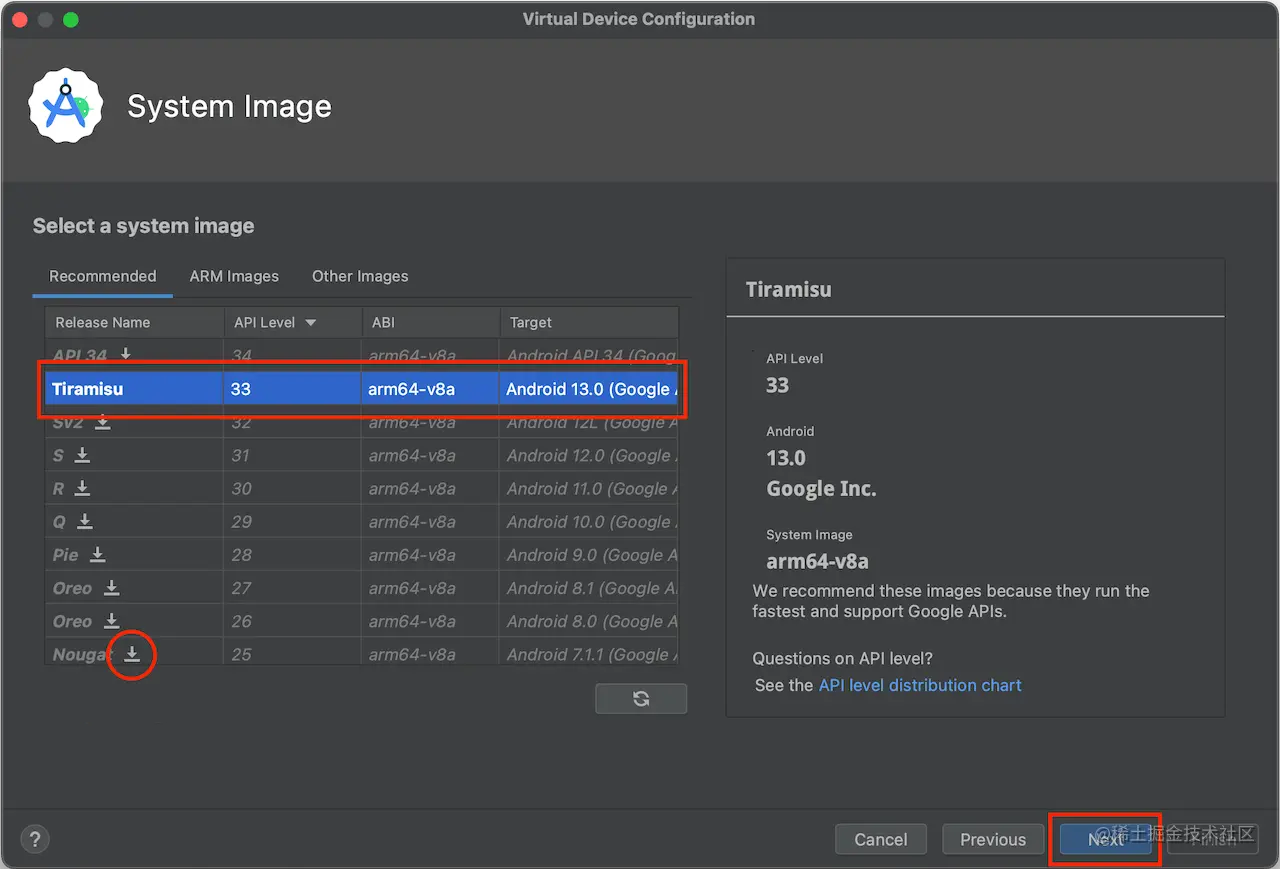
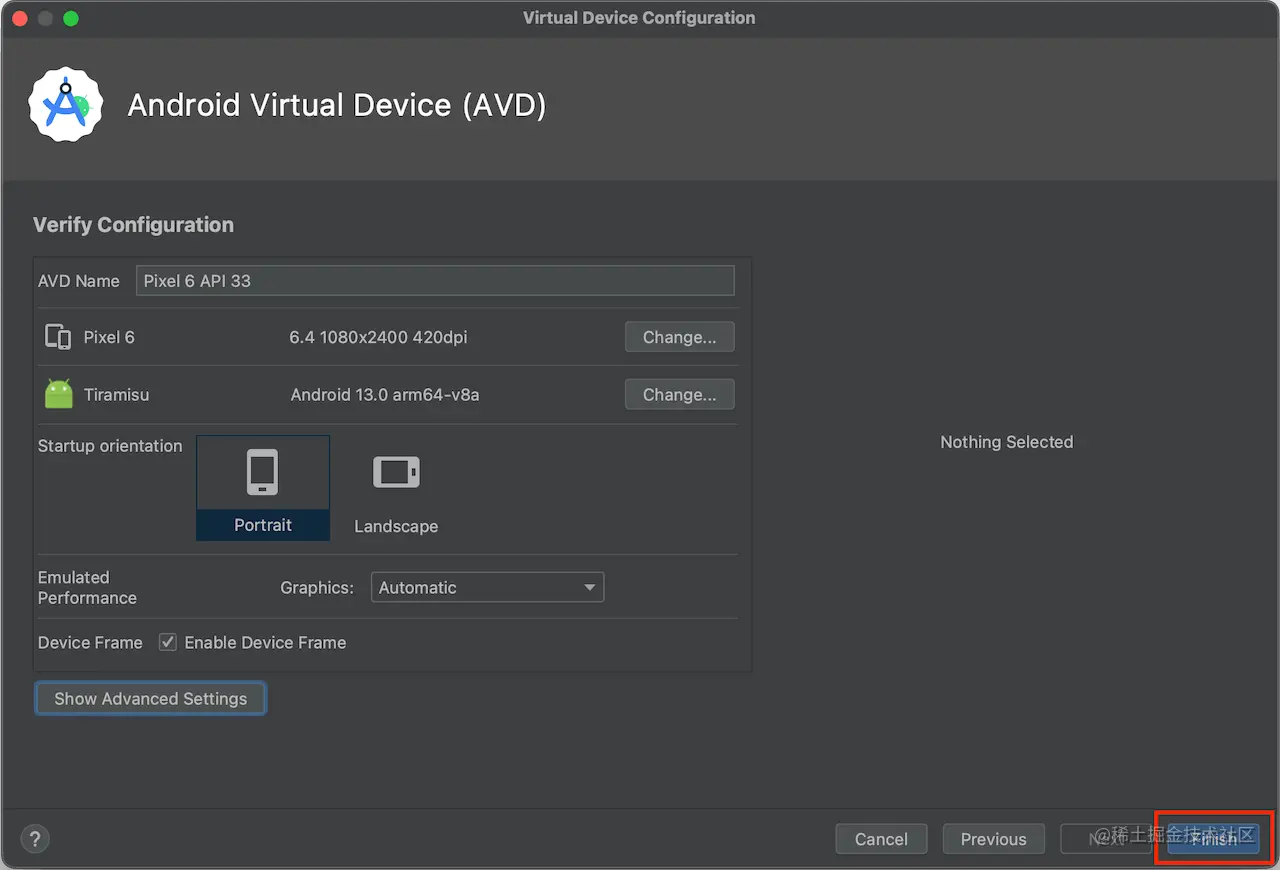
This step can configure some parameters for the emulator, such as memory size, storage space, etc. We ignore this configuration. Finally, click Finish to complete the creation of the emulator.
2.2 Emulator Startup
Here, we start the emulator from the command line instead of the GUI because we need to add startup parameters.
If you are using
other emulators, you can start them directly from the GUI. But make sure your emulator has root permissions. If you don't know how to get root permissions, please search for your emulator's root method.
First, configure the ANDROID_HOME environment variable to facilitate the use of adb and emulator commands.
export PATH="$PATH:/Users/megatronking/Library/Android/sdk/platform-tools"
export PATH="$PATH:/Users/megatronking/Library/Android/sdk/emulator"
export PATH="$PATH:/Users/megatronking/Library/Android/sdk/tools"
export JAVA_HOME="/Applications/Android Studio.app/Contents/jbr/Contents/Home"
Here is the MacOS environment variable configuration. Windows is slightly different. Here we must pay attention to the order of PATH, otherwise the emulator may fail to start.
Next, we use the emulator command to start the emulator, Pixel_6_API_33 is the name of the emulator. We can see the emulator name in the Android Studio's Device Manager. Replace spaces with underscores.
emulator -avd Pixel_6_API_33 -writable-system
The -writable-system parameter is to allow the system partition of the emulator to be writable, so that we can write files to the system directory.
If there are no errors, we will see that the emulator started successfully.
2.3 Unlock System Partition
We need to run adb service in root mode. Open a new command line window and enter the following commands in order:
# Start adb service in root mode
adb root
# Output: restarting adbd as root

# Disable secure boot verification
adb disable-verity

# Remount all partitions
adb remount
# Output Using overlayfs for /system
# Output Using overlayfs for /vendor
# Output Using overlayfs for /product
# Output Using overlayfs for /system_ext
# Output Now reboot your device for settings to take effect
# Output remount succeeded
We can see that the system has been unlocked, and now we can import the CA certificate.
2.4 Import CA Certificate
We need to import Reqable's CA certificate into the emulator so that the emulator can trust Reqable's certificate.
We first export the CA certificate from Reqable. Click the download button at the bottom left.
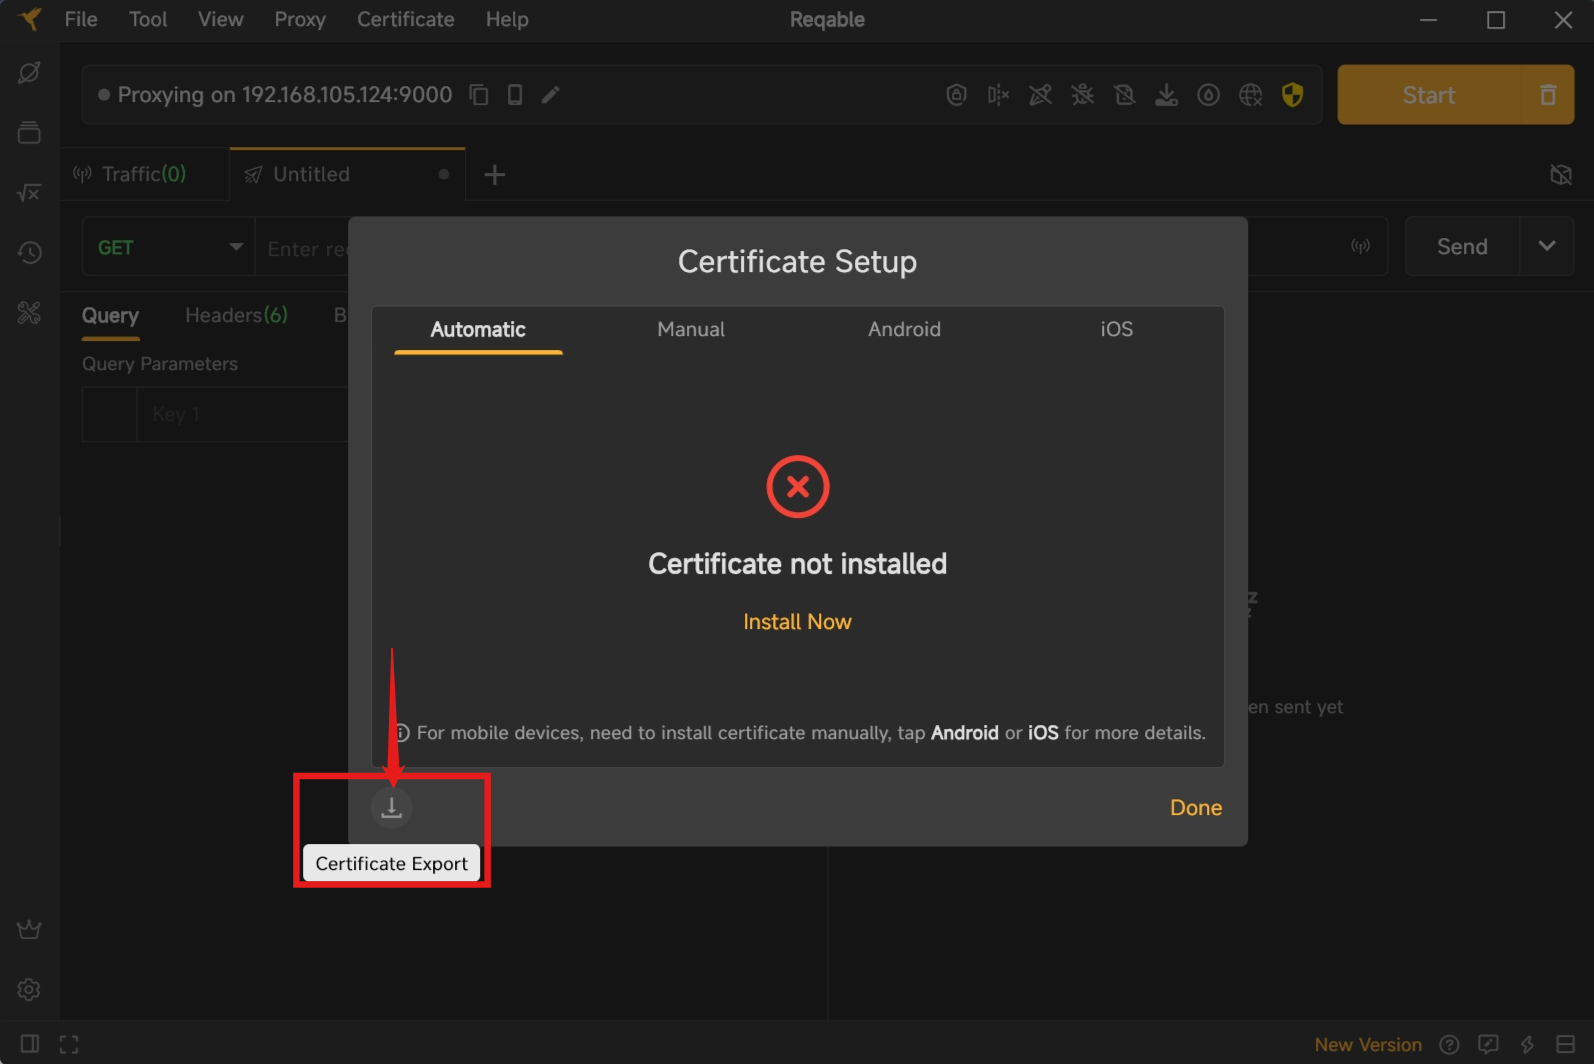
Use the following command to import the CA certificate into the emulator system directory:
adb push reqable-ca.crt /system/etc/security/cacerts/364618e0.0
After importing, we check Reqable's CA certificate in the emulator's Settings under "Credentials". It should be in the System directory.
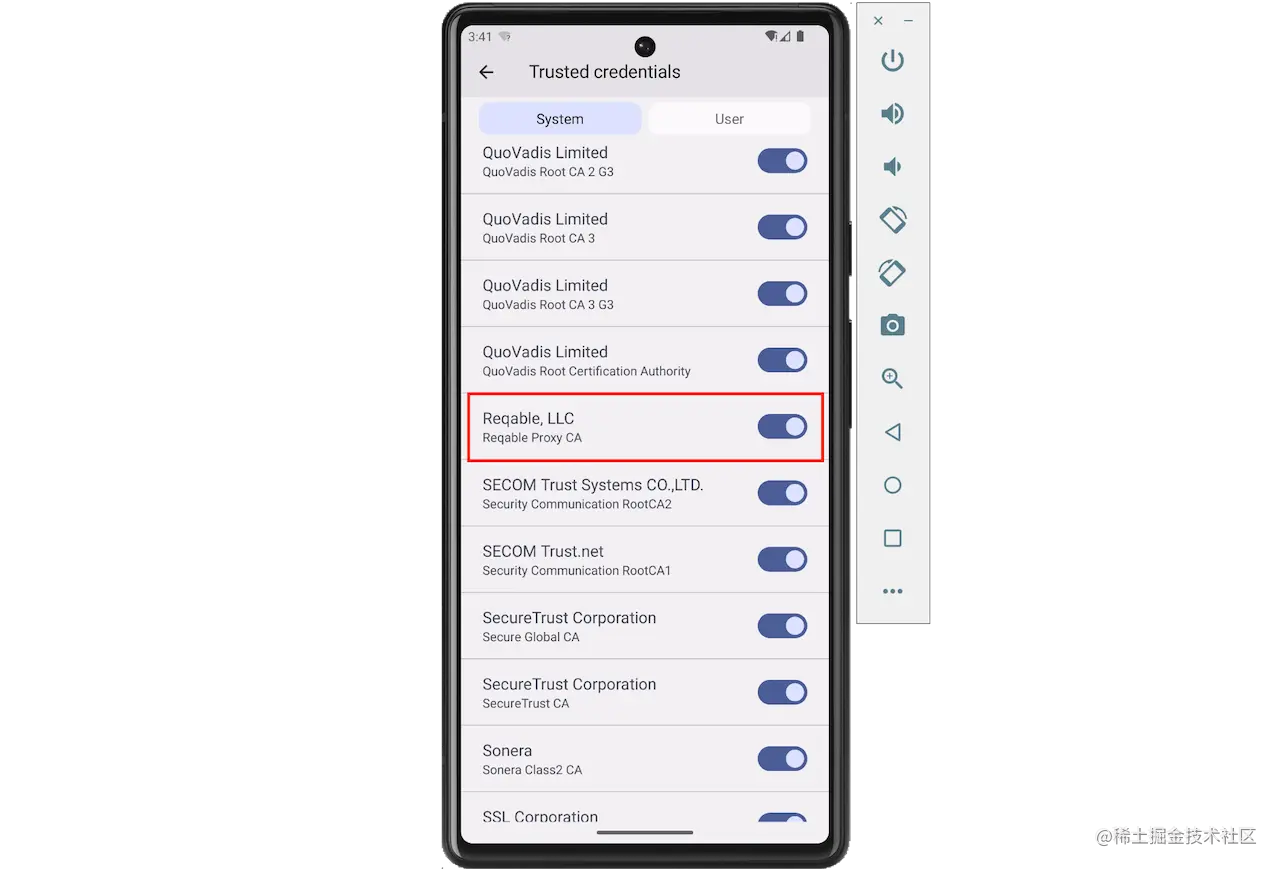
Above figure shows that the CA certificate has been imported successfully.
3. Traffic Forwarding
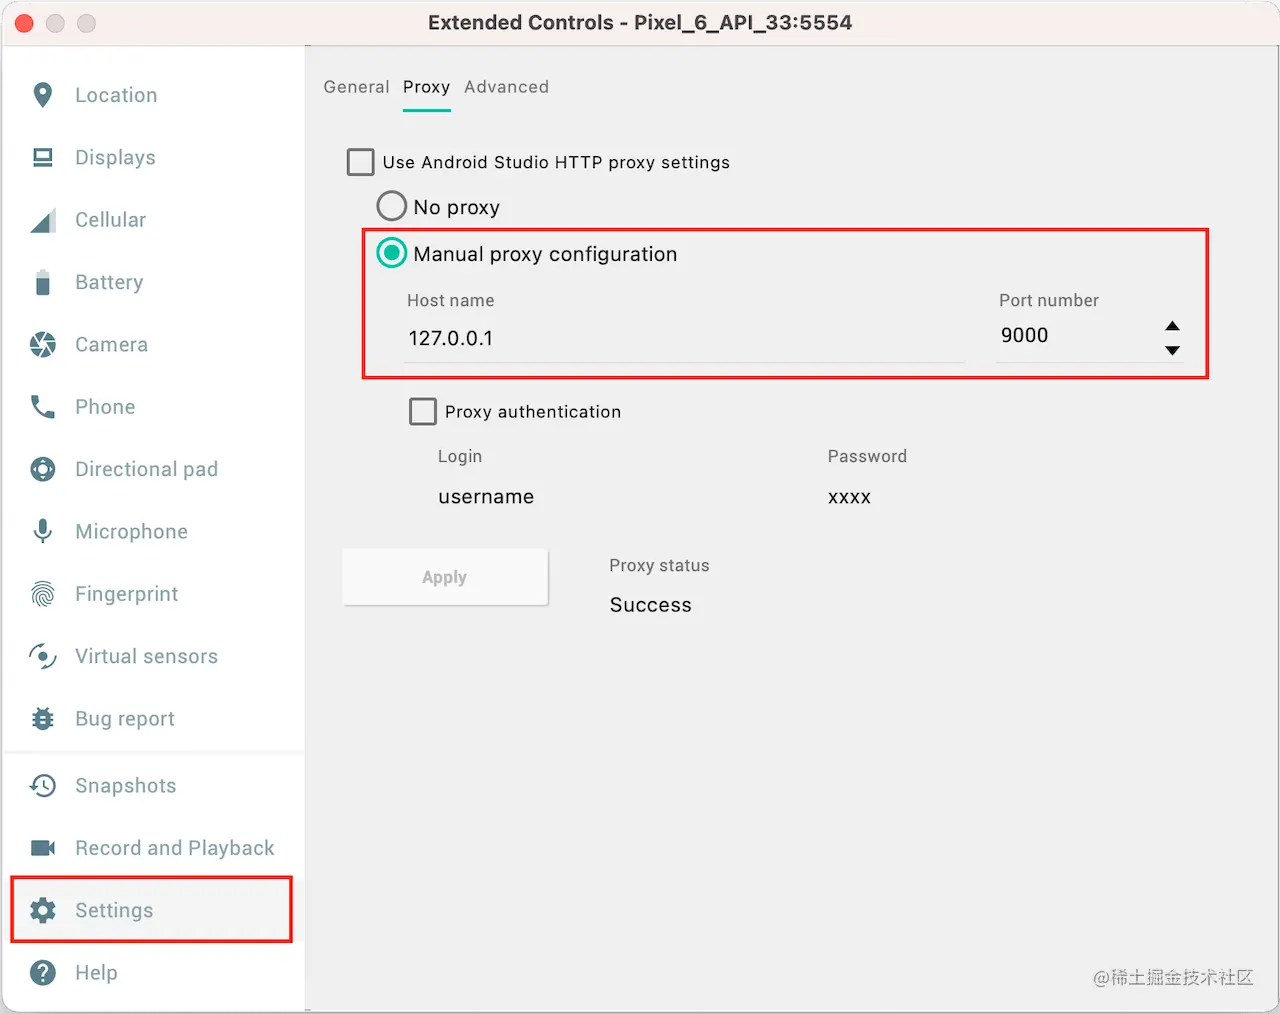
Next, we need to forward the traffic of the emulator to Reqable so that we can see the traffic of the emulator.
3.1 Proxy Forwarding
Set the proxy configuration of the emulator to Reqable's proxy server address, click the last button on the right side ... of the emulator's operation bar to open the emulator settings page.
3.2 VPN Forwarding
First, install socksdroid on the emulator.
Drag and drop the downloaded socksdroid directly onto the emulator window for installation, or use adb for installation.
adb install socksdroid-1.0.3.apk
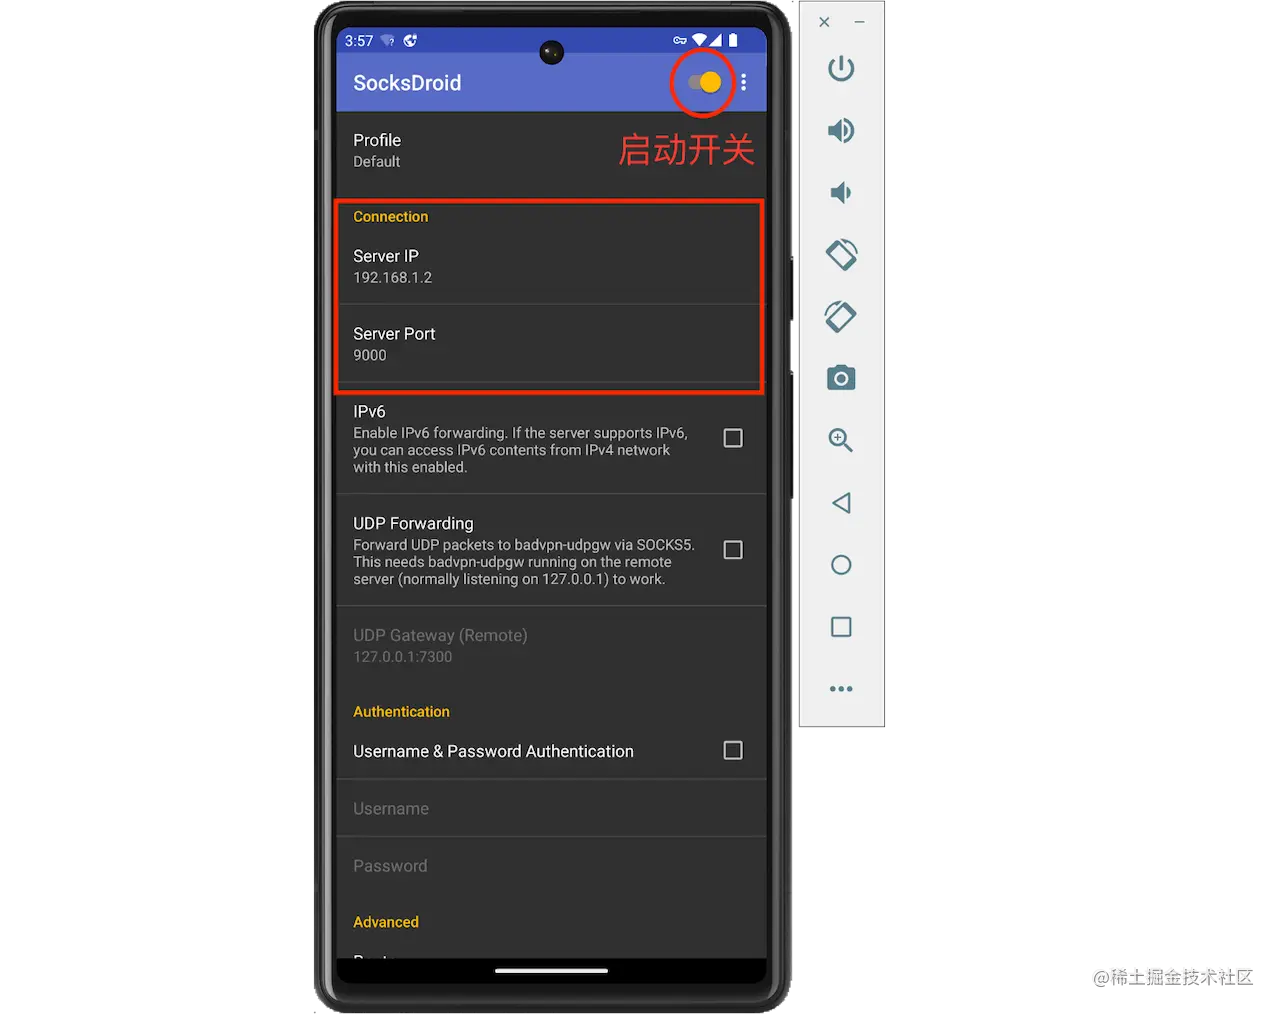
After installation, open socksdroid and set the computer's IP address and Reqable's proxy port, and turn on the switch on the upper right corner.
4. Traffic Analysis
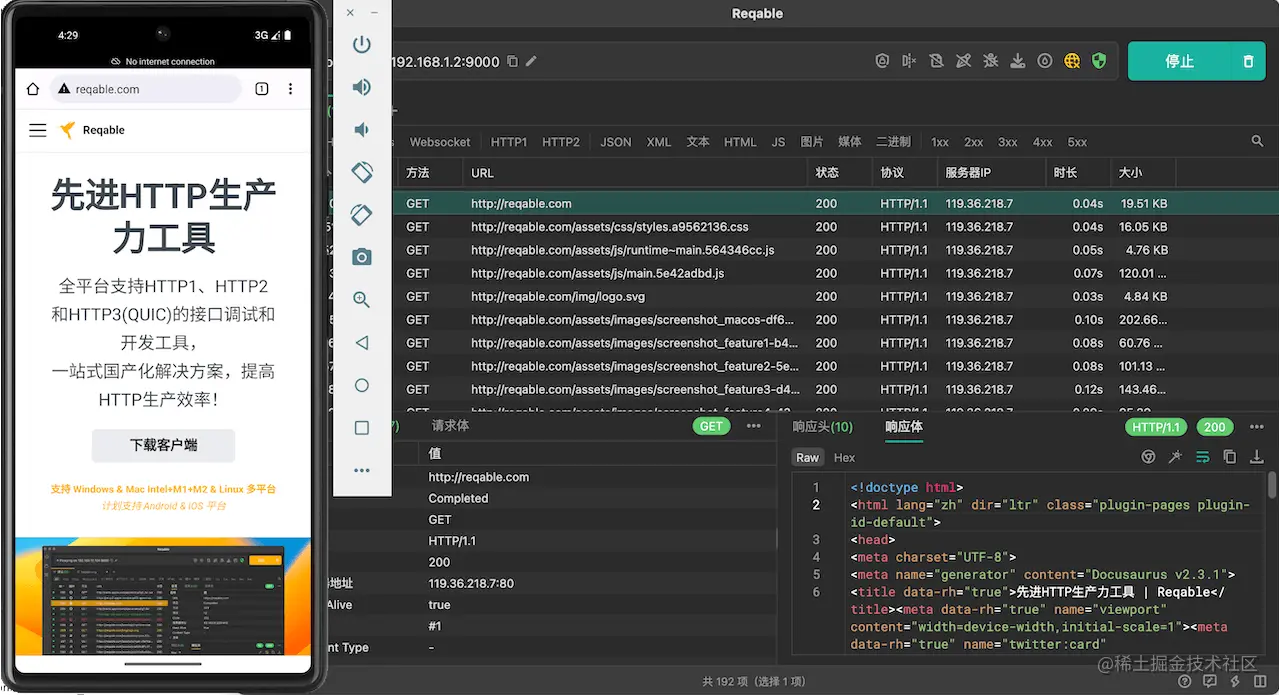
Start Reqable's debugging without configuring the system proxy because we don't need to analyze the traffic of the computer.
Use Chrome in the emulator to open Reqable's official website and test it out. It works fine.
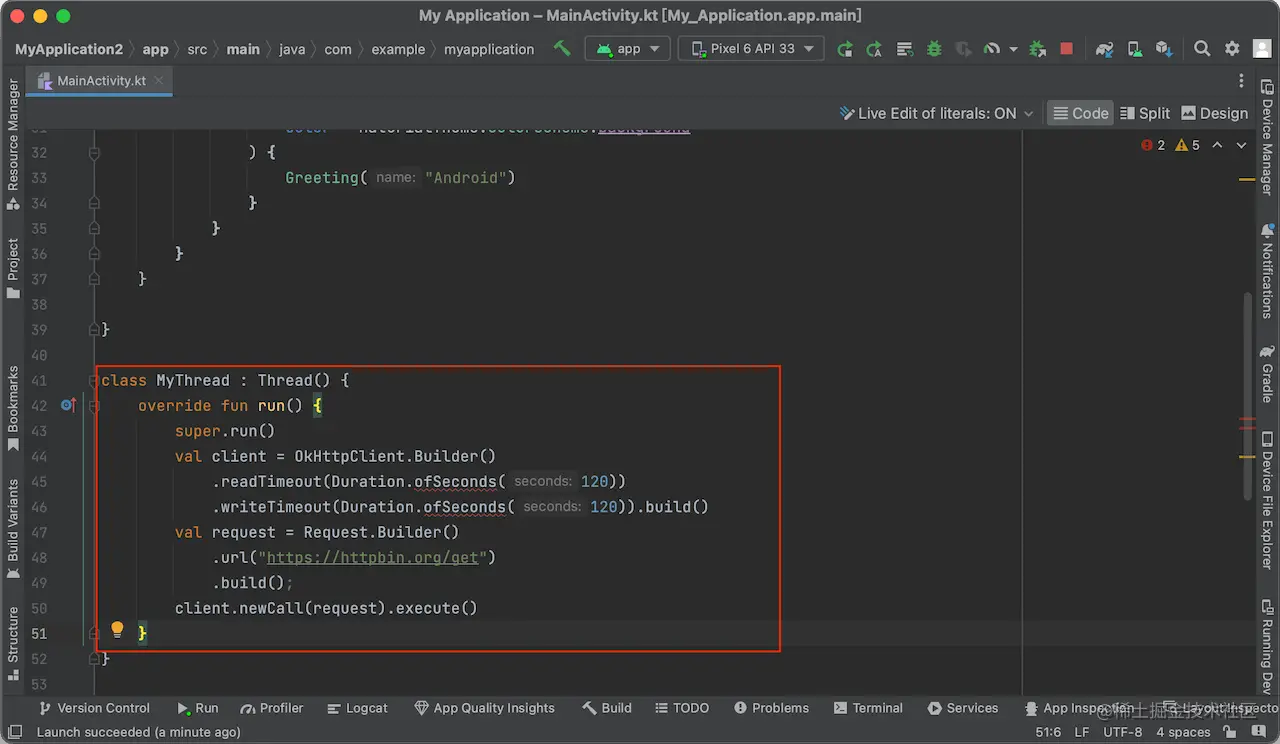
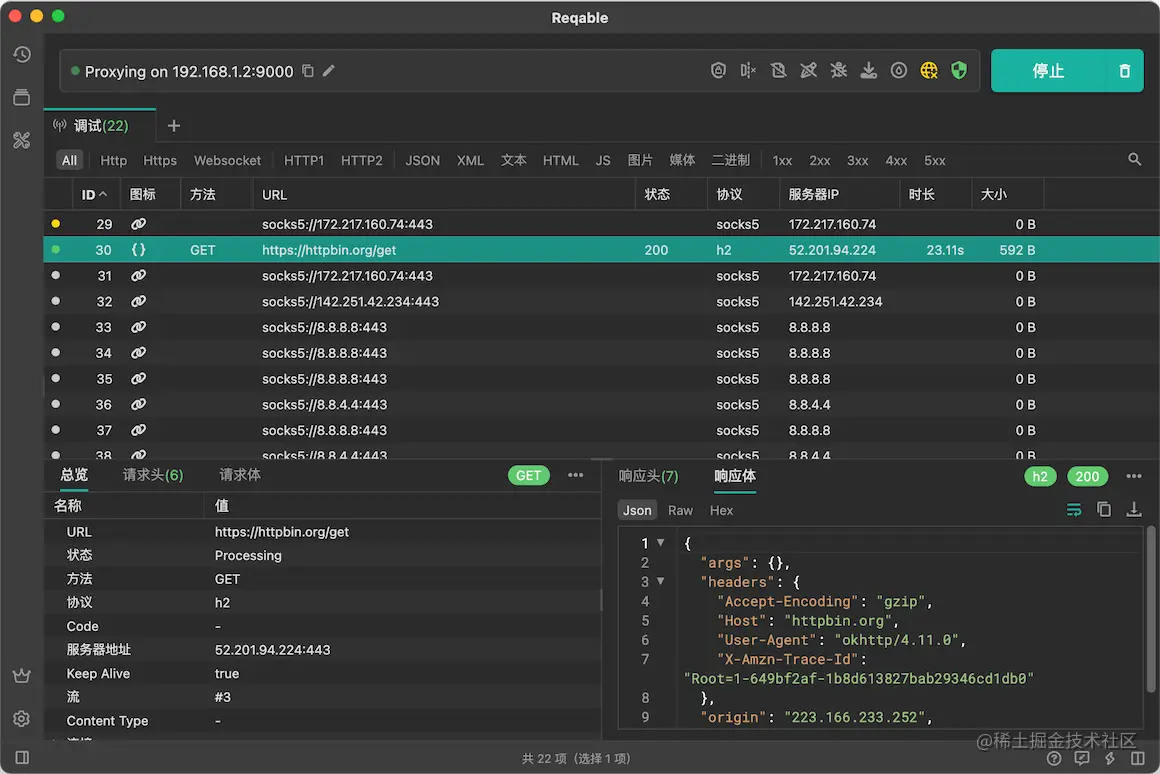
We also test it with a native app. Use Android Studio to write a demo and send a request to test it:
It seems that everything is fine, and it's done.
Ending
This article mainly explains how to use Reqable for traffic analysis on an Android emulator. I hope it will be helpful to you.
Thank you for reading, goodbye.
The original : 如何使用Reqable分析Android模拟器应用流量
Subscribe to my newsletter
Read articles from Reqable directly inside your inbox. Subscribe to the newsletter, and don't miss out.
Written by

Reqable
Reqable
Reqable is a new generation of one-stop solutions for packet capture and API testing. It's all-platform, no login required, lightweight, high-performance, and ad-free, making APIs faster and simpler without the need to struggle with complex configurations and interfaces.