Implementing CI/CD for .NET 8 APIs on AWS EC2 Using GitHub Actions and Docker
 Alex Taveras-Crespo
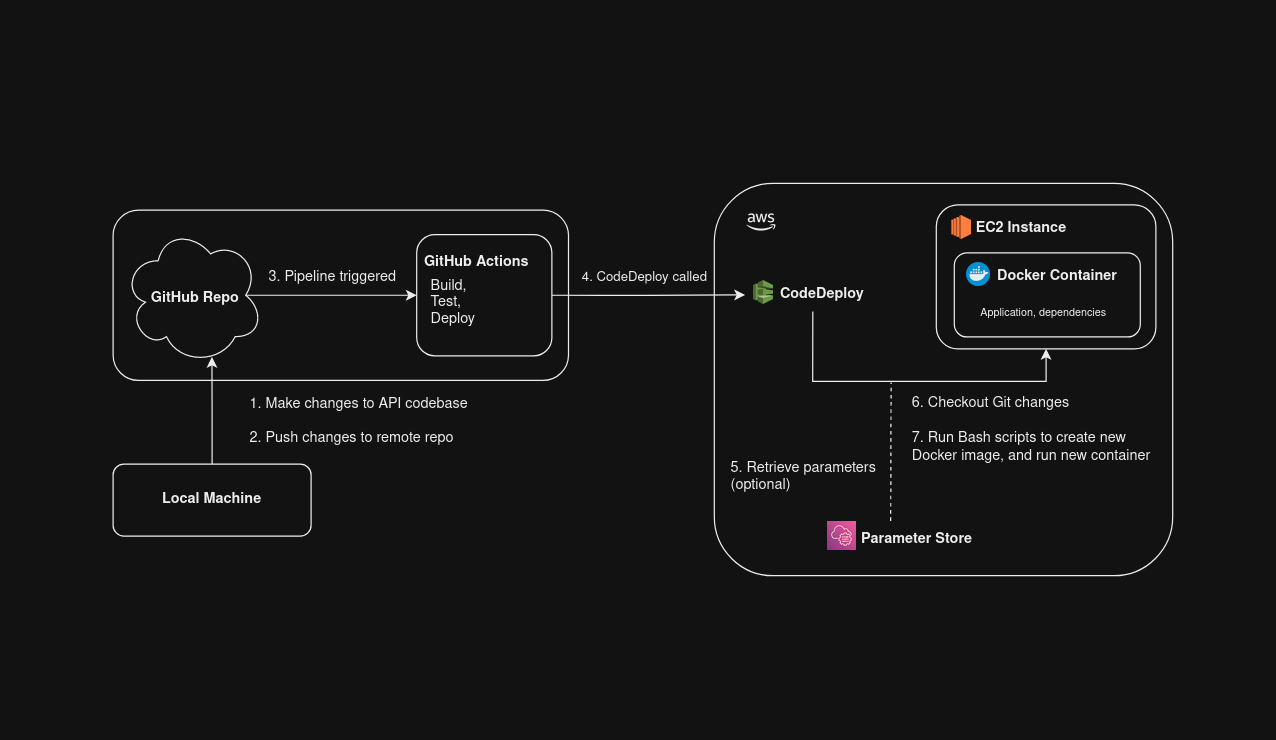
This blog documents the setup of an automated CI/CD workflow for a .NET 8 back-end API hosted on an AWS EC2 instance. It covers configuring AWS CodeDeploy, creating GitHub Actions scripts, and managing secrets with AWS Parameter Store. The goal is to automate deployments, improve reliability, and incorporate DevOps practices like automated testing. By the end, you'll have a CI/CD pipeline with build, test, and deploy stages, enhancing your project's efficiency and security.
This is Part 3 of an ongoing series I'm writing regarding .NET 8 deployment. Part 2 can be accessed here, or on my profile.
If you followed along with Part 2, you have a working .NET 8 API, which is containerized via Docker and hosted on an AWS EC2 instance. It then uses an NGINX reverse proxy and SSL certification to serve the dockerized API via HTTPS. It's a simple and cost-effective solution (thanks again, free tier).
However, what it really lacks is CI/CD workflows. In this part, we'll set up an automated CI/CD workflow, with AWS CodeDeploy, GitHub Actions, and optionally, AWS Parameter Store.
Getting Started
At the moment, whenever I push new changes to the API's Git repository, I have to do some manual steps in order for those changes to be deployed. These steps include SSHing into the EC2 instance, pulling the latest code from Git, building a new Docker image, and running the container with the necessary environment variables.
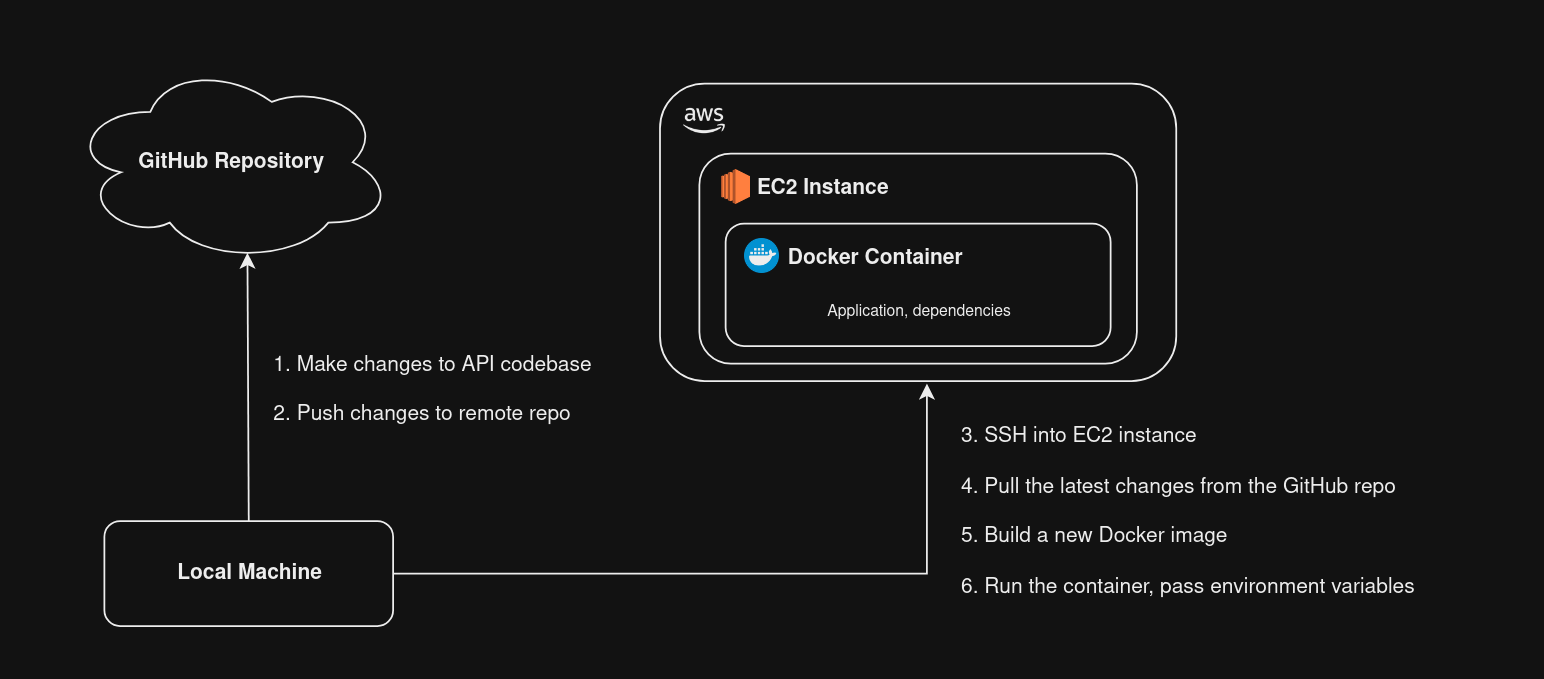
Although the steps are pretty easy, I'd like to automate the deployments because it:
Allows deployments to be faster and easier
Minimizes any mistakes in the manual workflow
Becomes a more reliable process
But I won't stop at deployments, as this gives me the perfect opportunity to introduce other DevOps practices such as automated unit testing and code analysis.
So let's simplify our workflow with a couple of steps:
Create and configure AWS CodeDeploy
Create GitHub Actions scripts
Create CodeDeploy scripts
By the end of this blog, our CI/CD architecture will look something like this:
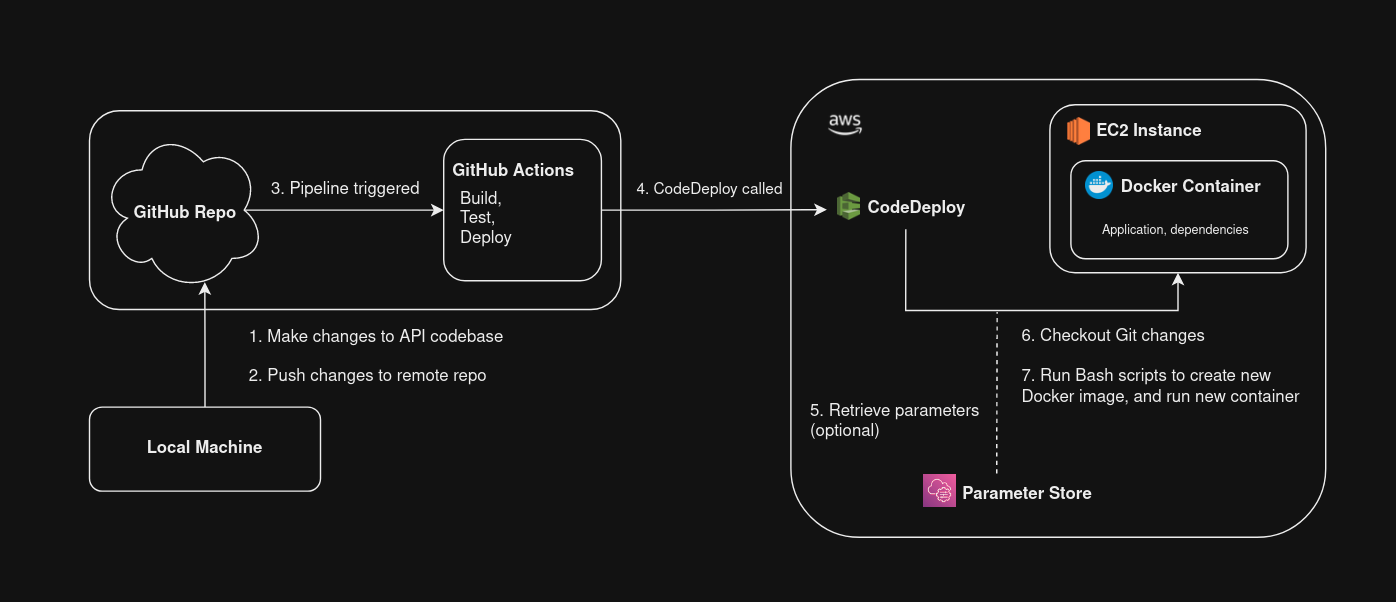
Prerequisites
To begin, you'll need a few things:
An API or web app (doesn't have to be part of the .NET ecosystem) that is hosted in version control, i.e on GitHub
a running EC2 instance, with Git and Docker installed
An SSH client. I'm using the Linux terminal but you can use clients such as PuTTY or SmarTTY, or even just the EC2 Instance Connect on the AWS portal.
Setting up AWS CodeDeploy
First, we need to configure AWS CodeDeploy. We're using CodeDeploy because it's a free, fully managed deployment service provided by AWS, and it will automate the process of deploying the latest code to our Amazon EC2 instance.
Step 1 - Create an Identity Provider for GitHub Integration
First, let's create an IAM role. This IAM role will serve two purposes:
Allowing us to access CodeDeploy from GitHub Actions through OpenID Connect (OIDC)
Allow us to utilize CodeDeploy via permissions
To begin, let's head over to the IAM console.

Select Web Identity as our entity type. Then we'll use the associated GitHub Provider and Audience fields (if these are not appearing for you, these AWS docs might help). For the GitHub organization and repository, supply your user/org name and repo name, respectively.

In the next pages, make sure to add the AWSCodeDeployRole permissions set, and give the role a unique name. Once you've created the role, select it in the IAM console.
Our next step is to add some extra permissions that will give us the ability to call CodeDeploy from the AWS CLI. In the Permissions tab, hit the Add Permissions dropdown and select Create inline policy .

Choose CodeDeploy as your service, then filter and select the following options:
GetDeploymentConfigCreateDeploymentRegisterApplicationRevision
Once you've saved that inline policy, we have one more task remaining for this step. In the IAM role, navigate to the Trust relationships tab and select Edit trust policy. Then edit the policy to add the new code section noted below:
{
    "Version": "2012-10-17",
    "Statement": [
        // ------ New code starts here - Add this to your Trust policy ------
        {
            "Sid": "",
            "Effect": "Allow",
            "Principal": {
                "Service": "codedeploy.amazonaws.com"
            },
            "Action": "sts:AssumeRole"
        },
        // ------ New code ends here - Add the above to your Trust policy ------
        {
            "Effect": "Allow",
            "Principal": {
                "Federated": "<your_arn_ID>"
            },
            "Action": "sts:AssumeRoleWithWebIdentity",
            "Condition": {
                "StringEquals": {
                    "token.actions.githubusercontent.com:aud": "sts.amazonaws.com"
                },
                "StringLike": {
                    "token.actions.githubusercontent.com:sub": "<your_repo>"
                }
            }
        }
    ]
}
Save the trust policy. Finally, before we move on, make sure to save the ARN ID found in the Summary tab of your IAM role - you'll need it later.
Step 2 - Create an IAM Role for EC2
Now that we've created an Identity Provider IAM role for CodeDeploy and GitHub Actions, we need to create another IAM role. This one will allow our existing EC2 instance to have access to all of the required CodeDeploy permissions. So let's head back to the IAM console.
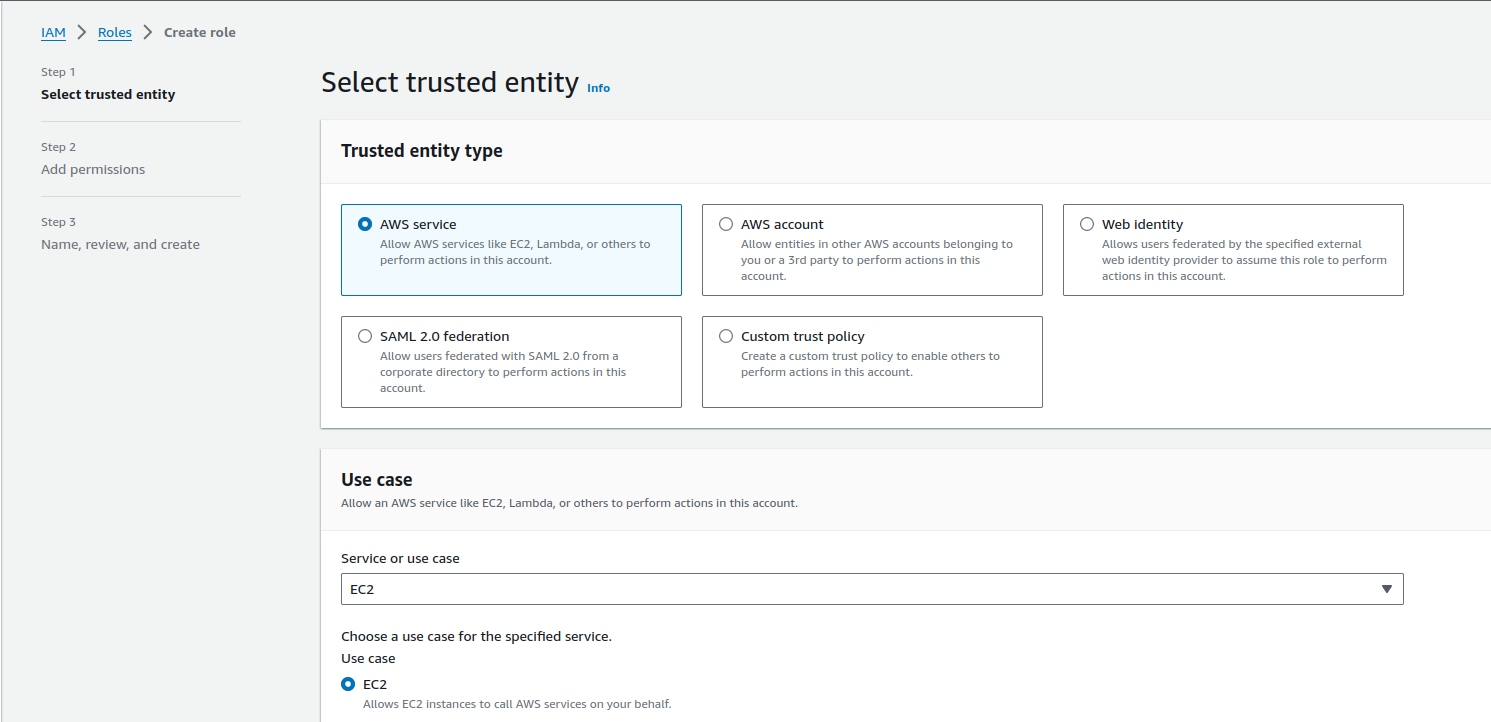
Once again, select AWS Service as the entity type, but this time select EC2 as our use case.
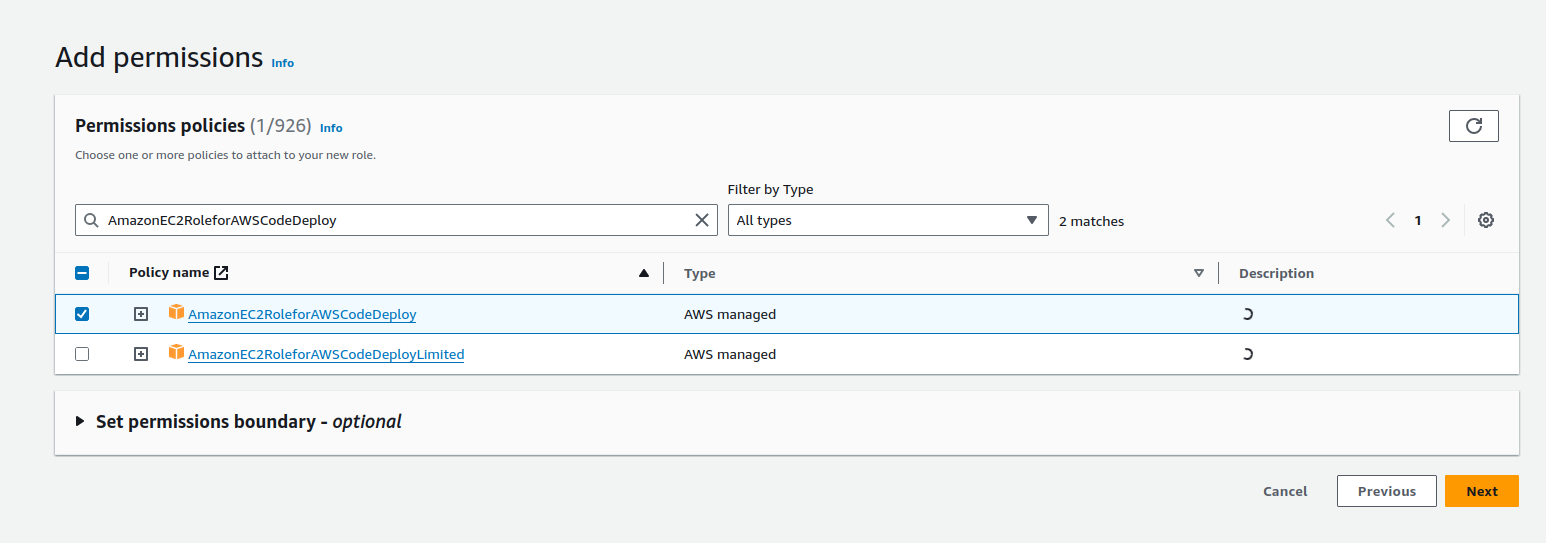
For our permissions, search for and select AmazonEC2RoleforAWSCodeDeploy , then save the IAM role with a unique name.
Now that we've created the last IAM role, let's attach it to our EC2 instance in the EC2 console. Select your instance, then select the Actions dropdown. Click on the Security tab, which will display some additional settings. From here, select Modify IAM Role.

Select the IAM role you just created and select Update IAM role to attach it to our instance.
Step 3 - Create an Application
Now that we have our IAM role configured, go to the CodeDeploy console. Navigate to Applications, then select Create application .

Give your application a name and a compute platform. For this blog we're using an EC2 instance, so select the EC2/On-premises compute platform.
Step 4 - Create a Deployment Group
Now that we have our application created in the CodeDeploy console, let's open it and create a deployment group.
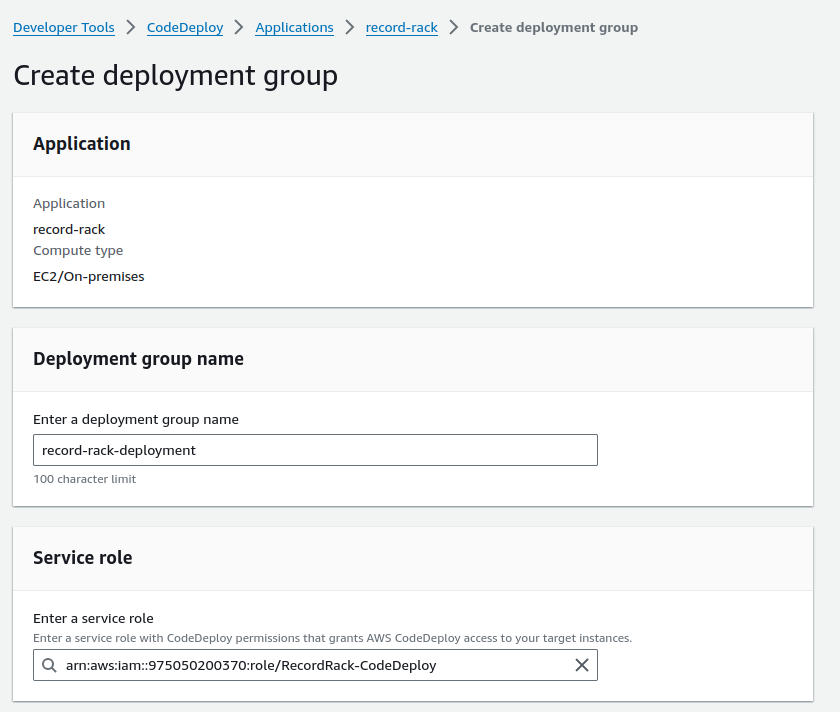
For the Service role, select our previously-created IAM role.

Make sure to select Amazon EC2 instances in the Environment configuration section. Then, give the deployment group a key-value pair. I used the name of the EC2 instance.
Make sure you do not install the AWS CodeDeploy Agent. We'll do that on our own via SSH.
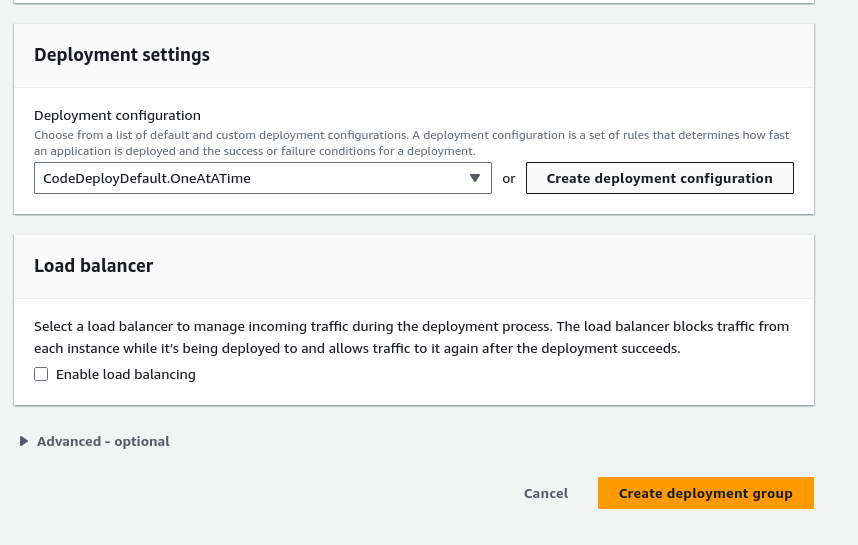
Finally, I selected OneAtATime as my deployment configuration and disabled the load balancer as I am only deploying to one EC2 instance.
Step 5 - Install the CodeDeploy Agent
The final step with our configuration is to install CodeDeploy on our EC2 instance. I'm using Amazon Linux 2, but instructions for different distros can be found here.
Once you've followed those instructions, we are officially done with CodeDeploy setup! Now we can move onto the next step, using GitHub Actions.
Creating Pipeline Scripts with Github Actions
Step 6 - Create Your Initial CI/CD Scripts
If you're following along, this is a great opportunity for you to customize your CI/CD workflow how you'd like. Here is my initial pipeline workflow:
name: CI/CD Pipeline

on:
  push:
    branches: [ "ci/cd" ]
  pull_request:
    branches: [ "ci/cd" ]

jobs:
  build:
    runs-on: ubuntu-latest
    steps:
    - uses: actions/checkout@v4
    - name: Setup .NET
      uses: actions/setup-dotnet@v4
      with:
        dotnet-version: 8.0.x
    - name: Build
      run: dotnet build
    - name: Test
      run: dotnet test --no-build --verbosity normal
I've setup my pipeline to trigger on git push and on merged PRs on the "ci/cd" branch (temporarily). I've also defined a job that will setup .NET 8 dependencies on the ubuntu Linux agent, then build/test my API code.
I'm extremely happy with this, as it covers the build portion of my CI/CD workflow, and finally adds some automated testing to my project (a very important DevOps practice). Now, let's continue on with our deployment.
Step 7 - Adding an Environment Secret
Remember that ARN ID I mentioned earlier when we created the Identity Provider IAM role? We're finally going to put it to use.
Repository secrets are a great tool that allow you to store and obfuscate (or mask) sensitive information, such as access tokens, in your repository.

In your GitHub repository, navigate over to Settings, then open the Secrets and variables dropdown (under Security), then over to Actions, and finally select New repository secret.
To start off, create a secret called IAMROLE_GITHUB and set the value to the ARN ID from the IAM Role's Summary tab. We'll use this secret in our next step.
Step 8 - Adding Deployment to Our Actions Script
Now that we've learned how to create secrets, let's add the next set of logic to our GitHub Actions YAML from Step 6 - the Deploy stage.
  deploy:
    needs: build # optional - i'm using this to ensure deploy runs only if build succeeds
    runs-on: ubuntu-latest
    permissions:
      id-token: write
      contents: read
    steps:
    - uses: actions/checkout@v4
    - uses: aws-actions/configure-aws-credentials@v4
      with:
        role-to-assume: ${{ secrets.IAMROLE_GITHUB }}
        role-session-name: GitHub-Action-Role
        aws-region: us-east-2
    - run: |
        echo "Deploying"
        commit_hash=`git rev-parse HEAD`
        aws deploy create-deployment --application-name <app_name> --deployment-group-name <deployment_name> --github-location repository=$GITHUB_REPOSITORY,commitId=$commit_hash
There's a couple things going on here, so let's break down this YAML in the steps.
First, we check out the latest changes from the Git repo.
Then, we use the "Configure AWS Credentials" marketplace actions to allow us to connect into AWS. Here, we'll use our secret variable from Step 2 and pass the region of our EC2/CodeDeploy instances.
Then, we run an inline bash script that takes advantage of the AWS CLI, specifically the create-deployment command.
We pass the application and deployment group names we created in Steps 3 and 4.
We pass the repository (as a predefined environment variable) as well as the ID of the most recent commit, which will represent the SHA1 identifier of the bundled deployment.
Once you've got your YAML configured, give it a run! It should run without errors (unless you are experiencing build issues / testing failures).
Step 9 - Create Your CodeDeploy Scripts
Now that we've configured our deploy stage to call the AWS CLI, specifically the create-deployment command, we need to give CodeDeploy something to actually execute.
In the root of your repository, create an appspec.yml file. Your exact implementation may vary, but thanks to my Docker/EC2 solution, here's what mine looks like:
version: 0.0
os: linux
hooks:
  ApplicationStop:
    - location: scripts/stop_container.sh
      timeout: 60
      runas: root
#scripts/stop_container.sh
#set -e
#CONTAINER_IDS=$(docker ps -aqf "name=recordrack")
#for CONTAINER_ID in $CONTAINER_IDS; do
   #docker rm -f "$CONTAINER_ID" || true
#done
  AfterInstall:
    - location: scripts/create_image.sh
      timeout: 180
      runas: root
#scripts/create_image.sh
#set -e
#cd /home/ec2-user/repos/RecordRack
#git pull origin
#docker build -t recordrack_image -f Dockerfile .
  ApplicationStart:
    - location: scripts/start_container.sh
      timeout: 60
      runas: root
#scripts/create_image.sh
#set -e
#docker run -d -p 5184:5184 --name recordrack recordrack_image
The appspec.yml file is used by CodeDeploy to determine how the deployment should happen, where the application should be installed, and the lifecycle scripts that need to be executed at each stage of the deployment.
If you take a quick glance at the scripts I've created, you'll notice they are pretty much the commands that I used to manually deploy my Docker container. That's because the CodeDeploy agent takes those scripts, and runs them directly on our EC2 instance! It's a much better and safer alternative to, say, SSHing into the EC2 instance in a pipeline and executing similar scripts.
To learn more information about the lifecycle hooks, the AWS docs break it down way better than I can.
Step 10 - Managing Bash Script Secrets with AWS Parameter Store (Optional)
In step 7, we covered repository secrets in GitHub. They're a great tool, but only useful inside of GitHub Actions workflows. I can't access them in the Bash scripts I created for the appspec.yml deployment, due to the security measures in place to prevent the exposure of these secrets.
But, I still need to pass some sensitive variables when running the new Docker container. Luckily, AWS gives us the ability to use Parameter Store, which is a free solution that provides secure storage for configuration variables and secrets.
First, navigate to the Systems Manager console. Under Application Management select Parameter Store. From here, select Create parameter. When creating a parameter, give it a useful name and make sure to select Standard tier, which is free!

For all of my sensitive variables, I'm going to be choosing SecureString and the default AWS managed key.
Head back over to the IAM console and select the EC2/CodeDeploy role we created in Step 2. In the Permissions tab, under the Add Permissions dropdown, select Create Inline policy. Add this new policy, replacing the AWS Region and Account ID with your own:
{
    "Version": "2012-10-17",
    "Statement": [
        {
            "Effect": "Allow",
            "Action": [
                "ssm:GetParameter",
                "ssm:GetParameters",
                "ssm:GetParametersByPath"
            ],
            "Resource": "arn:aws:ssm:<AWS-REGION>:<ACCOUNT-ID>:parameter/*"
        },
        {
            "Effect": "Allow",
            "Action": [
                "ssm:DescribeParameters"
            ],
            "Resource": "*"
        },
        {
            "Effect": "Allow",
            "Action": [
                "kms:Decrypt"
            ],
            "Resource": "*"
        }
    ]
}
This policy will allow CodeDeploy to access your created parameters, corresponding to the account region and ID, on the EC2 instance. Then, we just need to modify our Bash scripts accordingly. Here's an example of a Bash script that retrieves the parameters and uses them as Docker environment variables.
Parameter=$(aws ssm get-parameter --name "SecretParameter" --with-decryption --query "Parameter.Value" --output text)

docker run -d -p 5184:5184 --name container container_image -e "App:Env=$Parameter"
Your exact syntax for the Docker environment variables might vary - mine follows the syntax that allows my .NET 8 API to retrieve variables from an appsettings.json using colon seperators (:).
Finally, Running the Pipeline
By now, if you haven't already, give your Github Actions pipeline a run. If all the configuration is set up correct, you will have a working CI/CD pipeline with Build, Test and Deploy stages!
This was a great learning experience for me. Yes, I know I could've just set up the pipeline to SSH into my EC2 instance and run a script to execute my Docker commands. But I don't love the security of that solution, and in the end, I've learned so much more about AWS.
If you're experiencing some issues when running your pipeline, here's a few steps you can take to troubleshoot.
Check for any GitHub Actions errors. You can run in debug mode and get more details if your error is starting in the pipeline.
Head to the AWS CodeDeploy Console. Under
Deploy, selectDeployments, and select the most recent deployment by its ID. From there, scroll down toDeployment Lifecycle eventsand selectView events, under theEventscolumn. If there were any errors during deployment, you will be able to see the exact error codes here.If your deployment is successful, but your API/web app is still not working, SSH into your EC2 instance and run
docker ps -a. In the event of failure, your Docker container will usually exit immediately with aExited 139 SIGKILLerror. If that's the case, you can use eitherdocker logs [container ID/container name]ordocker inspect [container ID/container name]to find more information on the root cause.
Thanks for following along :)
Subscribe to my newsletter
Read articles from Alex Taveras-Crespo directly inside your inbox. Subscribe to the newsletter, and don't miss out.
Written by
