Two-tier application for kubernetes Deployment
 Deepika kumari
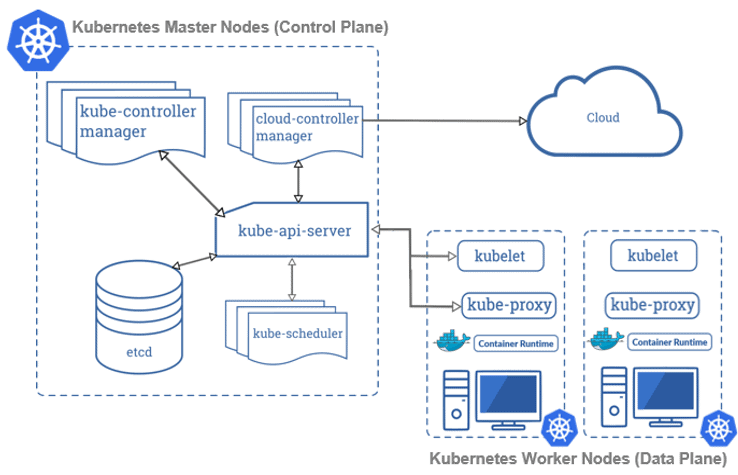
First setup kubernetes kubeadm cluster:
This guide outlines the steps needed to set up a Kubernetes cluster using kubeadm.
Pre-requisites
Ubuntu OS (Xenial or later)
sudo privileges
Internet access
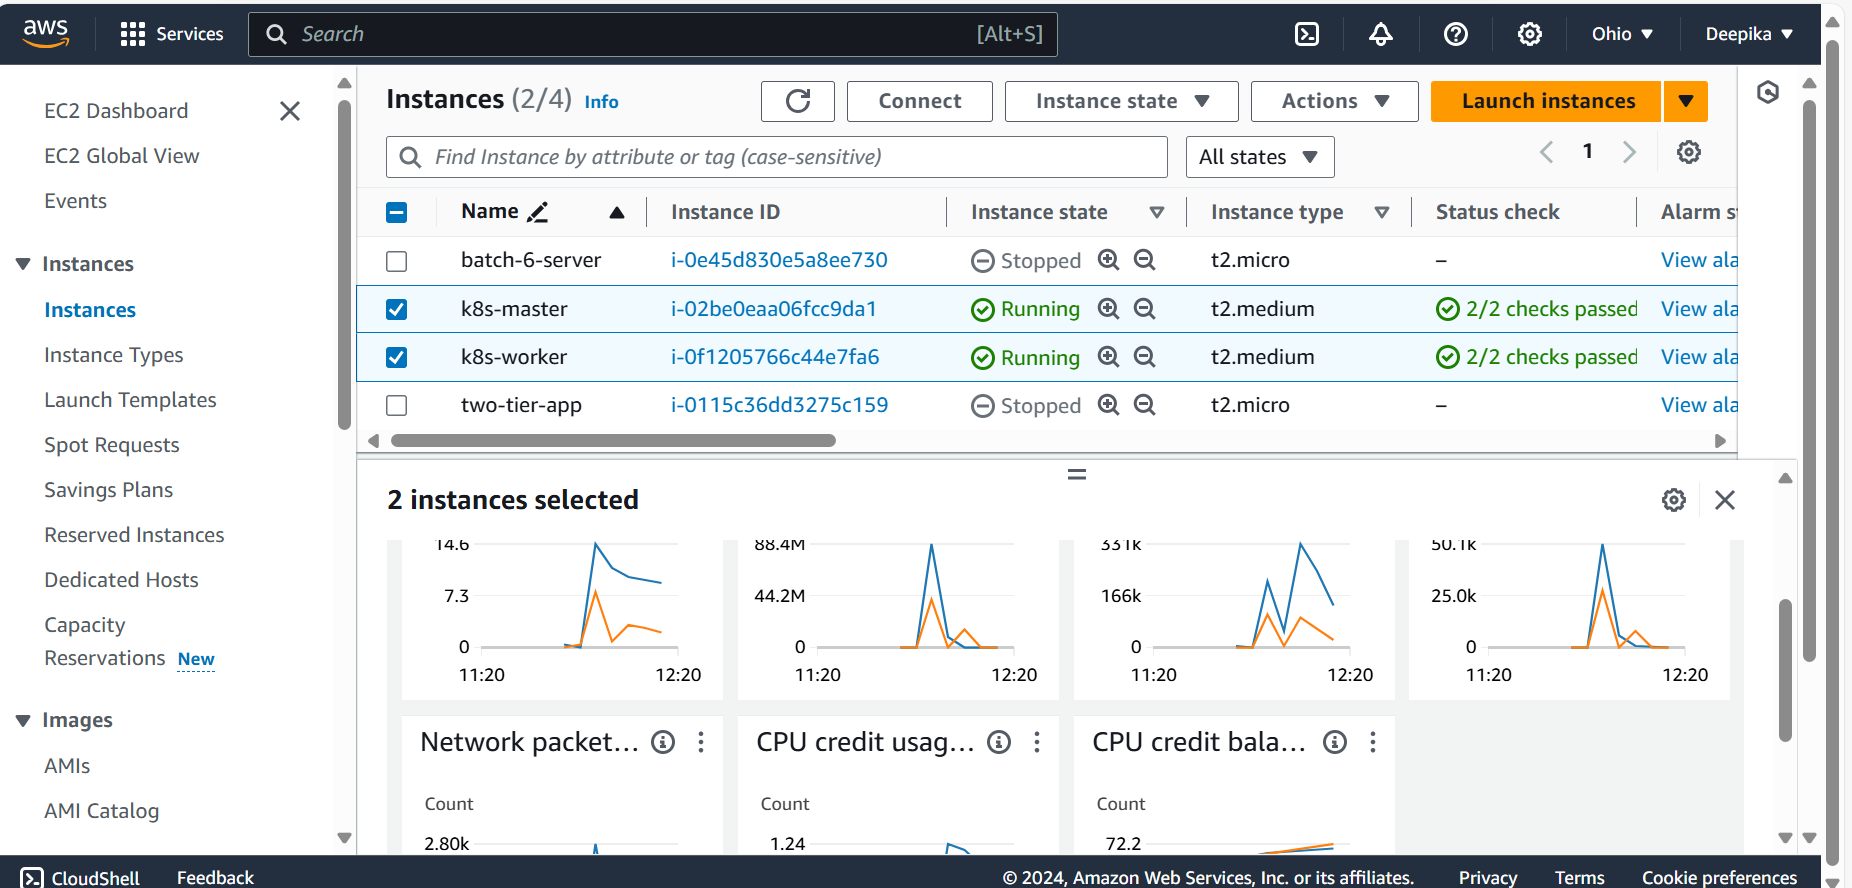
t2.medium instance type or higher
AWS Setup
Make sure your all instance is in same Security group.
Expose port 6443 in the Security group, so that worker nodes can join the cluster.
Launch 2 instance:
Execute on Both "Master" & "Worker Node"
Run the following commands on both the master and worker nodes to prepare them for kubeadm.
#using 'sudo su' is not a good practice.
sudo apt update
sudo apt-get install -y apt-transport-https ca-certificates curl
sudo apt install docker.io -y

sudo systemctl enable --now docker # enable and start in single command.

#Adding gpg keys.
curl -fsSL "https://packages.cloud.google.com/apt/doc/apt-key.gpg" | sudo gpg --dearmor -o /etc/apt/trusted.gpg.d/kubernetes-archive-keyring.gpg

#Add the repository to the sourcelist.
echo 'deb https://packages.cloud.google.com/apt kubernetes-xenial main' | sudo tee /etc/apt/sources.list.d/kubernetes.list

sudo apt update
sudo apt install kubeadm=1.20.0-00 kubectl=1.20.0-00 kubelet=1.20.0-00 -y
Execute ONLY on "Master Node"
sudo kubeadm config images pull
sudo kubeadm init  # Initialize the kubernetes master node.

# setup local kubeconfig (both for root user and normal user)
mkdir -p "$HOME"/.kube
sudo cp -i /etc/kubernetes/admin.conf "$HOME"/.kube/config
sudo chown "$(id -u)":"$(id -g)" "$HOME"/.kube/config

cat/etc/kubernetes/admin.conf

# Network Plugin = calico
kubectl apply -f https://raw.githubusercontent.com/projectcalico/calico/v3.26.0/manifests/calico.yaml

kubeadm token create --print-join-command
You will get
kubeadm token, Copy it.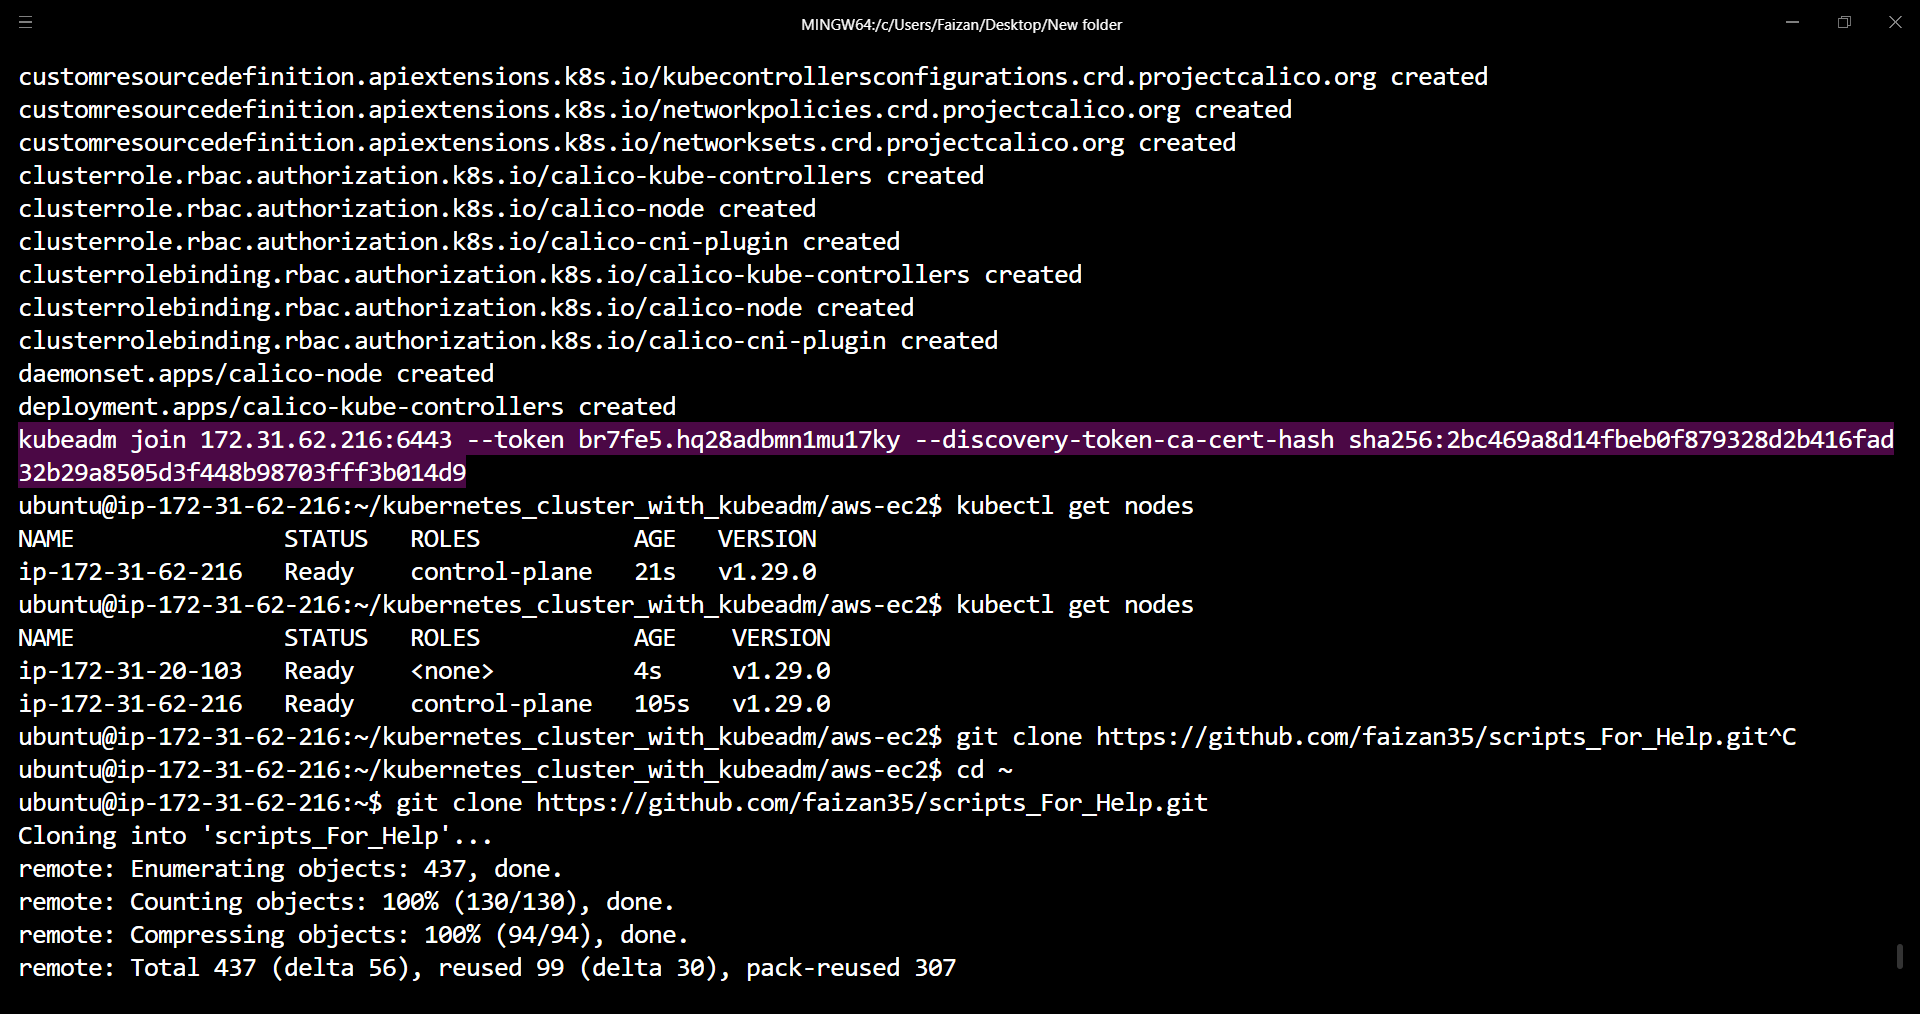
Execute on ALL of your "Worker Node's"
Perform pre-flight checks
sudo kubeadm reset pre-flight checksPaste the join command you got from the master node and append
--v=5at the end.sudo your-token --v=5Use
sudobefore the token.
If you are getting problem to connect- Go to "master Instance" and add rule "6443" to "security group".
Verify Cluster Connection on Master Node:
kubectl get nodes

SetUp:
- First clone the code to your machine:
git clone https://github.com/Deepika0313/two-tier-flask-app.git

- Move to k8s directory:
cd two-tier-flask-app/k8s
Now, execute below commands one by one:
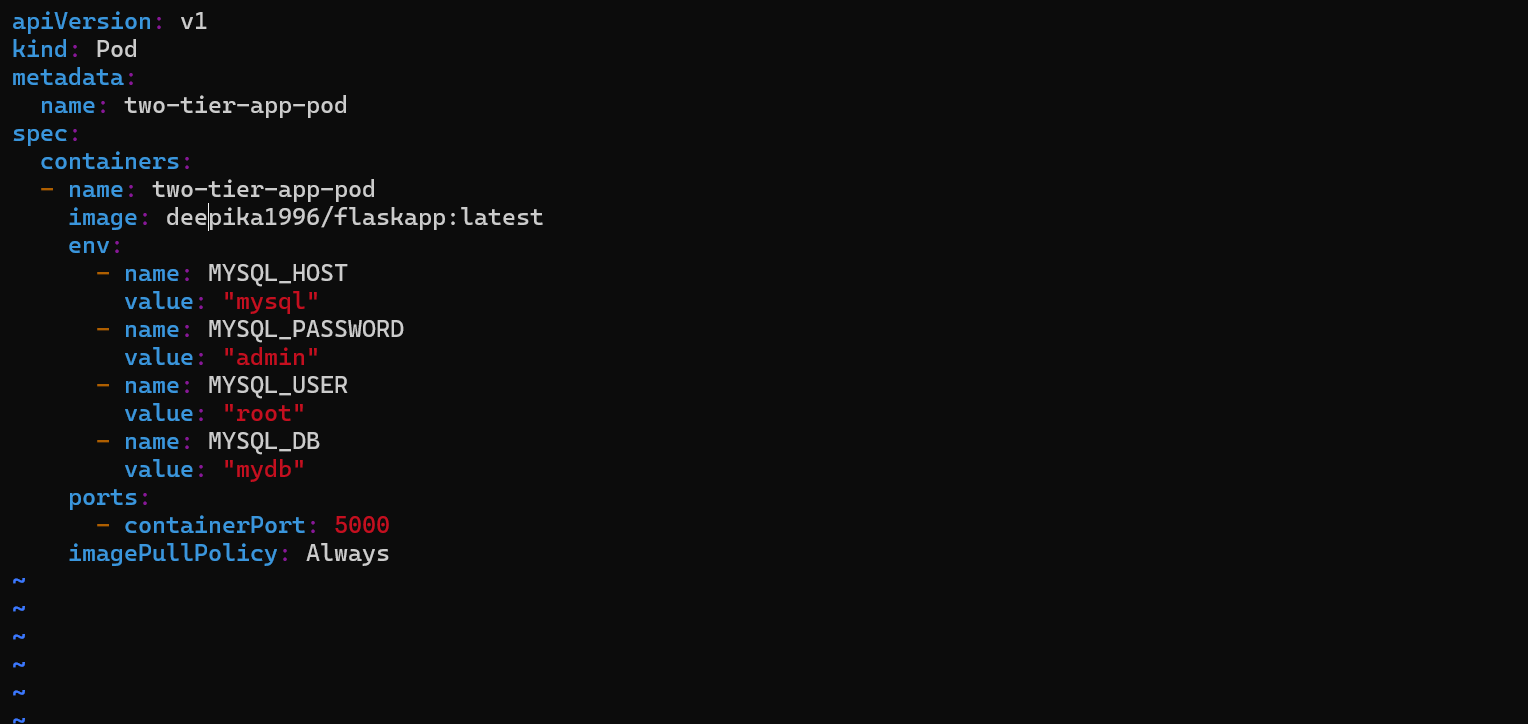
Creating a Pod:
Pods are the smallest units of computing that you can create and manage in Kubernetes. A Pod is a group of one or more containers, with shared storage and network resources, and a specification for how to run the containers.
  vim two-tier-app-pod.yml
  kubectl apply -f two-tier-app-pod.yml

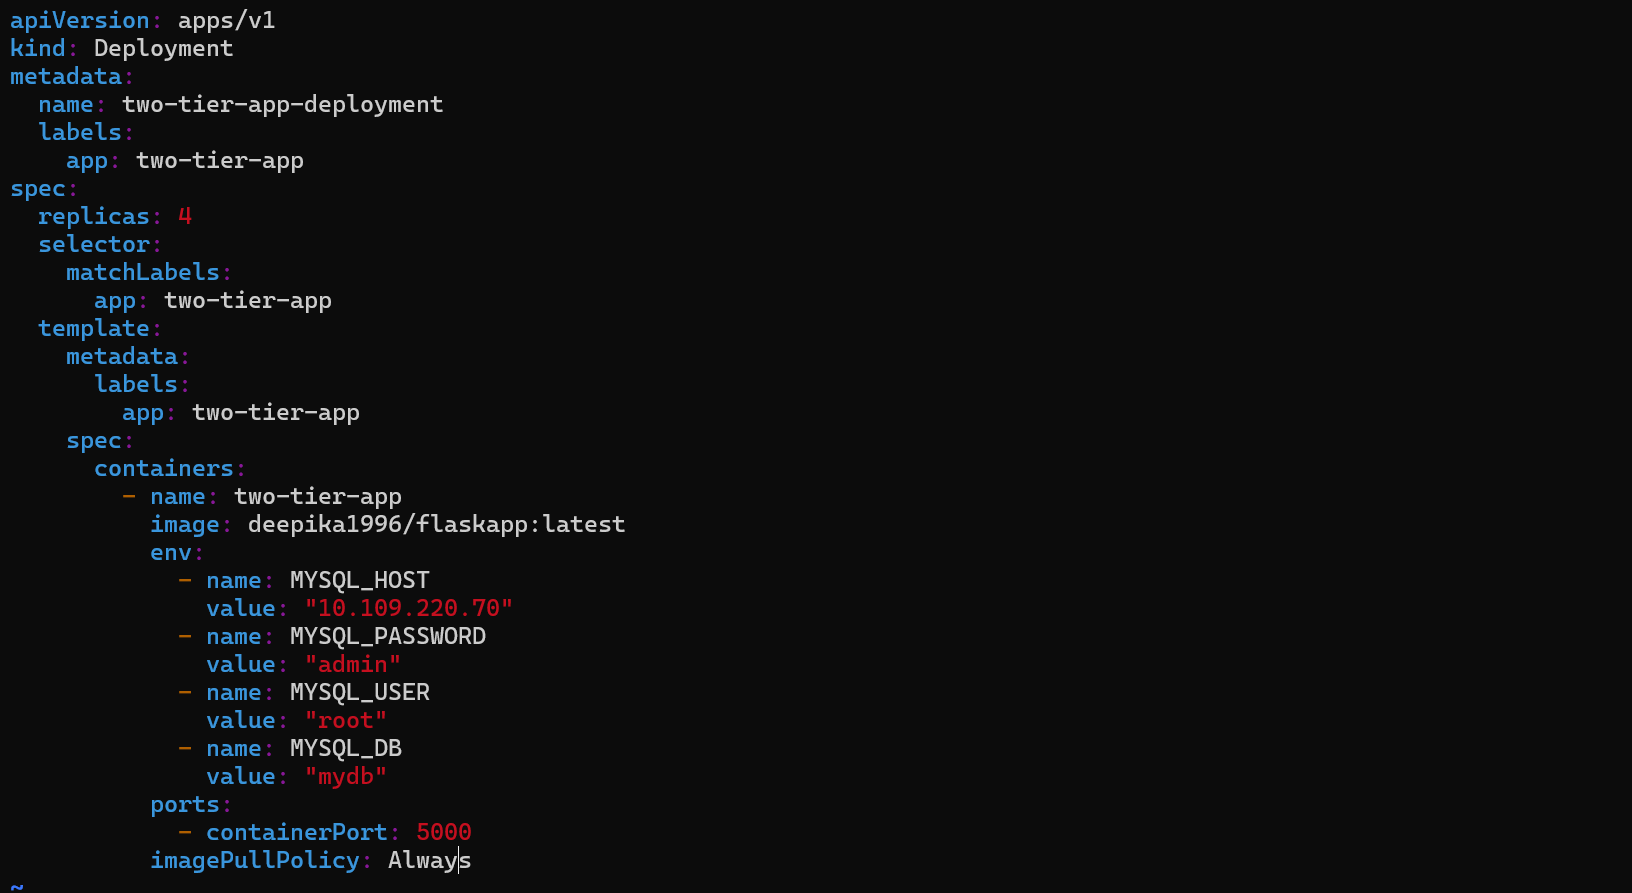
Create a Deployment Files:
A Deployment provides declarative updates for Pods and ReplicaSets.
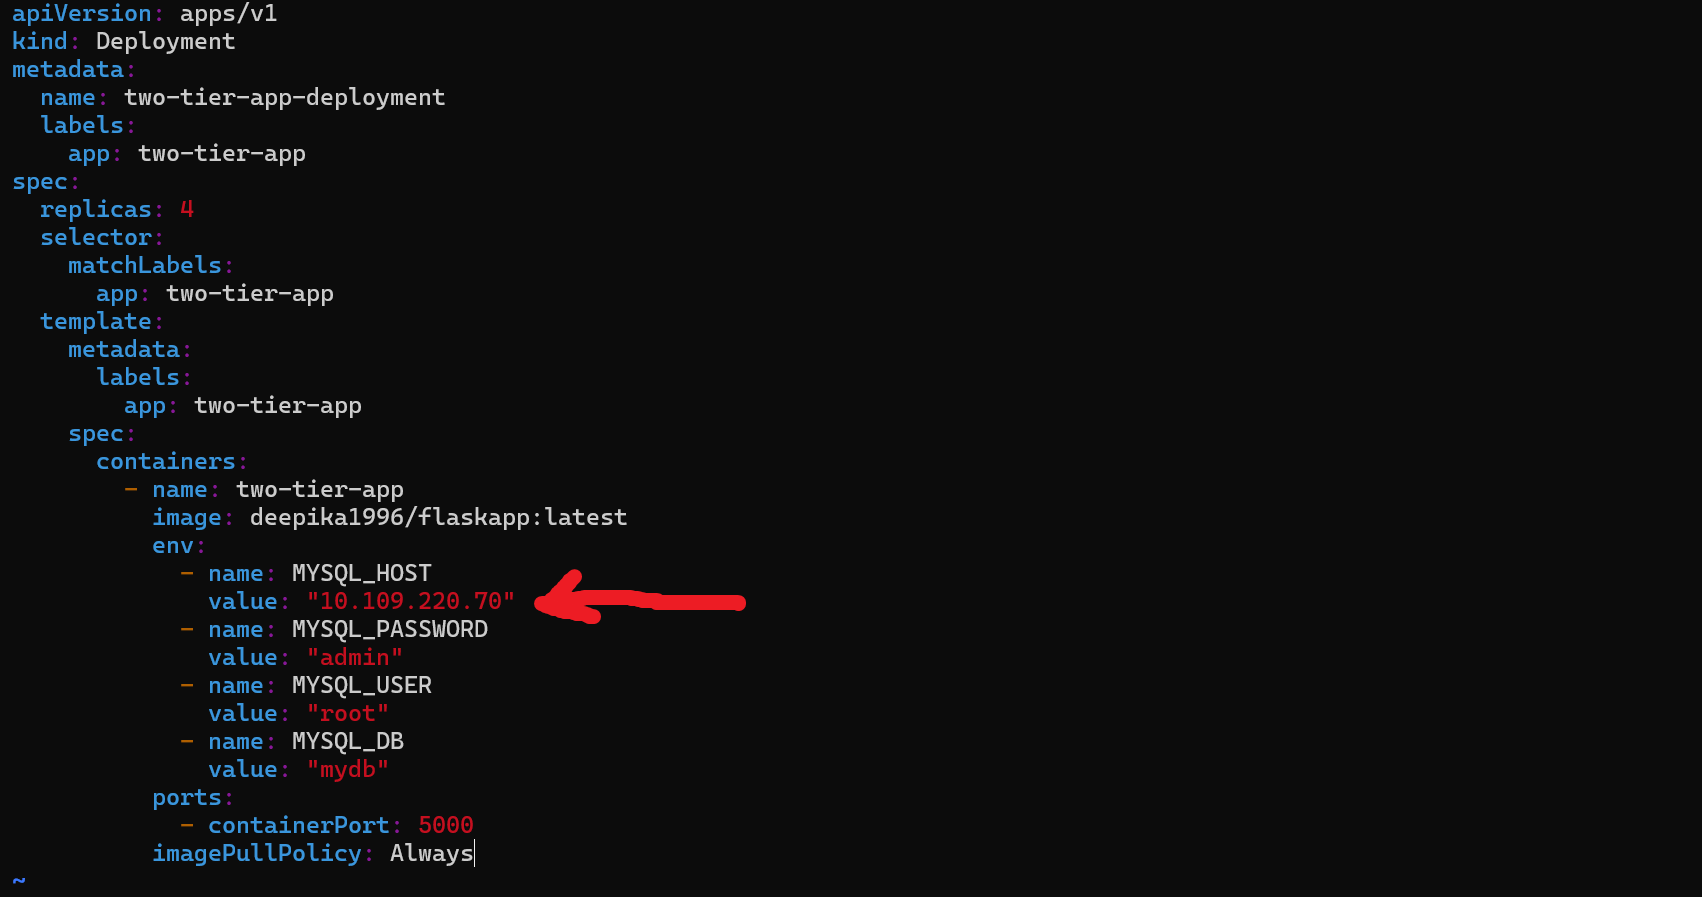
vim two-tier-app-deployment.yml
kube apply -f two-tier-app-deployment.yml

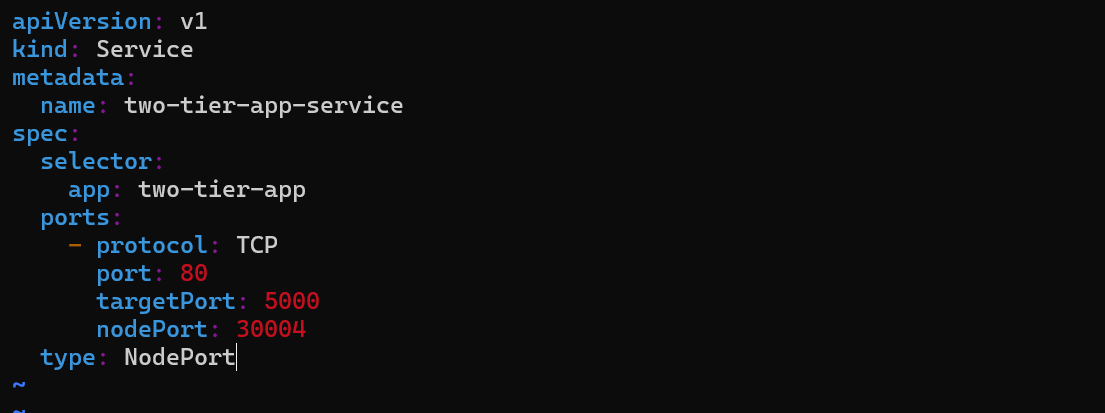
Create a Services Files:
A Service is a method for exposing a network application that is running as one or more Pods in your cluster. A key aim of Services in Kubernetes is that you don't need to modify your existing application to use an unfamiliar service discovery mechanism.
vim two-tier-app-svc.yml
kubectl apply -f two-tier-app-svc.yml

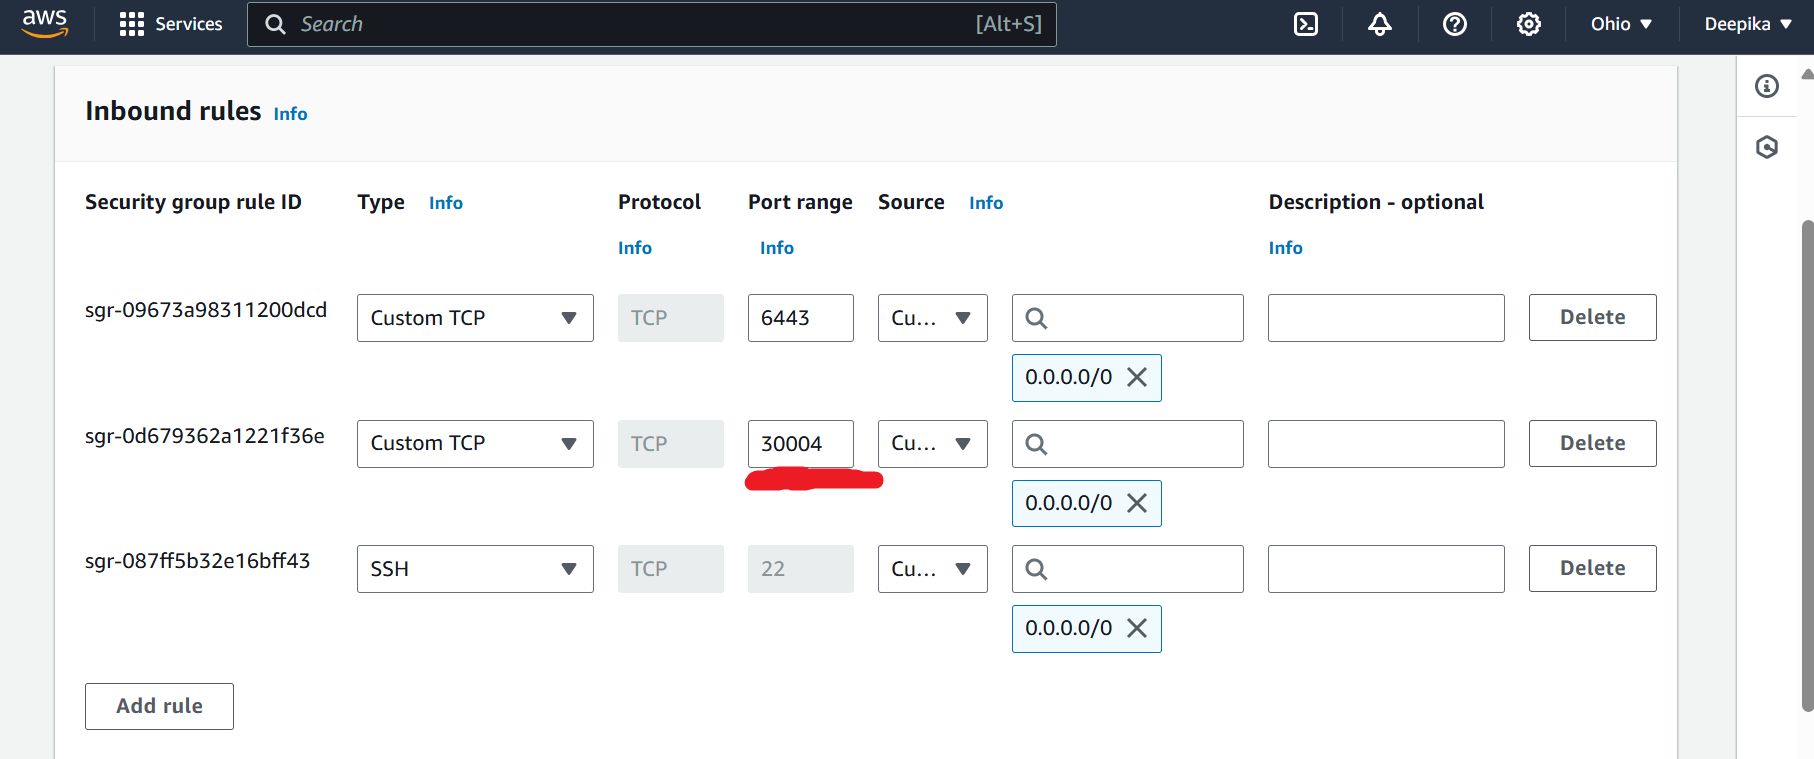
Change the Security Group Inbound rules:
Persistent Volumes:
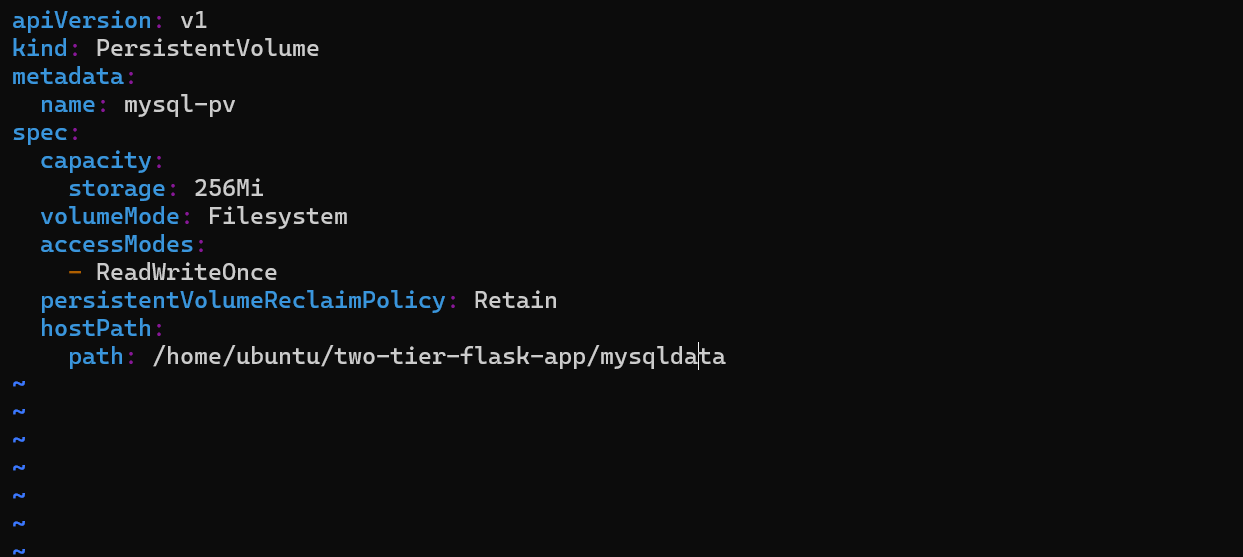
The PersistentVolume subsystem provides an API for users and administrators that abstracts details of how storage is provided from how it is consumed. There are two new API resources: PersistentVolume and PersistentVolumeClaim.
A PersistentVolume (PV) is a piece of storage in the cluster that has been provisioned by an administrator or dynamically provisioned using Storage Classes.
While PersistentVolumeClaims allow a user to consume abstract storage resources, it is common that users need PersistentVolumes with varying properties, such as performance, for different problems.
vim mysql-pv.yml
vim mysql-pvc.yml
kubectl apply -f mysql-pv.yml
kubectl apply -f mysql-pvc.yml

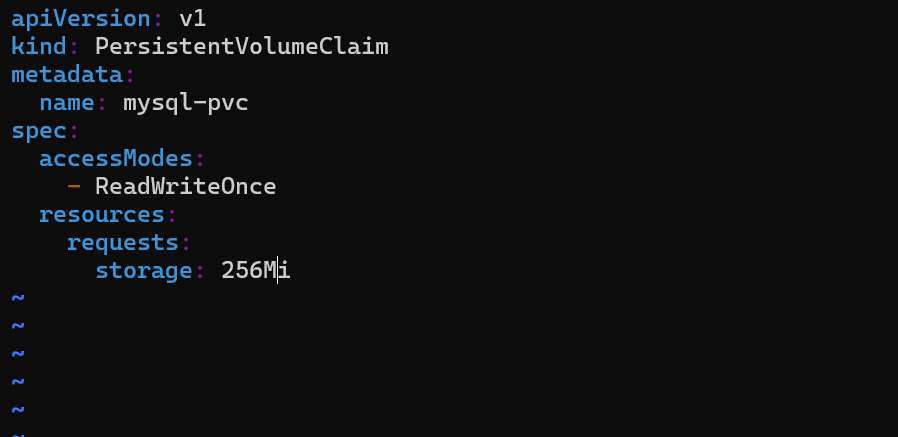
For Database we use MYSQL Deployment:
vim mysql-deployment.yml
kubectl apply -f mysql-deployment.yml
kubectl get pods


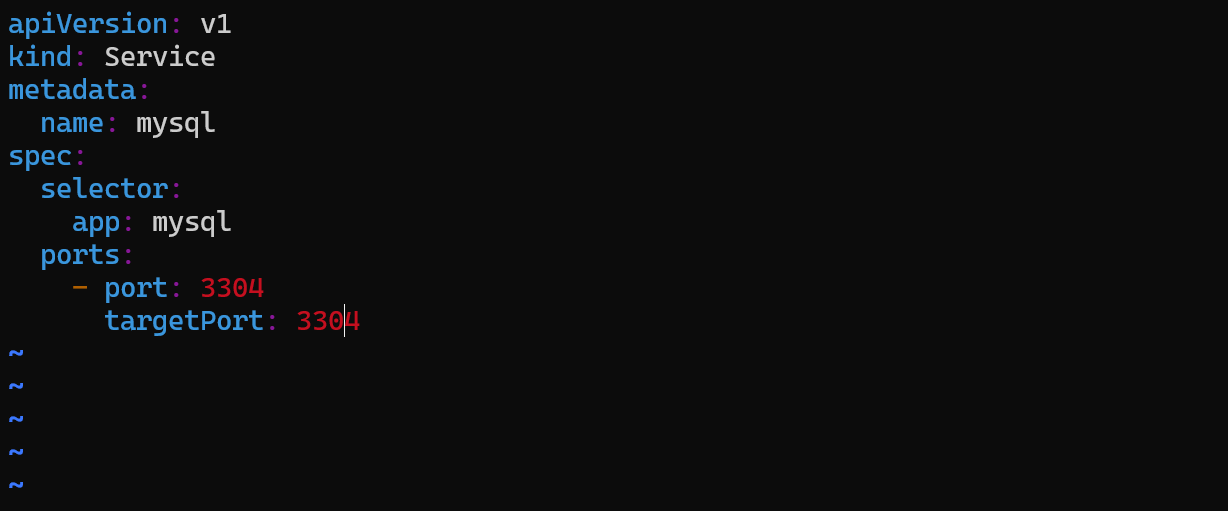
Change the "Cluster_IP" of mysql in two-tier-app-deployment.yml file:

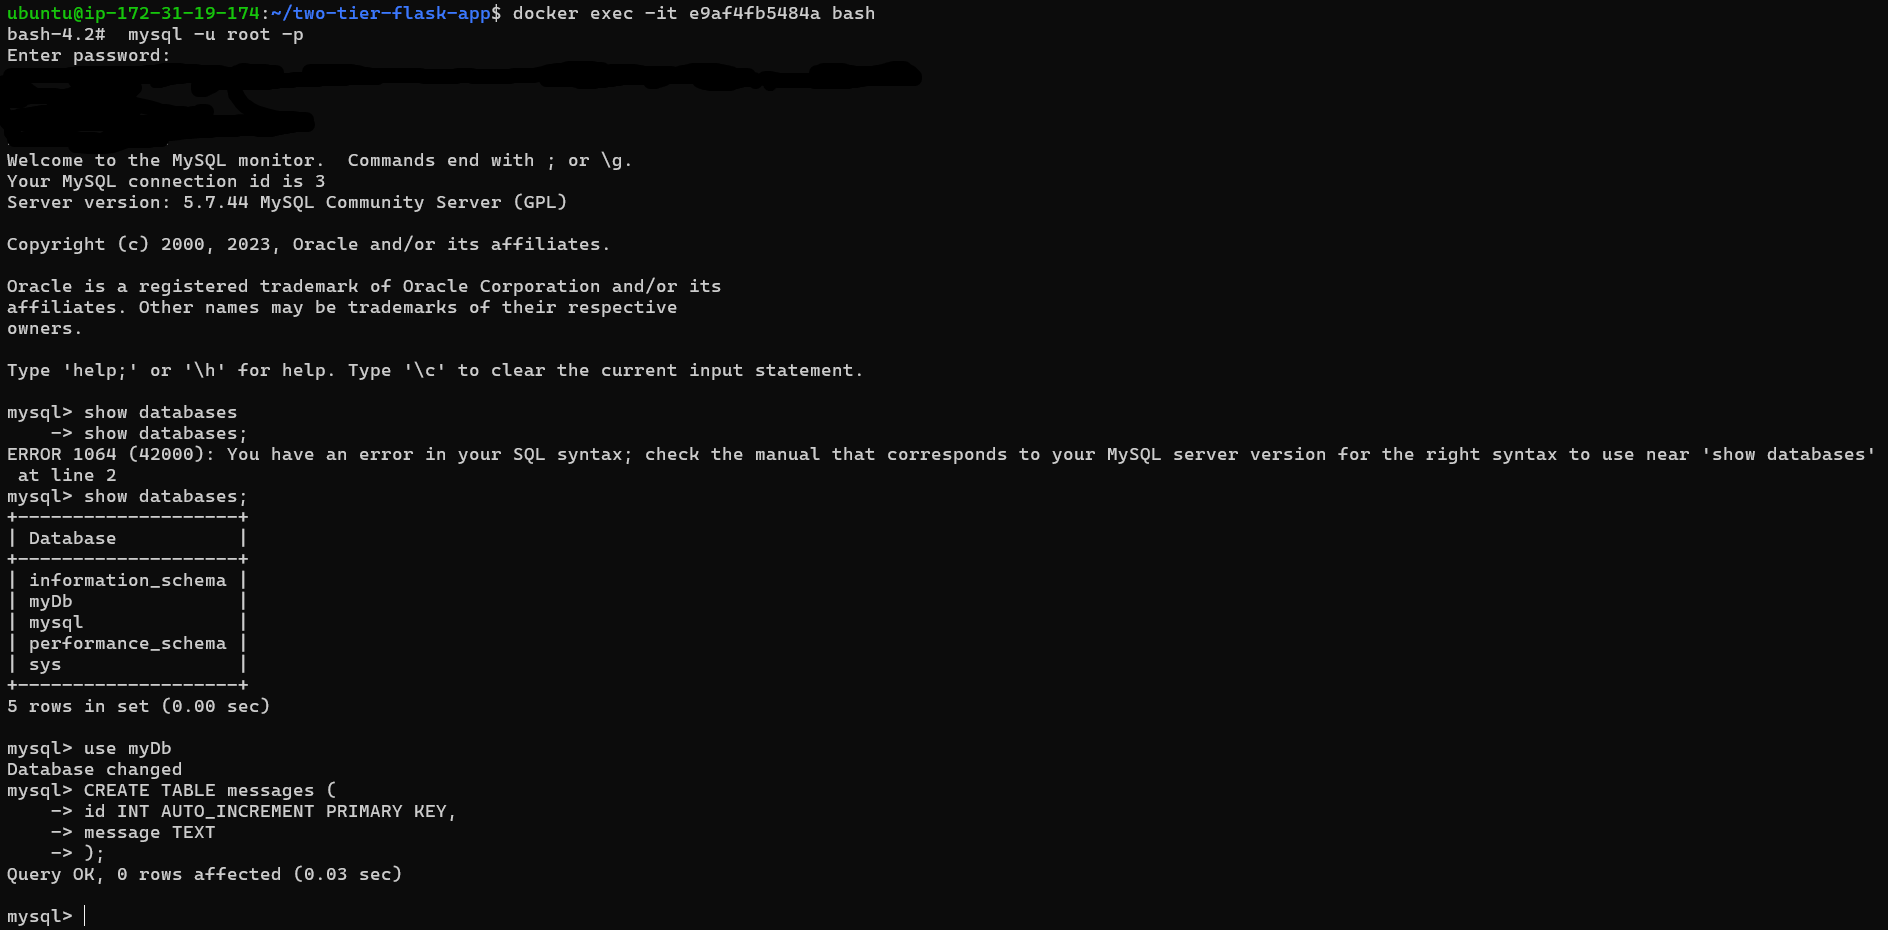
In "Worker Node" we run the below command:
sudo docker ps -a
sudo docker exec -it e9af4fb5484a bash
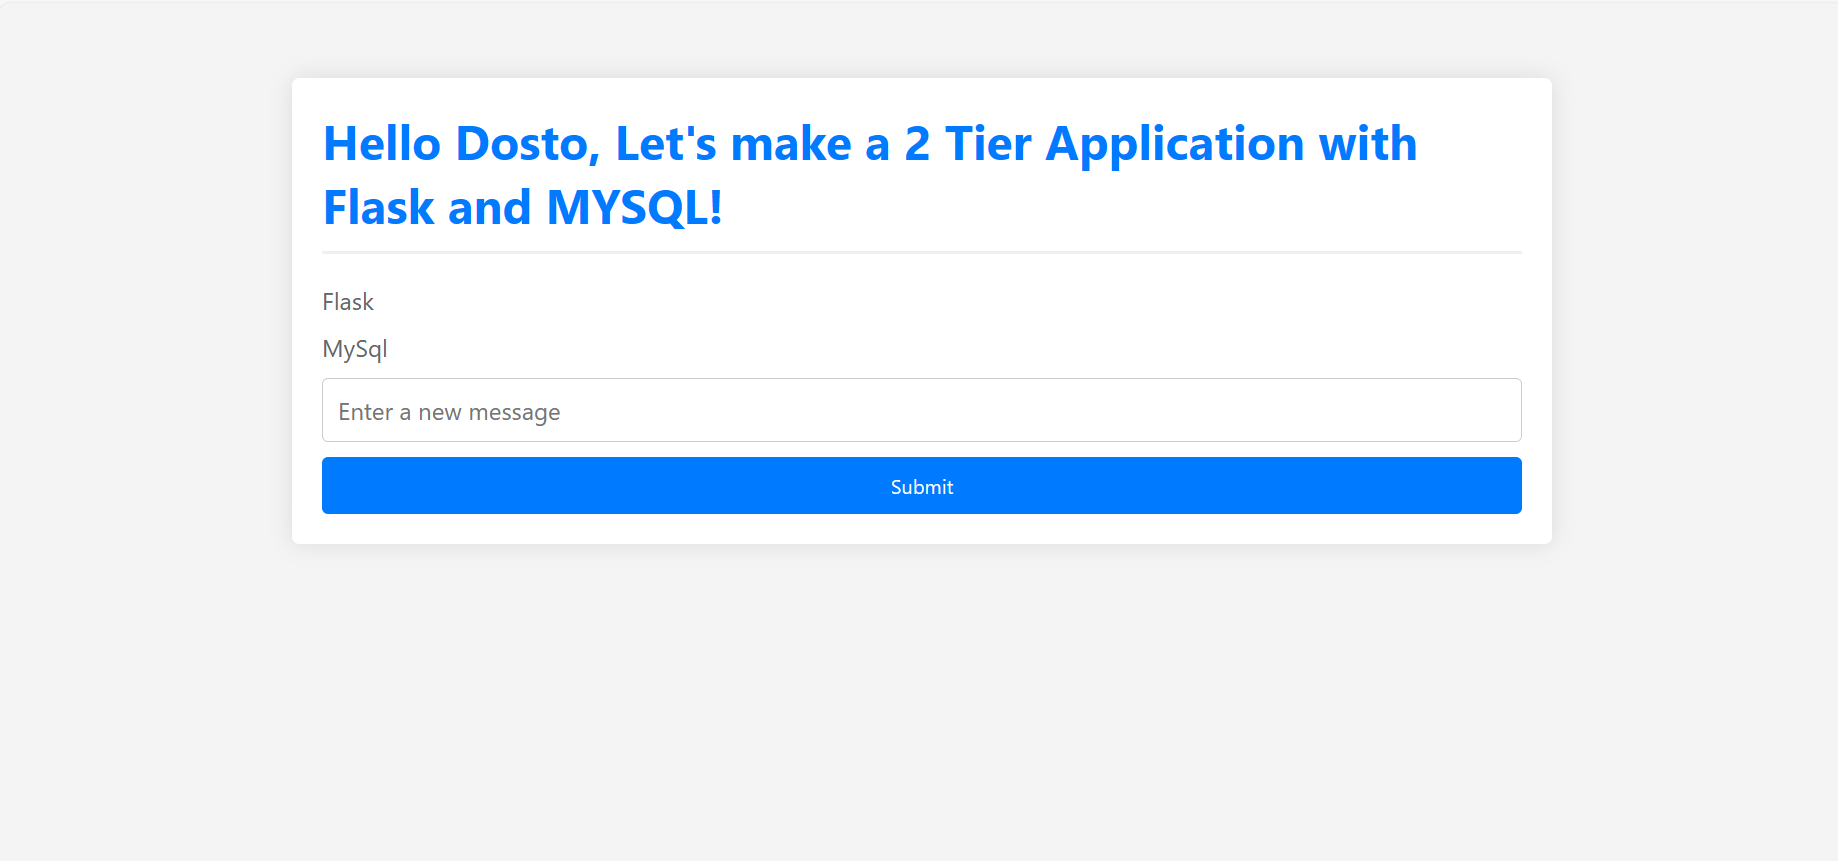
Open a web browser and navigate the application:

Conclusion:
In Conclusion, we've walked through the steps to set up a Two-tier application deployment on a Kubernetes cluster, deploying a two-tier application on Kubernetes offers significant advantages in terms of scalability, resilience, and management. By separating the application logic and database layers into distinct pods, Kubernetes enables efficient resource allocation and seamless scaling.
Using Kubernetes, you can easily manage and deploy both layers, ensuring they run smoothly and can handle user requests efficiently. This architecture enhances fault tolerance, as failures in one tier do not necessarily impact the other. Moreover, Kubernetes' built-in tools for monitoring, logging, and automated recovery simplify the maintenance and operational tasks, ensuring a robust and high-performing application environment.
Hope you found this article informative and useful. Thanks for reading this article.
Keep Learning... :)
Subscribe to my newsletter
Read articles from Deepika kumari directly inside your inbox. Subscribe to the newsletter, and don't miss out.
Written by
