AWS DAY 05 : VPC peering & AWS Transist Gateways.
 Aesha Shah
Cloud networking forms the backbone of modern cloud infrastructures, offering a robust framework for connecting and managing resources efficiently within and across cloud environments. Key concepts such as Virtual Private Clouds (VPCs), subnets, route tables, internet gateways, and peering connections are foundational elements that enable organizations to architect scalable, secure, and high-performance networks in the cloud.
First we Understanding Key Concepts in Cloud Networking:
VPC (Virtual Private Cloud):
A Virtual Private Cloud (VPC) is a logically isolated section of a cloud provider's network where you can launch resources in a virtual network that you define. It provides full control over your virtual networking environment, including selecting your IP address range, creating subnets, and configuring route tables and network gateways.
Subnets:
Subnets are subdivisions within a VPC that allow you to segment the VPC's IP address range into smaller, manageable chunks. Each subnet resides within a specific availability zone of the cloud provider, enabling you to place resources in different zones for redundancy and to control traffic routing more granularly.
Internet Gateways:
An Internet Gateway is a horizontally scaled, redundant, and highly available VPC component that allows communication between instances in your VPC and the internet. It acts as a gateway for inbound and outbound traffic, enabling resources within the VPC to communicate with external networks.
Route Tables:
A Route Table contains a set of rules, called routes, that determine where network traffic from your VPC is directed. Each subnet in your VPC is associated with a route table, which controls the traffic routing for that subnet. You can modify the route tables to direct traffic to various destinations, such as internet gateways, VPC peering connections, or other subnets.
Peering Connections:
Peering Connections are network links between two VPCs that enable them to route traffic to each other using private IP addresses. This allows for secure and efficient communication between resources in different VPCs without traversing the public internet, maintaining low latency and high security.
What is VPC peering?
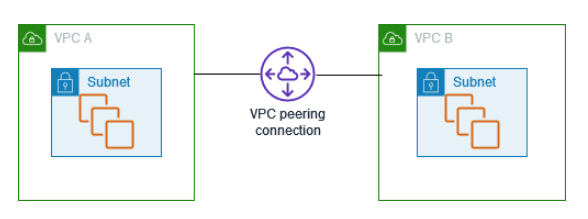
A VPC peering connection is a networking connection between two VPCs that enables you to route traffic between them using private IPv4 addresses or IPv6 addresses. Instances in either VPC can communicate with each other as if they are within the same network. You can create a VPC peering connection between your own VPCs, or with a VPC in another AWS account. The VPCs can be in different Regions (also known as an inter-Region VPC peering connection).

How Does VPC Peering Work?
When you set up a VPC peering connection, you create a route between two VPCs that enables the instances in those VPCs to communicate with each other as if they were within the same network. Here’s a simplified process of how VPC peering works:
Initiation: One VPC initiates a peering connection request to another VPC.
Acceptance: The second VPC accepts the peering request.
Configuration: Both VPCs configure their route tables to direct traffic destined for the peer VPC through the peering connection.
Communication: Instances in either VPC can now communicate using private IP addresses.
Common Use Cases for VPC Peering
Multi-Tier Applications: Separate different tiers of an application (e.g., web servers, application servers, and databases) into distinct VPCs for better security and management.
Shared Services: Allow multiple VPCs to access shared services such as logging, authentication, or DNS without exposing them to the internet.
Resource Sharing: Facilitate resource sharing between different teams, departments, or projects while maintaining isolation and control.
Hybrid Cloud Architectures: Integrate on-premises environments with cloud environments by peering cloud VPCs with on-premises networks.
What is AWS transist gateways?
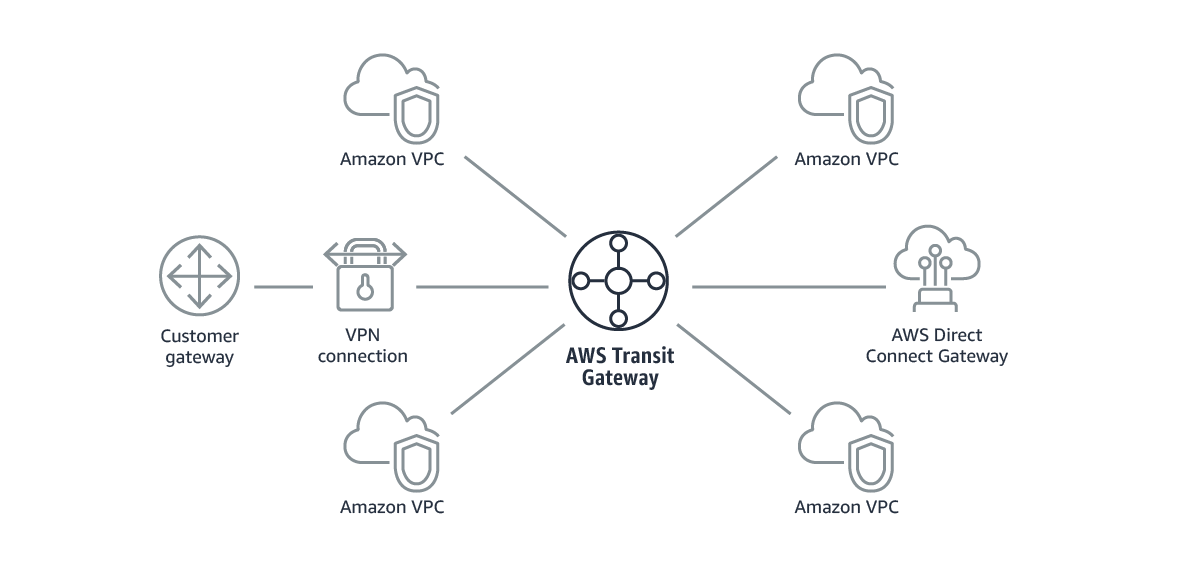
AWS Transit Gateway connects your Amazon Virtual Private Clouds (VPCs) and on-premises networks through a central hub. This connection simplifies your network and puts an end to complex peering relationships. Transit Gateway acts as a highly scalable cloud router—each new connection is made only once.

How transit gateways work?
Consider a shopping mall with various stores (VPCs) like a clothing store, a bookstore, and a cafe. VPC peering would be like creating dedicated walkways between specific stores for customers to move between them. While it allows movement, it gets confusing with numerous walkways crisscrossing the mall.
Transit Gateway acts as a central transportation hub within the mall. Each store connects to this hub through a single access point. Now, a customer (data packet) going from the clothing store (VPC) to the bookstore (VPC) can easily travel through the central hub. The Transit Gateway, like a smart information booth, directs the customer (data) based on the destination store (VPC), ensuring they reach their desired location efficiently. This central hub simplifies managing pathways, scales well as the mall adds more stores (VPCs), and keeps everyone within the secure confines of the mall (secure AWS network).
Let's do some hands-on pracrices:
Create AWS Transit Gateway in 2 different regions in single aws account.
First, we create two VPCs in different regions. Here, I created one VPC in Mumbai and a second VPC in the Ohio region. Follow the below image to create a VPC.
Now create EC2 instances in both regions, give the EC2 instance name, select Ubuntu in AMI, and in network settings, select the VPC that will be created for the Mumbai region.
Same configuration in the Ohio region for creating instances, and select VPC, which will be created in the Ohio region.
Once we create the basic requirements like VPC and EC2, let's create transit gateways in both regions.
To create a transit gateway Navigate to the Transit Gateway section:
Go to the VPC Dashboard.
In the left navigation pane, click on "Transit Gateways
-> Create a Transit Gateway in the First Region:
Make sure you are in your first desired region.
Click on "Create Transit Gateway".
Fill in the required details (name, description, and options for the ASN and default route table association and propagation).
Click "Create Transit Gateway".
Wait for the Transit Gateway to be created and note its ID.
-> Switch to the Second Region:
Change the region from the AWS Management Console to your second desired region.
Repeat the process of creating a Transit Gateway in this region by following the same steps as above.
Note the Transit Gateway ID for the second region.
Once you have created Transit Gateways in both regions, you need to peer them.Now create transit gateway attachment.
-> Attach VPCs to Transit Gateways
In each region, navigate to "Transit Gateway Attachments".
Create new attachments to link your VPCs to the Transit Gateway.
Configure route tables in your VPCs to route traffic through the Transit Gateway.
-> Update Route Tables in Both Regions:
Go to the "Route Tables" section under each Transit Gateway.
Add routes pointing to the peered Transit Gateway attachment.
Ensure that the route tables are properly configured to allow traffic to flow between the regions.
Peer the Transit Gateways
Once you have created Transit Gateways in both regions, you need to peer them.
Here we need to create another transit gateway attachment for Peering both the networks.
-> In the First Region:
Navigate to the Transit Gateway section in the first region.
Create a Transit Gateway Peering Attachment:
Go to "Transit Gateway Attachments".
Click "Create Transit Gateway Attachment".
Select "Peering".
Choose the Transit Gateway you created in this region.
Under "Peer Transit Gateway", enter the Transit Gateway ID of the second region.
Specify the region of the peer Transit Gateway.
Add tags if necessary.
Click "Create Transit Gateway Attachment".
-> Switch to the second region and accept the peering request:
Go to "Transit Gateway Attachments" in the second region.
You should see a peering attachment request pending acceptance.
Select the attachment and click "Actions" > "Accept".
The transit gateway will be categorised if you see the transit gateway route table here. If you have enabled the subnet routes, that is not necessary, so you also need to enable the routes in the transfigator router tables, so check the associations it has been associated with, go to routes, create a static route, and add the below image details in the both the region.
After achieving static routes on both regions using the public IP, you ping the respective region instances, and you can successfully create this.
In this hands-on we can create EC2 instance and apply cloud watch.
Whats need to be done:
Create an instance and deploy a nginx webserver on that instance.
Create a cloudwatch and connect it with your nginx server to monitor its logs.
Create an instance and deploy a nginx webserver on that instance.
Step 1: Create an EC2 Instance
Log in to the AWS Management Console and First create IAM role for EC2 & CloudWatch.
Navigate to the EC2 Dashboard:
- In the AWS Management Console, go to the EC2 Dashboard by selecting "Services" and then "EC2".
Launch an Instance:
Click on the "Launch Instance" button.
Configure the settings based on your requirements.
Click "Launch Instance".
After set-up the instance install the nginx on your instance.
Step 2: Set Up CloudWatch for the EC2 Instance
Install CloudWatch Agent
Connect to Your EC2 Instance:
- Use SSH to connect to your instance. The connection command is typically provided by AWS on the instance details page.
Install the CloudWatch Agent:
Update your package repository and install the CloudWatch Agent.
  sudo apt get update -y
  sudo apt install amazon-cloudwatch-agent -y
Configure the CloudWatch Agent:
Create a configuration file for the CloudWatch Agent. You can use the wizard to generate a default config file.
sudo /opt/aws/amazon-cloudwatch-agent/bin/amazon-cloudwatch-agent-config-wizardFollow the prompts to generate a configuration file. The wizard will ask for details on metrics to collect and where to send them.
Start the CloudWatch Agent:
Once configured, start the CloudWatch Agent.
sudo /opt/aws/amazon-cloudwatch-agent/bin/amazon-cloudwatch-agent-ctl -a start
Step 3: View Metrics in CloudWatch
Navigate to the CloudWatch Dashboard:
- In the AWS Management Console, select "Services" and then "CloudWatch".
View EC2 Metrics:
In the CloudWatch console, go to "Metrics".
Select "EC2" from the list to see metrics for your EC2 instance.
You should see various metrics such as CPU utilization, network activity, and disk I/O.
By following these steps, you’ll have an EC2 instance running and monitored by CloudWatch, giving you visibility into its performance and the ability to set up alarms for critical metrics.
Conclusion
In conclusion, AWS Transit Gateway simplifies your network architecture by centralizing connections of VPCs, on-premises networks, and VPNs, even across different regions. It ensures secure, efficient communication, making your infrastructure easier to manage and scale. Whether setting it up or expanding, Transit Gateway helps maintain a cohesive, well-organized network. Embrace this tool to streamline your cloud management and enhance your network efficiency.🌟
Subscribe to my newsletter
Read articles from Aesha Shah directly inside your inbox. Subscribe to the newsletter, and don't miss out.
Written by
