📚Unleashing the Power of AWS EBS | Snapshot | Multi-Attach
 Sprasad Pujari
Introduction:
When it comes to storing data in the cloud, Amazon Web Services (AWS) offers a wide range of storage options for its Elastic Compute Cloud (EC2) instances. Whether you're running a small web application or a large enterprise workload, understanding the different storage solutions is crucial for optimizing performance, durability, and cost-effectiveness. In this blog post, we'll dive into the various storage options available for EC2 instances, complete with real-time examples and easy-to-follow explanations. 🚀
- 💽 Elastic Block Store (EBS) Volumes
EBS Volumes are the bread and butter of EC2 storage solutions. They are network-attached storage devices that can be attached to your EC2 instances while they're running. Think of them as virtual USB drives that you can plug in and out of your instances on-the-fly. 📶
Key features of EBS Volumes:
💾 Data persistence: Even if your EC2 instance is terminated, your data stored on EBS Volumes remains intact, allowing you to re-attach the volume to a new instance later.
🔒 Availability Zone-bound: EBS Volumes are tied to a specific Availability Zone (AZ), meaning you can't attach a volume created in one AZ to an instance in a different AZ (unless you create a snapshot and restore it in the desired AZ).
🔋 Resizable: You can increase the size of an EBS Volume on the fly to accommodate your growing storage needs.
🔐 Encryption: EBS Volumes can be encrypted at rest and in transit for enhanced security.
Real-time example: Let's say you have an EC2 instance running a web application that requires persistent storage. You can create an EBS Volume, attach it to your instance, and store your application data on it. If your instance ever needs to be replaced or terminated, you can simply detach the EBS Volume, spin up a new instance, and re-attach the volume to pick up where you left off. 💻
Step-by-Step Guide: Creating an EBS Volume on AWS
we'll walk you through the process of creating an EBS Volume on AWS, complete with easy-to-follow steps and helpful visual aids.
🎯 Step 1: 🔑 Log in to the AWS Console
Open your web browser and navigate to the AWS Management Console (https://console.aws.amazon.com/). Enter your AWS credentials (Access Key ID and Secret Access Key) to log in. Once logged in, locate the "Services" dropdown menu at the top-left corner of the console.
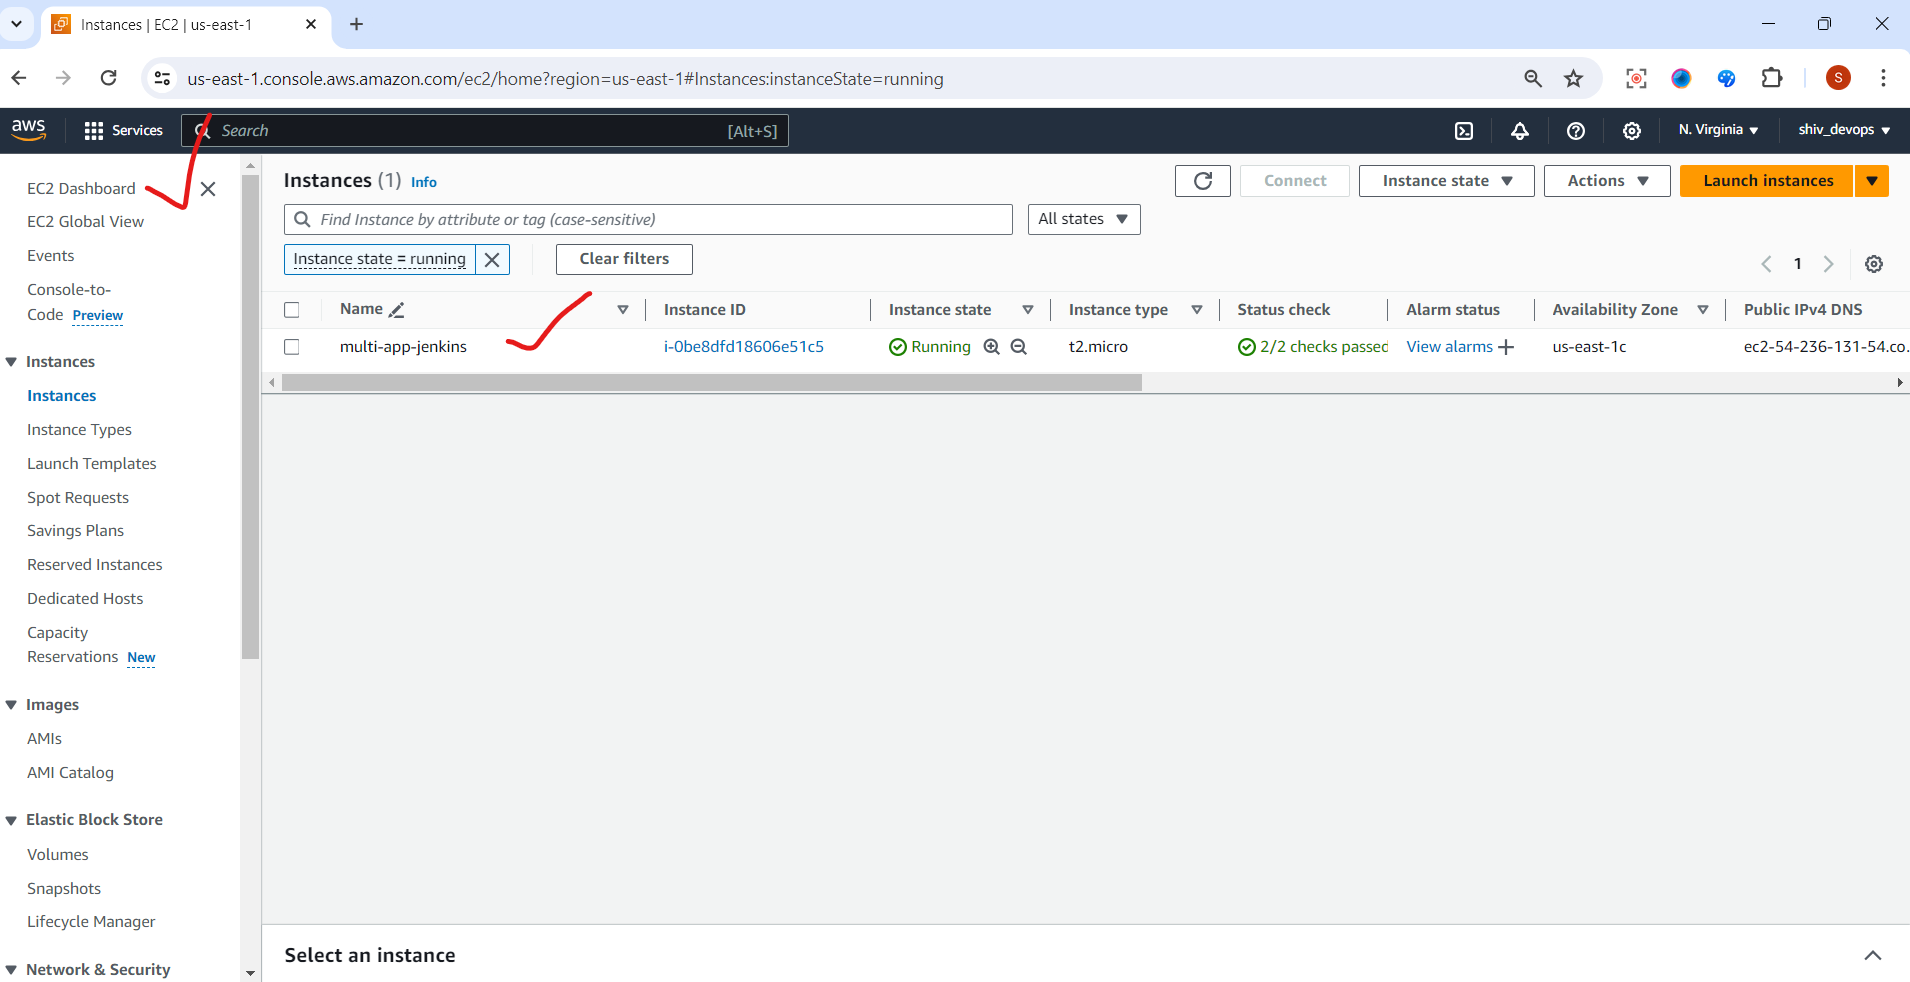
Step 2: 🖥️ Navigate to the EC2 Dashboard
From the "Services" dropdown menu, select "Compute" > "EC2". You'll be redirected to the EC2 Dashboard, which serves as the central hub for managing your EC2 instances and related resources.
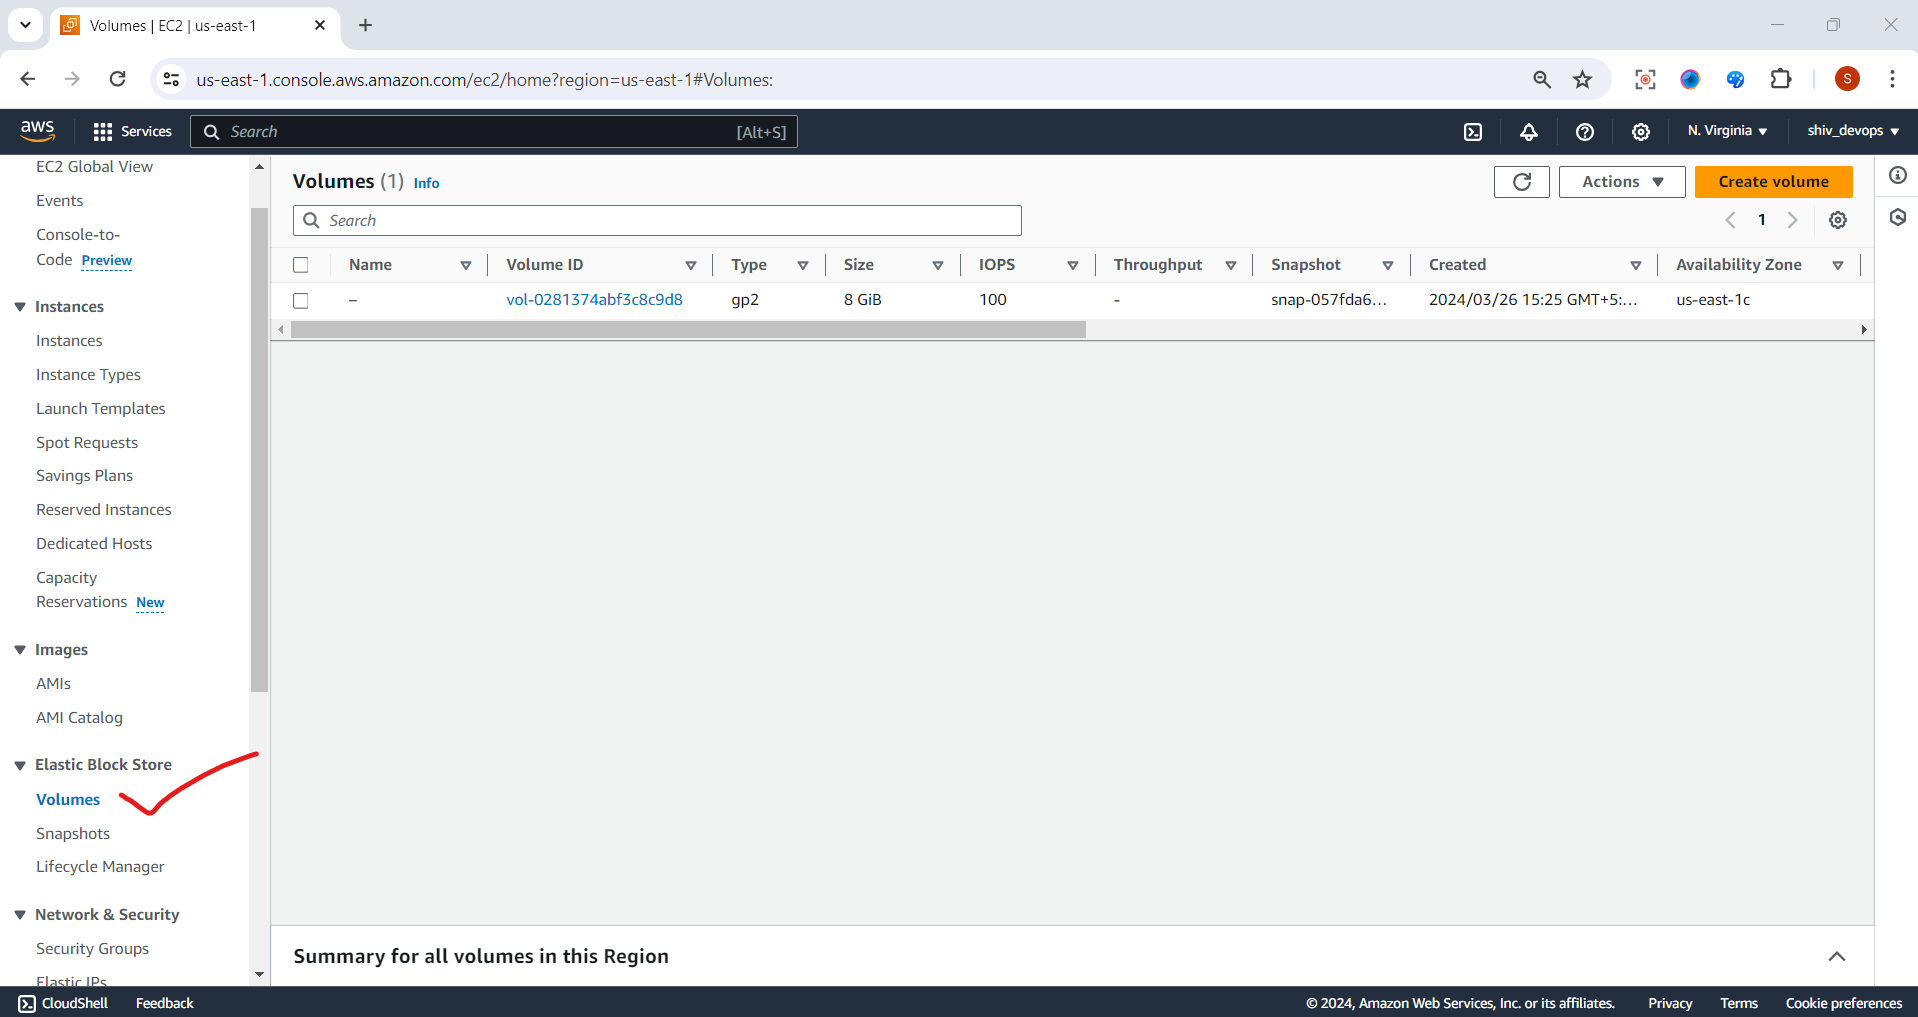
Step 3: 💽 Access the EBS Volumes Section
On the left navigation pane of the EC2 Dashboard, scroll down and click on "Elastic Block Store" > "Volumes". This will take you to the EBS Volumes Dashboard, where you can manage and create new EBS Volumes.
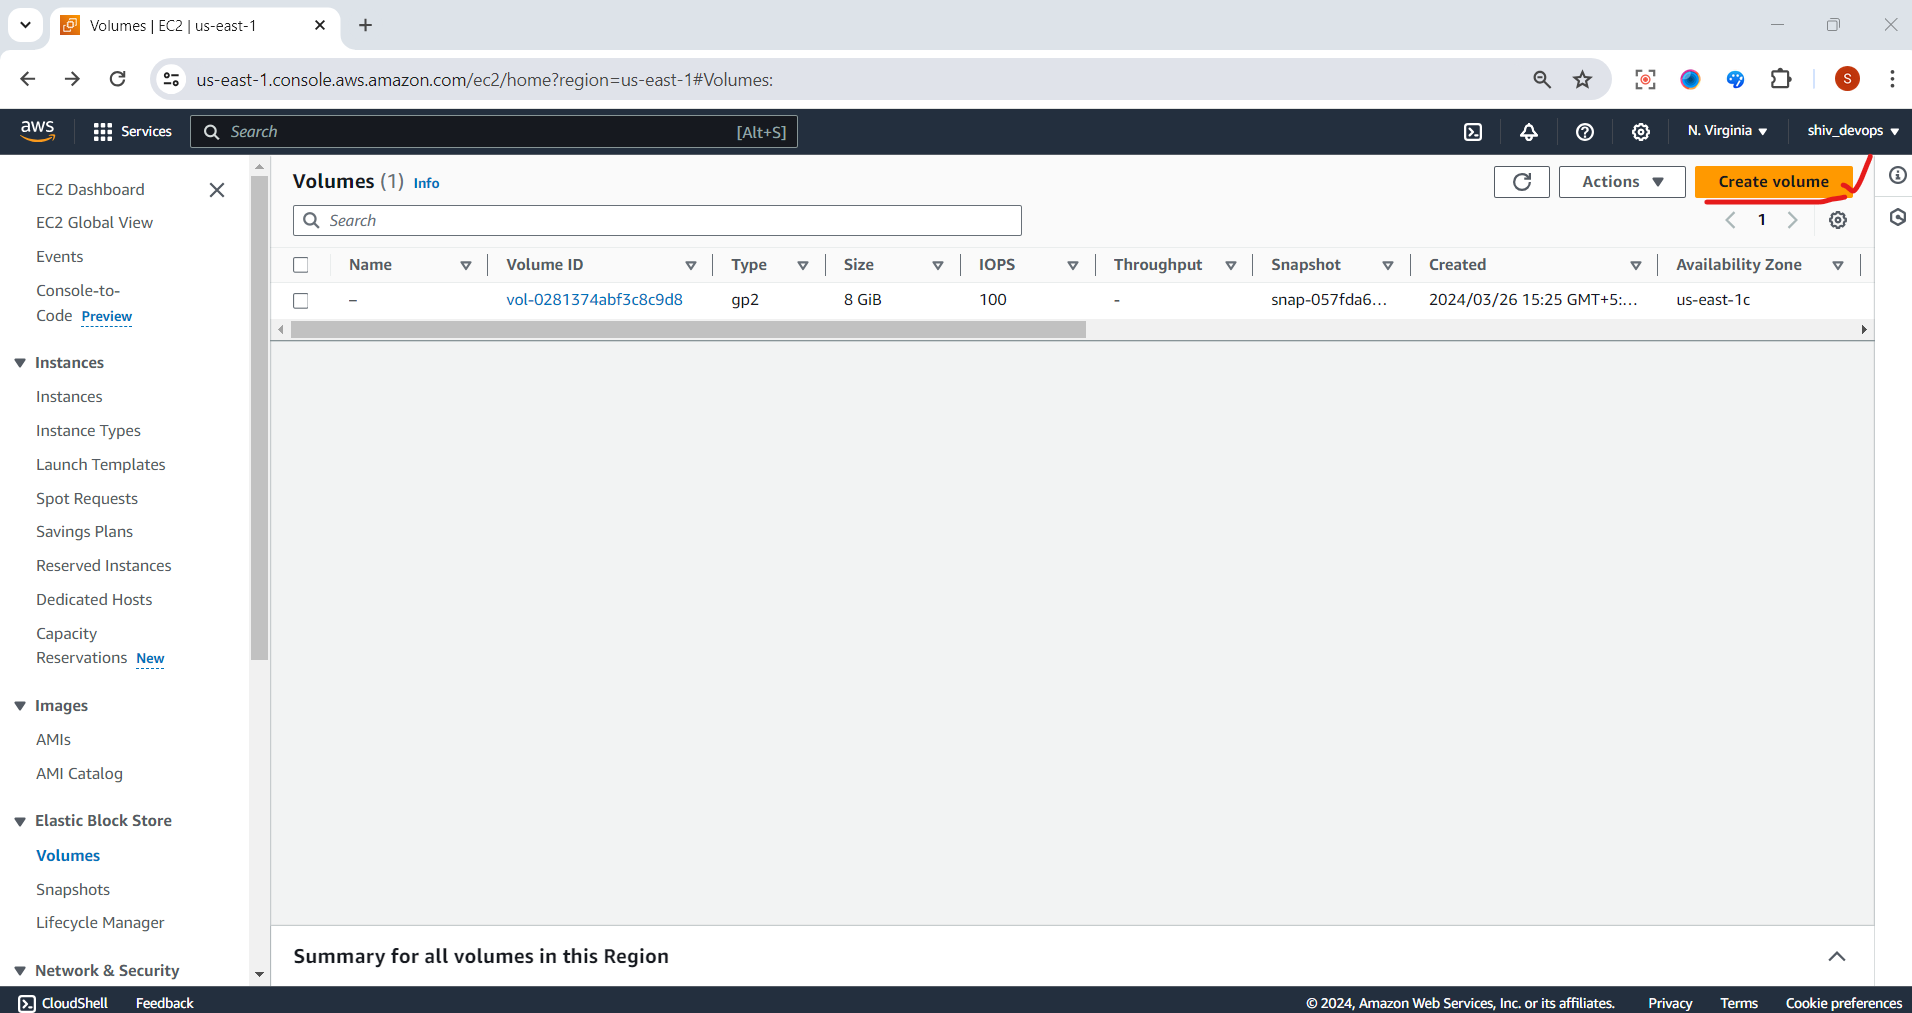
Step 4: ➕ Create a New EBS Volume
On the EBS Volumes Dashboard, click the "Create Volume" button. A new window will appear, prompting you to configure your new EBS Volume.
Step 5: ⚙️ Configure Volume Settings
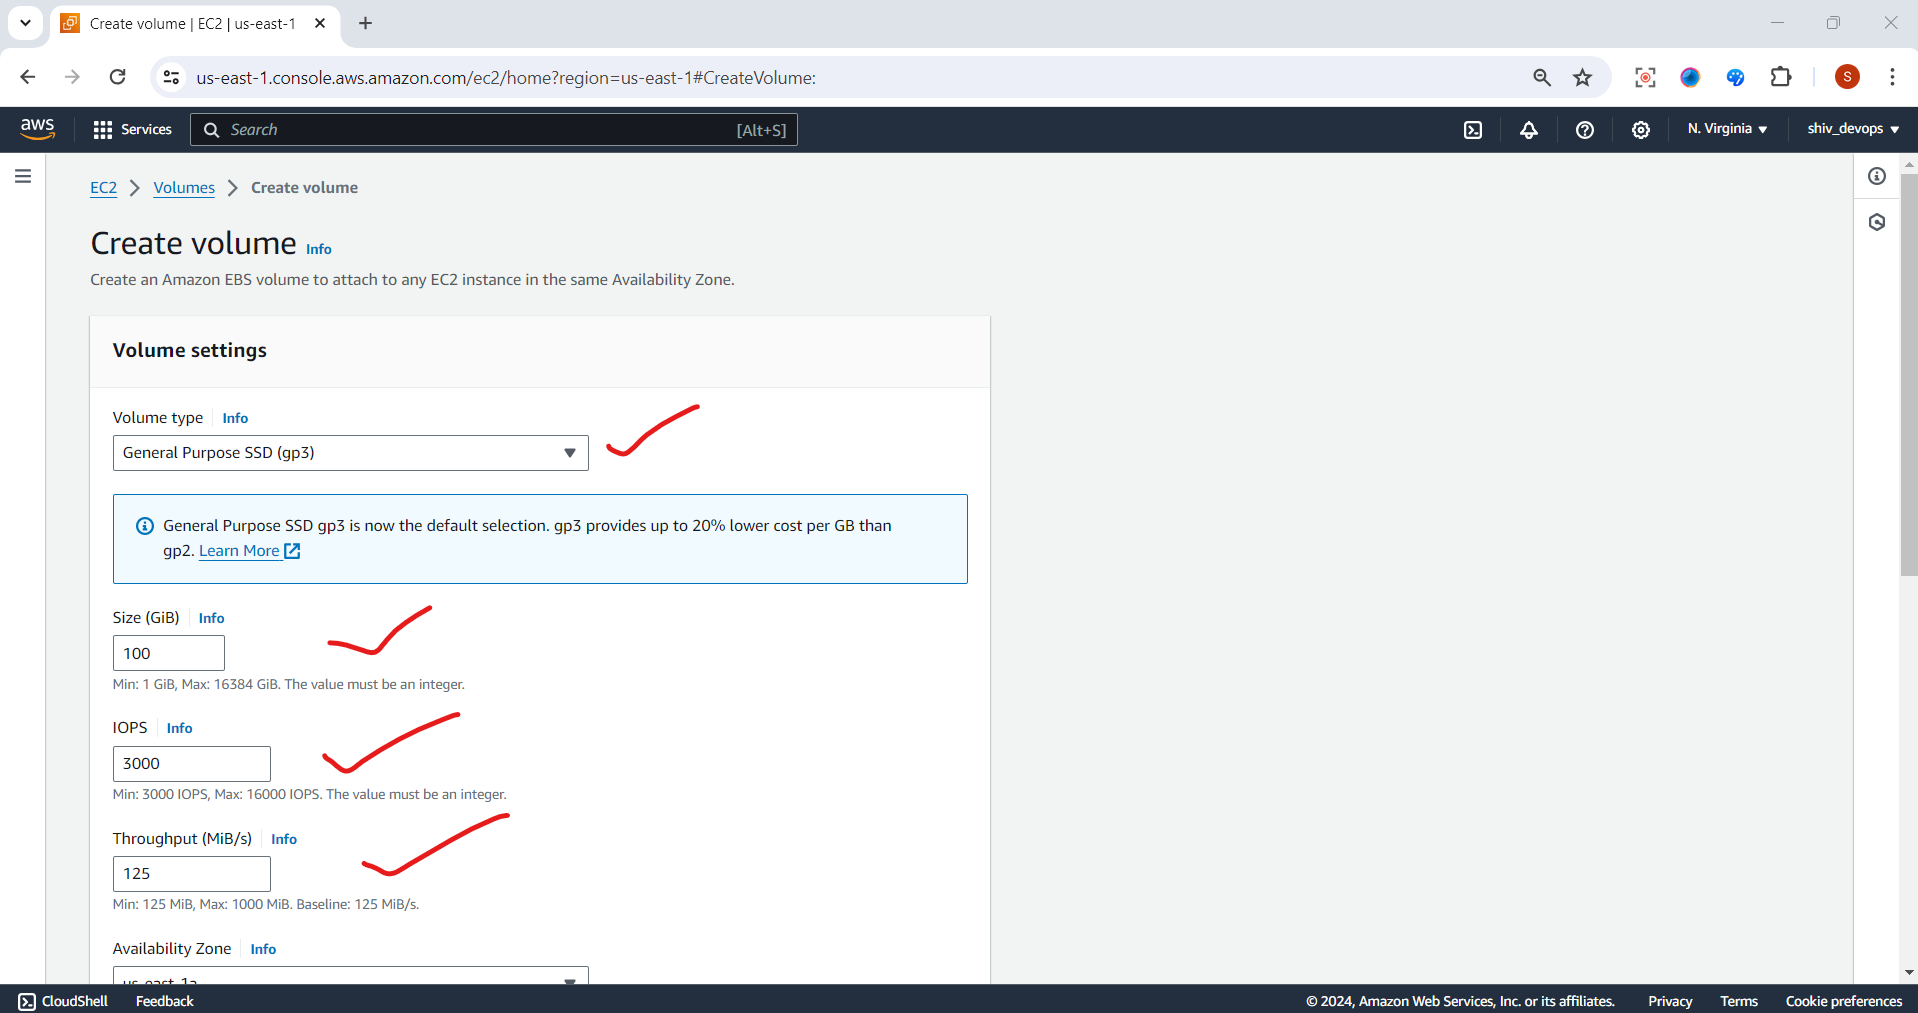
In the "Create Volume" window, you'll need to specify the following settings:
📀 Volume Type: Select "General Purpose SSD (gp2)" for a balanced price-performance ratio. 💾 Size (GiB): Enter the desired size for your EBS Volume (e.g., 4 GiB). 🌐 Availability Zone: Choose the Availability Zone where you want to create the EBS Volume (e.g., us-east-1a).
Step 6: 🏷️ Add Tags (Optional)
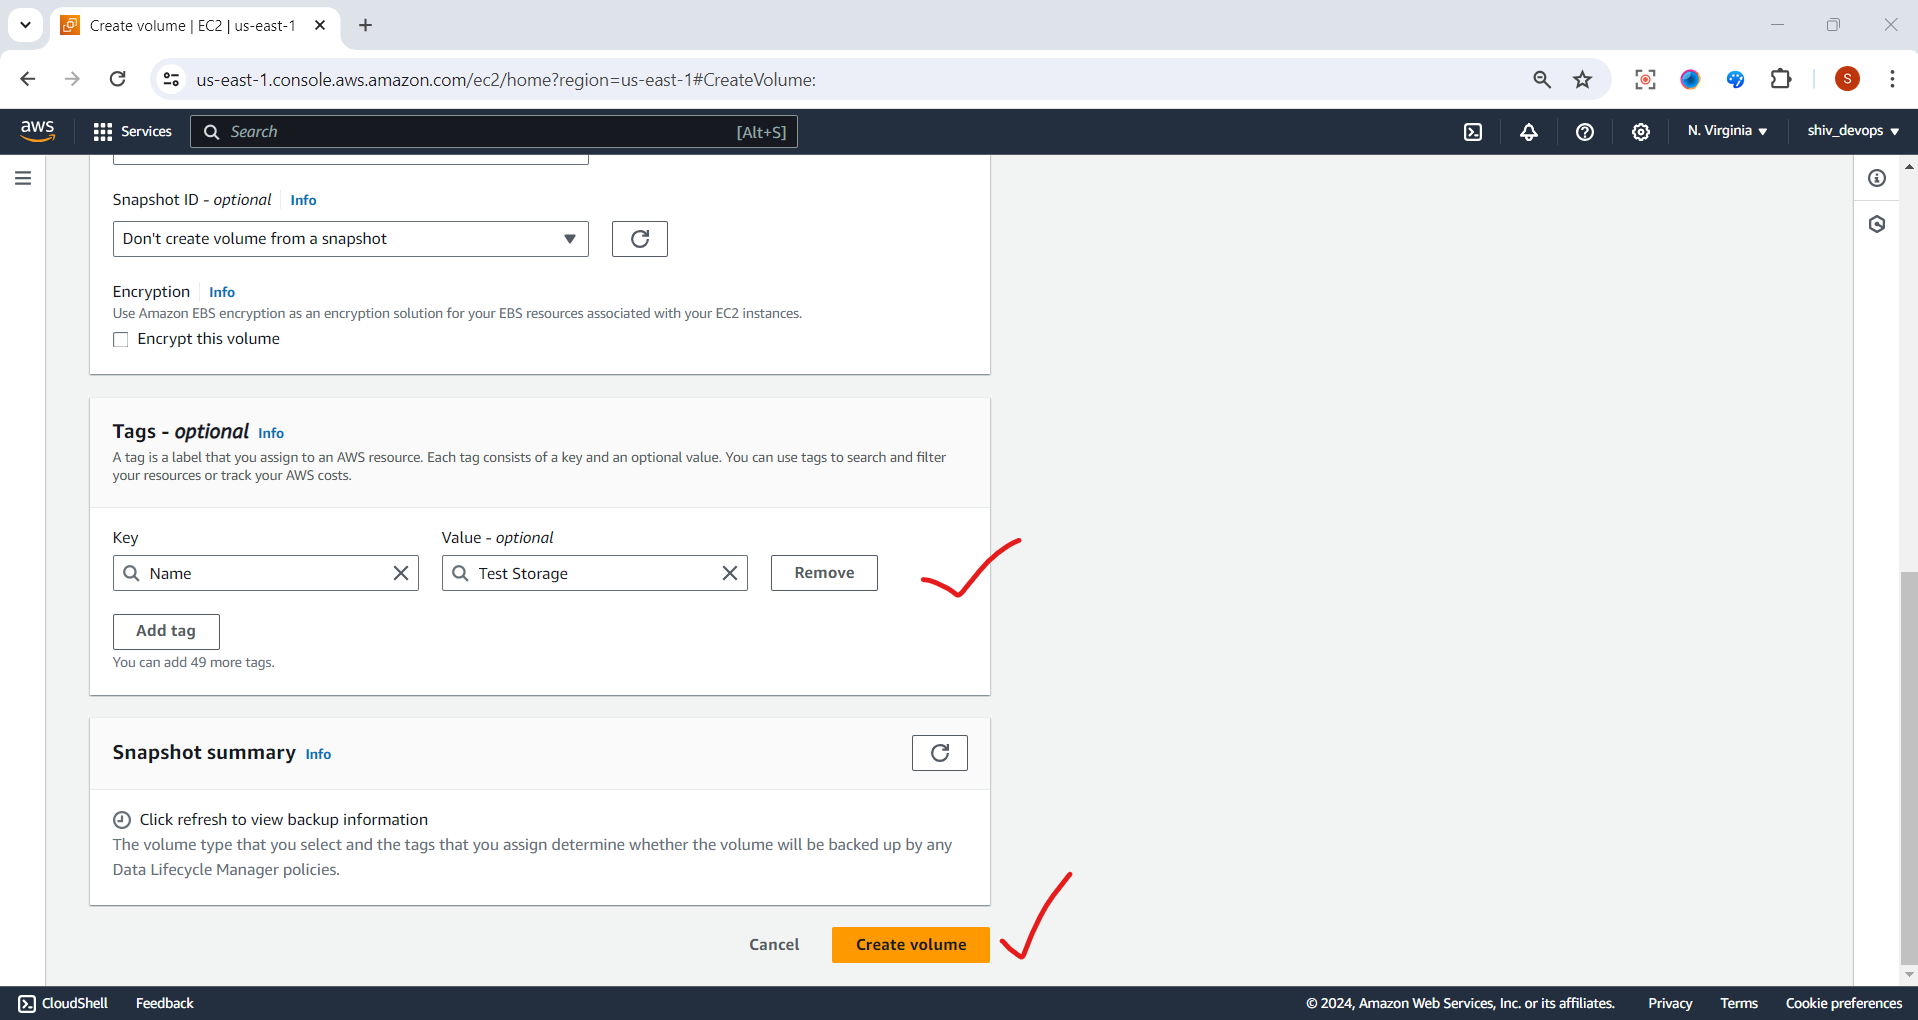
Tags are optional metadata labels that you can assign to your AWS resources for better organization and management.
Click "Add Tag" and enter a "Key" (e.g., "Name") and a "Value" (e.g., "Test Storage") for your EBS Volume.
Step 7: 🆕 Create the EBS Volume
Once you've configured the desired settings and added any necessary tags, click the "Create Volume" button at the bottom of the window.
Step 8: 📋 Review the EBS Volumes Dashboard
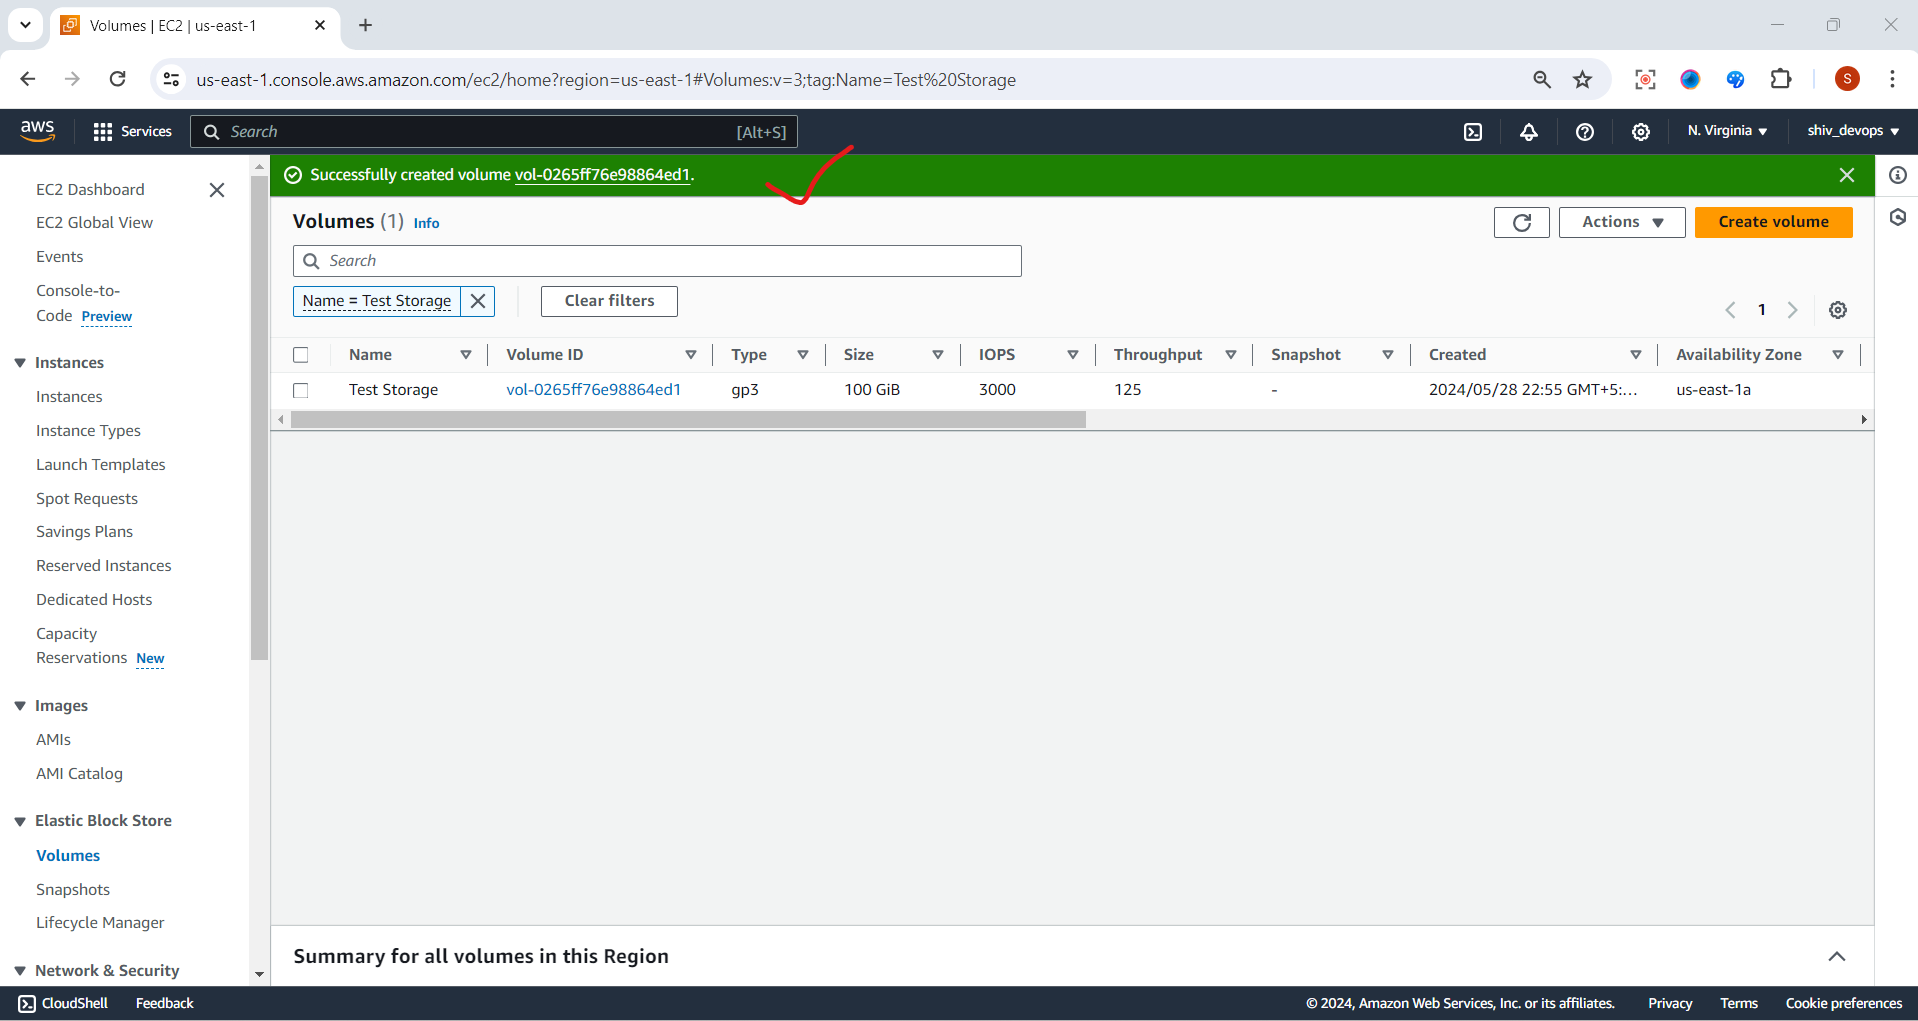
After a brief moment, you'll be redirected to the EBS Volumes Dashboard, which now displays your newly created EBS Volume. You can click on the Volume ID to view detailed information about your EBS Volume, such as its status, I/O performance, and monitoring metrics.
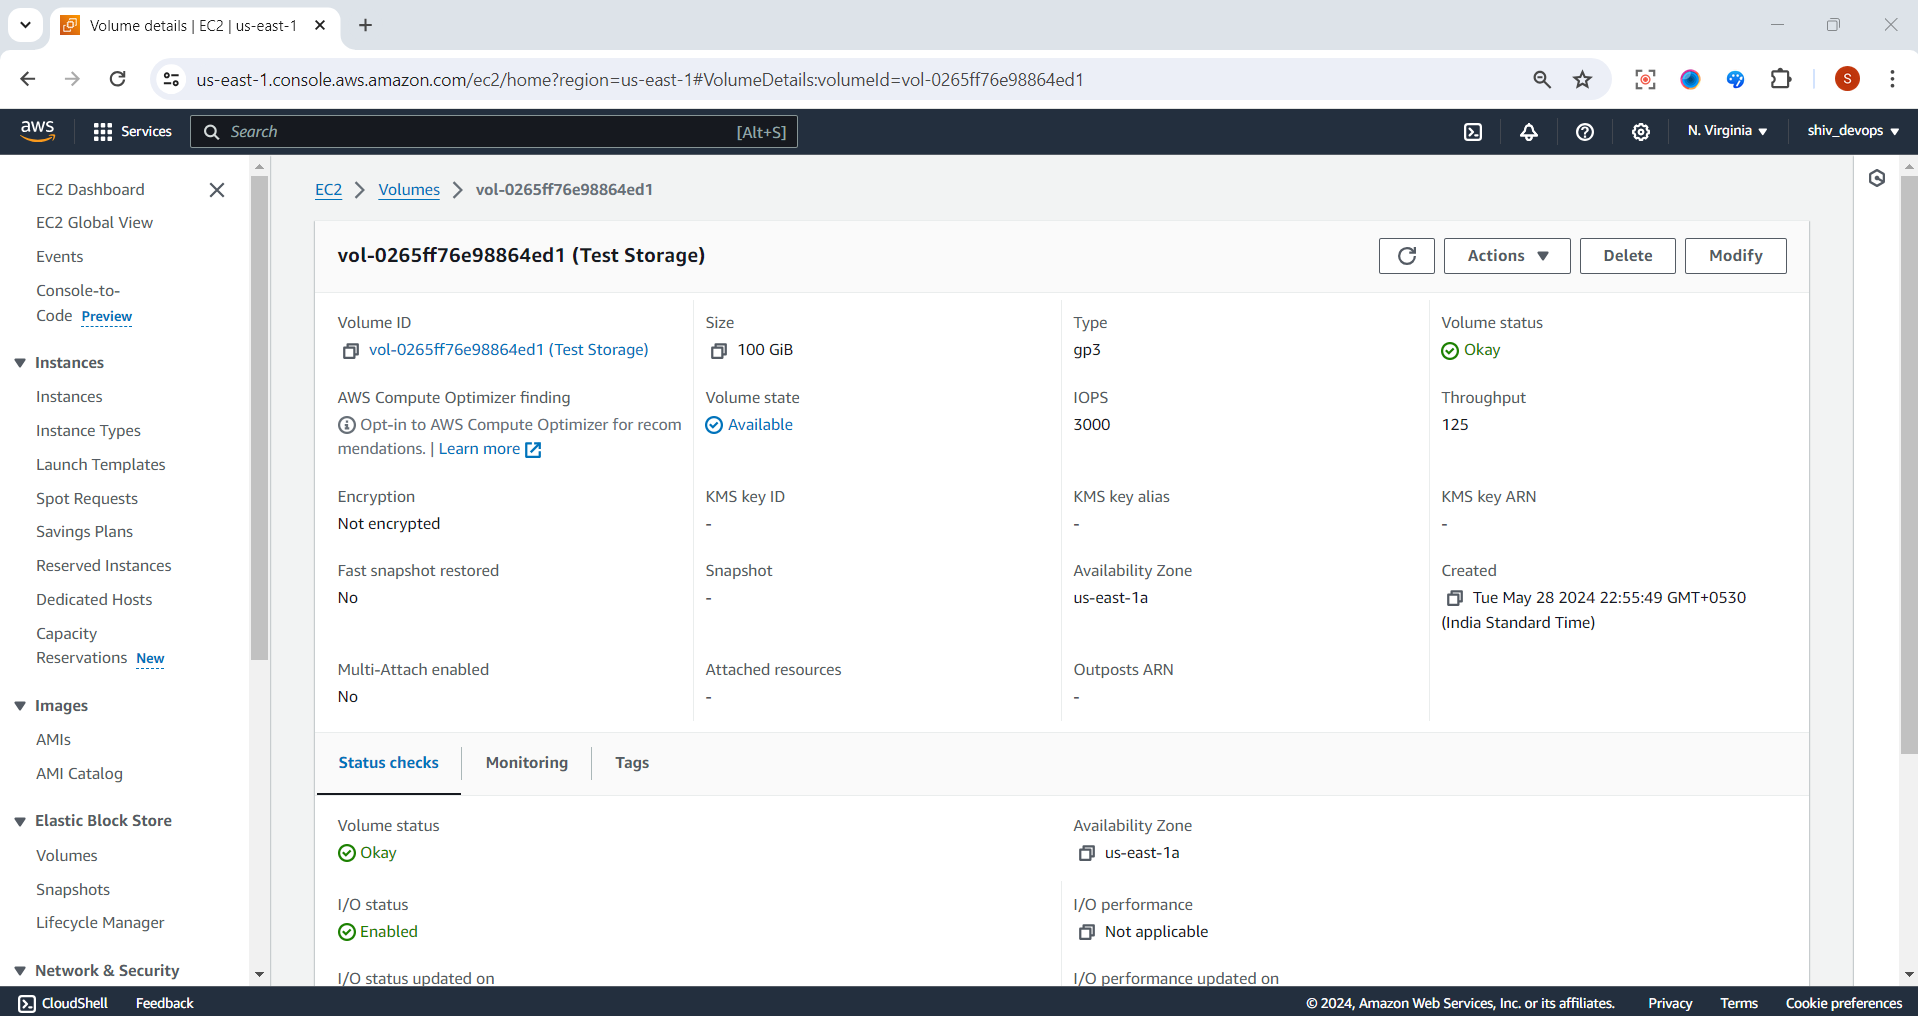
Step 9: 🎉 Congratulations! You've successfully created an EBS Volume.
Give yourself a pat on the back, and feel free to dance like a rock star! 🕺💃
- 🌅 EBS Snapshots
EBS Snapshots are point-in-time backups of your EBS Volumes. They allow you to create incremental backups of your data, which can be used for data recovery, migration, or creating new EBS Volumes. 📸
Key features of EBS Snapshots:
🌐 Cross-Region copying: EBS Snapshots can be copied across different AWS Regions, enabling disaster recovery strategies and data replication.
💾 Incremental backups: After the initial full snapshot, subsequent snapshots only capture the changed data blocks, reducing storage costs and backup times.
🗑️ Recycle Bin: AWS provides a Recycle Bin feature for EBS Snapshots, allowing you to recover accidentally deleted snapshots within a specified retention period.
Real-time example: Let's say you have a critical database running on an EC2 instance with an attached EBS Volume. You can schedule regular EBS Snapshots to create backup copies of your database data. In case of data corruption or accidental deletion, you can restore your database from the latest snapshot, minimizing downtime and data loss. 📆
📸 Step-by-Step Guide: Creating Amazon EBS Snapshots
we'll guide you through the process of creating EBS snapshots, with easy-to-follow steps, helpful tips, and a touch of fun with emojis and bullet points. 🎯 Step 1: 👆 Select the Volume
Step 1: 👆 Select the Volume
Log in to your AWS Management Console.
Navigate to the EC2 Dashboard by selecting "Services" > "Compute" > "EC2".

On the left navigation pane, click on "Elastic Block Store" > "Volumes".
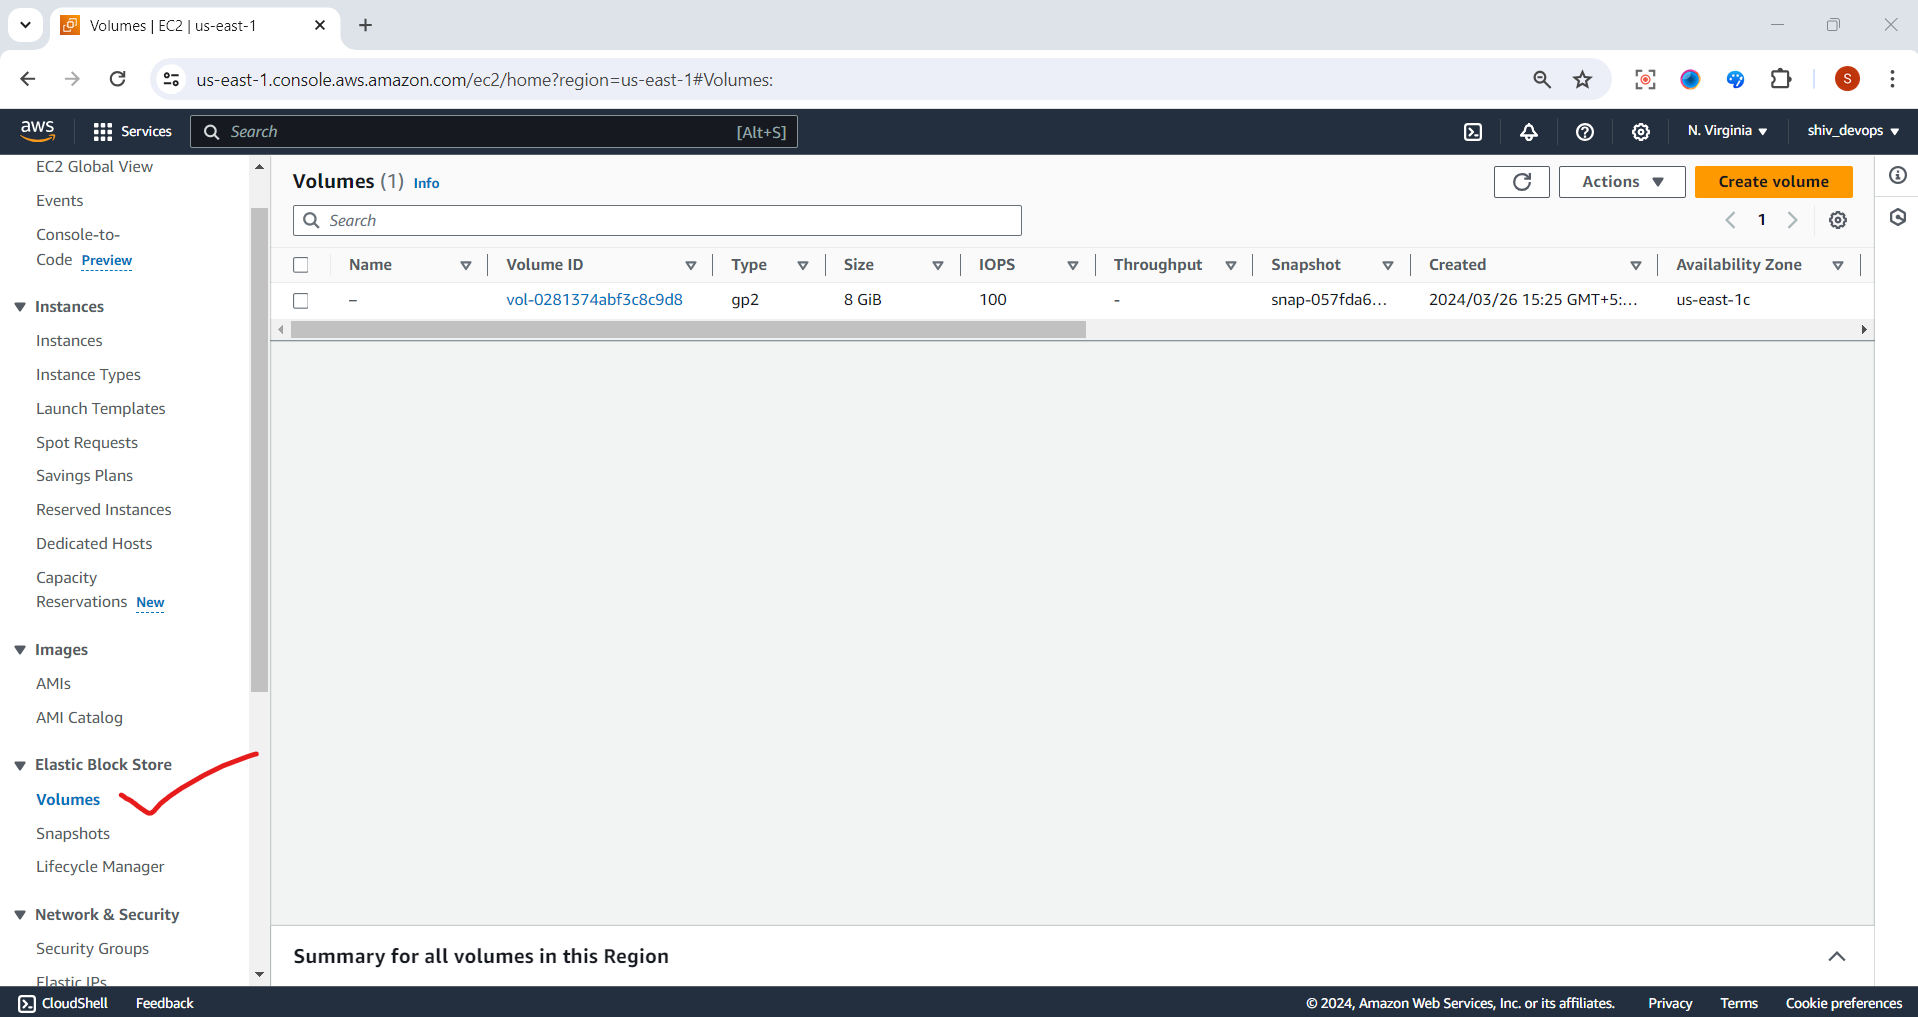
Locate the volume you want to create a snapshot for and right-click on it.
From the context menu, select "Create Snapshot". 🖱️
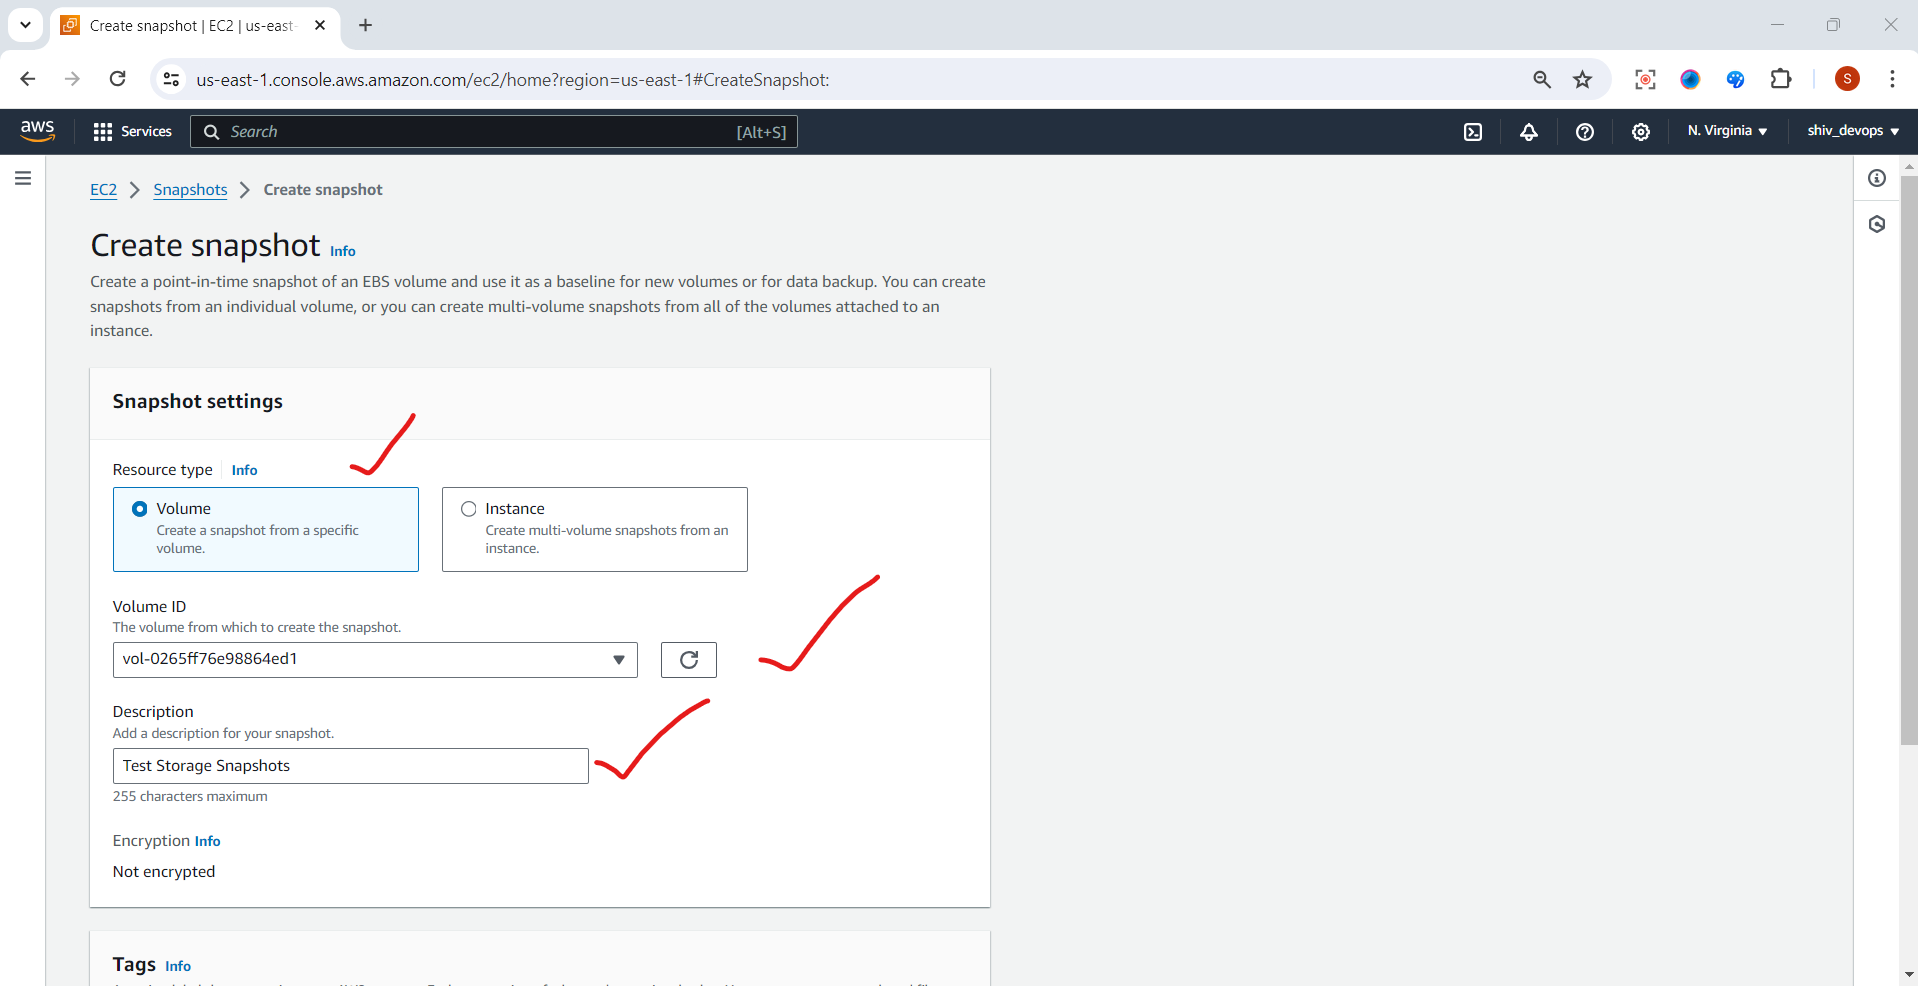
Step 2: ✍️ Provide a Description
A new window will appear, prompting you to enter a description for your snapshot.
Provide a descriptive name or details that will help you identify the snapshot later.
Click "Create" to initiate the snapshot creation process. ✅
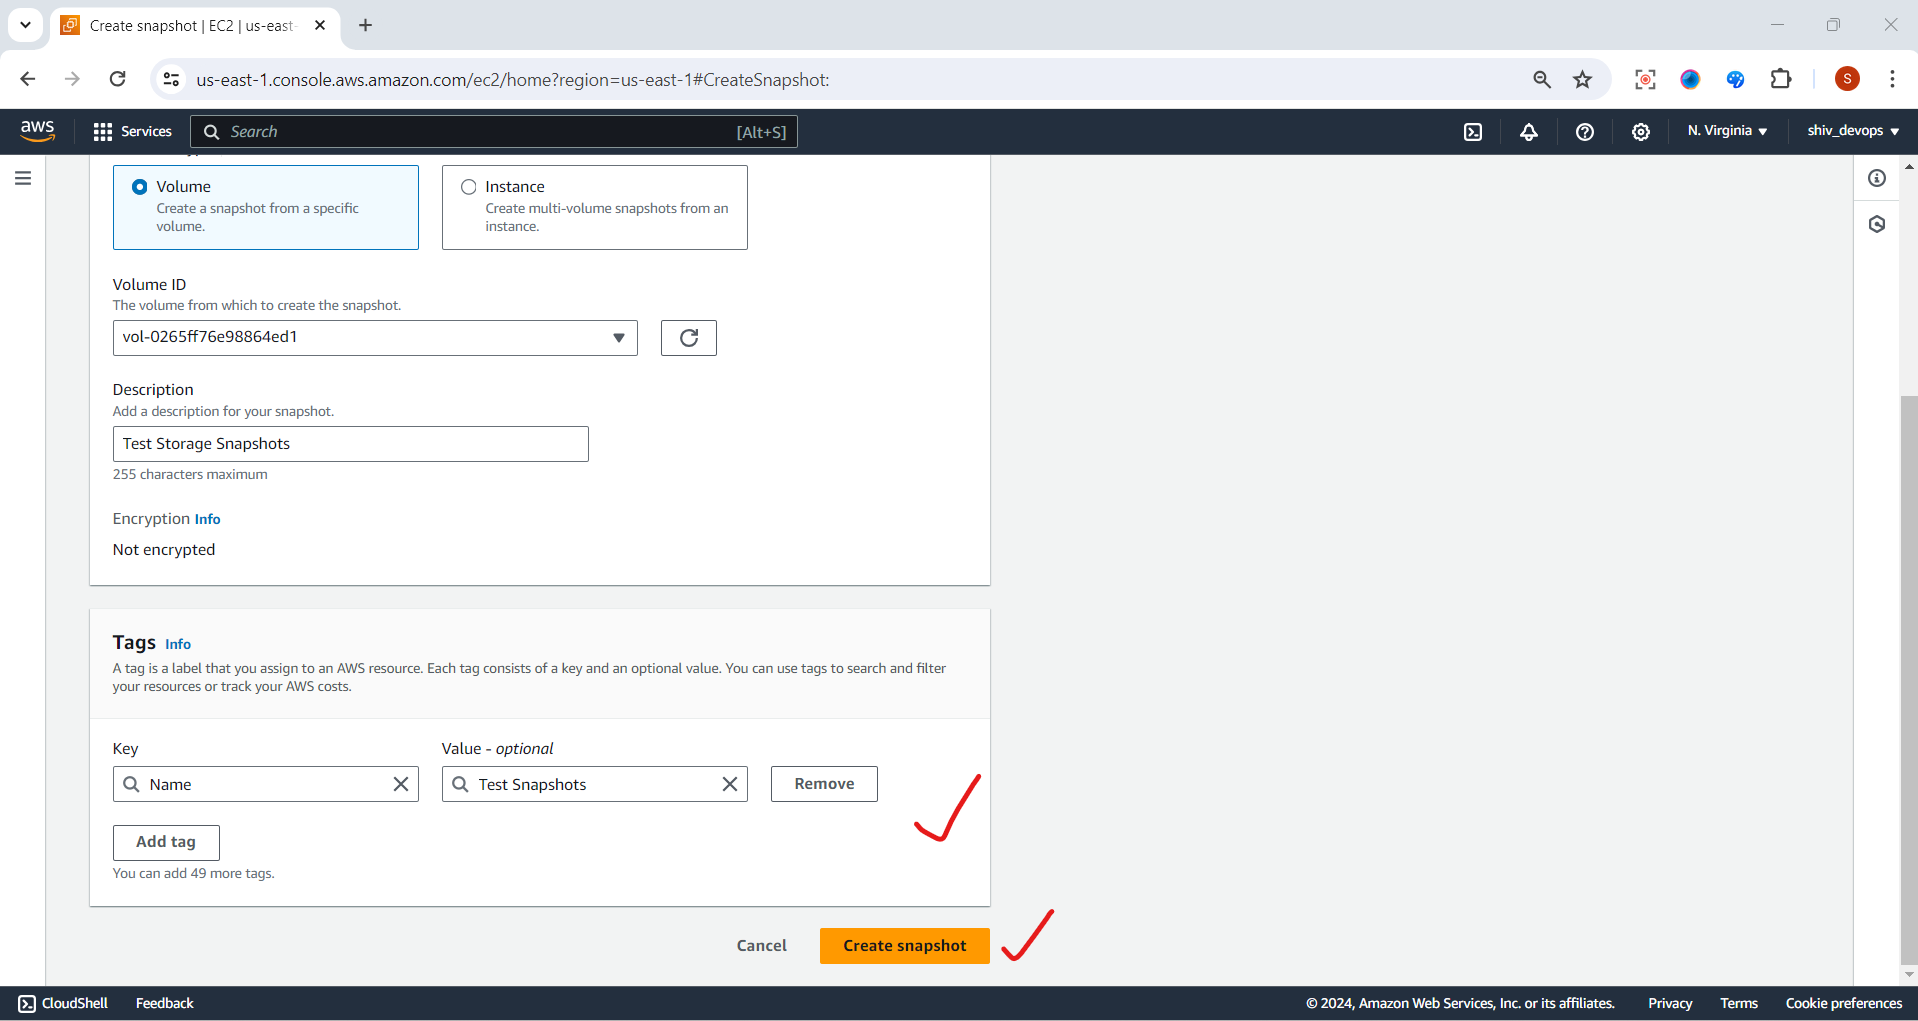
Step 3: 🕰️ Monitor the Snapshot Creation
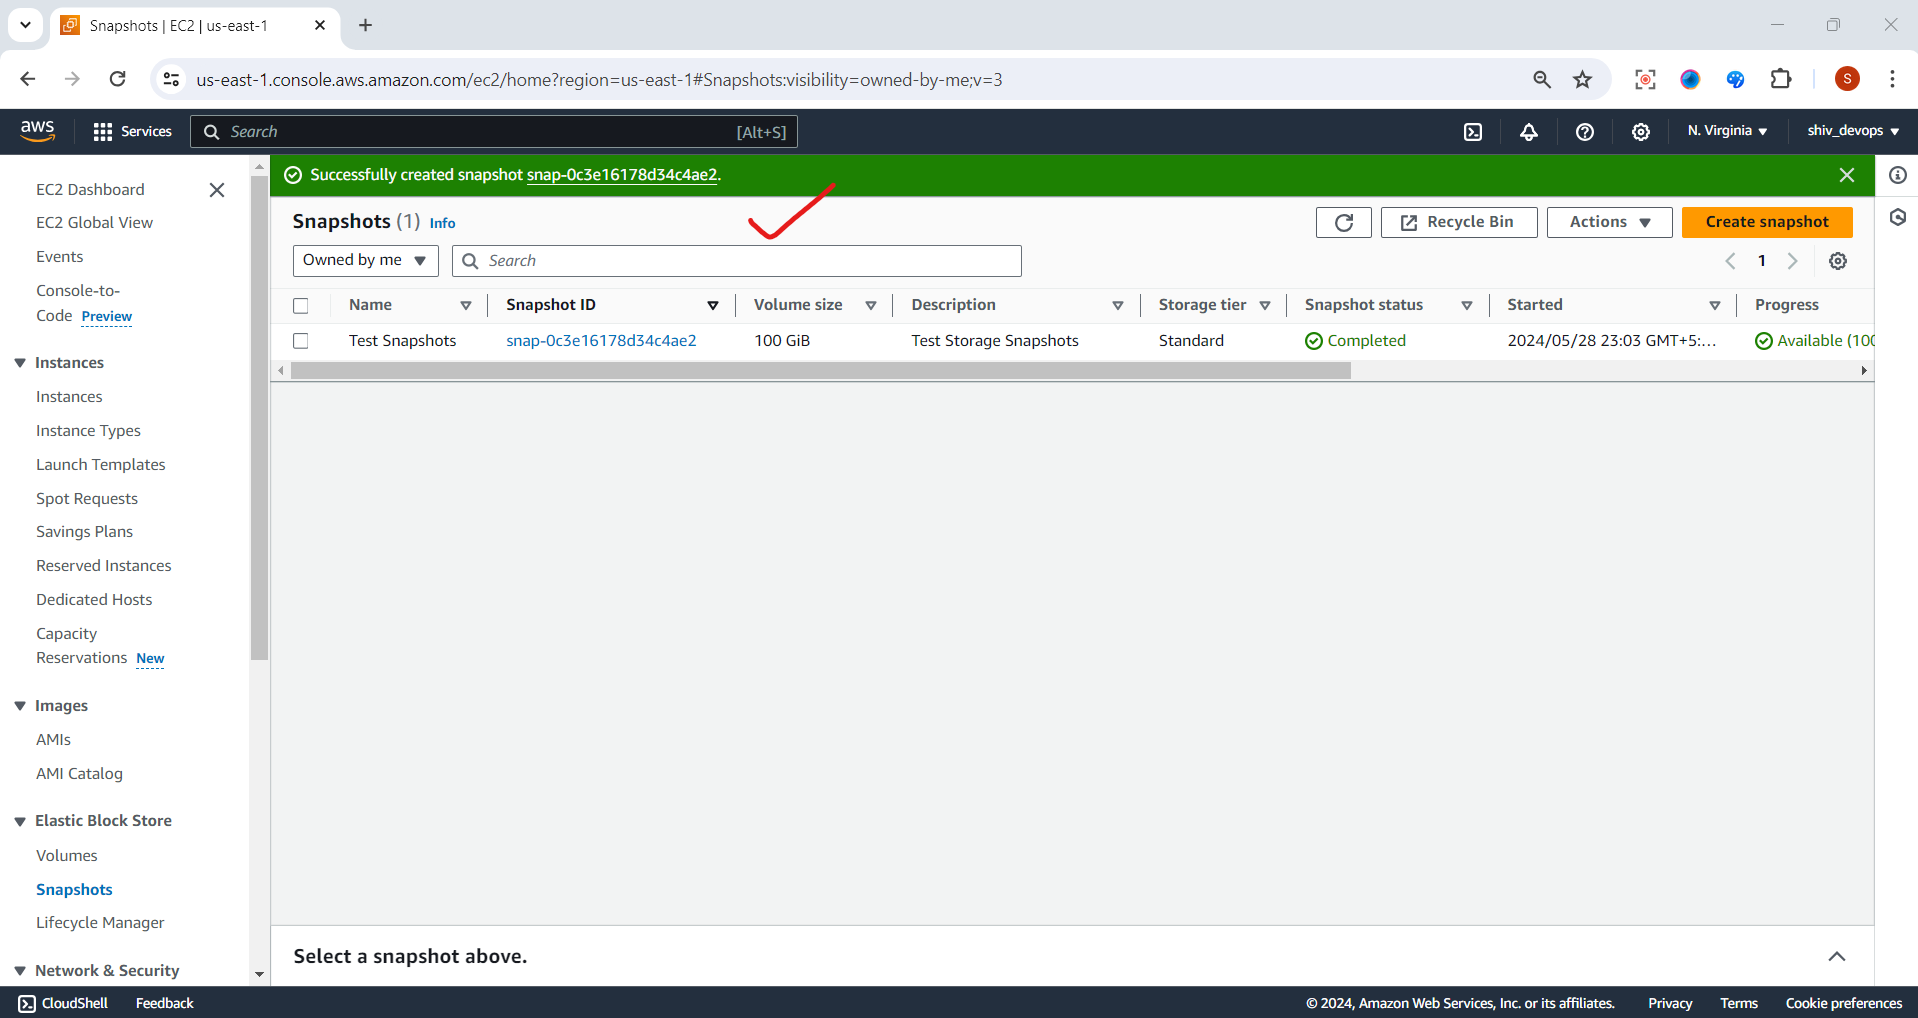
After clicking "Create," you'll receive a popup notification confirming that the snapshot creation has started.
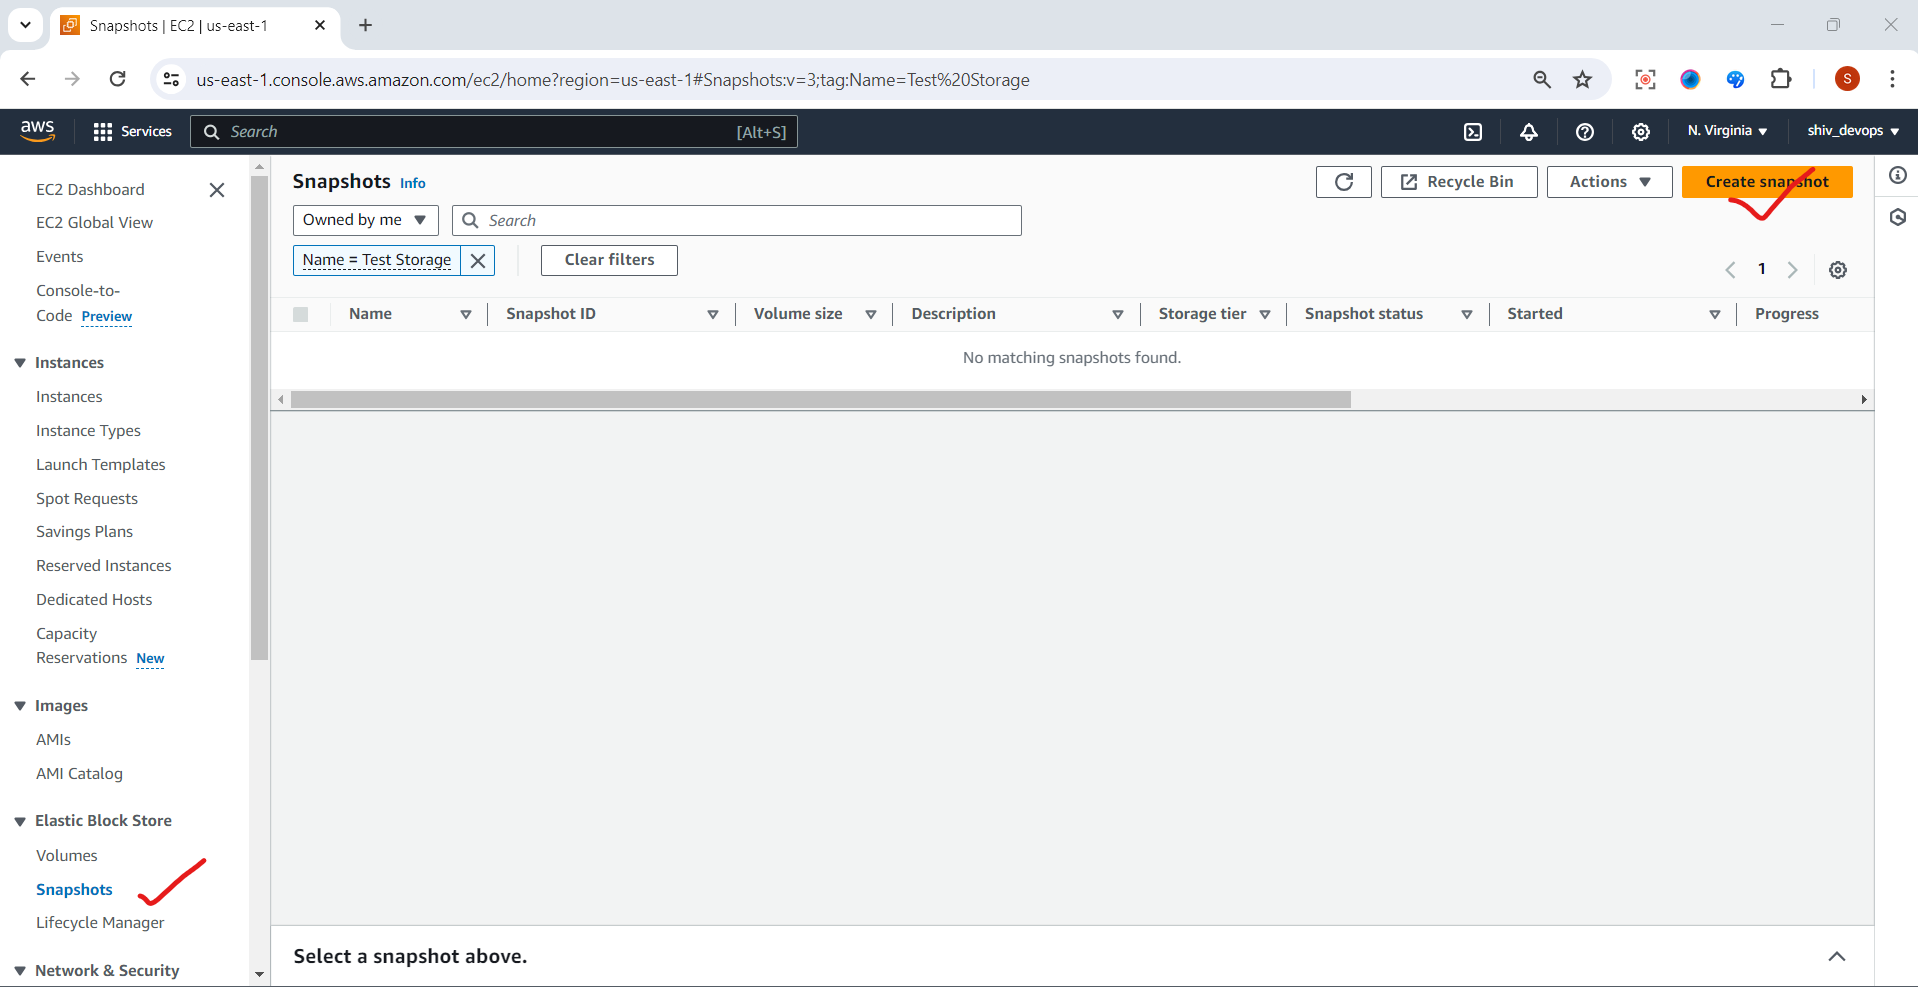
You can monitor the snapshot's status by navigating to the "Snapshots" tab on the left navigation pane.
Step 4: 📋 Review the Snapshots Dashboard
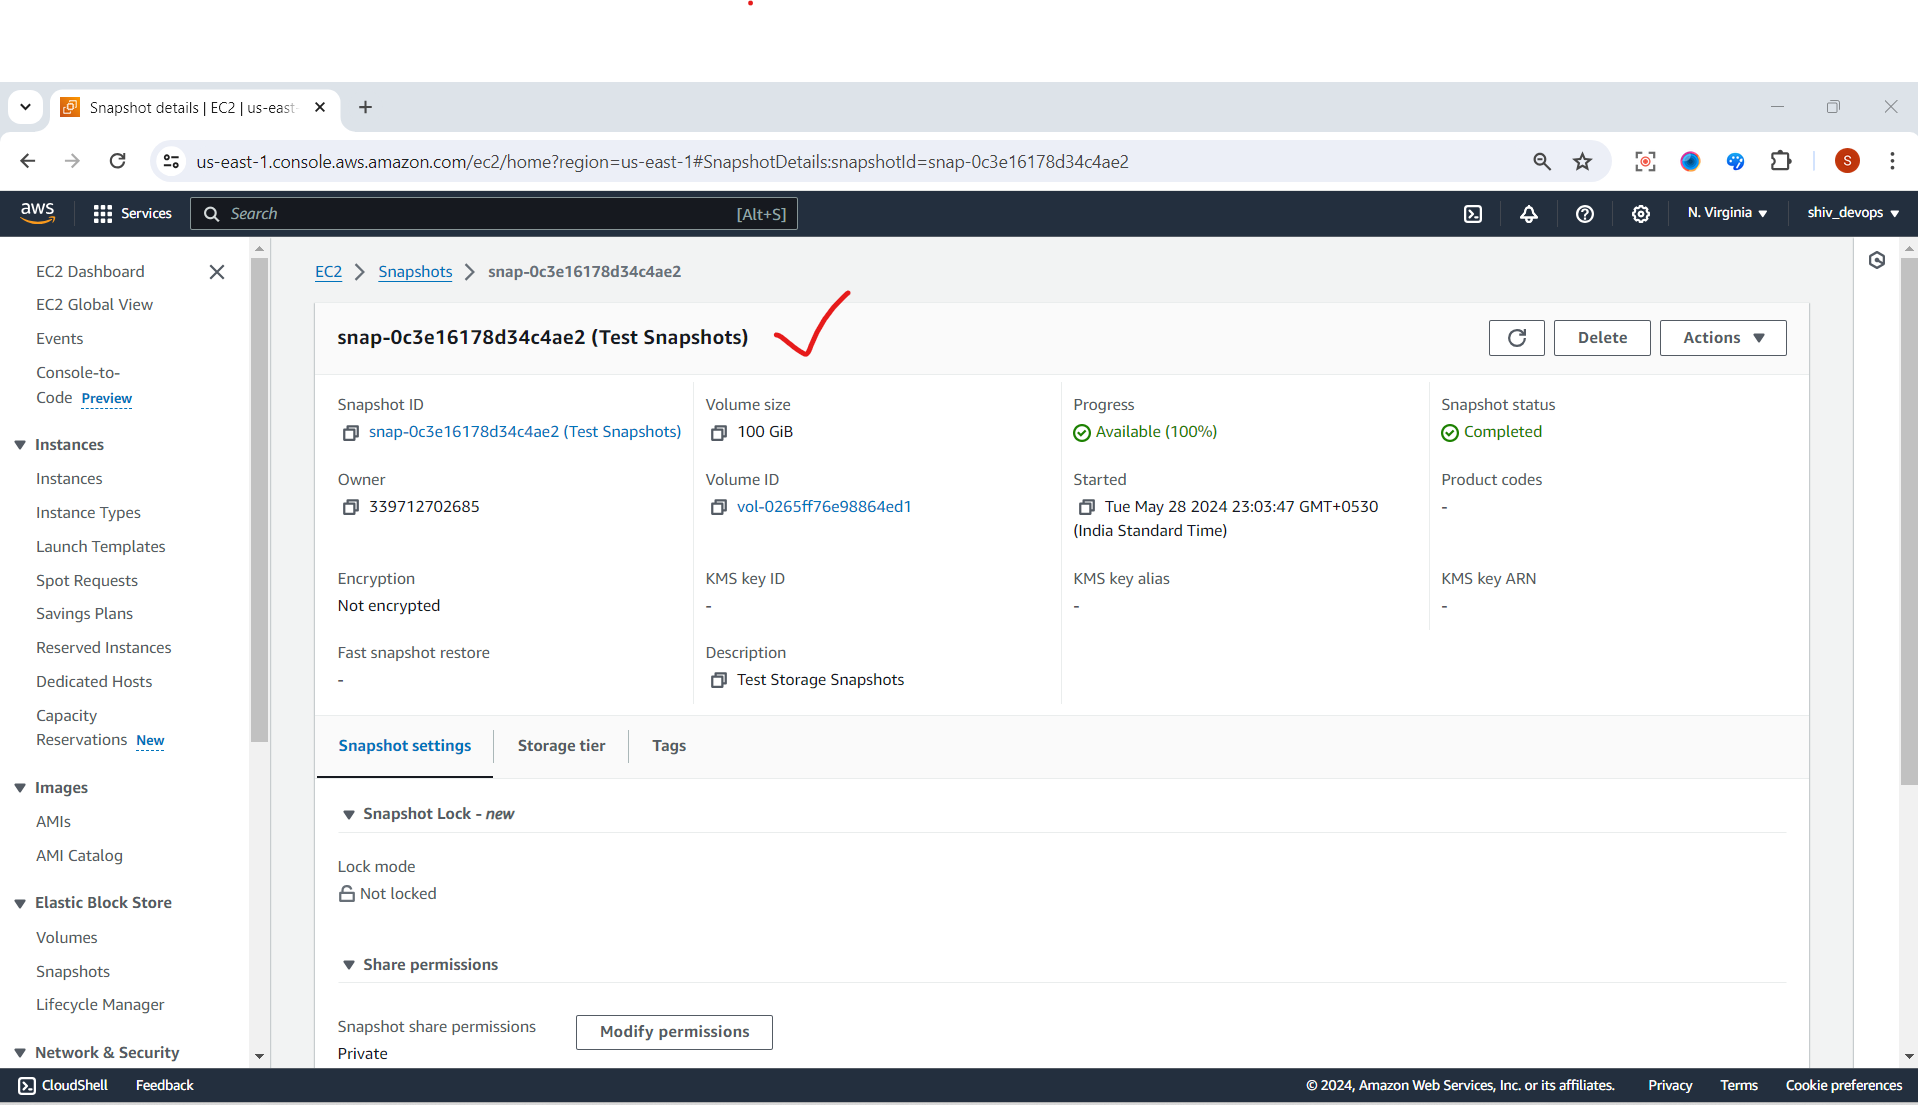
The "Snapshots" dashboard provides an overview of all your EBS snapshots, including their ID, volume ID, state, start time, and progress percentage.
Once the snapshot creation is complete, its state will change to "Completed." 🎉
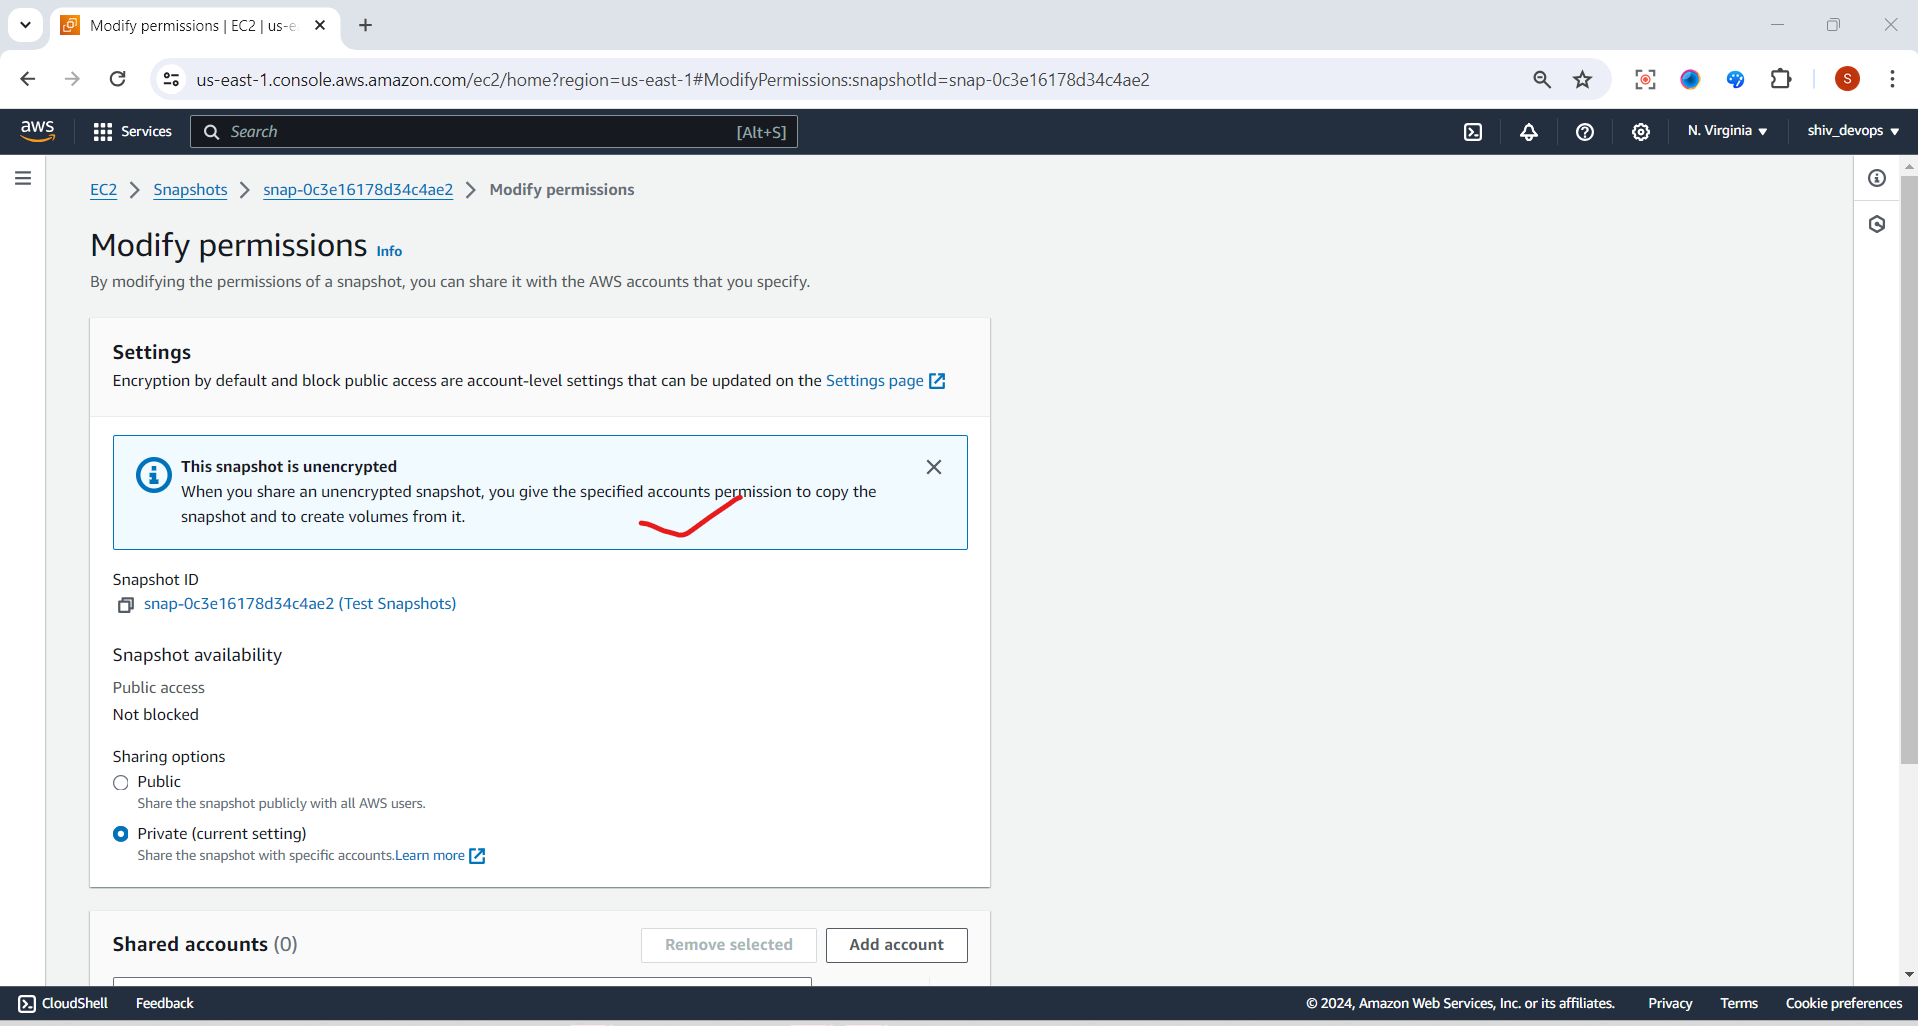
Step 5: 🔄 Copy and Share Snapshots (Optional)
You can copy an existing snapshot and share it with other AWS accounts.
To copy a snapshot, right-click on it and select "Copy Snapshot."
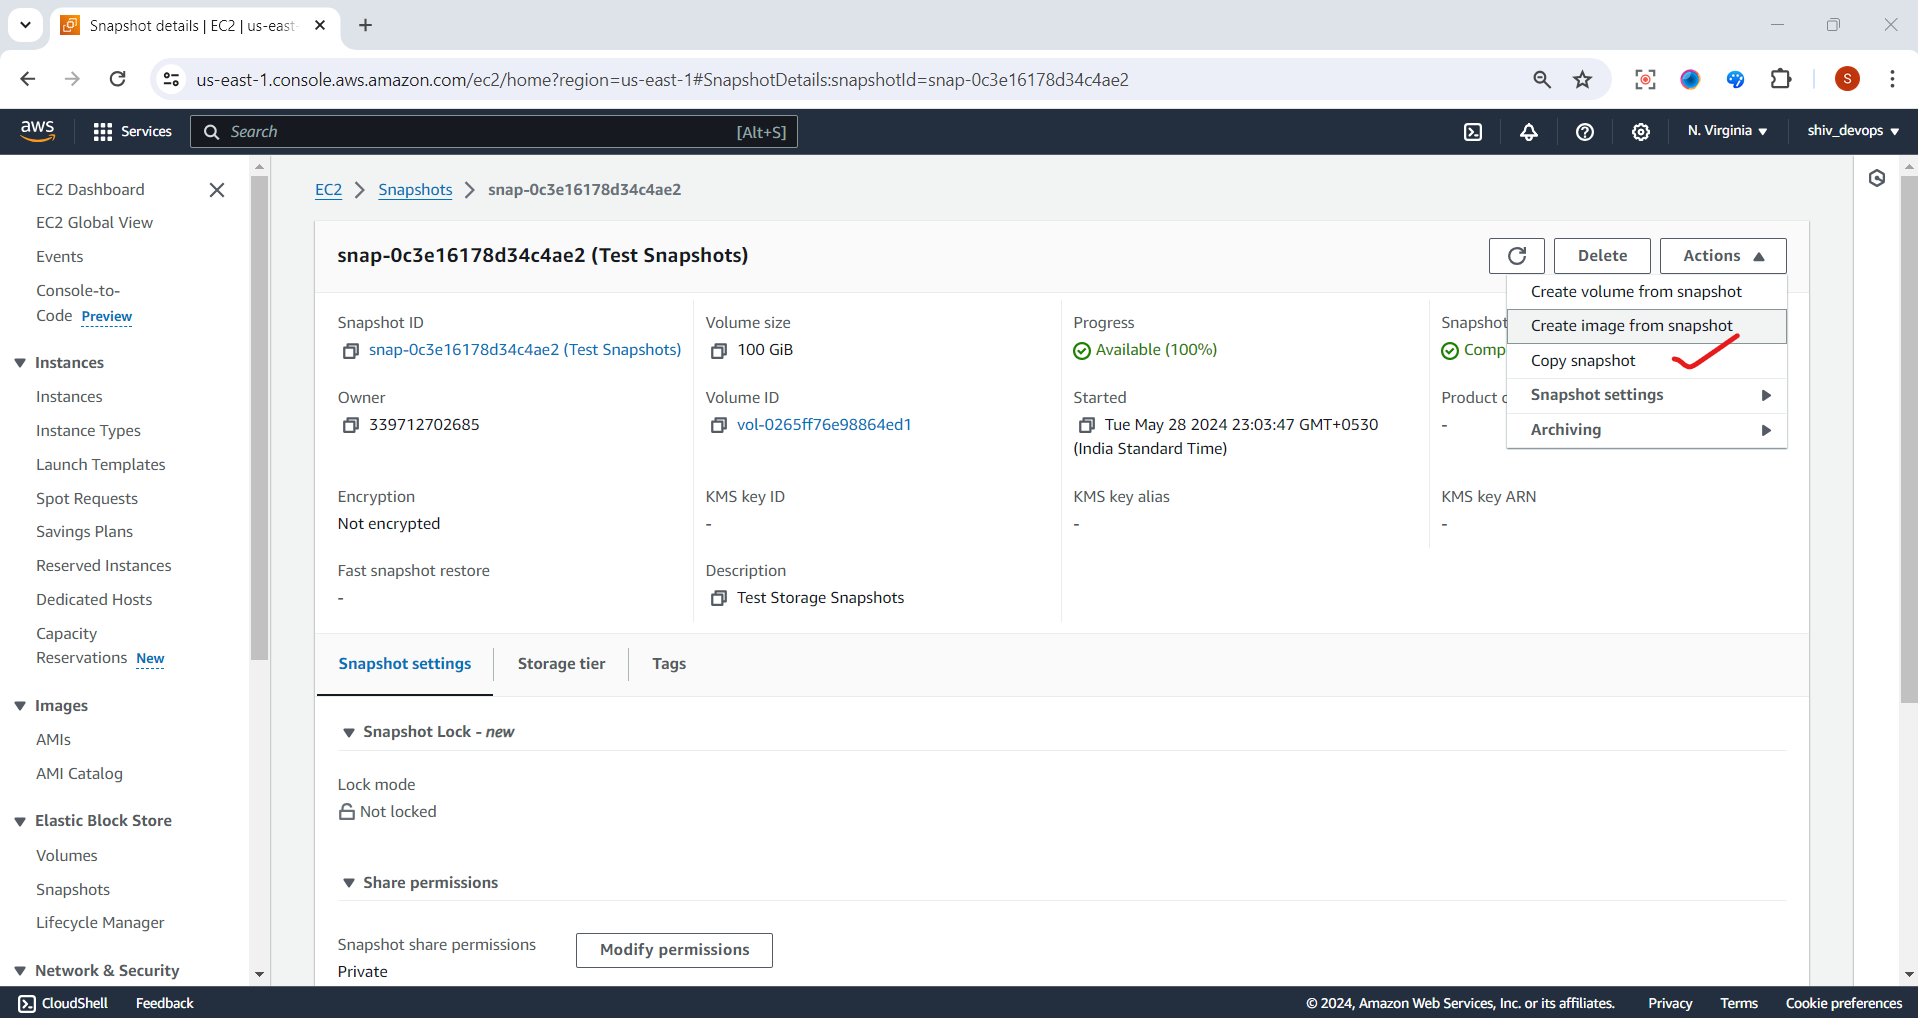
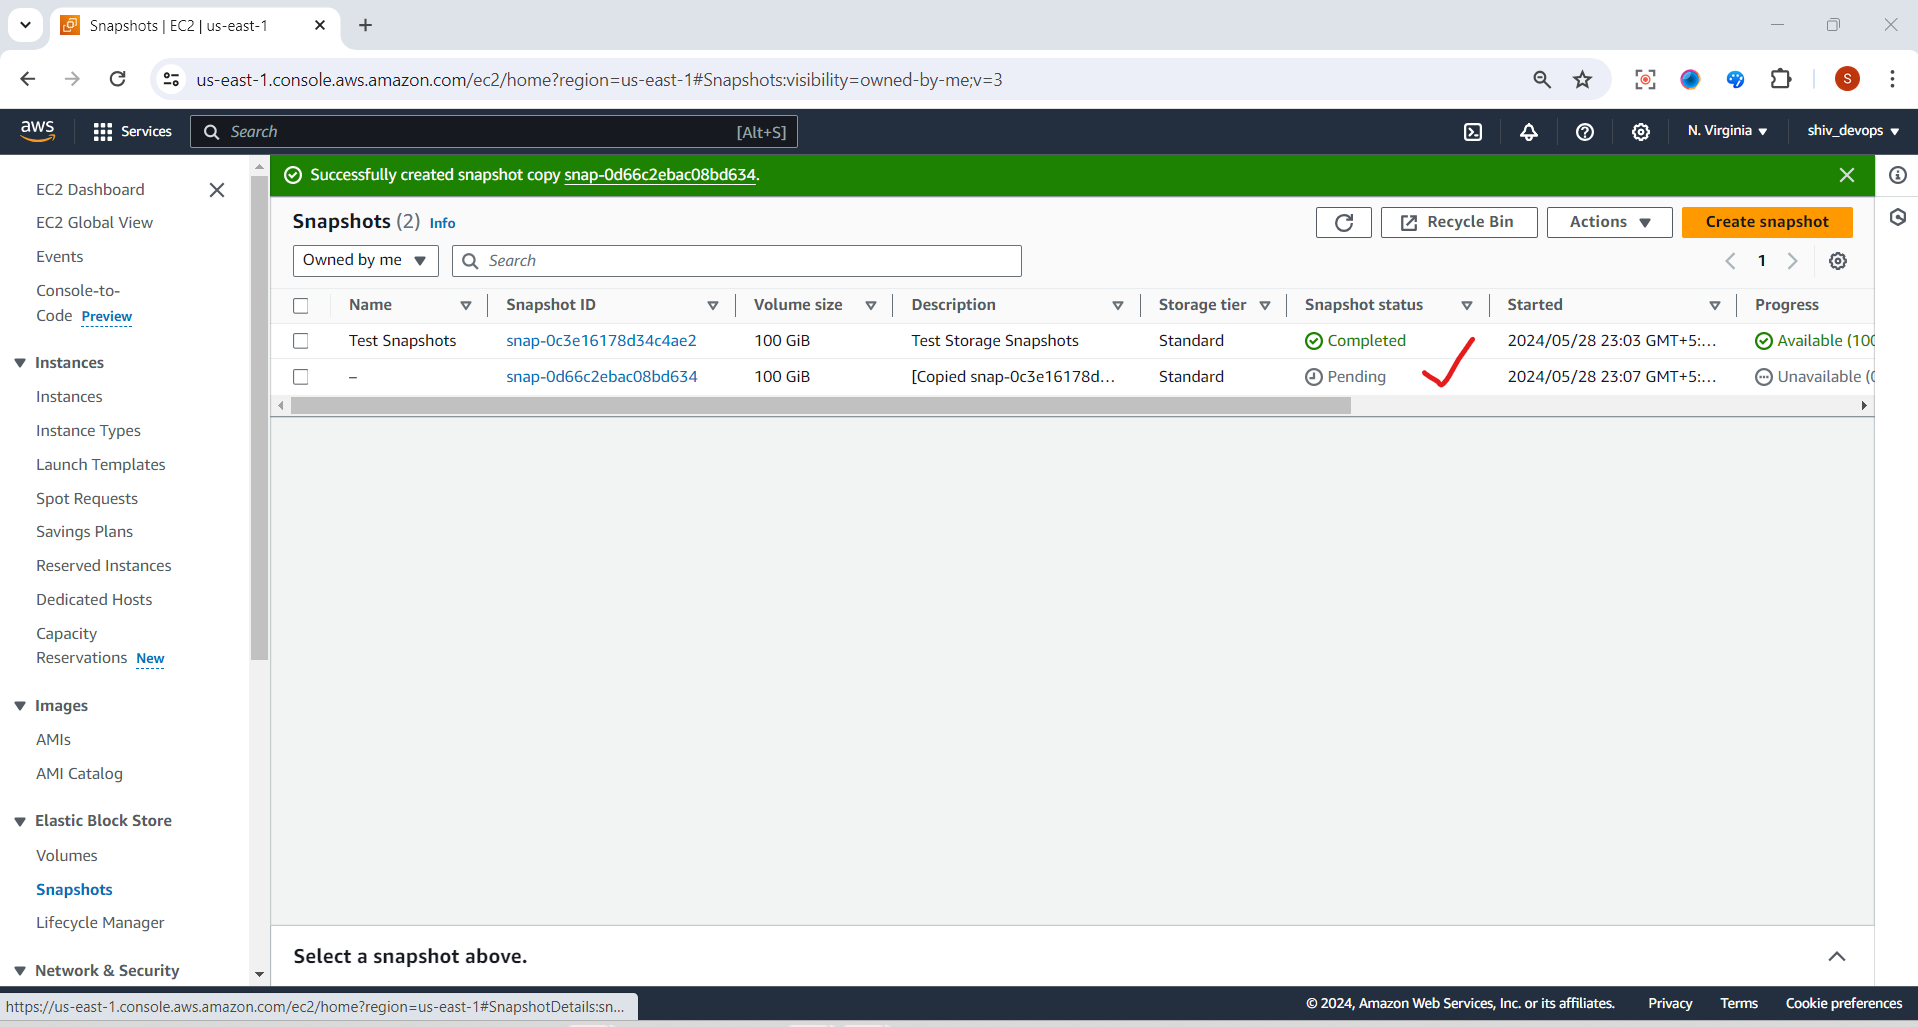
Follow the prompts to configure the copy settings and target destination.
When sharing a snapshot with another account, the recipient must first copy the snapshot to their account before creating a volume from it.
Step 6: 🔒 Encrypted Snapshots (Optional)
Both encrypted and unencrypted snapshots can be shared across AWS accounts.
However, if you attempt to copy an encrypted snapshot without the necessary permissions for the encryption key, the copy process will silently fail.
Step 7: 🗑️ Delete Snapshots (When Needed)
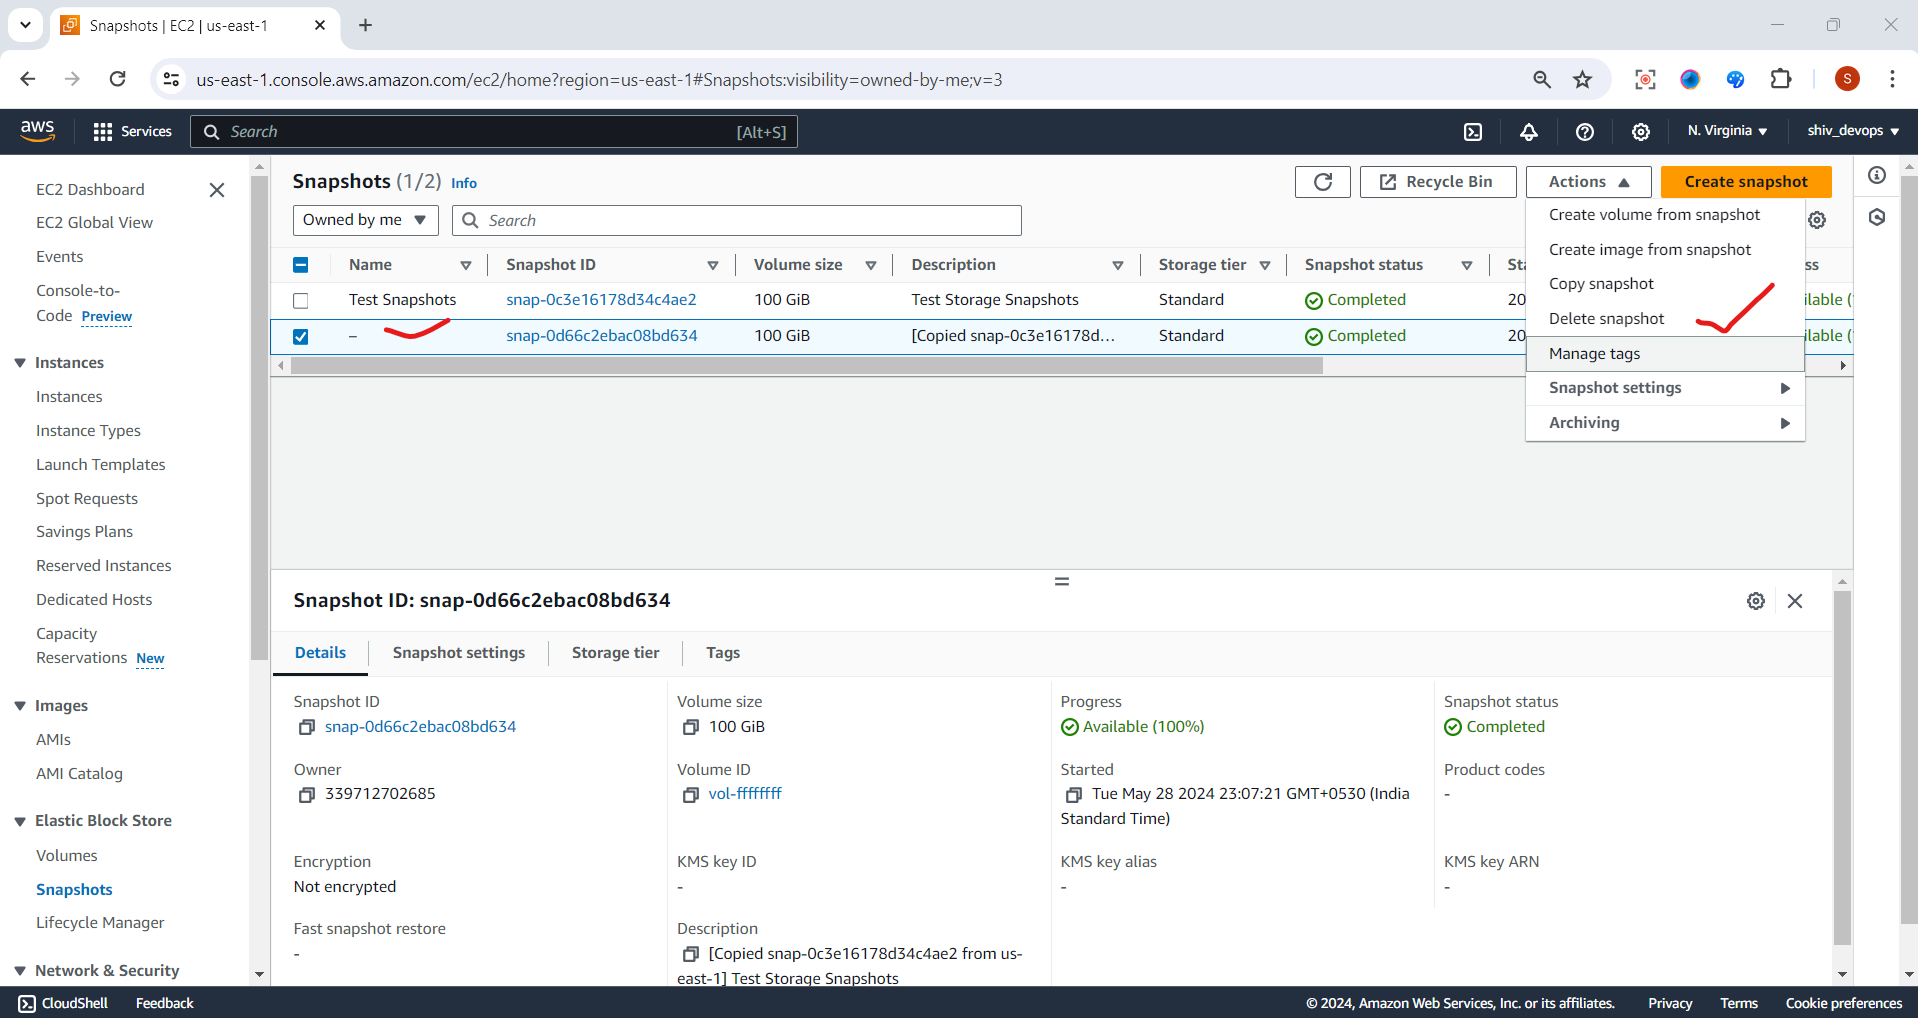
To delete a snapshot, follow these steps:
Open the Amazon EC2 console.
Select "Snapshots" in the navigation pane.
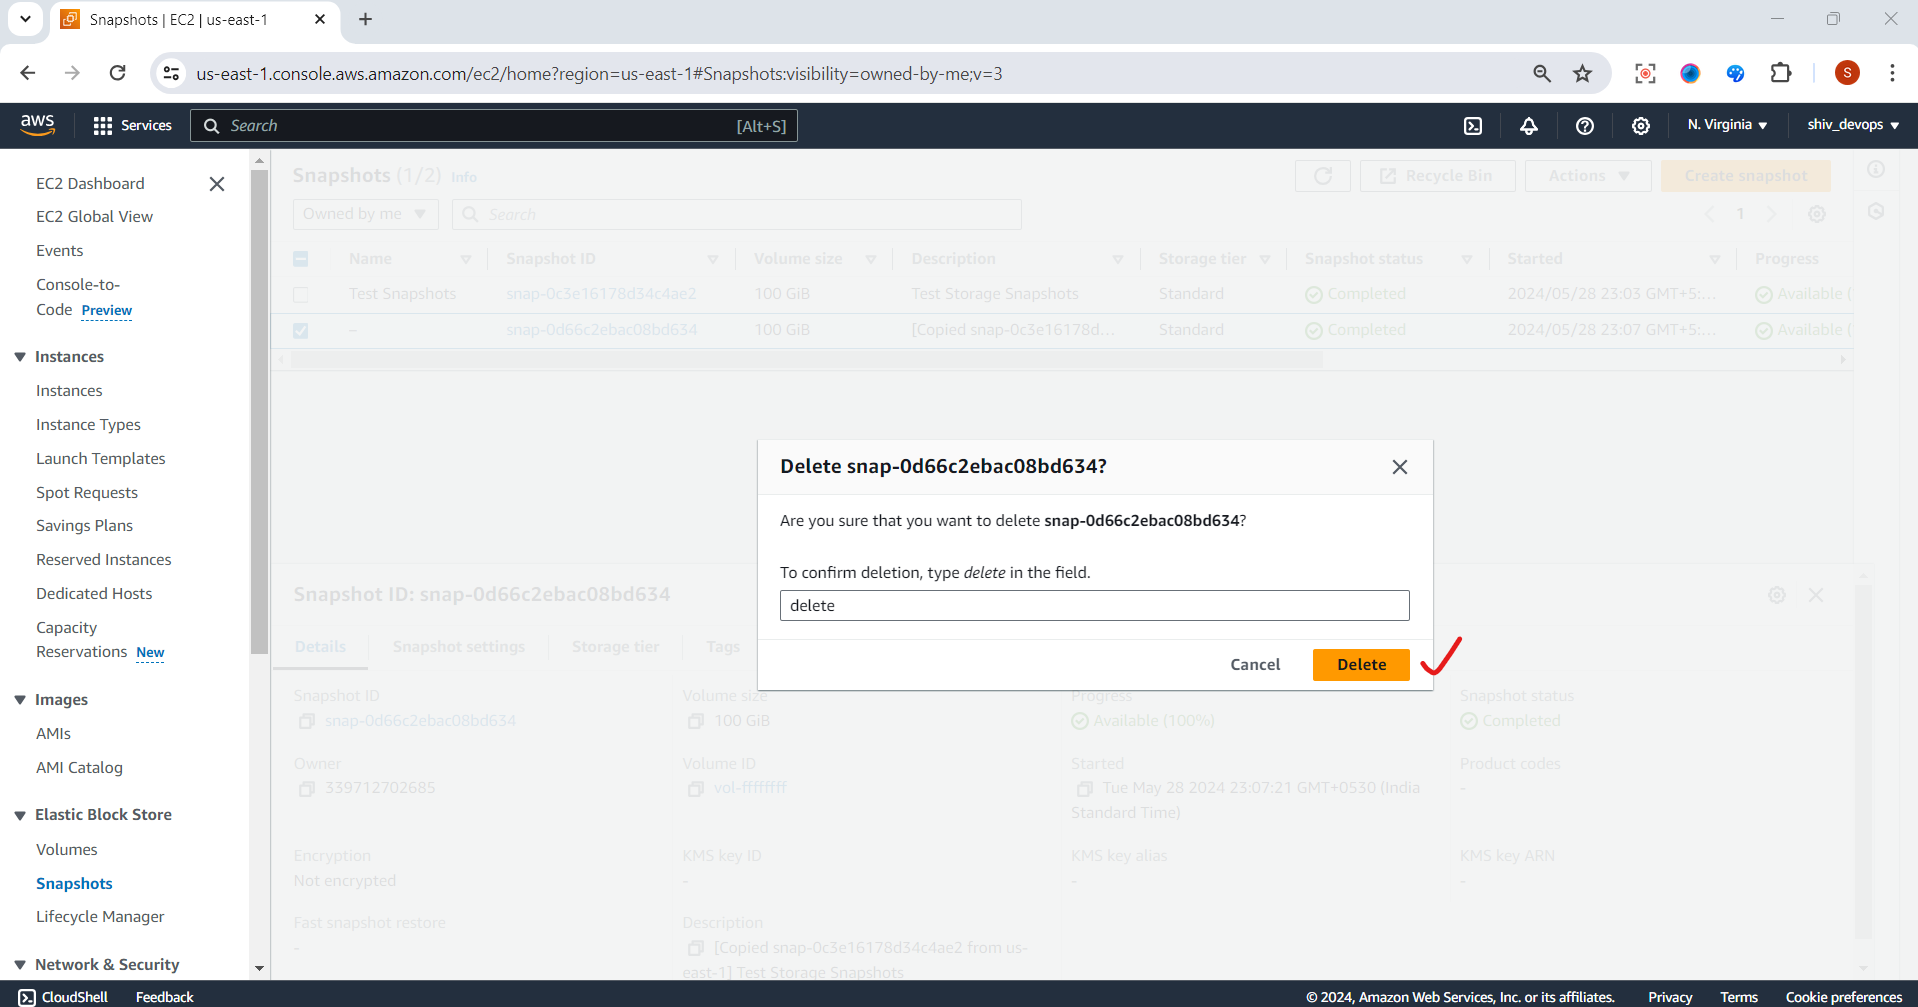
Choose the snapshot you want to delete and select "Delete" from the "Actions" list.
Confirm the deletion by clicking "Yes, Delete."
- 🚀 EBS Multi-Attach
The EBS Multi-Attach feature allows you to attach a single EBS Volume to multiple EC2 instances within the same Availability Zone. This feature is only available for the high-performance io1 and io2 EBS Volume types. 👥
Key features of EBS Multi-Attach:
🔄 Concurrent read/write access: All attached instances have full read and write permissions to the shared EBS Volume.
⚡ High availability: By sharing a single volume across multiple instances, you can achieve higher application availability and fault tolerance.
💻 Clustered applications: Multi-Attach is particularly useful for applications that require concurrent write operations, such as clustered databases or file systems.
Real-time example: Imagine you have a mission-critical application that requires high availability and fault tolerance. You can provision an io1 or io2 EBS Volume and enable the Multi-Attach feature. Then, you can attach this volume to multiple EC2 instances running in the same Availability Zone, ensuring that your application remains accessible even if one of the instances fails. 🏢
- 🔐 EBS Encryption
EBS Encryption is a security feature that encrypts your data at rest and in transit. It leverages the AWS Key Management Service (KMS) to manage and rotate encryption keys transparently. 🔒
Key features of EBS Encryption:
📡 Transparent encryption: Data is automatically encrypted and decrypted as it moves between your EC2 instance and the EBS Volume, with minimal impact on performance.
🔐 Snapshots and new volumes: Encrypted EBS Volumes, their snapshots, and any new volumes created from those snapshots are automatically encrypted.
🔑 Key management: AWS KMS handles encryption key management, including key rotation, backup, and auditing.
Real-time example: Let's say you're running a healthcare application that handles sensitive patient data. You can create an encrypted EBS Volume and attach it to your EC2 instance. All data stored on this volume, as well as any snapshots or new volumes created from it, will be automatically encrypted, ensuring compliance with data protection regulations. 💉
Conclusion:
AWS EC2 Storage Options offer a comprehensive suite of solutions to meet your diverse storage needs. From persistent block storage with EBS Volumes to incremental backups with EBS Snapshots, multi-instance attachment for high availability, and secure data encryption, these storage options provide flexibility, durability, and performance for your cloud workloads. By understanding the features and use cases of each option, you can optimize your storage infrastructure and ensure your data is protected, accessible, and cost-effective. 🏆
Remember, the key to making the most out of AWS storage solutions is to carefully evaluate your application requirements and choose the right combination of options that align with your performance, scalability, and security needs. Happy storing! 🎉
Thank you for joining me on this journey through the world of cloud computing! Your interest and support mean a lot to me, and I'm excited to continue exploring this lfascinating field together. Let's stay connected and keep learning and growing as we navigate the ever-evolving landscape of technology.
LinkedIn Profile: https://www.linkedin.com/in/prasad-g-743239154/
Feel free to reach out to me directly at spujari.devops@gmail.com. I'm always open to hearing your thoughts and suggestions, as they help me improve and better cater to your needs. Let's keep moving forward and upward!
If you found this blog post helpful, please consider showing your support by giving it a round of applause👏👏👏. Your engagement not only boosts the visibility of the content, but it also lets other DevOps and Cloud Engineers know that it might be useful to them too. Thank you for your support! 😀
Thank you for reading and happy deploying! 🚀
Best Regards,
Sprasad
Subscribe to my newsletter
Read articles from Sprasad Pujari directly inside your inbox. Subscribe to the newsletter, and don't miss out.
Written by

Sprasad Pujari
Sprasad Pujari
Greetings! I'm Sprasad P, a DevOps Engineer with a passion for optimizing development pipelines, automating processes, and enabling teams to deliver software faster and more reliably.