Node.js Contact Form: How to Create One, Validate Data, and Send Emails
 Ivan
Ivan
In this step-by-step tutorial, I’ll show you how to create a Node.js contact form, give it a personal touch, retrieve and validate data from it, and then send emails through the form via SMTP or API.
Note: you’ll need Node.js 6+ or any version released since May 2018 installed on your machine for the provided code snippets to work.
How to create a Node.js contact form
As you’re reading this article, I’m assuming you know how to install Node.js and create a new project, so allow me to keep it brief and get straight into setting up the project.
However, to freshen up your knowledge, you can check out this article on installing Node.js.
Setting up the project
First things first, let’s install some dependencies for our backend by opening the terminal and entering the following commands:
mkdir contact-form-test && cd contact-form-test– By running this command, we create a folder for our project, ensuring our project file will be within it instead of the current directory.npm init -y– This will create a package.json file that manages project dependencies and configurations.npm i express nodemailer– We need to install Express.js library and Nodemailer module as we will need them for setting up our server and sending emails with SMTP, respectively.npm i -D nodemon– This is a dev dependency that automates the process of restarting our server whenever we change our code, allowing us to see the changes we made without having us manually restart the server.
Once you install all the dependencies, your package.json file should look something like this:
{
  "name": "contact-form-test",          // Project name
  "version": "1.0.0",                   // Project version
  "description": "",                    // Description of the project
  "main": "server.js",                  // Entry point file of the project
  "scripts": {
    "dev": "nodemon --watch public --watch server.js --ext js,html,css", // Script to run the server with nodemon for development
    "start": "node server.js"           // Script to start the server normally
  },
  "keywords": [],                       // Keywords related to the project
  "author": "",                         // Author of the project
  "license": "ISC",                     // License type
  "dependencies": {
    "express": "^4.19.2",               // Express web server framework
    "nodemailer": "^6.9.13"             // Nodemailer for sending emails via SMTP
  },
  "devDependencies": {
    "nodemon": "^3.1.0"                 // Nodemon for automatically restarting the server on code changes
  }
}
Bonus tips:
npm i dotenv– Although optional, this command installs the dotenv package, which loads environment variables where you can safely store your authentication credentials such as an API key. All you have to do is run the command, create an .env file in the root of your project directory, and paste your desired creds in there.Starting from v20.6.0, Node.js has built-in support for .env files for configuring environment variables. So it is not necessary to use the dotenv package, but a lot of projects still depend on dotenv, so it’s still the de facto standard.
Configuring the server
Next, in our project folder, let’s create a new .js file called server.js which we refer to in the production script from the package.json file.
Then, simply paste the following code snippet into the server.js file:
const express = require('express');
const app = express();
const path = require('path');


const PORT = process.env.PORT || 3000;


// Middleware
app.use(express.static('public'));
app.use(express.json());


app.get('/', (req, res) => {
    res.sendFile(path.join(__dirname, 'public', 'contactform.html'));
});


app.post('/send-email', (req, res) => {
    console.log(req.body);
    res.send('Data received');
});


app.listen(PORT, () => {
    console.log(`Server running on port ${PORT}`);
});
Note: Later in the article, we’ll use the server.js file to add Nodemailer as a transport via SMTP and an API logic to send emails through our contact form.
Creating the contact form
Now, let’s create a new public folder called public for the static files (style.css, contactform.html, and app.js) we’re going to be using for this contact form.
In the contactform.html file, enter the following code:
<!DOCTYPE html>
<html lang="en">
<head>
    <meta charset="UTF-8"> <!-- Specifies the character encoding for the HTML document -->
    <link rel="stylesheet" href="/style.css"> <!-- Link to external CSS file for styling -->
    <link rel="preconnect" href="https://fonts.gstatic.com"> <!-- Preconnect to load fonts faster -->
    <link href="https://fonts.googleapis.com/css2?family=Poppins&display=swap" rel="stylesheet"> <!-- Google fonts link for 'Poppins' font -->
    <meta name="viewport" content="width=device-width, initial-scale=1.0"> <!-- Responsive design meta tag -->
    <title>Contact Form</title> <!-- Title of the document shown in the browser tab -->
</head>
<body>
    <div class="form-container"> <!-- Container for the form to style it specifically -->
        <form class="contact-form"> <!-- Form element where user inputs will be submitted -->
            <h2>CONTACT</h2> <!-- Heading of the form -->
            <input type="text" id="name" placeholder="Full name"><br> <!-- Input field for name -->
            <input type="email" id="email" placeholder="Email"><br> <!-- Input field for email, validates email format -->
            <input type="text" id="subject" placeholder="Subject"><br> <!-- Input field for subject -->
            <textarea id="message" placeholder="Message" cols="30" rows="10"></textarea><br> <!-- Textarea for longer message input -->
            <input type="submit" class="submit" value="Send Message"> <!-- Submit button to send the form data -->
        </form>
    </div>
    <script src="/app.js"></script> <!-- Link to external JavaScript file for scripting -->
</body>
</html>
I’ve added annotations in this code snippet as well to help you navigate through it, but feel free to delete them for a cleaner-looking code. 🙂
Styling the contact form
How about we tackle the frontend for a bit and add a personal touch to our contact form?
In the style.css file, enter the following code which will make our contact form prettier:
/* Global styles for all elements to ensure consistency */
* {
    margin: 0;                          /* Remove default margin */
    padding: 0;                         /* Remove default padding */
    box-sizing: border-box;             /* Include padding and border in the element's total width and height */
    font-family: 'Poppins', sans-serif; /* Set a consistent font family throughout the app */
}


/* Styling for the html and body elements */
html, body {
    background: #c0b7b7;                /* Set the background color for the entire page */
}


/* Container for the form providing relative positioning context */
.form-container {
    position: relative;                 /* Positioning context for absolute positioning inside */
    left: 20%;                          /* Position the container 20% from the left side of the viewport */
    width: 60%;                         /* Set the width of the container to 60% of the viewport width */
    height: 100vh;                      /* Set the height to be 100% of the viewport height */
    background-color: white;            /* Set the background color of the form container */
}


/* Styling for the contact form itself */
.contact-form {
    position: absolute;                 /* Position the form absolutely within its parent container */
    top: 10%;                           /* Position the form 10% from the top of its container */
    left: 10%;                          /* Position the form 10% from the left of its container */
    width: 80%;                         /* The form width is 80% of its container */
    min-height: 600px;                  /* Minimum height for the form */
}


/* Styling for input fields and textarea within the form */
input, textarea {
    width: 100%;                        /* Make input and textarea elements take up 100% of their parent's width */
    margin-top: 2rem;                   /* Add top margin to space out the elements */
    border: none;                       /* Remove default borders */
    border-bottom: 1px solid black;     /* Add a bottom border for a minimalistic look */
    padding: 10px; /* Add padding for better readability */
}


/* Styling for the submit button */
.submit {
    border: 1px solid black;            /* Add a solid border around the submit button */
    padding: 1rem;                      /* Add padding inside the button for better clickability */
    text-align: center;                 /* Center the text inside the button */
    background-color: white;            /* Set the background color of the button */
    cursor: pointer;                    /* Change the cursor to a pointer to indicate it's clickable */
}


/* Styling for the submit button on hover */
.submit:hover {
    opacity: 0.6;                       /* Change the opacity when hovered to give a visual feedback */
}
To see how your contact form looks, you can save the file and enter the following command in your terminal:
npm run dev
Then, you should see the message saying that your contact form is being hosted on the custom port you defined in your .env file or the default port 3000, which allows traffic to reach it.
Finally, paste the following link in your browser’s URL bar: http://localhost:3000/ and you should see your contact form in its full glory.
How to collect data from a Node.js contact form
To collect data from our Node.js contact form, we will add functionality for handling form submissions using JavaScript, which will capture form data and send it to the server without reloading the page.
For this, we’ll use an AJAX request, which allows us to avoid a full-page reload.
I’ve made this easy for you, so all you have to do is navigate to your app.js file and enter the following code:
const contactForm = document.querySelector('.contact-form');
const name = document.getElementById('name');
const email = document.getElementById('email');
const subject = document.getElementById('subject');
const message = document.getElementById('message');


contactForm.addEventListener('submit', (e) => {
    e.preventDefault();  // Prevent the default form submission


    const formData = {
        name: name.value,
        email: email.value,
        subject: subject.value,
        message: message.value
    };


    try {
        const response = await fetch('/send-email', {
            method: 'POST',
            headers: {
                'Content-Type': 'application/json'
            },
            body: JSON.stringify(formData)
        });


        // Wait for JSON response to be parsed
        const result = await response.json();


        if (!response.ok) {
            // If the response is not OK, handle it by showing an alert
            alert(`Failed to send message: ${result.message}`);
            return;  // Exit the function early if there's an error
        }


        // Check application-specific status from JSON when response is OK
        if (result.status === 'success') {
            alert('Email sent');


            // Reset form fields after successful submission
            name.value = '';
            email.value = '';
            subject.value = '';
            message.value = '';
        } else {
            // Handle application-level failure not caught by response.ok
            alert('Operation failed: ' + result.message);
        }


    } catch (error) {
        // Handle any exceptions that occur during fetch
        console.error('Error:', error);
        alert('Network error or cannot connect to server');
    }


});
Note: I used the fetch API here which is a more modern alternative to ‘XMLHttpRequest’ and leverages async/await syntax for better error handling.
How to validate data from a contact form
To validate data from a contact form in Node.js, you can either use:
Deep email validator – A comprehensive, MIT-certified, dependency package that makes sure an email is valid by running it through several different checks. It validates RegEx, common typos, disposable email blacklists, DNS records, and SMTP server responses.
Regex expressions – Patterns used to match character combinations in strings, ensuring that inputs conform to a predefined format. They provide a more basic level of validation compared to dependency packages like Deep email validator.
Deep email validator module
To install the Deep email validator, I typically use the npm command or Yarn:
npm i deep-email-validator

# or

yarn add deep-email-validator
Then after importing const { validate } = require('deep-email-validator'); simply add the following code in your /send-email controller:
// Endpoint to handle form submission and send email
app.post('/send-email', async (req, res) => {
   const { name, email, subject, message } = req.body;


   if (!name || !email || !subject || !message) {
       return res.status(400).json({ status: 'error', message: 'Missing required fields!' })
   }


   // Validate the email
   const validationResult = await validate(email);


   if (!validationResult.valid) {
       return res.status(400).json({
           status: 'error',
           message: 'Email is not valid. Please try again!',
           reason: validationResult.reason
       });
   }


   // Email sending logic


   // Placeholder response for a successful email submission
   res.status(200).json({
       status: 'success',
       message: 'Email successfully sent'
   });
});
For more information on Deep email validator, consult the official GitHub page.
Regular expressions for email validation
If you’d rather run basic ReGex checks against the email IDs instead of using a dependency package, you can paste the following code into your project file (e.g., server.js):
const emailRegex =

/^[a-zA-Z0-9.!#$%&'*+/=?^_`{|}~-]+@[a-zA-Z0-9](?:[a-zA-Z0-9-]{0,61}[a-zA-Z0-9])?(?:\.[a-zA-Z0-9](?:[a-zA-Z0-9-]{0,61}[a-zA-Z0-9])?)*$/


function isEmailValid(email) {
    // Check if the email is defined and not too long
    if (!email || email.length > 254) return false;

    // Use a single regex check for the standard email parts
    if (!emailRegex.test(email)) return false;

    // Split once and perform length checks on the parts
    const parts = email.split("@");
    if (parts[0].length > 64) return false;

    // Perform length checks on domain parts
    const domainParts = parts[1].split(".");
    if (domainParts.some(part => part.length > 63)) return false;

    // If all checks pass, the email is valid
    return true;
}
Then in your /send-email route add the following code to perform email validation:
// Endpoint to handle form submission and send email
app.post('/send-email', async (req, res) => {
   const { name, email, subject, message } = req.body;


   if (!name || !email || !subject || !message) {
       res.status(400).json({ status: 'error', message: 'Missing required fields!' })
   }


   // Validate the email
   if (!isEmailValid(email)) {
       return res.status(400).json({
           status: 'error',
           message: 'Email is not valid. Please try again!'
       });
   }


   // Email sending logic


   // Placeholder response for a successful email submission
   res.status(200).json({
       status: 'success',
       message: 'Email successfully sent'
   });
});
For more details on validating emails in Node.js, feel free to consult our dedicated article, where you can also learn how to verify emails by sending an activation link/code the end users activate from their inbox.
How to add reCAPTCHA
Now, let’s add a reCAPTCHA to our Node.js contact form to make sure no robots fill it out. 🤖
First, you need to get your ‘SITE KEY’ and ‘SECRET KEY’ from the Google reCAPTCHA admin console.
In this example we will be using Challenge (v2), so be sure to select it during creation and leave the default “I’m not a robot Checkbox”.
Also, since we are testing from a local computer we need to add ‘localhost’ to allowed domains during creation. Note: if you are in production you would need to use your own domains. And to use this code, simply copy your SITE KEY and SECRET KEY.
Next, in our contactform.html, add the following code snippet just before the closing of the head section:
<script src="https://www.google.com/recaptcha/api.js" async defer></script> <!-- Load google recaptcha API -->
Inside our form, we can add the reCAPTCHA element after the textarea like this:
<div class="g-recaptcha" data-sitekey="YOUR_SITE_KEY"></div><br> <!-- Google recaptcha element -->
Important: don’t forget to replace YOUR_SITE_KEY with your actual SITE KEY.
Then, we need to update our app.js inside the public folder to pass the reCAPTCHA token to our formData so the backend can verify it. To do this, after the e.preventDefault(); paste the following code :
// Get the reCAPTCHA token
   const recaptchaToken = grecaptcha.getResponse();


   if (!recaptchaToken) {
       alert('Please complete the reCAPTCHA');
       return;  // Exit the function early if reCAPTCHA is not completed
   }


   const formData = {
       name: name.value,
       email: email.value,
       subject: subject.value,
       message: message.value,
       'g-recaptcha-response': recaptchaToken
   };
To verify the reCAPTCHA on the server side, we need to make a request. For this, we can use the built in Node.js ‘https’, or a package like ‘node-fetch’ or ‘axios’.
And since Node.js ver 18, the fetch method is available on the global scope natively, so let’s use ‘fetch’.
First, in our server.js let’s create a function to verify the reCAPTCHA (make sure to add the SECRET KEY as RECAPTCHA_SECRET_KEY in environment variables else the verification will not succeed):
// Function to verify reCAPTCHA
async function verifyRecaptcha(token) {
   const recaptchaSecret = process.env.RECAPTCHA_SECRET_KEY;
   const recaptchaUrl = `https://www.google.com/recaptcha/api/siteverify?secret=${recaptchaSecret}&response=${token}`;


   const response = await fetch(recaptchaUrl, { method: 'POST' });
   const result = await response.json();


   return result.success;
}
Then in our /send-email endpoint we can update our code to this:
// Endpoint to handle form submission and send email
app.post('/send-email', async (req, res) => {
   const { name, email, subject, message, 'g-recaptcha-response': recaptchaToken } = req.body;


   if (!name || !email || !subject || !message || !recaptchaToken) {
       res.status(400).json({ status: 'error', message: 'Missing required fields!' })
   }


   // Verify the reCAPTCHA token
   const isRecaptchaValid = await verifyRecaptcha(recaptchaToken);
   if (!isRecaptchaValid) {
       return res.status(400).json({
           status: 'error',
           message: 'reCAPTCHA verification failed. Please try again.'
       });
   }


   // Validate the email
   const validationResult = await validate(email);


   if (!validationResult.valid) {
       return res.status(400).json({
           status: 'error',
           message: 'Email is not valid. Please try again!',
           reason: validationResult.reason
       });
   }


   // Email sending logic


   // Placeholder response for a successful email submission
   res.status(200).json({
       status: 'success',
       message: 'Email successfully sent'
   });
});
Send email from Node.js contact form using SMTP
Now that we have our Node.js contact form flow in place, let’s add an email-sending functionality to it.
For this, we’ll need two things:
Nodemailer – If you’re reading this article, I’m guessing you already have Nodemailer installed, but if you don’t, here’s how to install it.
SMTP credentials – With Nodemailer, you can leverage any SMTP server like, for example, Gmail. However, Gmail has some significant limitations, about which you can find out more in our dedicated Nodemailer Gmail tutorial.
So, to overcome Gmail limitations, we’ll set up Mailtrap Email Sending instead, as the SMTP service in our Nodemailer transporter object. It offers an infrastructure with high deliverability rates by default and by design, plus it’s easy to use.
First, create a free Mailtrap account and verify your domain. It only takes a couple of minutes, and you can watch the video we’ve prepared for you as a step-by-step tutorial.
Then, proceed to the Sending Domains section, choose your domain, and under Integration, select your preferred stream (Transactional, in this case). There, you will find your SMTP credentials, which you can easily paste into the Nodemailer config file.
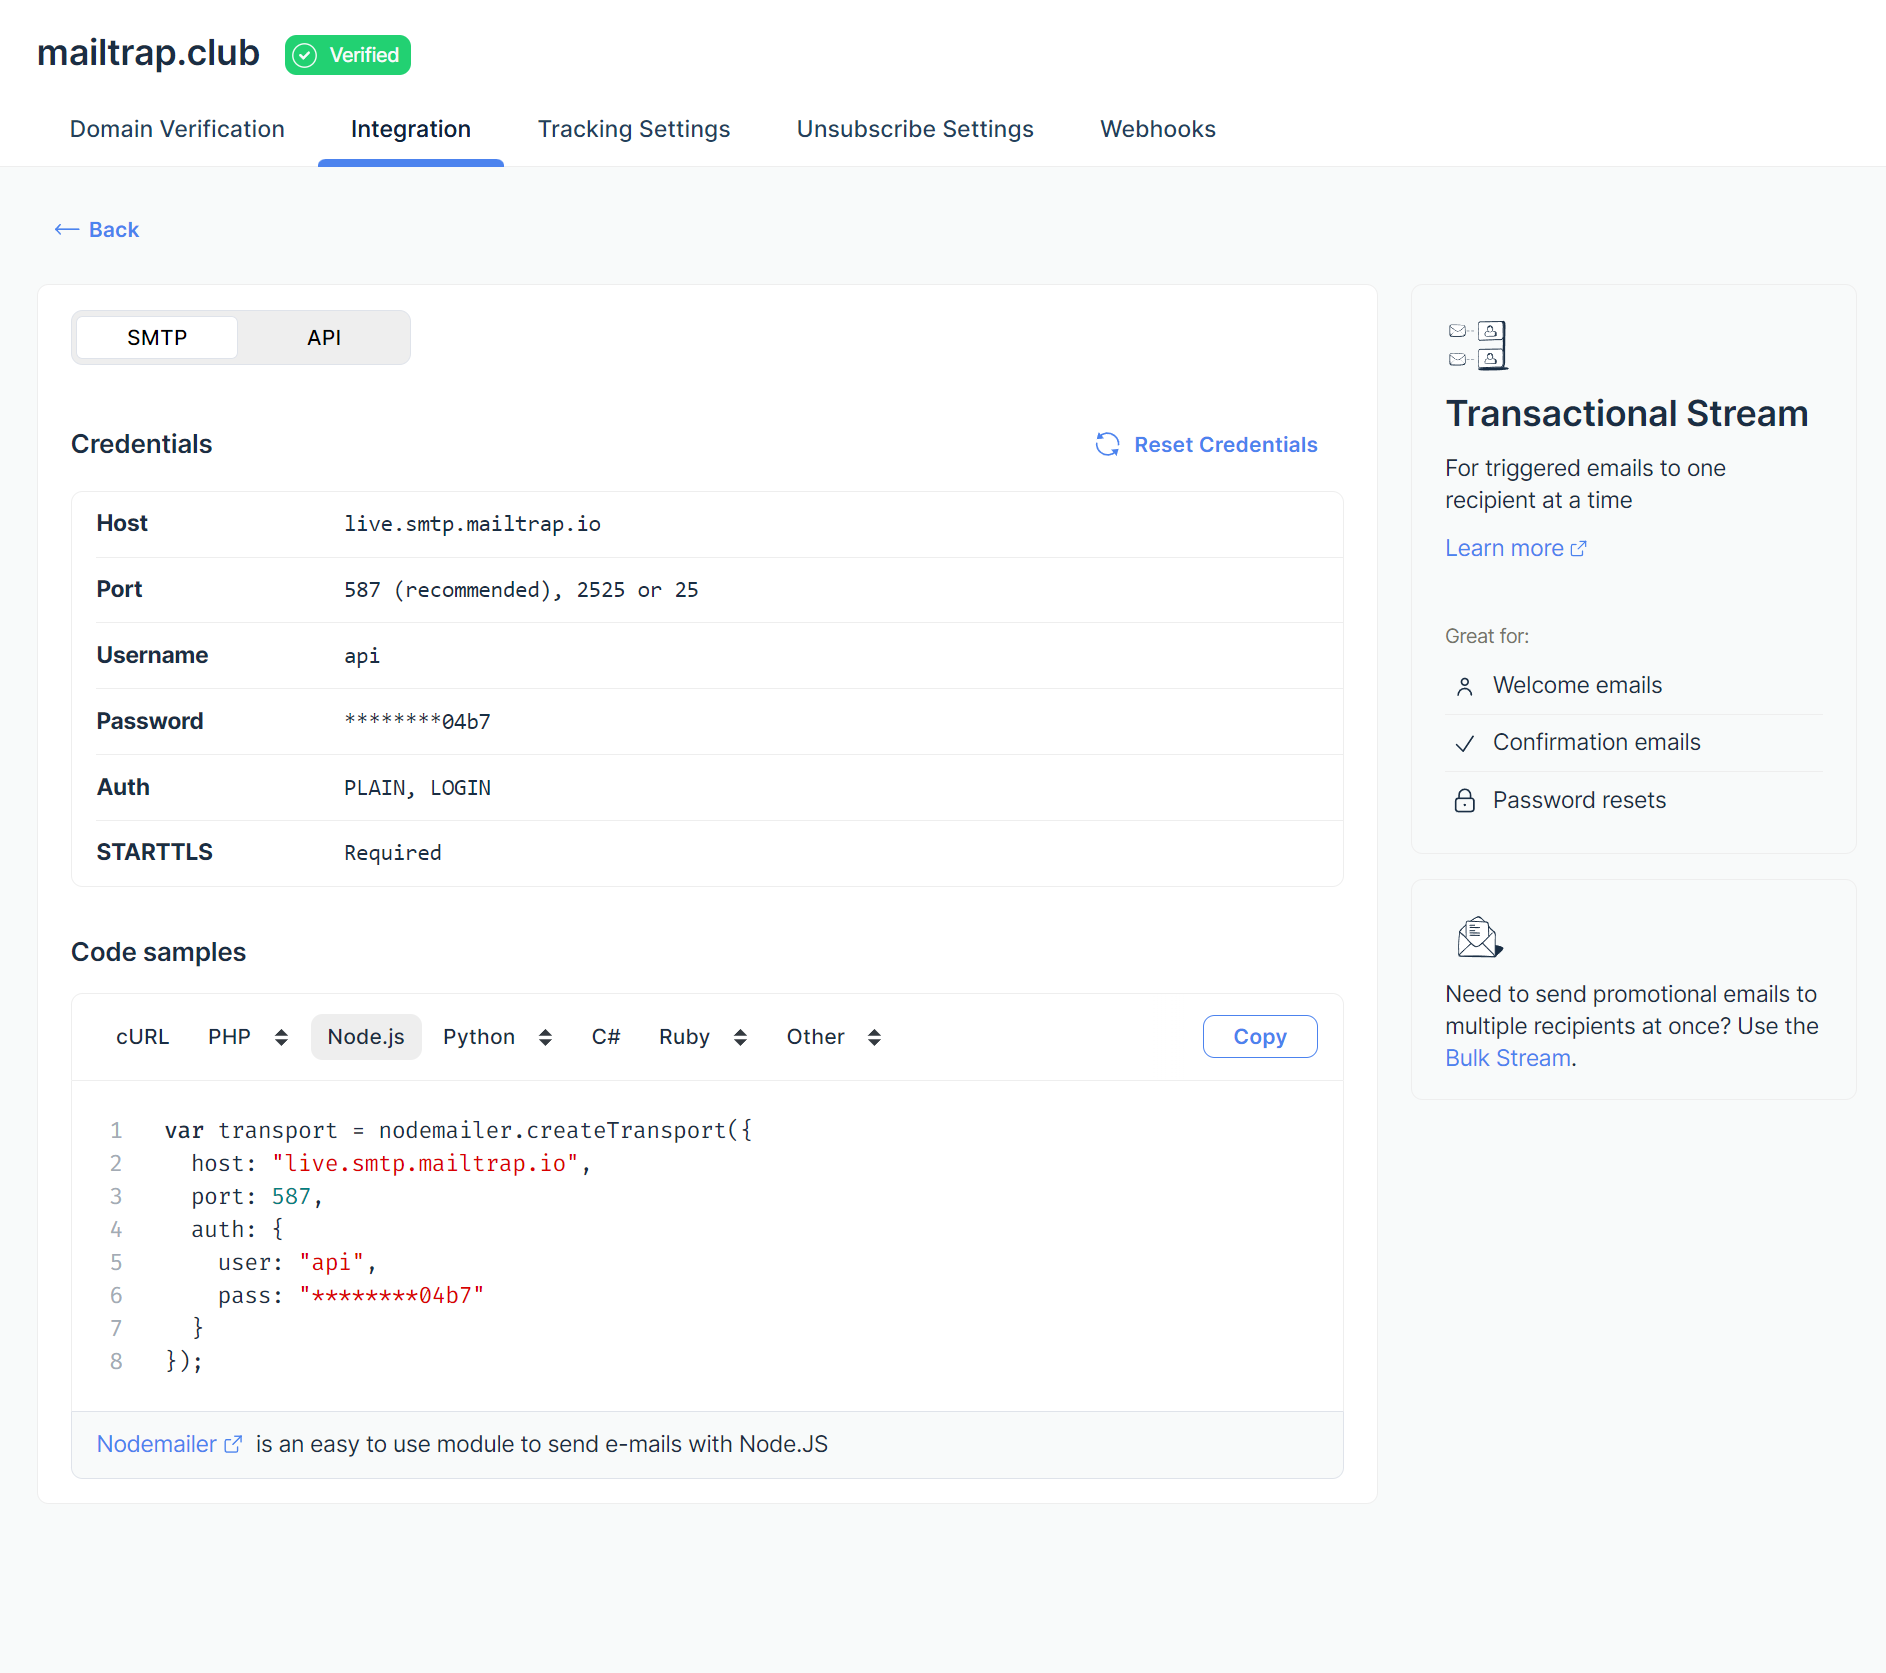
Speaking of Nodemailer configuration, let’s insert it into the server.js file beneath the comment // Create a transporter object, like so:
// Create a transporter object
const transporter = nodemailer.createTransport({
  host: 'live.smtp.mailtrap.io',
  port: 587,
  secure: false, // use false for STARTTLS; true for SSL on port 465
  auth: {
    user: '1a2b3c4d5e6f7g',
    pass: '1a2b3c4d5e6f7g',
  }
});

// Configure the mailoptions object
const mailOptions = {
  from: 'yourusername@email.com',
  to: 'yourfriend@email.com',
  subject: 'Sending Email using Node.js',
  text: 'That was easy!'
};

// Send the email
transporter.sendMail(mailOptions, (error, info) =>{
  if (error) {
    console.log('Error:' error);
    return res.status(500).json({ status: 'error', message: 'Failed to send email due to server error.' });
  } else {
    console.log('Email sent: ' + info.response);
    return res.status(200).json({
               status: 'success',
               message: 'Email successfully sent'
           });
  }
});
Then, just insert your Mailtrap credentials into their respectable fields, including host, port, user, and pass.
In the end, your server.js file should look something like this:
require('dotenv').config();
const express = require('express');
const { validate } = require('deep-email-validator');
const path = require('path');


const app = express();
const PORT = process.env.PORT || 3000;


// Middleware
app.use(express.static('public'));
app.use(express.json());


app.get('/', (req, res) => {
   res.sendFile(path.join(__dirname, 'public', 'contactform.html'));
});


// Function to verify reCAPTCHA
async function verifyRecaptcha(token) {
   const recaptchaSecret = process.env.RECAPTCHA_SECRET_KEY;
   const recaptchaUrl = `https://www.google.com/recaptcha/api/siteverify?secret=${recaptchaSecret}&response=${token}`;


   const response = await fetch(recaptchaUrl, { method: 'POST' });
   const result = await response.json();


   return result.success;
}


// Endpoint to handle form submission and send email
app.post('/send-email', async (req, res) => {
   const { name, email, subject, message, 'g-recaptcha-response': recaptchaToken } = req.body;


   if (!name || !email || !subject || !message || !recaptchaToken) {
       return res.status(400).json({ status: 'error', message: 'Missing required fields!' })
   }


   // Verify the reCAPTCHA token
   const isRecaptchaValid = await verifyRecaptcha(recaptchaToken);
   if (!isRecaptchaValid) {
       return res.status(400).json({
           status: 'error',
           message: 'reCAPTCHA verification failed. Please try again.'
       });
   }


   // Validate the email
   const validationResult = await validate(email);


   if (!validationResult.valid) {
       return res.status(400).json({
           status: 'error',
           message: 'Email is not valid. Please try again!',
           reason: validationResult.reason
       });
   }


   // Email sending logic
   // Create a transporter object
   const transporter = nodemailer.createTransport({
       host: process.env.SMTP_HOST,
       port: process.env.SMTP_PORT,
       secure: false, // use false for STARTTLS; true for SSL on port 465
       auth: {
           user: process.env.SMTP_USER,
           pass: process.env.SMTP_PASS,
       }
   });


   // Configure the mailoptions object
   const mailOptions = {
       from: process.env.EMAIL_FROM,
       to: process.env.EMAIL_TO,
       replyTo: email,
       subject: subject,
       text: `From: ${name}\nEmail:${email}\n\n${message}`
   };


   // Send the email
   transporter.sendMail(mailOptions, (error, info) => {
       if (error) {
           console.log('Error:', error);
           return res.status(500).json({ status: 'error', message: 'Failed to send email due to server error.' });


       } else {
           console.log('Email sent: ' + info.response);
           return res.status(200).json({
               status: 'success',
               message: 'Email successfully sent'
           });
       }
   });
});


app.listen(PORT, () => {
   console.log(`Server running on port ${PORT}`);
});
To safely store your Mailtrap credentials, you can use the environment variable, or the .env file, like so:
PORT=3200
SMTP_HOST='live.smtp.mailtrap.io'
SMTP_PORT=587
SMTP_USER='1a2b3c4d5e6f7g'
SMTP_PASS='1a2b3c4d5e6f7g'
EMAIL_FROM='yourusername@email.com'
EMAIL_TO='contactformrecipient@yourmail.com'
RECAPTCHA_SECRET_KEY='SECRET-KEY'
Send Emails with Mailtrap for Free
Send email from Node.js contact form using API
If you want to automate your contact form’s email-sending functionality, you can again rely on Mailtrap as it has a robust sending package. The package itself is regularly updated by a team of developers, lets you automate your sending process, and it’s super straightforward to use.
First, you’ll need a Mailtrap account, which, if you don’t already have one, you can create by following the instructions provided in the previous chapter.
Then, let’s install the Mailtrap package:
npm install mailtrap

# or, if you are using yarn:

yarn add mailtrap
Once it’s installed, you can use the following code snippet for email sending:
import { MailtrapClient } from "mailtrap"

/**
 * For this example to work, you need to set up a sending domain,
 * and obtain a token that is authorized to send from the domain.
 */

const TOKEN = "<YOUR-TOKEN-HERE>";
const SENDER_EMAIL = "<SENDER ADDRESS@YOURDOMAIN.COM>";
const RECIPIENT_EMAIL = "<RECIPIENT@EMAIL.COM>";

const client = new MailtrapClient({ token: TOKEN });

const sender = { name: "Mailtrap Test", email: SENDER_EMAIL };

client
  .send({
    from: sender,
    to: [{ email: RECIPIENT_EMAIL }],
    subject: "Hello from Mailtrap!",
    text: "Welcome to Mailtrap Sending!",
  })
 .then(response => {
    console.log("Email sent successfully:", response);
  })
  .catch(error => {
    console.error("Error sending email:", error);
  });
And for your convenience’s sake, here’s what your server.js file should look like:
require('dotenv').config();
const express = require('express');
const { MailtrapClient } = require('mailtrap');
const { validate } = require('deep-email-validator');
const path = require('path');


const app = express();
const PORT = process.env.PORT || 3000;


// Middleware
app.use(express.static('public'));
app.use(express.json());


app.get('/', (req, res) => {
   res.sendFile(path.join(__dirname, 'public', 'contactform.html'));
});


// Function to verify reCAPTCHA
async function verifyRecaptcha(token) {
   const recaptchaSecret = process.env.RECAPTCHA_SECRET_KEY;
   const recaptchaUrl = `https://www.google.com/recaptcha/api/siteverify?secret=${recaptchaSecret}&response=${token}`;


   const response = await fetch(recaptchaUrl, { method: 'POST' });
   const result = await response.json();


   return result.success;
}


// Endpoint to handle form submission and send email
app.post('/send-email', async (req, res) => {
   const { name, email, subject, message, 'g-recaptcha-response': recaptchaToken } = req.body;


   if (!name || !email || !subject || !message || !recaptchaToken) {
       return res.status(400).json({ status: 'error', message: 'Missing required fields!' })
   }


   // Verify the reCAPTCHA token
   const isRecaptchaValid = await verifyRecaptcha(recaptchaToken);
   if (!isRecaptchaValid) {
       return res.status(400).json({
           status: 'error',
           message: 'reCAPTCHA verification failed. Please try again.'
       });
   }


   // Validate the email
   const validationResult = await validate(email);


   if (!validationResult.valid) {
       return res.status(400).json({
           status: 'error',
           message: 'Email is not valid. Please try again!',
           reason: validationResult.reason
       });
   }


   // Configure mailtrap client and define sender
   console.log(process.env.MAILTRAP_TOKEN);
   const client = new MailtrapClient({ token: process.env.MAILTRAP_TOKEN });
   const sender = { name: "NodeJS App", email: process.env.EMAIL_FROM };


   // Send email
   try {
       const response = await client.send({
           from: sender,
           to: [{ email: process.env.EMAIL_TO }],
           subject: subject,
           text: `From: ${name}\nEmail: ${email}\n\n${message}`,
       });


       console.log('Email sent: ', response.message_ids);
       res.status(200).json({
           status: 'success',
           message: 'Email successfully sent'
       });
   } catch (error) {
       console.log('Error:', error);
       res.status(500).json({ status: 'error', message: 'Failed to send email due to server error.' });
   }


});


app.listen(PORT, () => {
   console.log(`Server running on port ${PORT}`);
});
If you want to safely store your credentials in an environment variable, here’s what your .env should look like:
PORT=3200
MAILTRAP_TOKEN='7ff93fc2453461800734fb5c8bbe735d'
EMAIL_FROM='yourusername@email.com'
EMAIL_TO='contactformrecipient@yourmail.com'
RECAPTCHA_SECRET_KEY='SECRET-KEY'
And voila! Your Node.js contact form can now send emails via API.
Keep in mind that the code snippet I’ve shown you here is only for plain-text messages. If you wish to send HTML emails or add embedded images or attachments, please refer to the examples folder in the GitHub repository.
Test email and email sending on staging
If you’re making a contact form, the chances are that you’ll use it for collecting critical user information like email addresses, names, and other sensitive data.
Hence, you need to make sure that your contact form’s functionality is spot on and that your submitted forms are reaching the desired addresses as they’re supposed to.
And that’s exactly where email testing comes in—an industry-standard practice that makes sure your submission system is working as intended, that your emails are looking flawless, and more importantly, that your emails are not being marked as spam.
Personally, I use Mailtrap Email Testing, another integral part of Mailtrap Email Delivery Platform that offers a sandbox for you to inspect and debug emails in staging, dev, and QA environments.
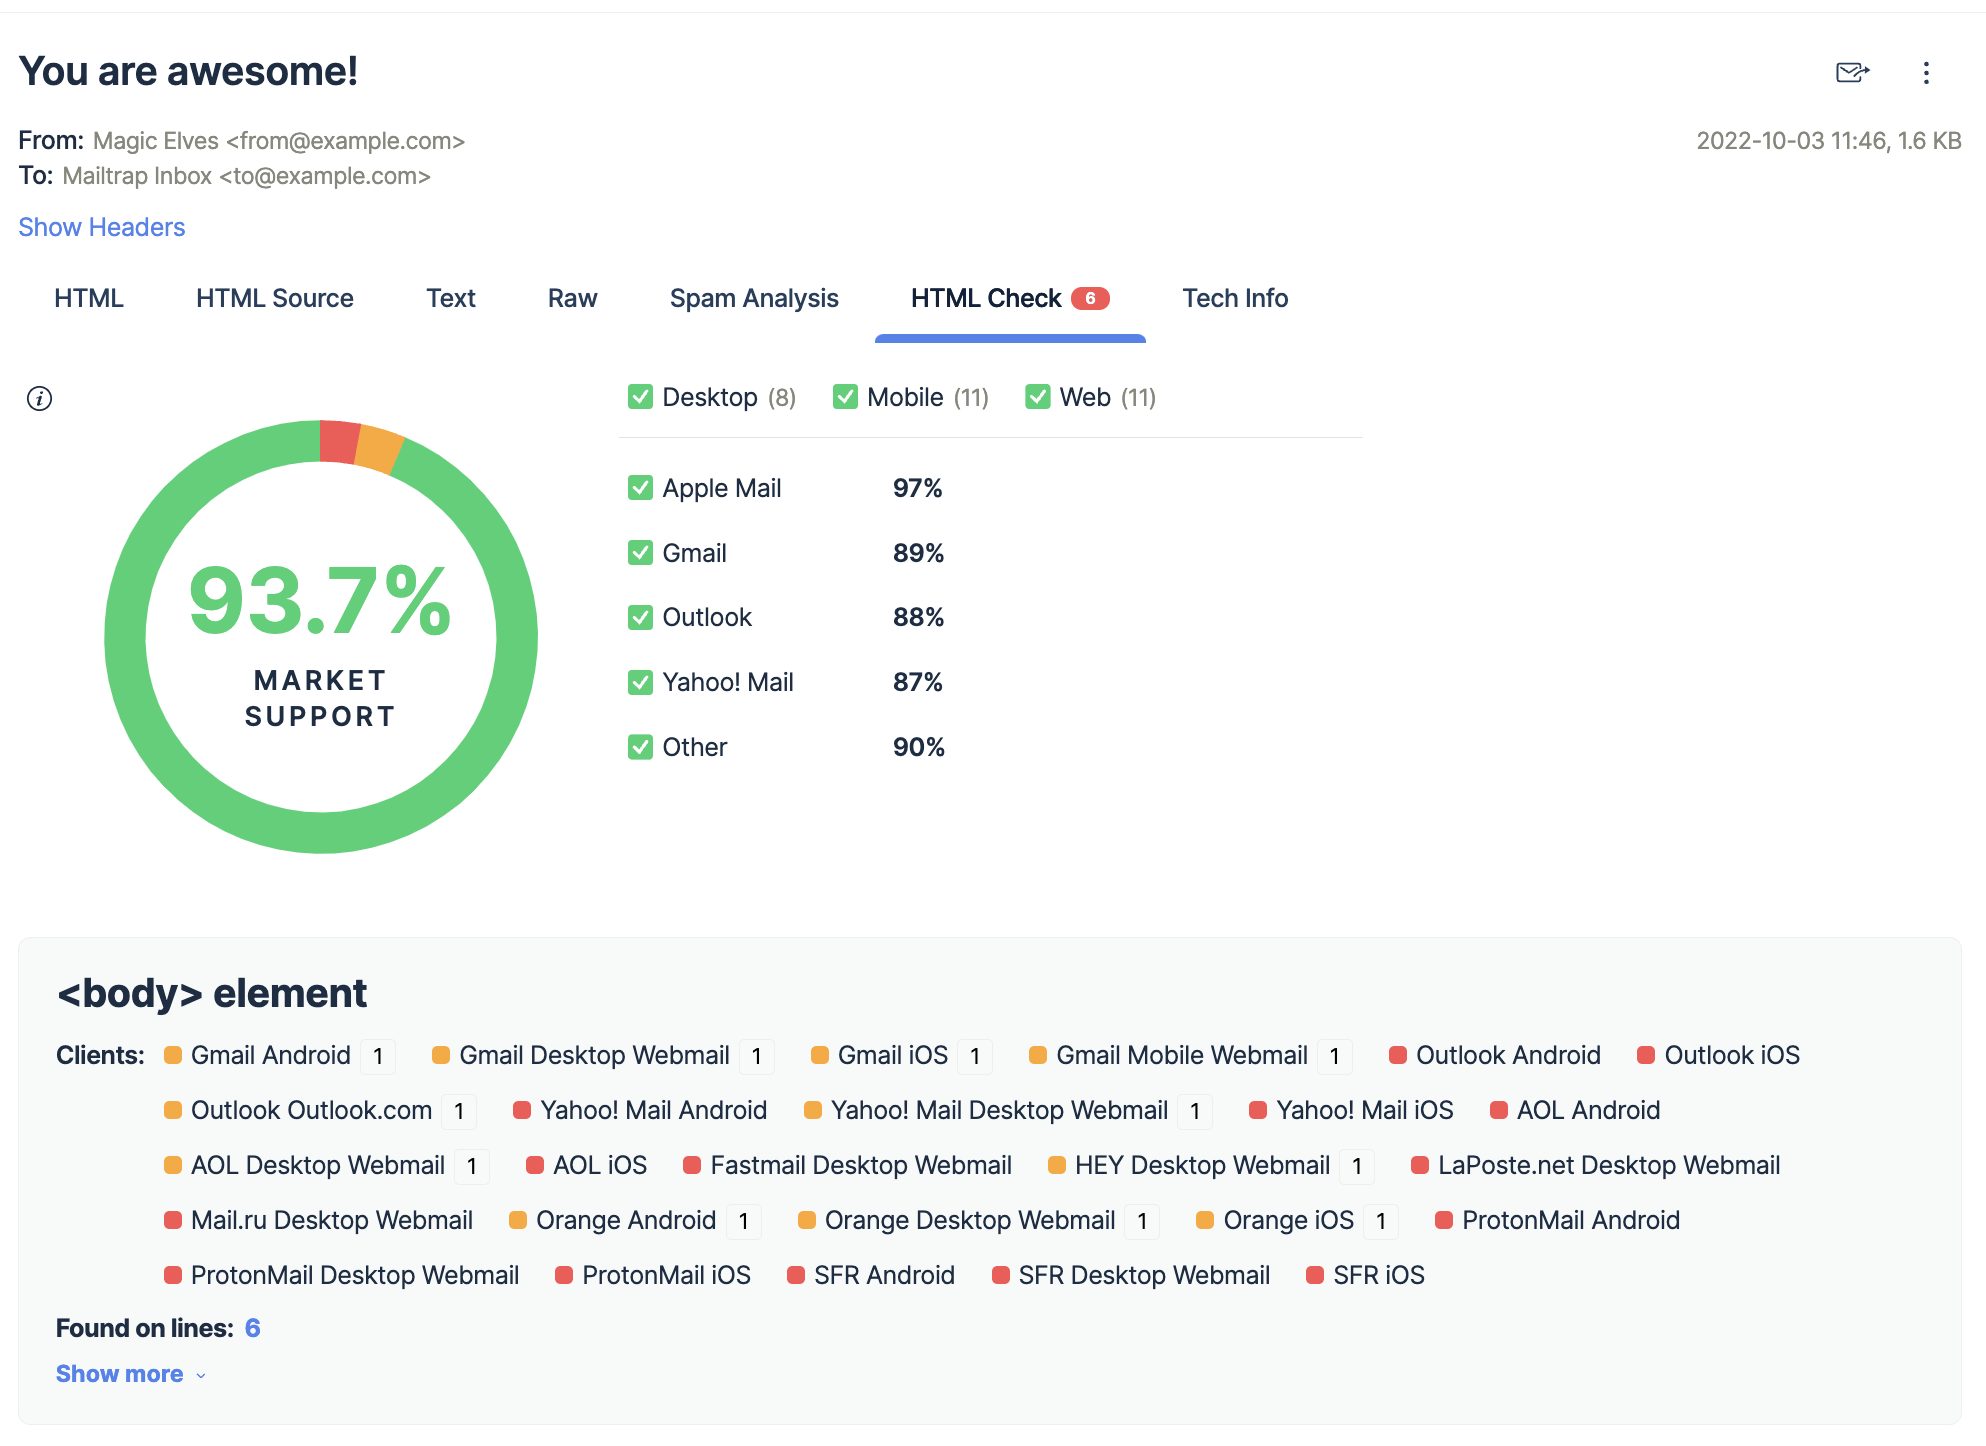
With Mailtrap Email Testing, you can preview how your emails look in different devices/clients, inspect their source HTML/CSS and easily fix any faulty lines of code.
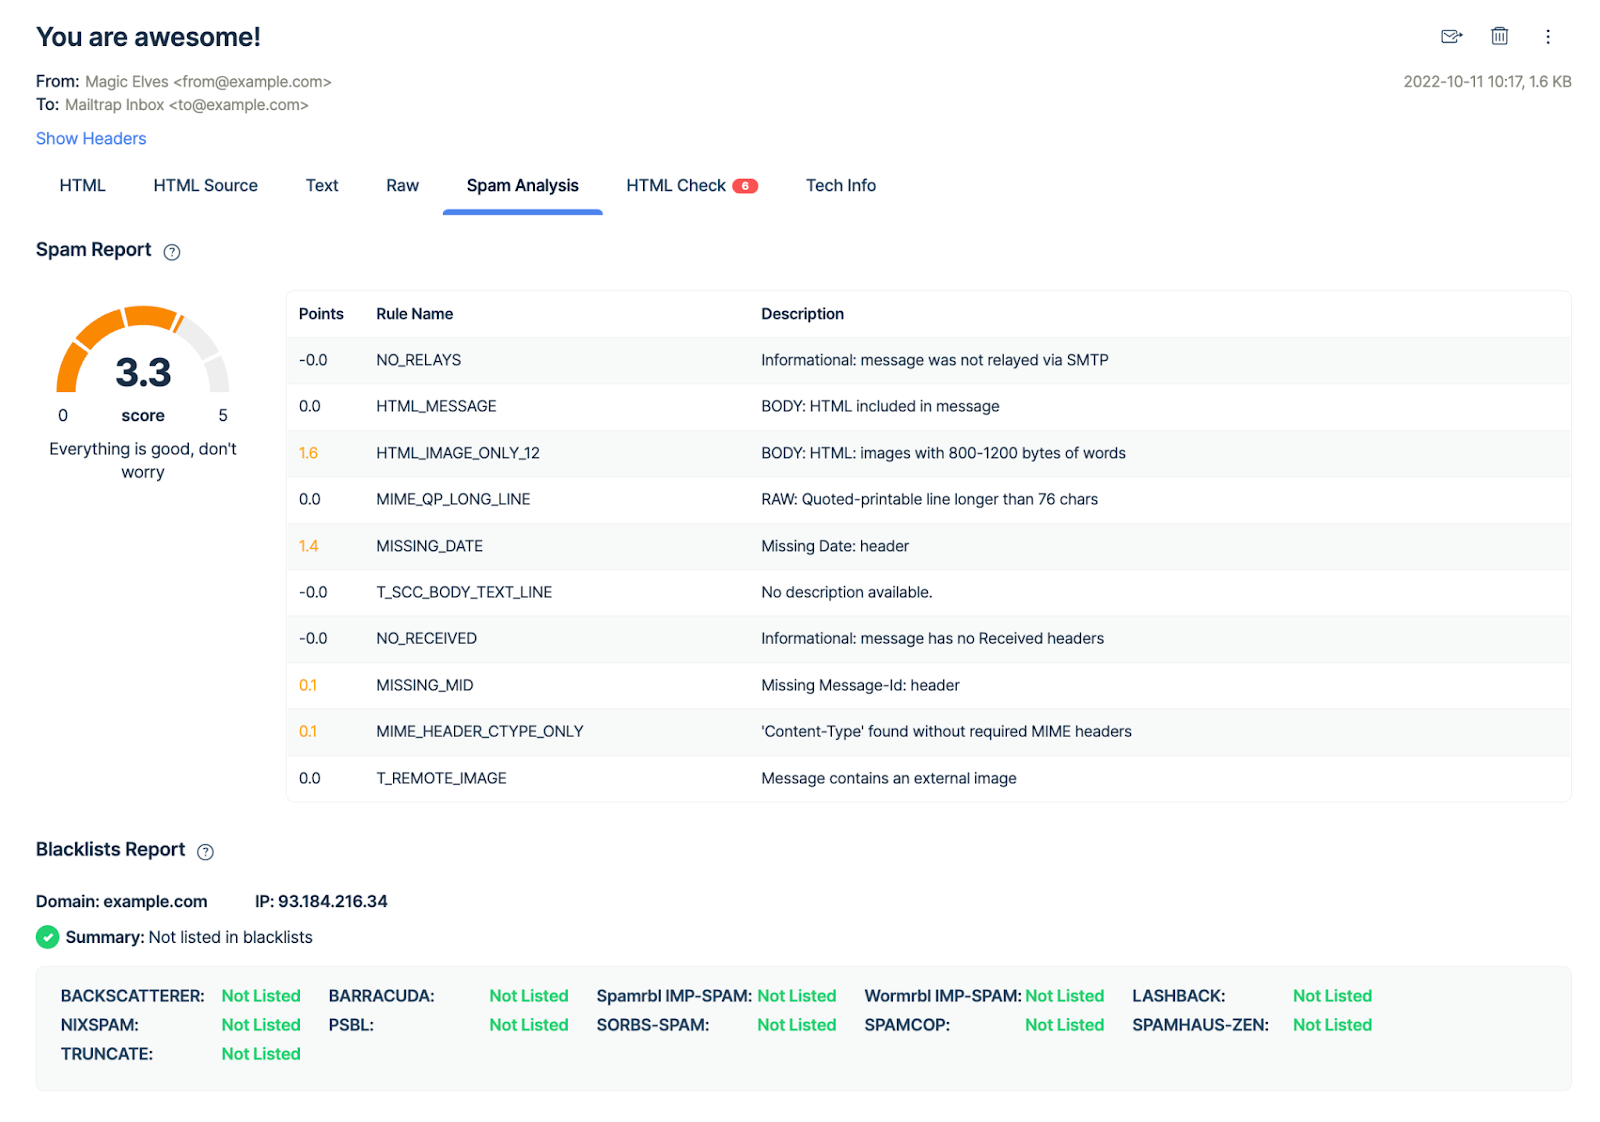
Additionally, thanks to the Spam Report feature, you will be aware of your spam score, which, if you keep under 5, prevents a considerable amount of potential email deliverability issues.
Besides these, you also get access to other features for improving your email deliverability, including:
Email preview in HTML form and raw text
Email Testing API for QA automation
Multiple inboxes for different projects and stages
User management, SSO
Email templates testing
Now, let me show you how it works!
SMTP
To start testing your emails with Nodemailer and SMTP, follow these steps:
Create a free Mailtrap account
Go to Email Testing and select your inbox
Copy your credentials from the Integration tab
Insert the credentials into your server.js file
You can also use Mailtrap’s ready-to-use integration, like so:
- Select Nodemailer from the list of integrations
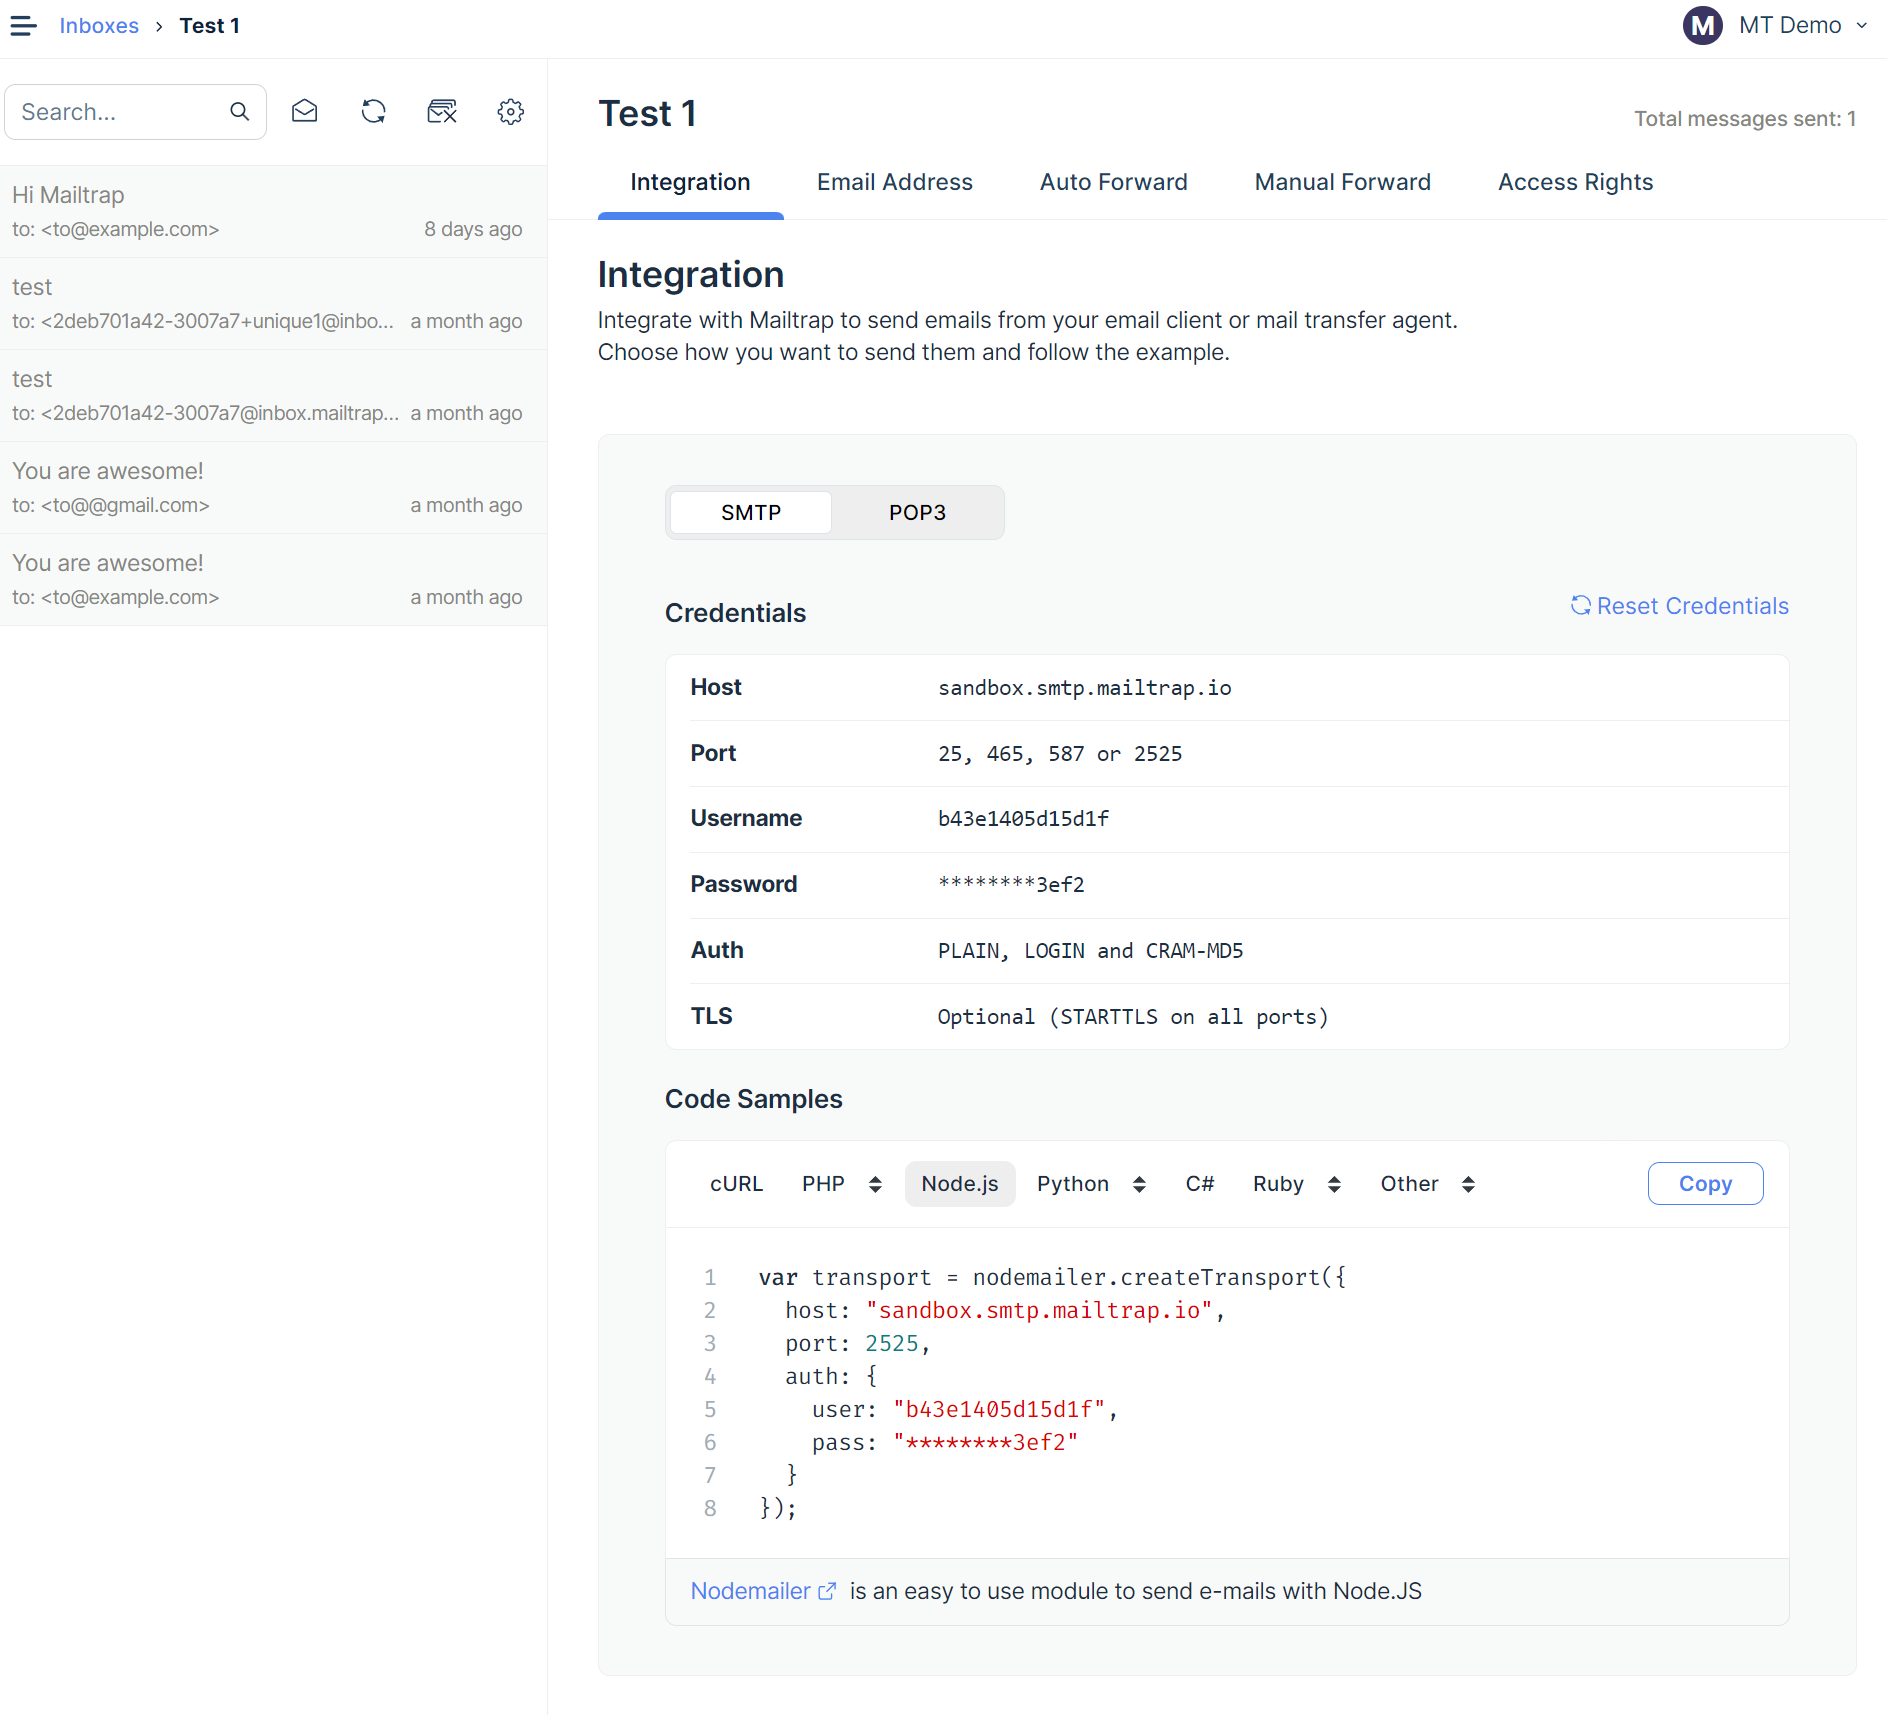
- Copy and paste the code snippet into your server.js file
Here’s what the snippet should look like:
const transport = nodemailer.createTransport({
  host: "sandbox.smtp.mailtrap.io",
  port: 2525,
  auth: {
    user: "1a2b3c4d5e6f7g",
    pass: "1a2b3c4d5e6f7g"
  }
});
Test Emails with Mailtrap for Free
API
Integrating Mailtrap Email Testing API for testing, automation, and testing automated sequences is as simple as using the following code snippet:
require('dotenv').config();
const { MailtrapClient } = require('mailtrap');
const nodemailer = require('nodemailer');


/* The official mailtrap package doesn't support sending test emails, so we send a mail first with nodemailer */


/* Initialize nodemailer with SMTP configuration from environment variables. */
const transport = nodemailer.createTransport({
   host: process.env.SMTP_HOST,
   port: process.env.SMTP_PORT,
   auth: {
       user: process.env.SMTP_USER,
       pass: process.env.SMTP_PASS
   }
});


/* Asynchronously send a test email using nodemailer. */
async function sendTestEmail() {
   const info = await transport.sendMail({
       from: process.env.EMAIL_FROM,
       to: "user@domain.com",
       subject: "Mailtrap Email Testing",
       html: '<h1>Mailtrap Email Testing</h1>',
       text: 'Mailtrap Email Testing'
   });


   console.log("Message sent: %s", info.messageId);
   return info;
}


/* Configure the Mailtrap client and fetch email information for testing and automation. */
const client = new MailtrapClient({
   token: process.env.MAILTRAP_TOKEN,
   testInboxId: process.env.TEST_INBOX_ID,
   accountId: process.env.ACCOUNT_ID
});


const inboxesClient = client.testing.inboxes;
const messagesClient = client.testing.messages;


/* Send the test email and then retrieve it from Mailtrap for analysis. */
sendTestEmail().then(() => {
   inboxesClient.getList()
       .then(async (inboxes) => {
           if (inboxes && inboxes.length > 0) {
               const firstInboxId = inboxes[0].id;
               console.log(`First inbox ID: ${firstInboxId}`);


               const messages = await messagesClient.get(firstInboxId);
               if (messages && messages.length > 0) {
                   const firstMessageId = messages[0].id;
                   console.log(`First message ID: ${firstMessageId}`);


                   const analysis = await messagesClient.getHtmlAnalysis(firstInboxId, firstMessageId);
                   console.log('HTML Analysis:', analysis);


                   const htmlMessage = await messagesClient.getHtmlMessage(firstInboxId, firstMessageId);
                   console.log('HTML Message:', htmlMessage);


                   const textMessage = await messagesClient.getTextMessage(firstInboxId, firstMessageId);
                   console.log('Text Message:', textMessage);


                   const headers = await messagesClient.getMailHeaders(firstInboxId, firstMessageId);
                   console.log('Mail Headers:', headers);


                   const eml = await messagesClient.getMessageAsEml(firstInboxId, firstMessageId);
                   console.log('Message as EML:', eml);


                   const htmlSource = await messagesClient.getMessageHtmlSource(firstInboxId, firstMessageId);
                   console.log('HTML Source:', htmlSource);


                   const rawMessage = await messagesClient.getRawMessage(firstInboxId, firstMessageId);
                   console.log('Raw Message:', rawMessage);


                   const spamScore = await messagesClient.getSpamScore(firstInboxId, firstMessageId);
                   console.log('Spam Score:', spamScore);


                   const emailMessage = await messagesClient.showEmailMessage(firstInboxId, firstMessageId);
                   console.log('Email Message:', emailMessage);


                   const updateStatus = await messagesClient.updateMessage(firstInboxId, firstMessageId, {
                       isRead: false
                   });
                   console.log('Update Status:', updateStatus);


                   // Forward the message (needs to be a confirmed email for forwarding in mailtrap)
                   // await messagesClient.forward(firstInboxId, firstMessageId, 'mock@mail.com');
                   // console.log('Message forwarded.');


                   // Delete the message
                   const response = await messagesClient.deleteMessage(firstInboxId, firstMessageId);
                   console.log('Delete Response:', response);


               } else {
                   console.log('No messages found in the first inbox.');
               }
           } else {
               console.log('No inboxes found.');
           }
       })
       .catch(error => {
           console.error('Error fetching inboxes or messages:', error);
       });
}).catch(console.error);
With this code, we are first sending a test email using Nodemailer and retrieving the information related to the test email programmatically. This can potentially be used to perform automation. This code only logs the information of the test email.
And of course, here’s what your .env file should look like for the Email Testing API:
MAILTRAP_TOKEN=''
SMTP_HOST='sandbox.smtp.mailtrap.io'
SMTP_PORT=2525
SMTP_USER=''
SMTP_PASS=''
EMAIL_FROM=''
TEST_INBOX_ID=
ACCOUNT_ID=
For more information and use cases of Mailtrap Email Testing API, check out the official GitHub page.
Wrapping up
And with that, we’ve come to the end of the line!
Now that you’ve got the ropes, you can style your Node.js contact form according to your artistic eye and make it function according to your application’s specific needs.
So, code away, and be sure to give our blog a read! We have a plethora of helpful JavaScript-related articles, including:
We appreciate you chose this article to find out how to create a Node.js contact form. If you want to see more content on related topics, visit Mailtrap blog and explore it!
Subscribe to my newsletter
Read articles from Ivan directly inside your inbox. Subscribe to the newsletter, and don't miss out.
Written by
Ivan
Ivan
As a Technical Content Writer with 5 years of experience, I specialize in covering email-related topics, collaborating closely with software engineers and email marketers. My goal is to provide you with thoroughly researched and actionable insights on email sending, testing, deliverability, and beyond. I'm eager to lend you a hand in navigating the intricate world of emails!