Pgpool-II with PostgreSQL
 Ahona Das
What is Pgpool-II?
Pgpool-II is a middleware that can run on Linux and Solaris between applications and PostgreSQL databases.
Its main features include the following:
Load balancing
Replication
Connection pooling
Automatic failover
Online recovery
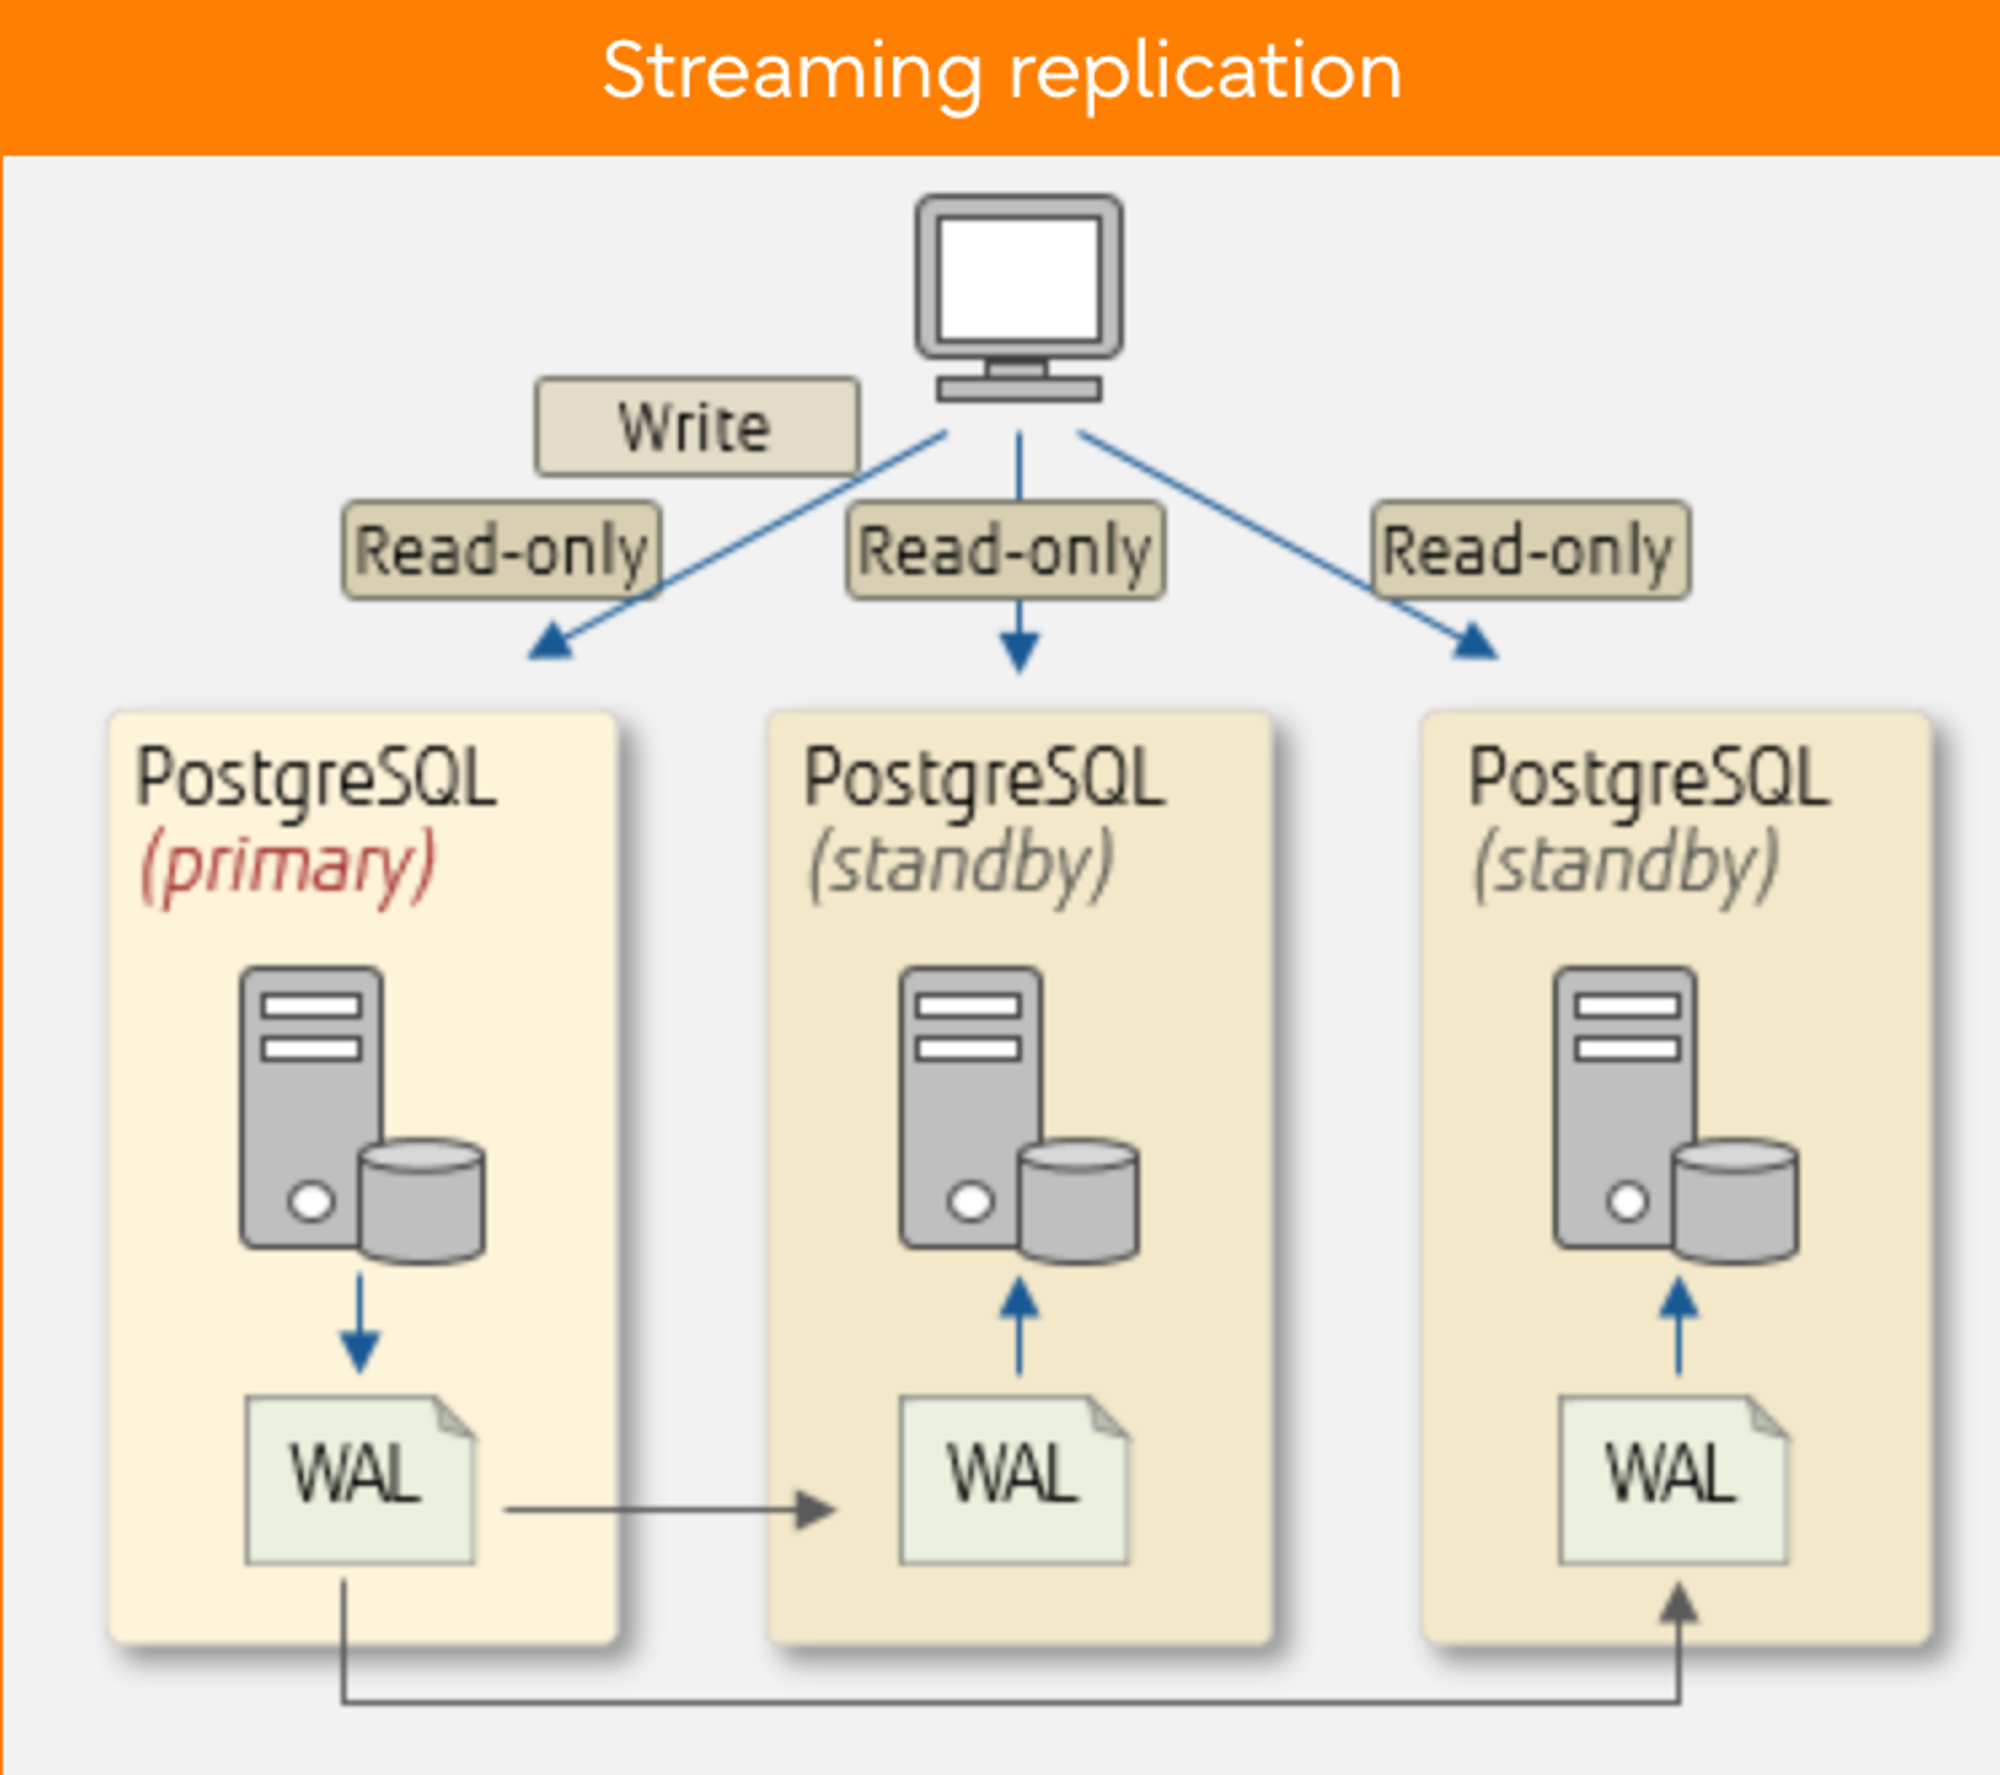
Streaming Replication
Pgpool-II can use its replication capabilities or those provided by other software, but PostgreSQL's streaming replication is often recommended. Streaming replication is a feature that replicates databases by shipping transaction logs (WALs) of PostgreSQL (primary) to multiple instances of PostgreSQL (standby).
Load Balancing and Connection Pooling
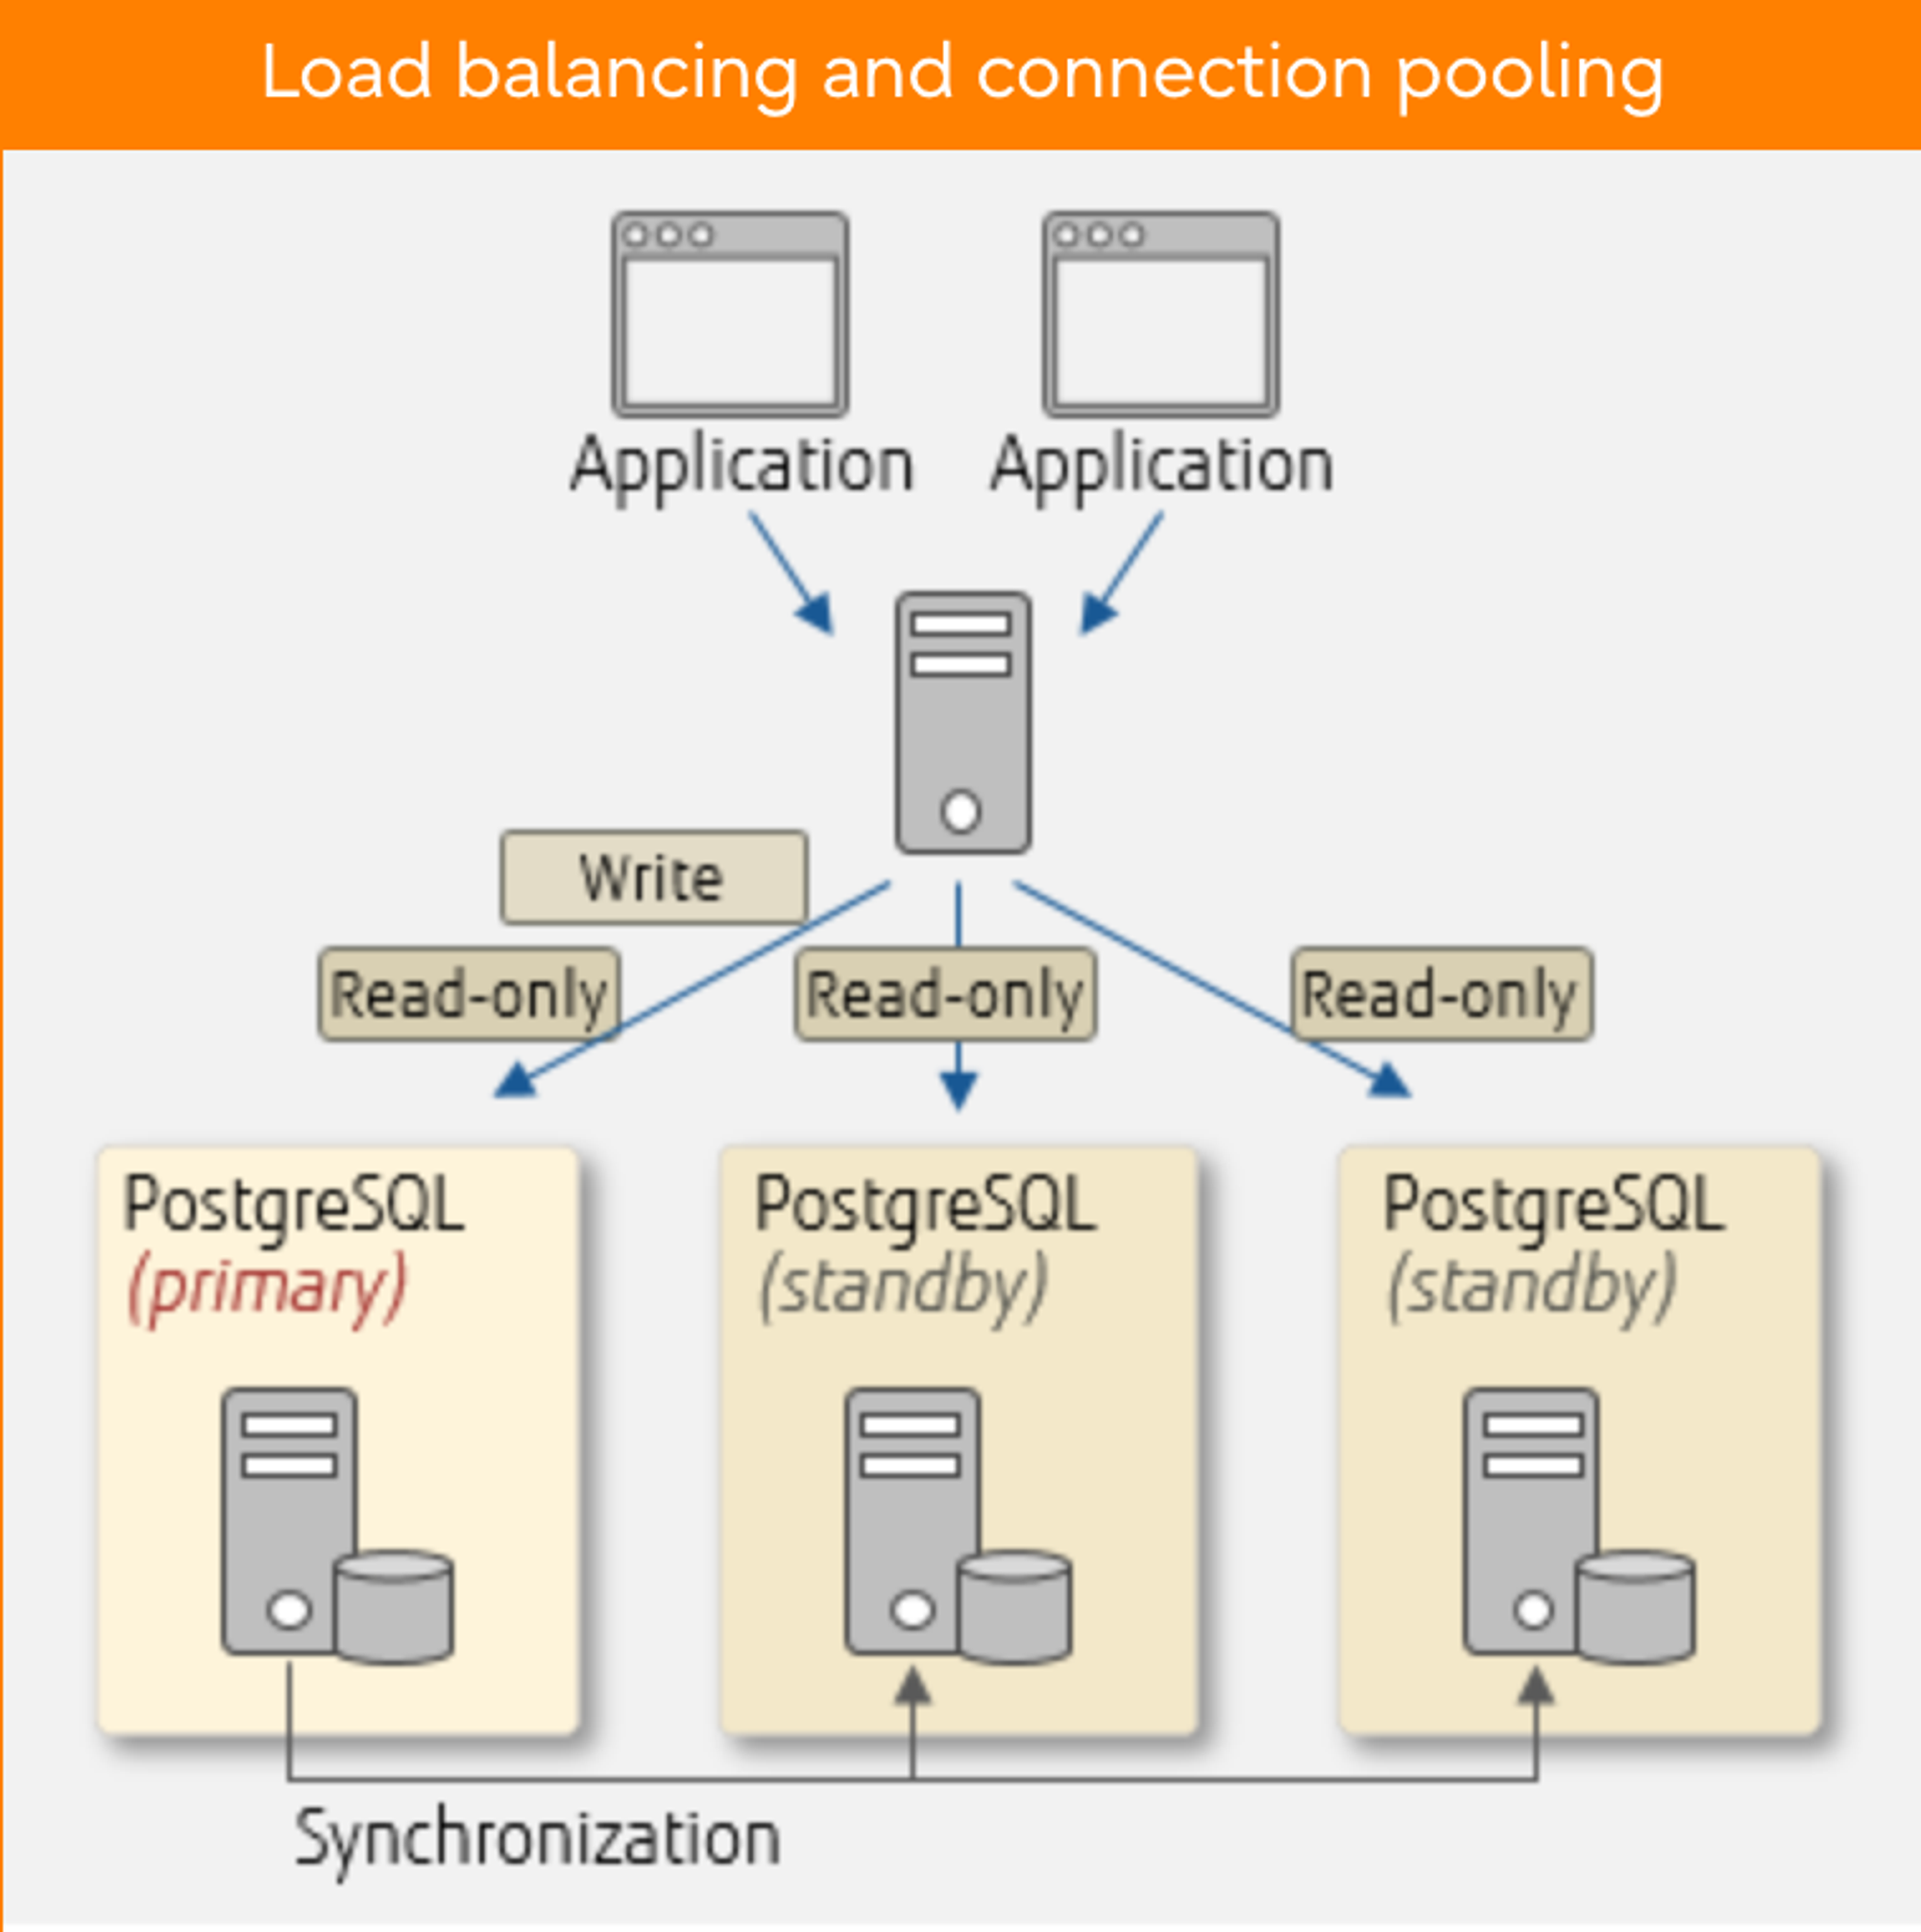
Scale-out is one way to increase the processing capacity of the entire database system by adding servers. PostgreSQL allows you to scale out using streaming replication. Efficiently distributing queries from applications to database servers is essential in this scenario. PostgreSQL itself does not have a distribution feature, but you can utilise the load balancing of Pgpool-II, which efficiently distributes read-only queries to balance workload.
Another great Pgpool-II feature is connection pooling. Using connection pooling of Pgpool-II, connections can be retained and reused, reducing the overhead that will occur when connecting to database servers.
In this article, we mainly concentrate on the replication and load-balancing features of Pgpool-II.
Steps to Follow to Set Up and Implement Pgpool-ll
In this article, I have used the Ubuntu-22 operating system. If you are using any other operating system please refer to this document.
Here, we are using PostgreSQL’s feature called streaming replication as mentioned above which sets up a master slave upon which we are configuring the Pgpool-II.
Since we require the master-slave streaming replication provided by PostgreSQL. Let us see what is streaming replication and how can we set it up.
Setup Master-slave Architecture for PostgreSQL Servers
What is Master-slave replication?
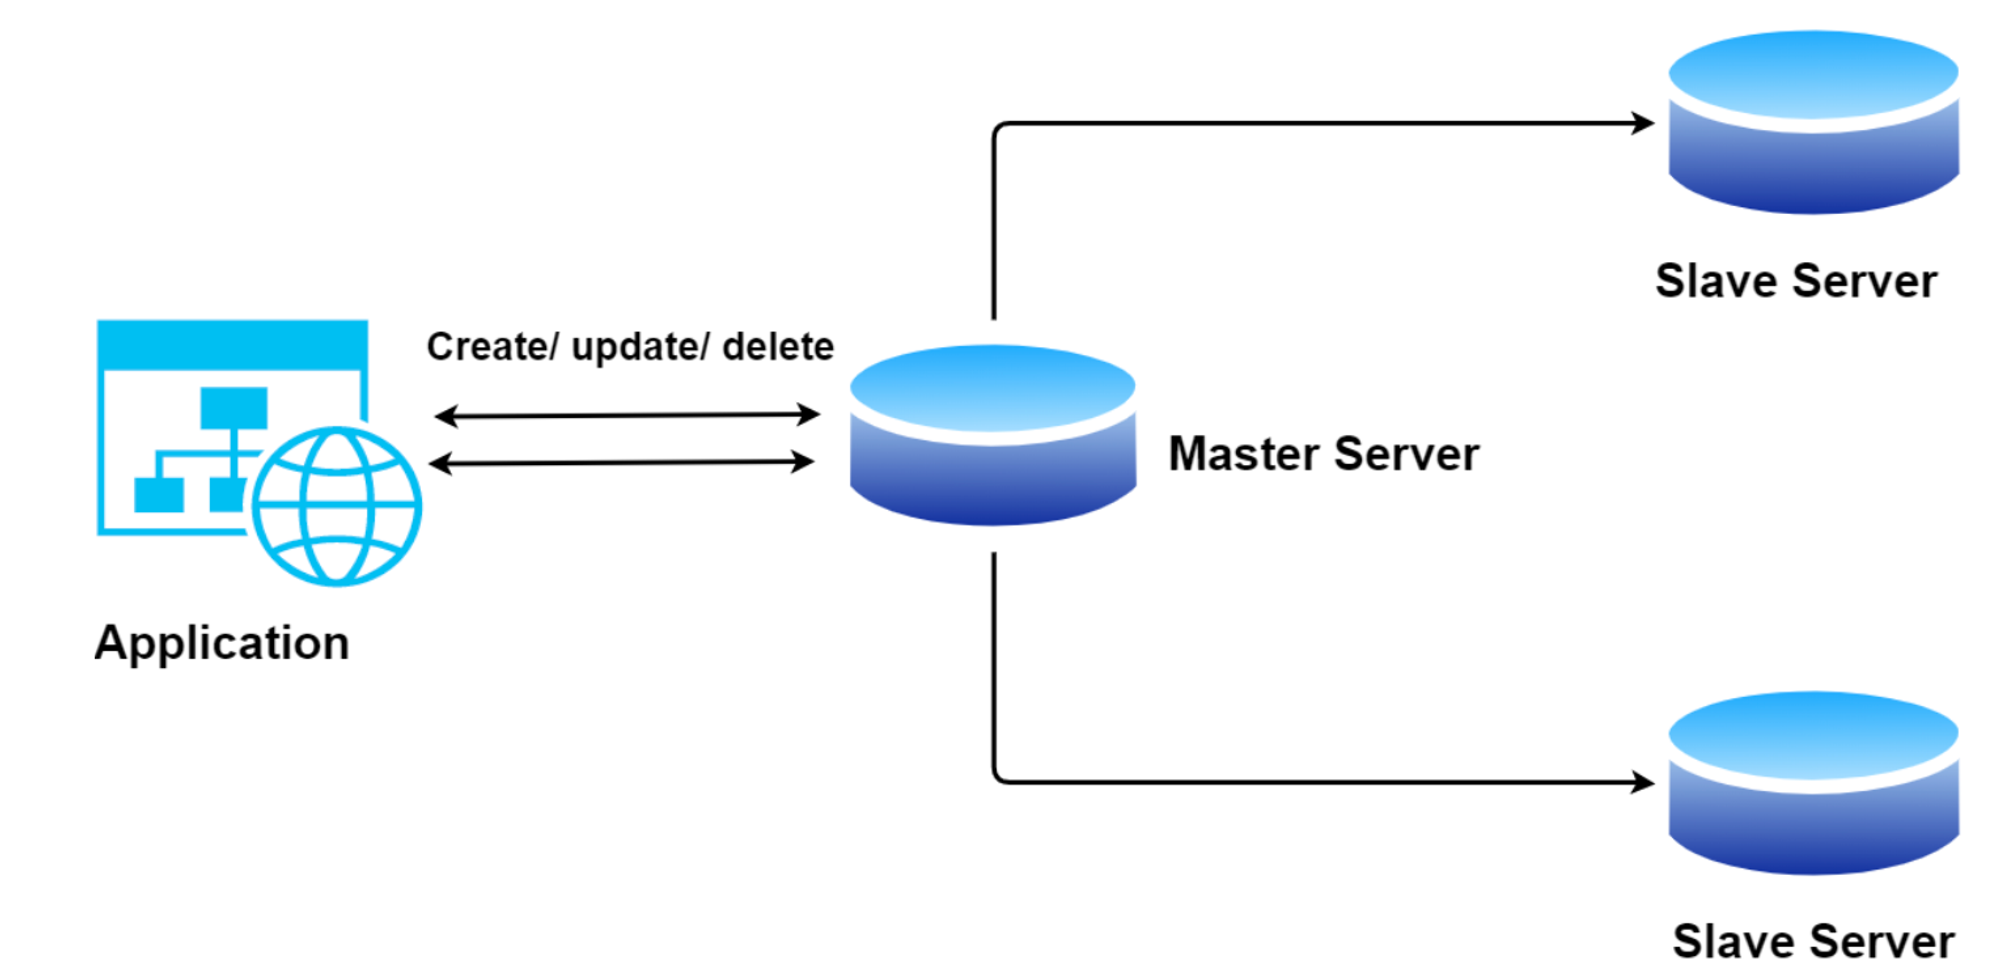
The master-slave database replication is a process of copying (syncing) data from a database on one server (the master) to a database on another server (the slaves) and distributing the read/write request load as per the system requirements. Where the Master is responsible for the read/write operations in the server and slaves are responsible for read-only operations in the servers.
In this article, we will use PostgreSQL Streaming Replication to develop a master-slave configuration. But before moving forward with the setup, I have a few questions.
What is Streaming replication?
Streaming replication allows a standby(slave) server to stay more up-to-date than is possible with file-based log shipping. The slave connects to the master, which streams WAL records to the slave once they are generated, without waiting for the WAL file to be filled.
Pre-requisite:
Install PostgreSQL on both servers, i.e. master and slave.
Both servers should be able to communicate with each other.
If you have not installed PostgreSQL on your servers, please follow this to install it.
Ubuntu:
apt install postgresqlAlma / CentOS:
yum install postgresql
If you are using any other operating systems please refer to this document to install PostgreSQL.
Configure The Master Slave
There are four things we have to do on the Master server:
- Enable Networking:
The first thing is to change postgresql.conf, The file can be found in /etc/postgresql/16/main/ of the main cluster. Here is how this works:
Open the conf file using vim /etc/postgresql/16/main/postgresql.conf.
(This path may vary according to your PostgreSQL version you are using.)
Change the listen_addresses = '*' which allows the server to listen from all the servers over the internet.


- Create a Replication User:
Now create a replication user which will be used for data replication over the master.
Login to the PostgreSQL terminal and execute the following command.
CREATE USER repuser WITH LOGIN REPLICATION;
This command can create a user for replication with login privileges.
- Allow Remote Access:
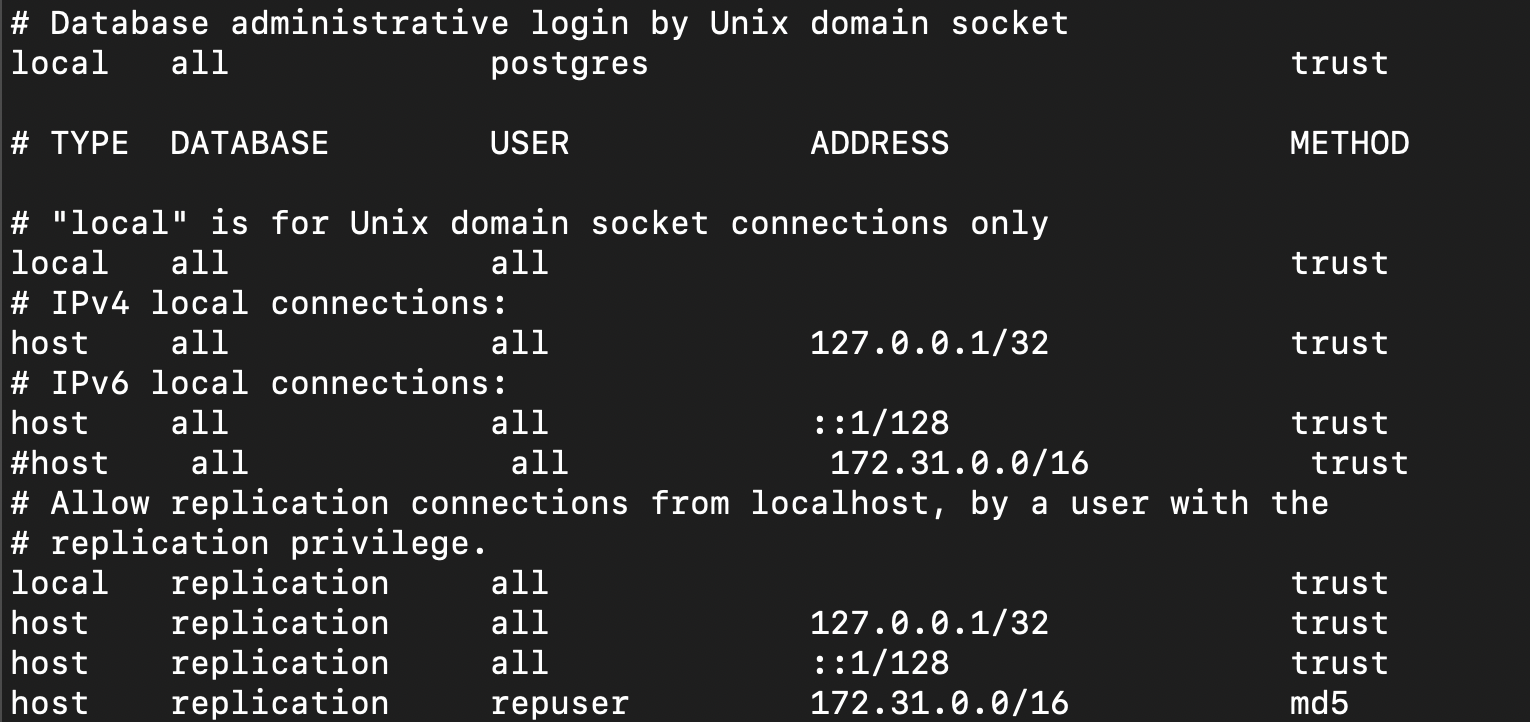
Once you have successfully created a user with REPLICATION permission, configure the pg_hba.conf file located at /etc/postgresql/16/main/.
host replication repuser 172.31.0.0/16 md5
Add the above line to the file.
What this does is allow replication for user from any server that belongs to 172.31.0.0/16CIDR block with md5 encrypted password. You can change the CIDR according to your requirements.
- Restart the Master Server:
By restarting the master server, this will apply all the new changes to the master server.
systemctl restart postgresql@16-main
Configure The Slave Server
The next step is to create the Slave. There are various things we need to do to make this work. First, ensure the replica is stopped and the data directory is empty.
To make sure you stop the PostgreSQL service on the slave server. Run
systemctl stop postgresql@16-mainNext, go to
/var/lib/postgresql/16/. Remember the path might vary for the version you are using
It is always recommended to create a safety backup. That is if any failure occurs in the process, we can have the old data which we can use to restore. Follow the below steps for the backup process.
mv main main_backup
mkdir main
Open the conf file using vim /etc/postgresql/16/main/postgresql.conf.
(This path may vary according to the PostgreSQL version you are using.)
Change the listen_addresses = '*' which allows the server to listen from all the servers over the internet.

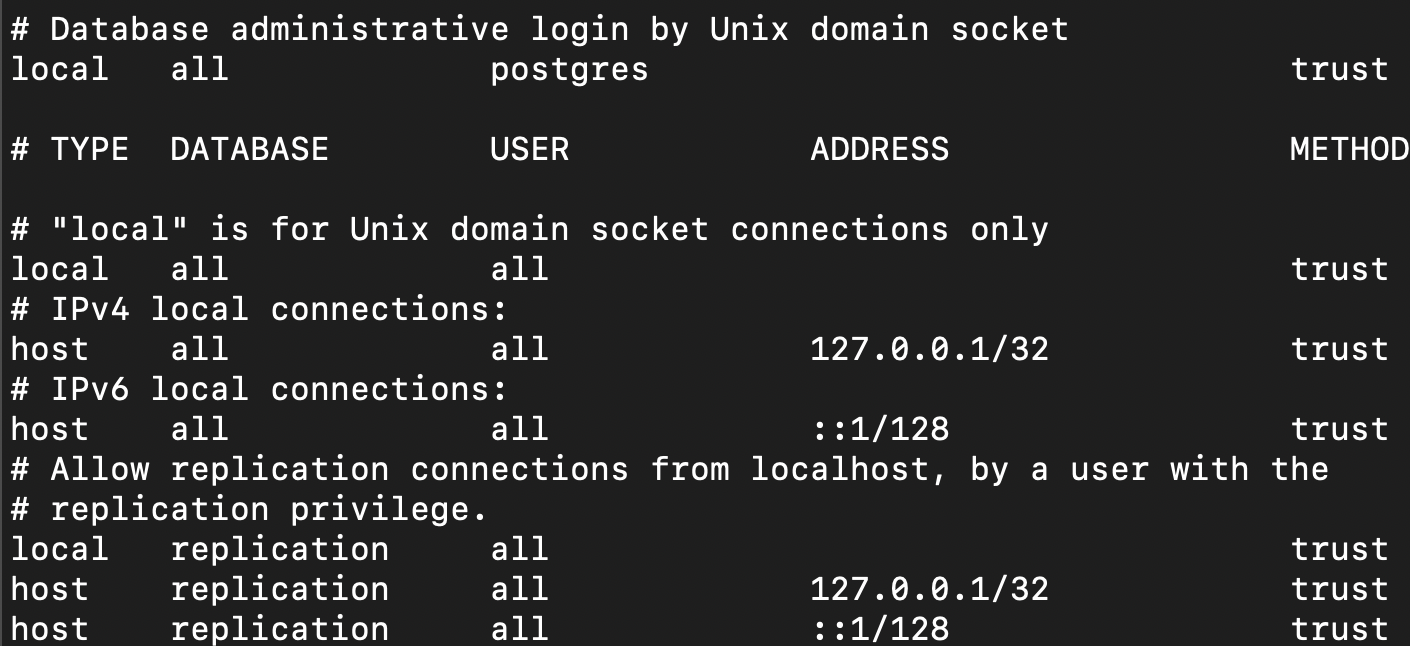
- Configure the pg_hba.conf file located at /etc/postgresql/16/main/.
Change the authentication method to trust as shown below. So that we don’t have to use password to access PostgreSQL in the same server.
- Command for slave replication base backup and setting it up.
pg_basebackup -h 172.31.3.42 -U repuser --checkpoint=fast -D /var/lib/postgresql/16/main/ -R --slot=replication -C --port=5432
This will take a real-time backup from the master server and allocate a slot for replication from the master server to the current slave server.
- Since we ran this command as root user we need to change the permission of main folder to Postgres user so that the Postgres can access the data from here.
Use chown -R postgres:postgres /var/lib/postgresql/16/main
This will change the permission to Postgres user.
- Restart the slave server.
Use systemctl restart postgresql@16-main to restart the slave server. Now, we can verify the replication between them.
Verify the Master-Slave Replication
Run the below command on Master server:
Login PostgreSQL database service.
SELECT * FROM pg_replication_slots WHERE active = true;
You will get the slot names of whichever is active. If the slot you created exist then the replication is successful.
Also you can try the below command to test it.
select * from pg_stat_replication;
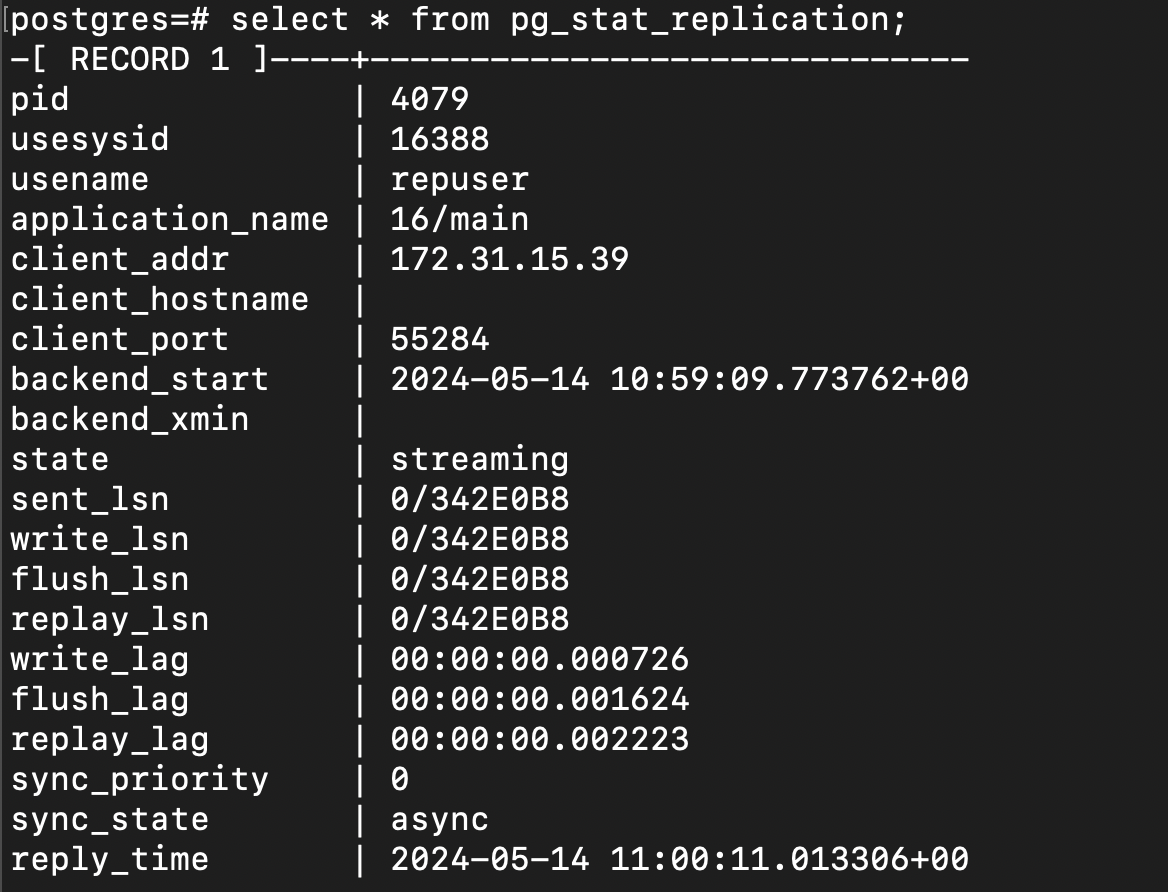
Run this command on slave server:
Login to the PostgreSQL service and run the below command.
select * from pg_stat_wal_receiver;
You will get the output something like the below image. You can verify the replication by referring to the conninfo row.

Pgpool-II Implementation
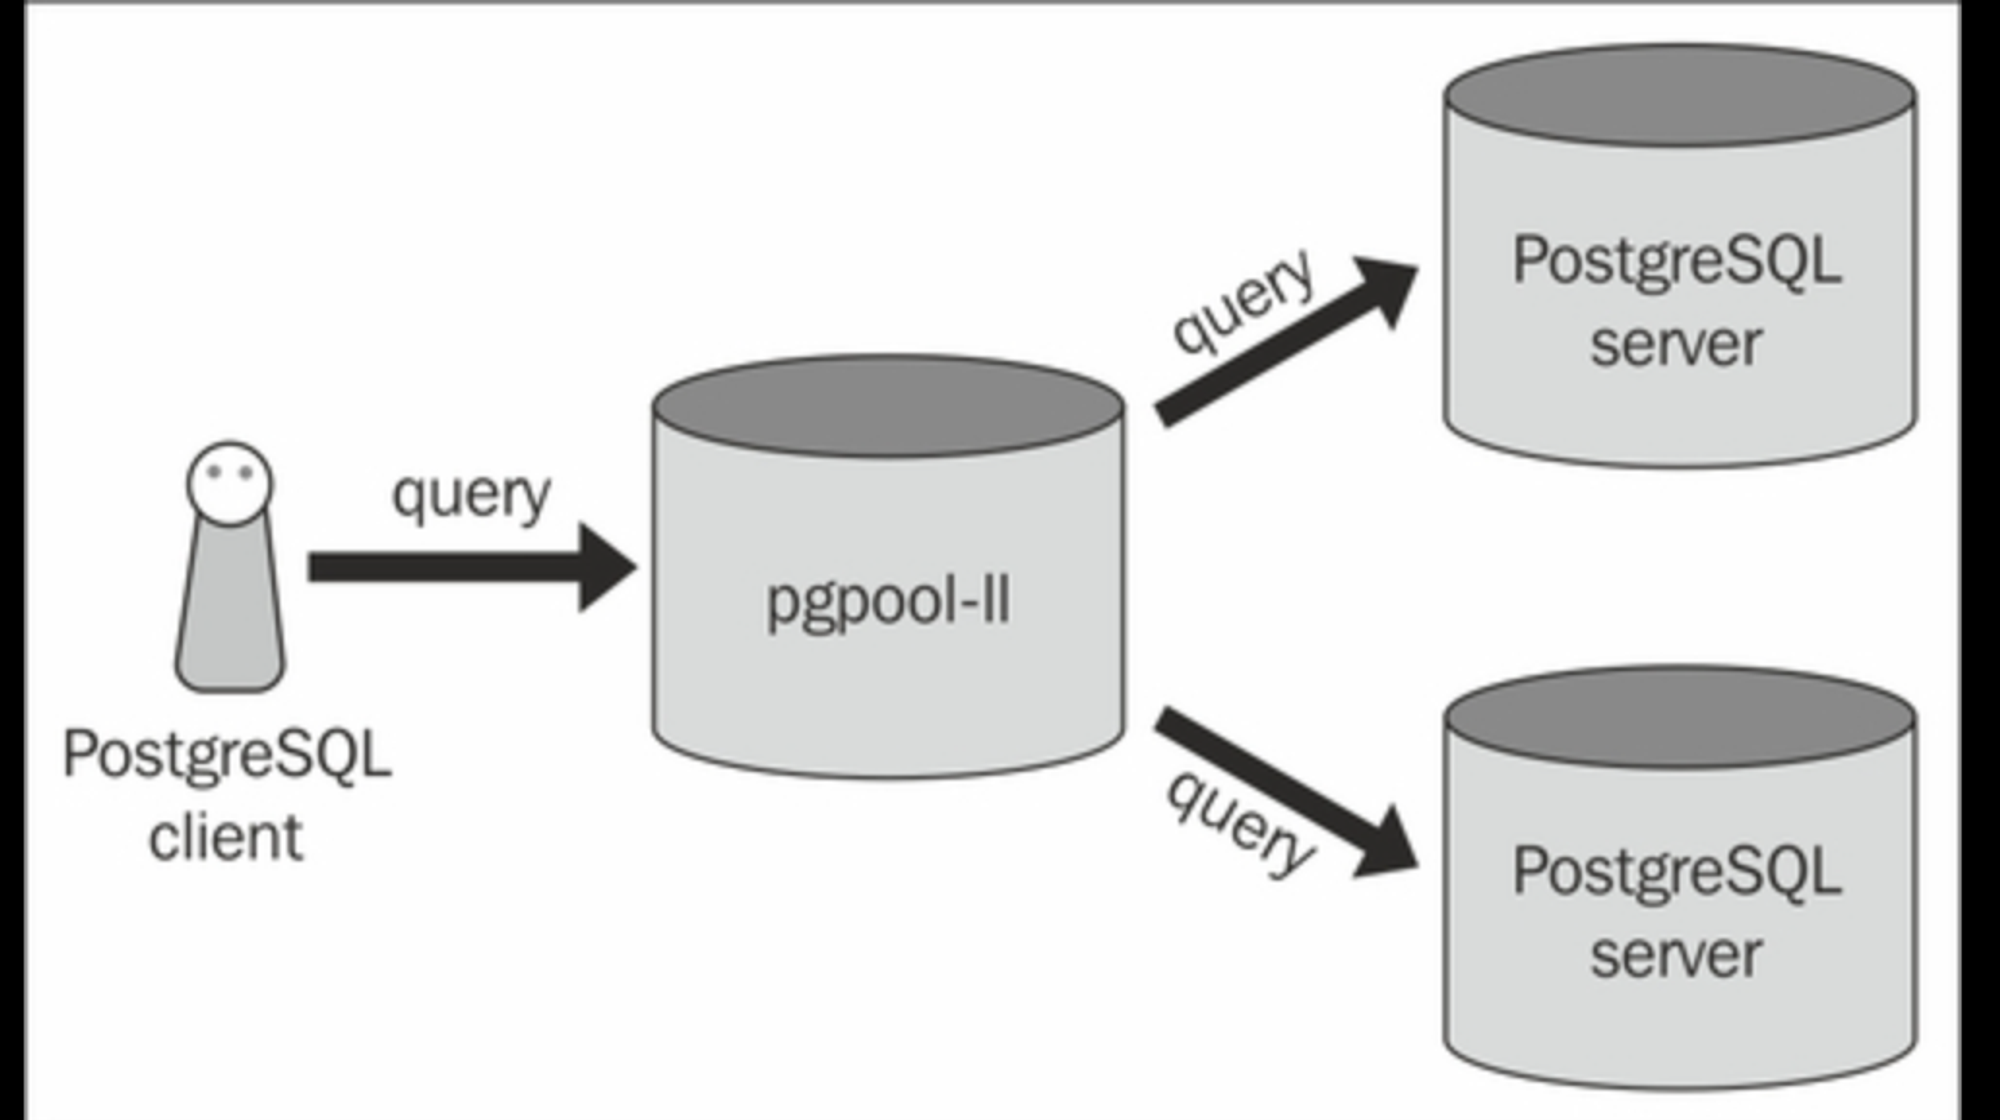
Now let us start with the setup of Pgpool-II. Here I am setting up the Pgpool-II on the master server itself. You can configure it on any server provided it can communicate with the PostgreSQL servers that you will be registering in the future. Using a private network is recommended to avoid vulnerability.
Install Pgpool-II
Ubuntu: apt install pgpool2
For any other operating systems please refer to this document to install Pgpool-II
Setup Pgpool
Open the /etc/postgresql/16/main/pg_hba.conf file on servers and add an entry for pgpool-II server to connect to your PostgreSQL server.
In my case it’s 172.31.0.0/16 as both master and slave server come under this CIDR network block. Now this allows all the servers in this block to connect without a password.
host all all 172.31.0.0/16 trust
Open /etc/pgpool2/pgpool.conf and we will making many changes in the config file and I’ll also let you know why we are doing it.
Change the default listen addresses to ‘*’
listen_addresses=’*’;
port=’9999’;
Adding host - 0 (master in my case):
backend_hostname0 = '172.31.3.42' #master server information
backend_port0 = 5432
backend_weight0 = 0
backend_data_directory0 = '/var/lib/postgresql/16/main'
backend_flag0 = 'ALLOW_TO_FAILOVER'
backend_application_name0 = 'server0'
Adding host -1 (slave in my case):
backend_hostname1 = '172.31.15.39' #slave server information
backend_port1 = 5432
backend_weight1 = 1
backend_data_directory1 = '/var/lib/postgresql/16/main'
backend_flag1 = 'ALLOW_TO_FAILOVER'
backend_application_name1 = 'server1'
Here hostname refers to the server’s IP / Hostname which we are trying to register to the Pgpool-II.
Port refers to the PostgreSQL server’s listening port and data_directory refers to the folder where the PostgreSQL database data exist.
Weight refers to the ratio of how we have decided to distribute the traffic across the nodes or say PostgreSQL servers.
We can also add more hosts by adding suffixes to the backend variables eg: backend_hostname2 and so on.
To add authentication to the Pgpool-II. Since we are using the PostgreSQL servers on trust it’s better to use Pgpool-II with password or say authentication. The request is done to the Pgpool-II server and the Pgpool-II will redirect the requests to the registered hosts.
Authentication
enable_pool_hba = on                # Use pool_hba.conf for client authentication
pool_passwd = 'pool_passwd'
Here, enable_pool_hba = on sets Pgpool-II to use pool_hba to check whether the requesting client is allowed to send a request or not. If the requesting client does not have permissions registered in pool_hba.conf the connection will be rejected.
And pool_passwd = ‘pool_passwd’ specifies which file should Pgpool-II use to authenticate the user. This pool_passwd file will have the list of user and their password in md5 format.
Log all Statements
log_statement = on
log_per_node_statement = on
load_balance_mode = on
This allows us to get the logs for statements / requests ran on the server and also logs of each node for the statements / requests executed on the server.
Streaming Replication Health
sr_check_period = 10
sr_check_user = 'postgres'
sr_check_password = ''
sr_check_database = 'postgres'
Here, these vars will help Pgpool-II to know the streaming replication health status i.e. whether it’s active or not.
Health Check Global Parameters
health_check_period = 10
health_check_timeout = 20
health_check_user = 'postgres'
health_check_password = ''
health_check_database = 'postgres'
These are some of the variables which are used to perform health checks on all the server by Pgpool-II to maintain and drop connections from active and inactive servers repectively.
Now that the configuration file changes are complete. Let us move on to Pgpool-II authentication.
As we had mentioned above in the config file about the pool_passwd which stores the password authentication. Here I’ll show you how do we create a user and password entry to this file.
Please use the following command to create a user and password entry in the pool_passwd file.
Execute - pg_md5 --md5auth -f /etc/pgpool2/pgpool.conf -u postgres -p .
This will prompt the user to enter the password for the user postgres. Upon entering the password it’ll add a line with user postgres and it’s password entered by user in md5 format.

Now open the /etc/pgpool2/pool_passwd. You should see the Postgres user and it’s encrypted password in this file.

Now let us start with the pool_hba.conf file configuration. Since we have made the enable_pool_hba = on , the Pgpool-II will check whether client who is requesting for connection is valid or not.
Open the /etc/pgpool2/pool_hba.conf .
Adding the below line allows the Pgpool-II to accept connection from any server provided they request with a correct password. As we are using md5 instead of trust it demands password.
host all all 0.0.0.0/0 md5

Restart the pgpool2.service
systemctl restart pgpool2.service
Please use psql -p 9999 -u postgres -W to connect through Pgpool2 like we do with PostgreSQL
(Since we have configured pgpool2 port to 9999 in the pg_pool.conf config file.)
Here I have provided a reference image below. where I have logged into Pgpool-II and viewed the nodes available. You can use SHOW POOL_NODES; to view all the nodes and all their information.
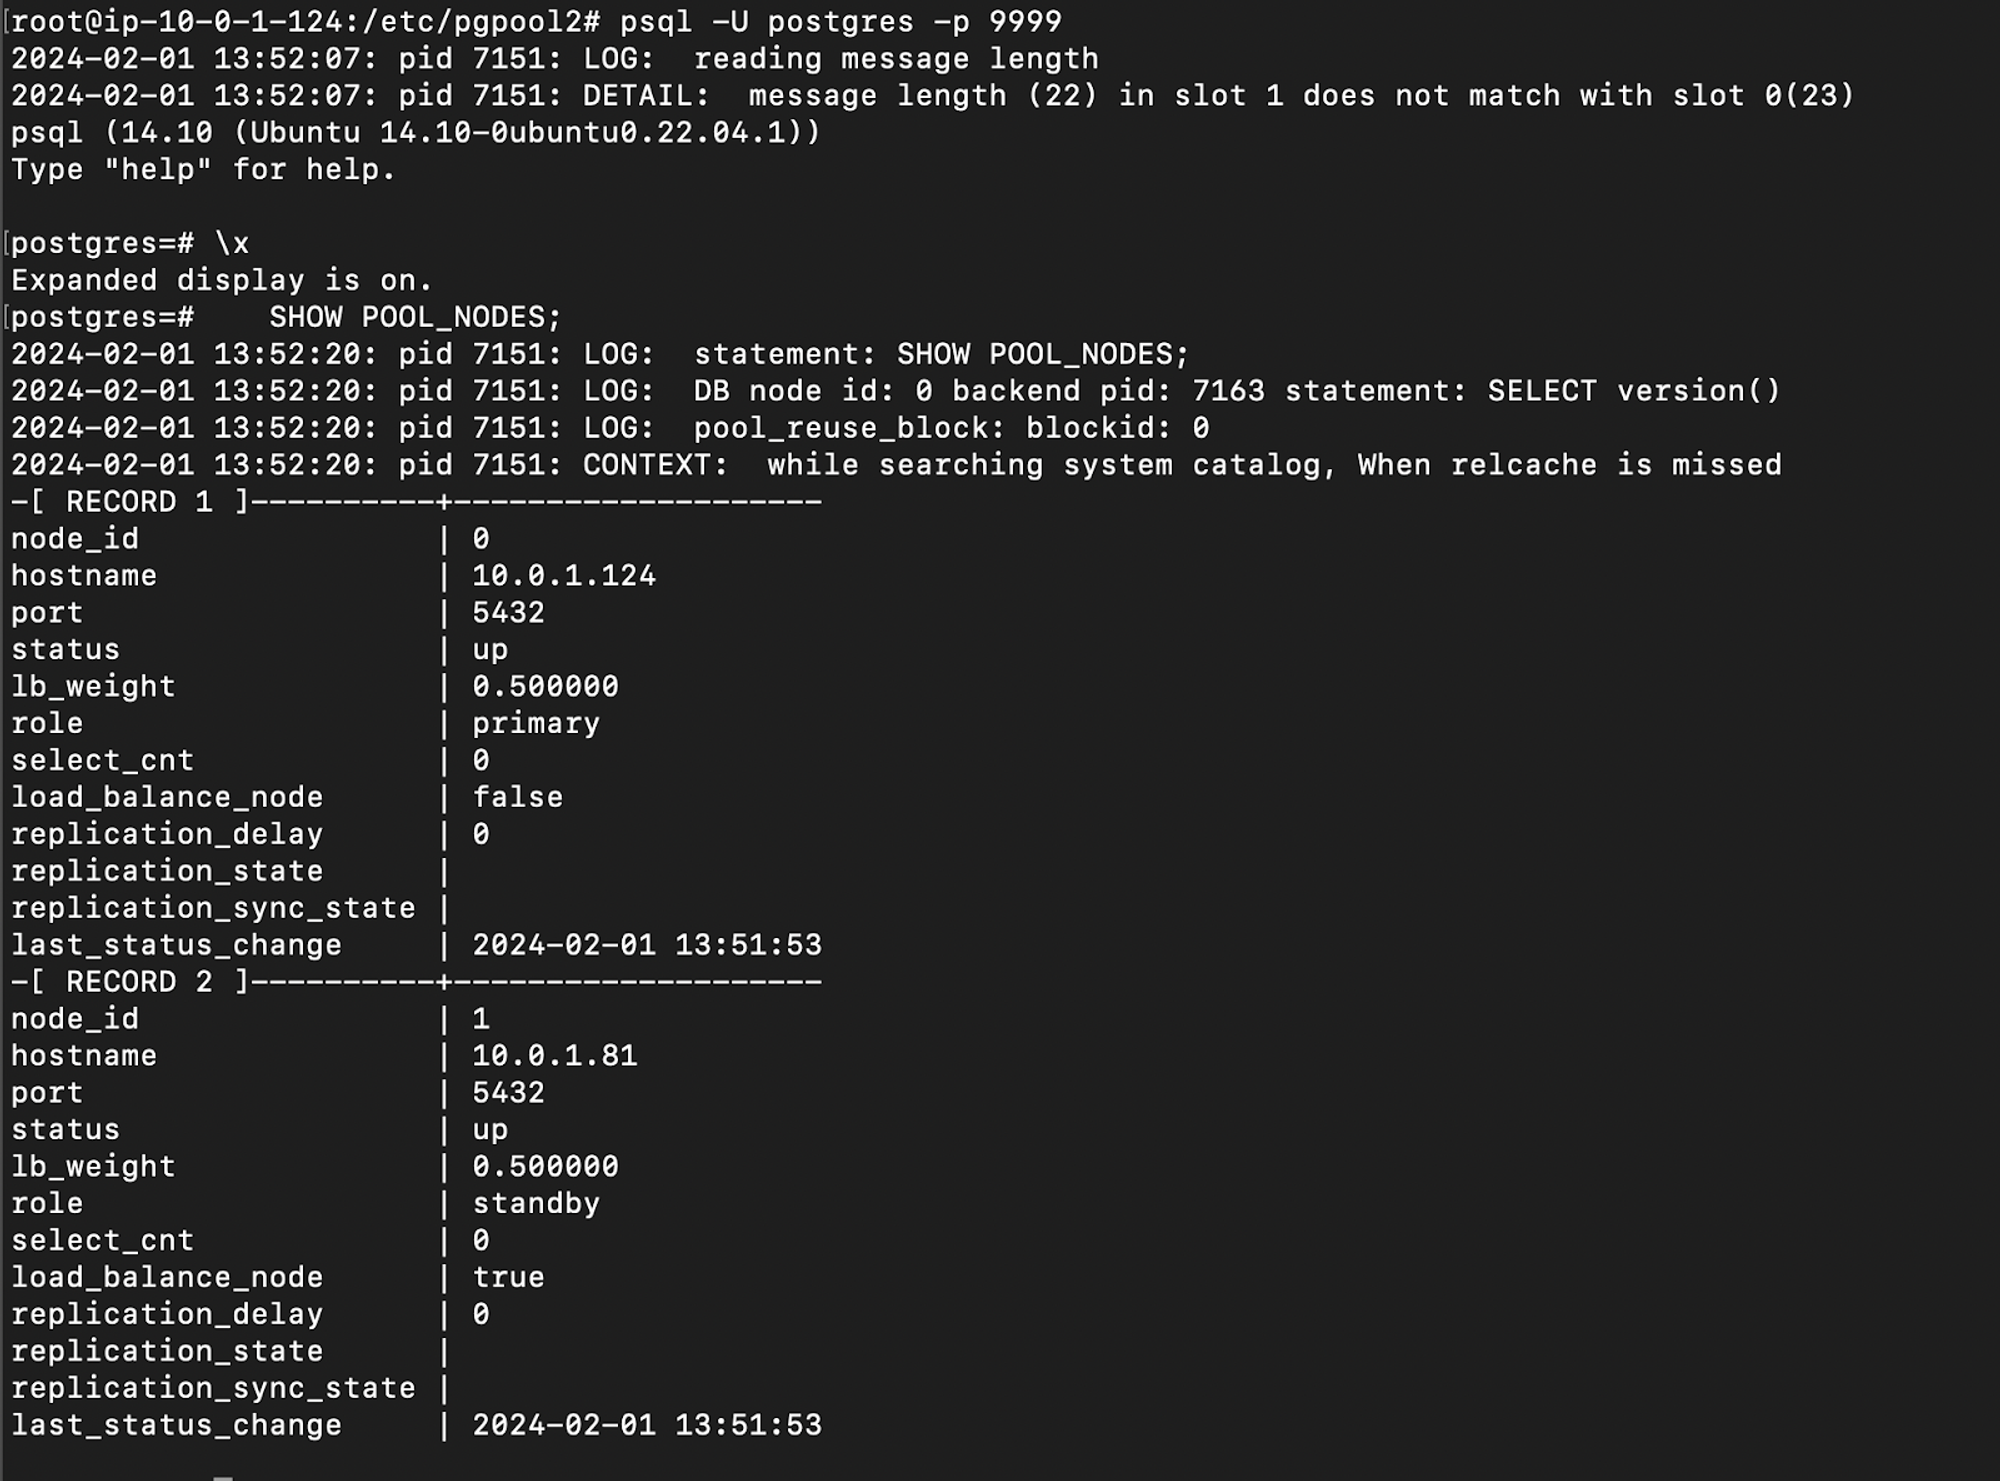
We can start the pgpool service using the command pgpool -n & or systemctl start pgpool2.service .
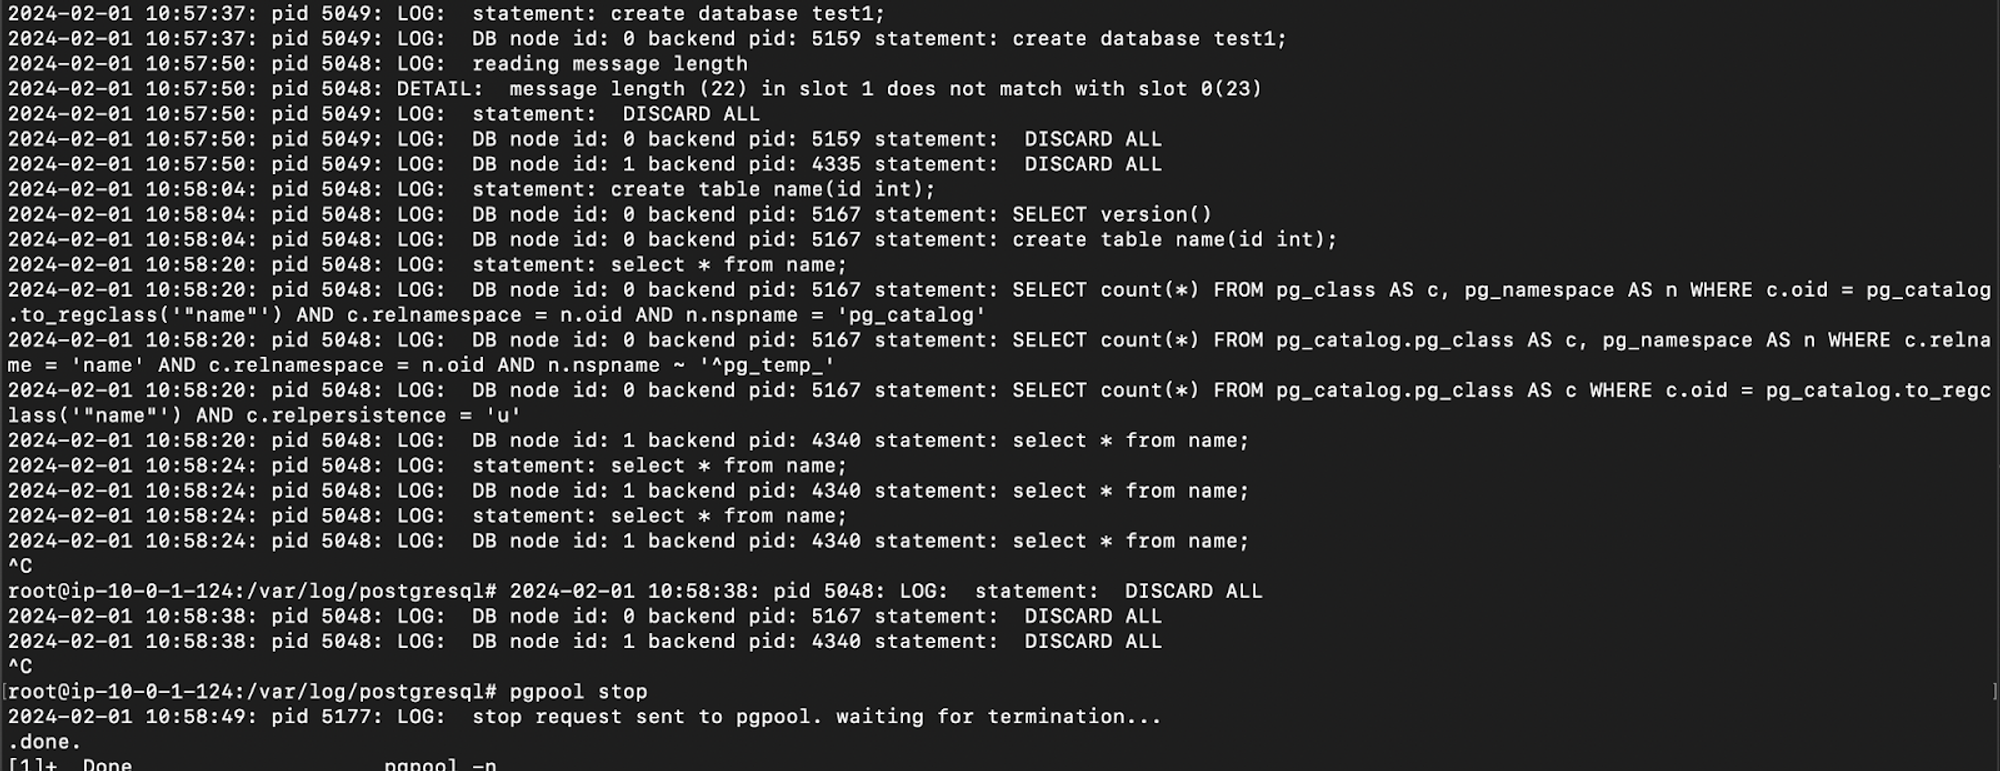
I am using pgpool -n & (This will provide us with logs of Pgpool-II on the terminal which we can use for our references.)
Here, you can see below how the READ statements are redirected to the slave, and WRITE statements are sent to the master even if the master weight is set to 0.

Note:
Here, I am using weight 0 for the master and 1 for the slave to achieve sending all READ requests to the slave and WRITE requests to master.
If we specify ‘1’ as the weight for both master and slave the READ request will also be sent to the master server when the load on the master is less.
Summing Up
In this article, we have only explored the Replication and how we use the replication for Load balancing the requests across the servers by manipulating the weights value. Once we explore all the other features of Pgpool-II, I will add a link to those concepts here.
Thank you for reading this article. Keep learning 😃
Subscribe to my newsletter
Read articles from Ahona Das directly inside your inbox. Subscribe to the newsletter, and don't miss out.
Written by
