Jenkins + JMeter = Love (Part 1)
 HarshKumar Jiladiya
In the world of software development, two standout tools play critical roles: Jenkins and JMeter. Jenkins is an open-source automation server that helps teams build, test, and deploy software smoothly through continuous integration and delivery. Meanwhile, JMeter, developed by Apache, specializes in performance testing, ensuring applications can handle heavy loads effectively. When these two tools combine forces, they create a powerful synergy that enhances software quality and reliability.
For this article we will see from starting How to add Jenkins in AWS EC2 instance and add power of JMeter to it to test an sample node application.
Table of contents (Part 1)
Introduction - Overview of Jenkins and JMeter
Setting up Jenkins on AWS EC2
Create Slave Node and Connect it with Jenkins Job
Integrating Git Project with Jenkins
Building our job
Conclusion
Table of contents (Part 2)
JMeter Test on local
Integrating JMeter with Jenkins
Testing a Sample Node Application
Analyzing Test Result
Conclusion
Introduction - Overview of Jenkins and JMeter
Jenkins: Picture a robot helper that can do lots of tasks for you, like building your software, testing it, and even putting it on the internet for people to use. That's Jenkins! It's like having a super-efficient assistant who never gets tired. Jenkins saves developers a ton of time by doing all the boring, repetitive work for them. This means developers can focus on making their software awesome without getting bogged down by the nitty-gritty details.
Jenkins help in the process of having shorter release cycle(i.e. several times a day) i.e. Creating a small feature and intigrating it to source code and employing automated build and test processes for quicker feedback which is Continuous Integration.
JMeter: Now, imagine a superhero whose job is to make sure your software is tough enough to handle anything. That's JMeter! It's a special tool used for something called performance testing. Performance testing is like checking how strong your software is. JMeter can pretend to be lots of people using your software all at once, or it can pretend to be a huge crowd visiting your website. By doing this, it shows developers if their software can handle a big group of users without getting slow or crashing. In short, JMeter helps ensure that your software can perform its best, no matter how many people are using it.
Their Superpowers in Action
Jenkins and JMeter team up to streamline software development and ensure its quality. Jenkins handles tasks like building and testing the software automatically, while JMeter steps in to check its strength by simulating lots of users accessing it simultaneously. Together, they form a powerful duo that automates processes and guarantees the reliability of software, saving developers time and effort.
Setting up Jenkins on AWS EC2
This is really simple. You just need an AWS account; the free tier will also work. Then, launch a Linux-based EC2 instance as shown below.
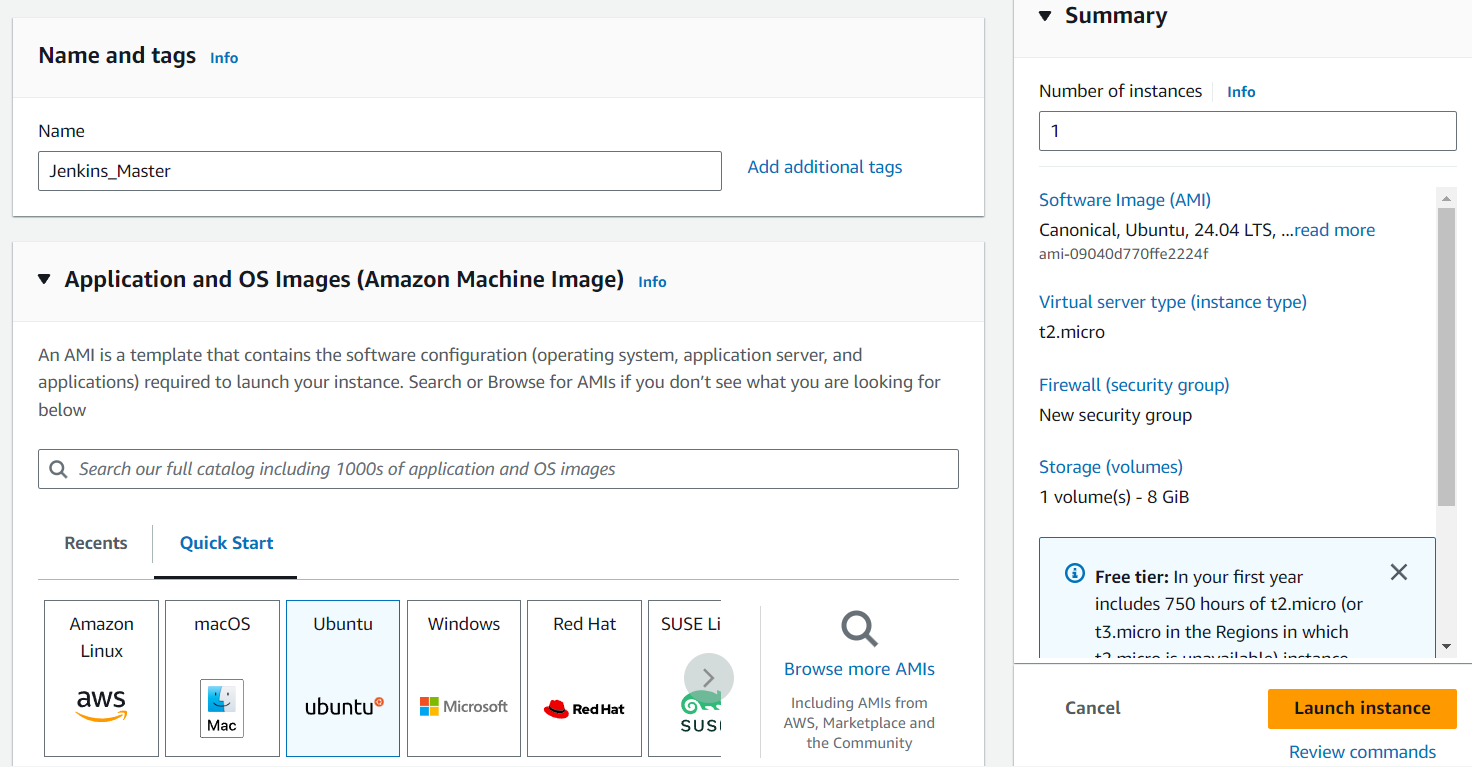
The default settings will work fine. Just make sure to save the Key Pair in a safe place. There is no need for PuTTY to connect to the newly created instance. Amazon does provide a simple way of connecting through the browser only.
Go to the newly created instance and connect through EC2 instance connect. You will get your console on a new tab. Now we just need to add jenkins in it, And for jenkins we need java so let first get over with java :
sudo apt update
sudo apt install openjdk-11-jre
Now for Jenkins, you can always refer to the official documentation. However, if you want to directly copy commands, here is a list:
sudo wget -O /usr/share/keyrings/jenkins-keyring.asc \
  https://pkg.jenkins.io/debian-stable/jenkins.io-2023.key
echo "deb [signed-by=/usr/share/keyrings/jenkins-keyring.asc]" \
  https://pkg.jenkins.io/debian-stable binary/ | sudo tee \
  /etc/apt/sources.list.d/jenkins.list > /dev/null
sudo apt-get update
sudo apt-get install jenkins
Once installed Start the jenkins with command
sudo service jenkins start
Now if your Security Group and Network ACl allow then on the public IP's 8080 port of your server you should able to see below page
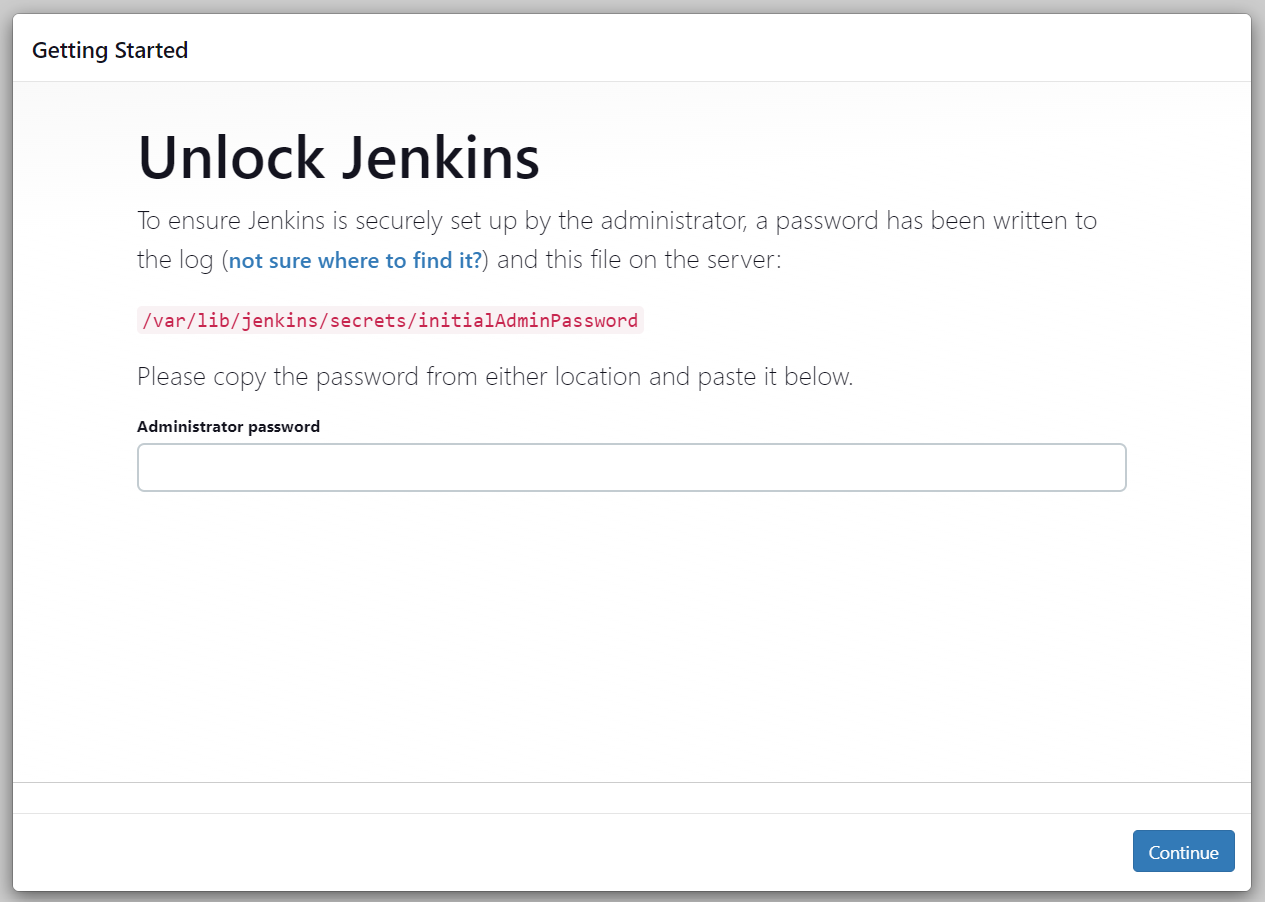
As stated on page got to jenkins master server and get the secret from /var/lib/jenkins/secrets/initialAdminPassword
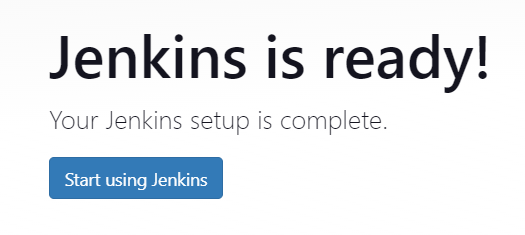
Use the secret, and then on the Customize Jenkins page, proceed with installing the suggested plugins. It will download all essential plugins for you. Then, fill in all the user-specific details like setting passwords and emails. After that, you're done, and it should lead you to the page below.
Create Slave Node and Connect it with Jenkins Job
From Dashboard Navigate to Dashboard > Manage Jenkins > Nodes and using + New Node Option create new node
On the welcome page, you will find the 'Create a Job' option. Alternatively, you can click on the '+ New Item' option to create a new job. Use the FreeStyle job for the first job creation for ease.
For new node configuration, set the 'Remote root directory' as /home/ubuntu/jenkins. This is the location where Jenkins will download the required data.
After saving it will create the empty slave for you but to put life on it we need real server which is another EC2, Create new instance same as before and get to the bash using inbuild option of AWS and install java in it.
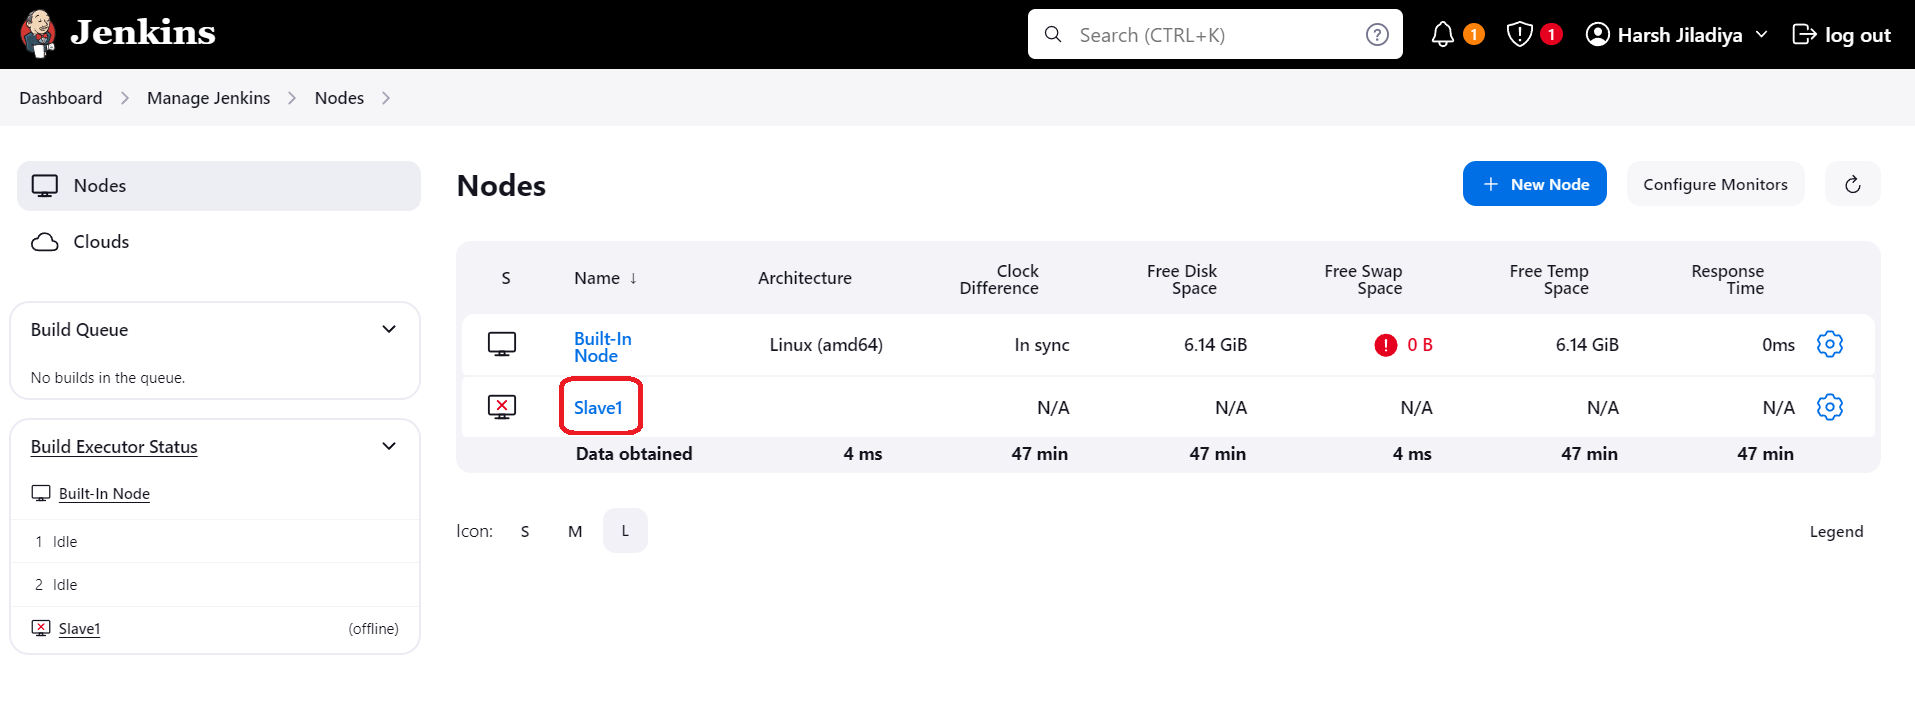
Click on the Node name, and it will redirect you to a page where commands are listed to connect the Node with Jenkins. Copy the commands according to your system. In our case, since we are creating a Linux server, the command "Run from agent command line: (Unix)" will work.
If you encounter the java.io.IOException: http://18.117.77.227:8080/tcpSlaveAgentListener/is invalid: 404 Not Found error, go to security settings and allow random port collection under the section "TCP port for inbound agents." This should resolve the issue, and now our slave machine should be connected to the master."
Integrating Git Project with Jenkins Node
Now we are all set to use our Git project for demonstration purposes. You can choose any simple Git project. One idea is to serve an HTML file with an Nginx server. Alternatively, you can use my project, which is a simple Node project with a Dockerfile for building. Here is the project link.
It's time to configure our newly created job. Go to the configuration section of the job and add the Git repository's HTTPS URL to the 'GitHub project' section. Here is an image for your reference.
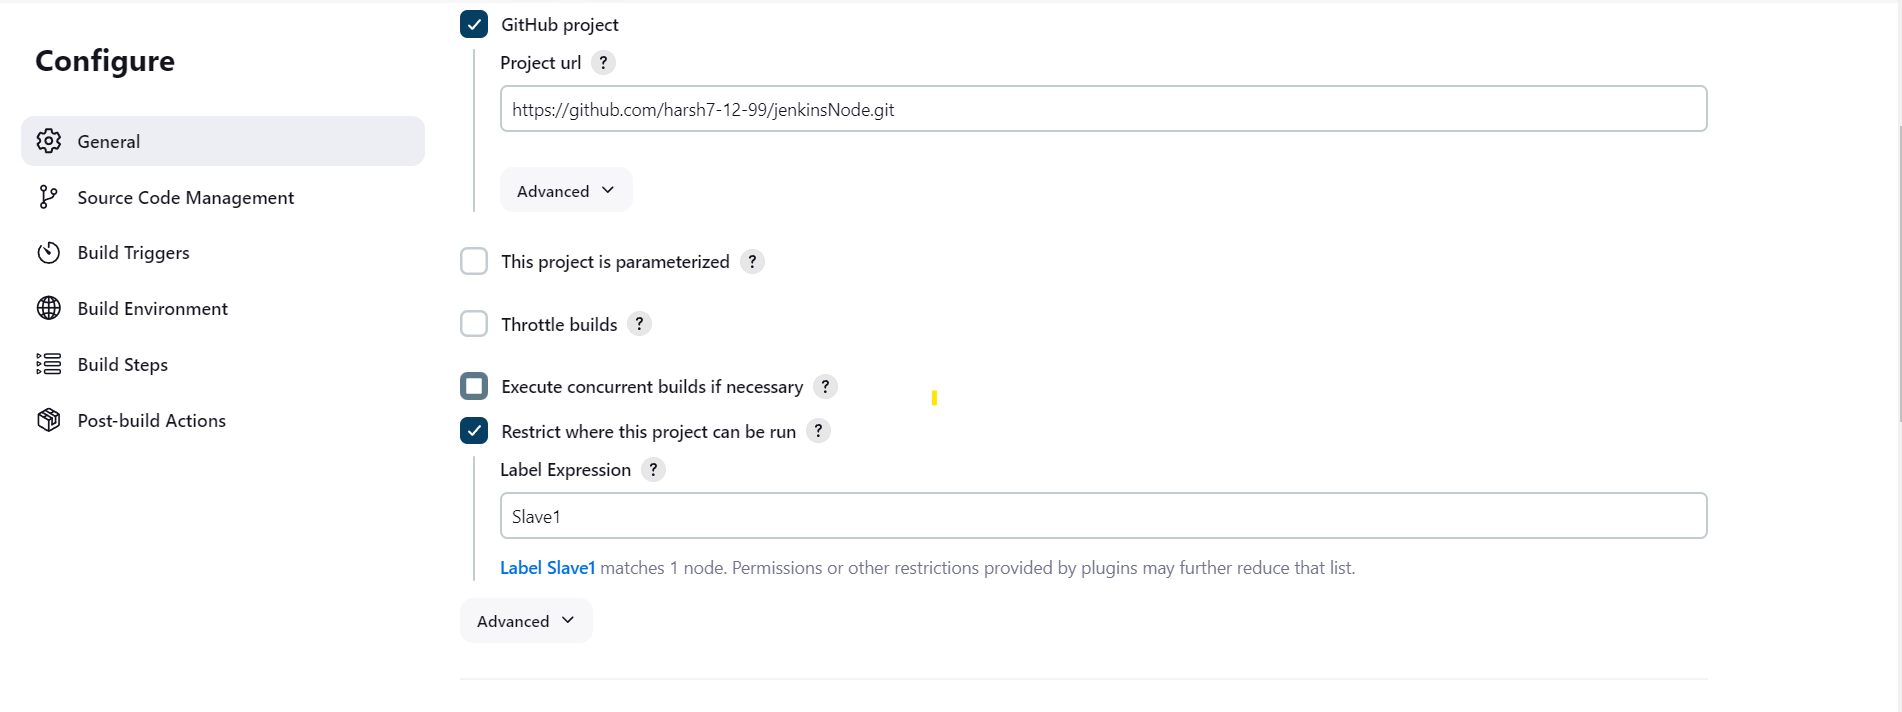
Once that is done, we need to specify in our job configuration that it should run on the registered slave. As shown in the image above, provide the label assigned to the slave in the 'Restrict where this project can be run' option. This ensures that the job runs on the designated slave, if it finds the slave you will be able the see the success messge below.
There is one more section where we need to configure our Git project, which is the "Source Code Management" section. This is the main section where the job retrieves all the information about the Git project. Again, provide the Git URL. If your project is private, then provide credentials for it. Configure the branch, and there are many more options, but by doing these three, you are good to go.
Now save the job and build it for the first time. What are we expecting from this job? To clone our project on our slave (Node). Let's see where we can confirm these results.
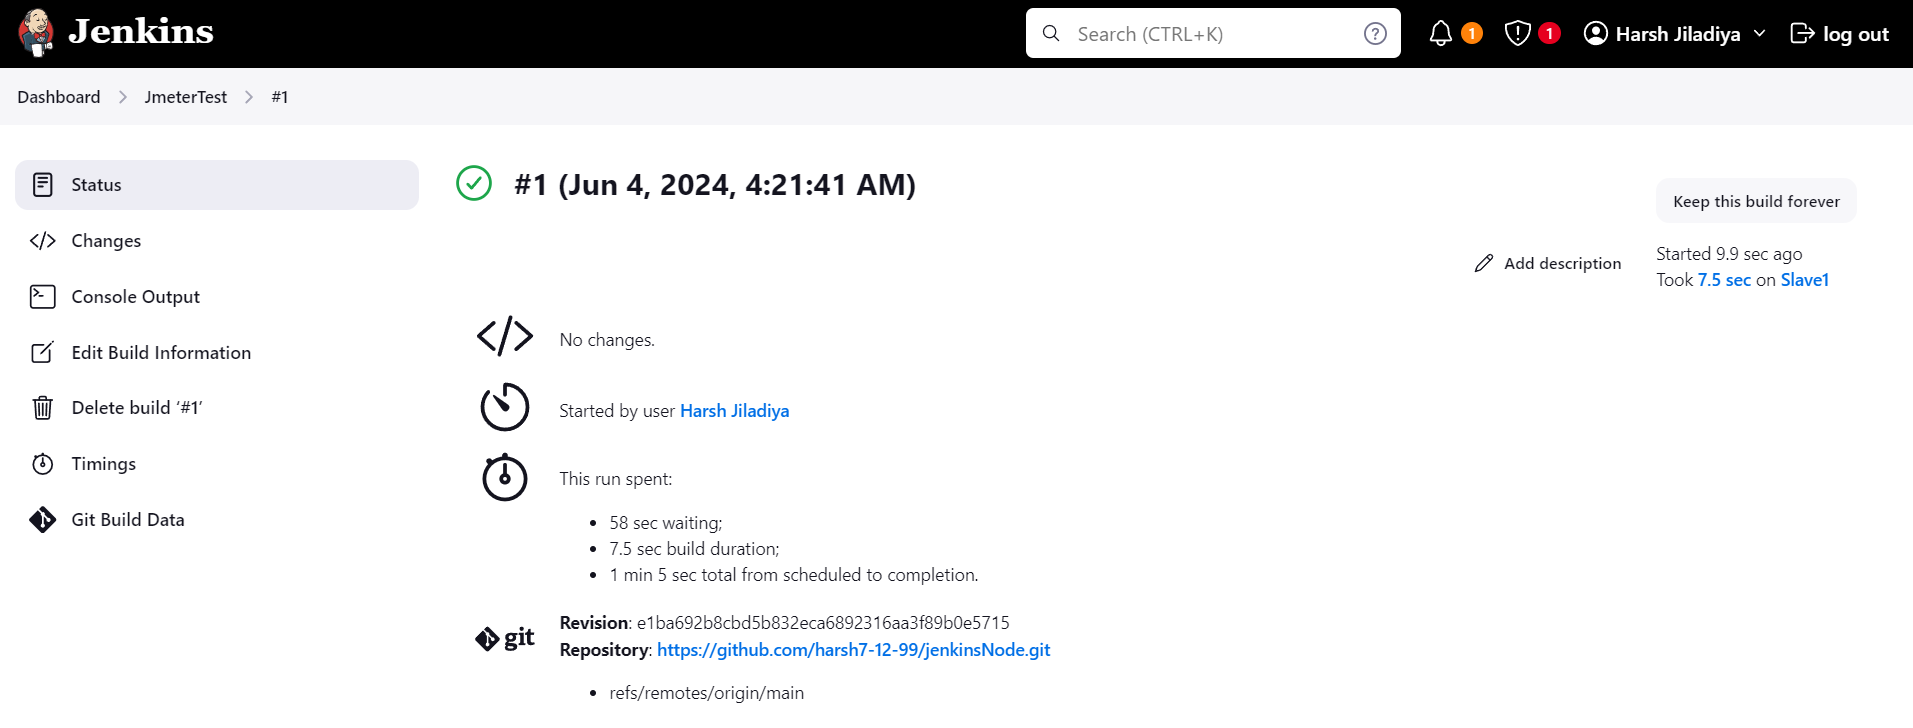
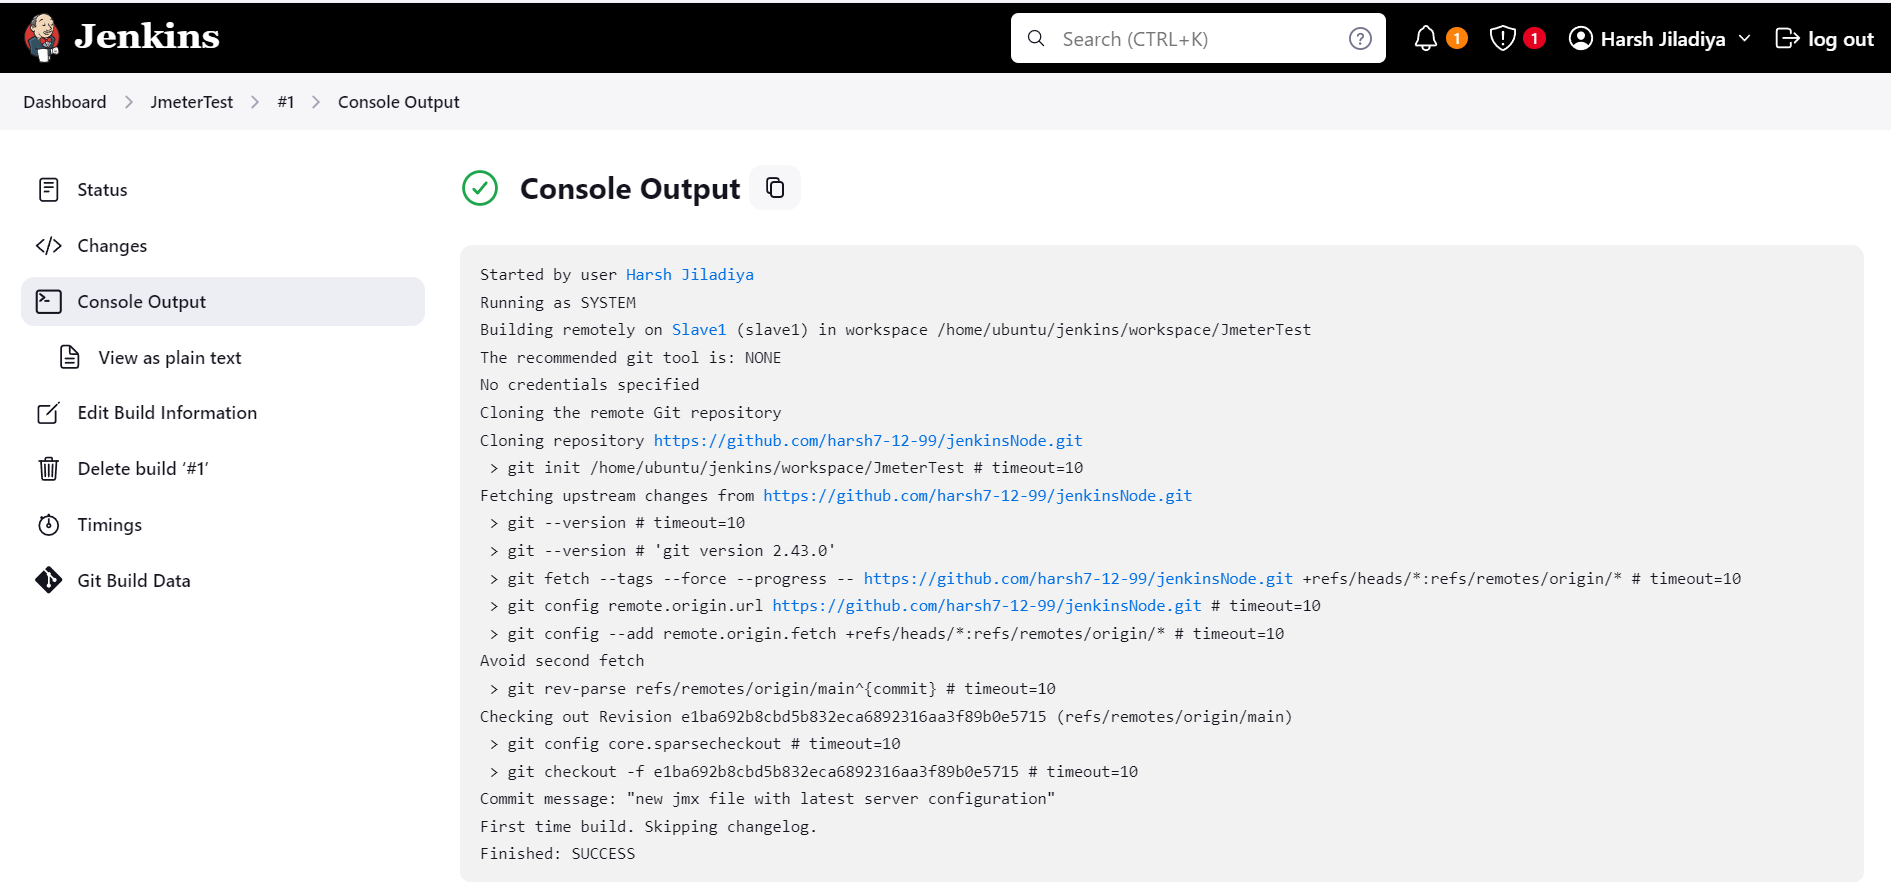
As you can see, our job was successful. You can find out which Git repository it used in the Git section below. You can also see who started the job, how much time it took, and many more details. If you need to take a closer look at the console feed, there is an option called 'Console Output' where you can check all the steps that the job performed on the slave machine.
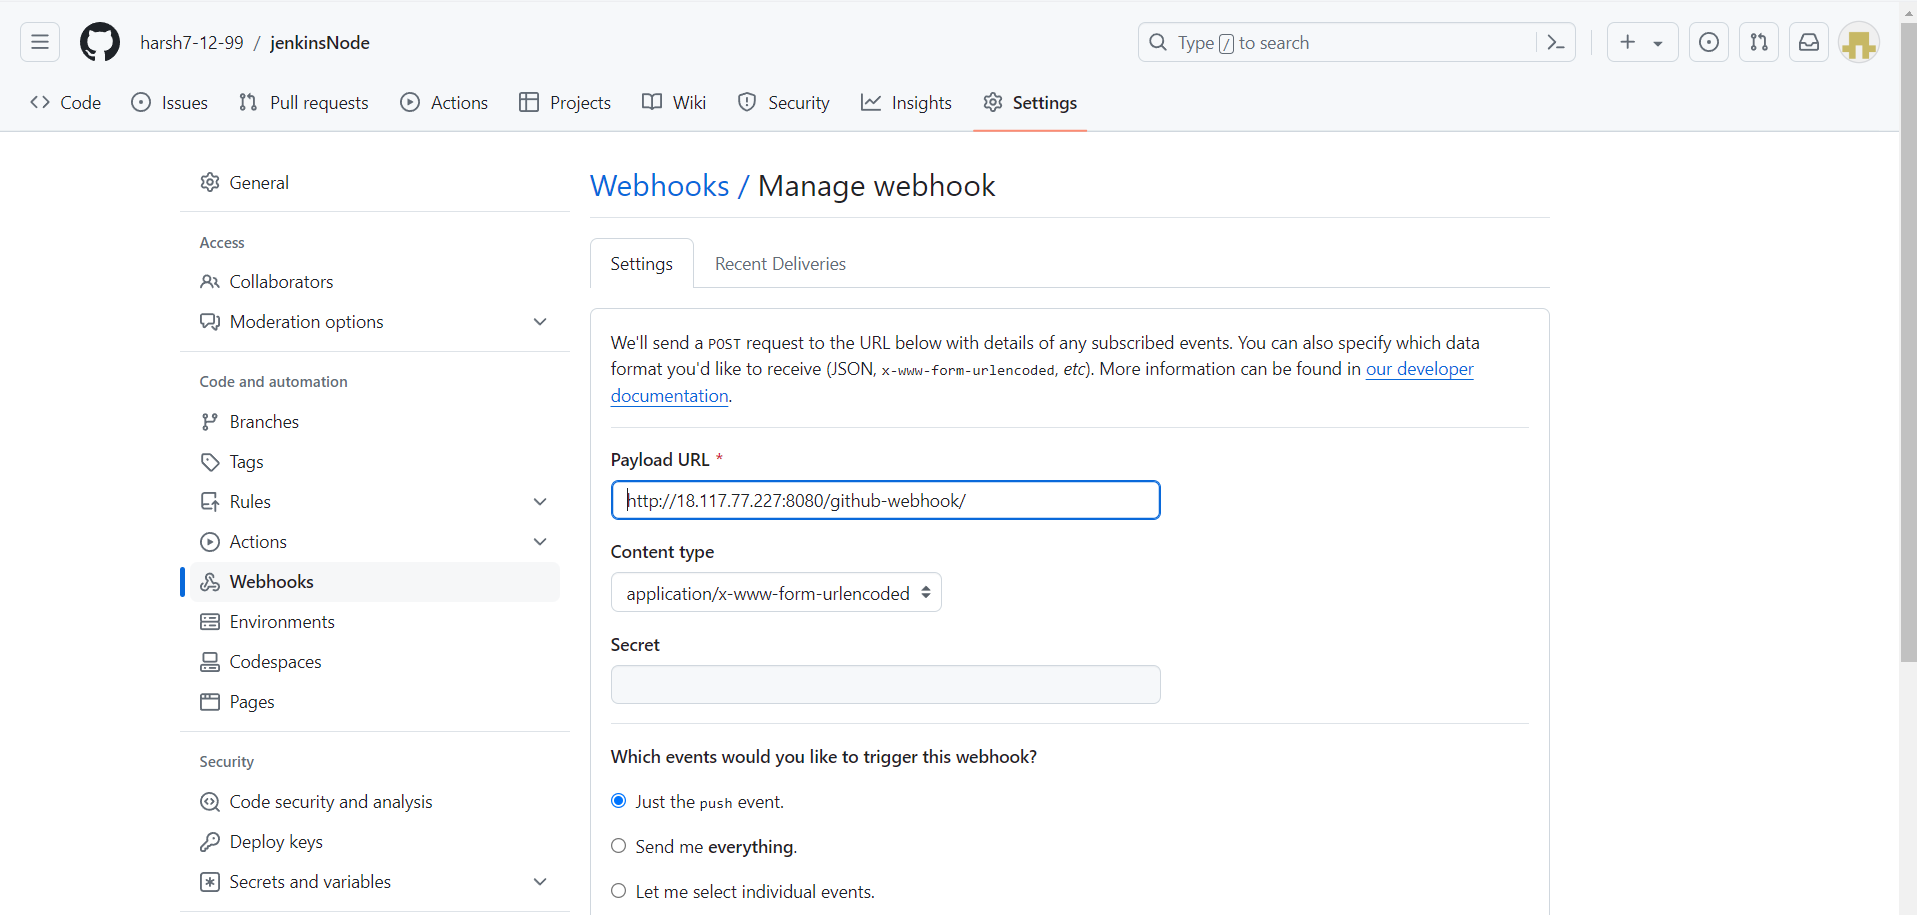
Still our job is getting pulled on the manual step i.e. building the job if you need to automate that there are many option one of which is creating a webhook for your git project so that each time you made push to that branch automatically this job got triggered , there is very easy process you have to follow to create the webhook go to you github and under the specific repo you will find the webhook section add your jekins url as shown below to the field payload URL, to test git will once push and show you success result
Building our job
Before building our job again we must add dokcer in slave1. Add docker to slave using below command
sudo apt install docker.io
Once docker is installed again go to configuration where we can add our build steps,
Here, we simply need to add build steps that will be performed once our project is cloned. To build our project, I have created a Dockerfile which will create an image, and from that image, a container will serve my application. This way, I don't need to add any dependencies such as Node.js to my slave. That's the magic of Docker! You can add build steps according to the requirements of your project. For me, this setup works fine. Here is a list of a few commands that will build your project.
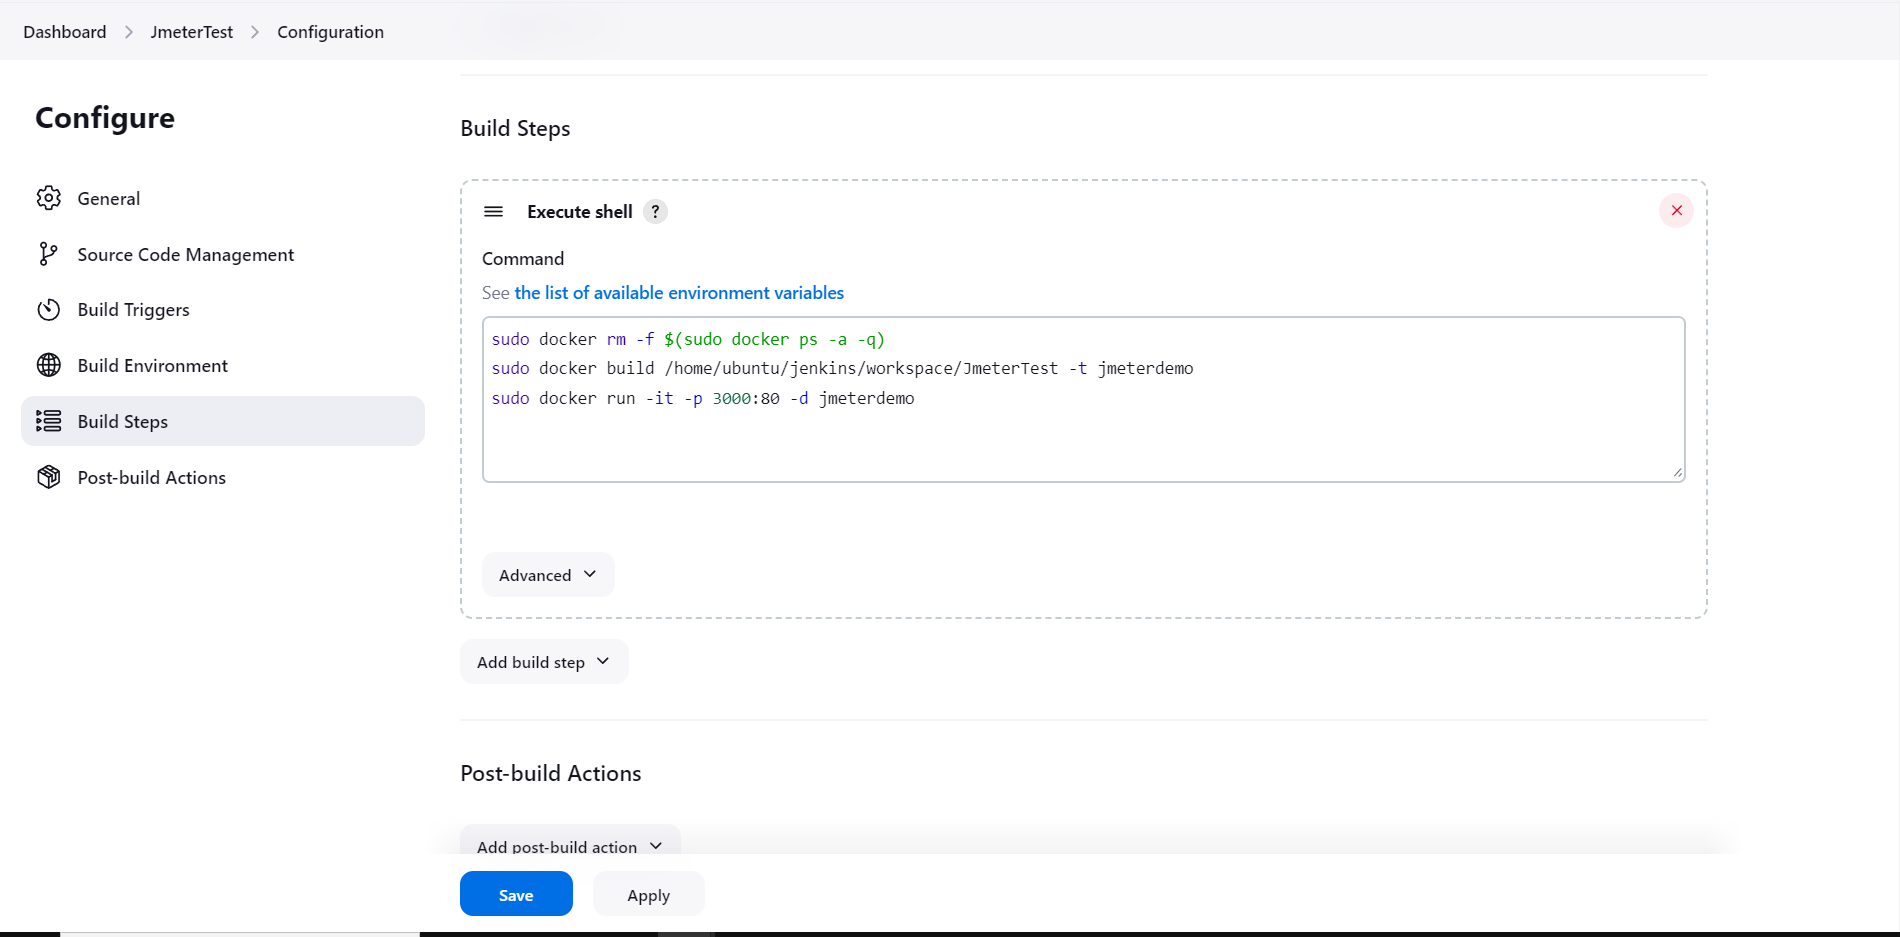
sudo docker rm -f $(sudo docker ps -a -q)
sudo docker build /home/ubuntu/jenkins/workspace/JmeterTest -t jmeterdemo
sudo docker run -it -p 3000:3000 -d jmeterdemo
Add the above commands in the 'Build Steps' section and save the changes. Then, build the job either by creating a commit as the webhooks are active or by manually clicking on the 'Build Now' option.
Congratulations, your job has been created successfully. That's it for part 1. In part 2, we will integrate the power of JMeter. But before that, let's take a look at what we have achieved so far.
Conclustion
In conclusion, our Jenkins job, integrated with Git through webhooks and utilizing Docker for self-building, marks a significant advancement in automating our development process. With basic setup details covered, including Git integration, webhook configuration, and Docker build steps, we've established a foundation for streamlined, reliable software deployments.
Subscribe to my newsletter
Read articles from HarshKumar Jiladiya directly inside your inbox. Subscribe to the newsletter, and don't miss out.
Written by
