Microservice Best Practices: Getting Started
 TECHcommunity_SAG
Overview
This article is part of the Article series on Microservices Best Practices for Cumulocity IoT . The goal of this Tech Community article series is to address the need for Best Practices for Microservices Development.
The article serves as a starting point and provides an introduction to the concept of microservices in Cumulocity IoT as well as pointers to the most important libraries and tools that help you when developing a microservice. To wrap things up, we will develop our first microservice together and run it both locally and deploy it to Cumulocity IoT.
The article focuses on developing microservices using Java and the official Microservice SDK for Java. It is possible to develop microservices in other languages but these approaches will only be mentioned in passing here and will be covered in detail by separate articles in this series.
Microservices in Cumulocity IoT
Microservices are server-side applications that run within Cumulocity IoT that are used to extend the platform with customer-specific functionality. Typically, they are the first choice when integrating Cumulocity IoT with other systems (a detailed discussion of the options for system integration can be found here Exploring System Integration options for Cumulocity IoT).
Besides system integration, microservices are also used in a variety of other use cases:
Server-side device agents for devices that cannot run thin-edge or a custom Cumulocity IoT agent
Mapping functionality for Device Protocols
Backend functionality for custom Cumulocity IoT solutions
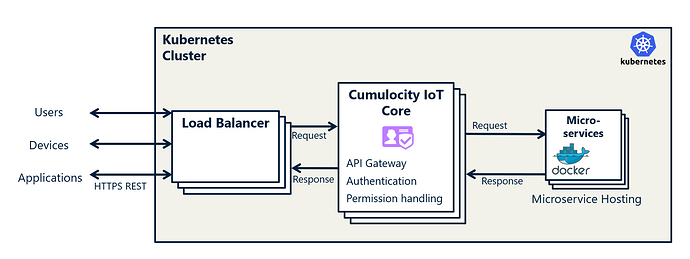
A microservice running in Cumulocity IoT is a Docker container that is running on a Kubernetes infrastructure. Like other Docker containers, it should not use the local file system for long-term persistence as its contents will not be available across service restarts. Cumulocity IoT microservices do not support persistent volumes to be mounted, so they are not a good choice to run e.g. databases or messaging systems.
A microservice can interact with the Cumulocity IoT tenant on which it is subscribed through credentials that are injected into the container at run-time. It can provide a REST API that is accessible as a service under the domain of the Cumulocity IoT tenant thus making it accessible by Cumulocity IoT Web applications without running into cross-site restrictions. Microservices can interact with external systems as long as they are accessible from the Cumulocity IoT instance, which typically means accessible from the internet. As microservices are constantly running, they are perfect candidates for running scheduled functionality.
To run for a Cumulocity IoT tenant, the microservice needs to be packaged as a Docker container image. That image needs to be bundled into a zip file together with the microservice manifest. The microservice manifest is a JSON file that describes how the microservice should be run. It includes the required resources, information about scaling the microservice to additional instances, and required permissions for the Cumulocity IoT API as well as settings for monitoring the microservice.

All traffic to the microservices on Cumulocity IoT goes through the Core Node, enforcing the security already in place. There is no direct access to the microservice.
Microservice can run in two isolation modes: per-tenant and multi-tenant. In per-tenant isolation mode each tenant that is subscribed to a microservice will get its own instance. In multi-tenant isolation mode a single instance is shared between multiple tenants. Multi-tenant microservice can make better use of resources as it is likely that activity peaks are distributed more evenly across multiple tenants. The microservice receives credentials for each tenant on which it is subscribed and must take care to perform activities on the right tenant. In general, it is recommended to implement microservices as if they run in multi-tenant isolation mode even if you do not plan to take advantage of this at the moment as it can be difficult to make all the necessary adjustments later on. The details of developing a multi-tenant microservice will be covered in a separate article.
The ability to deploy microservices is available both on Cumulocity IoT Cloud and Cumulocity IoT Edge. On a cloud, it is an optional feature that needs to be enabled and incurs additional costs per assigned resource. On Cumulocity IoT Edge, the microservice hosting feature needs to be enabled explicitly as it increases the minimum system requirements (even without any microservices being deployed).
Getting Started with Development
This section introduces the most important resources that will help you on your journey to develop microservices.
Microservice SDK and unofficial clients
Developing Cumulocity IoT microservices in Java using the official Microservice SDK is the default choice for microservice development. The Microservice SDK provides built-in support for multi-tenant microservices including the management of service user credentials and support for user and tenant scopes that make it easy to invoke the Cumulocity IoT API either on behalf of a user or on behalf of the microservice.
The Microservice SDK is built on top Spring Boot, which makes it easy use the wide range of Spring Framework libraries to implement REST service, to run scheduled functionality or to integrate with 3rd party systems. The example in the next section will use the Microservice SDK.
Not everyone wants to develop microservices in Java, though. This can be due to existing code in another programming language or personal preferences. Also Java microservices typically result in large Docker images (though there are ways to reduce the size) and consume significant memory resources.
So if you decide against using Java and the Microservice SDK there are plenty of options:
- Cumulocity IoT API - can be used directly in any programming language.
- C# - an unofficial SDK is available here and the authors talk about it in this tech talk IoT Tech Talk - C# Microservice Development
- Python - an unofficial Python API is available here. The author gives an introduction to the library in this article: Getting started with the Cumulocity Python API. The samples folder contains examples of single-tenant and multi-tenant microservices built using the library.
- Typescript - there is no ready to use SDK but this article How to write a "truly" multitenant microservice in typescript explains how to build a Typescript microservice from scratch. It is recommended reading even if you do not want to build microservices in Typescript as it explains the concepts behind microservices and you can easily adapt this to the programming language of your choice.
- Rust - This repository contains an example of a Rust microservice, which results in a very small microservice image.
go-c8y-cli for Microservice Development
If you do not know about go-c8y-cli aka Cumulocity IoT CLI, go check out the video and the documentation linked above. It provides an extremely user-friendly command line interface to the Cumulocity IoT that can be used in scripts to achieve anything from migrating data to simulating devices. In the TechCommunity you can find this introduction Have you ever used go-c8y-cli?
This article Easily run your java microservice locally with go-c8y-cli explains how go-c8y-cli simplifies the process of running microservices locally during development. In our example in the next section, we will use this approach instead of the one from the official documentation as it is much simpler.
Templates and Maven Archetype
Finally, before we are getting to develop our own microservice, two additional resources that can help you tremendously:
- cumulocity-microservice-archetype - a Maven archetype that creates the basic project structure of a Java microservice using the SDK for you.
- Microservice templates - this repository contains a number of examples that you can use as a starting point for you own development.
Create your first Java Microservice
As a last step in this article, we will together build your first microservice together. We are going to use the Cumulocity Microservice Archetype and go-c8y-cli. So first we need to setup both.
Prerequisites
Follow these instructions to install the Maven archetype
Follow these instructions to install and to configure go-c8y-cli
Step 1 - Create a Microservice project
Now we can create the microservice project. Make sure that go-c8y-cli is enabled to use the right tenant:
set-session
Now run Apache Maven to create the project:
mvn archetype:generate -DarchetypeGroupId=cumulocity.microservice -DarchetypeArtifactId=cumulocity-microservice-archetype
Answer the three questions like this:
- Choose name: helloworld
- Define value for property ‘artifactId’ cumulocity-microservice-helloworld: : (keep suggestion)
- Define value for property ‘package’ cumulocity.microservice.helloworld: : com.mycompany.helloworld
Step 2 - Create Cumulocity IoT Microservice Application for local development
After the microservice project has been created switch into its directory and create the microservice application on your Cumulocity IoT tenant:
c8y microservices create --file src/main/configuration/cumulocity.json --name helloworld

c8y microservices getBootstrapUser --id helloworld
The output of the second command will be a table like this
| tenant | name | password |
| t... | servicebootstrap_helloworld | ... |
Open the IDE or editor of your choice and open the file src/main/resources/application-dev.properties. Provide values for the following properties:
- C8Y.bootstrap.tenant - tenant id from column 1 above
- C8Y.baseURL - the URL of your Cumulocity IoT tenant
- C8y.bootstrap.user - the user name from column 2 above
- C8Y.bootstrap.password - the password from column 3 above
Step 3 - Run the microservice
You can now package and run your microservice:
mvn package

java -jar target/cumulocity-microservice-helloworld-1.0.0-SNAPSHOT.jar
You can also run or debug the App main class of your microservices directly if your IDE supports this.
The microservice already supports two endpoints (authentication using tenantid/user):
- http://localhost:8080/health - a standard endpoint that provides statistics about the status and resource consumption of your microservice
- http://localhost:8080/api/hello/devices - an example of a REST endpoint that lists all devices of your tenant.
The latter should be replaced by your actual microservice implementation.
Step 4 - Project overview and customization
Let us now have a look at the project structure and what we can customize:

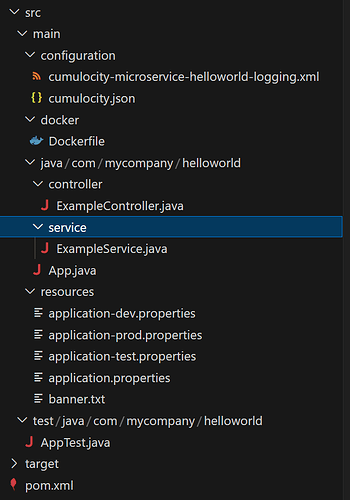
If you are familiar with Spring Boot applications, this structure should look familiar. The project source code is in the src folder separated into the actual microservice code in src/main and the test code in src/test. The former contains three subfolders:
- configuration - contains the microservice manifest and the logging configuration
- java - the Java source code
- resources - project resources like properties files. The generated project is already set up for three different profiles: dev, test, and prod. This allows you to run the microservice locally in development mode with increased logging and hard-coded bootstrap credentials while having a production version that is reduced to on important logging messages and that receives bootstrap credentials from the Cumulocity IoT platform.
So what are some of the things we can customize here?
Provide a custom microservice banner
A fun small change is to change the banner the microservice shows on startup. You can change the banner in this file:
src/main/resources/banner.txt
By default it shows a stylized version of the word microservice using ASCII art and version information of your microservice, the Microservice SDK and Spring Boot. You can replace this using one of the many ASCII art editors, e.g.:
      ___ ___         .__  .__            __      __            .__       .___._.
     /   |   \   ____ |  | |  |   ____   /  \    /  \___________|  |    __| _/| |
    /    ~    \_/ __ \|  | |  |  /  _ \  \   \/\/   /  _ \_  __ \  |   / __ | | |
    \    Y    /\  ___/|  |_|  |_(  <_> )  \        (  <_> )  | \/  |__/ /_/ |  \|
     \___|_  /  \___  >____/____/\____/    \__/\  / \____/|__|  |____/\____ |  __
           \/       \/                          \/                         \/  \/


    Version (${microservice.version})

     :: Cumulocity Microservices SDK (${c8y.version}) ::
     :: Spring Boot${spring-boot.formatted-version} ::
Update the Microservice SDK version
The Microservice SDK is regularly updated and while older versions typically continue to work (breaking changes are announced in the Release Notes), keeping the SDK up-to-date ensures less work when an update is required and allows you to profit from improvements.
The Maven Archetype is regularly updated to include the most recent Microservice SDK version and if you want to update the version in your created application, you can find the currently configured version in the pom.xml:
<c8y.version>1017.0.437</c8y.version>
Released versions can most easily be found on the Release page of the GitHub project:
SoftwareAG/cumulocity-clients-java
Change microservice manifest
More importantly, you can modify the microservice manifest in
src/main/configuration.json
The full reference of the manifest is provided in the documentation. The most important fields right now are:
- resources - the assigned memory and CPU resources. The defaults provided by the archetype are good starting points. If your microservice is not actively used you can further reduce the number of CPUs assigned to it but because Spring Boot applications are quite big you can typically not go much lower than the configured 512MB. As these resources will be permanently assigned to your microservice and you will be charged for them make sure to not over-allocate resources.
- requiredRoles - permissions the microservice user gets to access the Cumulocity IoT APIs. The generated manifest grants admin access to the Inventory API. If you are unsure about the required roles, check the Cumulocity IoT API documentation. Each API endpoint lists the required roles.
Change logging settings
The generated logging settings provide a good starting point and use profile-specific logging that increases log levels to DEBUG during development but reduces logging in production settings:
src/main/configuration/cumulocity-microservice-helloworld-logging.xml
Docker settings
The generated project contains a custom Docker file in src/main/docker/Dockerfile that will be used when building the actual microservice image. A custom Dockerfile is not strictly necessary but here it is used to reduce the size of the installed Java environment.
By default creation of the microservice image file is disabled. To enable it change c8y.docker.skip in the pom.xml to false and run
mvn package
This results in a zip file
helloworld-1.0.0-SNAPSHOT.zip
that can be uploaded to Cumulocity IoT.
Develop REST endpoint
Microservice development is out of scope of this Getting Started article but you can have a look at ExampleController for the implementation of a REST endpoint and ExampleService for implementation of backend functionality used by a REST endpoint.
Summary
This article provided an introduction into the concept of microservices in Cumulocity IoT, listed the most important resources to develop microservices using both the standard Microservice SDK for Java as well as other programming languages, and helped you to create your first microservice.
The article is part of the Microservices Best Practices article series for Cumulocity IoT . Future articles of the series will dive deeper into the concepts introduced in this article.
Subscribe to my newsletter
Read articles from TECHcommunity_SAG directly inside your inbox. Subscribe to the newsletter, and don't miss out.
Written by

TECHcommunity_SAG
TECHcommunity_SAG
Discover, Share, and Collaborate with the Software AG Tech Community The Software AG Tech Community is your single best source for expert insights, getting the latest product updates, demos, trial downloads, documentation, code samples, videos and topical articles. But even more important, this community is tailored to meet your needs to improve productivity, accelerate development, solve problems, and achieve your goals. Join our dynamic group of users who rely on Software AG solutions every day, follow the link or you can even sign up and get access to Software AG's Developer Community. Thanks for stopping by, we hope to meet you soon.