Mastering JavaScript Objects: A Comprehensive Guide to Object-Oriented Programming
 Vatsal Bhesaniya
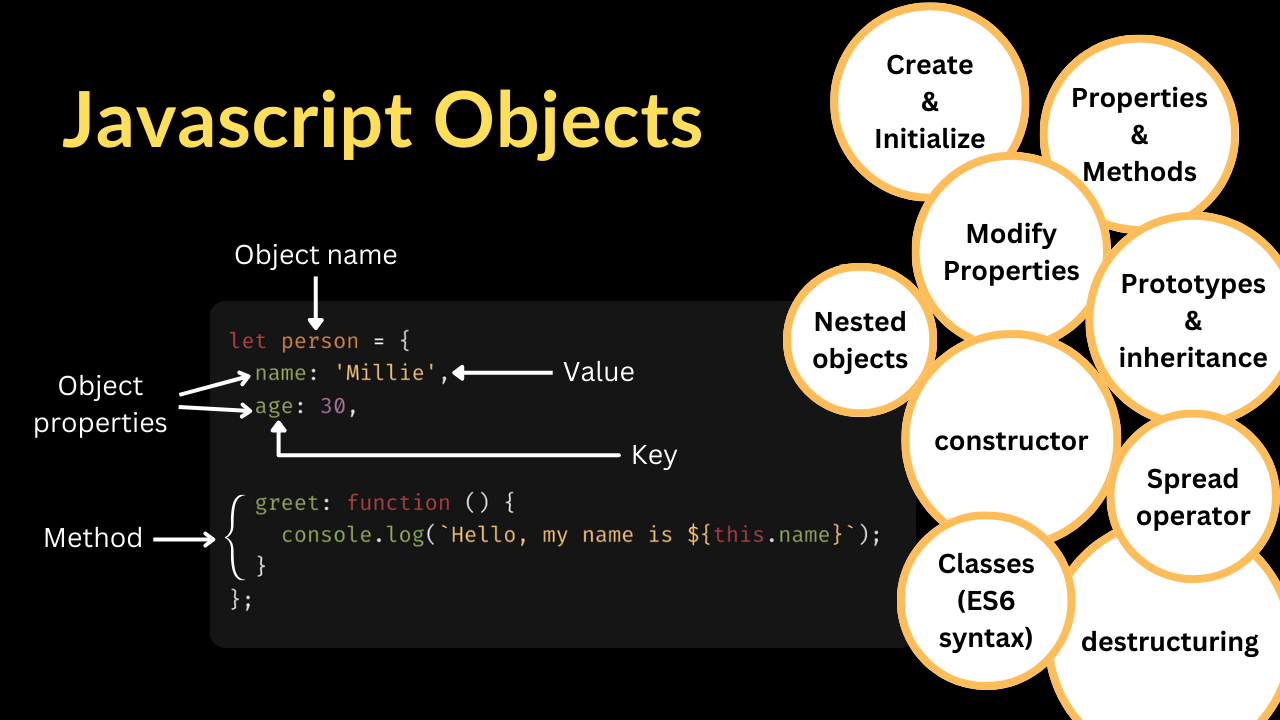
Objects are a fundamental data type in JavaScript, used to store collections of key-value pairs. They are versatile and can be used to represent complex data structures, model real-world entities, and encapsulate related data and behavior. In this video, we’ll explore various aspects of working with objects in JavaScript.
Creating and initializing objects
There are several ways to create objects in JavaScript. The most common way is using object literal notation. Object literals are written in the form of key-value pairs, where each key is a string and each value can be any valid JavaScript data type.
let person = {
  name: 'Millie',
  age: 30,
  greet: function () {
    console.log(`Hello, my name is ${this.name}`);
  }
};
You can also create an empty object and add properties and methods later. Like we are adding make and model properties and start method, which is starting the car.
let car = {};
car.make = 'Toyota';
car.model = 'Camry';
car.start = function () {
  console.log('Starting the car....v-v-v-vroom....v-v-v-vroom!');
};
Object properties and methods
Properties are key-value pairs that store data, while methods are functions that define the behavior of an object.
console.log(person.name); //Access property: 'Millie'
person.greet(); // Call method: 'Hello, my name is Millie'
Accessing and modifying object properties: You can access and modify object properties using dot notation or bracket notation.
person.age = 31; // Modify property using dot notation
person['age'] = 32; // Modify property using bracket notation
Nested objects
Objects can contain other objects as properties, creating nested structures. Here we create objects having the properties of the other objects, this process is called as nesting of objects. Nesting helps in handling complex data in a much more structured and organized manner by creating a hierarchical structure.
let student = {
  name: 'Charles',
  age: 20,
  address: {
    street: '123 Main St',
    city: 'Los Angeles',
    state: 'CA'
  }
};
console.log(student.address.city); // Access nested property: 'Los Angeles'
Object constructors
We can create objects using a constructor function, which acts as a blueprint for creating multiple objects with the same structure. It is considered good practice to name constructor functions with an upper-case first letter.
function Person(name, age) {
  this.name = name;
  this.age = age;
  this.greet = function () {
    console.log(`Hello, my name is ${this.name}`);
  }
}

let jeremy = new Person('Jeremy', 30);
let zara = new Person('Zara', 25);

jeremy.greet(); // 'Hello, my name is Jeremy'
zara.greet(); // 'Hello, my name is Zara'
Here we have created an Object Type Person. Now, we can create many new Person objects. Jeremy and Zara are two Person objects. We can also call the greet method on the Jeremy and Zara objects, which will output the greeting message based on the input name while creating a constructor.
Prototypes and inheritance
All objects in JavaScript inherit properties and methods from a prototype. We can add properties and methods to an object’s prototype, which all instances of that object will inherit. In our code, we are adding a new method called introduce to the Person constructor. Then we are calling the introduce method on the Jeremy and Zara objects, printing their names and ages to the console.
Person.prototype.introduce = function() {
  console.log(`My name is ${this.name}, and I'm ${this.age} years old.`);
};

jeremy.introduce(); // 'My name is Jeremy, and I'm 30 years old.'
zara.introduce(); // 'My name is Zara, and I'm 25 years old.'
Classes (ES6 syntax)
JavaScript added a syntactical sugar for creating objects using a class-like syntax. It starts with the class keyword, followed by the class name Person. Inside the curly braces, the class body defines a constructor and a method called greet. Then we create a new object named olivia, and call the greet method on the olivia object.
class Person {
  constructor(name, age) {
    this.name = name;
    this.age = age;
  }

  greet() {
    console.log(`Hello, my name is ${this.name}`);
  }
}

let olivia = new Person('Olivia', 30);
olivia.greet(); // 'Hello, my name is Olivia'
Object destructuring
You can extract values from objects and assign them to variables using restructuring. Our code defines an object named car using object literal notation with two properties. Then we are using object destructuring to assign the value of the object properties to the variables we listed. An equivalent way to achieve the same result without destructuring is to assign values to separate variables using dot notation.
let car = {model: 'Mustang', engine: 'V8'};
let { model, engine } = car;

// This is similar to
// const model = car.model;
// const engine = car.engine;

console.log(model); // 'Mustang'
console.log(engine); // 'V8'
Spread operator with objects
The spread operator can be used to copy properties from one object to another or to combine multiple objects into a new object. Here we are defining two objects: car1 and car2, with properties: model and engine respectively. Then we created a new object named combined in which we merged two objects using the spread operator.
let car1 = {model: 'Mustang'};
let car2 = {engine: 'V8'};
let combined = { ...car1, ...car2 };

console.log(combined); // {model: 'Mustang', engine: 'V8'}
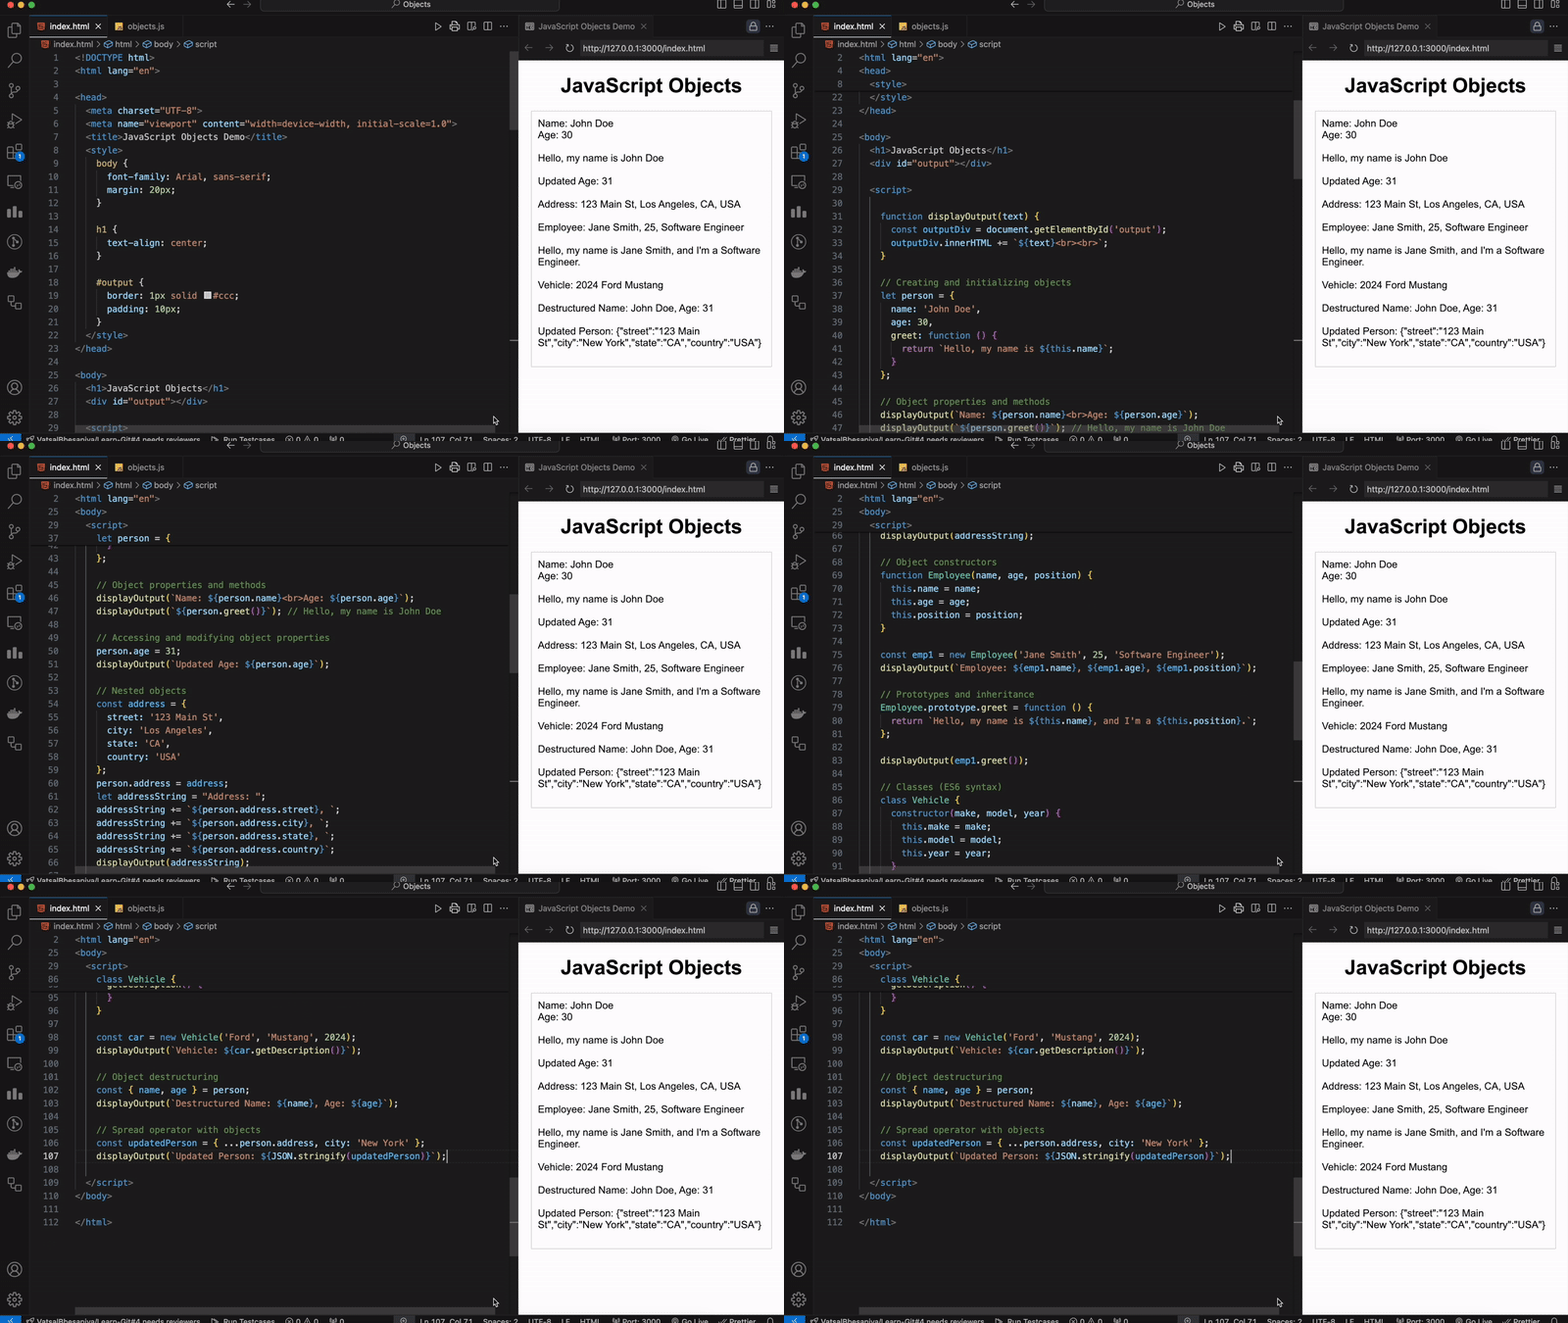
Let’s understand all concepts with an example. Demonstration of this example will help you visualize the results of each code snippet.

First, we have defined a displayOutput Function, which is used to display the output of the code snippet.
function displayOutput(text) {
  const outputDiv = document.getElementById('output');
  outputDiv.innerHTML += `${text}<br><br>`;
}
This code defines an object named person using object literal notation. It has three properties: name, age, and greet.
// Creating and initializing objects
let person = {
  name: 'John Doe',
  age: 30,
  greet: function () {
    return `Hello, my name is ${this.name}`;
  }
};
Here we are accessing the name and age properties and calling the greet method which is displaying the string: “Hello, my name is (Jjhon) Doe”.
// Object properties and methods
displayOutput(`Name: ${person.name}<br>Age: ${person.age}`);
displayOutput(`${person.greet()}`); // Hello, my name is John Doe
This code demonstrates modifying an object property by changing the value of the age property to 31.
// Accessing and modifying object properties
person.age = 31;
displayOutput(`Updated Age: ${person.age}`);
In this code snippet, we are defining another object named address that stores address information. Then assigning the address object to a new property named address within the person object. This creates a nested object structure. Finally, the displayOutput function shows the person’s address by accessing properties from the Person object.
// Nested objects
const address = {
  street: '123 Main St',
  city: 'Los Angeles',
  state: 'CA',
  country: 'USA'
};

person.address = address;

let addressString = "Address: ";
addressString += `${person.address.street}, `;
addressString += `${person.address.city}, `;
addressString += `${person.address.state}, `;
addressString += `${person.address.country}`;

displayOutput(addressString);
Here we defined a constructor function named Employee that takes three arguments: name, age, and position. An employee object named emp1 is created using the Employee constructor, providing values for the name, age, and position. And the displayOutput function is called to show the employee details.
// Object constructors
function Employee(name, age, position) {
  this.name = name;
  this.age = age;
  this.position = position;
}

const emp1 = new Employee('Jane Smith', 25, 'Software Engineer');
displayOutput(`Employee: ${emp1.name}, ${emp1.age}, ${emp1.position}`);
This code adds a new property named greet to the Employee object. Since emp1 was created using the Employee constructor, it inherits the greet method from the prototype. Calling the greet on emp1 demonstrates this inheritance and prints the employee introduction message to the console.
// Prototypes and inheritance
Employee.prototype.greet = function () {
  return `Hello, my name is ${this.name}, and I'm a ${this.position}.`;
};

displayOutput(emp1.greet());
This code defines a class named Vehicle. It has a constructor that takes three arguments. It also defines a method named getDescription that returns a formatted string containing the vehicle’s year, make, and model. A car object named car is created using the Vehicle class constructor, providing values for the make, model, and year. The displayOutput function displays the car description using the getDescription method.
// Classes (ES6 syntax)
class Vehicle {
  constructor(make, model, year) {
    this.make = make;
    this.model = model;
    this.year = year;
  }

  getDescription() {
    return `${this.year} ${this.make} ${this.model}`;
  }
}

const car = new Vehicle('Ford', 'Mustang', 2024);
displayOutput(`Vehicle: ${car.getDescription()}`);
Here we are demonstrating the object destructuring using the spread operator. This code extracts the name and age properties from the person object and assigns them to separate variables: name and age.
// Object destructuring
const { name, age } = person;
displayOutput(`Destructured Name: ${name}, Age: ${age}`);
This code showcases the spread operator to create a new object based on an existing one. By creating a new object named updatedPerson using the spread operator to copy all properties from the address object which is the nested object of the person object. Then, it adds a new property named city with the value “New York” to the updatedPerson object. The displayOutput function displays the updated person object with the updated city: New York.
// Spread operator with objects
const updatedPerson = { ...person.address, city: 'New York' };
displayOutput(`Updated Person: ${JSON.stringify(updatedPerson)}`);
Now that you’ve conquered the realm of JavaScript objects, including object creation, properties and methods, constructors, prototypes, classes, destructuring, and the spread operator, you’re ready to embark on the next chapter of your coding journey. In the upcoming article, we’ll delve into the powerful world of DOM manipulation, exploring techniques for selecting, traversing, creating, and modifying HTML elements with JavaScript. Get ready to bring your web applications to life and create dynamic, interactive experiences for your users!
Subscribe to my newsletter
Read articles from Vatsal Bhesaniya directly inside your inbox. Subscribe to the newsletter, and don't miss out.
Written by
