How to Perform CRUD Operations with Spring Boot in IntelliJ IDEA Community
 Rishabh Singh
Hi everyone, today we will create a RESTful API in Spring Boot from scratch and perform CRUD operations on our MySQL database. Spring Boot is an open-source, Java-based framework for building enterprise Spring applications. It is used to create stand-alone, production-grade spring based application with minimum efforts. You can find the complete code link at the end of this blog.
Spring Boot is a module of the Spring Framework, widely used to develop REST APIs. Its primary feature is Autoconfiguration, which automatically configures classes based on requirements. Spring Boot also offers embedded servers like Jetty and Tomcat. Now, before we dive into the code, let's first look at its features and architecture.
Features of Spring Boot
Inversion of Control: Instead of the developer, the framework will take control to create the objects, configure and assemble their dependencies, and manage their entire lifecycle.
Dependency Injection: Dependency Injection is a design pattern that removes the dependency of the programs and makes them loosely coupled. The Spring framework provides two ways to inject dependency: by Constructor, and by Setter method.
Spring Framework Architecture
So, as per the architecture of Spring Boot, we will create different layers in our project. Different packages will be created for each layer. We will go through the definitions of each layer as we implement them in our code.
Spring Boot Architecture:
Presentation Layer: Handles HTTP requests, converts JSON to objects, and authenticates requests before passing them to the business layer.
Business Layer: Manages business logic, including service classes, data access, authorization, and validation.
Persistence Layer: Manages data logic, converting business objects to and from database rows.
Database Layer: Performs CRUD operations.

Requirements
Maven 3.0+
IDE (Eclipse or IntelliJ IDEA)
JDK 1.8+
MySQL database server
Postman or Insomnia for testing
Project Setup
1. Create Project Boilerplate and Add Dependencies
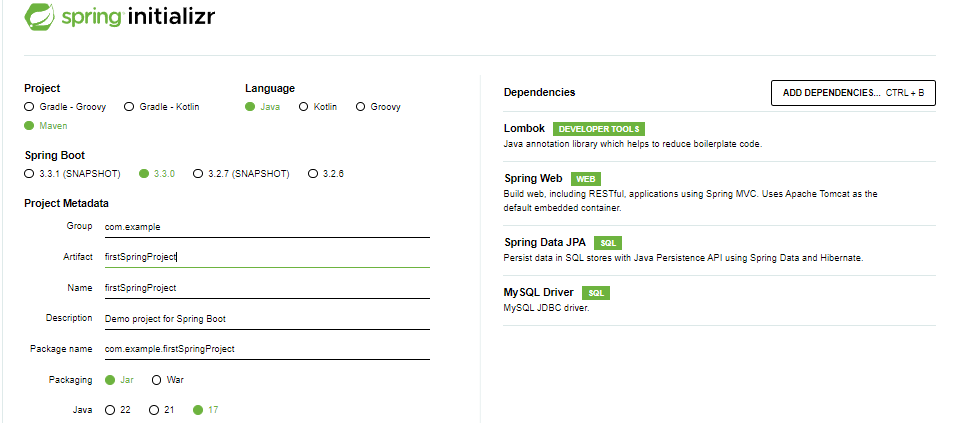
Go to Spring Initializr.
Select Maven project and Java language.
Give a Group (package) and Artifact (Application) name to your project.
Add dependencies for Spring Web, MySQL Driver, lombok and Spring Data JPA.
Click on Generate.
The project zip file will get downloaded, now unzip your folder.
2. Create the MySQL Database
Open MySQL Command Line Client and create a new database named studentsdb using the following SQL query: create database studentsdb;
3. Configuring the Database into Your Project
Open the unzipped project in your favorite IDE or simply drag and drop your unzipped project into IntelliJ IDEA. And add database configuration to the application.properties file which is present inside the src/main/resources/application.properties:
spring.application.name=firstSpringProject
spring.datasource.url=jdbc:mysql://localhost:3306/studentsdb?allowPublicKeyRetrieval=true&useSSL=false&serverTimezone=UTC
spring.datasource.username=root
spring.datasource.password=root
spring.jpa.properties.hibernate.dialect = org.hibernate.dialect.MySQLDialect
spring.jpa.hibernate.ddl-auto = update
4. Creating Employee Entity
Entities are persistence objects where an entity represents a table in a relational database, and each entity instance corresponds to a row in that table.
Create a new package named
model.Add a Java class to the package named
Student.
package com.example.firstSpringProject.model;
import lombok.AllArgsConstructor;
import lombok.Getter;
import lombok.NoArgsConstructor;
import lombok.Setter;
import jakarta.persistence.*;
import java.time.LocalDate;

@Getter
@Setter
@NoArgsConstructor
@AllArgsConstructor
@Entity
@Table(name = "students")
public class Student {
    @Id
    @GeneratedValue(strategy = GenerationType.IDENTITY)
    private long id;
    @Column(name = "first_name")
    private String firstName;

    @Column(name = "last_name")
    private String lastName;

    @Column(name = "email_id")
    private String emailId;

    @Column(name = "date_of_birth")
    private LocalDate dateOfBirth;

    @Column(name = "address")
    private String address;

    @Column(name = "phone_number")
    private String phoneNumber;
    // Lombok generates the constructors, getters, and setters
}
5. Creating a JPA Repository
JPA stands for Java Persistence API. It is a specification for accessing, managing, and persisting data between Java objects and relational databases.
Create a new package named
repository.Add a Java interface to the
repositorypackage namedStudentRepositoryand annotate it with@Repository.Extend the interface with
JpaRepository.
package com.example.firstSpringProject.repository;
import com.example.firstSpringProject.model.Student;
import org.springframework.data.jpa.repository.JpaRepository;
import org.springframework.stereotype.Repository;

@Repository
public interface StudentRepository extends JpaRepository<Student, Long> {
    // You can add custom query methods here if needed
}
6. Creating a Service Class
The service layer facilitates communication between the controller and the persistence/entity layer. Business logic is stored in the service layer.
Create a new package named
services.Add a Java interface to the
servicespackage namedStudentService.package com.example.firstSpringProject.services; import com.example.firstSpringProject.model.Student; import java.util.List; import java.util.Optional; public interface StudentService { Student createStudent(Student student); List<Student> getAllStudents(); Optional<Student> getStudentById(Long studentId); Student updateStudent(Long studentId, Student studentDetails); void deleteStudent(Long studentId); }
Add a Java class named
StudentServiceImplto theservicespackage. ThisStudentServiceImplclass implements theStudentServiceinterface.// StudentServiceImpl.java package com.example.firstSpringProject.services; import com.example.firstSpringProject.exception.ResourceNotFoundException; import com.example.firstSpringProject.model.Student; import com.example.firstSpringProject.repository.StudentRepository; import org.springframework.beans.factory.annotation.Autowired; import org.springframework.stereotype.Service; import java.util.List; import java.util.Optional; @Service public class StudentServiceImpl implements StudentService { private final StudentRepository studentRepository; @Autowired public StudentServiceImpl(StudentRepository studentRepository) { this.studentRepository = studentRepository; } @Override public Student createStudent(Student student) { return studentRepository.save(student); } @Override public List<Student> getAllStudents() { return studentRepository.findAll(); } @Override public Optional<Student> getStudentById(Long studentId) { return studentRepository.findById(studentId); } @Override public Student updateStudent(Long studentId, Student studentDetails) { Student student = studentRepository.findById(studentId) .orElseThrow(() -> new ResourceNotFoundException("Student not found with id: " + studentId)); student.setFirstName(studentDetails.getFirstName()); student.setLastName(studentDetails.getLastName()); student.setEmailId(studentDetails.getEmailId()); student.setDateOfBirth(studentDetails.getDateOfBirth()); student.setAddress(studentDetails.getAddress()); student.setPhoneNumber(studentDetails.getPhoneNumber()); return studentRepository.save(student); } @Override public void deleteStudent(Long studentId) { Student student = studentRepository.findById(studentId) .orElseThrow(() -> new ResourceNotFoundException("Student not found with id: " + studentId)); studentRepository.delete(student); } }
7. Creating the Controller
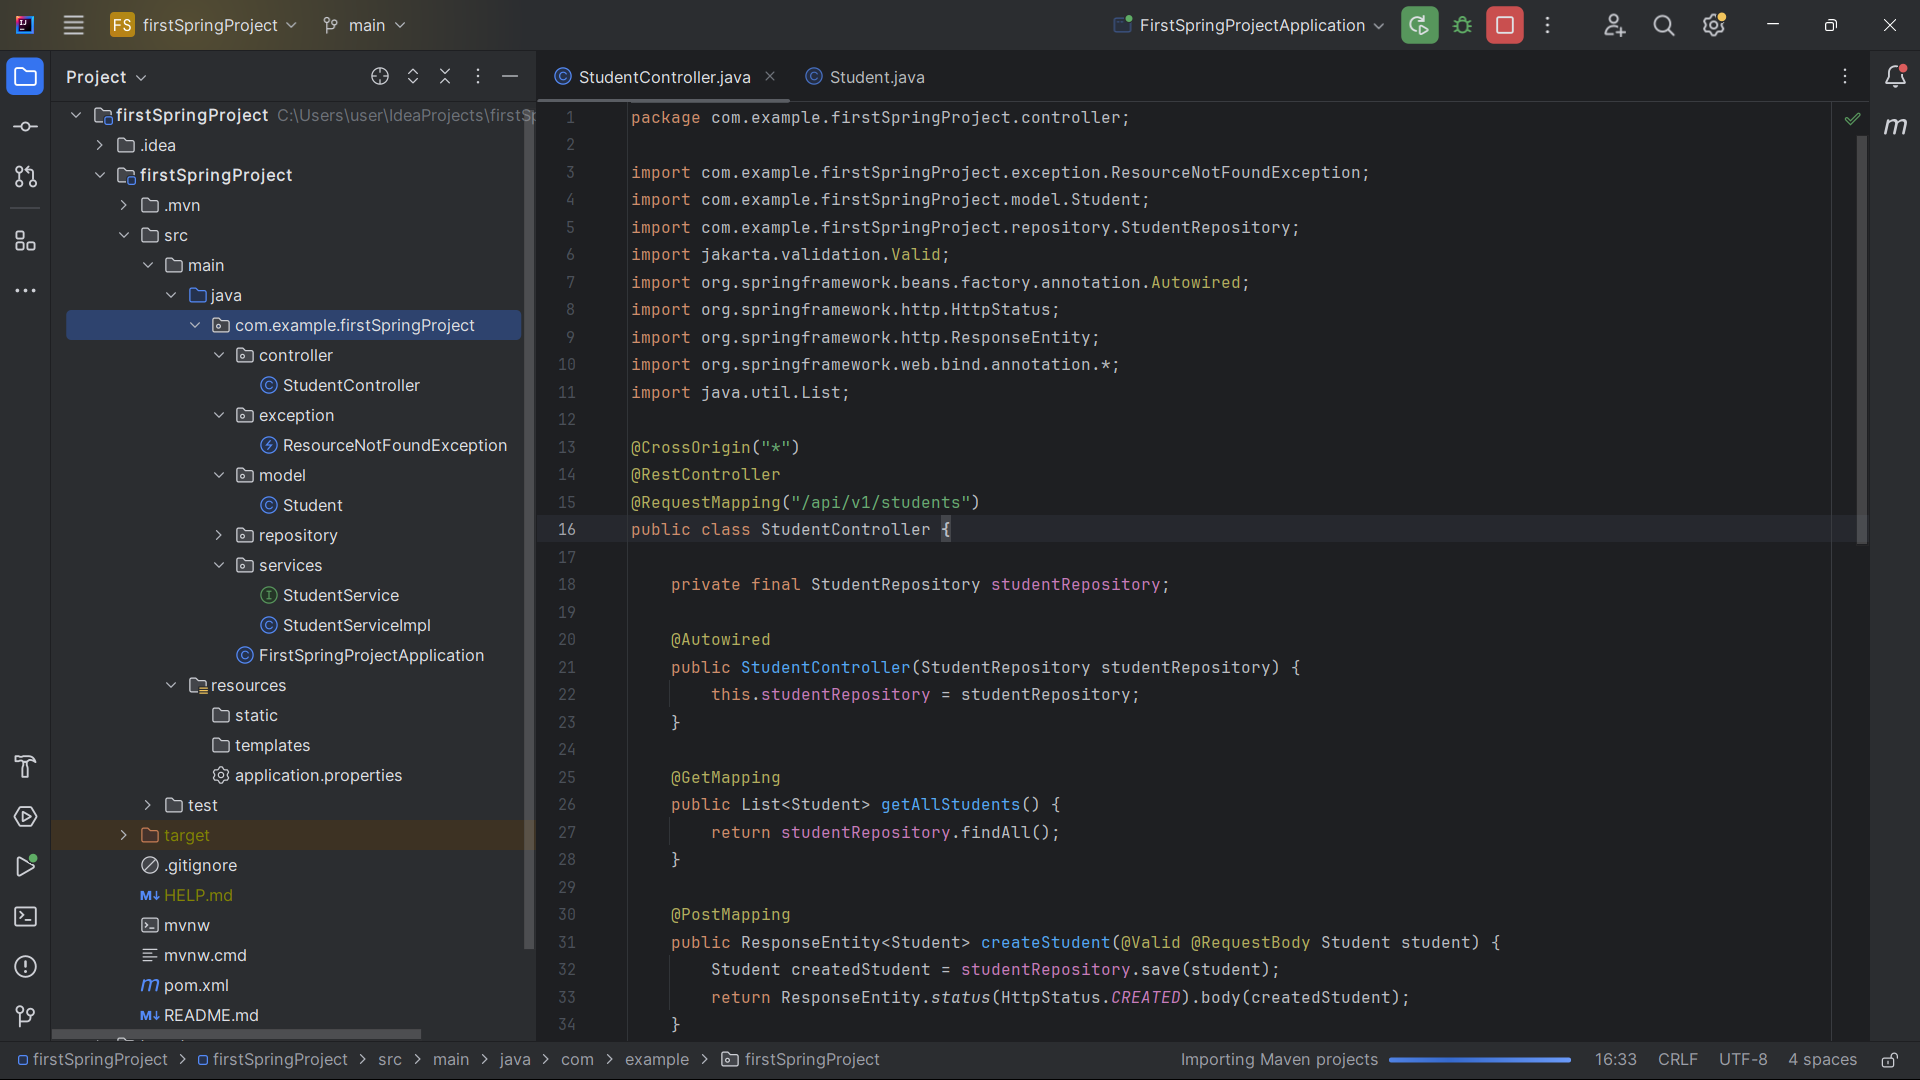
The controller processes web requests by interacting with the service layer to perform the necessary operations. @RestController helps create REST-based web services.
Create a new package named
controller.Add a Java class to the
controllerpackage namedStudentController.Implement the REST APIs and call the necessary service methods.
package com.example.firstSpringProject.controller;
import com.example.firstSpringProject.exception.ResourceNotFoundException;
import com.example.firstSpringProject.model.Student;
import com.example.firstSpringProject.repository.StudentRepository;
import jakarta.validation.Valid;
import org.springframework.beans.factory.annotation.Autowired;
import org.springframework.http.HttpStatus;
import org.springframework.http.ResponseEntity;
import org.springframework.web.bind.annotation.*;
import java.util.List;

@CrossOrigin("*")
@RestController
@RequestMapping("/api/v1/students")
public class StudentController {
    private final StudentRepository studentRepository;
    @Autowired
    public StudentController(StudentRepository studentRepository) {
        this.studentRepository = studentRepository;
    }

    @GetMapping
    public List<Student> getAllStudents() {
        return studentRepository.findAll();
    }

    @PostMapping
    public ResponseEntity<Student> createStudent(@Valid @RequestBody Student student) {
        Student createdStudent = studentRepository.save(student);
        return ResponseEntity.status(HttpStatus.CREATED).body(createdStudent);
    }

    @GetMapping("{id}")
    public ResponseEntity<Student> getStudentById(@PathVariable long id) {
        Student student = studentRepository.findById(id)
                .orElseThrow(() -> new ResourceNotFoundException("Student not found with id: " + id));
        return ResponseEntity.ok(student);
    }

    @PutMapping("{id}")
    public ResponseEntity<Student> updateStudent(@PathVariable long id, @Valid @RequestBody Student studentDetails) {
        Student updateStudent = studentRepository.findById(id)
                .orElseThrow(() -> new ResourceNotFoundException("Student not found with id: " + id));

        updateStudent.setFirstName(studentDetails.getFirstName());
        updateStudent.setLastName(studentDetails.getLastName());
        updateStudent.setEmailId(studentDetails.getEmailId());
        updateStudent.setDateOfBirth(studentDetails.getDateOfBirth());
        updateStudent.setAddress(studentDetails.getAddress());
        updateStudent.setPhoneNumber(studentDetails.getPhoneNumber());

        Student updatedStudent = studentRepository.save(updateStudent);

        return ResponseEntity.ok(updatedStudent);
    }

    @DeleteMapping("{id}")
    public ResponseEntity<Void> deleteStudent(@PathVariable long id) {
        Student student = studentRepository.findById(id)
                .orElseThrow(() -> new ResourceNotFoundException("Student not found with id: " + id));

        studentRepository.delete(student);
        return ResponseEntity.noContent().build();
    }
}
8. Creating the Exception Package and ResourceNotFoundException Class:
To handle exceptions gracefully, we'll create an exception package and a ResourceNotFoundException class.
package com.example.firstSpringProject.exception;
import org.springframework.http.HttpStatus;
import org.springframework.web.bind.annotation.ResponseStatus;

@ResponseStatus(value = HttpStatus.NOT_FOUND)
public class ResourceNotFoundException extends RuntimeException{
    public ResourceNotFoundException(String message){
        super(message);
    }
}
8. Testing APIs:
Use Postman or any other API testing tool to test your APIs:
Save StudentDetails: Send a POST request to
/api/v1/studentswith the employee JSON data.Retrieve Student Details: Send a GET request to
/api/v1/students.Update Student Details: Send a PUT request to
/api/v1/students/{id}with the updated employee JSON data.Delete Student: Send a DELETE request to
/api/v1/students/{id}.
Summary
In this article, we will build a RESTful API using Spring Boot to perform CRUD operations on a MySQL database. We'll cover project setup, database configuration, creating entities, repositories, service classes, and controllers. We'll also handle exceptions and test the API using Postman. By the end, you'll have a fully functional Spring Boot application ready for further enhancements.
Complete Code
The complete code for this project is available here. Feel free fork the repository and try it out yourself!
End of the Blog
Congratulations! You've successfully built a Spring Boot application with CRUD operations using IntelliJ IDEA Community Edition. We covered each step in detail, ensuring a comprehensive understanding. Feel free to explore further and enhance your application with additional features and functionalities.
I hope you have enjoyed browsing my blog. However, if you have other request or question, don't hesitate to use the contact form. Happy coding!
About Me
LinkedIn | Github | Twitter | Portfolio | Freelancer
Subscribe to my newsletter
Read articles from Rishabh Singh directly inside your inbox. Subscribe to the newsletter, and don't miss out.
Written by

Rishabh Singh
Rishabh Singh
Experienced full-stack developer with a robust foundation in front-end and back-end technologies. My experience here has further solidified my ability to solve technical problems, research and learn new technologies.
