Demystifying Docker: Unveiling the Magic of OverlayFS in Image & Container Management
 Naimul Islam
More than a year ago, I began exploring Docker's internal architecture to understand how it functions under the hood. Although I gathered extensive knowledge, I did not document my findings at the time. In this blog, I will share a portion of that exploration, focusing on the Overlay Filesystem (OverlayFS), its functionality, and how Docker leverages it to manage images and containers.
To understand how docker utilized overlayFS, we need to first understand what is OverlayFS and how it works.
OverlayFS is a type of filesystem service for Linux that allows for the layering of multiple directories to form a unified filesystem. This functionality is particularly useful in environments where a separation between static, read-only data and dynamic, writable data is beneficial, such as in containerized applications.
Internally, OverlayFS operates by combining two directories called layers: a lower layer and an upper layer. The lower layer is typically read-only and contains the base files and directories. The upper layer is writable and is where changes and new files are stored. When a file or directory is accessed, OverlayFS first checks the upper layer. If the file is present in the upper layer, it is used. If it is not found, the system looks in the lower layer. This way, the upper layer effectively overlays the lower layer.
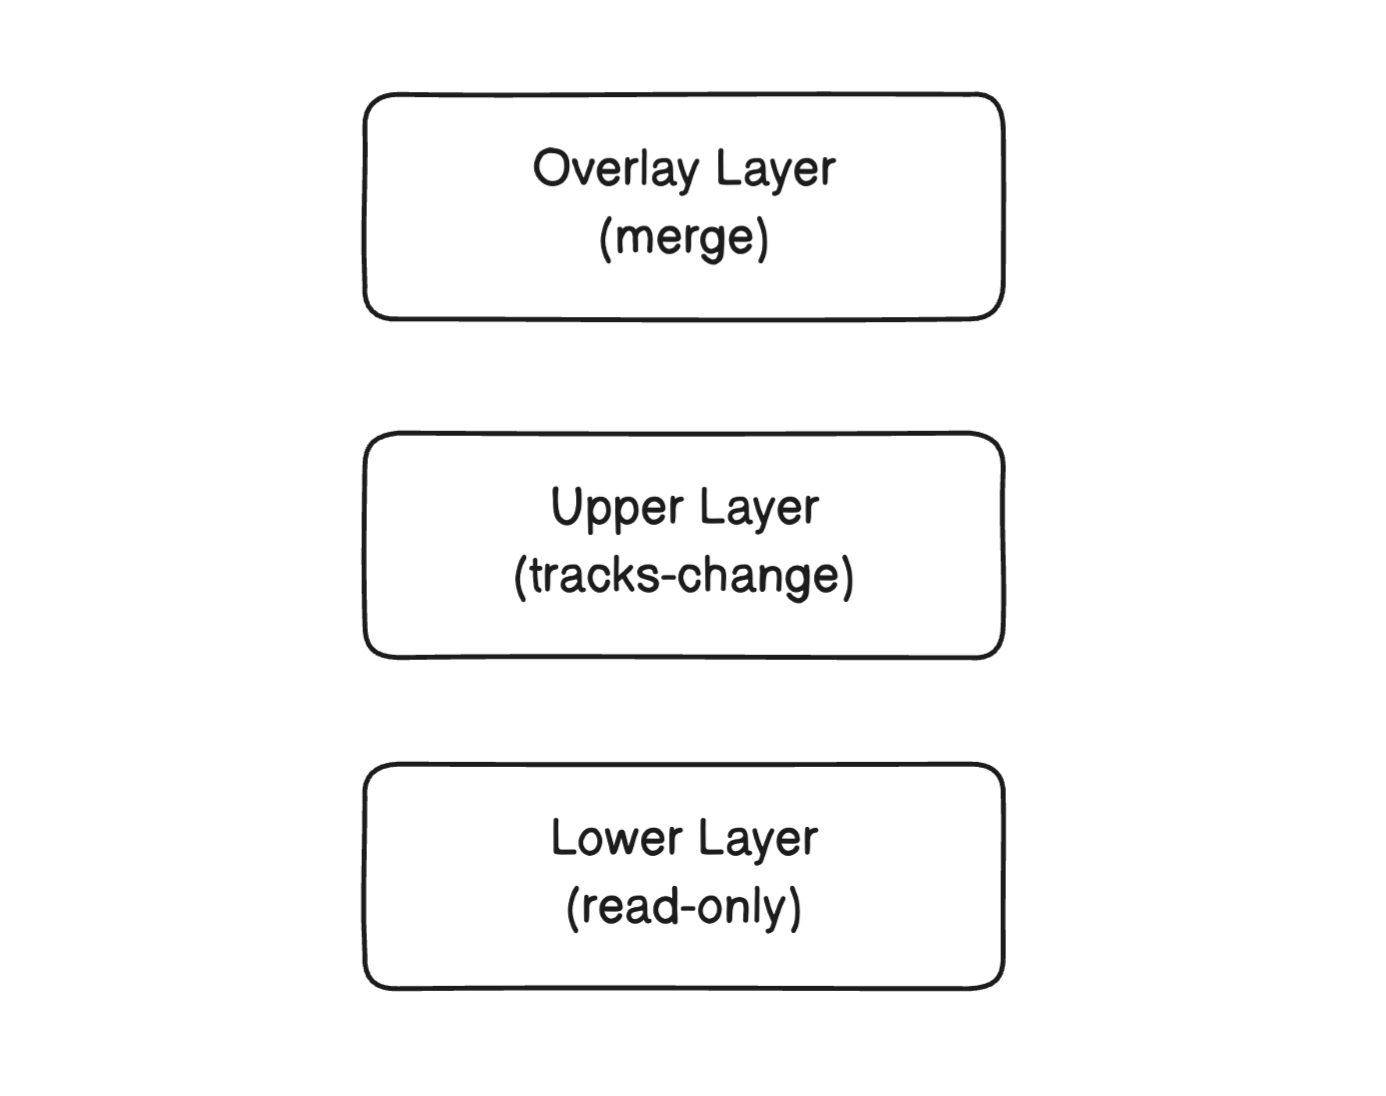
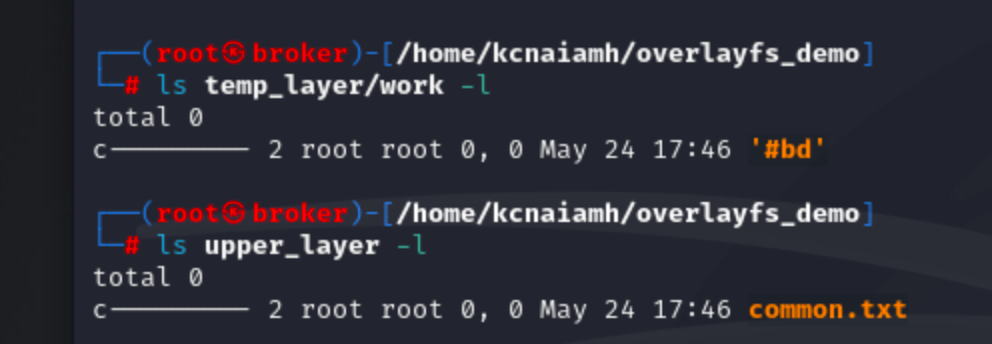
When a file in the lower layer is modified, OverlayFS does not alter the lower layer directly. Instead, it copies the file to the upper layer, where the changes are then made. This process is known as "copy-up." Subsequent access to this file will read from the modified version in the upper layer. Similarly, when a file is deleted, it is not removed from the lower layer. Instead, a character file is created in the upper layer, indicating that the file should be considered deleted.
This approach provides several advantages. It allows for the preservation of the original data in the lower layer while maintaining a complete view of the filesystem that includes modifications and additions. It also enables efficient use of storage, as only modified and new files consume space in the writable upper layer. Furthermore, OverlayFS simplifies the rollback of changes and updates, as the lower layer can remain untouched and intact.
We will practically see how OverlayFS is used to manage the layered nature of container images and their writable layers later section of this blog.
Now lets create and overlay file system by our selves. For this we have created a dummy folders and files structure as shown below.
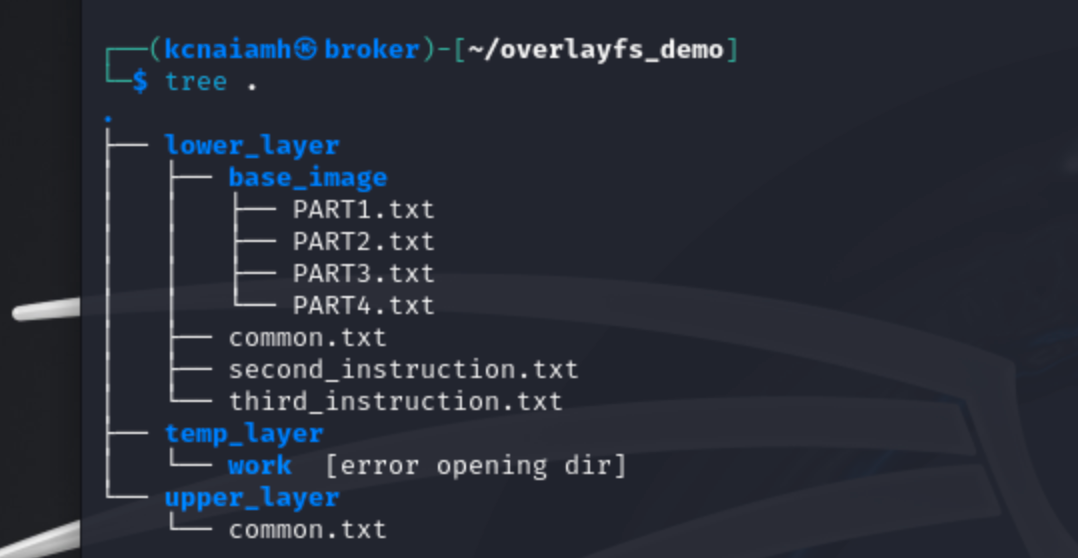
We will use the following command to create the overlay layer.
mount -t overlay -o lowerdir=lower_layer/,upperdir=upper_layer/,\
workdir=temp_layer/ none overlay_layer/
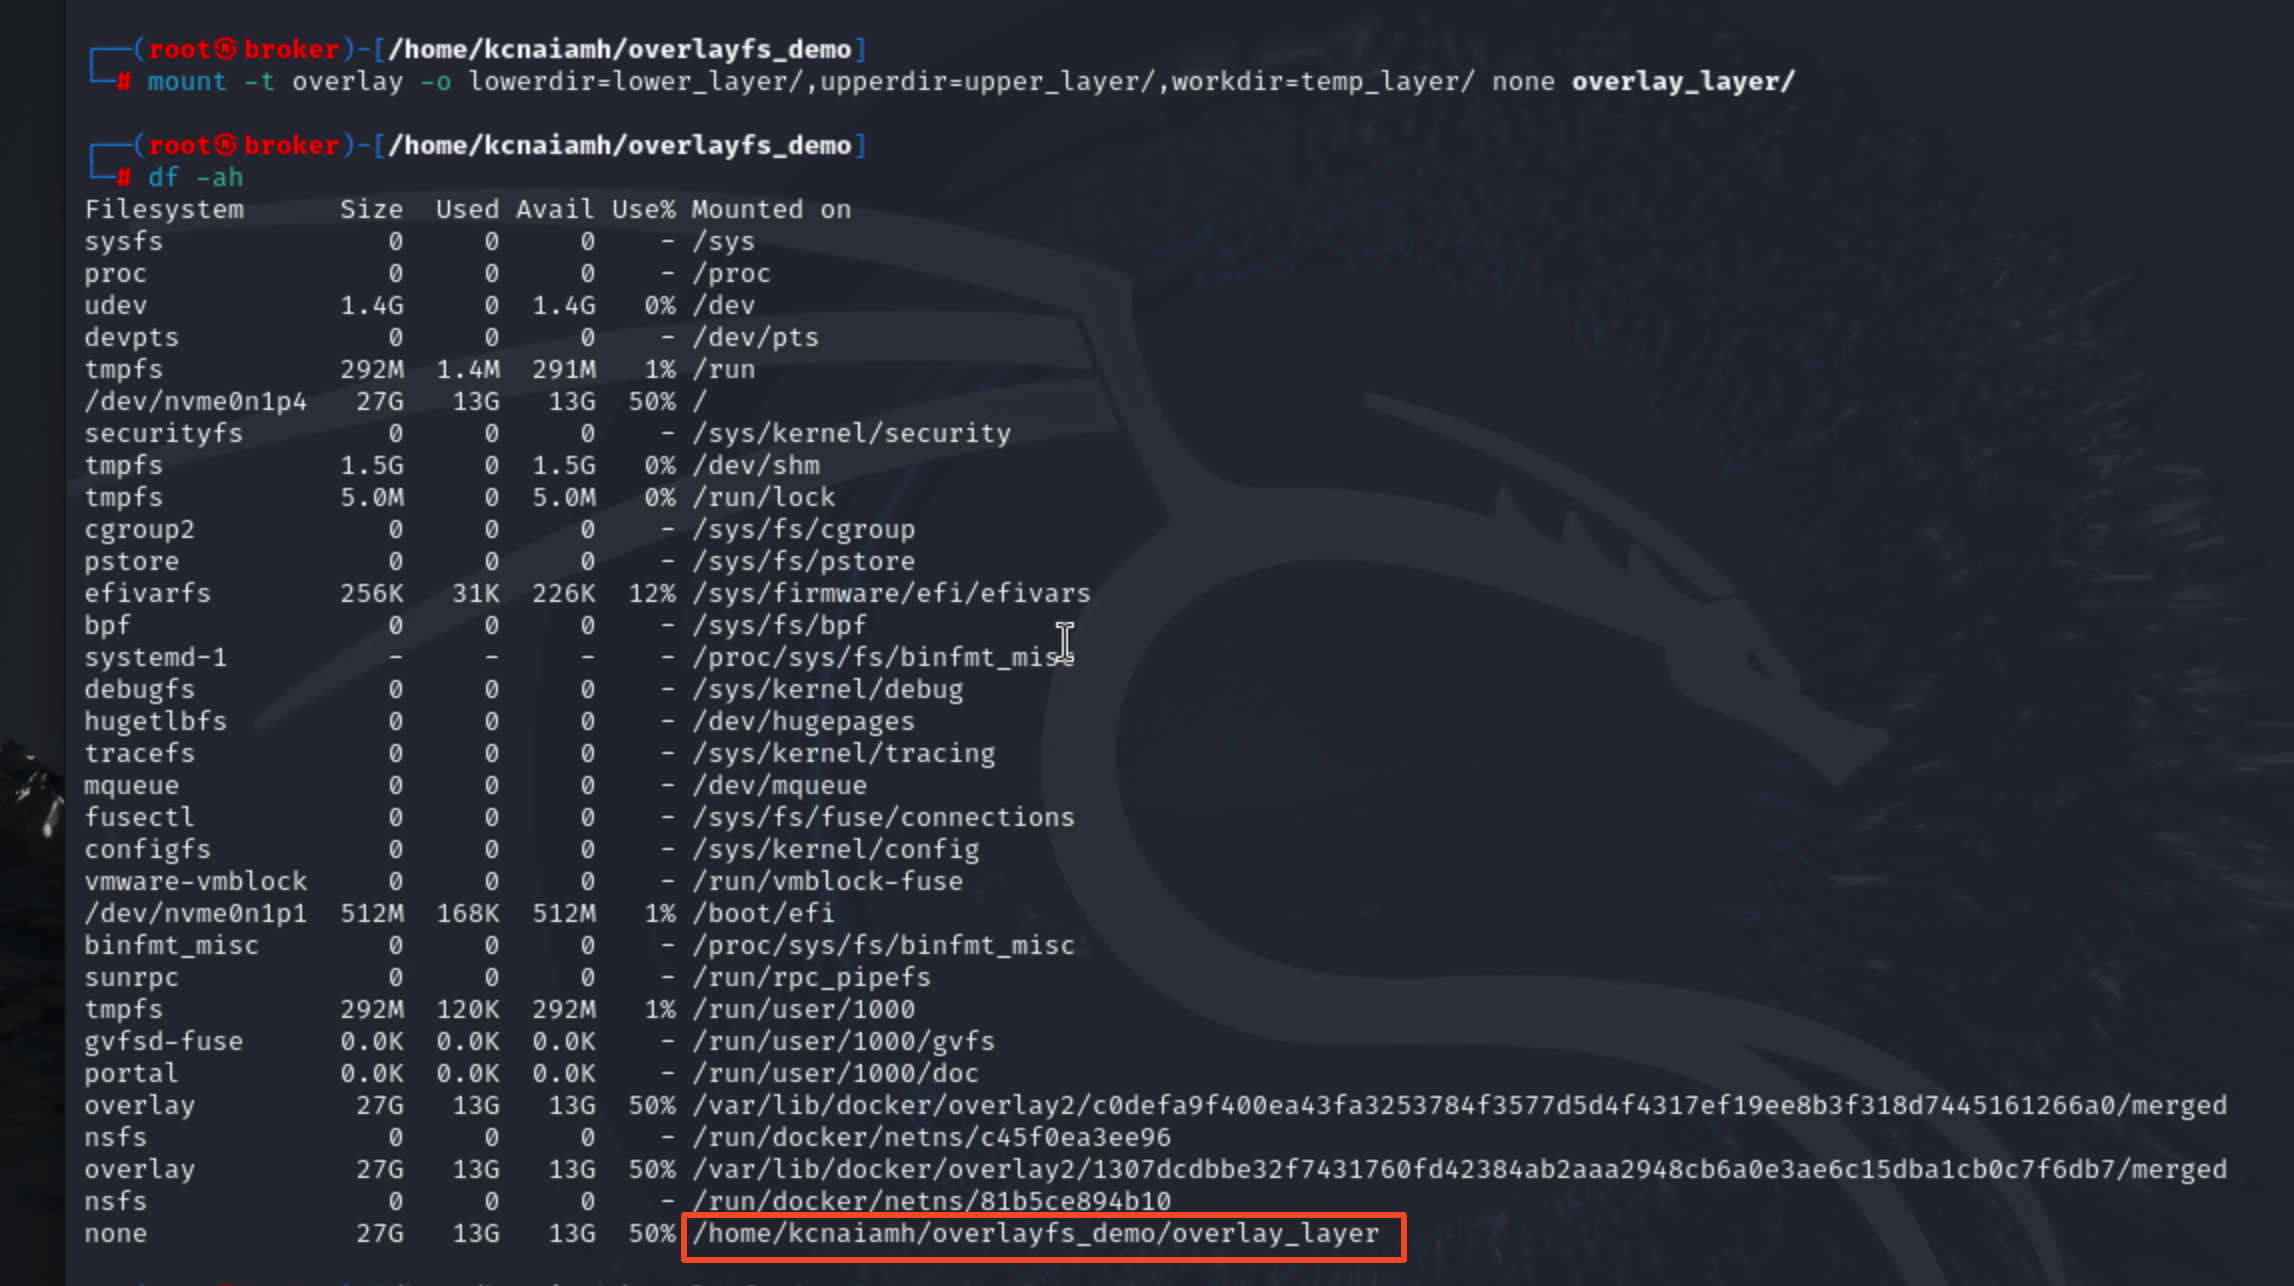
By running the df -ah command you can see that our overlay_layer is running as none file system
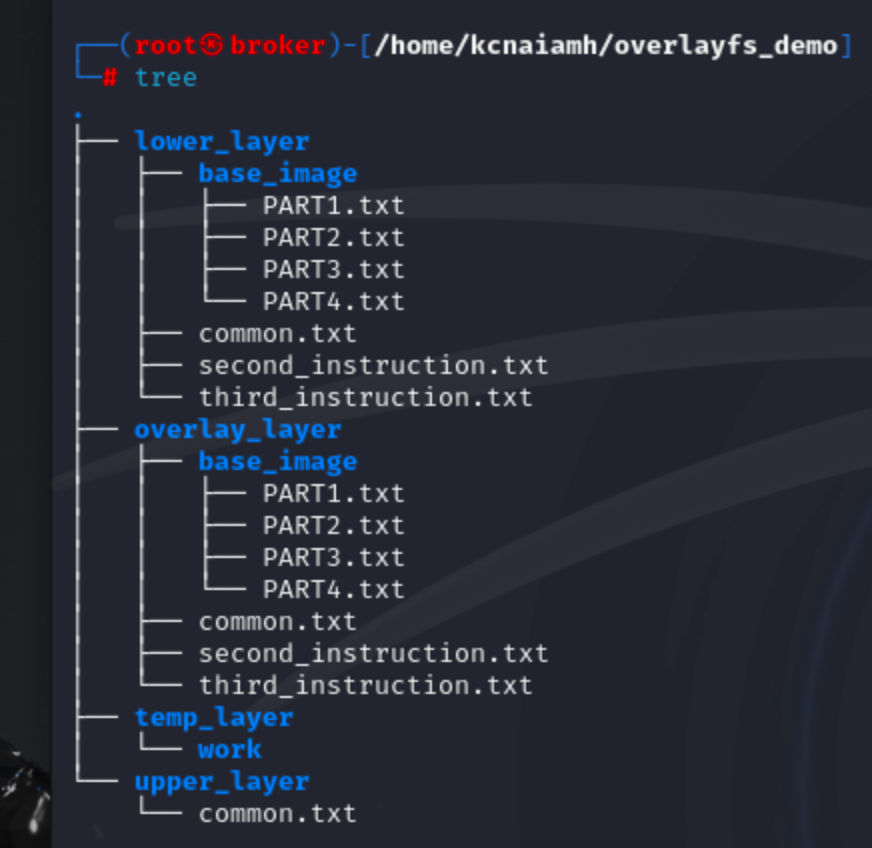
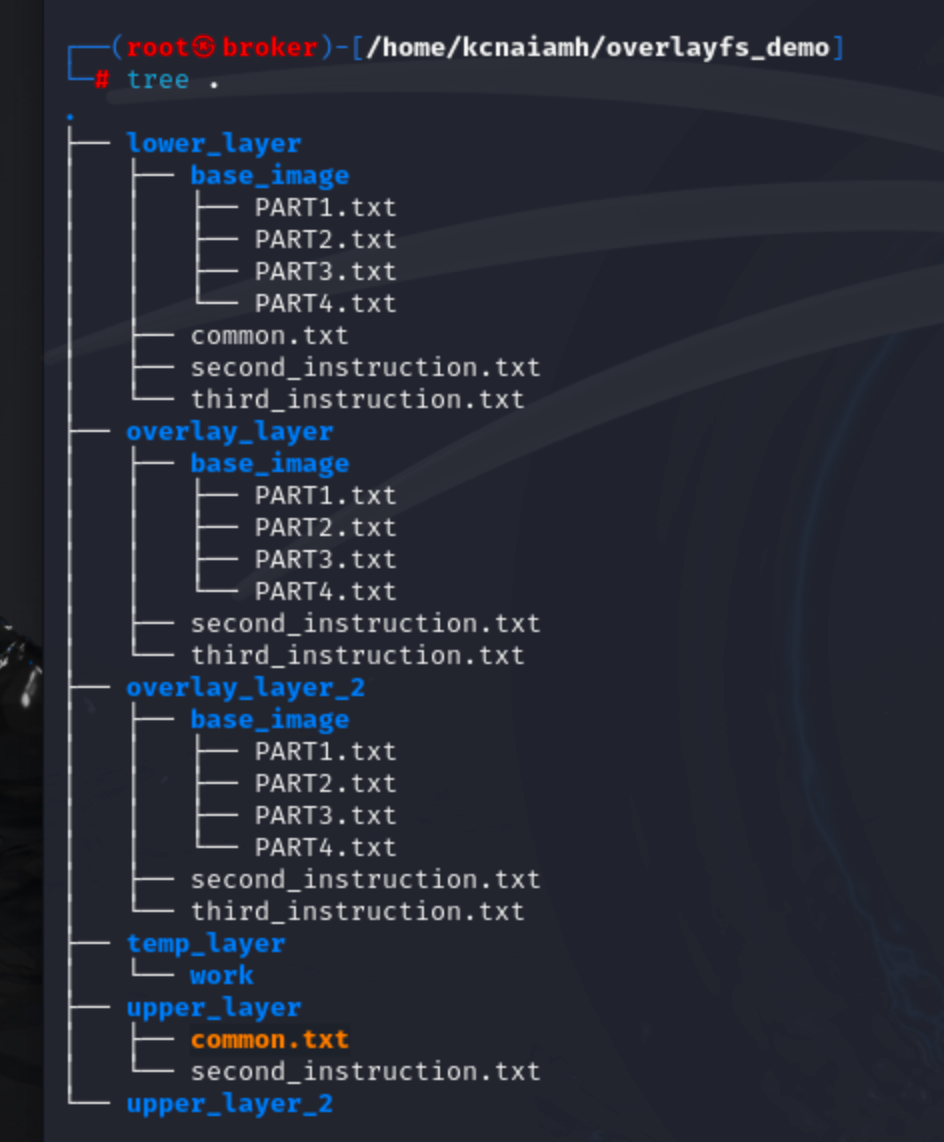
Using tree command we can see the structure includes several key layers: lower_layer, overlay_layer, temp_layer, and upper_layer.
The lower_layer represents the base image in our scenario, containing the foundational files upon which other layers build. Inside the base_image directory, we have several files named PART1.txt through PART4.txt, as well as common.txt, second_instruction.txt, and third_instruction.txt. These files form the initial content that is common across multiple layers.
The overlay_layer also contains a base_image directory mirroring the lower_layer. This layer includes identical files (PART1.txt through PART4.txt, second_instruction.txt, and third_instruction.txt), indicating that the overlay layer starts as a copy of the lower layer.
The temp_layer contains a work directory, which serves as a temporary workspace for OverlayFS to manage the merging of the lower and upper layers. This workspace is crucial for operations that modify the file system, ensuring consistency and stability.
Finally, the upper_layer contains only one file, common.txt, which contains different content common.txt file than the lower layer. Overlay layer only tracked the upper_layer's common.txt file.

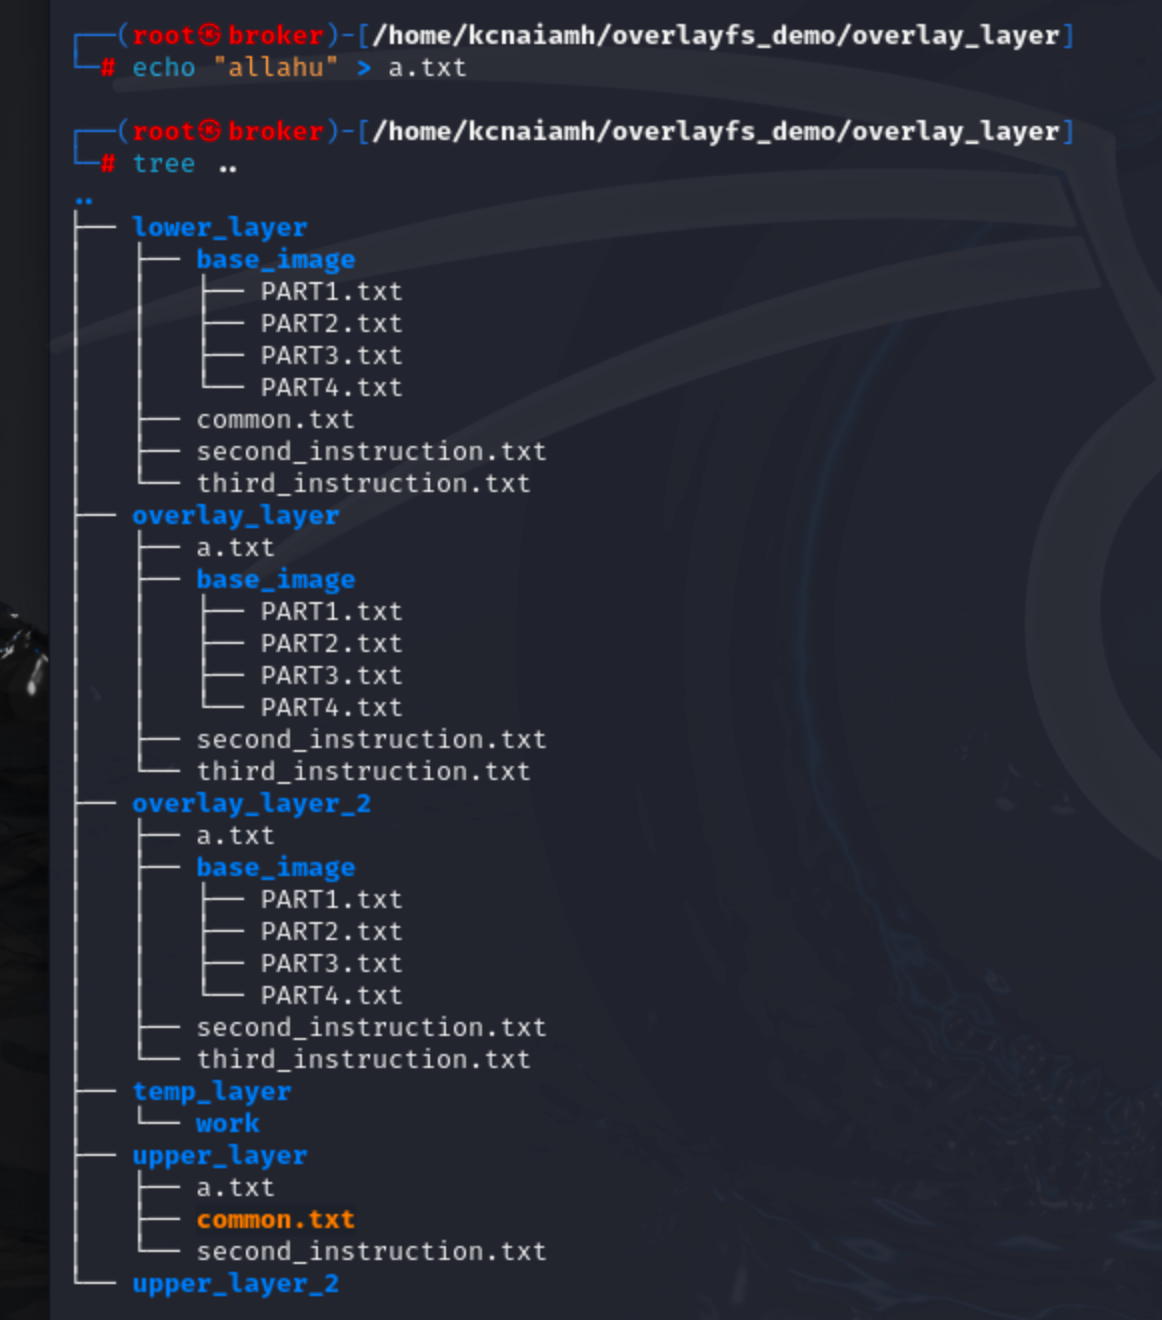
Now lets create a new file in overlay_layer folder. We can see that the newly created file is also inside the upper_layer folder.
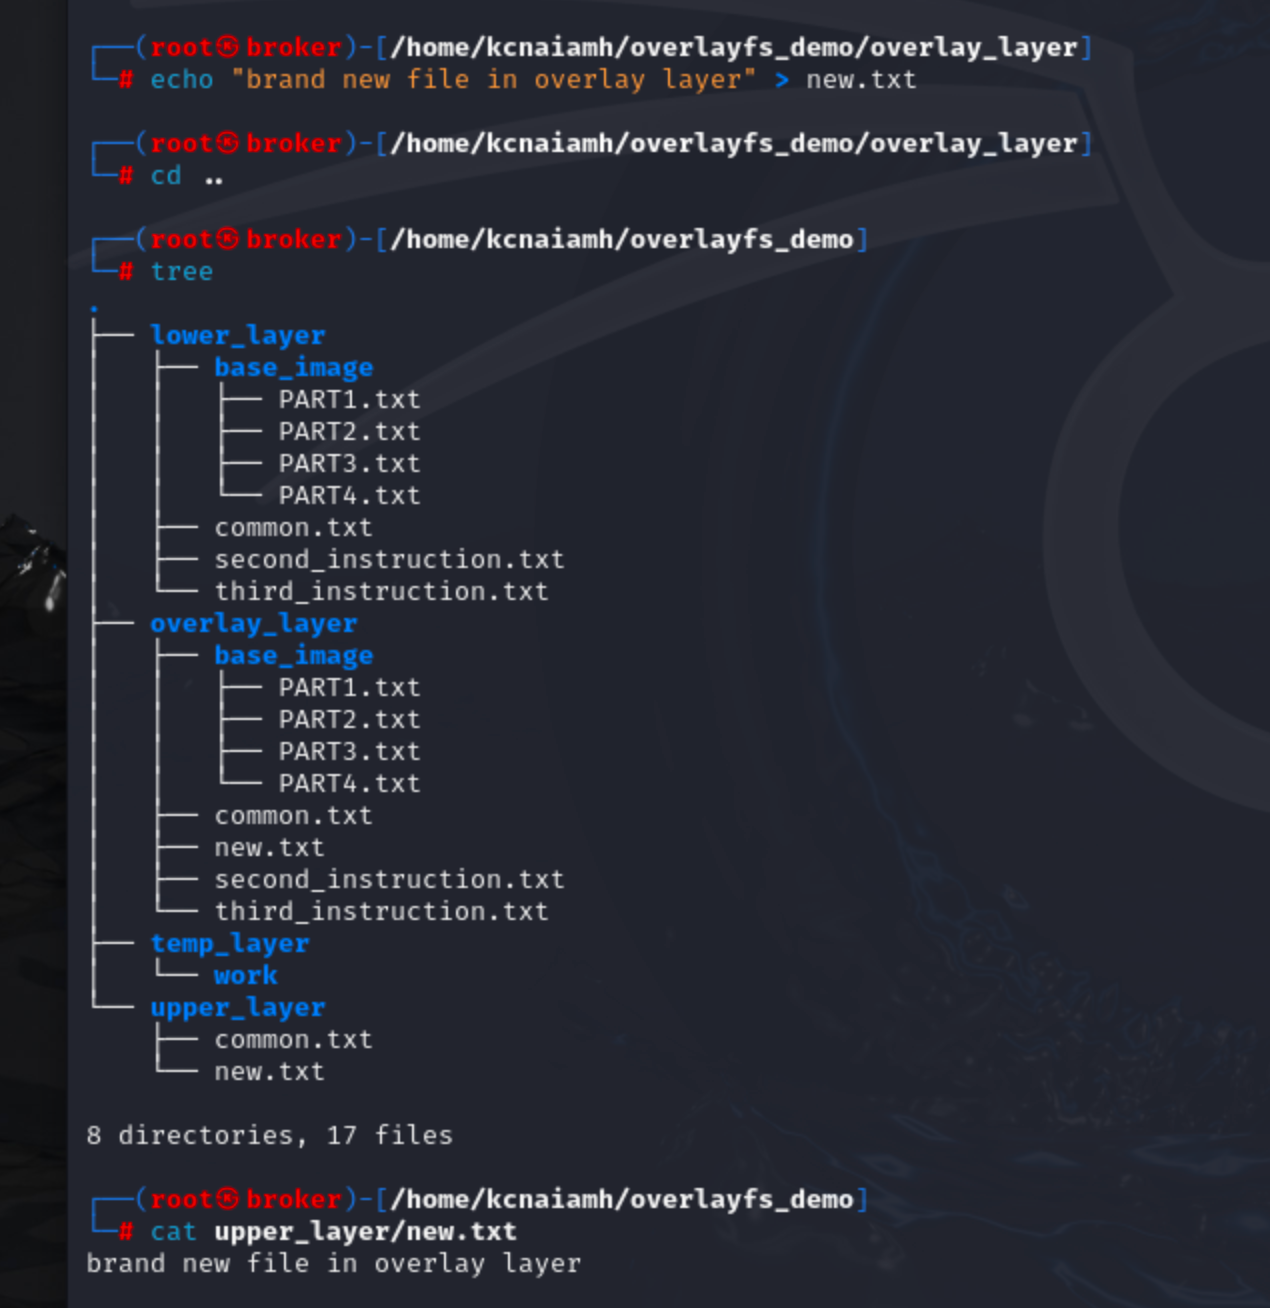
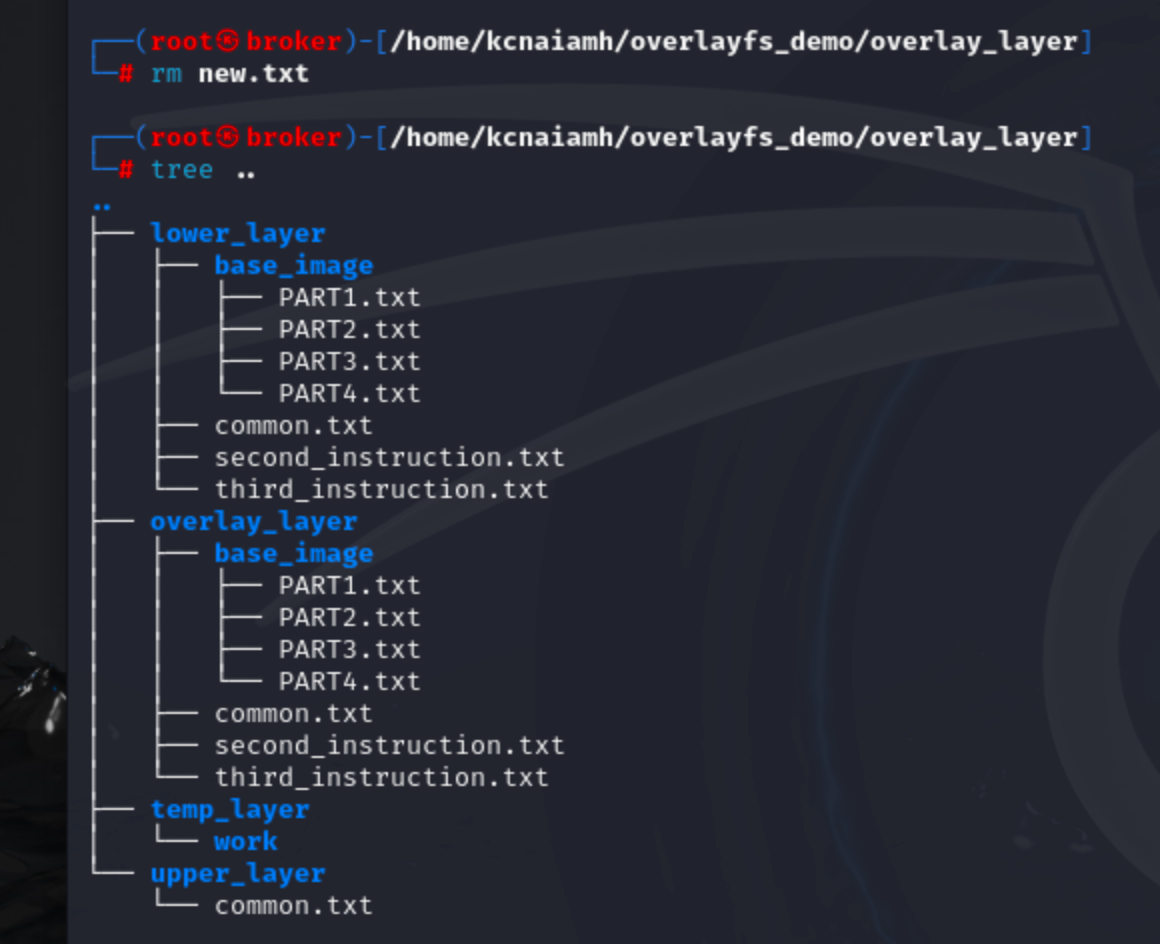
Deleting the newly created file also deletes from the upper_layer folder.
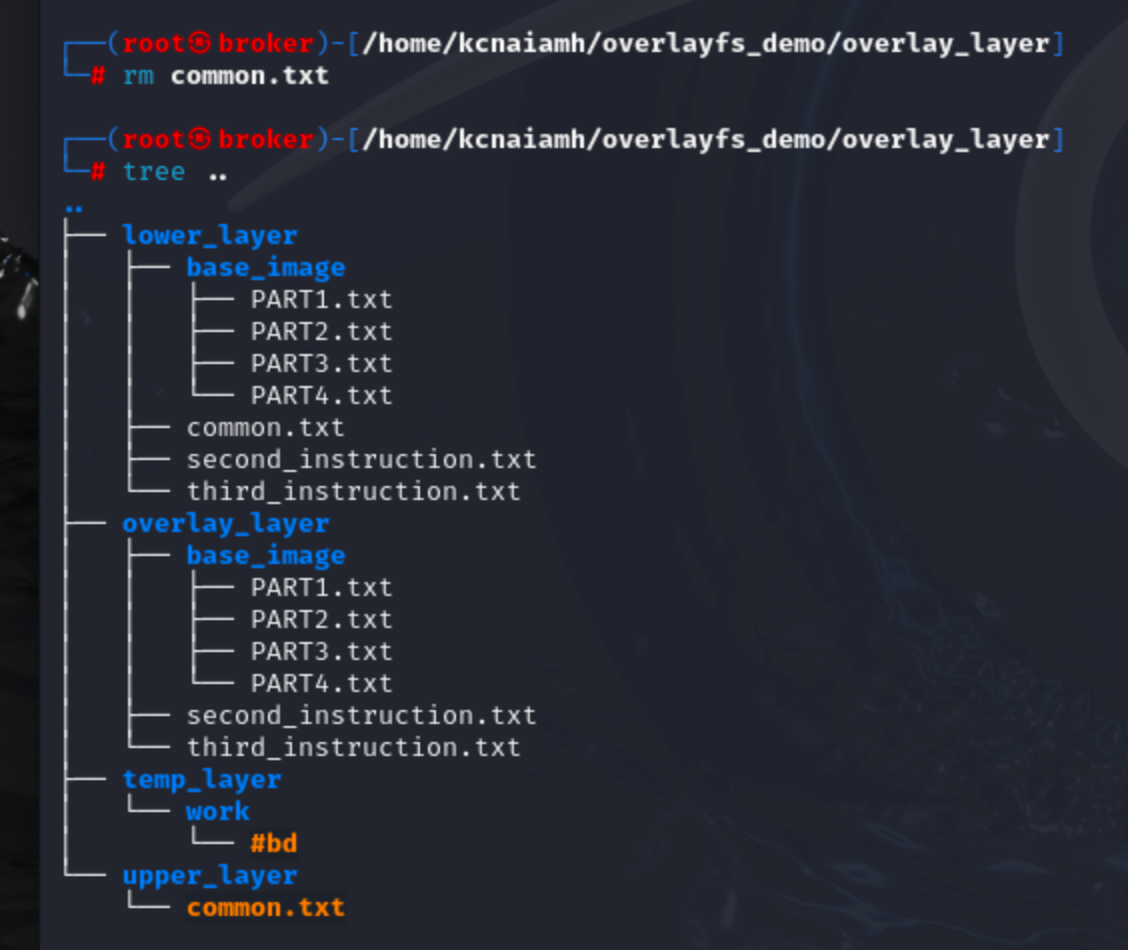
If we delete the common.txt file then it deletes the file from the overlay_layer and upper_layer folder but this also creates a character file inside upper_layer folder. This character file indicates that this file is deleted and so the common.txt file from the lower_layer is not copied to overlay_layer folder.
Now, lets update the second_instruction.txt file in overlay_layer folder.
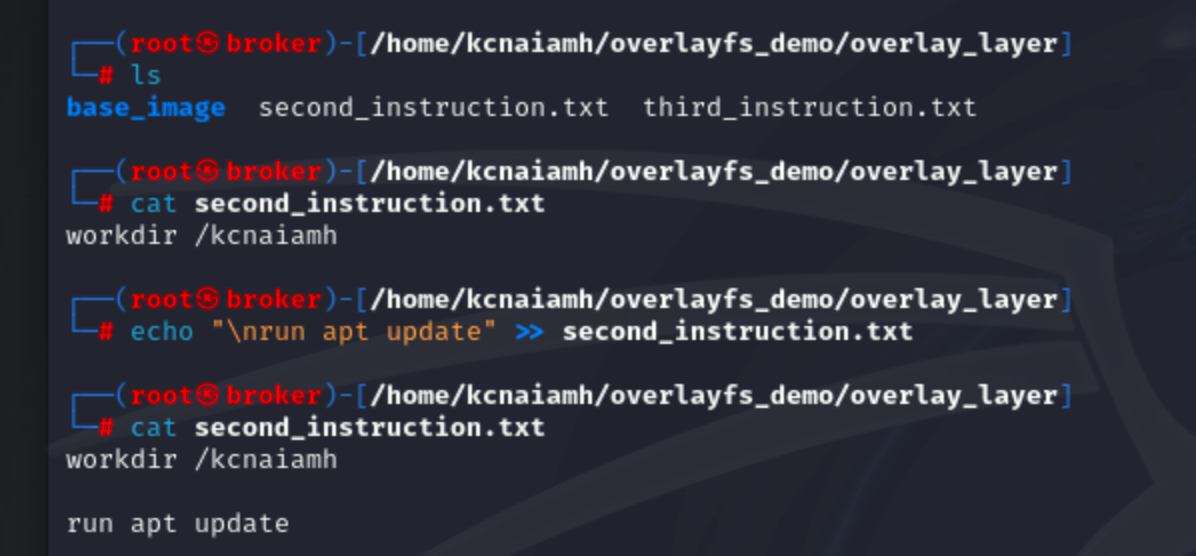
We can see that second_instruction.txt in upper_layer is updated, but lower_layer is as it was before.

So, we have understood how overlayFS works with two layers. How about there is multiple layers? like docker? Lets try to implement the following diagram.
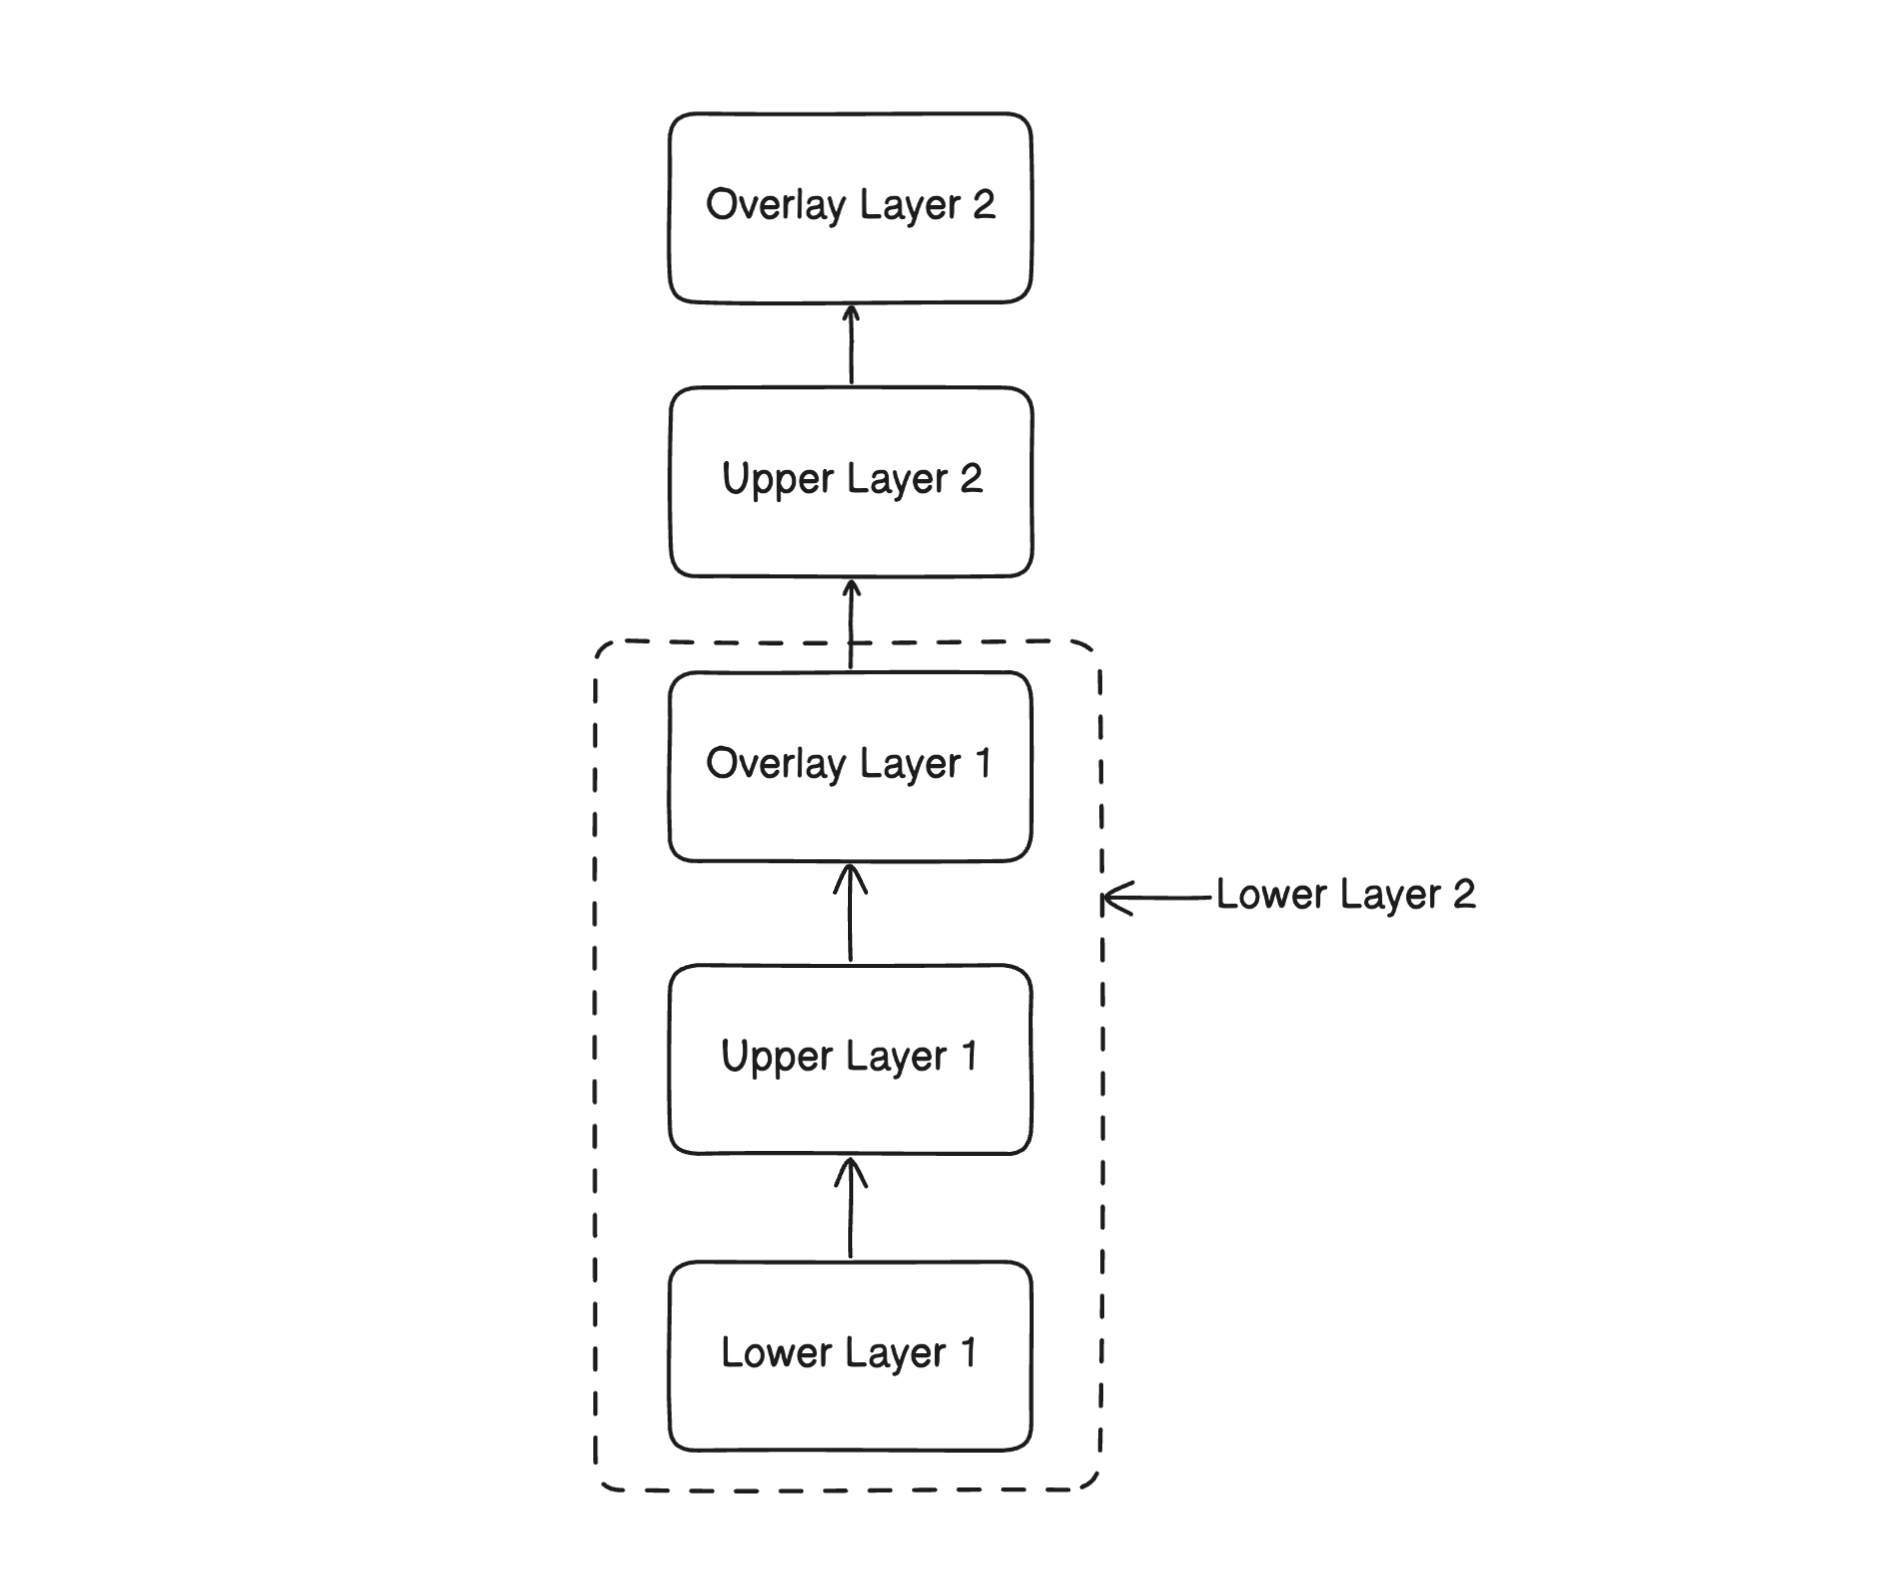
We will use the following command to build the OverlayFS structure like above diagram.
mount -t overlay -o lowerdir=overlay_layer/,upperdir=upper_layer_2/,\
workdir=temp_layer/ none overlay_layer_2/
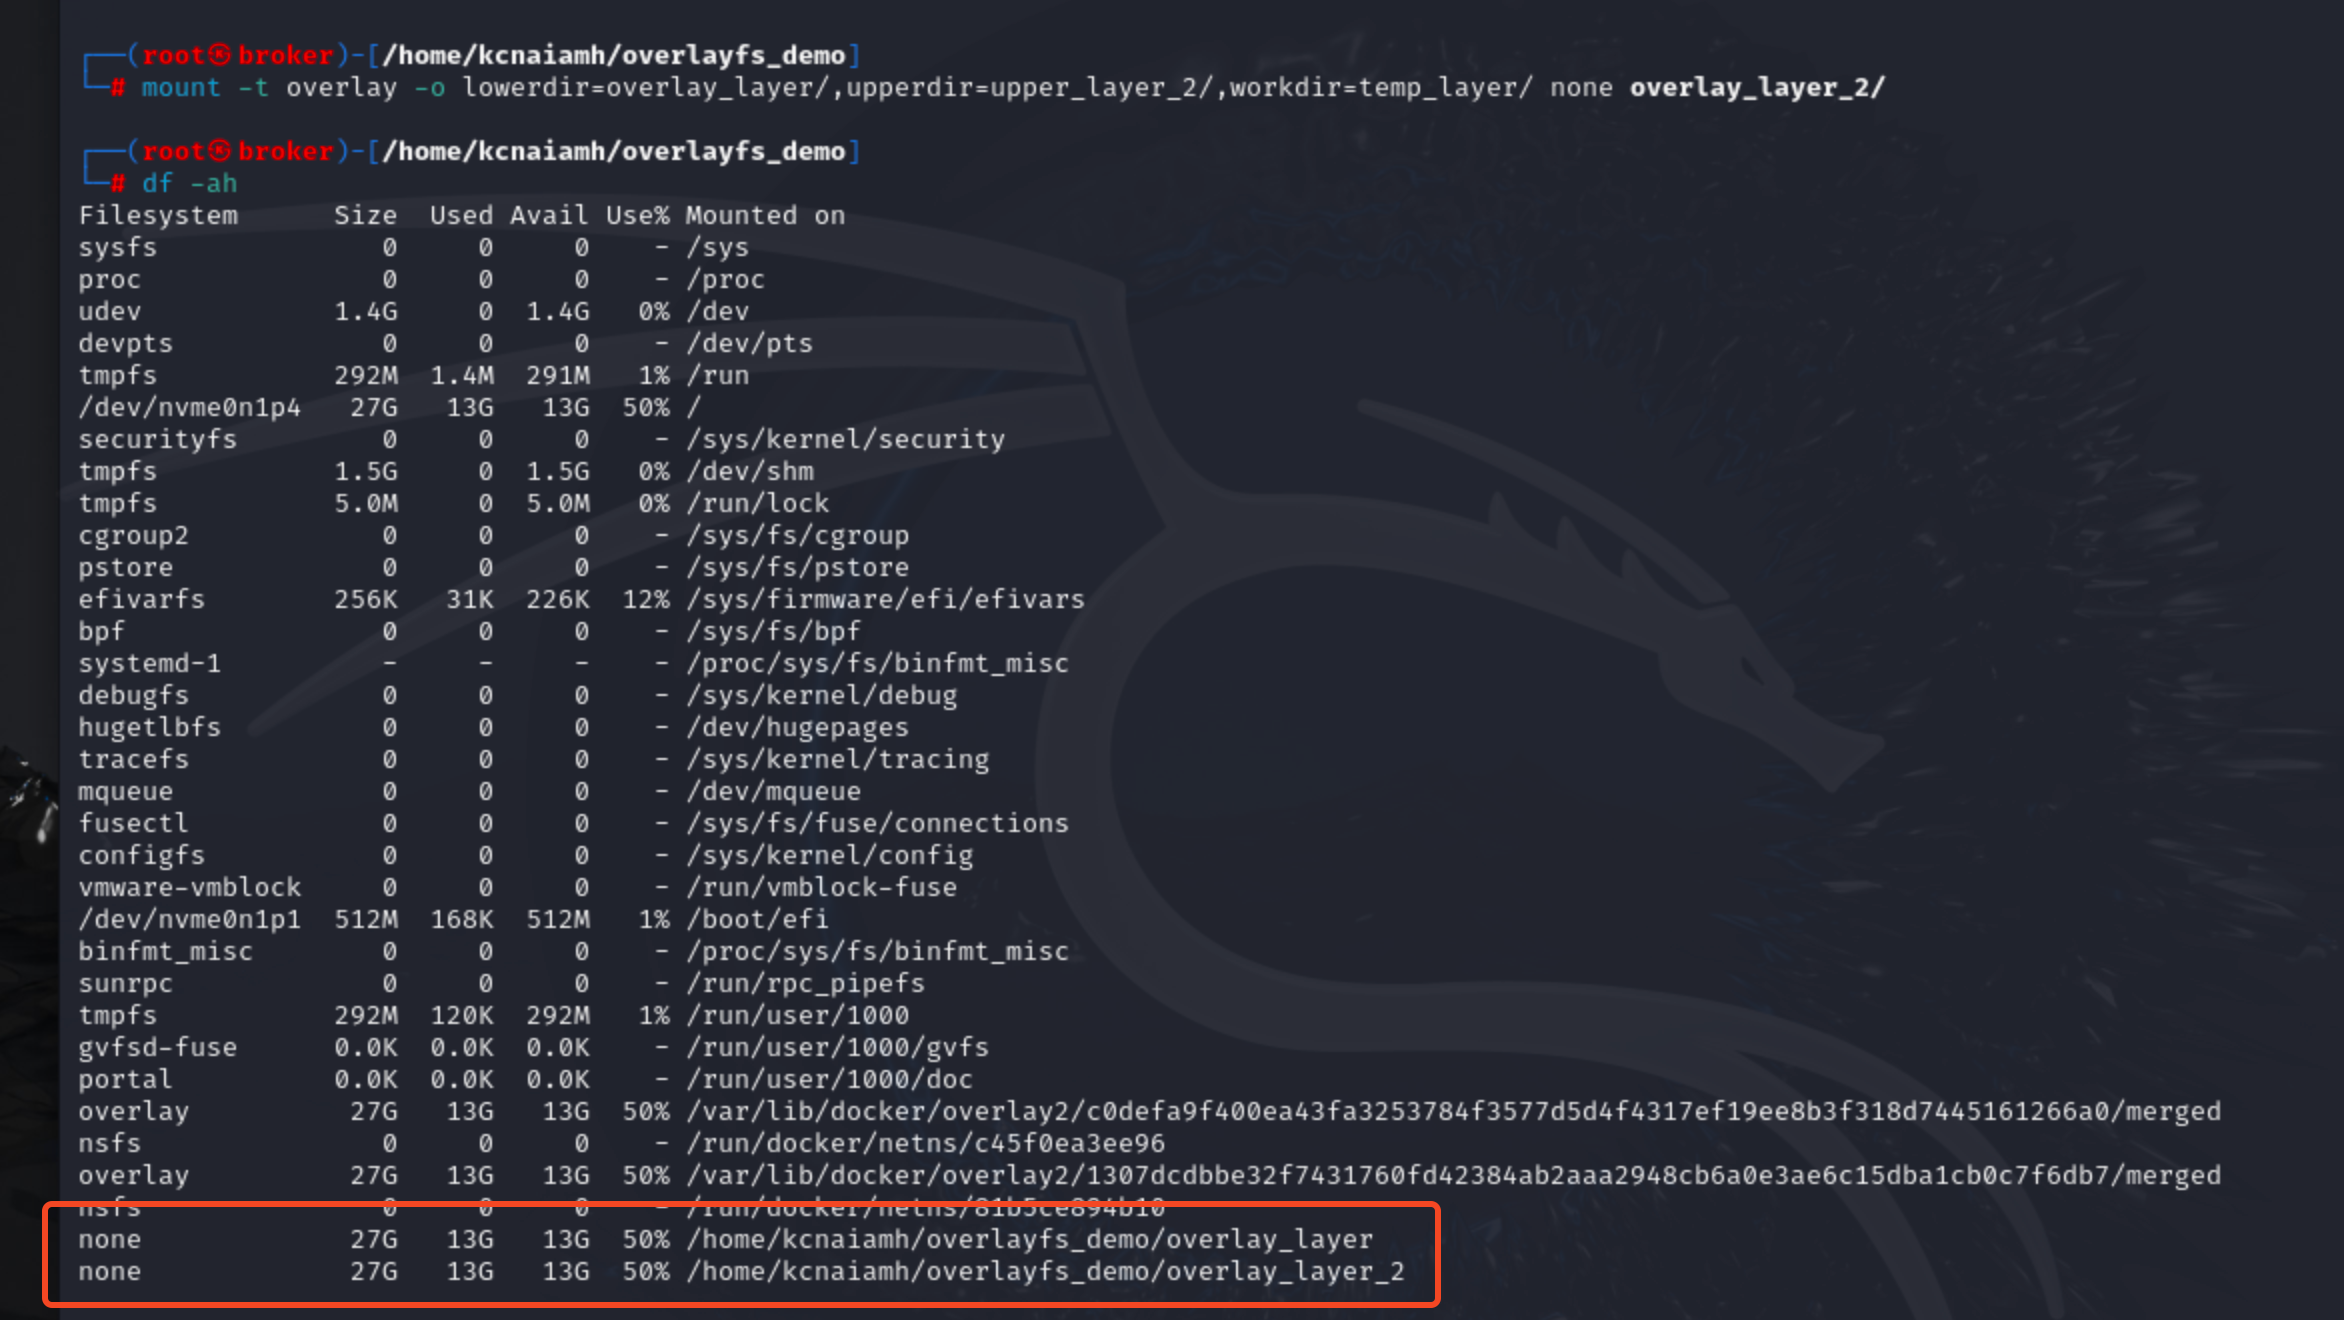
We can see overlay_layer_2 has everything identical as overlay_layer. So what happens when we update the overlay_layer now?
We can see, after creating a new file a.txt inside overlay_layer, upper_layer and overlay_layer_2 also updated with the new file.
When we create a new file inside overlay_layer_2, it updates the upper_layer_2 only.
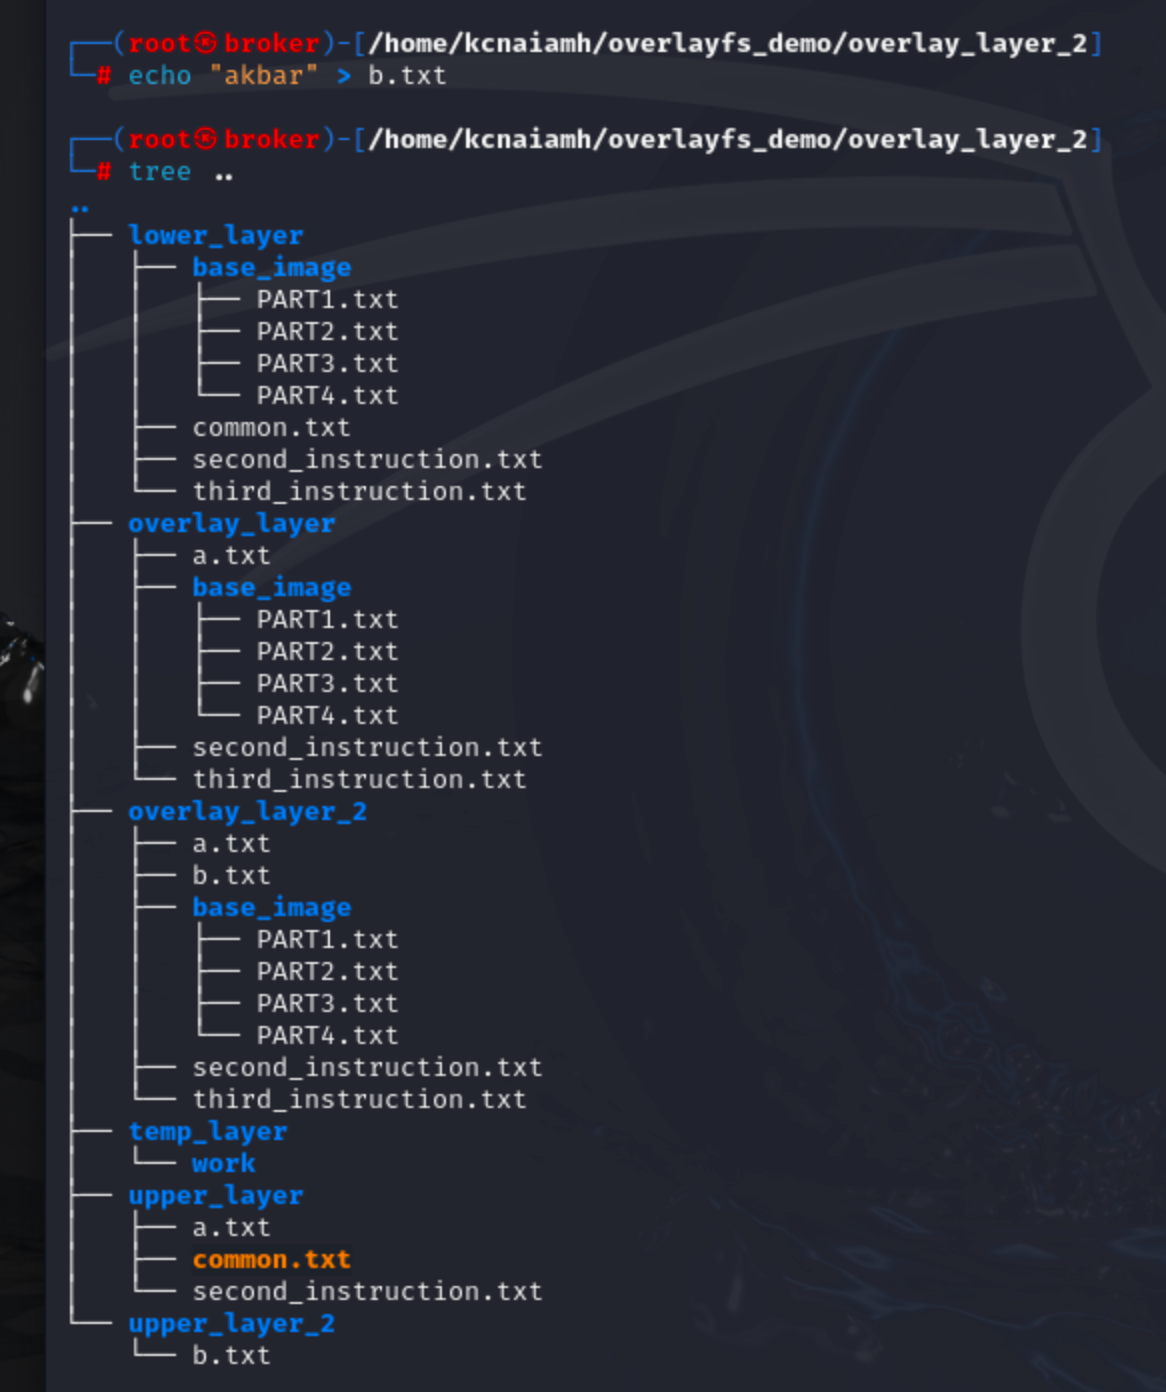
The above observation tells us that overlay_layer_2 is treating overlay_layer as lower layer. So, any update inside overlay_layer_2 will not reflect inside overlay_layer, but updating overlay_layer will reflect inside the overlay_layer_2.
Now lets strengthend our understanding on overlayFS by investigating the changes with docker image and containers.
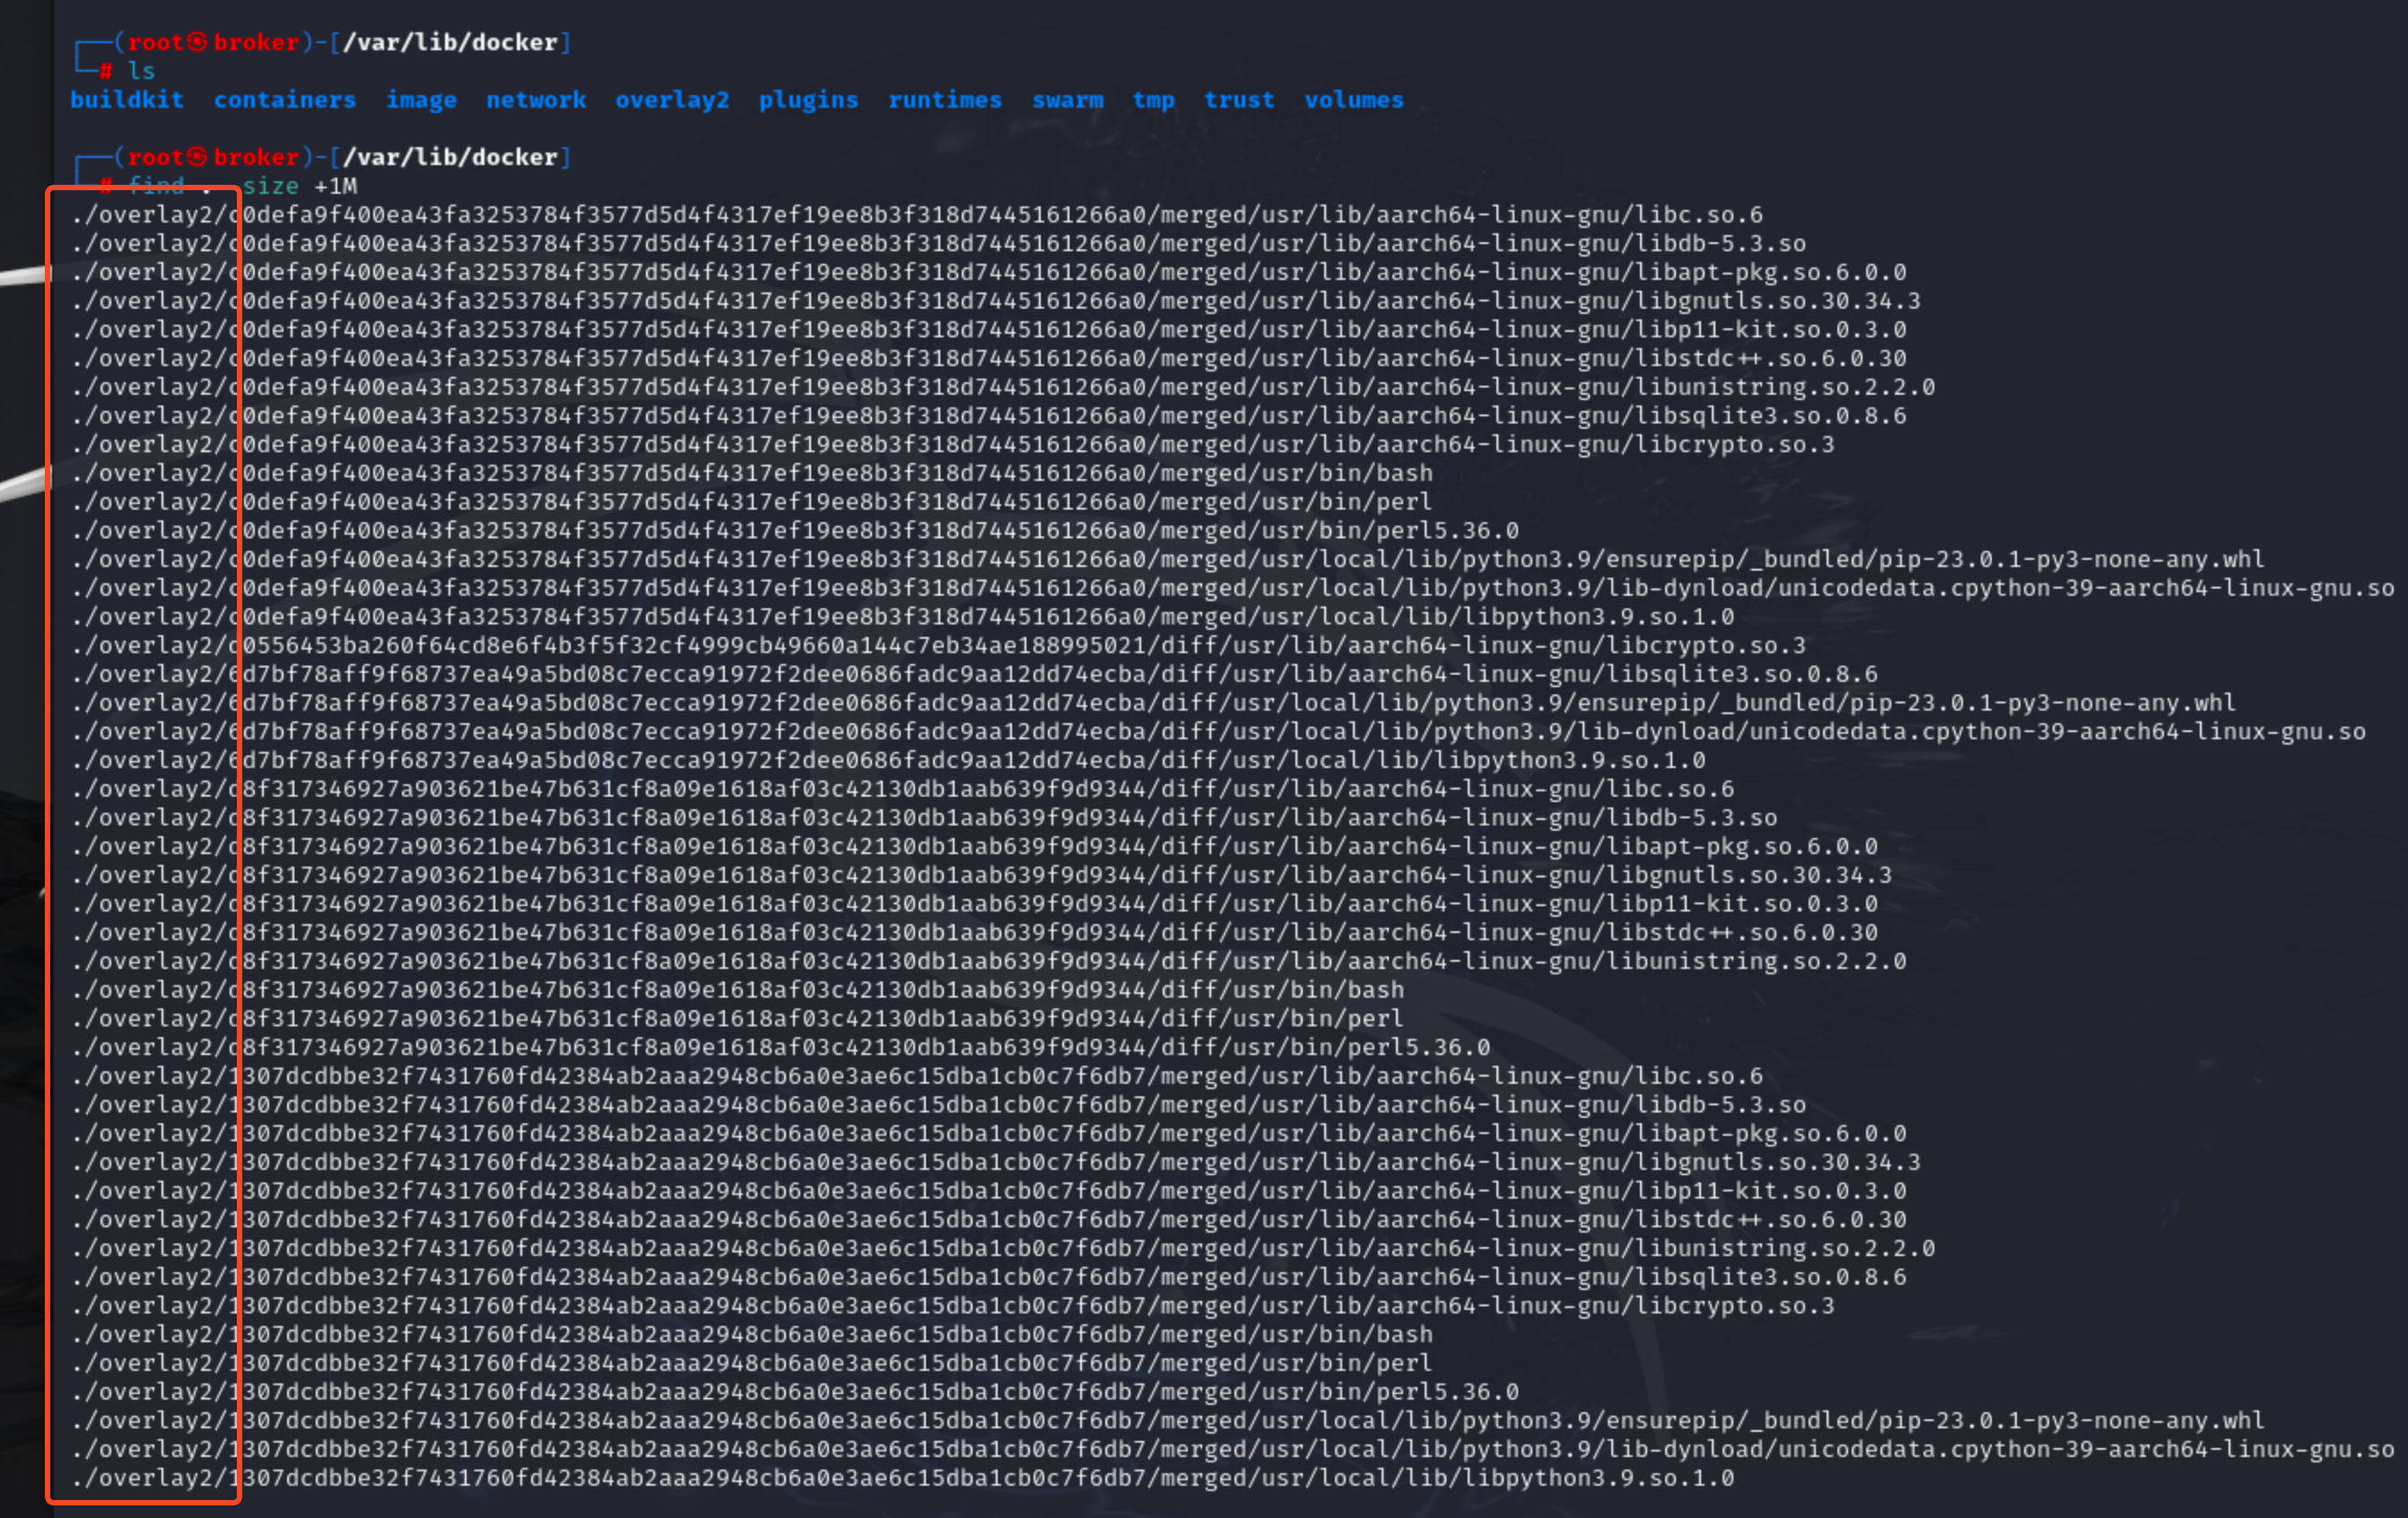
The /var/lib/docker directory is the backbone of Docker's storage and runtime environment. This directory houses everything from images and containers to volumes and network configurations. To identify files larger than 1 megabyte within this directory, we can use the command find . -size +1M. Upon running this command, we discover that all such files are located in the overlay2 directory. This indicates that Docker stores its images and containers within the overlay2 directory.
When you first install Docker on a Linux system, you will notice that the /var/lib/docker/overlay2 directory is initially empty. However, as you start interacting with Docker—pulling images from a registry, creating containers, and committing containers into images—this directory will begin to populate and grow in size.
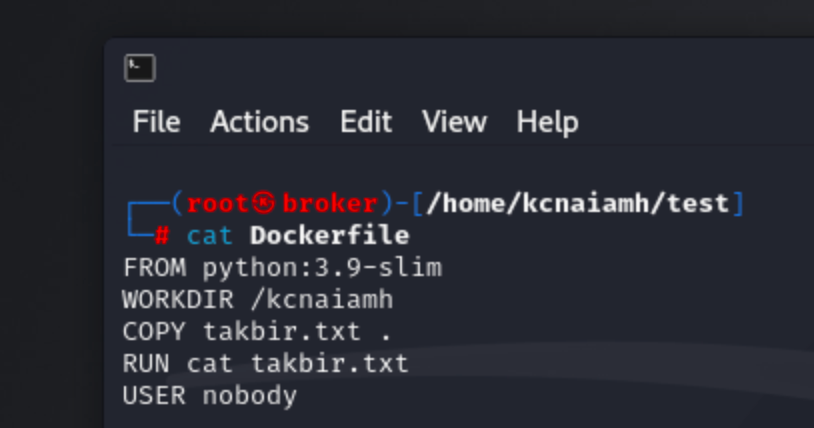
Now, lets build an image with dockerfile on a fresh machine. We are using the following dockefile to build an image. The Dockerfile sets up a container by first using the lightweight python:3.9-slim image as its base. It then sets the working directory inside the container to /kcnaiamh. The takbir.txt file from the local machine is copied into this directory. The RUN instruction executes the cat takbir.txt command, displaying the contents of the file. Finally, the USER nobody command specifies that the container should run as the nobody user for increased security.
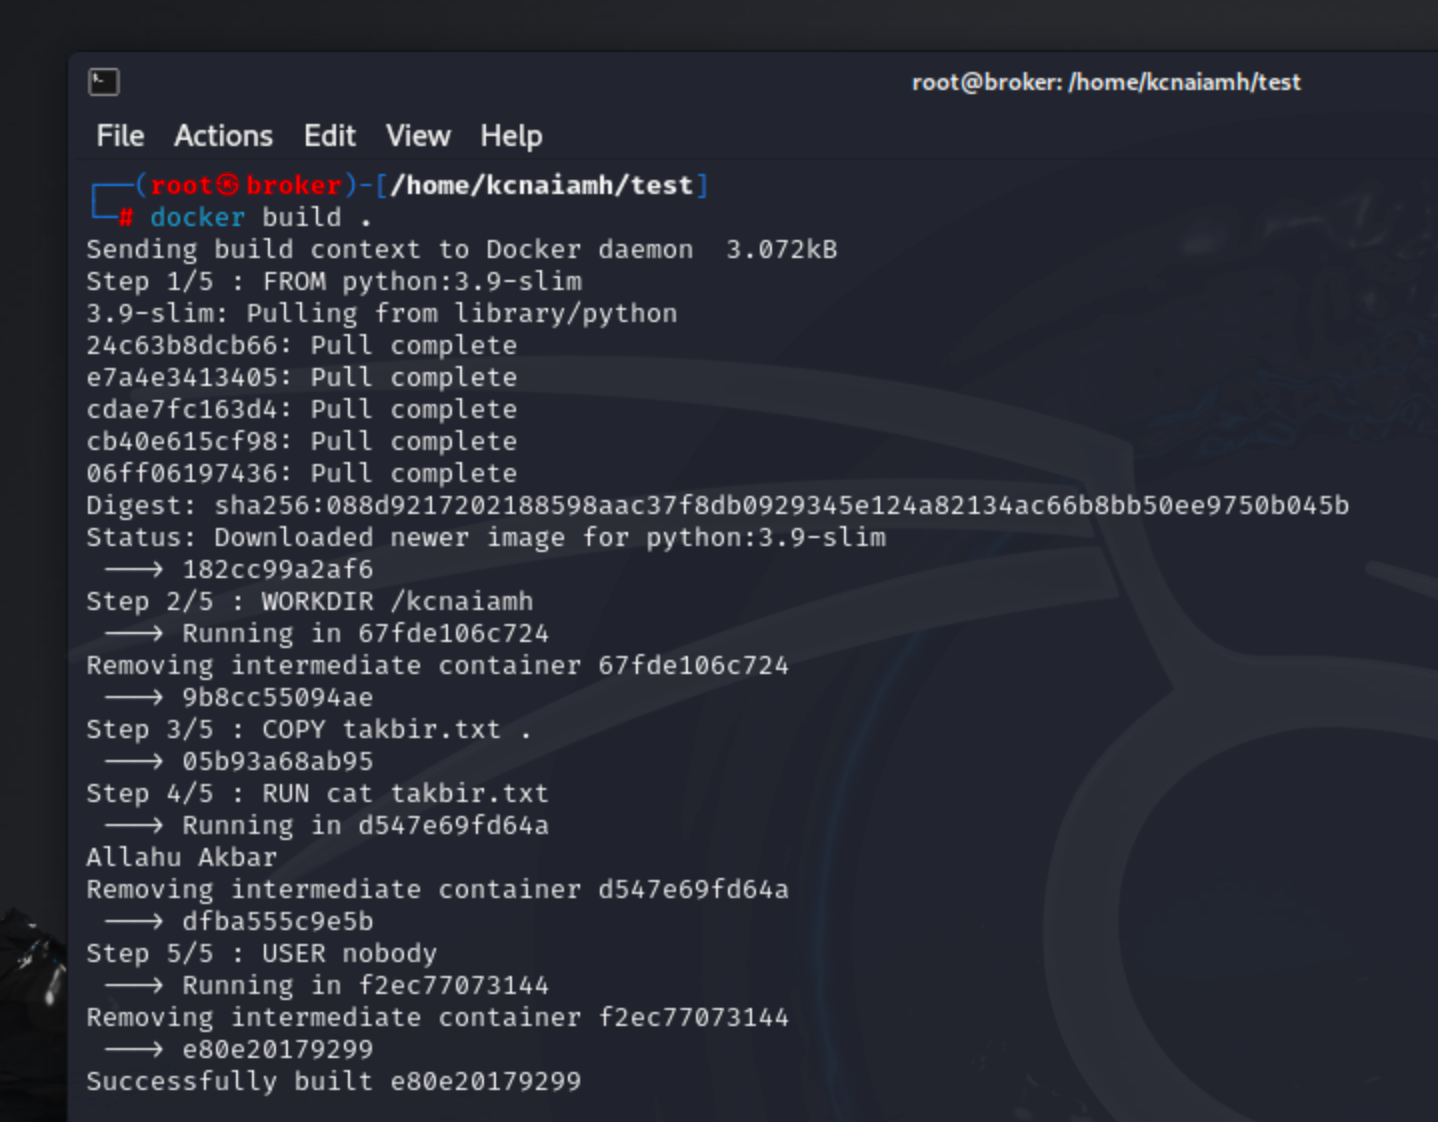
After running the docker build . command, Docker initiates the process of creating an image based on the instructions specified in the Dockerfile. Below, lets outline the detailed steps involved in this process.
The first step involves sending the build context to the Docker daemon. The build context includes all files and directories that will be used during the build process. In this case, the context is quite small, only 3.072kB, as it only contains the Dockerfile and the takbir.txt file.
The build process starts with the instruction FROM python:3.9-slim, which sets the base image for the build. Since this image is not already present on the local machine, Docker pulls it from the Docker Hub repository. The output shows five layers being downloaded (24c63b8dcb66, e7a43413405, cdae7c163d4, cb40e615cf98, 06ff06197436), which are different parts of the base image. After all layers are pulled, the image is verified by its digest (sha256:088d9217202188598aac37f8db0929345e124a82134ac66b8bb50ee9750b045b), ensuring its integrity. This step completes with the base image being ready, indicated by the image ID 182cc99a2af6.
The second instruction is WORKDIR /kcnaiamh, which sets the working directory inside the container to /kcnaiamh. Docker creates a temporary container to execute this instruction and then removes the container once the instruction is successfully applied, resulting in the intermediate image ID 9b8cc55094ae.
The third step is COPY takbir.txt ., which copies the takbir.txt file from the build context to the current working directory inside the image. The resulting intermediate image is identified by 05b93a68ab95.
The fourth instruction, RUN cat takbir.txt, runs the command cat takbir.txt inside the container. This command outputs the contents of the file ("Allahu Akbar") to the console. Docker again creates a temporary container to execute the command, and after successful execution, removes the container. The intermediate image ID at this stage is dfba555c9e5b.
The final instruction is USER nobody, which changes the user context for the container to nobody for security purposes. This instruction is also run in a temporary container, and upon successful completion, the intermediate container is removed. The resulting final image ID is e8020179299.
This final image can now be used to run containers with the specified configuration.
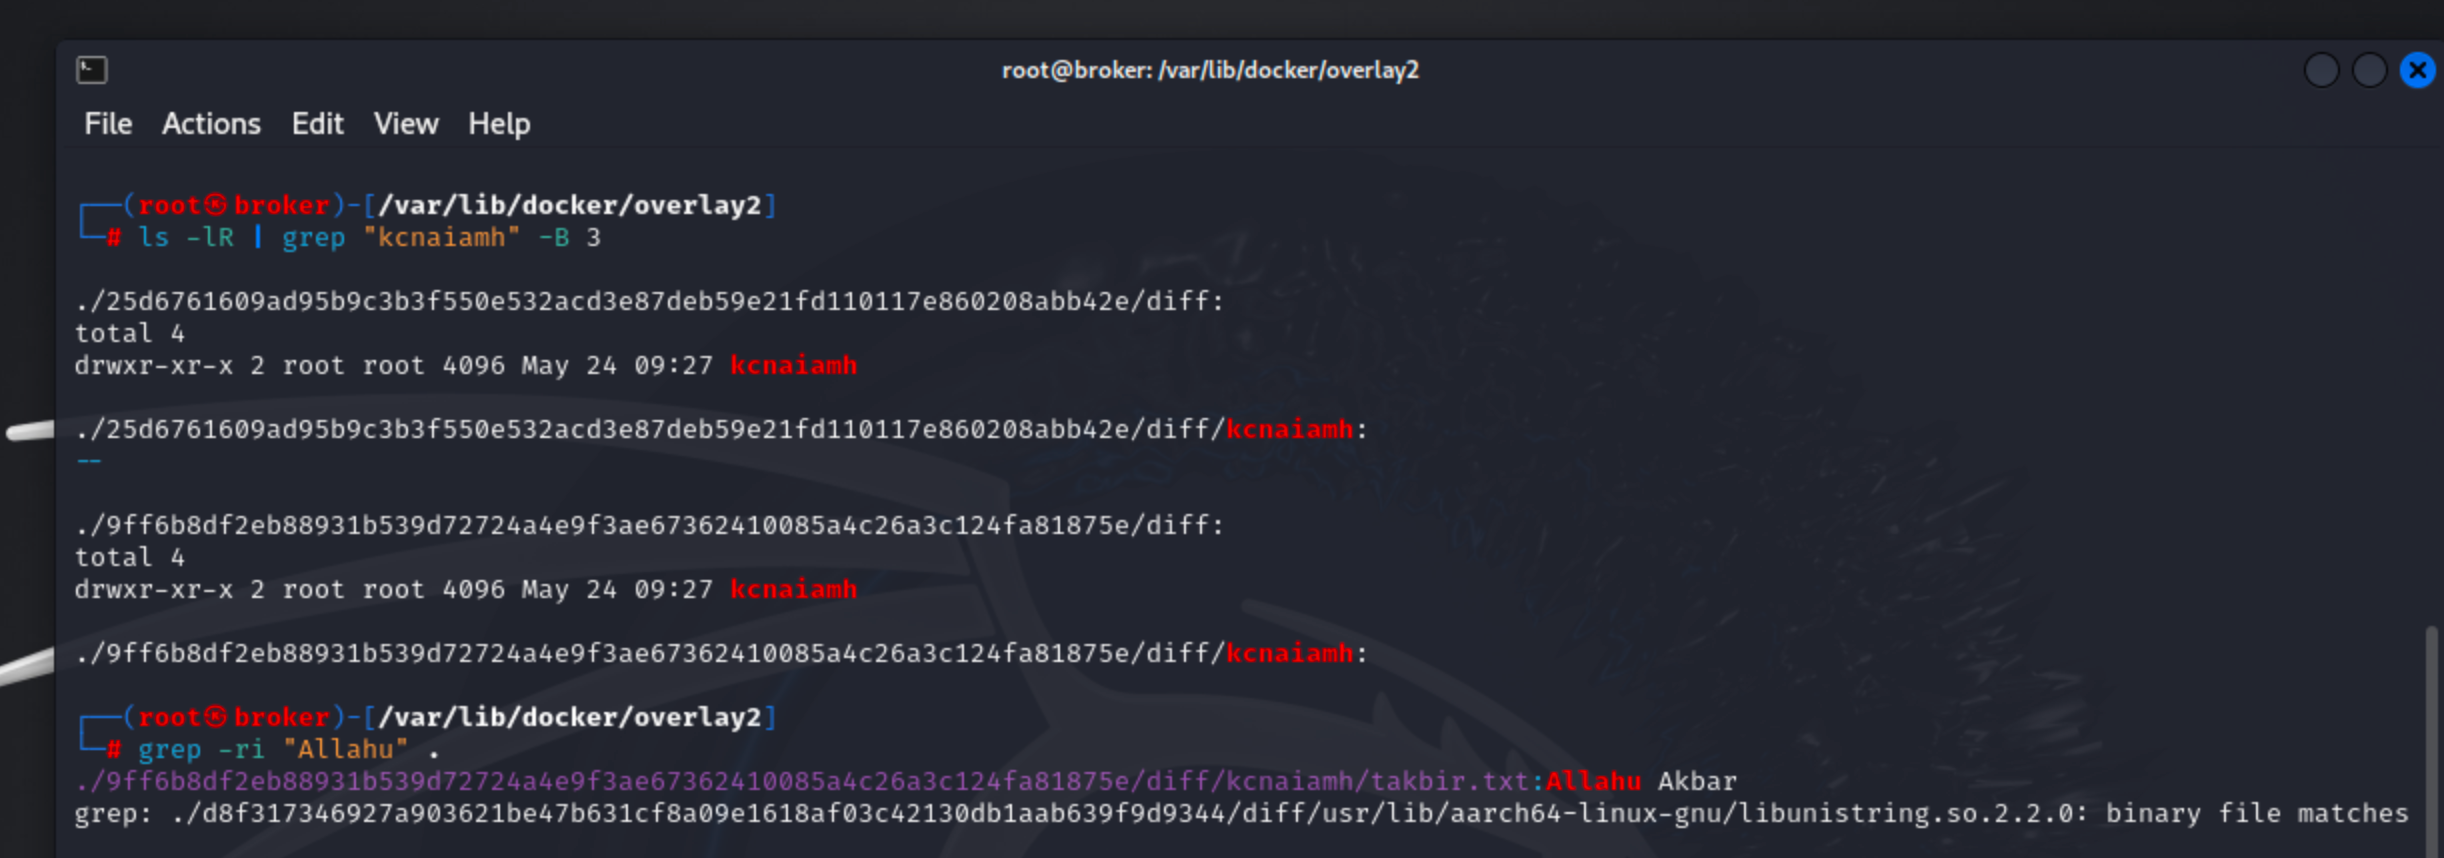
Previously, we observed that the /var/lib/docker/overlay2 directory was empty. Now that we have built the image, we should be able to find the kcnaiamh folder somewhere within this path. To locate it, we can use the command ls -1R | grep "kcnaiamh", which recursively lists directories and files, filtering the output to show only those containing the name "kcnaiamh".
The output indicates that the kcnaiamh directory is found within two different layers of the Docker overlay filesystem, specifically in paths starting with /25d6761609ad... and /9ff6b8df2eb8....
Next, we can use the command grep -ri "Allahu" to recursively search for the string "Allahu" within files. The search finds the string "Allahu Akbar" in the file located at /9ff6b8df2eb8.../kcnaiamh/takbir.txt, confirming the content previously displayed by the RUN cat takbir.txt command during the Docker build process.
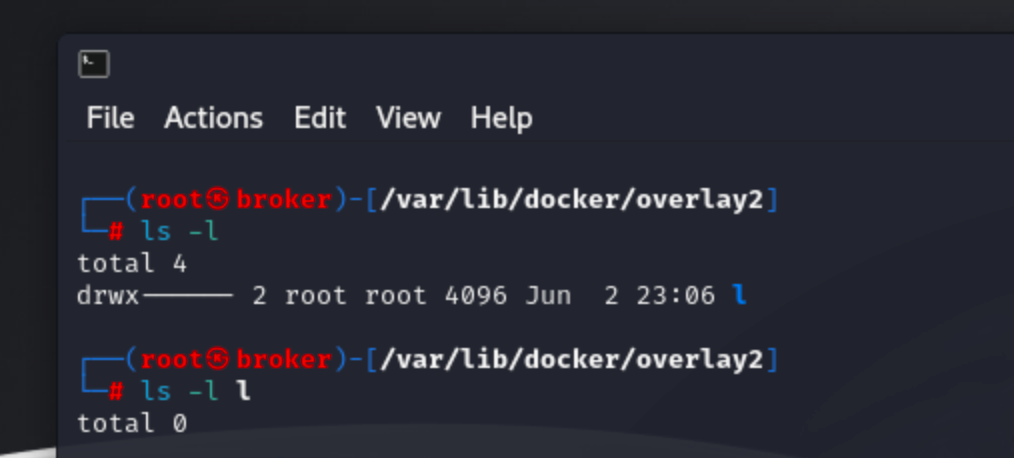
Let’s explore the contents of the /var/lib/docker/overlay2/l directory. After executing the ls -l command, we observe several hard links pointing to diff directories, which are located in different subdirectories under the overlay2 folder. This setup raises the question: What is the purpose of this l directory?
This directory is integral to Docker's overlay2 storage driver, which efficiently manages the layering of filesystem changes. The l directory stores hard links to files in the lower layers, optimizing Docker's ability to reference and share files across multiple layers without duplication. By using hard links, Docker ensures quick access to shared files, which enhances performance and reduces storage overhead. The overlay2 driver works by stacking read-only layers on top of each other. The role of the l folder is to maintain these references, making file management more efficient. This setup is crucial for maintaining the integrity and efficiency of Docker images and containers, particularly when dealing with complex layer hierarchies and numerous containers.
By leveraging the l directory and its hard links, Docker can efficiently manage the filesystem layers that comprise an image. This ensures that common files are stored only once on disk, while still being accessible from multiple layers. This architecture not only conserves storage space but also speeds up access to files, as the need for redundant copies is eliminated. Thus, the l directory is a key component in Docker’s strategy to streamline container storage and enhance overall performance.
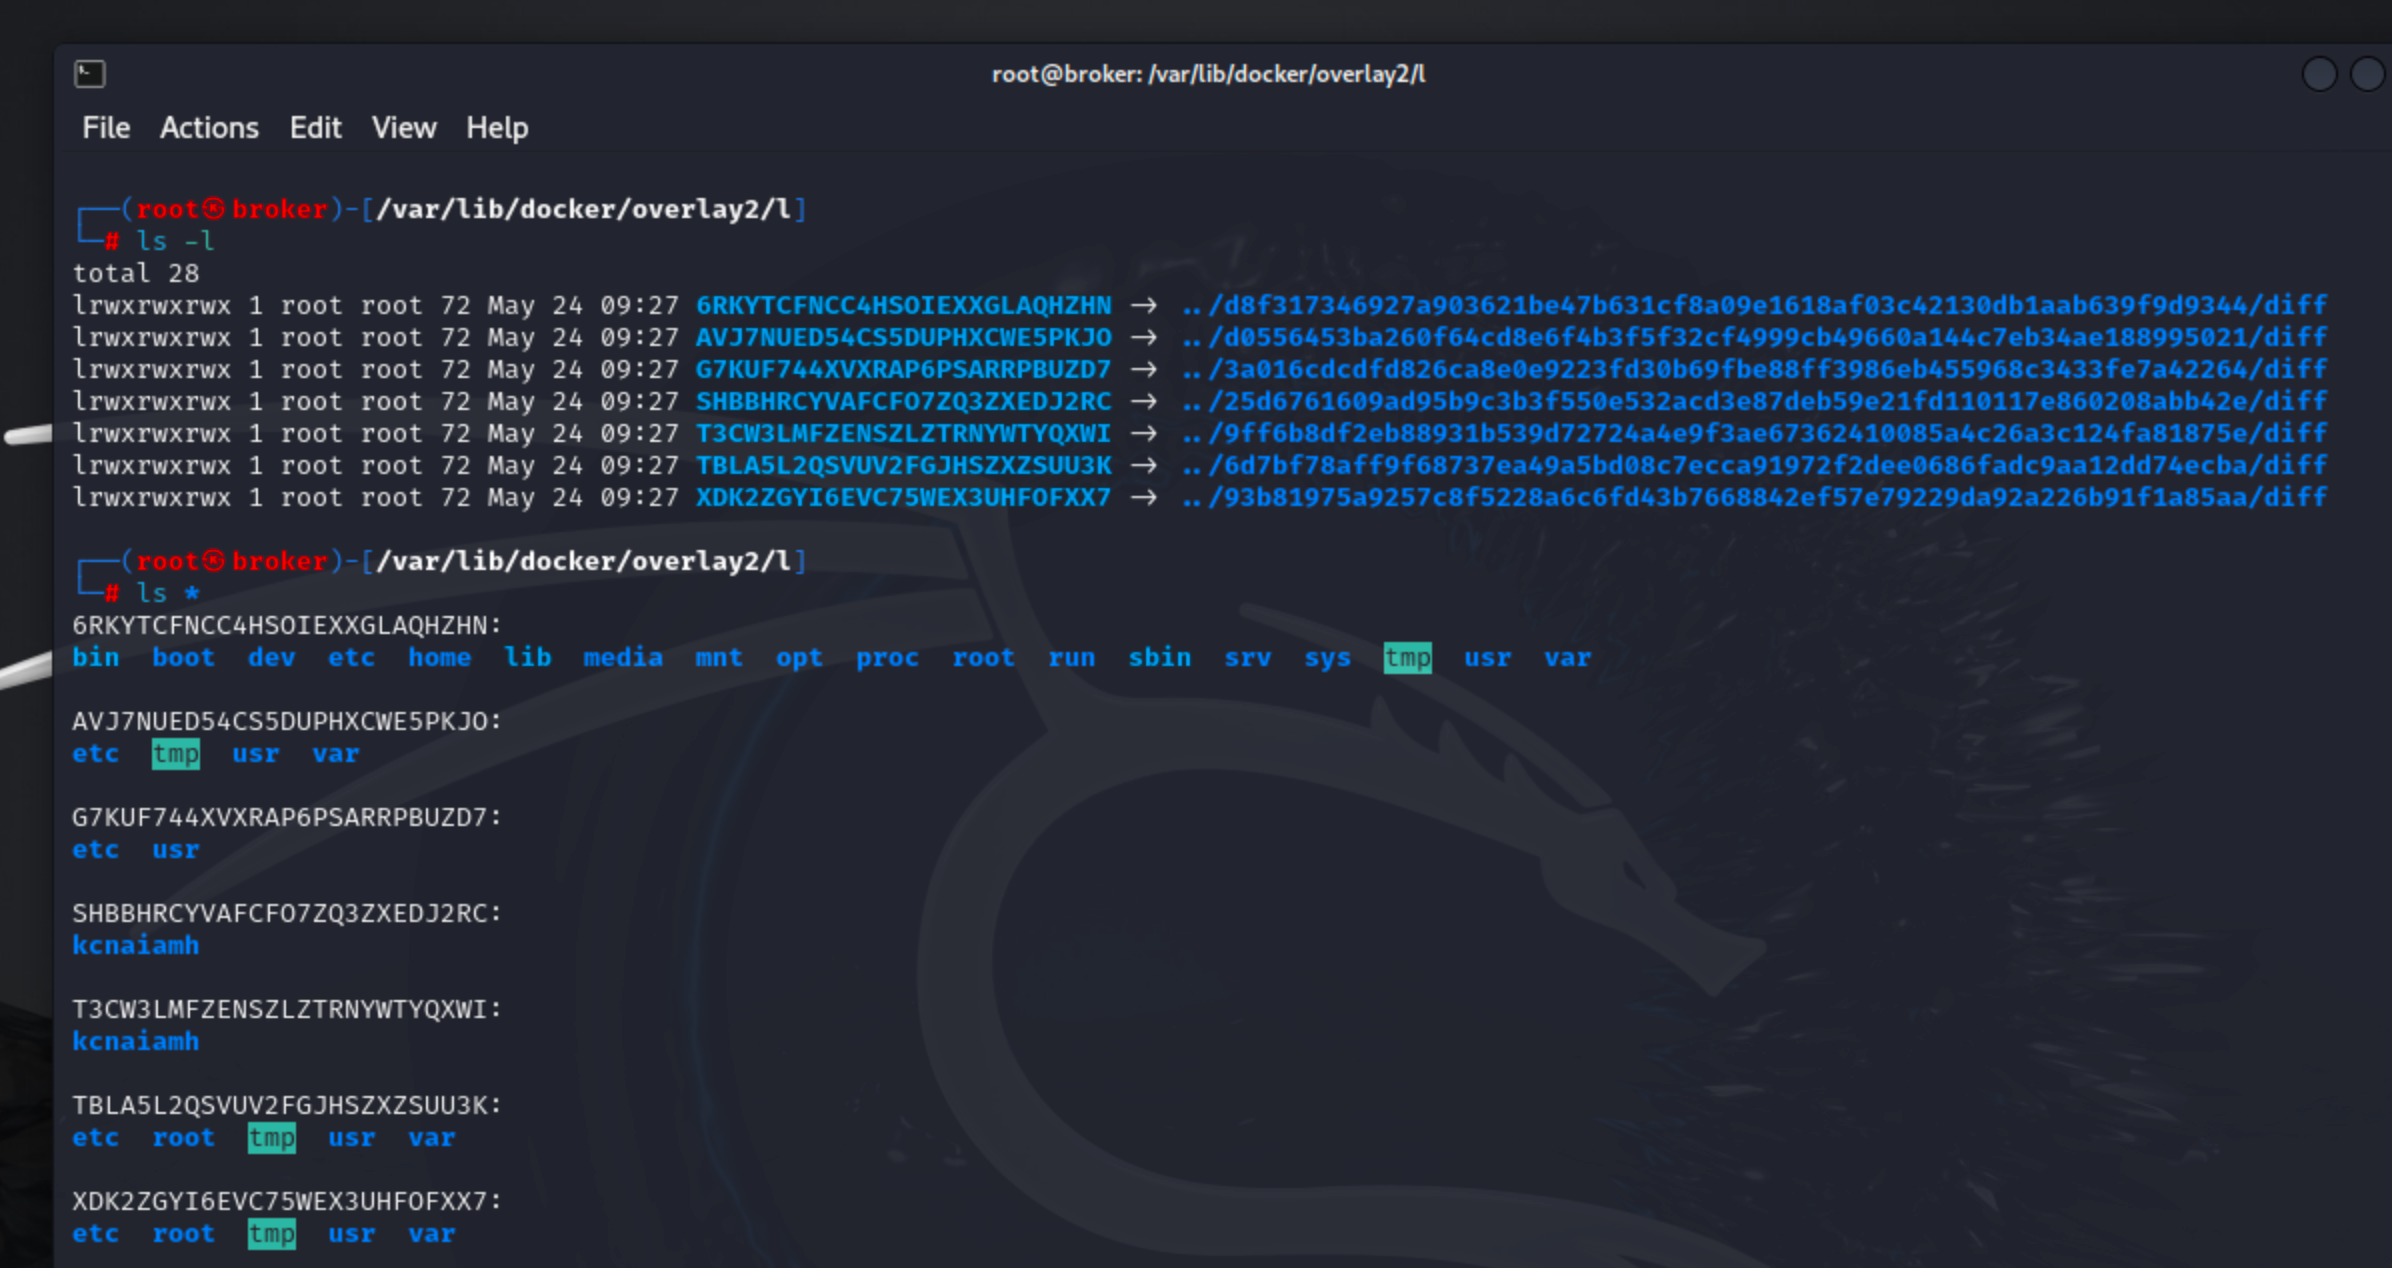
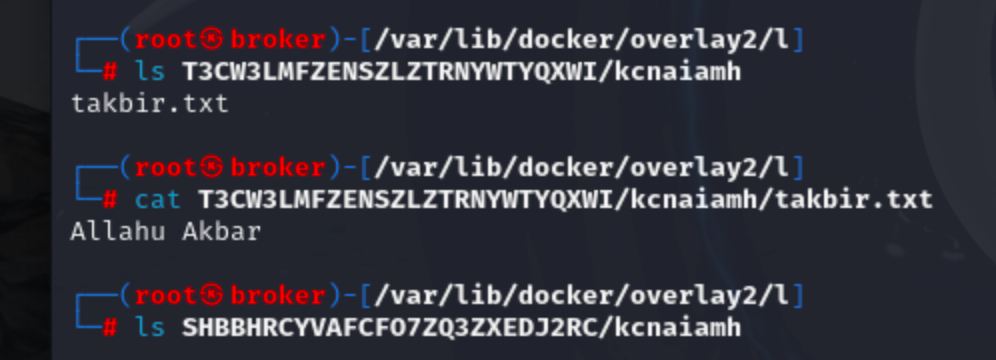
The WORKDIR /kcnaiamh instruction in dockerfile created SHBBHRCYVAFCF07ZQ3ZXEDJ2RC layer. And COPY takbir.txt . instruction created T3W3LMFZENSZLZTRNYWTYQXWI layer.
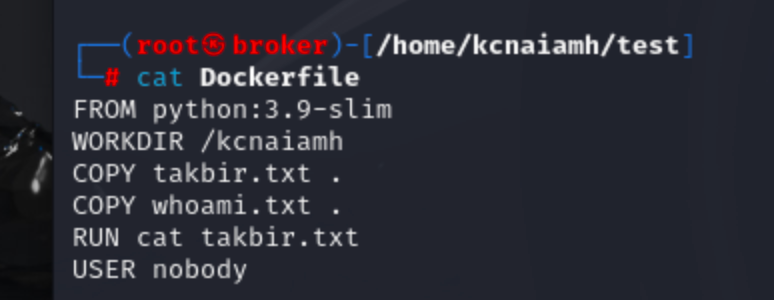
Now lets update the Dockerfile by adding one more instruction (COPY whoami.txt .) after third instruction.
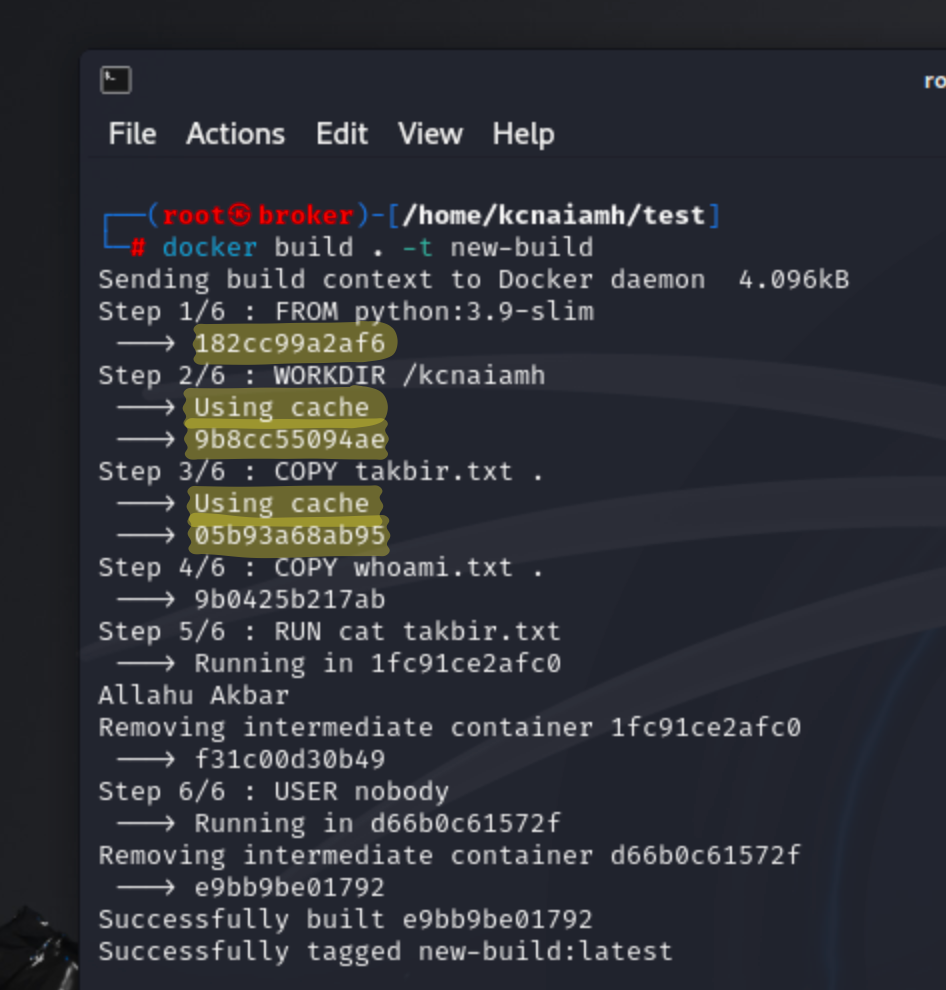
Now, lets build a new docker image named new-build using our modified dockerfile. Initially, the Docker engine executes Step 1 up to Step 3 by fetching the layers from the local cache, signified by the "Using cache" message. Notably, their hash values persist unchanged from prior builds.
However, at Step 4, we can see a divergence. Here, a new file, whoami.txt is added into the image, resulting the formation of a new layer. As the build advances, additional directives are executed, such as executing a command to reveal the contents of "takbir.txt" (Step 5) and configuring the user as "nobody" (Step 6). Each of these actions creates new layers, each with its own hash value.
Docker makes the build process faster by using cached layers when possible, avoiding repeated work for unchanged steps. However, any changes in later steps require new layers, showing changes in the image. The final hash value uniquely identifies the complete image, making it easier to recognize and reuse in future Docker tasks.
Even though the instructions in Steps 5 and 6 of the Dockerfile are the same as in the previous build, Docker's caching works step-by-step. This means that even if the instructions haven't changed, they are part of a new build context because of the new layer added in Step 4. Docker checks for changes in each step, including changes to files or directories in the build directory. If any part of the build context changes, Docker doesn't reuse the cache for that step. So, even though the instructions in Steps 5 and 6 haven't changed, Docker treats them as new steps in the current build, requiring them to run again and creating new layers with unique hash values.
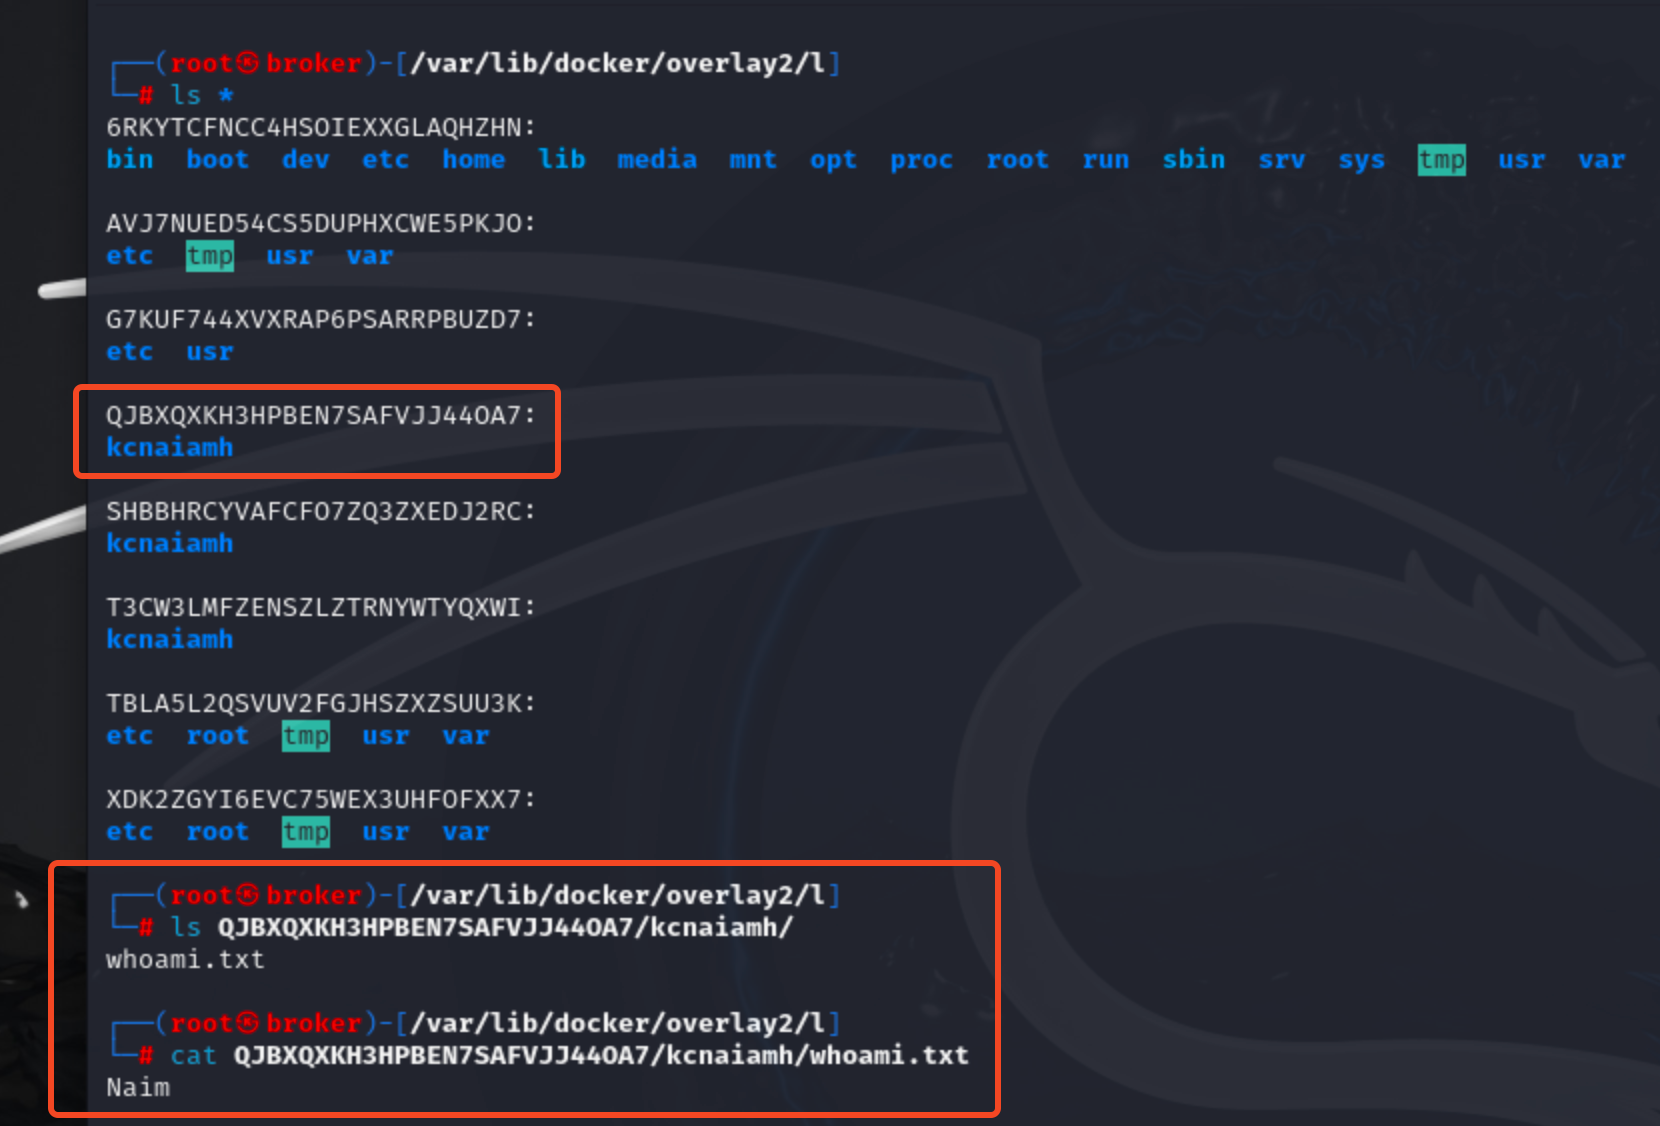
After building the image we see another new layer (folder) is created and inside that we see the whoami.txt file.
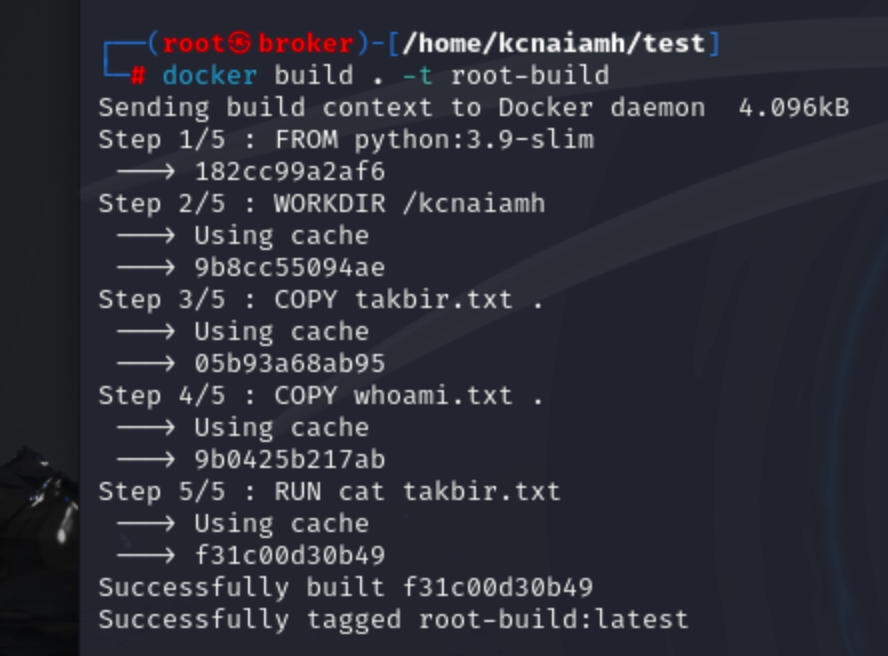
Now lets build another image, but we will just remove the last command from our previous dockerfile which set the user to nouser. So the container from the new image will run as root user.
Also note that, this time all the layers are fetched from the cache.
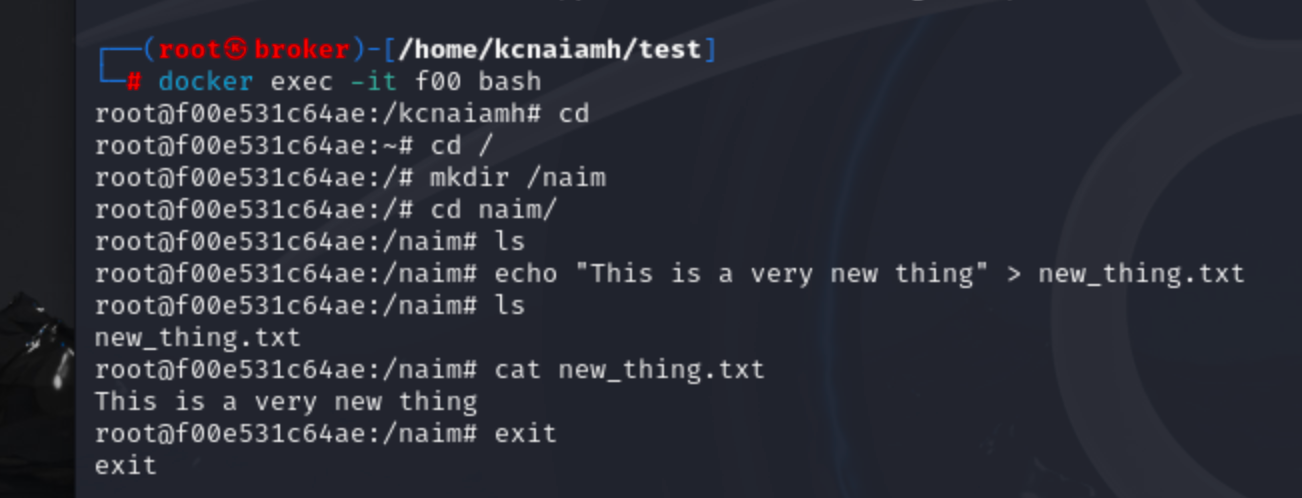
Now lets create a new container from the root-build image and created a directory named naim inside root directory. Inside that direcotry lets create a file named new_thing.txt that contains a specific text.
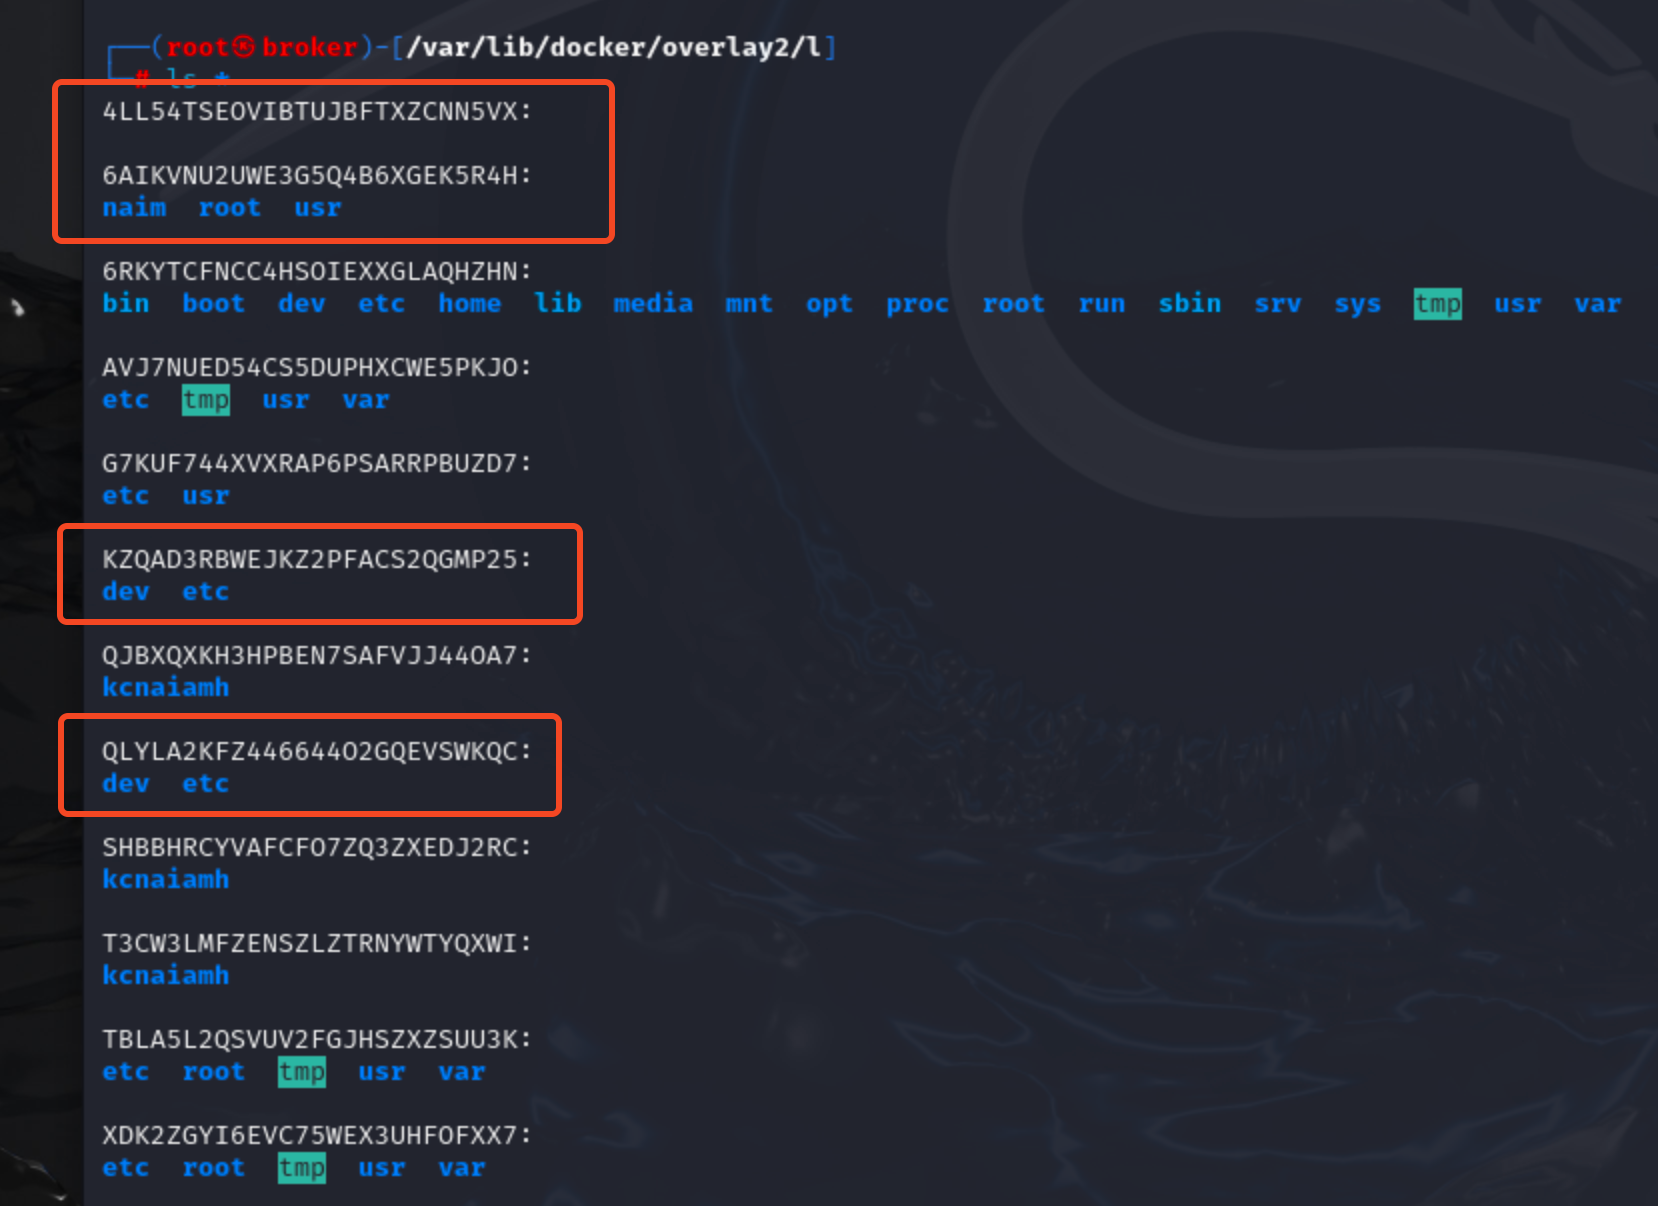
Here we can see 4 new directories, in which most interesting is 6AIKVNU2UWE3G5Q4B6XGEK5R4H directory. It shows the folders that differs from the root-build image. We've created naim folder inside container. .bash_history file is change inside /root folder. ( why usr folder is here? What changed inside usr? I'm not sure (: )

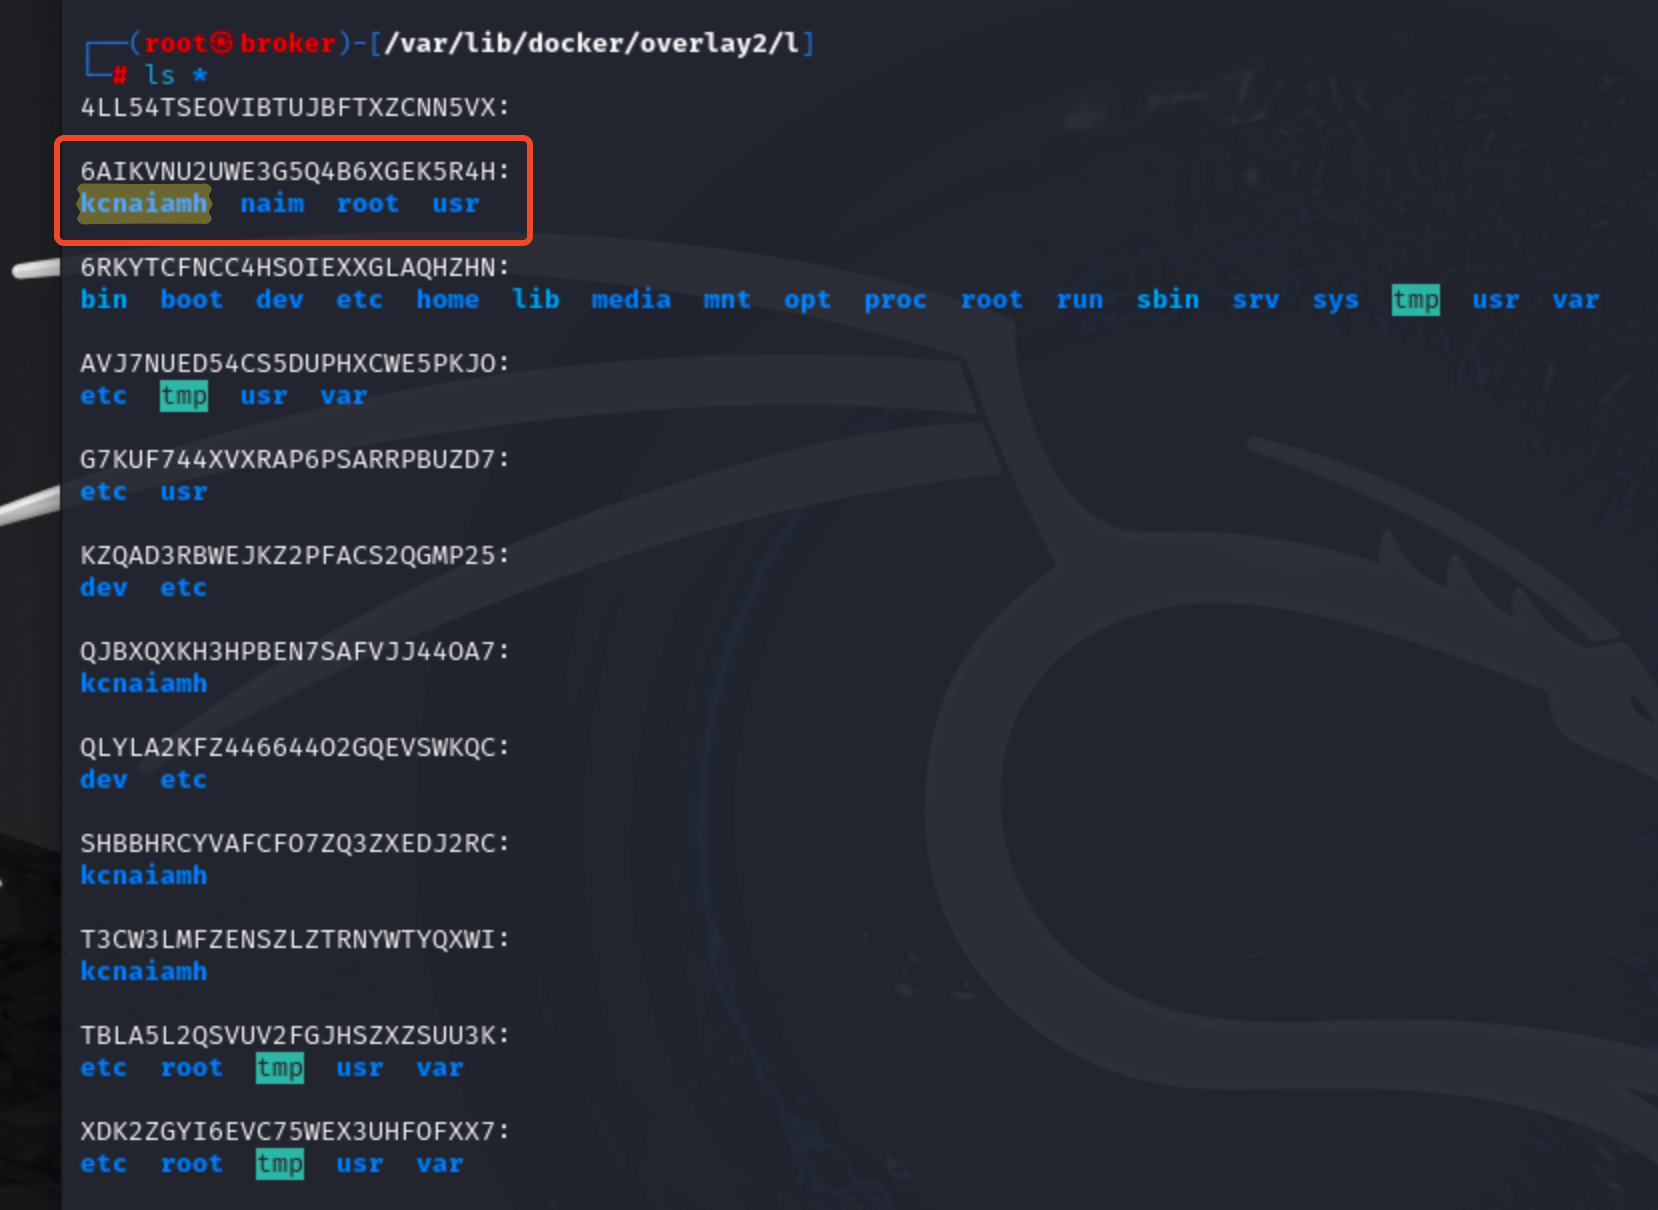
Now lets create a new file inside /kcnaiamh directory named newfile.txt and check if 6AIKVNU2UWE3G5Q4B6XGEK5R4H reflect some change.

Yes, it does. kcnaiamh folder came inside 6AIKVNU2UWE3G5Q4B6XGEK5R4H and it contains the file we just created, not the file it already had.
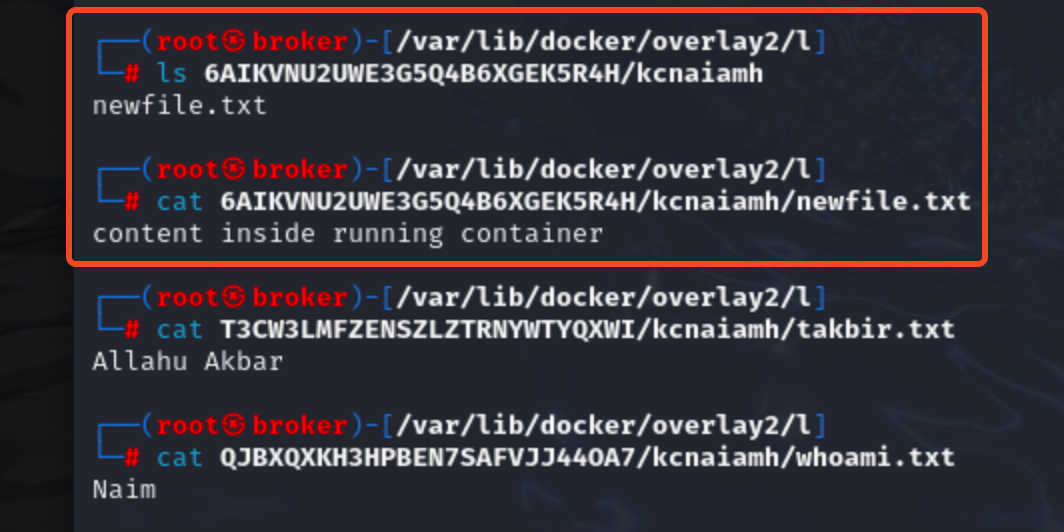
Interesting. So what happens when we delete a file? Lets figure it out. Lets delete whoami.txt file inside the container.
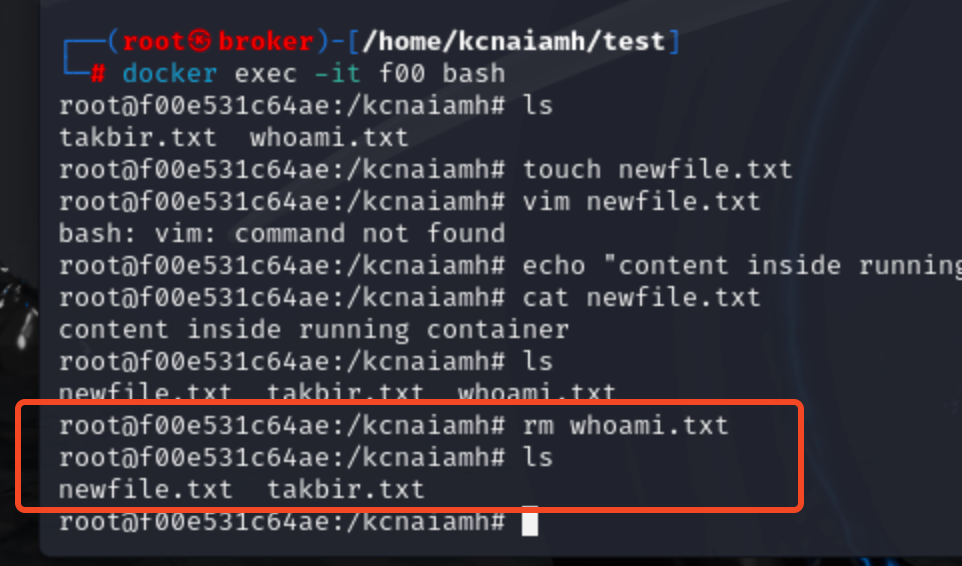
We can see a new character file in 6AIKVNU2UWE3G5Q4B6XGEK5R4H. But the acutal whoami.txt file still exists in different layer.
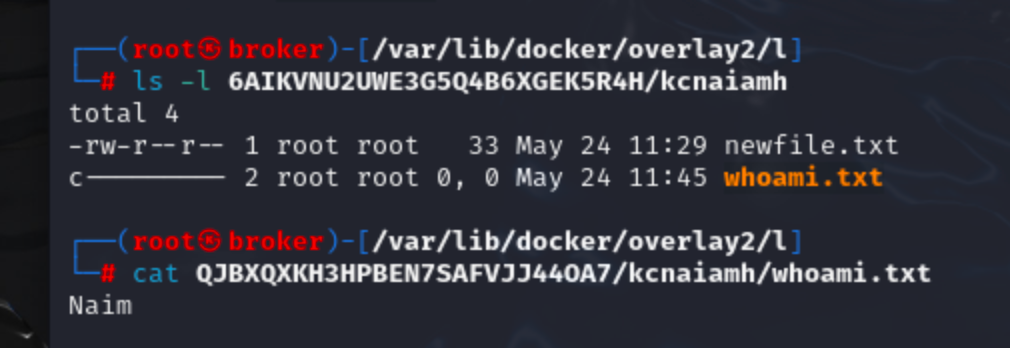

Now letes delete the naim directory, which we have created inside the running container (not while building image).

We can see the folder does not exists in 6AIKVNU2UWE3G5Q4B6XGEK5R4H.

Now lets delete kcnaiamh derectory.

We can see the directory is deleted from 6AIKVNU2UWE3G5Q4B6XGEK5R4H and in place of that a character file is created.


From our previous observations, we can conclude that when a container creates or modifies something from the image it is built from, it creates a new layer to store those changes. If we delete something from the container that was created during its runtime, it is removed from this newly created layer. Conversely, if we delete something that was originally part of the image, a new character file is created in the layer to mark this deletion.
This is exactly the way OverlayFS works.
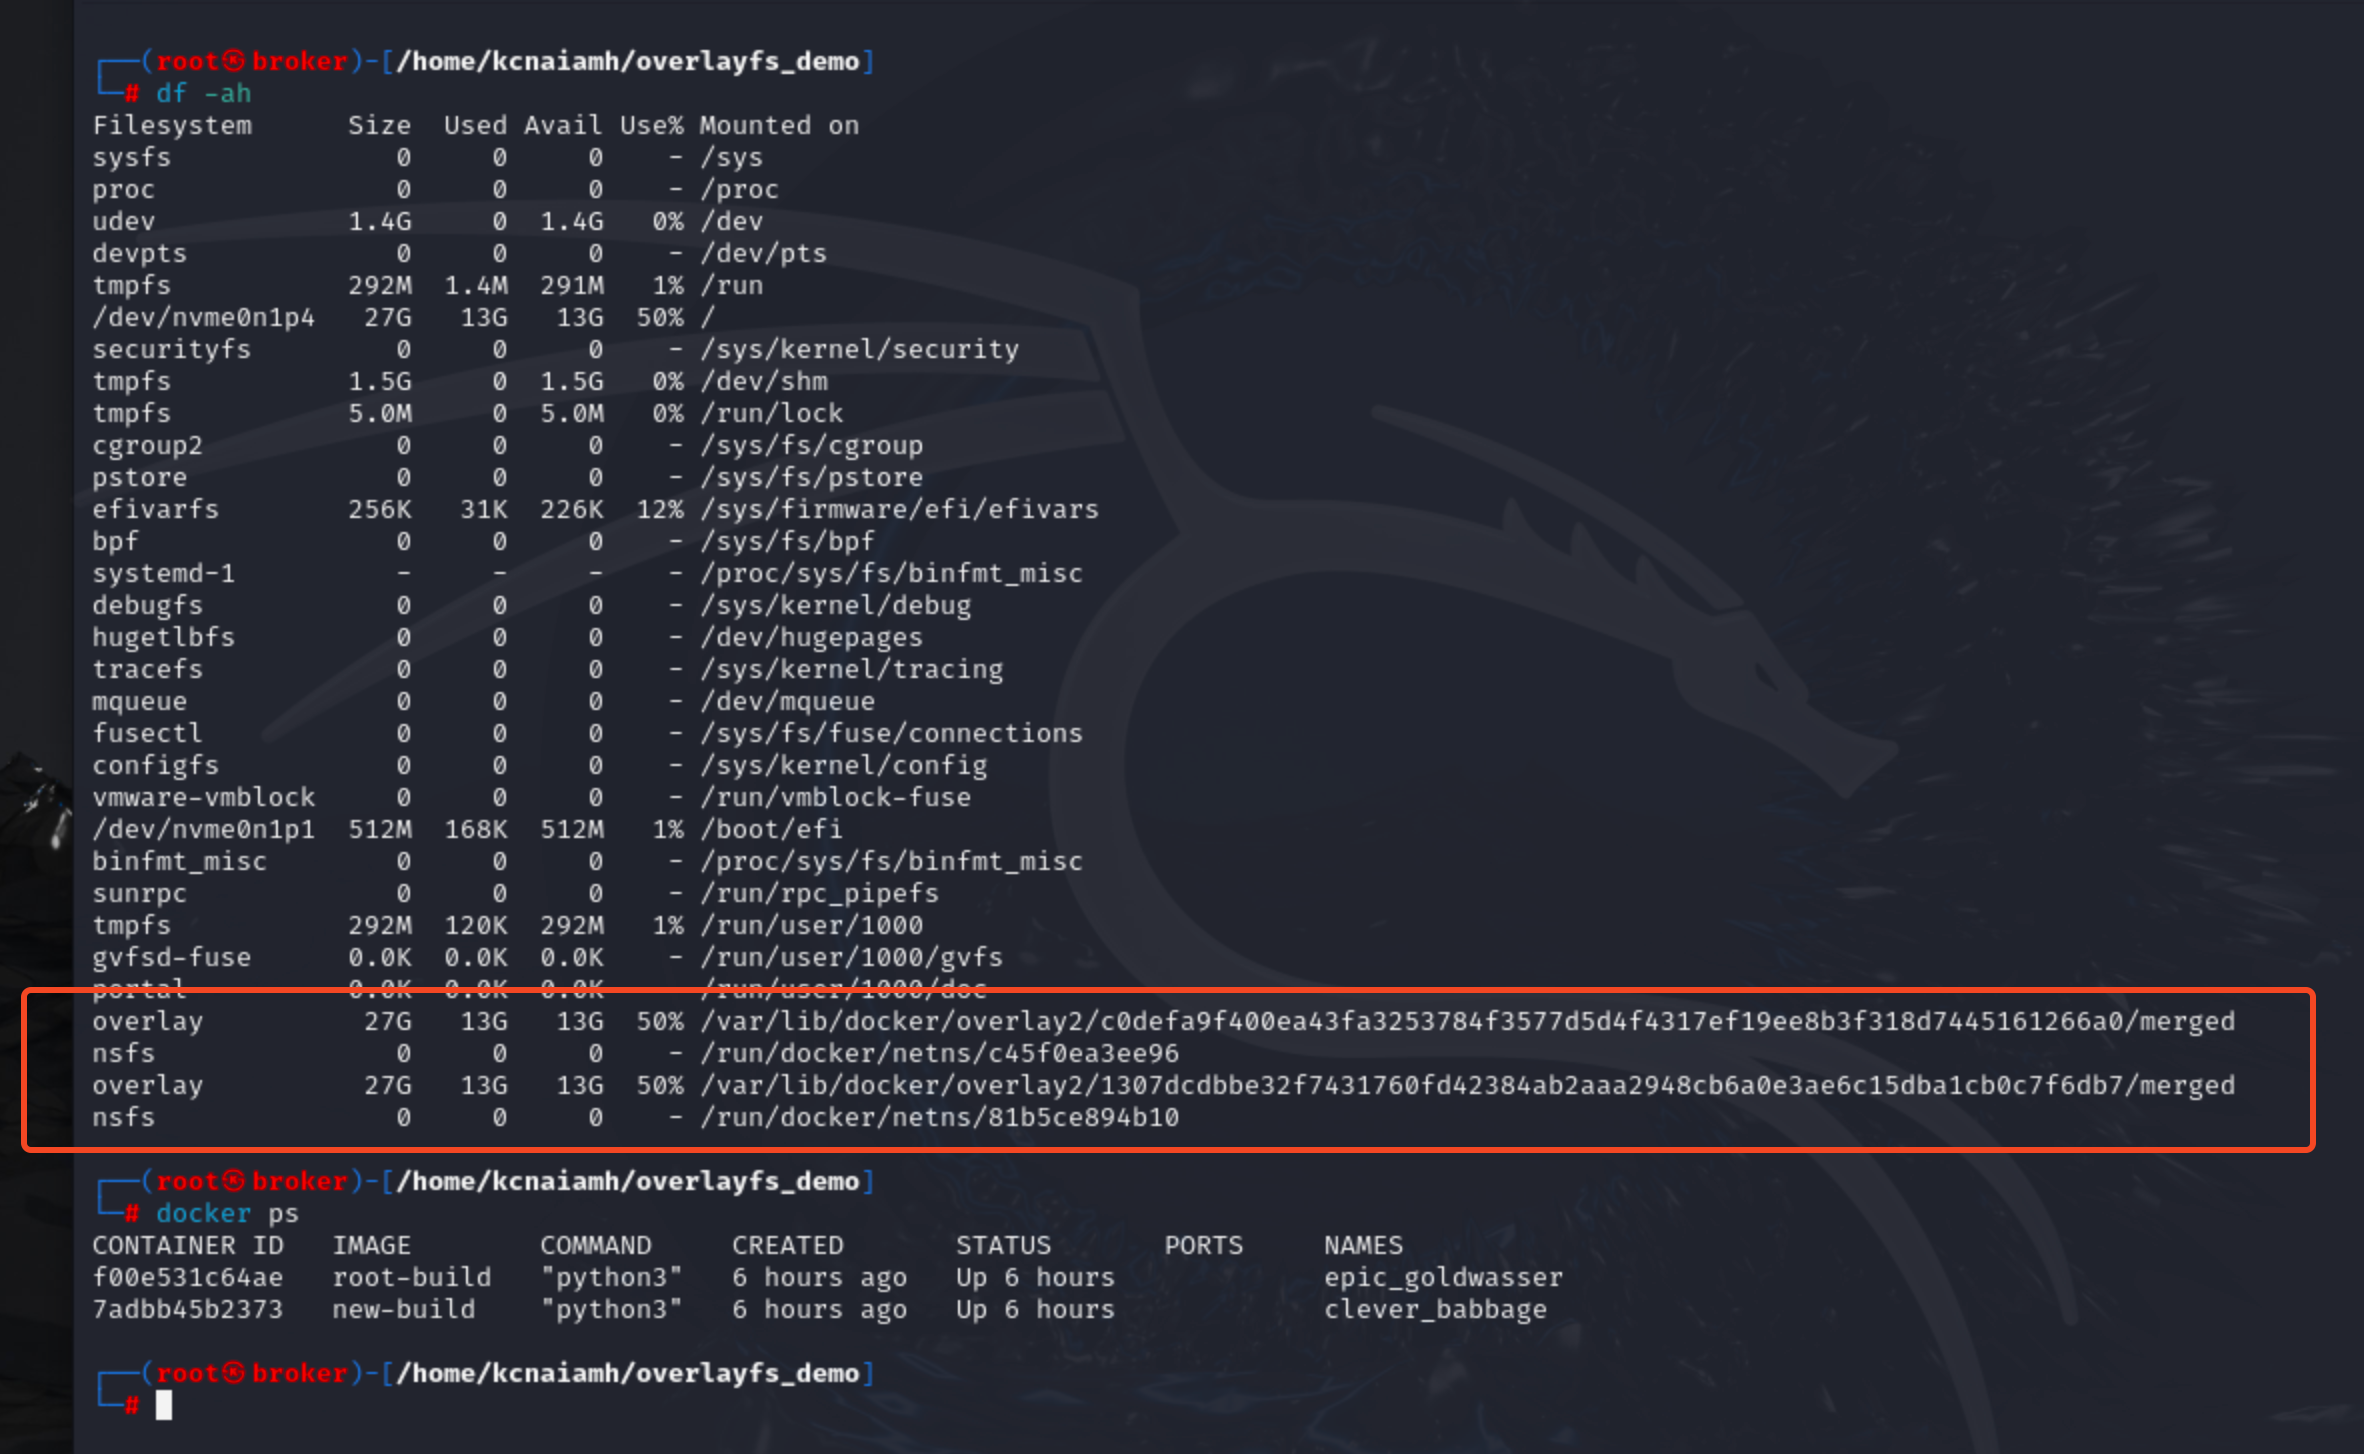
From the above screenshot we can see two containers are running. So two overlay file systems are created. The following screenshot displays all the directories inside/var/lib/docker/overlay2/ directory.
Within this directory, container IDs with the -init suffix represent the initialization layers of the respective containers. By examining the directories with the same name but without the -init suffix, we find a merged directory inside each.
The merged directory contains the entire file system of the running container, providing a complete view of the container’s filesystem at that layer. This directory structure is a result of Docker's use of the overlay filesystem.

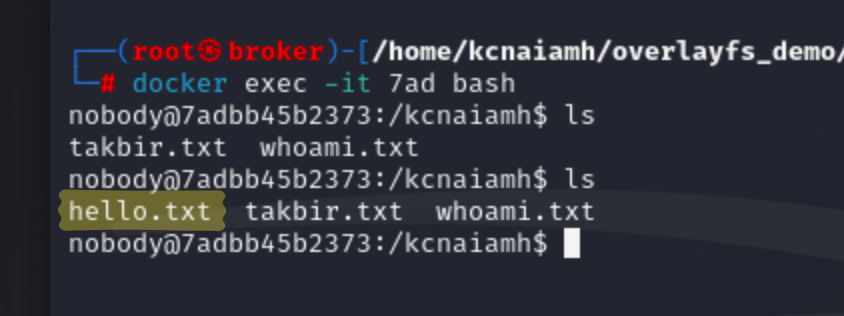
Lets change the content inside this folder. If the change reflects inside the container then we can manipulate the files and folders of container from outside!
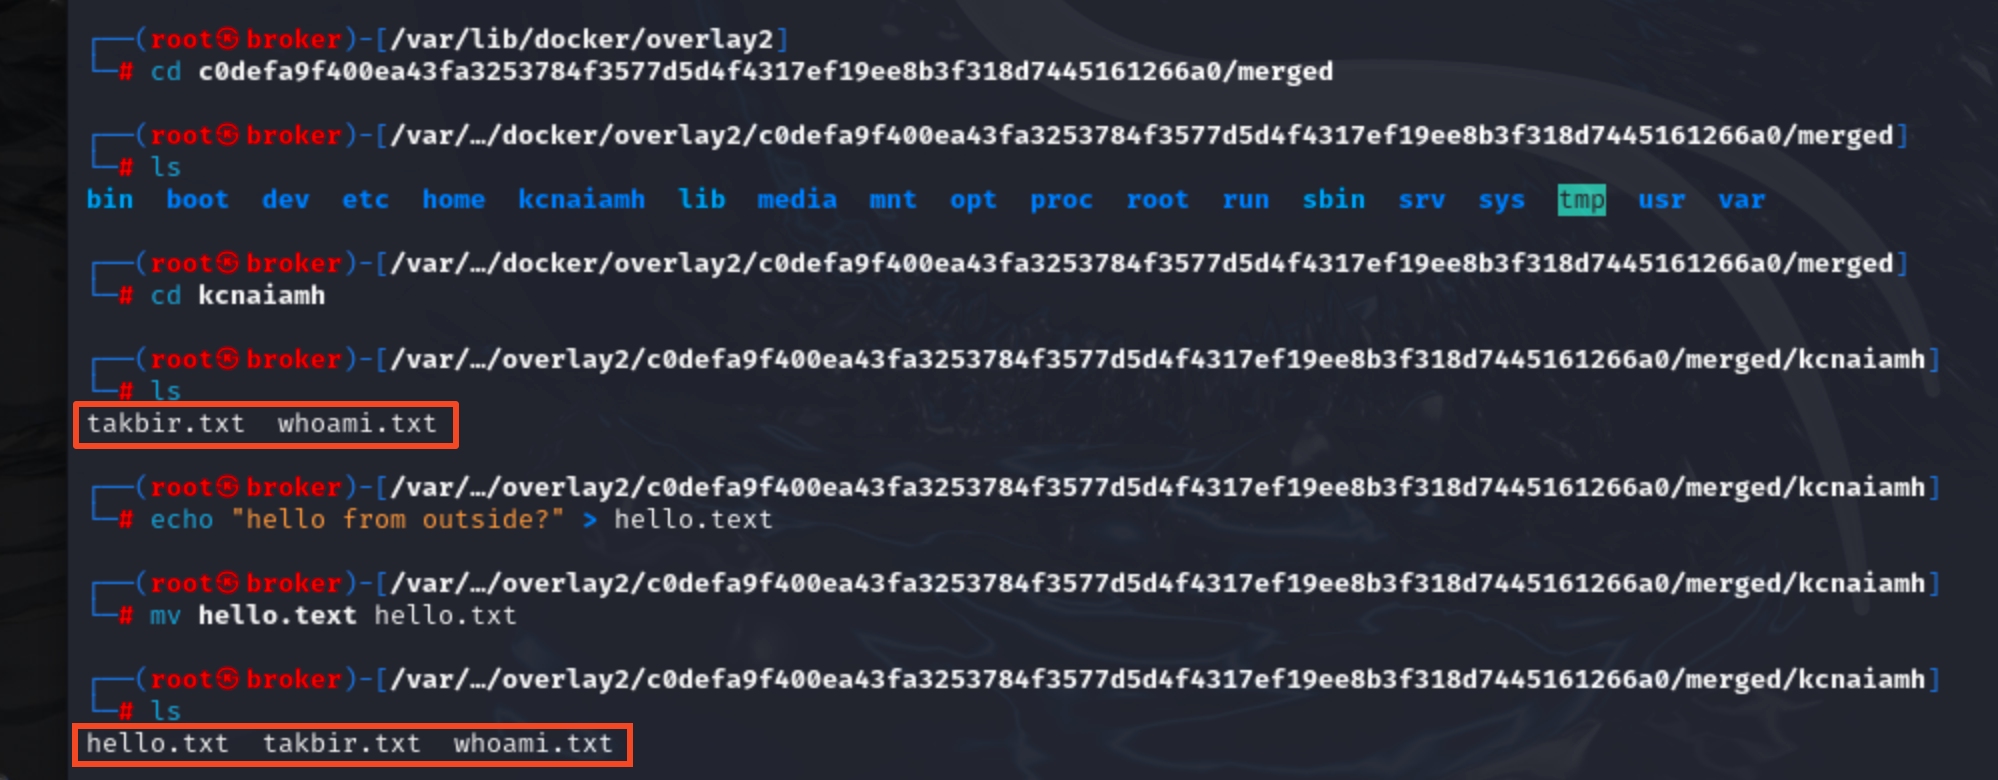
Woah! the change actually reflected inside container. Do you know what that means? If we have root access then we can change the container without interacting with docker daemon. Also, note that 7adbb45b2373 container is build on new-build image. What we had set as nobody user. So we can not do anything to the container by interacting with the docker daemon. But we can manipulate the container if we have the root access to the host machine.
If you reached till here, you are a different beast man! Congratulations. Hope to see you in another of my technical blog.
Subscribe to my newsletter
Read articles from Naimul Islam directly inside your inbox. Subscribe to the newsletter, and don't miss out.
Written by
