How to Migrate Your Terraform State to Terraform Cloud: A Step-by-Step Guide
 AKEH EUNICE
Introduction
Terraform Cloud is a powerful platform by HashiCorp that centralizes Terraform workflows and state management. By migrating your state to Terraform Cloud, you gain several advantages including enhanced security, team collaboration, remote state management, and more. This guide will help you transition your Terraform state from a local environment to Terraform Cloud seamlessly
TERRAFORM STATEFILE
Maps configurations to real-world resources
Enables dependency mapping
Enhances performance
Note: The Terraform statefile should be kept secure and confidential. It can be stored in Azure Storage or Terraform Cloud. The file terraform.tfstate is in JSON format.
Advantages of Terraform Cloud
Encrypts the statefile, ensuring its security both at rest and during transit
Facilitates collaboration
Prerequisites
Before starting the migration, ensure you have the following prerequisites:
Terraform Installed: Ensure you have Terraform installed on your local machine. You can download it from the official Terraform website.
Terraform Cloud Account: Create an account on Terraform Cloud if you don’t have one.
Azure CLI: Ensure you have the Azure CLI installed and configured. You can download it from the official Azure CLI page.
Terraform Configuration: Have an existing Terraform configuration and state file that you want to migrate
Step-by-Step Guide
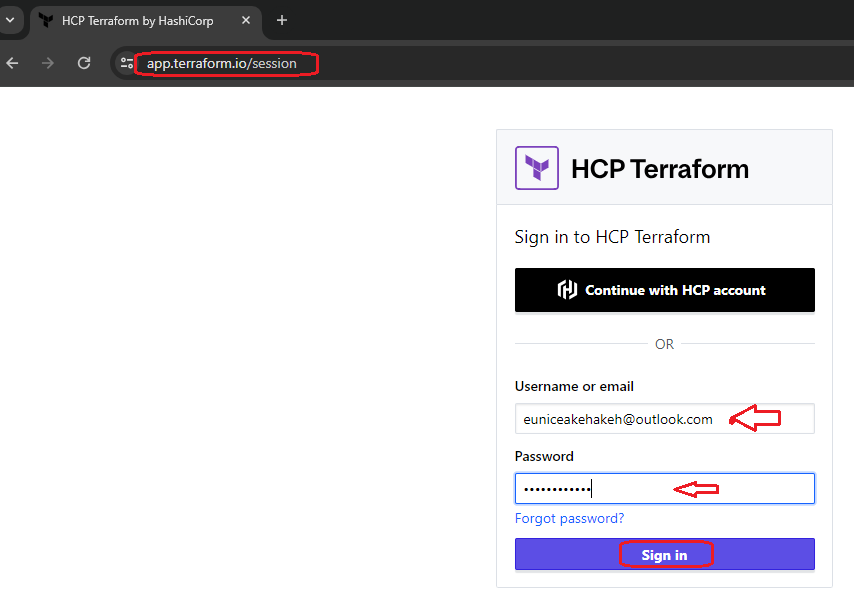
Step 1: Create a Terraform Account - To create an account on Terraform Cloud, go to https://www.terraform.io/ . Enter your email address and password in the respective fields, then click on the "Sign In" button.
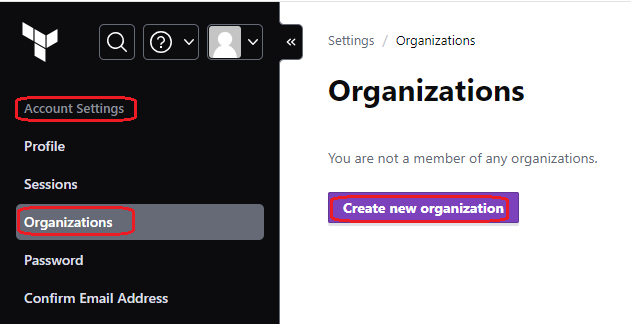
Step 2: Create an Organization - In the account settings, click on "Organizations." This will take you to the organizations page. On the right side of the page, click on "Create New Organization."
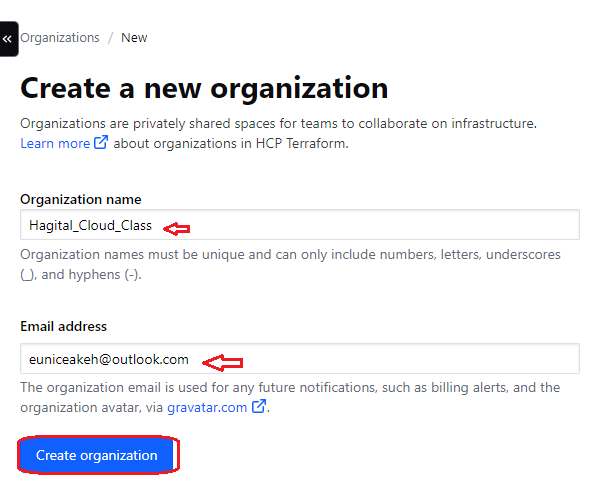
Step 2a: Give your organization a unique name, Input an email and click on "Create Organization"
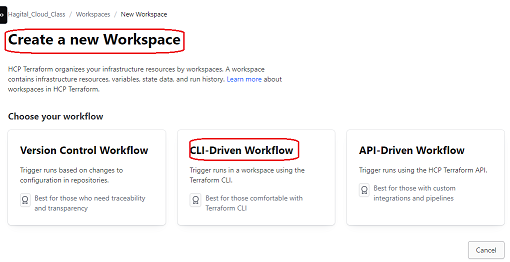
Step 2b: Create a New Workspace - Click On "CLI-Driven Workflow" because it supports terraform on Visual Studio Code
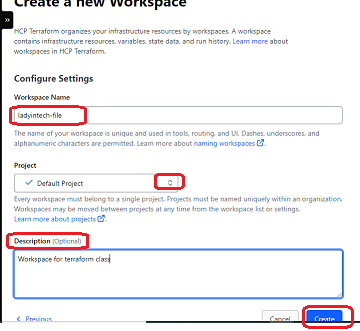
Step 2c: Configure Workspace - Give your workspace a name - Select a project "Default Project" - Give a description which is optional and click on the "Create" button
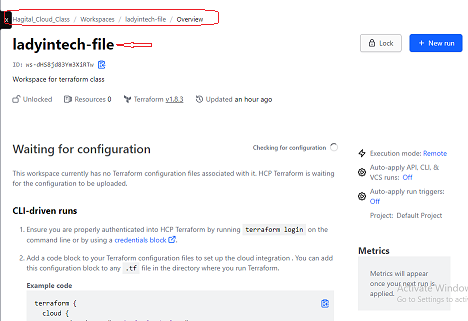
Step 2d: Overview of Terraform Organization and Workspace
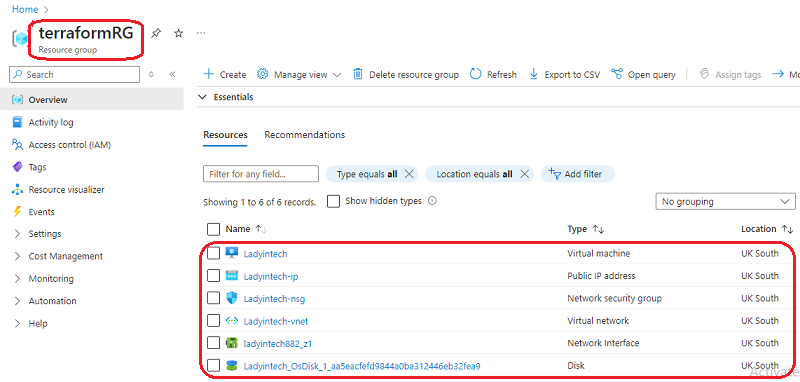
Step 3: Create a Resource group and Virtual Machine In Azure - Create a VM in azure refer to link of my blog on how to create a Vm https://ladyintech.hashnode.dev/a-beginners-guide-to-creating-a-windows-11-pro-virtual-machine-in-azure - Create a new resource group and other resources
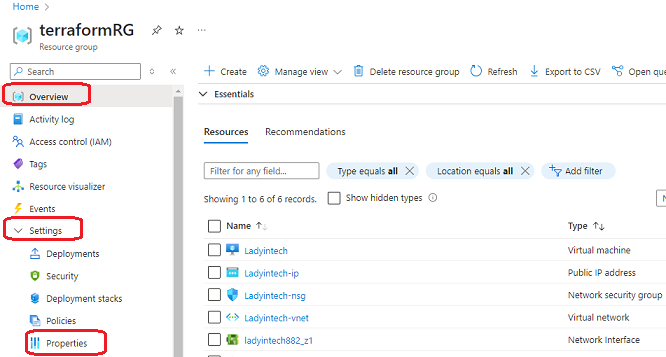
Step 3a: On the overview page, go to the left pane, click on the "Settings" dropdown menu, and select "Properties"
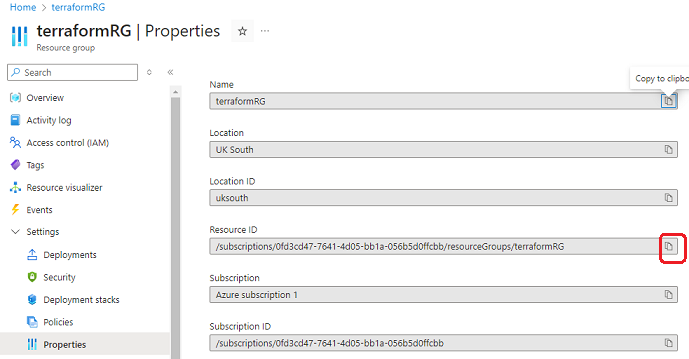
Step 3b: Copy the Resource ID (as highlighted in red)
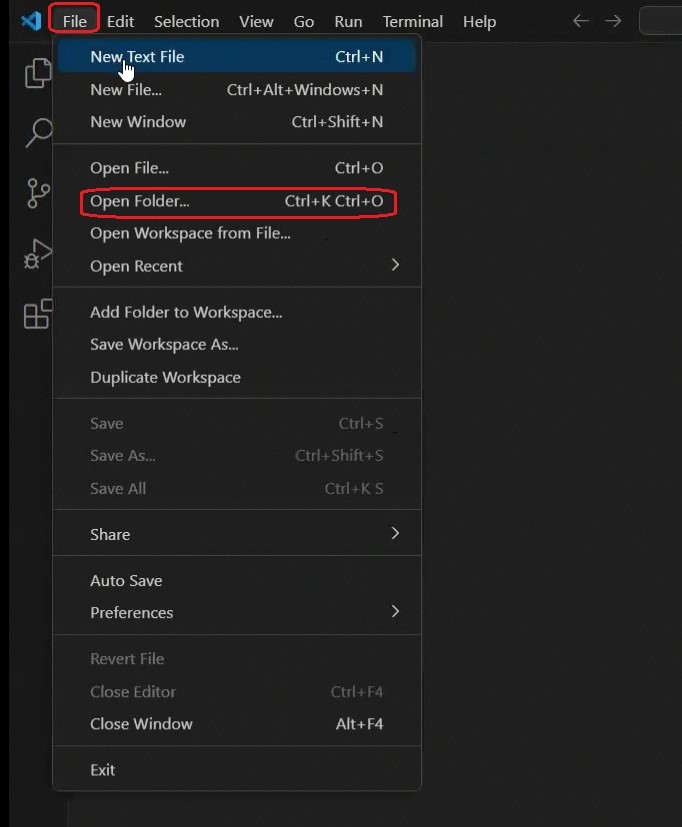
Step 4: Open VSC and Create Folder - Click on "File" from the dropdown Select "Open Folder"
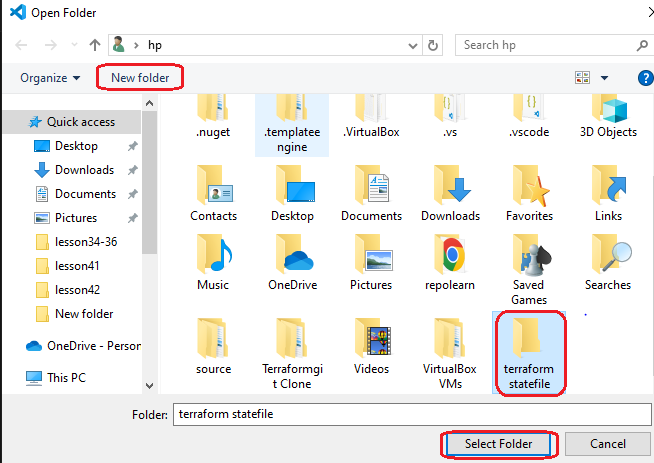
Step 4a: Click On "New Folder" - Enter a name for your folder - Click "Select Folder"
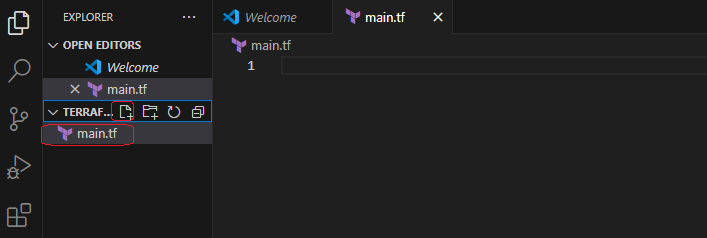
Step 5: Create a File - Click on the add file Icon to create a file and name it "main.tf" - main.tf file is the main configuration file in Terraform, where you define your resource definitions and implement infrastructure as code logic
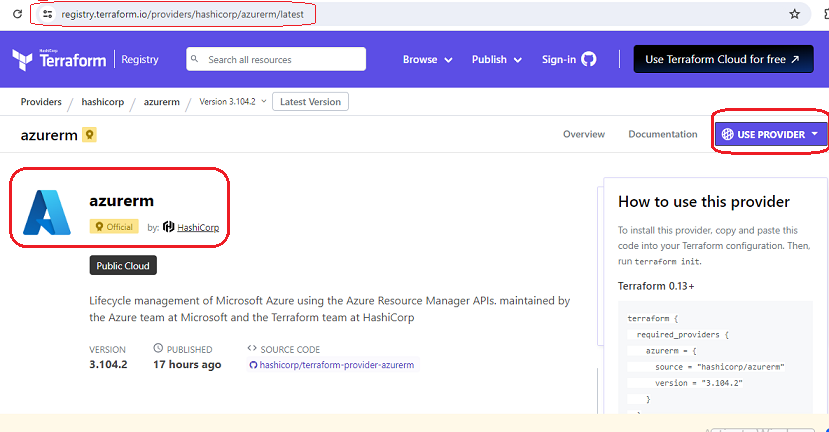
Step 6: Go to Terraform official site to select a provider https://registry.terraform.io/browse/providers - The URL in the browser is highlighted, showing the link to the latest version of the AzureRM provider: https://registry.terraform.io/providers/hashicorp/azurerm/latest. - "Click" "USE PROVIDER" button , which allows users to copy the code
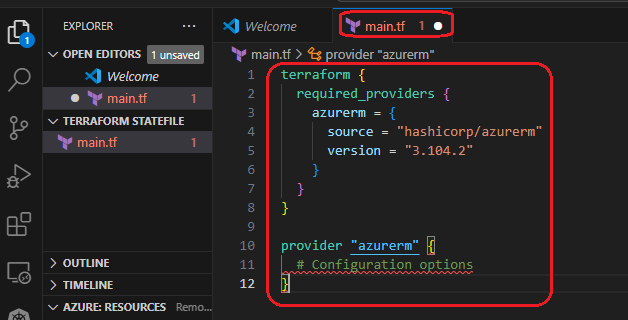
Step 6a: Paste Provider"azurerm" configuration on your main.tf file - Incomplete Configuration error: you will encounter this error
- The
provider "azurerm"block is empty and only contains a comment (# Configuration options). While an empty provider block is not necessarily an error in Terraform itself, the editor might flag it as an incomplete configuration
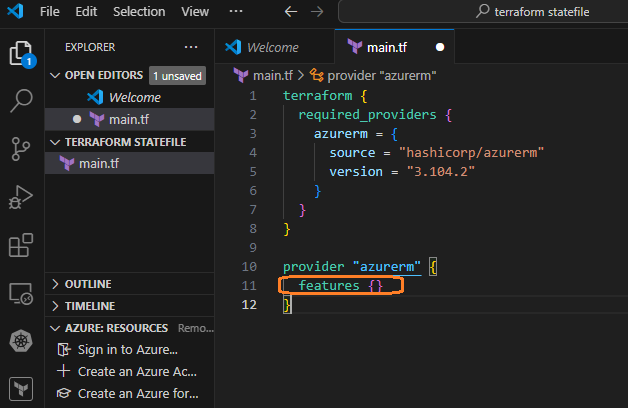
Step 6b: Updated Configuration - Replace #Configuration options with the features {} block resolves the editor’s error by making the provider configuration complete and compliant with Terraform’s expectations. - This block is where you would typically configure provider-specific features and settings
Step 7: Create a Resource group - Created 2 resource group resource "azurerm_resource_group" "eunicerg": This is a default resource group for terraform and the name = "terraformRG": specifies the name of the resource group in Azure that holds Our virtual machine

Step 8: Open the Terminal Log in to Azure : Log in to your Azure account using the Azure CLI: Run command az login
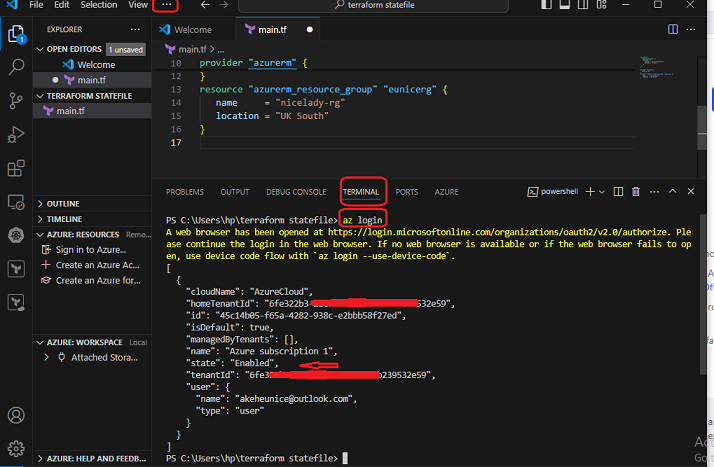
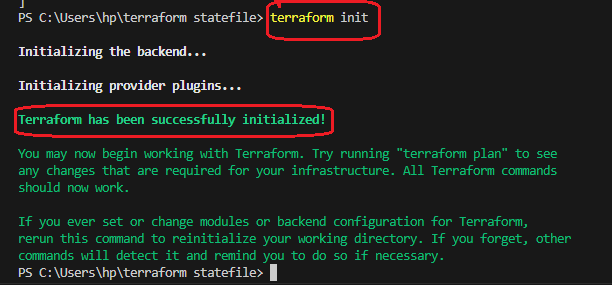
Step 8a: Initialize Terraform - In the terminal, initialize Terraform within your project directory: This command downloads the Azure provider and sets up your working directory
Step 9: Import Existing Resources -Follow step3b to retrieve your resource group ID - Run commandterraform import azurerm_resource_group.eunicerg <YOUR_SUBSCRIPTION_ID> to import resources

Step 10: Review the Imported State - After importing, review the state to ensure everything is correctly imported. - Run command terraform show to display the current state of your Terraform-managed infrastructure.

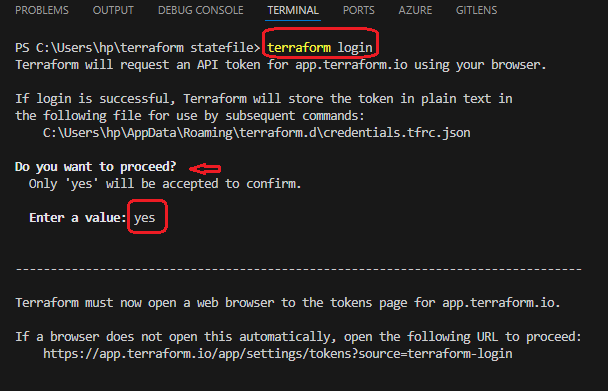
Step 11: Login to Terraform Cloud - Next, log in to Terraform Cloud to obtain the API token required for integration. - Follow the prompts to generate and enter the API token from the Terraform Cloud website. This will store the token locally for future Terraform commands.
Step 12: After logging into Terraform Cloud, you will be prompted to generate a token. Provide a description, set the expiration to 30 days, and click on "Generate Token"
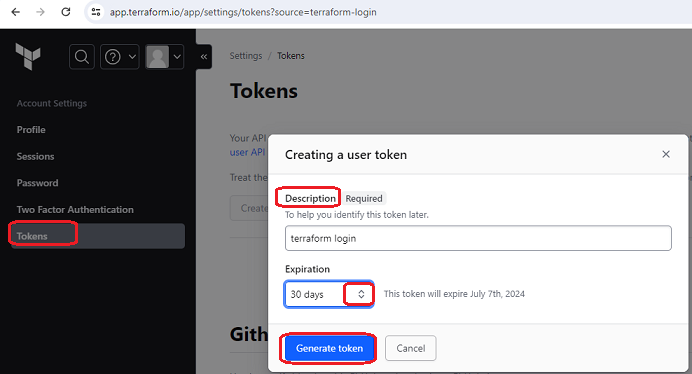
Step 12a: Copy Token - A copy will also be sent to your email NOTE: The token should be kept secret because it grants access to your Terraform Cloud account and resources. If someone else obtains the token, they could potentially make unauthorized changes to your infrastructure, access sensitive data, and compromise the security and integrity of your cloud environment. Keeping the token secret ensures that only authorized individuals can manage and modify your Terraform configurations and state.

Step 13: Set Up Cloud Integration -Add Cloud Integration Block: Include the following block(Examplecode: highlighted in red) in your Terraform configuration file to set up cloud integration: NOTE: Setting up cloud integration with Terraform Cloud is essential because it allows for centralized management, state storage, automation, enhanced security and collaboration
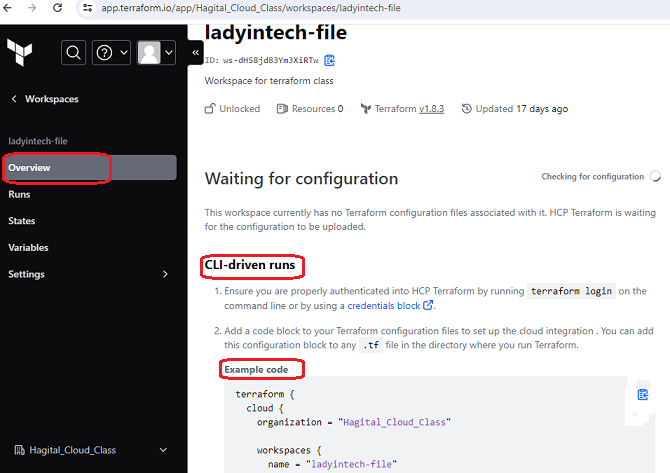
Step 13a: Copy code
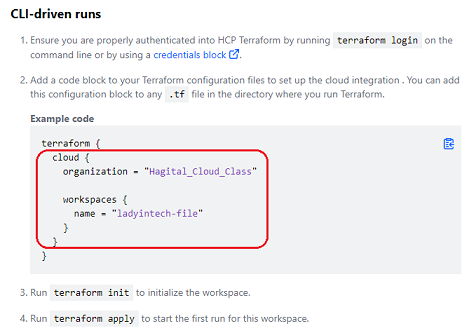
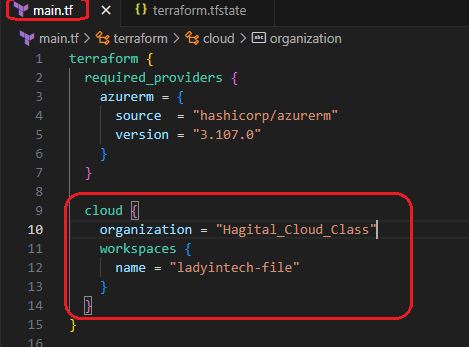
Step 14: Configure Terraform to Use Terraform Cloud - Edit your terraform block in your configuration file to specify the use of Terraform Cloud. - Cloud Block: Get code as seen in step 13& 13a
organization: Specifies the name of the Terraform Cloud organization, which isHagital_Cloud_Class.workspaces: Defines the workspace settings.name: Sets the workspace name toladyintech-file.
This configuration sets up Terraform to use the azurerm provider and connects it to the specified Terraform Cloud organization and workspace for state management.
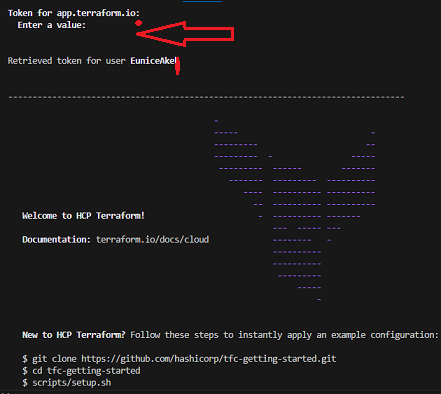
Step 15: Token generated in Step 12 & 12a copy, right click to paste and press enter NOTE: The token is encrypted so it wont be seen/invisible when you input it
Step 16: View in JSON the contents of your Imported file
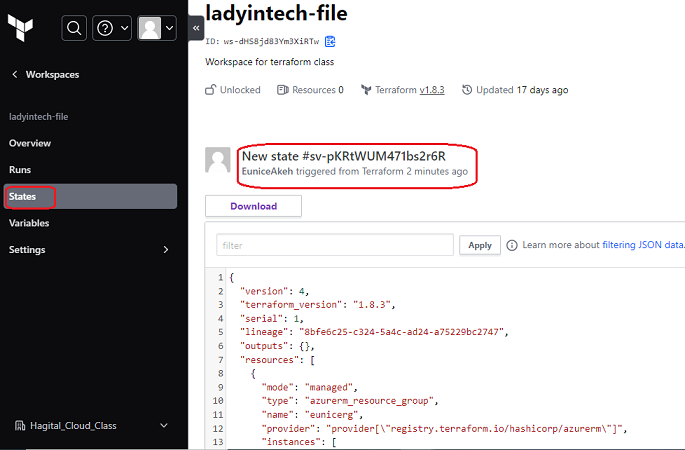
Step 16a: View your Resource group in Terraform

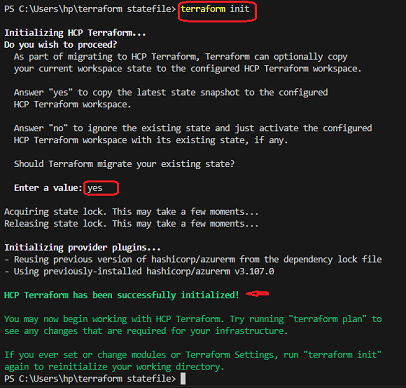
Step 17: Initialize Terraform Cloud - Reinitialize Terraform to apply the new backend configuration. - Terraform will prompt you to migrate your existing state to Terraform Cloud. Confirm the migration by entering yes.
Step 18: The command rm terraform.tfstate* is used to delete the Terraform state files.

Conclusion
The simple step of moving your Terraform state to Terraform Cloud greatly improves your infrastructure management capabilities. You may take advantage of Terraform Cloud's advantages, like centralized state management, greater security, and improved collaboration, by following this step-by-step instructions. Many happy terraformings!
You will have effectively moved your Terraform state to Terraform Cloud by following these steps, guaranteeing a more safe, cooperative, and effective infrastructure management workflow.
Subscribe to my newsletter
Read articles from AKEH EUNICE directly inside your inbox. Subscribe to the newsletter, and don't miss out.
Written by
