Unlocking the Power of DOM Manipulation in JavaScript: A Comprehensive Guide
 Vatsal Bhesaniya
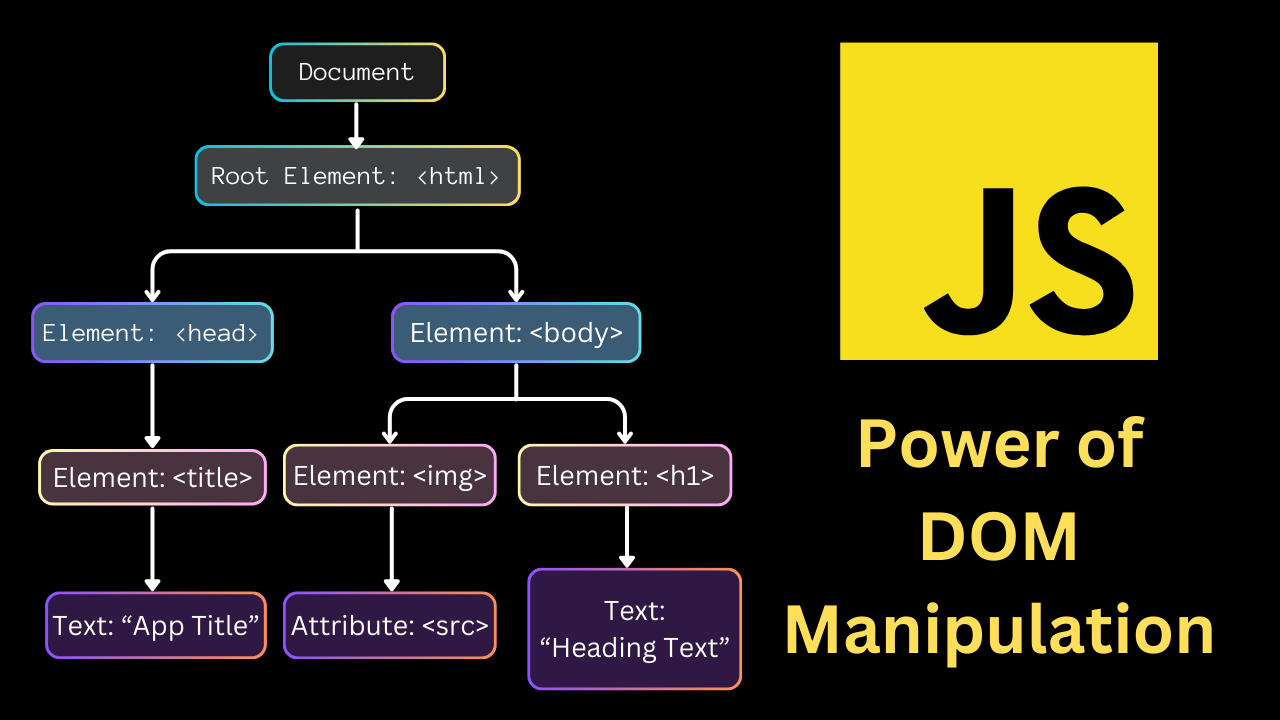
The Document Object Model plays a crucial role in bringing interactivity and dynamism to web pages. The DOM represents the structured hierarchy of elements on a web page, allowing developers to access and manipulate these elements using JavaScript.
We’ll explore various techniques and methods to select, traverse, create, modify, and interact with DOM elements with a to-do application.
Here is the starter code for our to-do application. It includes a title, an input box, and a container to display the list of todos. I also include some CSS.
<!DOCTYPE html>
<html lang="en">
<head>
  <meta charset="UTF-8">
  <meta name="viewport" content="width=device-width, initial-scale=1.0">
  <title>To-Do List App</title>

  <style>
    body {
      font-family: Arial, sans-serif;
      max-width: 500px;
      margin: 0 auto;
      padding: 20px;
    }
    h1 {
      text-align: center;
    }
    #todo-container {
      padding: 10px;
      border: 1px solid #ccc;
    }
    .todo-item {
      list-style-type: none;
      padding: 5px;
      margin-bottom: 5px;
      display: flex;
      justify-content: space-between;
      align-items: center;
    }
    .completed {
      text-decoration: line-through;
      color: #aaa;
    }
    .delete-todo {
      color: red;
      cursor: pointer;
    }
  </style>
</head>

<body>
  <h1>To-Do List</h1>
  <input type="text" id="new-todo-input" placeholder="Enter a new task">
  <br /><br />

  <div id="todo-container"></div>
</body>

</html>
Let’s move on to the Javascript.
<script>
  const todoContainer = document.getElementById('todo-container');
  const newTodoInput = document.getElementById('new-todo-input');
</script>
Here, we first grab references to the elements we need to manipulate using document.getElementById. These functions allow us to find specific elements in the HTML by their unique id attribute.
<script>
  const todoContainer = document.getElementById('todo-container');
  const newTodoInput = document.getElementById('new-todo-input');

  function addTodo() {
    const newTodoItem = document.createElement('li');
    newTodoItem.textContent = newTodoInput.value;
    newTodoItem.classList.add('todo-item');

    const deleteButton = document.createElement('span');
    deleteButton.textContent = '❌';
    deleteButton.classList.add('delete-todo');
    newTodoItem.appendChild(deleteButton);

    todoContainer.appendChild(newTodoItem);
    newTodoInput.value = '';
  }
</script>
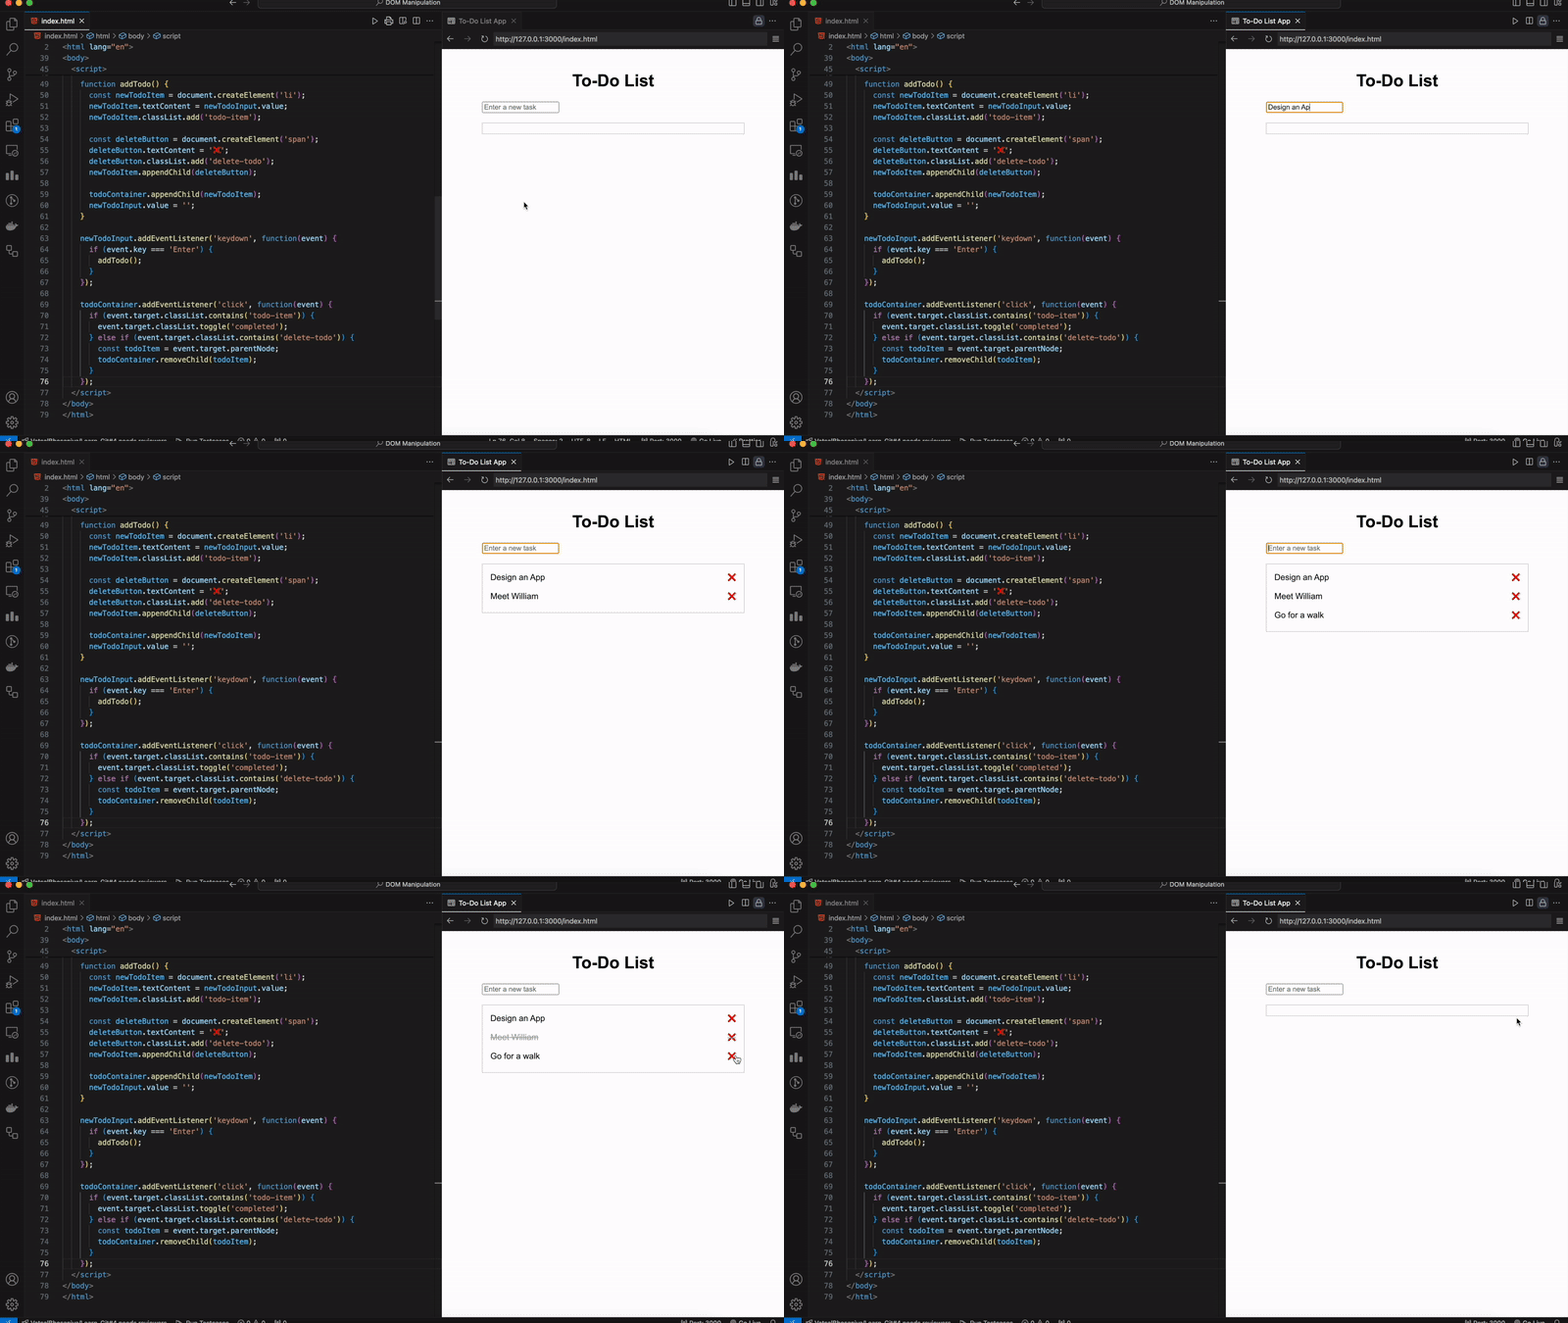
We then define a function called addTodo. This function is responsible for creating new to-do list items. Here's what happens inside:
We use
document.createElementto create a new list item element. This will become the container for each to-do item.We set the text content of the new list item using
textContentproperty. This grabs the value entered in the input field and displays it as the task description.To style our list items, we add a class name “todo-item” using the
classListproperty andaddmethod. This class likely styles the appearance of each to-do item in the CSS.We want a way to delete tasks, so we create a delete button using
createElement. This creates a<span>element which will hold the delete icon.We set the text content of the delete button to a cross symbol using
textContentproperty. We are directly adding the emoji character here.Similar to the to-do item, we add a class name “delete-todo” for styling the delete button.
Finally, we append the delete button as a child element to the new list item using
appendChildmethod. This creates a nested structure where the delete button sits inside the to-do item.The new to-do item, complete with the delete button, is then added to the to-do container using
appendChild. This inserts the new list item into the webpage.We clear the input field after adding a new to-do item so the user can enter the next task.
<script>
  ...

  newTodoInput.addEventListener('keydown', function(event) {
    if (event.key === 'Enter') {
      addTodo();
    }
  });
</script>
Next, we have an event listener on the input field that listens for the “Enter” key press. This is achieved using addEventListener method. The keydown event triggers whenever a key is pressed down on the input field. The function passed as an argument checks if the pressed key is "Enter" using if condition. If it's "Enter", it calls the addTodo function we just explained, essentially creating a new to-do item when the user presses enter.
<script>
  ...

  todoContainer.addEventListener('click', function(event) {
    if (event.target.classList.contains('todo-item')) {
      event.target.classList.toggle('completed');
    } else if (event.target.classList.contains('delete-todo')) {
      const todoItem = event.target.parentNode;
      todoContainer.removeChild(todoItem);
    }
  });
</script>
Another event listener is added to the to-do container. This one listens for clicks. When there’s a click inside the container, the function checks what element was clicked using the target property.
If the clicked element has the class “todo-item” (which means the user clicked on a to-do item itself), we toggle a class called “completed” using the
togglemethod. This class likely controls the styling to indicate a completed task, perhaps strikethrough text.If the clicked element has the class “delete-todo” (which means the user clicked on the delete button), we target the parent element (the to-do item) using the
parentNodeproperty. Then, we remove the to-do item from the to-do container using theremoveChildmethod. This effectively deletes the task from the list.
So far, our code has created a functional to-do list where you can add items, mark them complete, and delete them.

Let me demonstrate some other methods similar to getElementById we have seen earlier. The selectElement function selects various elements and changes their styles or attributes.
<body>
  <h1>To-Do List</h1>
  <input type="text" id="new-todo-input" placeholder="Enter a new task">
  <br /><br />
  <div>
    <button onclick="selectElement()">Select Element</button>
  </div>
  <br />
  <div id="todo-container"></div>

  <script>
    ...

    function selectElement() {
      const todoItem = document.getElementsByClassName('todo-item');
      todoItem[0].style.backgroundColor = 'green';

      const tagElement = document.getElementsByTagName('input');
      tagElement[0].placeholder = 'Updated placeholder';

      const node = document.querySelector('#todo-container');
      node.style.border = '1em solid #0000FF';

      const nodeList = document.querySelectorAll('li');
      for (let i = 2; i < nodeList.length; i++) {
        nodeList[i].style.color = 'brown';
      }
    }
  </script>
</body>
To target multiple elements at once, we can use
getElementsByClassNamemethod. This grabs all elements with the class "todo-item", which is likely all our to-do list items.We can only access elements by index within the returned collection. Here, it changes the background color of the first to-do item using the
backgroundColorproperty.This line demonstrates selecting elements by tag name using the
getElementsByTagNamemethod. This grabs all<input>elements on the page, which can include the to-do input field and other potential inputs that might exist on the page.Similar to the to-do items, it changes the placeholder text of the first input element using the
placeholderproperty.This line shows how to select a single element using a CSS selector with the
querySelectormethod. This is a more concise way to target an element with a specific ID. Here, it selects the to-do container again.It changes the border style of the container using the
borderproperty.To manipulate a collection of elements more dynamically, it uses
querySelectorAllmethod. This grabs all<li>elements, which likely represent all our to-do list items.It loops through the list of elements using a for loop. Here, it skips the first two elements and changes the text color of the remaining elements using the
colorproperty.
The elementTree function is similar but dives a bit deeper into the DOM structure.
<body>
  <h1>To-Do List</h1>
  <input type="text" id="new-todo-input" placeholder="Enter a new task">
  <br /><br />
  <div>
    <button onclick="selectElement()">Select Element</button>
    <button onclick="elementTree()">Element Tree</button>
  </div>
  <br />
  <div id="todo-container"></div>

  <script>
    ...

    function elementTree() {
      const todoItem = document.getElementsByClassName('todo-item')[0];
      todoItem.parentNode.style.backgroundColor = 'cadetblue';

      const children = todoItem.parentNode.childNodes;
      for (let i = 0; i < children.length; i++) {
        children[i].style.color = 'white';
      }

      todoItem.parentNode.firstChild.firstChild.textContent += ' + First Child';
      todoItem.parentNode.lastChild.firstChild.textContent += ' + Last Child';

      children[3].nextSibling.style.color = 'purple';
      children[3].previousSibling.style.color = 'purple';

      todoItem.setAttribute('class', 'new-class');
      todoItem.getAttribute('class'); // new-class
    }

  </script>
</body>
First, we select the first to-do item using the
getElementsByClassNamemethod.Then, it grabs the parent node of the selected to-do item using the
parentNodeproperty. The parent node is the container that holds this specific to-do item.It retrieves all the child nodes of the parent container using the
childNodesproperty. Child nodes can include various elements and text within that container.It loops through all the child nodes using a for loop and changes their text color to white using the
colorproperty.The next two lines modify the text content of the first child of the first and last child, by appending additional text using the
textContentproperty.Next, it demonstrates navigating between sibling elements. It targets the element before and after the fourth child node using the
previousSiblingandnextSiblingmethods respectively. Then, it changes its text color to purple.The last two lines show the
setAttributeandgetAttributemethods. It directly modifies an attribute of the first to-do item. It sets a new class name "new-class" usingsetAttributemethod. ThegetAttributemethod returns the value of a specified attribute on the element. In this case, if we print it in the console, we will get the class name “new-class”.
You now have a solid understanding of the Document Object Model, how to select and traverse elements, create and modify elements, and handle events. Keep practicing and experimenting with DOM Manipulation techniques to solidify your skills.
Subscribe to my newsletter
Read articles from Vatsal Bhesaniya directly inside your inbox. Subscribe to the newsletter, and don't miss out.
Written by
