Car Model Detection and Reverse Image Search AI with ImageBind, Qdrant and Streamlit
 Vansh Khaneja
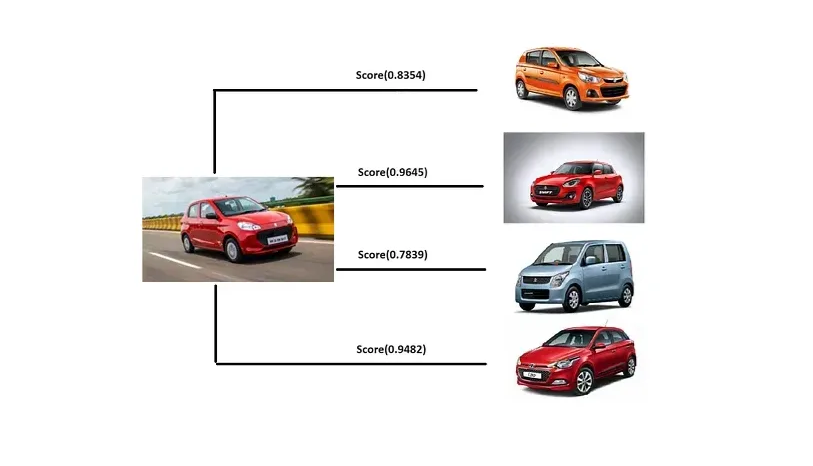
Imagine a world where technology seamlessly connects vision and action, transforming our interaction with the environment. In this article, we explore how computer vision and vector similarity together can revolutionize visual data management, enhancing search capabilities enabling smarter and more intuitive image retrieval systems.
Introduction
This project will be executed in two phases. First, we will gather the data and convert it into vectors. In the second phase, we will use that data along with input images to display similar images using the Streamlit framework.
Access the full code and implementation details on GitHub.
Setting Up the Environment
We’ll be using ImageBind, an open-source library developed by Meta to convert images into embeddings.
The code starts by installing the ImageBind library, which requires cloning from its GitHub repository for proper integration and usage.
git clone https://github.com/facebookresearch/ImageBind.git
cd ImageBind
pip install -e .
Additionally, we require some other libraries, including ultralytics and qdrant-client, to ensure the project functions correctly and efficiently.
pip install ultralytics
pip install qdrant-client
pip install streamlit
Data Collection
We have gathered a collection of images representing various types of cars along with their respective prices.
Kindly access the dataset from here.
Subsequently, storing them in lists: one for storing names, and another for their respective prices.
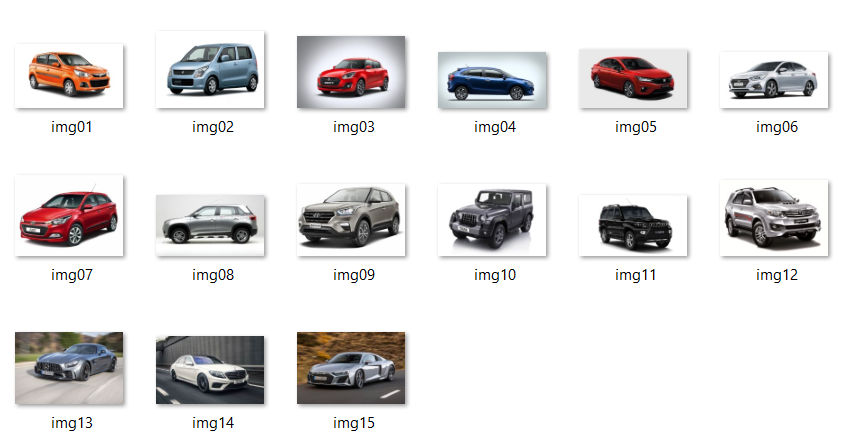
cars_img_list = ["img01","img02","img03","img04","img05","img06","img07","img08","img09","img10","img11","img12","img13","img14","img15"]
cars_cost_list = ["6.49","3.99","6.66","6.65","7.04","5.65","61.85","11.00","11.63","11.56","11.86","46.05","75.90","13.59","13.99"]
Importing Libraries
Now let's import all the necessary libraries required to convert the images into embeddings.
from ultralytics import YOLO
import cv2
import os

import torch
from imagebind import data
from imagebind.models import imagebind_model
from imagebind.models.imagebind_model import ModalityType
Image Segmentation
We will be using the YOLOv8 algorithm to clip out the cars, thereby removing unnecessary noise from the images.
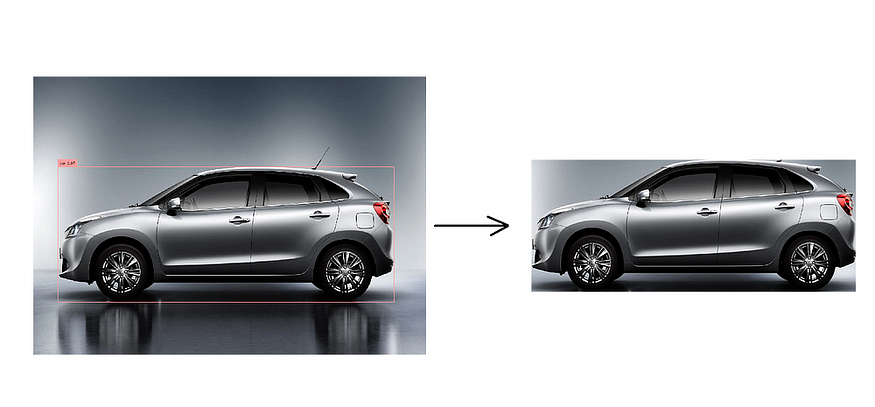
To achieve this, we will first draw a bounding box with the help of YOLOv8 around the car, then use OpenCV to clip out that region and, at last, save the images in a directory.
model = YOLO('yolov8n.pt')

for im in cars_img_list:
    img = cv2.imread("cars_imgs/"+im+".jpg")
    img = cv2.resize(img,(320,245))
    results = model(img,stream=True)

    for r in results:
        for box in r.boxes:
            x1,y1,x2,y2 = box.xyxy[0]
            x1,y1,x2,y2 = int(x1),int(y1),int(x2),int(y2)

            cv2.rectangle(img,(int(x1),int(y1)),(int(x2),int(y2)),(255,0,0),1)
        cv2.imwrite("cropped_imgs/"+im+"_cropped.jpg",img[y1:y2, x1:x2])
Images to Embeddings
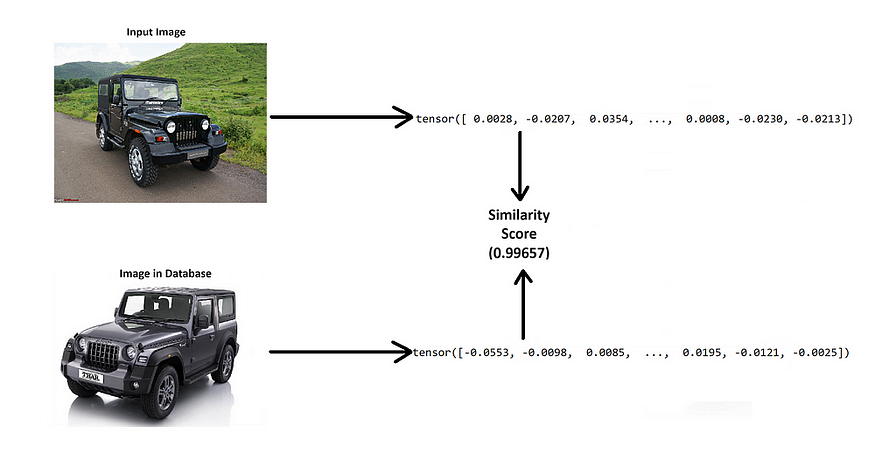
Next, we will convert the cropped images into numeric format by transforming them into vector embeddings using the ImageBind library.

Note: This is a time-consuming process as it will download a model from the internet.
embedding_list = []

model_embed = imagebind_model.imagebind_huge(pretrained=True)
model_embed.eval()
model_embed.to("cpu")

for i in range(1,len(cars_img_list)):
    img_path = "cropped_imgs/img"+str(i)+"_cropped.jpg"
    vision_data = data.load_and_transform_vision_data([img_path], device)

    with torch.no_grad():
        image_embeddings = model_embed({ModalityType.VISION: vision_data})
    embedding_list.append(image_embeddings)
To reduce processing time, you can set pretrained=False, although this will decrease the model's accuracy.
Let’s save the embeddings for later use in the code.
import pickle
with open('embedded_data.pickle', 'wb') as file:
    pickle.dump(embedding_list, file)
Similar Images Search
Moving forward to the second phase of the code, we will proceed to take an image as input and identify the most similar images. Subsequently, we will display these images along with their respective prices.
Importing Libraries
In addition to the previously imported libraries, the following additional libraries are required:
import streamlit as st
from PIL import Image
import base64
import os
from io import BytesIO
import numpy as np
Now we will start the code by initiating the ImageBind model that will convert the uploaded input images to vector embeddings.
model_embed = imagebind_model.imagebind_huge(pretrained=True)
model_embed.eval()
model_embed.to("cpu")
Let’s proceed by opening the saved file “embedded_data.pickle” which contains the vector data for our image dataset.
with open('embedded_data.pickle', 'rb') as file:
    embedding_list = pickle.load(file)
Storing Vector Data
We will utilize Qdrant, an open-source vector database, to store and compare all the embeddings of the images with the input image.
client = QdrantClient(":memory:")

client.recreate_collection(
    collection_name='vector_comparison',
    vectors_config=VectorParams(size=1024, distance=Distance.COSINE)
)

client.upsert(
    collection_name='vector_comparison',
    points=[
        PointStruct(id=i, vector=embedding_list[i]['vision'][0].tolist()) for i in range(15)
    ]
)
Comparing Images
Next, we will compare each vector embedding we stored in the Qdrant database with the input image supplied to the program.
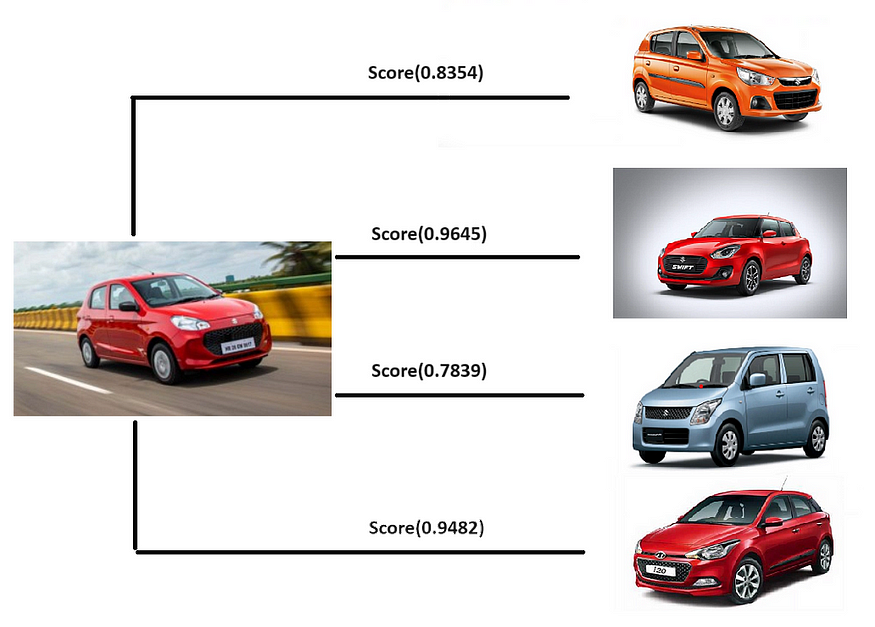
This will be done in 3 steps:
Cropping the car from the image.
Converting cropped image into vector embedding.
Comparing that vector with the vectors of other images.
In this process, we are employing cosine similarity to assess the similarity among the embeddings.
We have declared a function that takes an image as input and gives out the index of 4 most similar images to the input image.
def image_to_similar_index(cv2Image):
        img = cv2.resize(cv2Image,(320,245))
        model = YOLO('yolov8n.pt')
        results = model(img,stream=True)
        results = model(img,stream=True)
        for r in results:
                for box in r.boxes:
                    x1,y1,x2,y2 = box.xyxy[0]
                    x1,y1,x2,y2 = int(x1),int(y1),int(x2),int(y2)

                    cv2.rectangle(img,(int(x1),int(y1)),(int(x2),int(y2)),(255,0,0),1)
                    cropped_img = img[y1:y2, x1:x2]
                cv2.imwrite("test_cropped.jpg",cropped_img)

        vision_data = data.load_and_transform_vision_data(["test_cropped.jpg"], device)
        with torch.no_grad():
            test_embeddings = model_embed({ModalityType.VISION: vision_data})

        client.upsert(
                collection_name='vector_comparison',
                points=[
                  PointStruct(id=20, vector=test_embeddings['vision'][0].tolist()),
                ])
        search_result = client.search(
            collection_name='vector_comparison',
            query_vector=test_embeddings['vision'][0].tolist(),
            limit=20 # Retrieve top similar vectors (excluding the new vector itself)
        )
        return [search_result[1].id,search_result[2].id,search_result[3].id,search_result[4].id]
Deploying the Model
We will now proceed to develop a frontend web application for our model to enhance interactivity and user-friendliness.
To accomplish this, we will utilize Streamlit to create web interfaces for our Python application in a simple and efficient manner.
We’ll begin by configuring the page and integrating a file uploader widget onto the web page.
st.set_page_config(layout="wide")
st.title('Similar Cars Finder')
st.markdown("""
        <style>
               .block-container {
                    padding-top: 3rem;
                    padding-bottom: 0rem;
                    padding-left: 5rem;
                    padding-right: 5rem;
                }
        </style>
        """, unsafe_allow_html=True)
uploaded_file = st.file_uploader("Upload an image of a car", type=["jpg", "jpeg", "png"])

Now we’ll create a function to display the images with proper padding and margins along with the prices. This function takes images and prices list as input and shows them on the web page in a formatted manner.
def display_images_with_padding_and_price(images, prices, width, padding, gap):
    cols = st.columns(len(images))
    for col, img, price in zip(cols, images, prices):
        with col:
            col.markdown(
                f"""
                <div style="margin-right: {0}px; text-align: center;">
                    <img src="data:image/jpeg;base64,{img}" width="{250}px;margin-right: {50}px; ">
                    <p style="font-size: 20px;">₹{price} Lakhs</p>
                </div>
                """,
                unsafe_allow_html=True,
            )
Finally, we will read the uploaded image as input, convert it into a NumPy array, and provide it as input to the image_to_similar_index function we defined earlier, which will return the indices of the most similar images to the input.
We will then retrieve the images and prices corresponding to the returned indices and supply them to the display_images_with_padding_and_price function, which will format the images and display them on the web page.
if uploaded_file is not None:
    car_image = Image.open(uploaded_file)
    img_array = np.array(car_image)
    st.image(car_image, caption='Uploaded Car Image', use_column_width=False, width=300)
    results = image_to_similar_index(img_array)

    if os.path.exists("cars_imgs"):
        car_images = [os.path.join(car_images_dir, img) for img in os.listdir(car_images_dir) if img.endswith(('jpg', 'jpeg', 'png'))]
        print(car_images)
    else:
        st.error(f"Directory {car_images_dir} does not exist")
        car_images = []

    if len(car_images) < 4:
        st.error("Not enough car images in the local storage")
    else:
        car_imagess = []
        for i in results:
             car_imagess.append(car_images[i])
        car_prices = [cars_cost_list[a] for a in results]

        car_images_pil = []
        for img_path in car_imagess:
            try:
                img = Image.open(img_path)
                buffered = BytesIO()
                img.save(buffered, format="JPEG")
                img_str = base64.b64encode(buffered.getvalue()).decode()
                car_images_pil.append(img_str)
            except Exception as e:
                st.error(f"Error processing image {img_path}: {e}")

        if car_images_pil:
            st.subheader('Similar Cars with Prices')
            display_images_with_padding_and_price(car_images_pil, car_prices, width=200, padding=10, gap=20)
Final Output
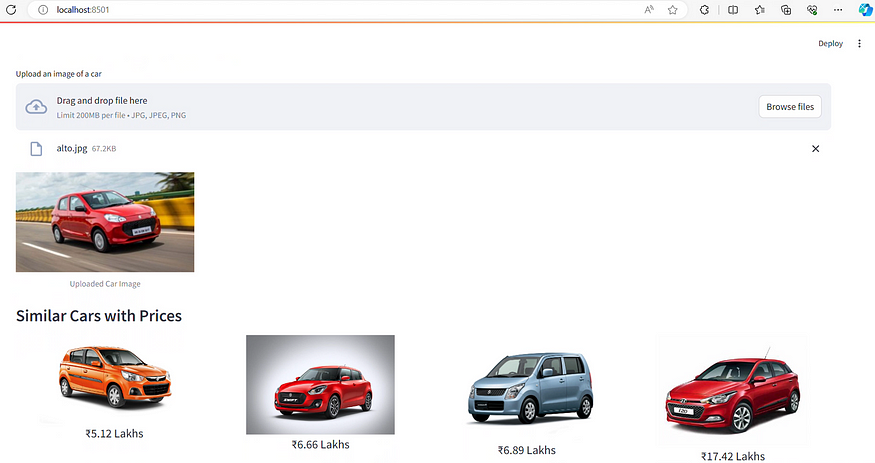
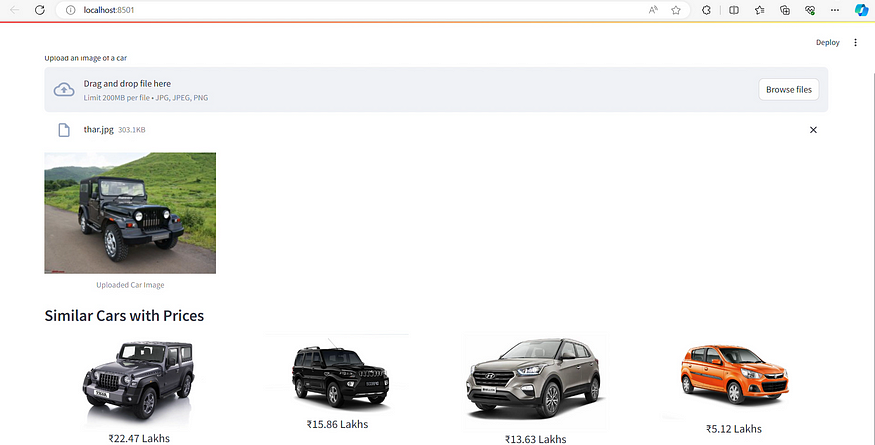
Upon uploading an image to the web page, the ImageBind model initiates loading, which may take a moment. However, once the model is fully loaded, the image is converted into embeddings and compared to others to identify the most similar one. Subsequently, the similar images are displayed on the web page.
Video Demonstration
Conclusion
In summary, this project showcases the power of combining computer vision, vector embeddings, and web development tools like Streamlit to create a user-friendly system for image similarity detection. Through efficient processing and comparison of image embeddings, we’ve demonstrated the potential of enhancing search and recommendation systems.
Subscribe to my newsletter
Read articles from Vansh Khaneja directly inside your inbox. Subscribe to the newsletter, and don't miss out.
Written by
