Easy Steps to Connect a subdomain Name to Your Self-Hosted Website with SSL certificate
 Keshav Carpenter
In a previous post I shared how can you host your application on a Linux server. Now, to make your website address presentable while sharing it with others having a domain is essential. For multiple website you don't necessarily need separate domains, you can use subdomains of your main domain. For example I own a domain keshavcarpenter.tech and I've deployed multiple website using it's subdomain like this blog itself.
To get a domain name for free gettech provide free .tech domains for students under their Github student pack.
Create a subdomain
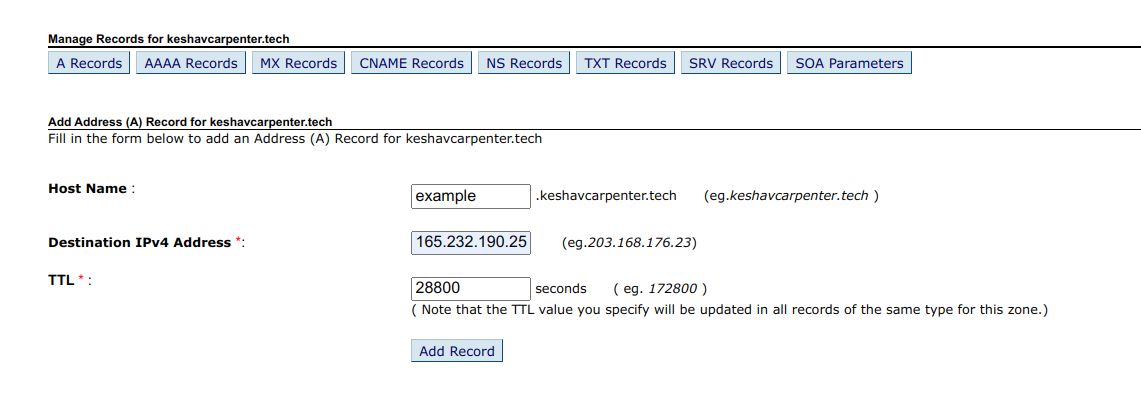
So to assign a domain name you just need to login to user dashboard of your domain provide. For example in my case it's https://controlpanel.tech/ .
Go to DNS management section and add a A Record pointing a subdomain or your main domain to the IP address of your Linux server.

To point your main domain to a server you can simply leave the Host name value as blank or use @ .
Now, moving on to next step!
Update your nginx configuration for your subdomain
Open the nginx conf file at /etc/nginx/sites-available/our-app and update the server_name with your subdomain.
server {
  listen 80;
  server_name example.keshavcarpenter.tech;
  location / {
    proxy_pass http://localhost:3000;
    proxy_http_version 1.1;
    proxy_set_header Upgrade $http_upgrade;
    proxy_set_header Connection 'upgrade';
    proxy_set_header Host $host;
    proxy_cache_bypass $http_upgrade;
  }
}
Now restart the nginx server :
sudo nginx -t
sudo service nginx restart
At this point your subdomain will be pointing to your website. But it will show as unsafe website in the browser since we do not have SSL certificate.
Get SSL certificate using cert-bot
Follow these commands to get a SSL certificate :
Install required dependencies.
sudo apt update
sudo apt install certbot python3-certbot-nginx
Get SSL certificate on your subdomain using cert-bot.
sudo certbot --nginx -d example.keshavcarpenter.tech
Automatic renewal
Certbot provides a systemd timer to handle automatic certificate renewal. To ensure the timer is enabled, run:
sudo systemctl status certbot.timer
Certbot will update your website's nginx conf, now it will look like this.
server {
    listen 80;
    server_name example.keshavcarpenter.tech;

    location / {
        return 301 https://$host$request_uri;
    }
}

server {
    listen 443 ssl;
    server_name example.keshavcarpenter.tech;

    ssl_certificate /etc/letsencrypt/live/example.keshavcarpenter.tech/fullchain.pem;
    ssl_certificate_key /etc/letsencrypt/live/example.keshavcarpenter.tech/privkey.pem;
    include /etc/letsencrypt/options-ssl-nginx.conf;
    ssl_dhparam /etc/letsencrypt/ssl-dhparams.pem;

    location / {
        proxy_pass http://localhost:3000;
        proxy_http_version 1.1;
        proxy_set_header Upgrade $http_upgrade;
        proxy_set_header Connection 'upgrade';
        proxy_set_header Host $host;
        proxy_cache_bypass $http_upgrade;
    }
}
Restart nginx
sudo nginx -t
sudo systemctl reload nginx
Verify SSL
After reloading Nginx, open your website (https://example.keshavcarpenter.tech) in a web browser to ensure the SSL certificate is working correctly.
So, by following these easy steps you can add a SSL certificate on your website for free.
Subscribe to my newsletter
Read articles from Keshav Carpenter directly inside your inbox. Subscribe to the newsletter, and don't miss out.
Written by

Keshav Carpenter
Keshav Carpenter
I am a software engineer with a passion for creating efficient and user-friendly web applications. I have experience in developing scalable and maintainable web applications using modern technologies and frameworks. I spent my time writing clean, robust, reusable and maintainable code.