Azure Data Services and Azure SQL
 Prakash Agrawal
In this first part of the blog, we will go through some high-level definition of services we will use and create Azure SQL database resource to start with.
Azure Data Storage: Azure Data Storage is a suite of cloud-based storage solutions provided by Microsoft Azure, designed to meet various data storage needs for businesses and developers. It offers scalable, durable, and highly available storage options that can be tailored to specific requirements, from simple file storage to complex, structured data storage systems.
Some key Azure Data Storage services are Azure Blob Storage, Azure File Storage, Azure Table Storage, Azure Queue Storage, Azure Disk Storage, Azure Data Lake Storage and Azure Managed Disks.
Azure SQL: Azure SQL is a family of managed, secure, and intelligent SQL database services offered by Microsoft Azure. These services are designed to meet various database requirements, from single databases to large-scale data warehousing and distributed databases. Azure SQL provides a range of deployment options and features that offer high availability, scalability, and automated maintenance.
Key Azure SQL Services
Azure SQL Database
- A fully managed relational database service that offers built-in intelligence, security, and performance optimization. It supports the latest SQL Server capabilities and provides several deployment options, including single databases, elastic pools, and hyperscale databases.
Azure SQL Managed Instance
- A fully managed SQL Server instance that combines the best features of SQL Server with the benefits of a managed service. It offers full compatibility with SQL Server on-premises and supports easy migration with minimal changes to applications.
Azure SQL Data Warehouse (Synapse Analytics)
- A cloud-based, enterprise-grade data warehouse solution that offers massive parallel processing (MPP) to run complex queries across large datasets quickly. It integrates deeply with other Azure services for comprehensive data analytics solutions.
Azure Data Factory: Azure Data Factory (ADF) is a cloud-based data integration service provided by Microsoft Azure. It allows data engineers and developers to create, schedule, and orchestrate data workflows at scale. ADF supports a wide variety of data sources, both on-premises and in the cloud, and provides capabilities for data transformation, movement, and orchestration. It is designed to handle complex data integration scenarios, making it a powerful tool for building data pipelines and ETL (Extract, Transform, Load) processes.
Key Features of Azure Data Factory
Data Integration: Supports over 90 built-in connectors to various data sources, including SQL databases, data lakes, SaaS applications, and file storage systems.
Data Transformation: Leverages mapping data flows and integration with Azure Databricks, HDInsight, and SQL Server Integration Services (SSIS) for complex data transformations.
Orchestration: Allows creation of data pipelines that can be scheduled, monitored, and managed with built-in triggers and monitoring tools.
Hybrid Data Movement: Facilitates data movement between on-premises and cloud data stores securely and efficiently using self-hosted integration runtime.
Scalability: Automatically scales to handle large data volumes and complex workflows.
Low-Code/No-Code Development: Provides a visual interface for building data pipelines with minimal coding required.
I am now writing the general steps that can be used to set up Azure SQL database. Please note that you will need your own Azure account to follow these steps hands on.
A. Create an Azure SQL Resource and create SQL table
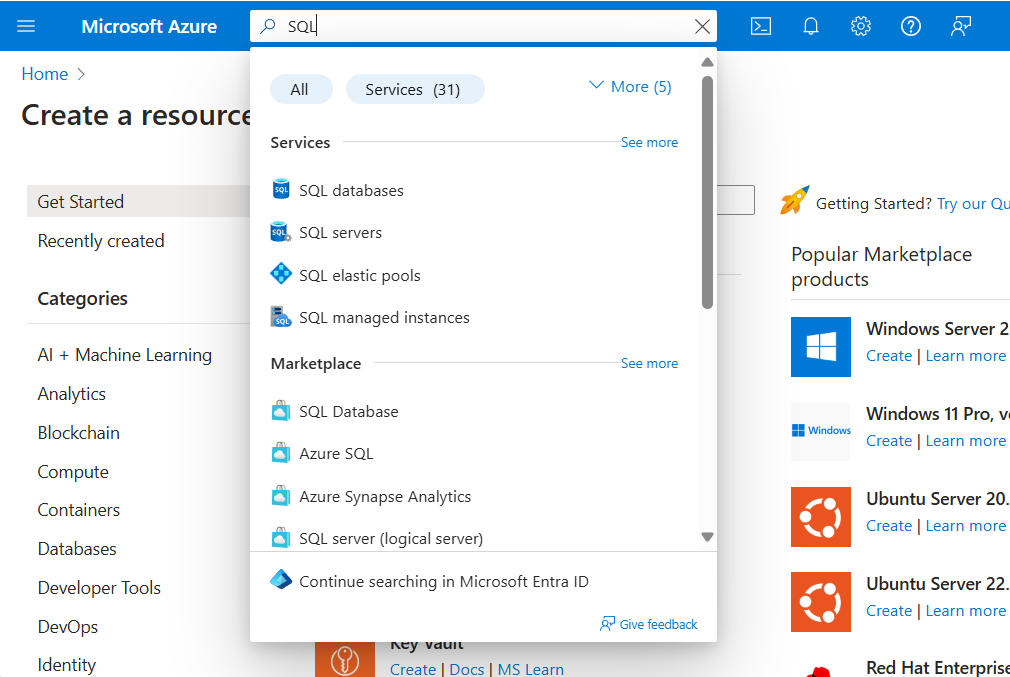
- Search for SQL in Create a Resource option
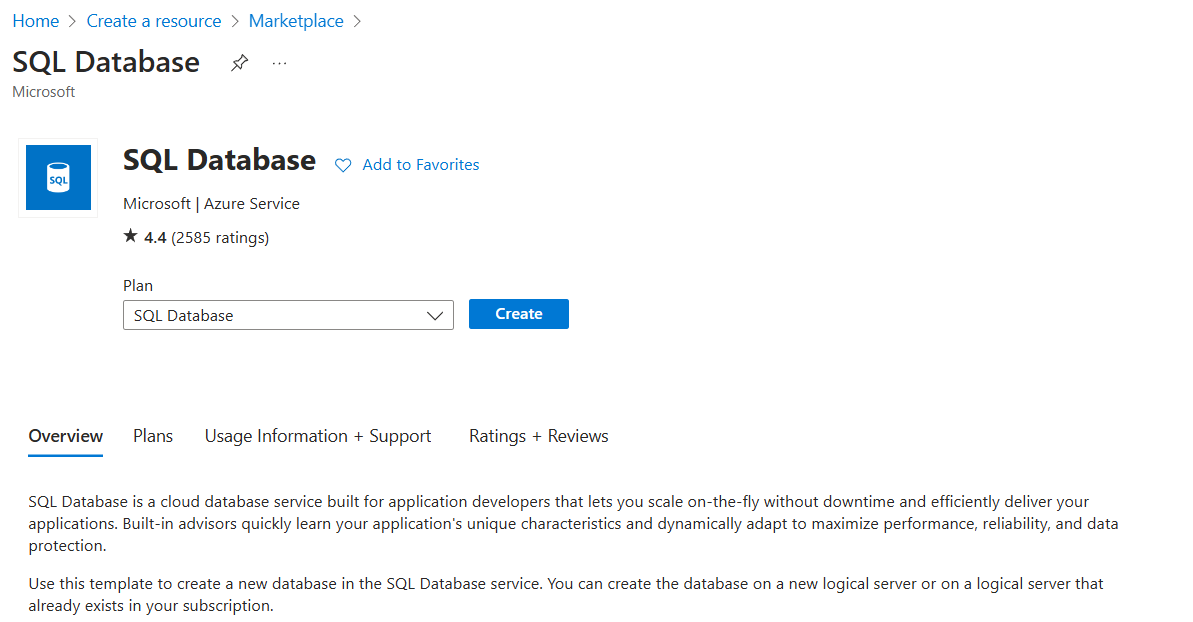
- Use the Create button for the SQL Database
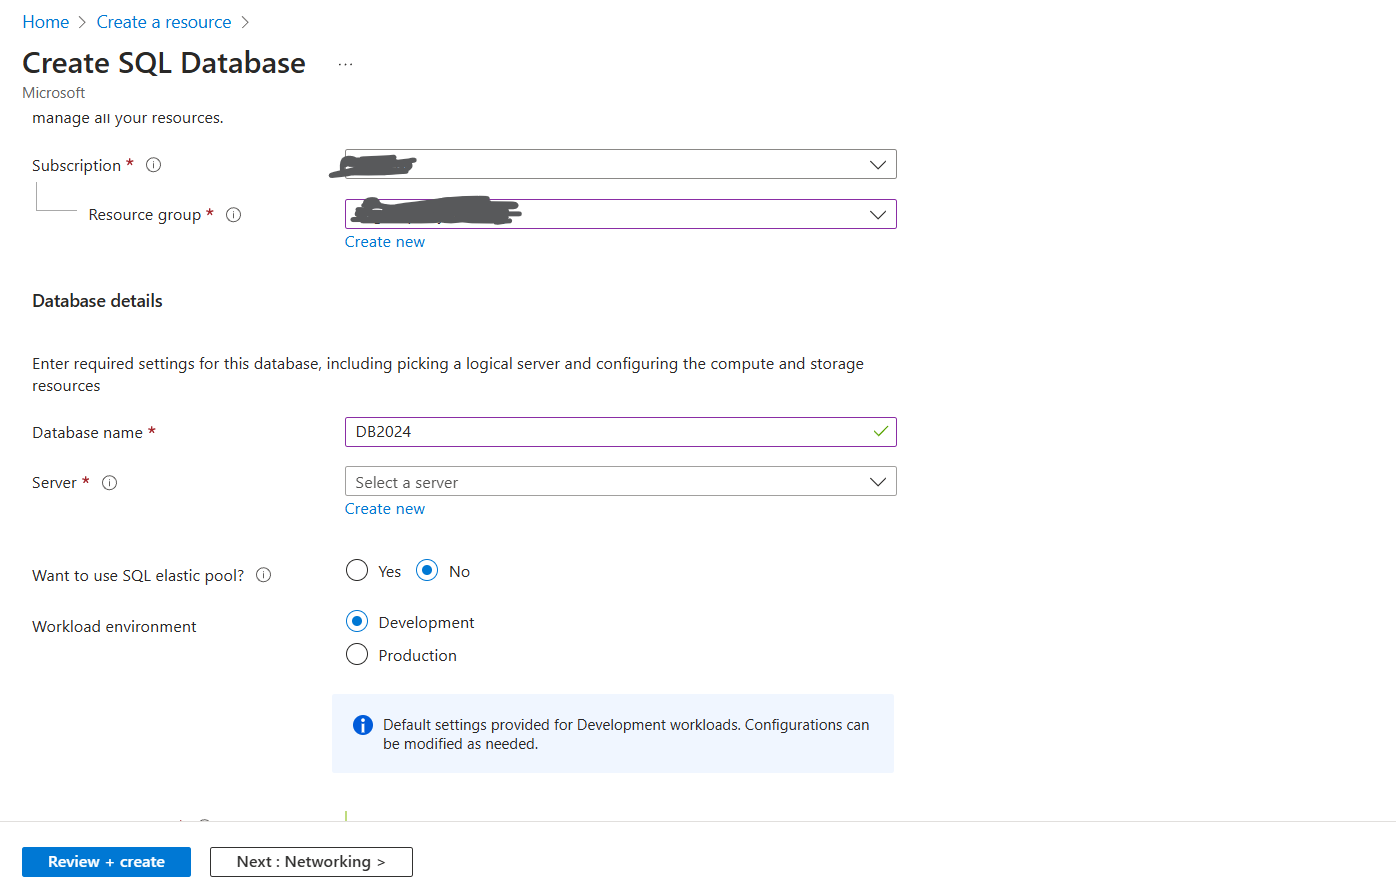
Populate the specifications on each of the setup pages
Basics
Under Resource group, select the default resource group that appears in the dropdown menu or Create New
For Database name, type in a unique Database name (for example, "data")
For Server, if you have not already created one, you will need to create a new one by selecting Create new underneath the Server dropdown
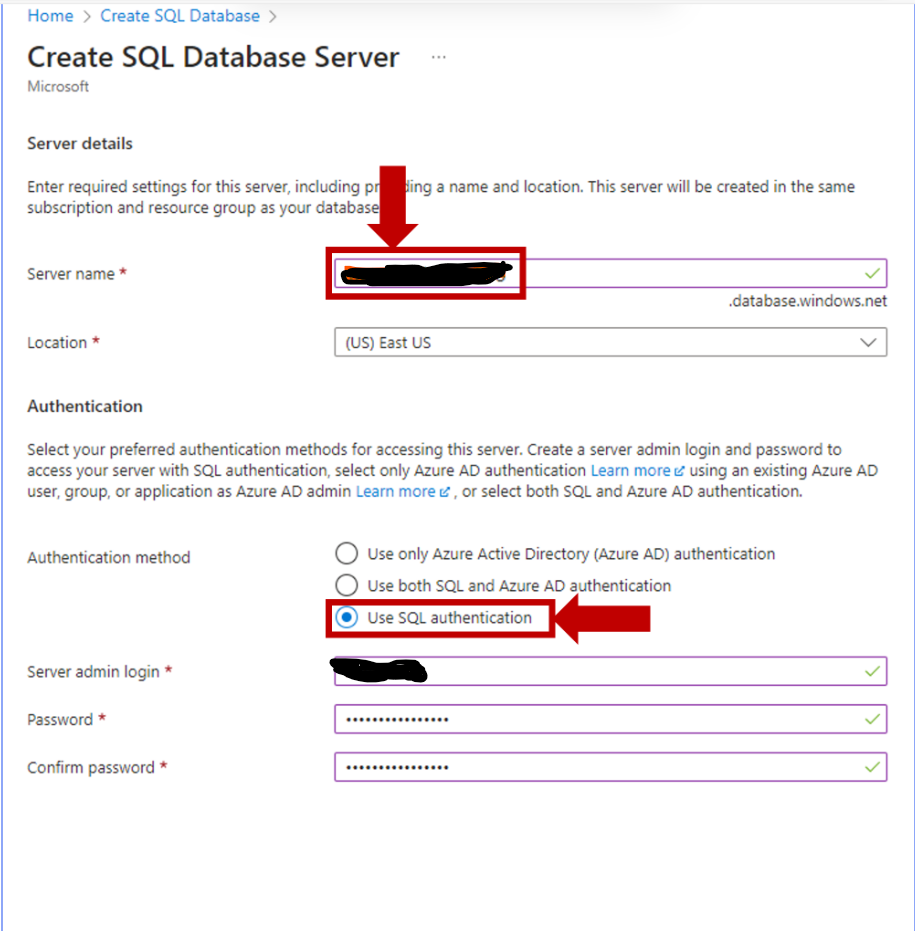
Creating the new server:
For Server name, type in a unique name - it should not be in use with any other Azure SQL Database. For example, type in "healthofcitizensXX" where "XX" are two random numbers
Change the Location to (US) East US
For Authentication, select Use SQL Authentication
For this authentication method, you need to create a server admin login and a password. Please remember your server admin login and password as we will need these for future steps.
A complete Server creation page will look like this
Select OK on the bottom to continue to the rest of the Basics specifications
Under Want to use SQL elastic pool, select No
Under Workload environment, select Development
Under Compute + storage, select the default option, which is General Purpose - Serverless
For Backup storage redundancy, select Geo-redundant backup storage
Select the Next:Networking button at the bottom of the page to continue

Networking:
Choose Public endpoint for the Connectivity method.
In the Firewall rules section:
Enable Allow Azure services and resources to access this server.
Enable Add current client IP address.
Verify that the Connection policy is set to Default and the TLS version is set to TLS 1.2.
Click the Review + create button at the bottom of the page to proceed.

- After a few minutes, verify that your Azure SQL Database server has been provisioned.
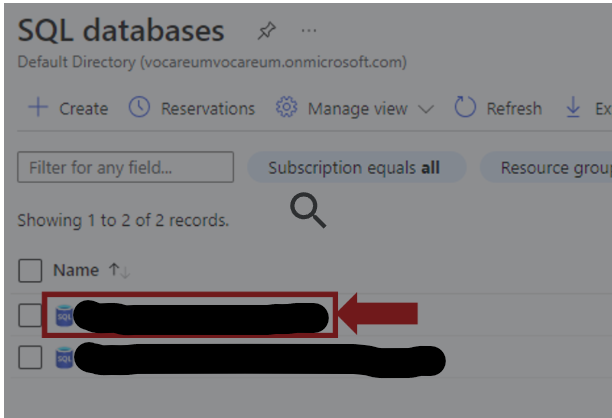
Search for "SQL" in the search bar and choose the SQL databases service.
Your Azure SQL database should be listed. Select the SQL database you provisioned.
- Connect to your Azure SQL resource.
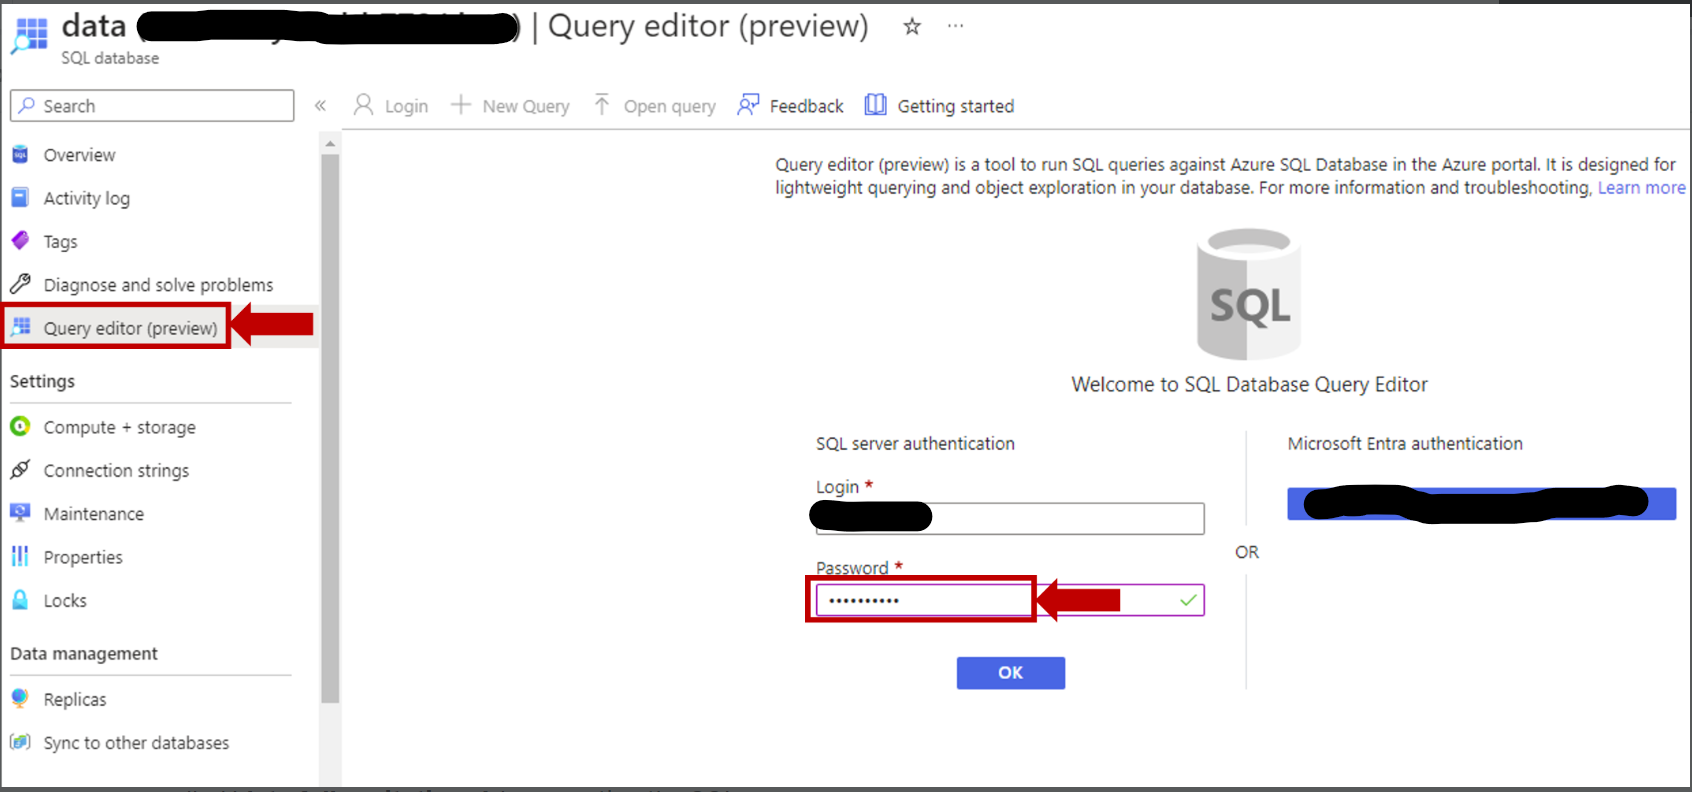
There are several methods to connect to Azure SQL databases, such as using Azure Data Studio or SQL Server Management Studio. In this instance, we'll use the built-in SQL editor within the Azure Portal.
From the previous step, click on Query editor (preview) from the left-hand menu, enter the SQL password you created earlier, and click OK to continue.
Create a SQL Table:
Create a new schema named 'hospitals' and a new table called 'hospitals.wait_time_in_hospitals' by running the SQL query as below. To run the query, copy and paste the SQL code below, then click the Run button at the top of the window.
Verify the table's creation by executing a query that retrieves all rows from the table. You should see the following output.
create schema hospitals
go

create table hospitals.wait_time_in_hospitals (
    hospital_id int,
    patient_id int,
    procedure_id int,
    wait_time int,
    hospital_name varchar(100),
    hospital_leader_name varchar(100)
)

select * from hospitals.wait_time_in_hospitals
Subscribe to my newsletter
Read articles from Prakash Agrawal directly inside your inbox. Subscribe to the newsletter, and don't miss out.
Written by
