Week # 01: DevOps Learning Journey - CodeSide of our MERN Stack CRUD App (Backend)
 Malik Muneeb Asghar
In the previous, Section # 01: SDLC - Building a MERN CRUD Application, We studied the seven-phase process for building software. It starts with planning and defining the tech stack, then progresses through requirements gathering, design, coding, testing, and finally deployment with ongoing maintenance. Each phase focuses on specific tasks like user needs analysis, UI design, coding the application, rigorous testing to ensure quality, and deployment for real-world use. This structured approach ensures a well-rounded product that meets user requirements.

Section # 01: Setting Up the Project
Start by creating a new directory for your project and initializing it with npm.
In this blog post, I will guide you through the process of building a complete CRUD application using the MERN stack (MongoDB, Express, React, Node.js). We will create both the backend and frontend, demonstrating how they integrate seamlessly. This application allows users to create, read, update, and delete data while using MongoDB for storage. Additionally, we'll discuss how I leveraged tutorials and resources to build this application, with the code available on my GitHub.
Prerequisites
Ensure you have the following installed on your system:
Node.js
MongoDB
npm (Node Package Manager)
Git
Setting Up the Project
Start by creating a new directory for your project and initializing it with npm.
mkdir mern-crud-app
cd mern-crud-app
npm init -y
Setting Up the Backend
First, we will set up the backend using Node.js, Express, and MongoDB.
- Install Dependencies
npm install express mongoose dotenv multer fast-csv moment cors
- Project Structure
Create the following directory structure:
mern-crud-app
│
├── Controllers
│   └── usersControllers.js
├── db
│   └── conn.js
├── models
│   └── usersSchema.js
├── multerconfig
│   └── storageConfig.js
├── Routes
│   └── router.js
├── .env
├── app.js
└── package.json
- Database Connection (
conn.js)
This file is responsible for establishing the connection to the MongoDB database. It uses the mongoose library to connect to the database using a connection string.
const mongoose = require('mongoose');

const connectionString = 'your-mongodb-connection-string-here';

mongoose.set('strictQuery', false);  // Add this line before or after connect

mongoose.connect(connectionString)
    .then(() => console.log('MongoDB database connected successfully!'))
    .catch(error => console.error('MongoDB connection error:', error));
- User Schema (
usersSchema.js)
Defines the schema for the user data, specifying the structure and validation rules for each user document stored in MongoDB.
const mongoose = require("mongoose");
const validator = require("validator");

const usersSchema = new mongoose.Schema({
    fname: { type: String, required: true, trim: true },
    lname: { type: String, required: true, trim: true },
    email: { type: String, required: true, unique: true, validate(value) { if (!validator.isEmail(value)) { throw Error("not valid email") } } },
    mobile: { type: String, required: true, unique: true, minlength: 10, maxlength: 10 },
    gender: { type: String, required: true },
    status: { type: String, required: true },
    profile: { type: String, required: true },
    location: { type: String, required: true },
    datecreated: Date,
    dateUpdated: Date
});

const users = new mongoose.model("users", usersSchema);

module.exports = users;
- Storage Configuration (
storageConfig.js)
Configures multer for handling file uploads, setting the destination directory and the filename format, and filtering file types.
const multer = require("multer");

// storage config
const storage = multer.diskStorage({
    destination: (req, file, callback) => {
        callback(null, "./uploads")
    },
    filename: (req, file, callback) => {
        const filename = `image-${Date.now()}.${file.originalname}`
        callback(null, filename)
    }
});

// filter
const filefilter = (req, file, callback) => {
    if (file.mimetype === "image/png" || file.mimetype === "image/jpg" || file.mimetype === "image/jpeg") {
        callback(null, true)
    } else {
        callback(null, false)
        return callback(new Error("Only .png .jpg & .jpeg formatted Allowed"))
    }
}

const upload = multer({
    storage: storage,
    fileFilter: filefilter
});

module.exports = upload;
- User Controllers (
usersControllers.js)
Contains all the controller functions for handling CRUD operations, including registering, fetching, updating, and deleting users, as well as exporting user data to CSV.
const users = require("../models/usersSchema");
const moment = require("moment");
const csv = require("fast-csv");
const fs = require("fs");
const BASE_URL = process.env.BASE_URL;

// Register user
exports.userpost = async (req, res) => {
    const file = req.file.filename;
    const { fname, lname, email, mobile, gender, location, status } = req.body;

    if (!fname || !lname || !email || !mobile || !gender || !location || !status || !file) {
        res.status(401).json("All inputs are required")
    }

    try {
        const preuser = await users.findOne({ email: email });

        if (preuser) {
            res.status(401).json("This user already exists in our database")
        } else {
            const datecreated = moment(new Date()).format("YYYY-MM-DD hh:mm:ss");

            const userData = new users({
                fname, lname, email, mobile, gender, location, status, profile: file, datecreated
            });
            await userData.save();
            res.status(200).json(userData);
        }
    } catch (error) {
        res.status(401).json(error);
        console.log("catch block error")
    }
};

// Get users
exports.userget = async (req, res) => {
    const search = req.query.search || "";
    const gender = req.query.gender || "";
    const status = req.query.status || "";
    const sort = req.query.sort || "";
    const page = req.query.page || 1;
    const ITEM_PER_PAGE = 4;

    const query = {
        fname: { $regex: search, $options: "i" }
    }

    if (gender !== "All") {
        query.gender = gender;
    }

    if (status !== "All") {
        query.status = status;
    }

    try {
        const skip = (page - 1) * ITEM_PER_PAGE;
        const count = await users.countDocuments(query);

        const usersdata = await users.find(query)
            .sort({ datecreated: sort == "new" ? -1 : 1 })
            .limit(ITEM_PER_PAGE)
            .skip(skip);

        const pageCount = Math.ceil(count / ITEM_PER_PAGE);

        res.status(200).json({
            Pagination: {
                count, pageCount
            },
            usersdata
        });
    } catch (error) {
        res.status(401).json(error);
    }
};

// Get single user
exports.singleuserget = async (req, res) => {
    const { id } = req.params;

    try {
        const userdata = await users.findOne({ _id: id });
        res.status(200).json(userdata);
    } catch (error) {
        res.status(401).json(error);
    }
};

// Edit user
exports.useredit = async (req, res) => {
    const { id } = req.params;
    const { fname, lname, email, mobile, gender, location, status, user_profile } = req.body;
    const file = req.file ? req.file.filename : user_profile;

    const dateUpdated = moment(new Date()).format("YYYY-MM-DD hh:mm:ss");

    try {
        const updateuser = await users.findByIdAndUpdate({ _id: id }, {
            fname, lname, email, mobile, gender, location, status, profile: file, dateUpdated
        }, {
            new: true
        });

        await updateuser.save();
        res.status(200).json(updateuser);
    } catch (error) {
        res.status(401).json(error);
    }
};

// Delete user
exports.userdelete = async (req, res) => {
    const { id } = req.params;
    try {
        const deletuser = await users.findByIdAndDelete({ _id: id });
        res.status(200).json(deletuser);
    } catch (error) {
        res.status(401).json(error);
    }
};

// Change status
exports.userstatus = async (req, res) => {
    const { id } = req.params;
    const { data } = req.body;

    try {
        const userstatusupdate = await users.findByIdAndUpdate({ _id: id }, { status: data }, { new: true });
        res.status(200).json(userstatusupdate);
    } catch (error) {
        res.status(401).json(error);
    }
};

// Export users
exports.userExport = async (req, res) => {
    try {
        const usersdata = await users.find();
        const csvStream = csv.format({ headers: true });

        if (!fs.existsSync("public/files/export/")) {
            if (!fs.existsSync("public/files")) {
                fs.mkdirSync("public/files/");
            }
            if (!fs.existsSync("public/files/export")) {
                fs.mkdirSync("./public/files/export/");
            }
        }

        const writablestream = fs.createWriteStream("public/files/export/users.csv");
        csvStream.pipe(writablestream);

        writablestream.on("finish", function () {
            res.json({
                downloadUrl: `${BASE_URL}/files/export/users.csv`,
            });
        });

        if (usersdata.length > 0) {
            usersdata.map((user) => {
                csvStream.write({
                    FirstName: user.fname ? user.fname : "-",
                    LastName: user.lname ? user.lname : "-",
                    Email: user.email ? user.email : "-",
                    Phone: user.mobile ? user.mobile : "-",
                    Gender: user.gender ? user.gender : "-",
                    Status: user.status ? user.status : "-",
                    Profile: user.profile ? user.profile : "-",
                    Location: user.location ? user.location : "-",
                    DateCreated: user.datecreated ? user.datecreated : "-",
                    DateUpdated: user.dateUpdated ? user.dateUpdated : "-",
                });
            });
        }
        csvStream.end();
        writablestream.end();

    } catch (error) {
        console.error("Error during user export:", error);
        res.status(500).json({ message: "Error generating user export file" });
    }
}
- Routes (
router.js)
Defines the routes for the application, mapping HTTP requests to the appropriate controller functions for handling user operations.
const express = require("express");
const router = new express.Router();
const controllers = require("../Controllers/usersControllers");
const upload = require("../multerconfig/storageConfig")

// routes
router.post("/user/register", upload.single("user_profile"), controllers.userpost);
router.get("/user/details", controllers.userget);
router.get("/user/:id", controllers.singleuserget);
router.put("/user/edit/:id", upload.single("user_profile"), controllers.useredit);
router.delete("/user/delete/:id", controllers.userdelete);
router.put("/user/status/:id", controllers.userstatus);
router.get("/userexport", controllers.userExport);

module.exports = router;
- Main Server File (
app.js)
Defines the routes for the application, mapping HTTP requests to the appropriate controller functions for handling user operations.
require("dotenv").config();
const express = require("express");
const app = express();
require("./db/conn"); // Assuming your database connection logic is in db/conn.js
const cors = require("cors");
const router = require("./Routes/router");
const PORT = process.env.PORT || 6010;
const mongoose = require('mongoose');

// Configure CORS to allow requests from port 3000 (your React frontend)
const corsOptions = {
  origin: "http://localhost:3000", // Replace with your frontend URL if deployed elsewhere
  credentials: true, // Allow cookies for authentication purposes (if applicable)
  allowedHeaders: ["Content-Type", "Authorization", "X-Requested-With", "Origin", "Accept"],
  methods: ["GET", "POST", "PUT", "DELETE", "OPTIONS"], // Allowed HTTP methods
};

app.use(cors(corsOptions)); // Apply CORS middleware with options

app.use(express.json());
app.use("/uploads", express.static("./uploads"));
app.use("/files", express.static("./public/files"));
mongoose.set('strictQuery', false);
app.use(router);

app.listen(PORT, () => {
  console.log(`Server started at port no ${PORT}`);
});
Section # 02: Configuring and Running the Backend
Now that we have set up our project structure and written the necessary code for the backend, let's configure and run the backend server. Follow these steps:
Step 1: Configure Environment Variables
Create a .env file in the root directory of your project. This file will hold your environment variables, including the MongoDB connection string and the base URL for your server.
PORT=6010
BASE_URL=http://localhost:6010
MONGODB_URI=your-mongodb-connection-string-here
Replace your-mongodb-connection-string-here with your actual MongoDB connection string. You can get this connection string from your MongoDB Atlas account.
Step 2: Connect to MongoDB Atlas
To connect your application to MongoDB Atlas, follow these steps:
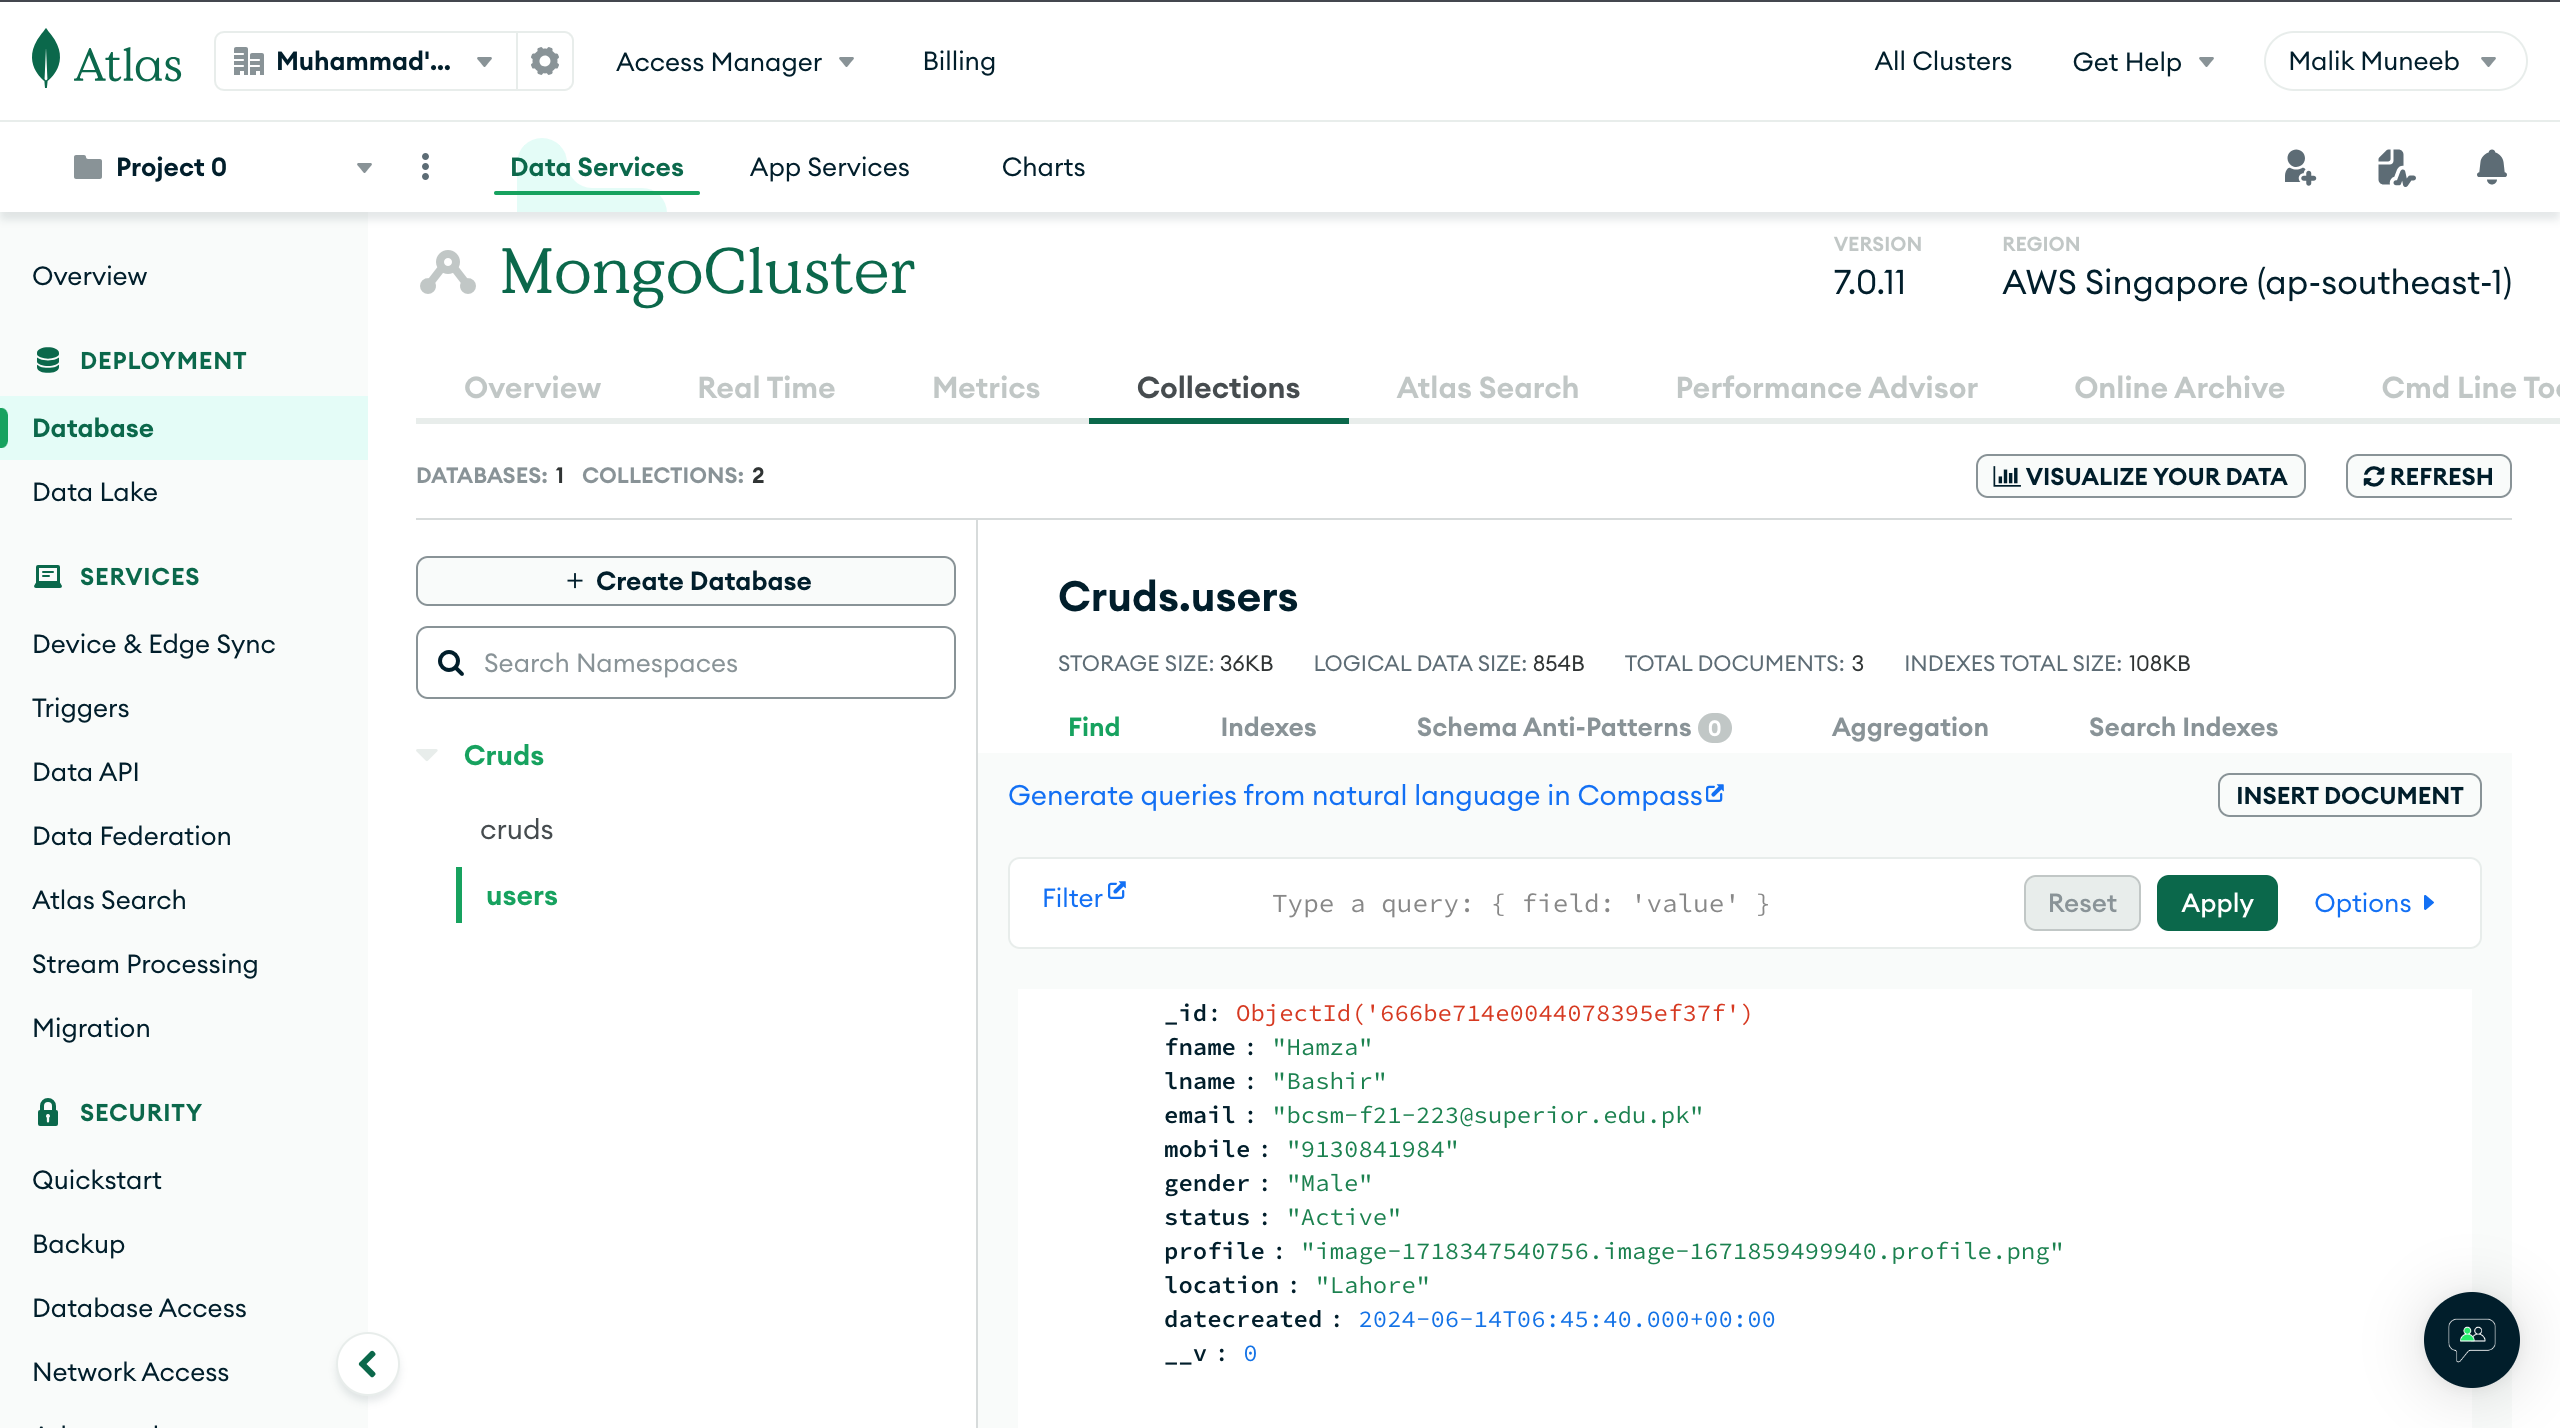
Create a MongoDB Atlas Account: If you don't have one already, create an account on MongoDB Atlas.
Create a Cluster: Once logged in, create a new cluster.
Get Connection String: After creating the cluster, click on "Connect" and follow the instructions to whitelist your IP address and create a database user. MongoDB Atlas will provide you with a connection string that looks something like this:
mongodb+srv://<username>:<password>@cluster0.mongodb.net/<dbname>?retryWrites=true&w=majority
Replace
<username>,<password>, and<dbname>with your actual database username, password, and database name.Add the Connection String to
.env: Copy the connection string and add it to your.envfile under theMONGODB_URIkey.

Step 3: Run the Backend Server
With your environment variables configured, you can now run your backend server. In the terminal, navigate to the root directory of your project and run:
node app.js
If everything is set up correctly, you should see a message in the terminal indicating that the server has started successfully and is connected to the MongoDB database.
Server started at port no 6010
MongoDB database connected successfully!
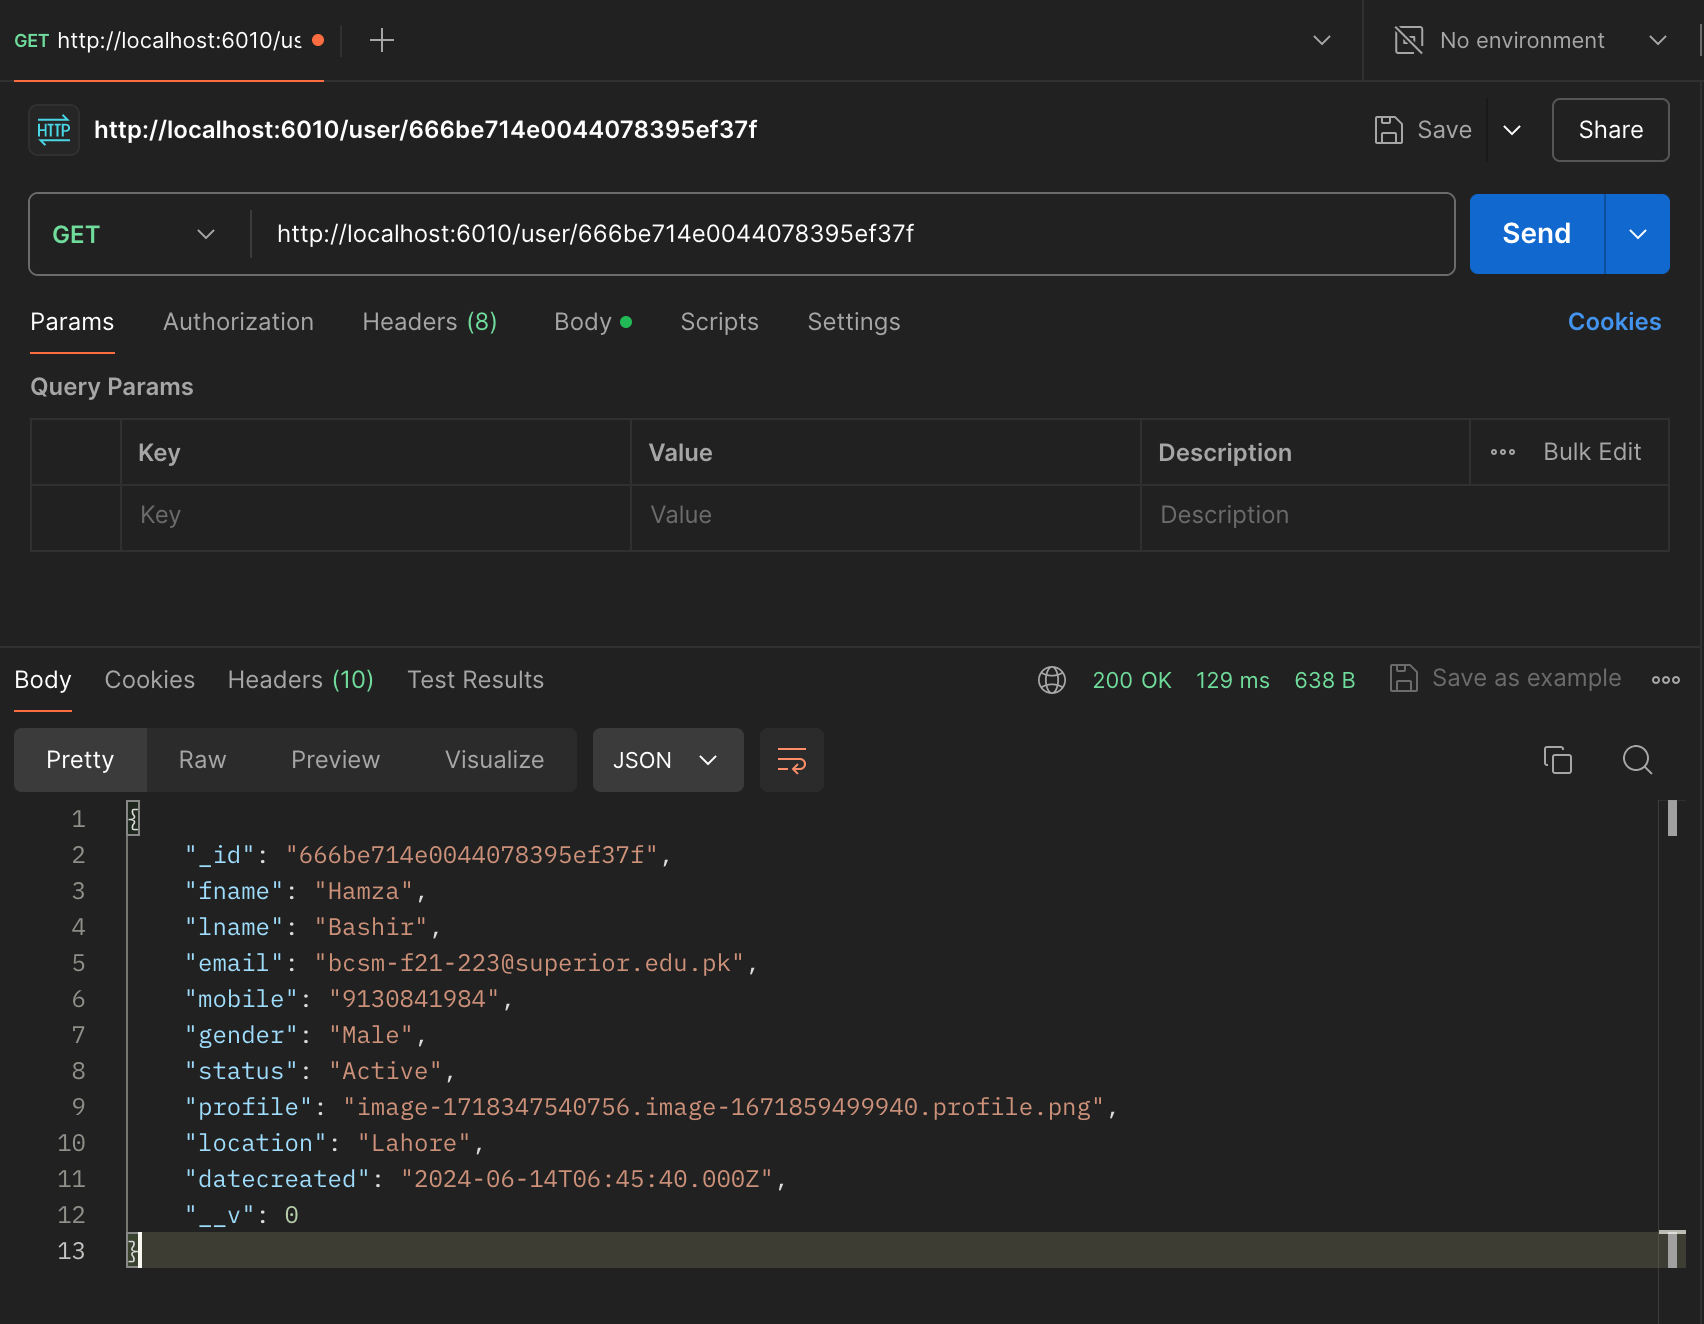
Step 4: Test the APIs Using Postman
To ensure that your backend APIs are working correctly, you can use Postman or any other API testing tool. Here’s how you can test each of the CRUD operations:
Register User:
Endpoint:
POST /user/registerURL:
http://localhost:6010/user/registerHeaders:
Content-Type: multipart/form-data
Body: Form-data
user_profile: (Choose a file)fname: Johnlname: Doeemail: johndoe@example.commobile: 1234567890gender: Malelocation: New Yorkstatus: Active
Get Users:
Endpoint:
GET /user/detailsURL:
http://localhost:6010/user/details
Get Single User:
Endpoint:
GET /user/:idURL:
http://localhost:6010/user/60c72b1f4f1a2c001f9d7b6b(replace with an actual user ID)

Edit User:
Endpoint:
PUT /user/edit/:idURL:
http://localhost:6010/user/edit/60c72b1f4f1a2c001f9d7b6b(replace with an actual user ID)Headers:
Content-Type: multipart/form-data
Body: Form-data
user_profile: (Choose a new file)fname: Johnlname: Doeemail: johndoe@example.commobile: 1234567890gender: Malelocation: New Yorkstatus: Inactive
Delete User:
Endpoint:
DELETE /user/delete/:idURL:
http://localhost:6010/user/delete/60c72b1f4f1a2c001f9d7b6b(replace with an actual user ID)
Change User Status:
Endpoint:
PUT /user/status/:idURL:
http://localhost:6010/user/status/60c72b1f4f1a2c001f9d7b6b(replace with an actual user ID)Body: JSON
  jsonCopy code{
    "data": "Active"
  }
Export Users to CSV:
Endpoint:
GET /userexportURL:
http://localhost:6010/userexport
Download Application Code:
You can download the whole code from my GitHub repository.
MERN-BACKEND-WEEK01
Connecting the Frontend:
After setting up and testing the backend, the next step is to connect it with the frontend using React. We will make HTTP requests to the backend API endpoints from the React application to perform CRUD operations.
Stay tuned for the next part of the tutorial where we will set up the React frontend and integrate it with our backend. In the meantime, ensure that
your backend is running correctly and you have tested all the APIs thoroughly.

Final Thoughts
Building a complete CRUD application using the MERN stack involves setting up both the backend and frontend. The backend uses Node.js, Express, and MongoDB for managing data and providing API endpoints, while the frontend will use React to create a user-friendly interface.
Here are a few final tips:
Error Handling: Make sure to implement comprehensive error handling in your controllers and routes to manage and debug issues efficiently.
Security: Secure your API endpoints, especially those that involve user data. Consider using authentication and authorization mechanisms such as JWT (JSON Web Tokens).
Environment Variables: Use environment variables to manage sensitive information like database connection strings. Never hardcode these values directly in your source code.
Testing: Regularly test your application using tools like Postman to ensure that all endpoints are functioning as expected.
By following this guide, you should now have a fully functional backend ready to be connected to a React frontend. This setup will allow users to create, read, update, and delete data, and you can extend the functionality as needed for your specific use case.
Next Steps
In the next part of this tutorial, we will set up the React frontend and connect it to our backend. This will involve creating forms for user input, displaying data fetched from the backend, and integrating functionalities such as file uploads and data exports.
Stay tuned, and happy coding!
Subscribe to my newsletter
Read articles from Malik Muneeb Asghar directly inside your inbox. Subscribe to the newsletter, and don't miss out.
Written by

Malik Muneeb Asghar
Malik Muneeb Asghar
Tech fanatic with a passion for problem-solving and cloud services. Expertise in React, Angular, Express, Node, and AWS. Tech visionary with a knack for problem-solving and a passion for cloud services.