Azure Data Storage
 Prakash Agrawal
A. Create an Azure Data Storage resource and upload the input CSV files
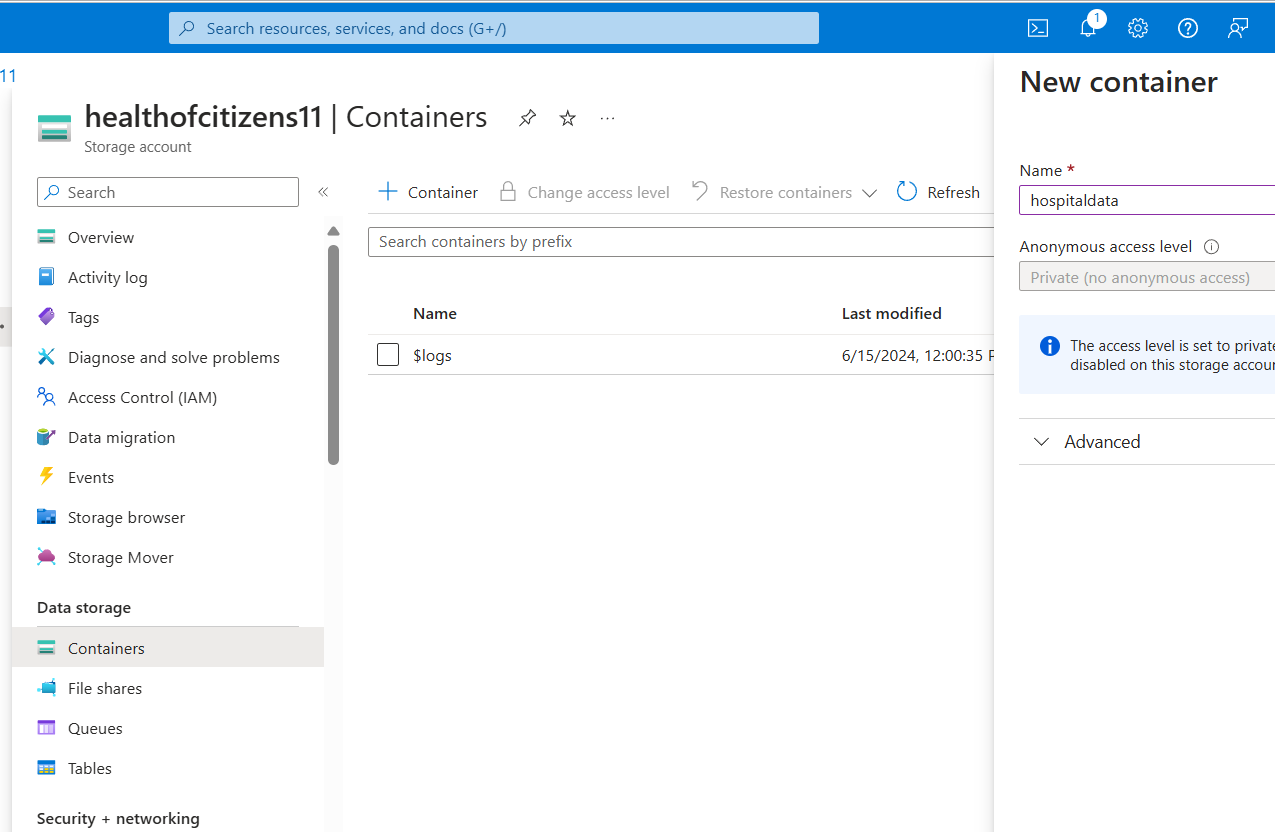
In this task, we will create an Azure Data Storage account to store the input data files (CSVs) received from the hospitals. Name the container "hospitaldata" and upload the CSV files having data like below.
hospital_info.csv
| hospital_id | hospital_name | hospital_leader_name |
| 1 | ABC Health Center | Dr. Akash Agarwal |
| 2 | DEF City Medical | Dr. Manish Joshi |
| 3 | GHI Hospital of San Francisco | Dr. Angela Rico |
| 4 | JKL Hospital in New York | Dr. James Becker |
| 5 | MNO Hospital | Dr. Amitabh Arun |
wait_times.csv
| hospital_id | patient_id | procedure_id | wait_time |
| 3 | 38 | 2 | 4 |
| 5 | 49 | 4 | 88 |
| 1 | 24 | 10 | 24 |
| 5 | 30 | 2 | 58 |
| 5 | 7 | 8 | 85 |
| 2 | 17 | 4 | 96 |
| 2 | 38 | 1 | 60 |
| 4 | 44 | 8 | 75 |
| 3 | 40 | 10 | 9 |
| 3 | 22 | 8 | 55 |
| 3 | 6 | 5 | 13 |
| 4 | 24 | 1 | 91 |
| 1 | 37 | 5 | 90 |
| 4 | 19 | 3 | 48 |
| 5 | 19 | 6 | 34 |
| 1 | 17 | 1 | 62 |
| 4 | 22 | 8 | 108 |
| 2 | 41 | 5 | 61 |
| 5 | 36 | 2 | 40 |
| 1 | 6 | 10 | 13 |
| 1 | 44 | 2 | 65 |
| 2 | 8 | 2 | 77 |
| 5 | 34 | 2 | 12 |
| 3 | 14 | 3 | 64 |
| 1 | 2 | 5 | 79 |
| 4 | 10 | 1 | 68 |
| 3 | 16 | 9 | 83 |
| 4 | 26 | 4 | 89 |
| 4 | 49 | 6 | 13 |
| 1 | 19 | 9 | 78 |
| 1 | 48 | 7 | 41 |
| 2 | 5 | 2 | 116 |
| 2 | 41 | 3 | 90 |
| 1 | 27 | 6 | 27 |
| 5 | 2 | 6 | 70 |
| 2 | 46 | 7 | 116 |
| 4 | 34 | 5 | 48 |
| 2 | 38 | 6 | 100 |
| 3 | 5 | 8 | 106 |
| 3 | 39 | 6 | 32 |
| 3 | 39 | 6 | 65 |
| 5 | 44 | 9 | 15 |
| 1 | 33 | 5 | 118 |
| 5 | 3 | 4 | 5 |
| 3 | 18 | 1 | 10 |
| 1 | 22 | 1 | 43 |
| 3 | 7 | 5 | 109 |
| 2 | 9 | 2 | 99 |
| 4 | 42 | 5 | 116 |
| 2 | 12 | 7 | 56 |
| 4 | 6 | 10 | 101 |
| 5 | 35 | 9 | 29 |
| 4 | 19 | 3 | 67 |
| 2 | 3 | 3 | 80 |
| 3 | 23 | 10 | 57 |
| 4 | 27 | 5 | 11 |
| 3 | 44 | 2 | 90 |
| 3 | 16 | 2 | 91 |
| 4 | 37 | 8 | 88 |
| 3 | 7 | 7 | 14 |
| 4 | 47 | 9 | 102 |
| 5 | 26 | 2 | 117 |
| 4 | 41 | 6 | 4 |
| 2 | 10 | 9 | 66 |
| 1 | 19 | 8 | 92 |
| 5 | 13 | 4 | 16 |
| 3 | 9 | 1 | 25 |
| 2 | 39 | 9 | 71 |
| 4 | 19 | 3 | 45 |
| 3 | 25 | 4 | 25 |
| 5 | 13 | 9 | 105 |
| 3 | 9 | 1 | 90 |
| 3 | 3 | 10 | 85 |
| 3 | 31 | 10 | 68 |
| 4 | 2 | 6 | 51 |
| 4 | 12 | 10 | 30 |
| 2 | 11 | 5 | 56 |
| 3 | 35 | 8 | 2 |
| 2 | 28 | 8 | 65 |
| 4 | 16 | 7 | 63 |
| 1 | 3 | 6 | 103 |
| 5 | 35 | 1 | 9 |
| 1 | 40 | 8 | 46 |
| 1 | 17 | 8 | 86 |
| 2 | 28 | 3 | 87 |
| 4 | 48 | 2 | 16 |
| 1 | 32 | 6 | 52 |
| 4 | 33 | 7 | 59 |
| 1 | 39 | 9 | 35 |
| 2 | 35 | 3 | 78 |
| 5 | 39 | 7 | 114 |
| 3 | 12 | 5 | 58 |
| 5 | 25 | 8 | 59 |
| 3 | 46 | 9 | 56 |
| 2 | 24 | 2 | 101 |
| 3 | 46 | 8 | 10 |
| 4 | 16 | 4 | 76 |
| 3 | 20 | 5 | 78 |
| 2 | 24 | 2 | 100 |
| 4 | 33 | 9 | 32 |
| 5 | 46 | 1 | 115 |
| 5 | 48 | 2 | 84 |
| 3 | 9 | 4 | 28 |
| 1 | 26 | 7 | 66 |
| 2 | 28 | 9 | 112 |
| 2 | 50 | 2 | 54 |
| 1 | 34 | 7 | 82 |
| 2 | 23 | 8 | 84 |
| 1 | 43 | 7 | 112 |
| 3 | 50 | 4 | 41 |
| 5 | 20 | 1 | 34 |
| 4 | 15 | 6 | 85 |
| 4 | 12 | 2 | 67 |
| 4 | 5 | 1 | 27 |
| 5 | 7 | 9 | 97 |
| 3 | 40 | 2 | 101 |
| 3 | 35 | 5 | 10 |
| 4 | 12 | 5 | 44 |
| 3 | 30 | 9 | 92 |
| 2 | 16 | 3 | 98 |
| 3 | 26 | 10 | 1 |
| 2 | 4 | 4 | 83 |
| 5 | 47 | 10 | 109 |
| 3 | 32 | 4 | 16 |
| 3 | 47 | 6 | 67 |
| 3 | 2 | 6 | 40 |
| 5 | 13 | 3 | 12 |
| 1 | 25 | 1 | 10 |
| 4 | 37 | 10 | 63 |
| 5 | 30 | 4 | 38 |
| 1 | 1 | 10 | 29 |
| 5 | 38 | 1 | 83 |
| 3 | 35 | 4 | 8 |
| 1 | 24 | 4 | 119 |
| 4 | 26 | 6 | 120 |
| 1 | 3 | 5 | 62 |
| 3 | 22 | 6 | 87 |
| 3 | 36 | 1 | 54 |
| 2 | 25 | 9 | 103 |
| 5 | 10 | 6 | 45 |
| 5 | 41 | 2 | 110 |
| 4 | 25 | 3 | 58 |
| 3 | 50 | 5 | 6 |
| 1 | 8 | 4 | 87 |
| 5 | 12 | 10 | 57 |
| 5 | 23 | 4 | 83 |
| 5 | 45 | 10 | 91 |
| 4 | 20 | 4 | 36 |
| 5 | 6 | 8 | 37 |
- Search for Storage Accounts in search bar and select the Storage Accounts
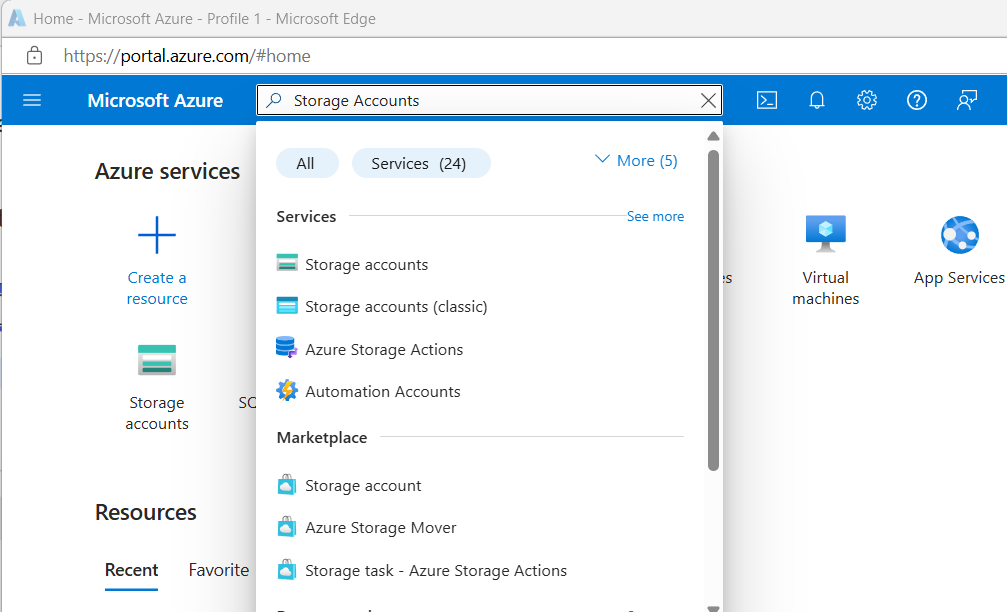
Click the Create button in the top menu to set up a new Storage account.
Fill in the required details on each setup page.
For Resource group, choose the default resource group from the dropdown menu.
For Storage account name, enter a relevant name, such as "healthofcitizensXX," where XX represents random numbers or characters.
Select the nearest Region to your location.
For Performance and Redundancy, keep the default settings of Standard and Geo-redundant, respectively.
Click the Review button to continue.
- Scroll down to the bottom of the page and click Create which will create the Resource

After a few minutes, verify that your Storage account has been provisioned.
Search for "Storage accounts" in the search bar and choose the Storage accounts service.
Your Storage account should be listed. Select the Storage account you provisioned.
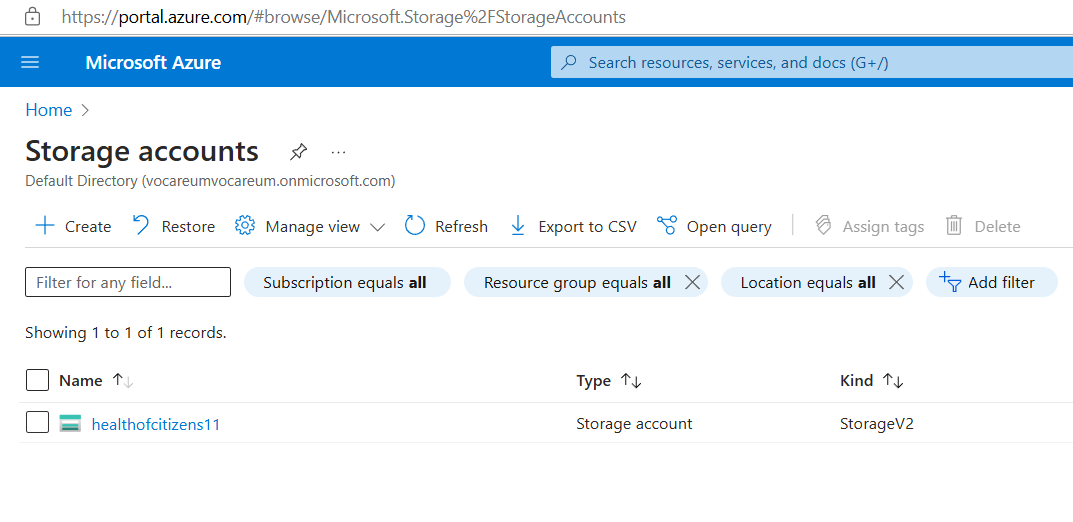
- Select Containers from the side menu
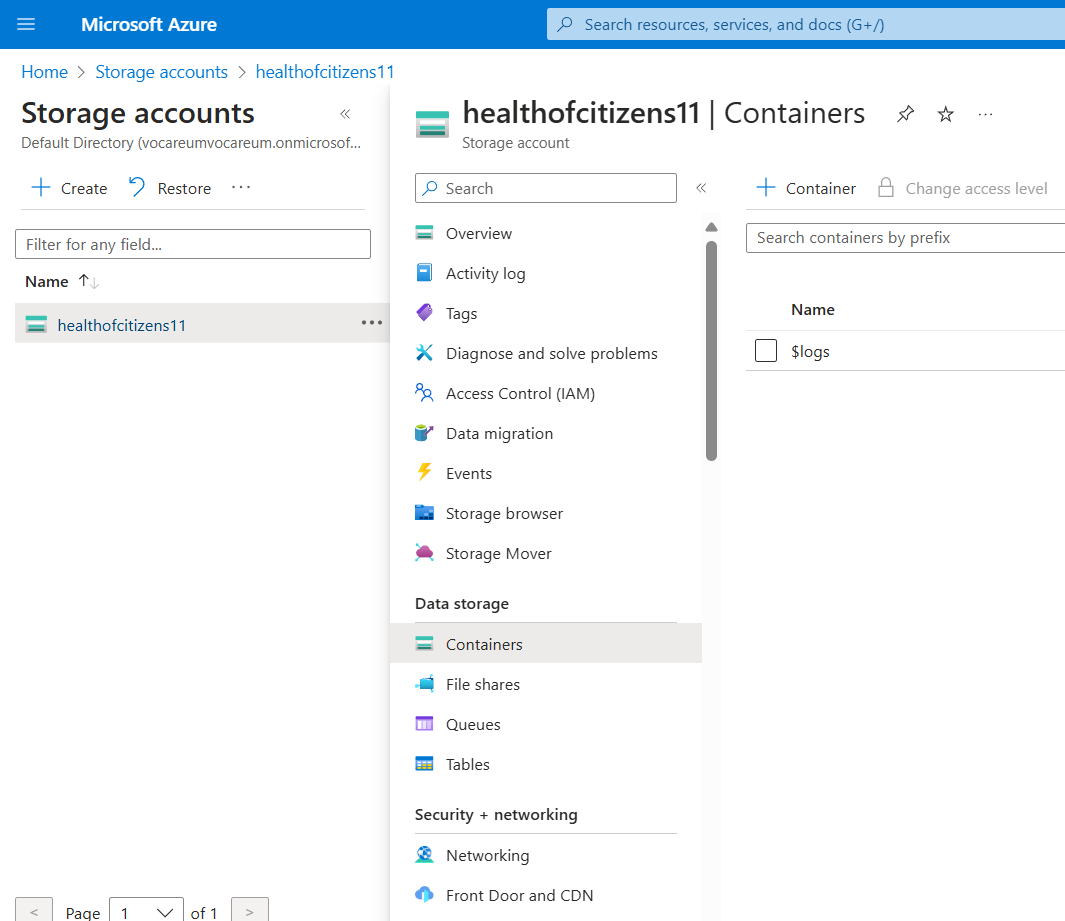
Click + Container from the top menu to create a new container.
Name the container "hospitaldata" and then click Create.
Click Upload from the top menu and then choose Browse for files. Locate and select the two CSV files you had created. Click Upload to finish the process.
After the upload of files, you will see the records as:
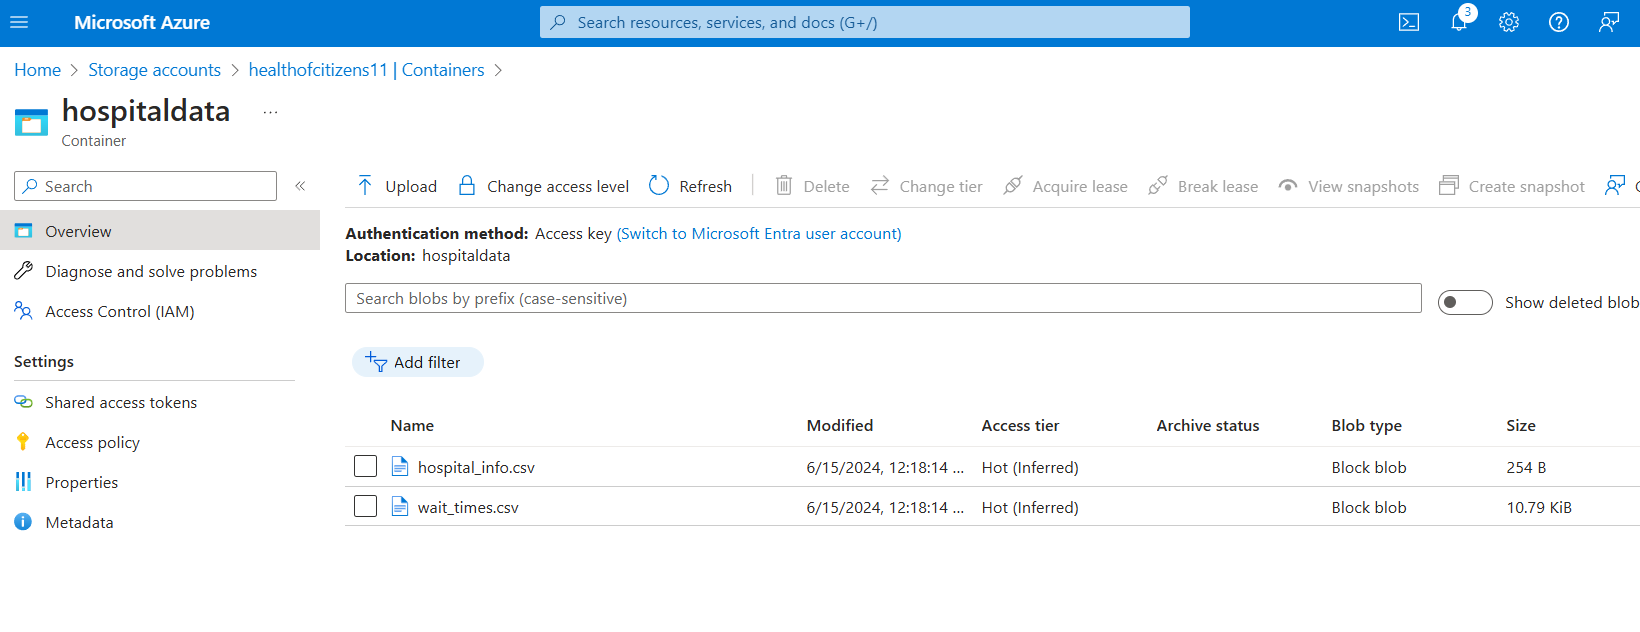
This concludes the steps required to set up Storage Account, adding container to it and then uploading files in the container. In the next blog I will write steps on setting up Azure Data Factory.
Subscribe to my newsletter
Read articles from Prakash Agrawal directly inside your inbox. Subscribe to the newsletter, and don't miss out.
Written by
