How to Improve User Experience with Image Previews: A Step-by-Step Guide
 Raaj Aryan
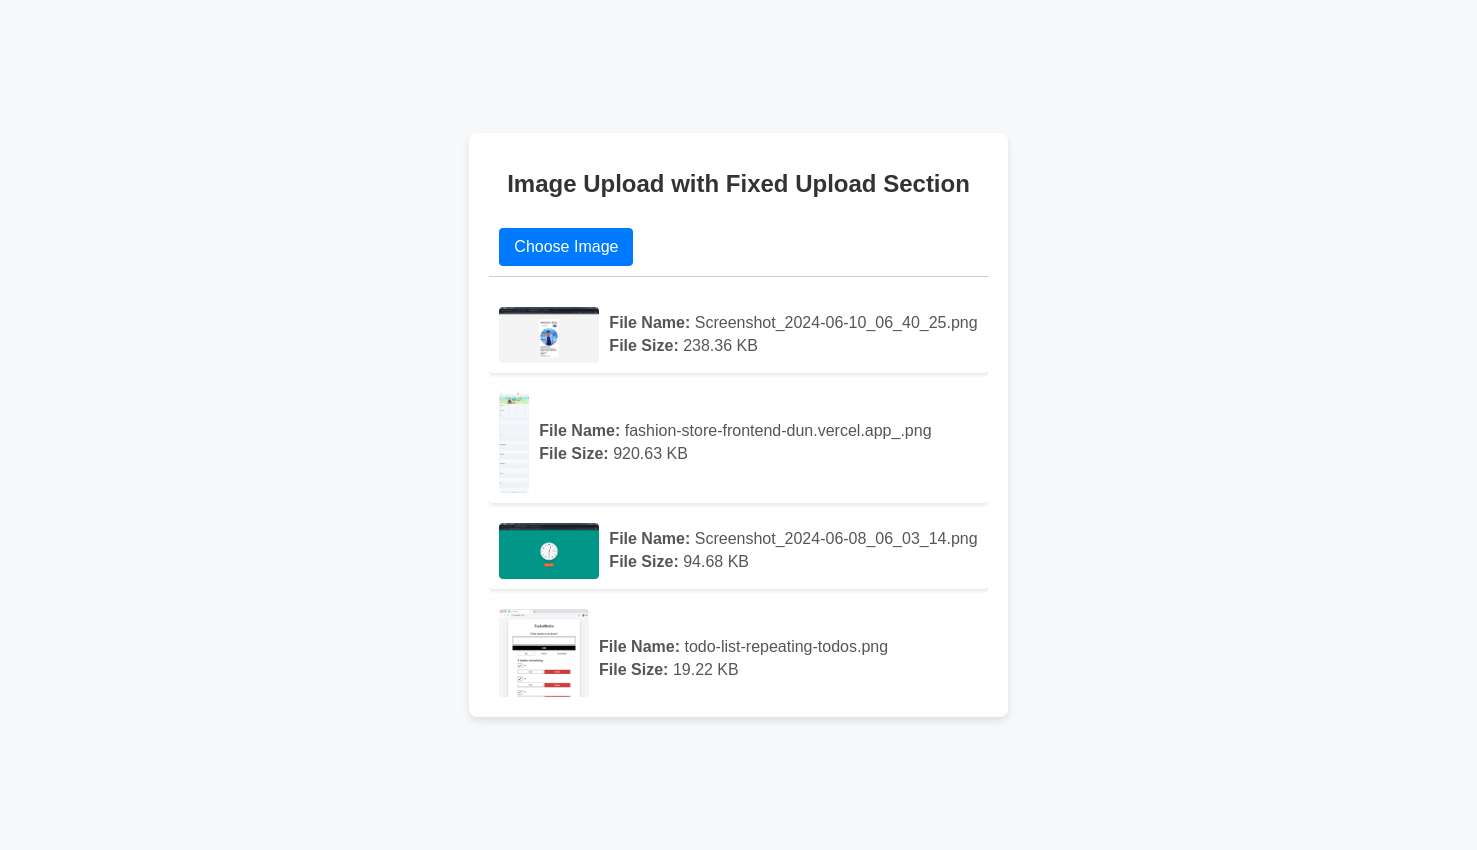
In today's digital age, providing a seamless user experience is crucial for web developers. One effective way to enhance user interaction is by allowing users to preview images before uploading them. This feature not only improves the user experience but also reduces errors, ensuring that users select the correct files. In this blog post, we'll walk you through a simple implementation of an image preview feature using HTML, JavaScript, and the FileReader API.
Why Image Previews Matter
Image previews offer several benefits:
Immediate Feedback: Users can see the image they are about to upload, ensuring it's the correct file.
Improved UX: A more interactive and visually appealing interface.
Error Reduction: Users can catch mistakes before uploading the wrong image.
Let's dive into the code to implement this feature.
Step-by-Step Guide
HTML Structure
Start with a basic HTML structure that includes a file input element and a container for displaying the images.
   <!DOCTYPE html>
<html lang="en">
<head>
  <meta charset="UTF-8">
  <meta name="viewport" content="width=device-width, initial-scale=1.0">
  <title>Image Upload with Fixed Upload Section</title>
  <style>
    /* CSS styles will be discussed later */
  </style>
</head>
<body>
  <div class="container">
    <h1>Image Upload with Fixed Upload Section</h1>
    <div class="file-upload">
      <input type="file" name="file" id="fileupload" class="file-input" accept="image/*">
      <label for="fileupload" class="file-label">Choose Image</label>
    </div>
    <div class="image-preview-container">
      <ul id="imgaestore" class="image-preview-list"></ul>
    </div>
  </div>

  <script>
    // JavaScript functionality will be discussed later
  </script>
</body>
</html>
- Styling the Interface with CSS Next, let's apply CSS to achieve a clean and modern design for our upload section and image previews:
body {
  font-family: 'Segoe UI', Tahoma, Geneva, Verdana, sans-serif;
  background-color: #f8f9fa;
  margin: 0;
  padding: 0;
  display: flex;
  justify-content: center;
  align-items: center;
  min-height: 100vh;
}

.container {
  max-width: 600px;
  background-color: #fff;
  padding: 20px;
  border-radius: 8px;
  box-shadow: 0 4px 8px rgba(0,0,0,0.1);
  position: relative;
}

h1 {
  font-size: 24px;
  margin-bottom: 20px;
  color: #333;
  text-align: center;
}

.file-upload {
  position: sticky;
  top: 0;
  background-color: #fff;
  z-index: 1000;
  padding: 10px;
  display: flex;
  justify-content: space-between;
  align-items: center;
  margin-bottom: 20px;
  border-bottom: 1px solid #ccc;
}

.file-input {
  display: none;
}

.file-label {
  display: inline-block;
  padding: 10px 15px;
  background-color: #007bff;
  color: #fff;
  border-radius: 4px;
  cursor: pointer;
  transition: background-color 0.3s ease;
}

.file-label:hover {
  background-color: #0056b3;
}

.image-preview-container {
  max-height: 400px; /* Adjust the maximum height as needed */
  overflow-y: auto;
}

.image-preview-list {
  list-style-type: none;
  padding: 0;
  margin: 0;
}

.image-preview-item {
  margin-bottom: 10px;
  padding: 10px;
  background-color: #fff;
  box-shadow: 0 2px 4px rgba(0,0,0,0.1);
  border-radius: 4px;
  display: flex;
  align-items: center;
}

.preview-image {
  max-width: 100px;
  max-height: 100px;
  margin-right: 10px;
  border-radius: 4px;
}

.image-info {
  flex: 1;
}

.image-info p {
  margin: 5px 0;
  color: #555;
}
JavaScript for Image Preview
Use JavaScript to handle the file input change event and display the selected image.
   <script>
  const fileupload = document.getElementById("fileupload");
  const imagePreviewList = document.getElementById("imgaestore");

  fileupload.addEventListener("change", showimgaefile);

  function showimgaefile() {
    const files = fileupload.files;
    for (let i = 0; i < files.length; i++) {
      const file = files[i];
      if (file.type.startsWith('image/')) {
        const reader = new FileReader();
        reader.onload = function(e) {
          const img = document.createElement("img");
          img.src = e.target.result;
          img.alt = "Uploaded Image";
          img.classList.add("preview-image");

          const imageInfo = document.createElement("div");
          imageInfo.classList.add("image-info");
          imageInfo.innerHTML = `
            <p><strong>File Name:</strong> ${file.name}</p>
            <p><strong>File Size:</strong> ${(file.size / 1024).toFixed(2)} KB</p>
          `;

          const li = document.createElement("li");
          li.classList.add("image-preview-item");
          li.appendChild(img);
          li.appendChild(imageInfo);

          imagePreviewList.appendChild(li);
        };
        reader.readAsDataURL(file);
      } else {
        alert("Please select an image file.");
      }
    }
    // Clear input value after file selection
    this.value = null;
  }
</script>
Explanation
Event Listener: We add a
changeevent listener to the file input element. This event triggers when the user selects a file.FileReader API: This API is used to read the content of the file. We use
readAsDataURLto read the file and convert it into a Data URL.Creating Image Element: Once the file is read, we create an
imgelement and set itssrcattribute to the Data URL obtained from the FileReader.Appending Elements: Finally, we create a
lielement, append theimgelement to it, and then append thelito theulelement.
Conclusion
Implementing an image preview feature is a simple yet effective way to enhance user experience on your website. By providing immediate visual feedback, you can improve user satisfaction and reduce errors. This guide provides a basic implementation, but there are many ways to expand and customize this feature to fit your specific needs.
Start integrating this feature into your projects and see the difference it makes in user engagement and satisfaction. Happy coding!
By following this guide, you'll be able to add a valuable feature to your web applications, making them more user-friendly and interactive. For more advanced topics and tips on web development, stay tuned to our blog. If you have any questions or need further assistance, feel free to leave a comment below.
Subscribe to my newsletter
Read articles from Raaj Aryan directly inside your inbox. Subscribe to the newsletter, and don't miss out.
Written by

Raaj Aryan
Raaj Aryan
MERN Stack Developer • Open Source Contributor • DSA With Java • Freelancer • Youtuber • Problem-solving •