Deploy a Flask app with multistage build and distroless container image (AWS EC2)
 Bandhan Majumder
Table of contents
- What does Newz_Shortie do?
- A basic format of a flask app (according to official docs)
- Step 1: Spin up an EC2 instance (Ubuntu)
- Step 2: Connect
- Step 3: Install Docker on that instance
- Step 4: Clone the project
- Step 5: Create Dockerfile
- Build image
- Edit Inbound rule :
- Problem with this simple image :
- Solutions :
- Does multistage and distroless only reduce size?
- Conclusion,

Before starting anything we must know the file structure of a flask-based web app. The web-app we will deploy is Newz_Shortie . The main structure of this is :
static -> contains all the images
templates -> contains all the HTML files
Dockerfile
app.py -> main file
api_key.py -> contains API key
other files
What does Newz_Shortie do?
It uses News API to fetch news according to people's desired genre and shows in a readable format. There are some common and random genres included. That's it.
A basic format of a flask app (according to official docs)
Step 1: Spin up an EC2 instance (Ubuntu)
To execute the process we need a host machine. We will use AWS EC2 Ubuntu instance of free tier for this tutorial.
Don't know how to launch an EC2 instance in AWS? Click here
Step 2: Connect
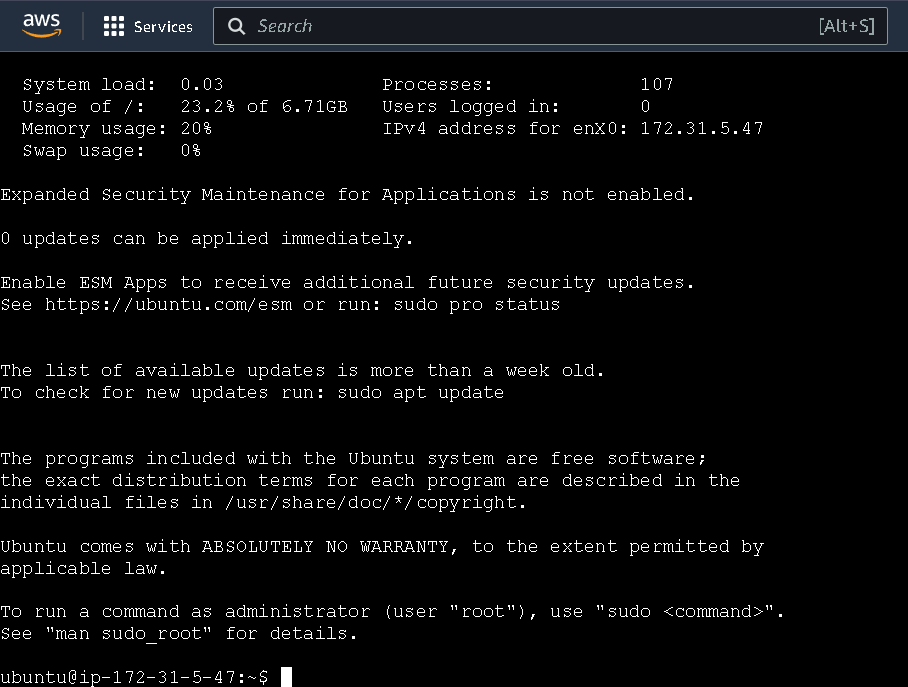
Click on the instance and on the top, click on connect. Now there are 4 options. Connect with any of them. But for faster access, connect with EC2 instance connect. Something like this will appear.

Step 3: Install Docker on that instance
Run these commands to install Docker.
````
sudo apt update
sudo apt install docker.io -y
sudo systemctl start docker
sudo usermod -aG docker ubuntu
sudo docker run hello-world
```
i. update the dependencies first
ii. install docker
iii. start the docker daemon if not started (dockerd)
iv. give access to run docker commands to the group
v. run the hello-world image
This must give some output like this :

Step 4: Clone the project
Clone the repo with
git clone https://github.com/bandhan-majumder/Newz_Shortie/
now change the directory and delete the existing Dockerfile with
cd Newz_Shortie/ && rm -rf Dockerfile
Step 5: Create Dockerfile
Lifecycle
First, we need to understand the lifecycle of docker. Containerization is a process and Docker implements that by creating an image and running a container. Lifecycle includes ;
Creating a Dockerfile: Define instructions in a Dockerfile to build an image.
Build Image: Use
sudo docker build . -t <any_img_name>for examplesudo docker build . -t shortie_img>to create an image from the Dockerfile. Here "." is the build context . Build context is the directory where the Dockerfile is located and includes all files and sub directories in that location. AndRun Container: Launch containers from the built image using
docker run -d -p 5000:5000 <img_docker run -d -p 5000:5000 my-flask-app.Manage Containers: Use Docker commands (
docker ps,docker stop,docker start, etc.) to manage running containers.Cleanup: Remove containers (
docker rm) and images (docker rmi) when no longer needed.
Create Dockerfile
According to the official docs, Dockerfile is a text-based document that's used to create a container image. It provides instructions to the image builder on the commands to run, files to copy, startup command, and more.
Some of the most common instructions in a Dockerfile include:
FROM <image>- this specifies the base image that the build will extend.WORKDIR <path>- this instruction specifies the "working directory" or the path in the image where files will be copied and commands will be executed.COPY <host-path> <image-path>- this instruction tells the builder to copy files from the host and put them into the container image.RUN <command>- this instruction tells the builder to run the specified command.ENV <name> <value>- this instruction sets an environment variable that a running container will use.EXPOSE <port-number>- this instruction sets configuration on the image that indicates a port the image would like to expose.USER <user-or-uid>- this instruction sets the default user for all subsequent instructions.ENTRYPOINT ["<command>"]- this instruction helps configure a container you can run as an executable.CMD ["<command>", "<arg1>"]- this instruction sets the default command a container using this image will run.
Still confused between ENTRYPOINT ["<command>"] and CMD ["<command>", "<arg1>"] ?
See the StackOverflow discussion
Now create a file with the exact name "Dockerfile" in the main directory where app.py exists and open it in any editor (nano, vim whatever).
vi DockerfileNow add the text from below.
 # base image
 FROM ubuntu:20.04

 # working directory
 WORKDIR /test

 # moving files into working directory
 COPY . /test

 # install the dependecies
 RUN apt-get update && \
     apt-get install -y python3 python3-pip && \
     pip install -r requirements.txt

 # expose the port
 EXPOSE 5000

 # run app
 ENTRYPOINT ["python3"]
 CMD ["app.py"]
Build image
sudo docker build . -t shortie_imgBuilding an image is the second step of the docker cycle. To give image a desired name we use -t tag.
In the simplest terms, docker build will build an image out of the existing dockerfile. We can see the list of images with the below command.
sudo docker imagesThe output will be something like this :

Now the step remaining is running the container out of the image. To run the container out of the image we need to run the below command. Parameters are explained in the above section.
 sudo docker run -d -p 5000:5000 shortie_img
 # instead of name, you can also run with id
 # sudo docker run -d -p 5000:5000 b890lb7fcld3
By default AWS only allow ssh traffic. If we try of access our application outside of the container, we need to expose the port so that we can access via <public_ip_of_EC2_instance>:8080.
for example if the public IP of my ec2 instance is 13.232.161.106 . Search for
13.232.161.106:5000 in your favorite browser.
Edit Inbound rule :
Now here comes the concept of inbound rule and outbound rule. Inbound rule allows traffic to enter the network and outbound allows to leave a network.
To edit the inbound rule,
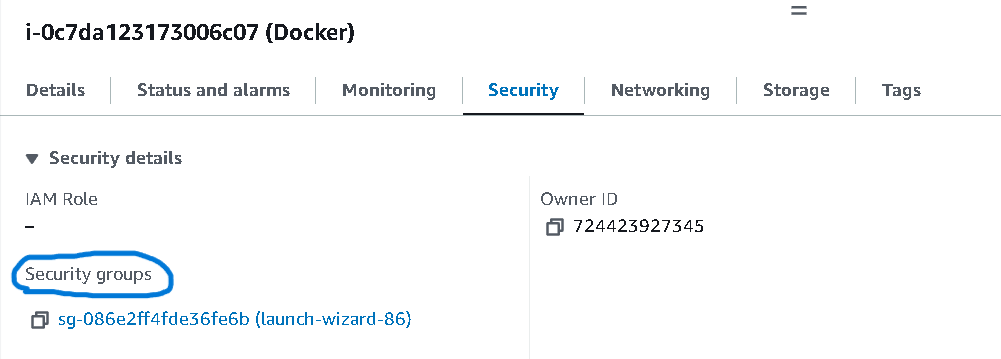
go to the security of the instance

click on the security groups

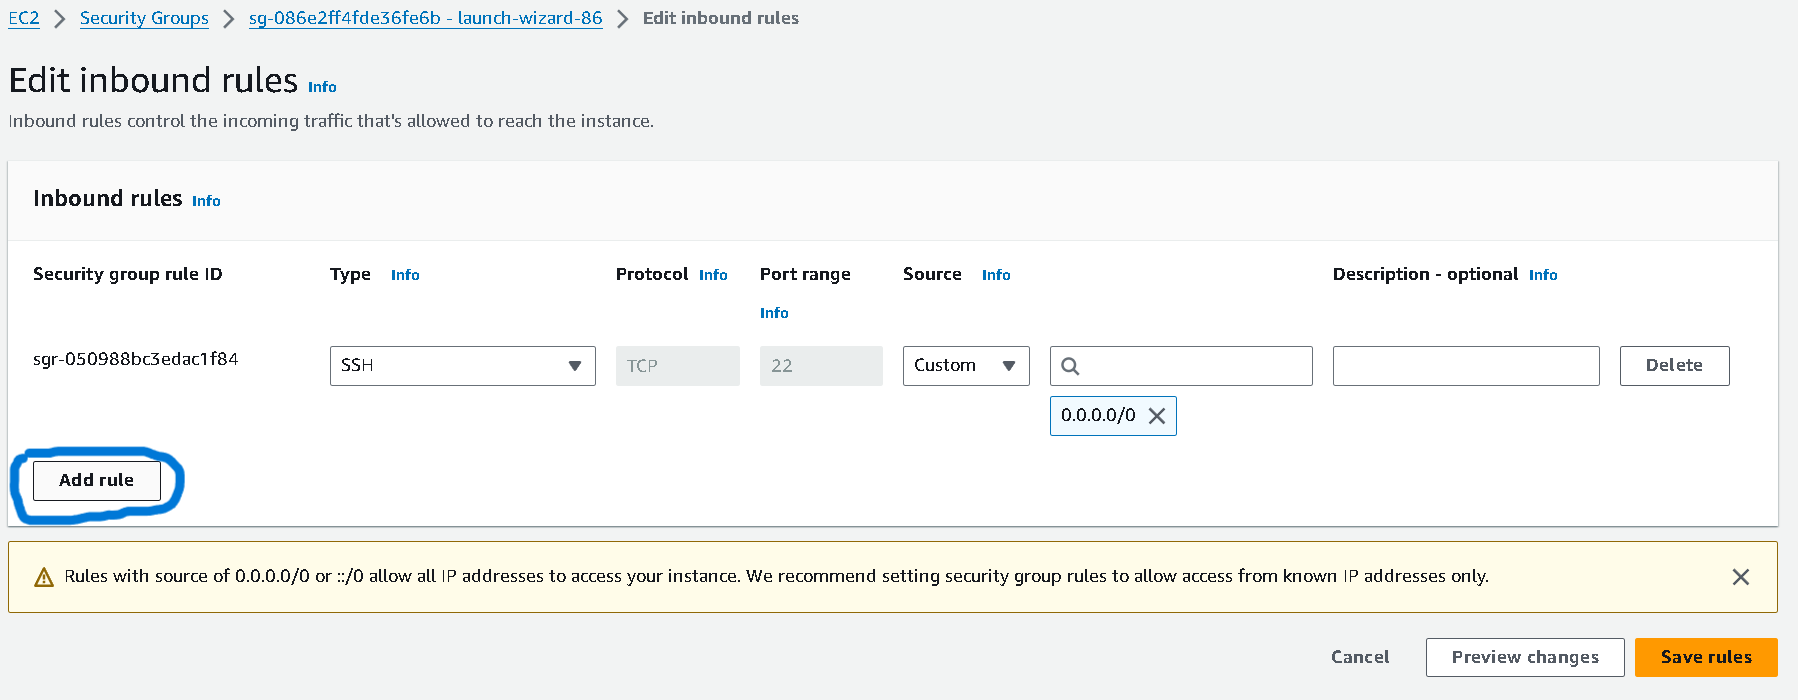
there click on edit inbound rule on the right

Click on the add rule option in the left below

There we can do 2 things,
i) we can add the inbound rules with type - all traffic source anywhere IPv4
ii) we can add the inbound rules with type - custom TCP port as specific port. For this, we will go with port 5000 source anywhere IPv4
Click on the save rules to save the newly added rule.
Now try to access the same port
Now if you try to access the port again. It will show something like this :-

Congrats this is our deployment of the simple flask application.
But this is not the end.
Problem with this simple image :
If you see the image size via
sudo docker images
it will show something like this, here notice the size of the shortie_img, its 520 mb.

Why is it so large? Cause it includes unnecessary operating system packages or tools to run just the file. Can we reduce the size any how but using only the dependencies needed to run the application ?
Solutions :
There are two solutions available. The first is Multistage build and the second one is Distroless image containers. The second one is the advance of the first one.
Multistage Build :
What is Multistage Build ?
According to official docs , with multi-stage builds, you use multiple FROM statements in your Dockerfile. Each FROM instruction can use a different base, and each of them begins a new stage of the build. You can selectively copy artifacts from one stage to another, leaving behind everything you don't want in the final image. For example in java application we need only java runtime to run the app right.
How Multistage Works:
Stage 1: In the first stage, you use a larger base image that includes all the necessary build tools and dependencies to compile your application.
Stage 2: In subsequent stages, you copy only the necessary artifacts from the previous stage(s) into a new, smaller base image that contains only what is required to run your application.
To see a demo, delete the existing image with,
# grab container id
sudo docker ps
# stop the container
sudo docker stop <container_id>
# remove the container
sudo docker rm <container_id>
# grab the img id
sudo docker images
# remove the img
sudo docker rmi <img_id>
Here is the multistage form of our previous Dockerfile, edit using any text editor and replace the content with the below text.
# ------------------- Stage 1: Build Stage ------------------------------
FROM python:3.9 AS build

# Set the working directory to /test
WORKDIR /test

# Copy everything to the container at /test
COPY . /test

# Install dependencies specified in requirements.txt
RUN pip install --no-cache-dir -r requirements.txt

# ------------------- Stage 2: Final Stage ------------------------------

# Use a slim Python 3.9 image as the final base image
FROM python:3.9-slim

# Set the working directory to /test
WORKDIR /test

# Copy the built dependencies from build stage
COPY --from=build # base image
FROM ubuntu:20.04

# working directory
WORKDIR /test

# moving files into working directory
COPY . /test


# install the dependecies
RUN apt-get update && \
    apt-get install -y python3 python3-pip && \
    pip install -r requirements.txt

# run app
ENTRYPOINT ["python3"]
CMD ["app.py"]/usr/local/lib/python3.9/site-packages/ /usr/local/lib/python3.9/site-packages/

# Copy the application code from the build stage
COPY --from=build /test /test

# Expose port 5000 for the Flask application
EXPOSE 5000

# Define the default command to run the application
CMD ["python", "app.py"]
Now build the image again using and check the size of the shortie_img
# build the image
docker build . -t shortie_img
# check the size of shortie_img
sudo docker images
If you look close at the size, it have been reduced by around 60% which will save a lot of unnecessary resources.

Distroless container images :
Distroless container images are a type of container image that is designed to be minimal. Unlike traditional images based on Debian or Ubuntu — which include package managers, utilities, and shells — distroless images typically contain only essential software required to run an application or service. Only the run time is available to run an application.
How Distroless works?
Minimalist Runtime Environment:
Distroless images contain only the essential components needed to run the application.
They exclude package managers, shells, and other user-level tools, reducing the attack surface and minimizing potential vulnerabilities.
Focus on Application Execution:
The application and its dependencies are copied into the container during the build process.
The container runs the application directly using the specified entry point, typically without any unnecessary background processes or services.
Here is a demo of the same application with distroless container image. Stop and remove the container and delete the image again with the previous commands. And replace the Dockerfile's content with the below text :
# source: https://github.com/GoogleContainerTools/distroless
FROM debian:buster-slim AS build
RUN apt-get update && \
    apt-get install --no-install-suggests --no-install-recommends --yes \
    python3-venv gcc libpython3-dev iputils-ping libcap2 libunistring2 libidn2-0 libnettle6 && \
    python3 -m venv /venv && \
    /venv/bin/pip install --upgrade pip

FROM build AS build-venv
COPY requirements.txt /requirements.txt
RUN /venv/bin/pip install --disable-pip-version-check -r /requirements.txt

FROM gcr.io/distroless/python3-debian10
COPY --from=build-venv /venv /venv
COPY --from=build-venv /bin/ping /bin/ping
COPY --from=build-venv /lib/x86_64-linux-gnu/libcap.so.2 /lib/x86_64-linux-gnu/libcap.so.2
COPY --from=build-venv /usr/lib/x86_64-linux-gnu/libidn2.so.0 /usr/lib/x86_64-linux-gnu/libidn2.so.0
COPY --from=build-venv /usr/lib/x86_64-linux-gnu/libnettle.so.6 /usr/lib/x86_64-linux-gnu/libnettle.so.6
COPY --from=build-venv /usr/lib/x86_64-linux-gnu/libunistring.so.2 /usr/lib/x86_64-linux-gnu/libunistring.so.2
COPY . /app
WORKDIR /app

EXPOSE 5000
ENTRYPOINT ["/venv/bin/python3", "app.py"]
Now if we run docker build -t shortie_img . and check the size of the image via docker ps

near about 74% difference in size will be seen from the initial size. And obviously we can access our application at public_ip:5050 after running with docker run -d -p 5050:5050 shortie_img .

If you face any problem in accessing the application with pub_ip:5050 , try to stop and remove the container with the below given instruction and run a new container and try to access again.
# get the id
sudo docker ps
# stop and remove
sudo docker stop <container_id>
sudo docker rm <container_id>
# start again
sudo docker run -d -p 5050:5000 <img_name>
# test
curl <url>
Does multistage and distroless only reduce size?
Well, the answer is no. It is not just to reduce size.
Multistage :
It separates build dependencies from runtime dependencies, reducing the attack surface. It ensures a clean environment for the final image, free from intermediate build artifacts.
Distroless container image :
It minimizes the attack surface by excluding package managers, shells, and other unnecessary tools and reduces the number of potential vulnerabilities and attack vectors. It also improves troubleshooting or operational efficiency.
Conclusion,
In this tutorial we get to know the lifecycle of docker, how it works, how to deploy a flask application with docker image containers, and how to reduce the size of the images via using multistage docker build and distroless image containers. What are the importance of building with multistage and distroless container images, how they are helpful to us, and where we get unbelievably reduced size.
I will leave you with a question... Is our container image really distroless? Read here
Thanks for reading!
Subscribe to my newsletter
Read articles from Bandhan Majumder directly inside your inbox. Subscribe to the newsletter, and don't miss out.
Written by

Bandhan Majumder
Bandhan Majumder
I am Bandhan from West Bengal, India. I write blogs on DevOps, Cloud, AWS, Security and many more. I am open to opportunities and looking for collaboration. Contact me with: bandhan.majumder4@gmail.com